Best FL Studio Audio Settings for Low Latency and No Crackling
A practical audio setup guide for FL Studio: driver choice, sample rate, buffer length, underruns, crackles, and latency.
Short answer: choose your real audio interface driver if you have one, set sample rate to 44.1 kHz or 48 kHz, and use the smallest buffer that does not crackle. For many beginners, that means 128-256 samples while recording and 512 samples or higher while mixing.
Audio Settings are not glamorous, but they decide whether FL Studio feels playable or delayed. If your keyboard feels late, the buffer is probably too high. If the sound clicks and breaks up, the buffer is probably too low or the driver is unstable.
The starter settings I would try first
Use these as starting points, not commandments. Every computer, interface, and plugin chain behaves a little differently.
| Situation | Driver | Sample rate | Buffer |
|---|---|---|---|
| Windows laptop, no interface | FL Studio ASIO | 44.1 kHz | 256 samples |
| Windows with audio interface | Interface ASIO driver | 44.1 or 48 kHz | 128-256 samples |
| MacBook built-in output | Core Audio | 44.1 or 48 kHz | 128-256 samples |
| Mixing a heavy project | Best stable driver | Project rate | 512-1024 samples |
If you only remember one rule, remember this: lower buffer for playing and recording, higher buffer for mixing and heavy sessions.
Where to open Audio Settings
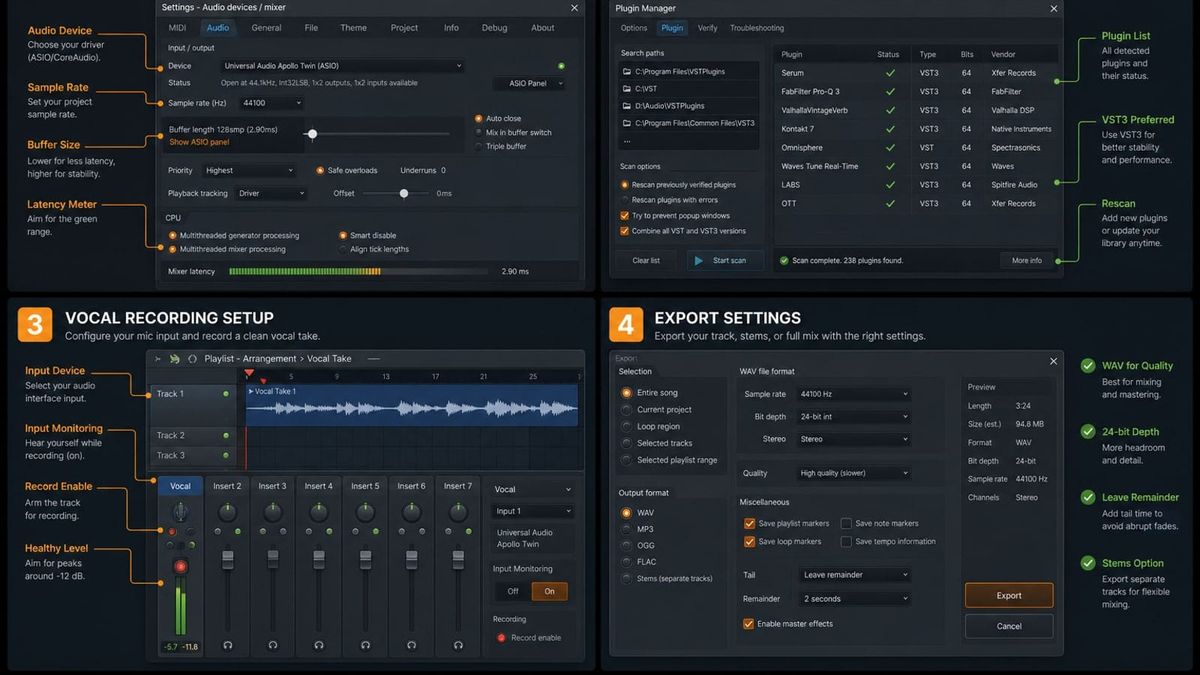
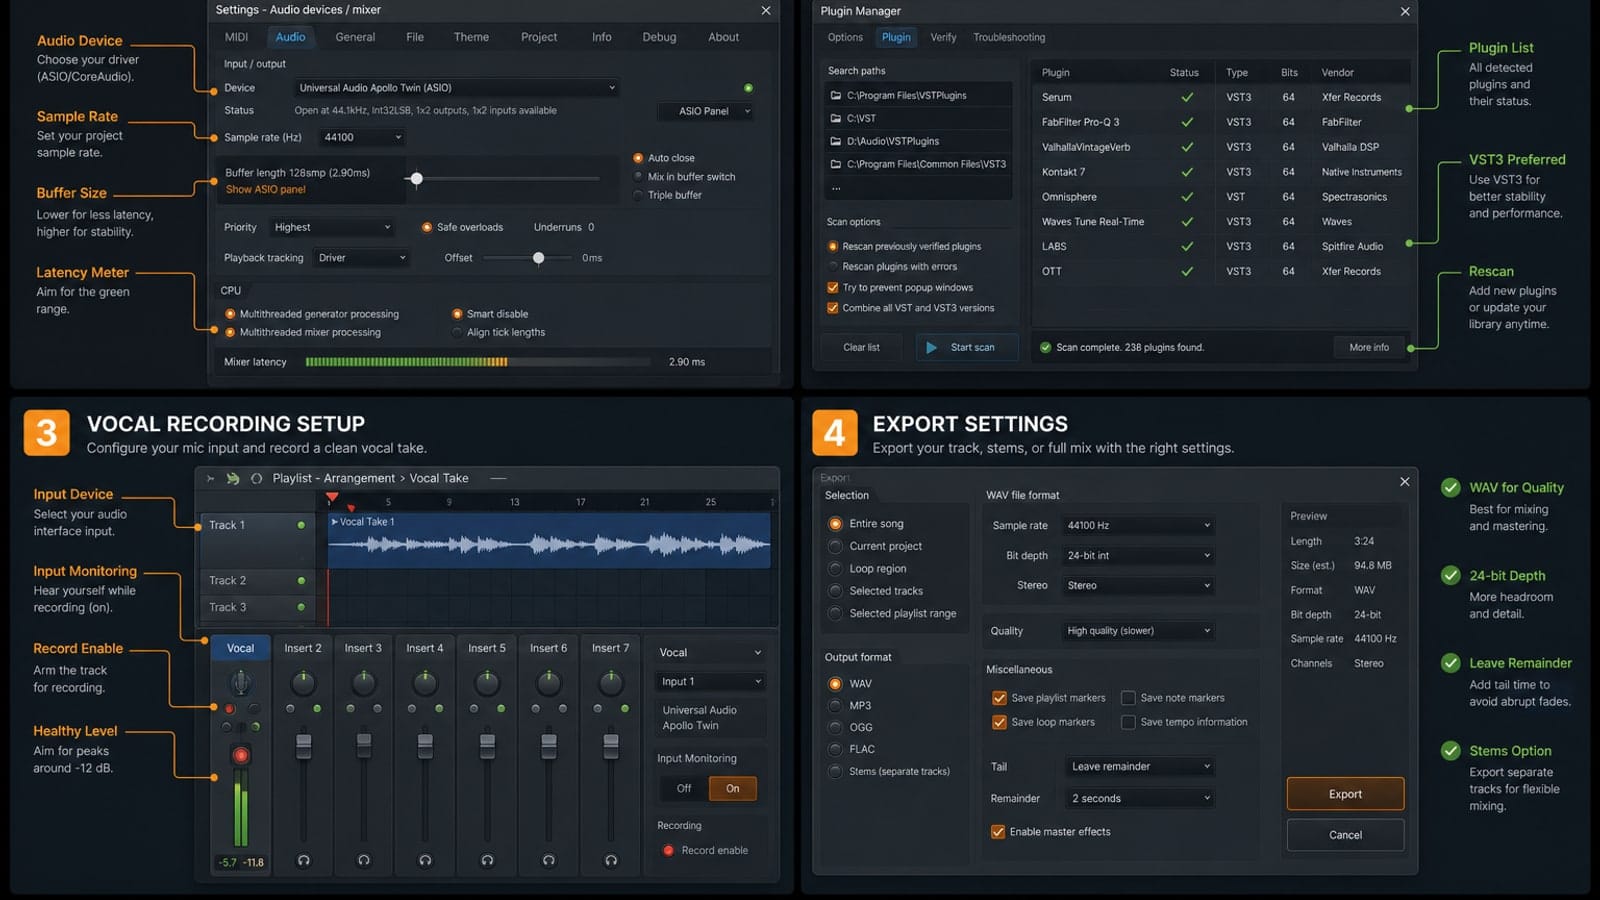
Go to Options > Audio Settings. This screen controls the audio device, sample rate, buffer length, underruns, and CPU-related playback behavior.
Pick the right driver first
If you use an audio interface, choose its ASIO driver. Focusrite, Universal Audio, Audient, Steinberg, MOTU, and similar interfaces usually install a dedicated driver on Windows. That driver is almost always better than a generic option.
If you are on a laptop with no interface, use FL Studio ASIO on Windows. It is not magic, but it is simple and usually stable enough to learn. On macOS, use Core Audio and select the output device you actually hear.
Do not switch drivers every five minutes while troubleshooting. Pick one, test it, and write down what changed. Random driver switching makes it hard to tell whether the buffer, sample rate, or output device fixed the problem.
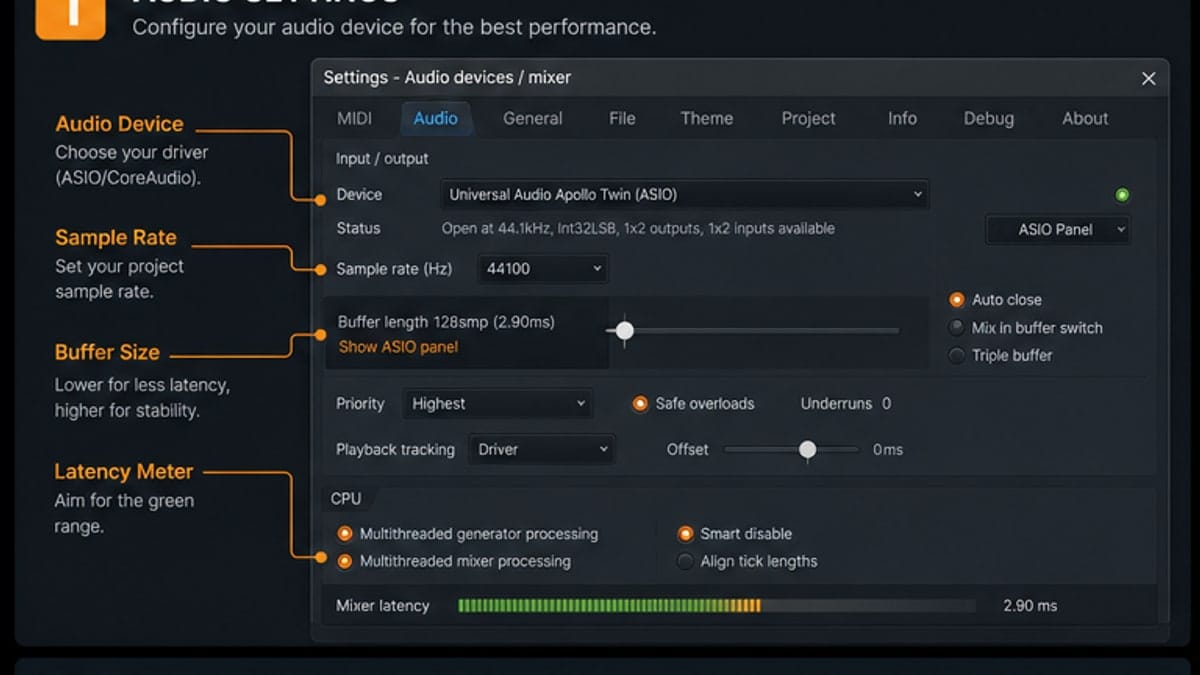
Buffer length: the one setting you will change most
Buffer length is the tradeoff between responsiveness and stability. A low buffer feels immediate when you play keys, but it gives the computer less time to process audio. A high buffer gives the computer more time, but you feel delay when recording.
Underruns happen when FL Studio cannot fill the audio buffer in time. You hear that as crackles, pops, gaps, or tiny dropouts. Raising the buffer gives the computer more time to breathe.
Sample rate: keep it boring
Use 44.1 kHz for most music. Use 48 kHz if the project is tied to video, streaming workflows, or an interface already set that way. Do not keep jumping between rates while troubleshooting. That creates more variables.
Higher sample rates can sound attractive on paper, but they also increase CPU load and file size. Beginners usually gain more from a stable 44.1 or 48 kHz project than from chasing 96 kHz before the arrangement is finished.
How to fix crackles and pops
- Raise the buffer one step.
- Make sure FL Studio and your audio device use the same sample rate.
- Close browser tabs, screen recorders, and other audio apps.
- Disable or freeze the heaviest plugin in the project.
- Try the interface driver instead of a generic driver.
If the project crackles only when one plugin starts playing, the problem is probably that plugin chain, not the whole DAW.
What to check when FL Studio has no sound
No sound usually comes from the output device, not the song. First, check that the selected driver uses the speakers or interface you are listening through. Then check that the Master track is not muted and that the Windows or macOS output is not pointed somewhere else.
If FL Studio plays through laptop speakers but not headphones, the output device is wrong. If the meters move but you hear nothing, the audio is leaving FL Studio but not reaching the device you expect.
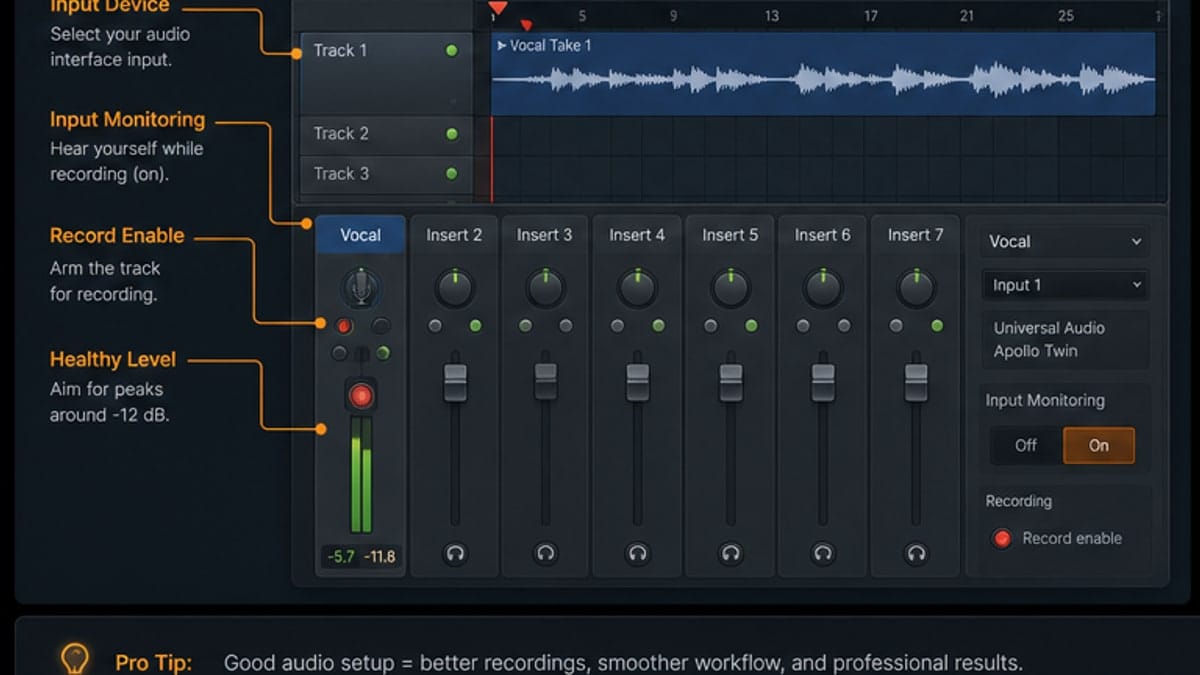
How to fix MIDI or vocal latency
Latency means you press a key or sing into the mic and hear the result late. Lower the buffer while recording. If the sound starts crackling, raise it one step. That is the whole game.
For vocals, also check whether you are monitoring through FL Studio, through your interface, or through both at the same time. Double monitoring creates slapback delay and makes people think the buffer is broken.
CPU settings that are worth touching
After the driver and buffer are right, look at CPU behavior. Smart Disable can help stop idle plugins from wasting CPU. Multithreaded processing is usually worth keeping on. The bigger win, though, is project discipline: disable heavy plugins while recording and turn them back on when mixing.
Freezing or rendering a heavy synth part to audio is not cheating. It is how large sessions stay playable.
Sources and reference pages
Reference pages used: Image-Line's Audio Settings manual, the FL Studio ASIO panel shown in the manual, and community troubleshooting patterns around buffer underruns and crackling.
FAQ
What buffer size should I use in FL Studio?
Use 128-256 samples for recording, 256-512 for arranging, and 512-1024 for mixing large sessions. The right value is the lowest setting that does not crackle on your machine.
Should I use FL Studio ASIO or ASIO4ALL?
Use your audio interface driver first. If you do not have an interface, FL Studio ASIO is the easiest Windows default. ASIO4ALL can help in some setups, but it can also confuse beginners because it wraps Windows devices.
Why does FL Studio crackle when the CPU meter is not high?
Crackles can come from buffer underruns, mismatched sample rates, unstable drivers, or one heavy plugin causing spikes. Raise the buffer one step and check the driver before blaming the whole project.
Is 44.1 kHz or 48 kHz better for FL Studio?
Both are fine. Use 44.1 kHz for most music projects and 48 kHz if you work with video or your interface/project already uses it. Consistency matters more than chasing a higher number.