FL Studio Export Settings for WAV, MP3, YouTube, and Streaming
Choose the right FL Studio export settings for WAV masters, MP3 previews, stems, YouTube, streaming, and avoiding cut-off tails.
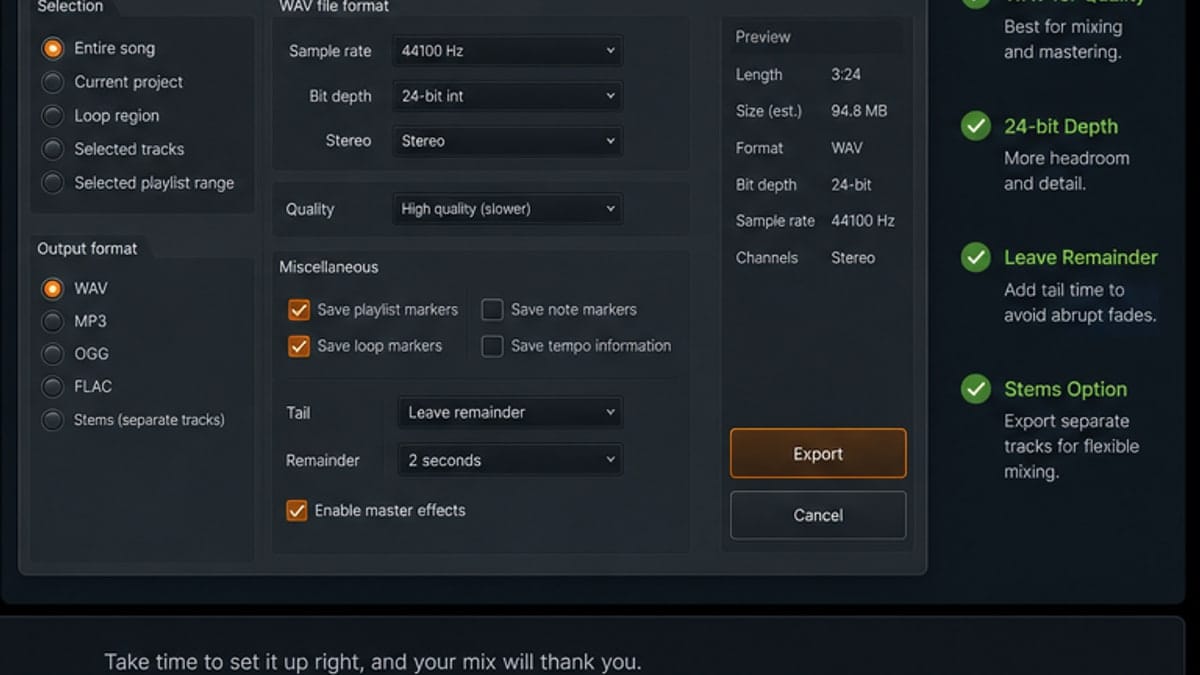
Short answer: export WAV for your master/archive, MP3 for quick previews, and split mixer tracks only when you need stems. Leave a render tail so reverb and delay do not cut off.
Use WAV for final files
WAV is the safest export for a final version, a mix archive, or a file you may upload later. Use 24-bit WAV for most finished tracks unless a collaborator asks for 32-bit float.
Use MP3 for quick sharing
MP3 is convenient for sending ideas, references, and quick feedback. It should not be your only copy. Keep the WAV, then make MP3 versions from it.
Do not cut off the tail
Reverb and delay often continue after the last visible clip. If the export stops too early, the ending sounds chopped. Use a remainder/tail setting that lets effects decay naturally.
When to split mixer tracks
Split mixer tracks when a collaborator, mixing engineer, remix project, or live set needs stems. For a normal beginner export, leave it off. Stems create many files and can confuse simple projects.
YouTube and streaming
Upload the best WAV your project can produce. Do not crush the master just because it sounds louder in FL Studio. Streaming platforms adjust playback level, and a distorted file stays distorted after upload.
Always check the exported file
Play the rendered file outside FL Studio before sending it anywhere. Check the beginning, the loudest section, and the ending tail. That two-minute check catches wrong selection ranges, missing plugins, and chopped reverbs.
Sources and reference pages
Image-Line export project manual, Image-Line Playlist manual.
Loudness reality
Do not export louder just because the preview feels exciting. If the master is distorted, streaming services will not fix it. They may turn it down, but the distortion stays. A clean export with a little headroom is easier to master and safer to upload.
If you are comparing against a mastered reference, lower the reference volume while mixing. Otherwise you will push your unfinished track too hard just to match loudness.
Archive habit
Keep a folder with the project file, a full WAV export, an MP3 preview, and any stems if you made them. Name exports with date or version: songname_mix_2026-05-16.wav. Future you will thank present you when a client, label, or collaborator asks for the previous version.
Do not overwrite your only good render. Make new versions when you change the mix.
FAQ
What export format should I use in FL Studio?
Use WAV for a final master or archive, MP3 for quick sharing, and split mixer tracks when you need stems. Do not keep only an MP3 as your master copy.
Should I export FL Studio at 24-bit or 32-bit?
For most final music exports, 24-bit WAV is a safe choice. Use 32-bit float when sending stems for further mixing or when another engineer requests it.
Why is my reverb cut off after export?
The render tail or remainder setting may be wrong. Leave a tail so delay and reverb can decay naturally.
Should I normalize when exporting from FL Studio?
Usually no for serious mixes. Normalize changes level after the mix. Set levels in the Mixer and export intentionally.
Recommended export settings by use case
| Use case | Format | Setting |
|---|---|---|
| Final archive | WAV | 24-bit or 32-bit float |
| Quick feedback | MP3 | High bitrate preview |
| Mix engineer | WAV stems | Split mixer tracks if requested |
| YouTube upload | WAV | Full-quality export |
| Social preview | MP3/WAV | Check loudness after export |
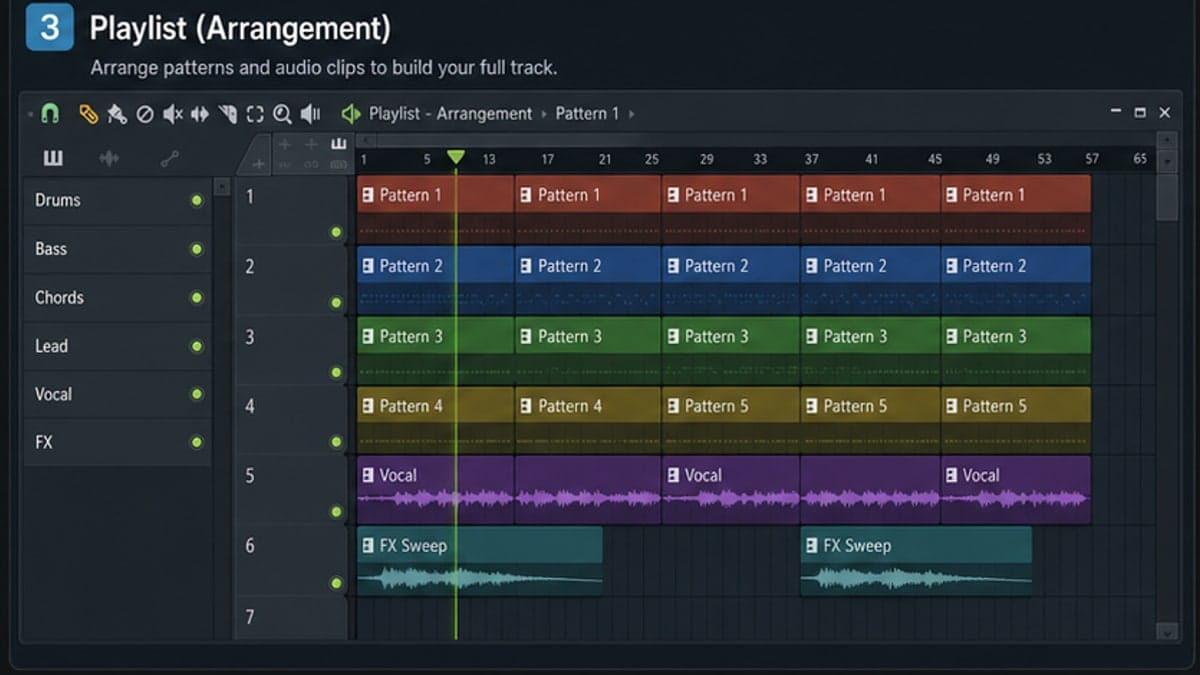
Check the selected range
If only part of the song exports, check the Playlist selection. A highlighted time range can tell FL Studio to render only that section. This is useful for loops and previews, but annoying when you expected the whole track.
Stem export warning
Stems are not always the same as a full mix. Sends, sidechains, master effects, and bus routing can change what each file contains. If you are sending stems to someone else, include a full reference mix so they know what the song should sound like.
Final quality-control pass
After export, listen outside FL Studio. Check the first second, the loudest drop, quiet breaks, and the ending. Wrong export settings usually reveal themselves in those four places.