How to Use FL Studio for Beginners: Your First Beat
A practical first-session guide to FL Studio: audio setup, Channel Rack, Piano Roll, Playlist, Mixer, and export without guessing where to click.

Short version: FL Studio gets easier when you stop treating it like one giant screen. Use the Channel Rack to make patterns, the Piano Roll to write notes, the Playlist to arrange sections, the Mixer to balance and process sound, and the Export window to render the final file.
If this is your first day inside FL Studio, do not start with plugin shopping. Do not start with mastering. Start by making one small beat and exporting it. A finished eight-bar loop teaches more than three hours of random menu clicking.
This guide is written for FL Studio 21 and current FL Studio builds in 2026.
What we are making in this first session
The target is not a perfect song. The target is a small finished project: drums, one bass or chord part, one melody, a rough mix, and one exported audio file. That gives you the full FL Studio path without turning the first lesson into a six-hour production course.
| Part | Beginner target | Window |
|---|---|---|
| Drums | Kick, snare, hats, one extra sound | Channel Rack |
| Music | Simple bass, chord, or melody | Piano Roll |
| Structure | Intro, main loop, outro | Playlist |
| Balance | No red master meter, clear kick and bass | Mixer |
| File | One WAV export and one MP3 preview | Export window |
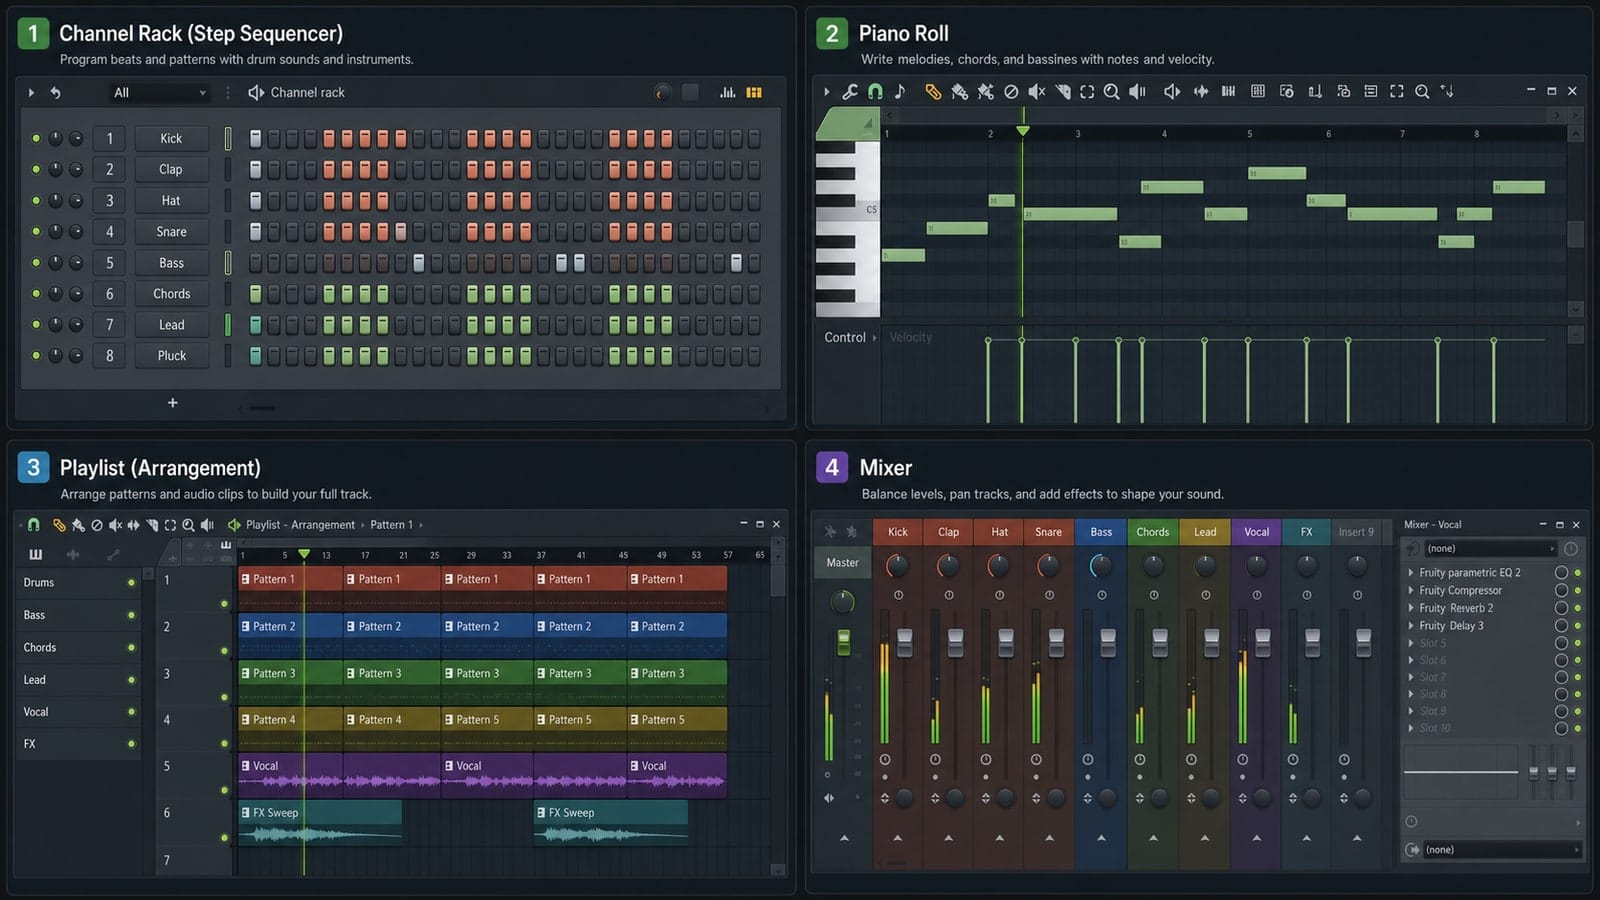
The four windows you need to understand first
FL Studio is built around four windows. Once you know their jobs, the program stops feeling like a maze.
- Channel Rack: where you load sounds and create short patterns.
- Piano Roll: where you write melodies, chords, bass lines, and detailed drum parts.
- Playlist: where patterns become a full arrangement.
- Mixer: where you set levels, add effects, and route audio.
That is the beginner map. If you get lost, ask which job you are doing: making a pattern, editing notes, arranging the song, or mixing the sound.
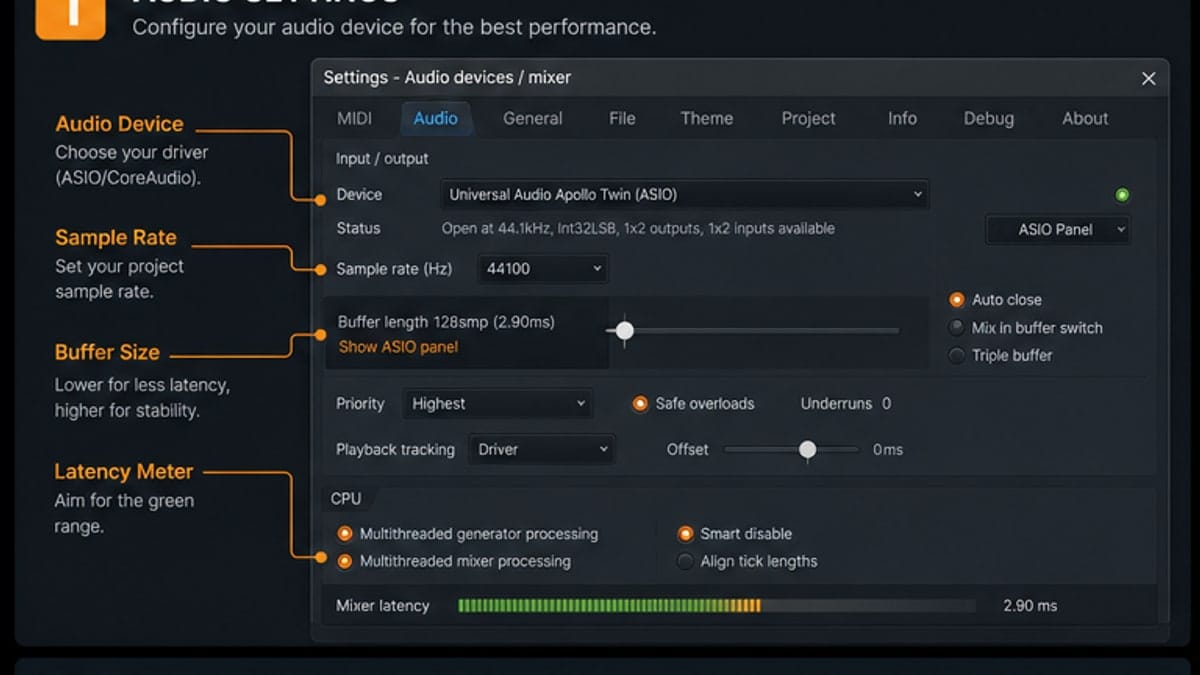
Step 1: Set Audio Settings before making music
Before you write the first note, open Options > Audio Settings. This is where you pick the audio driver, sample rate, and buffer length.
On Windows, start with your audio interface ASIO driver if you have one. If you are using built-in laptop audio, FL Studio ASIO is usually the easiest first choice. On macOS, Core Audio is the normal path.
For a beginner project, set the sample rate to 44.1 kHz or 48 kHz and leave it alone. The buffer is the setting you will actually change. Lower buffer means less delay when playing a MIDI keyboard or recording. Higher buffer means more stability when the project gets heavy.
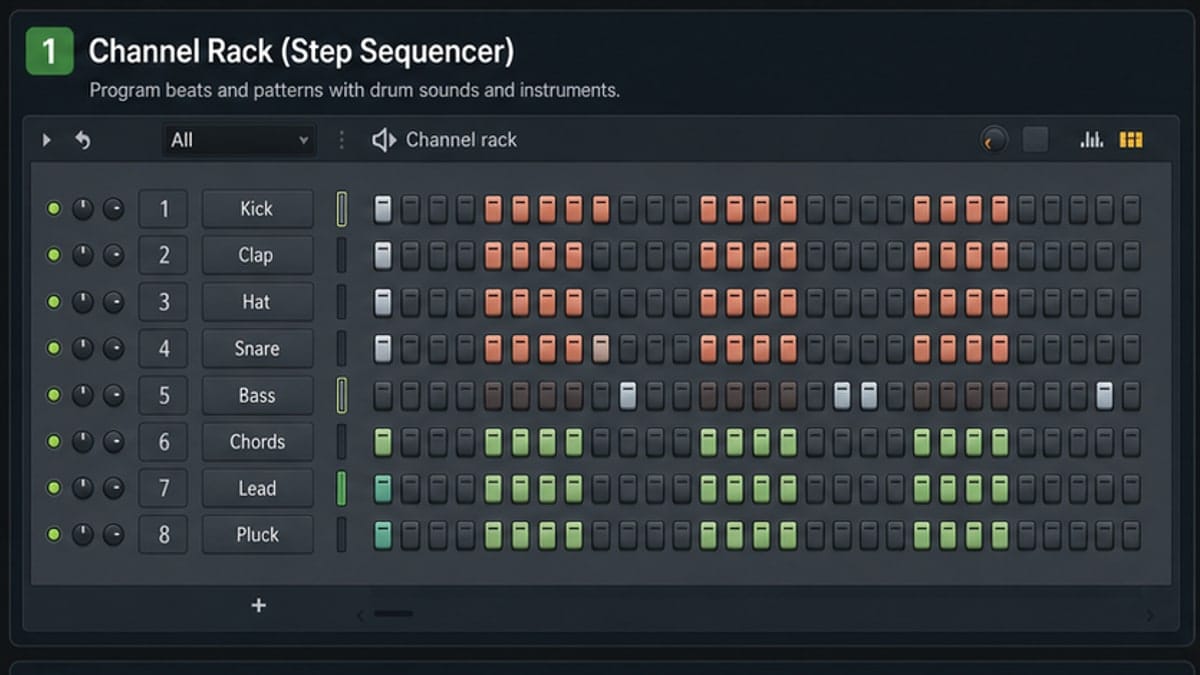
Step 2: Build a drum pattern in the Channel Rack
The Channel Rack is the fastest place to make a first beat. Load a kick, snare, hat, and one extra sound. Then click steps on and off.
Think of the step buttons as a row of sixteenth notes. For a basic four-beat pattern, put the kick on the first beat, the snare on beats two and four, and hats between them. It will sound plain, but plain is good for the first pass.
The biggest beginner mistake is adding twenty sounds before the groove works. Use four sounds. Make the pattern loop cleanly. Then move on.
If the loop feels empty, do not add a random riser or crash yet. Change the rhythm first. Move one kick, remove one hat, or shorten one snare. Beginners usually learn faster by editing a small pattern than by loading more samples.
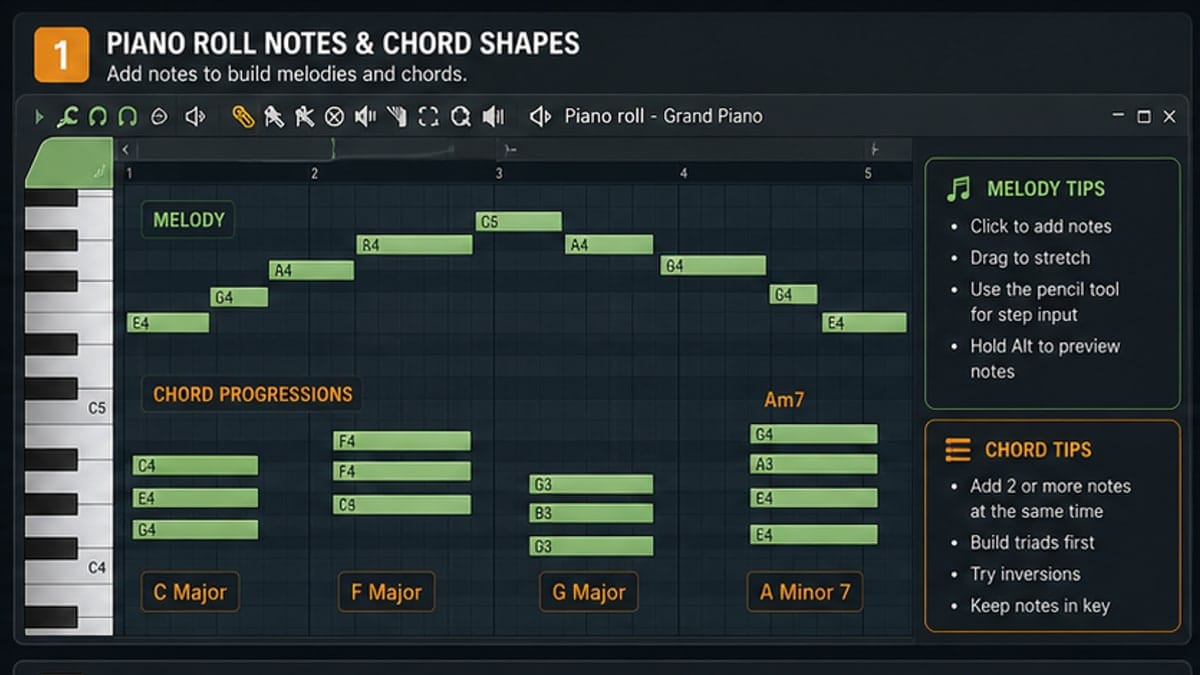
Step 3: Use the Piano Roll for melody, bass, and feel
Right-click a channel and choose Piano Roll. This is where FL Studio becomes more than a drum machine.
Notes move left and right in time. Notes move up and down in pitch. Drag the right edge of a note to make it longer or shorter. The lower lane controls velocity, which is how hard the note is played.
For your first beat, write a bass note on the root of the chord and a simple two- or three-note melody. If you do not know music theory yet, stay simple. Repetition is easier to arrange than a busy melody that never repeats.
Use velocity early. Even a simple melody sounds better when not every note hits at the exact same strength. Pull a few notes down slightly, especially passing notes between the main hits.
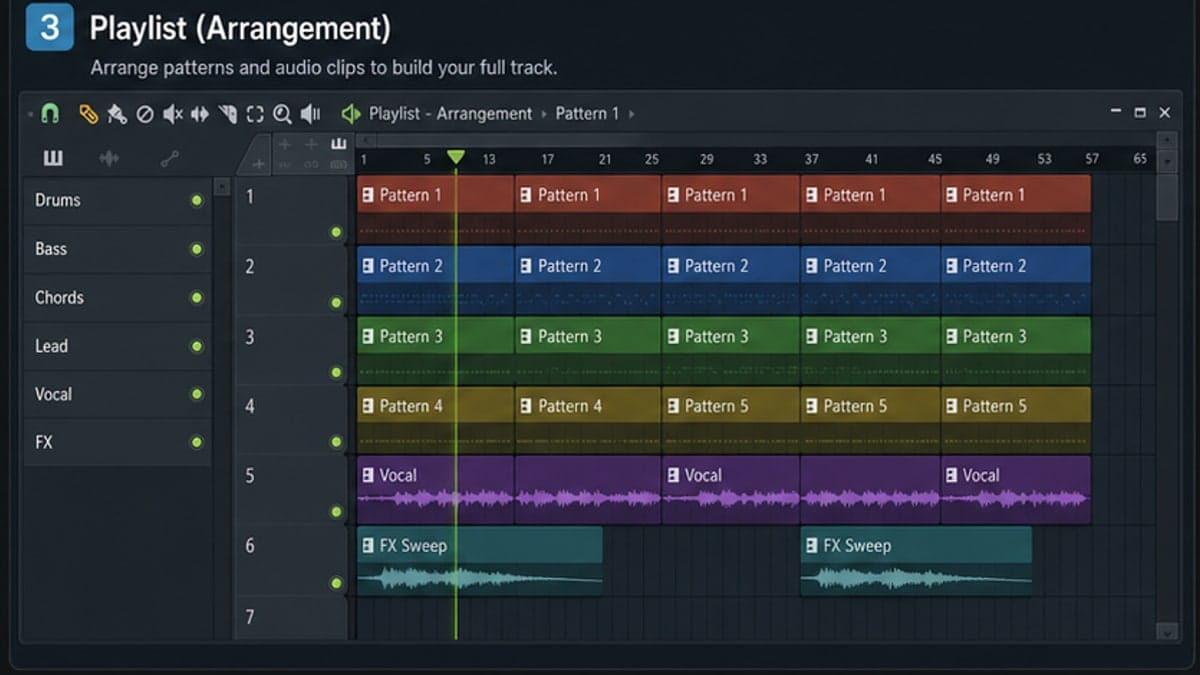
Step 4: Arrange patterns in the Playlist
The Playlist is where your loop starts becoming a track. Drag your pattern into the Playlist and place it where the song should start.
For a first arrangement, make four sections:
- Intro: melody or chords only.
- Beat enters: drums join.
- Main loop: full pattern.
- Outro: remove one or two parts.
Do not worry about making a radio-ready song. The goal is to learn that patterns live in the Channel Rack, but structure lives in the Playlist.
Keep the arrangement visible. If you cannot explain what happens every eight bars, your Playlist is probably too messy. Name clips when the project grows, and leave space between sections while learning.
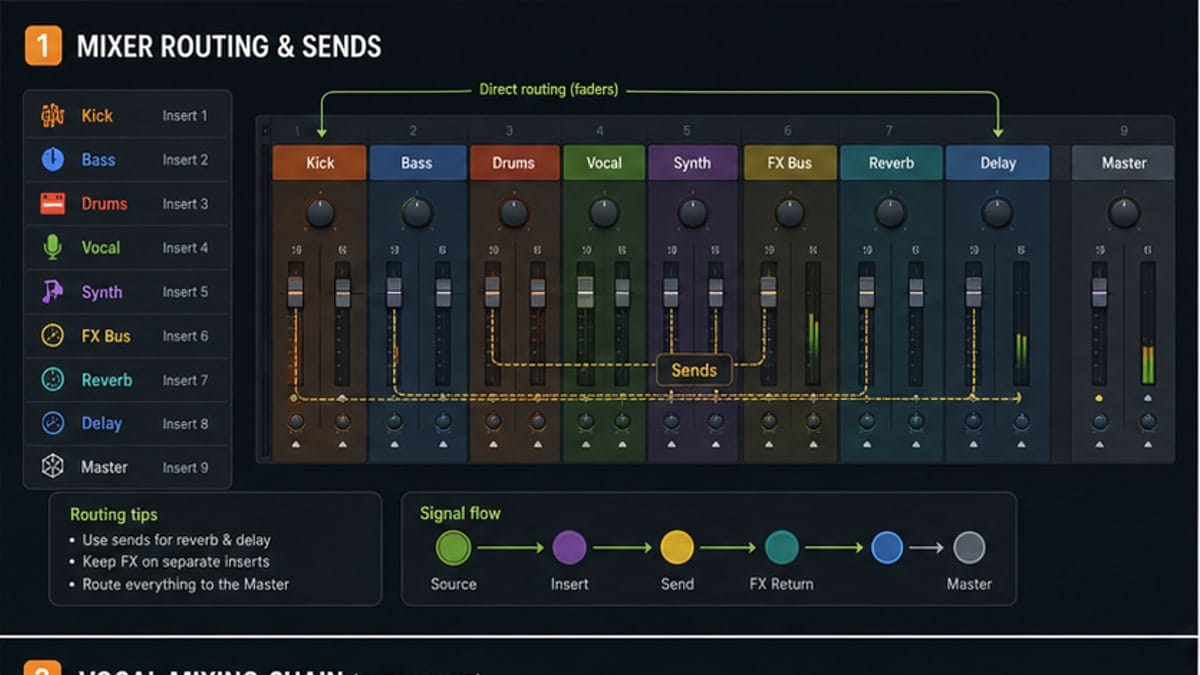
Step 5: Route sounds to the Mixer
The Mixer is where you stop sounds from fighting each other. Each important sound should have its own Mixer insert, especially kick, snare, bass, lead, and vocals.
Set levels first. Effects come later. Pull everything down, then bring the kick up, add snare, add hats, add bass, and finally add melody. If the Master meter is red, lower the channels instead of pretending a limiter fixed the mix.
For a first project, use one EQ if a sound is muddy and one reverb if the melody feels too dry. That is enough.
A good first mix is mostly level balance. If the kick disappears, turn other things down before boosting the kick. If the melody hurts, lower it before adding more effects. The Mixer should solve a problem you can hear.
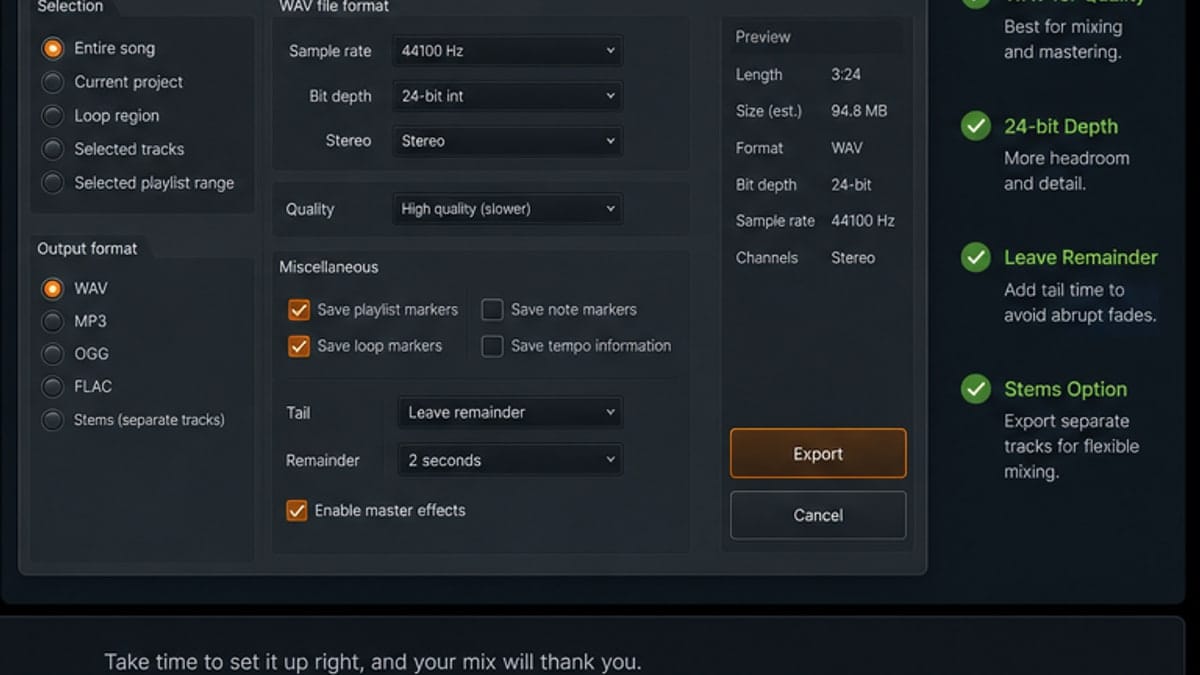
Step 6: Export a file you can actually play
When the loop feels complete, go to File > Export. Choose WAV for a clean master file and MP3 for quick sharing.
For the first export, do not overthink it. Use WAV, 24-bit if available, and leave enough tail so reverb or delay does not cut off. If you only need to send a quick idea to a friend, MP3 is fine.
After exporting, play the file outside FL Studio. Use headphones, laptop speakers, and your phone if you can. The point is not to judge yourself harshly. The point is to learn how your project translates after it leaves the DAW.
Common beginner mistakes
- Skipping Audio Settings: this causes crackles, delay, or no sound before the creative part even starts.
- Using the Playlist like the Channel Rack: patterns are made in the Channel Rack, then arranged in the Playlist.
- Ignoring velocity: notes at the same velocity can sound stiff, especially hats and melodies.
- Mixing before arranging: balance levels, but do not spend an hour polishing a four-bar loop.
- Exporting only MP3: keep a WAV file for your archive, then make MP3 copies when needed.
What not to learn on day one
Skip mastering chains, paid plugin lists, advanced routing, and complicated genre recipes for now. Those topics matter later, but they can hide the basic workflow. If you cannot route a sound to the Mixer and export a clean WAV, a mastering limiter will only make confusion louder.
The first win is small: open FL Studio, make sound, arrange it, mix it roughly, export it, and know where every step happened. Once that is natural, the advanced tutorials become much easier to follow.
Sources and reference pages
Reference pages checked for interface behavior: Channel Rack, Piano Roll, Playlist, Mixer, Audio Settings, and Export Project Dialog.
FAQ
Is FL Studio good for complete beginners?
Yes. FL Studio is beginner-friendly once you understand the four main windows: Channel Rack, Piano Roll, Playlist, and Mixer. The hard part is not the software; it is knowing which window does which job.
Can I make a full song in FL Studio Trial?
You can make and export music in the trial, but saved projects have limitations when reopening. For serious learning, use the trial to test the workflow, then pick the edition that matches your recording and plugin needs.
What should I learn first in FL Studio?
Learn Audio Settings first, then Channel Rack, Piano Roll, Playlist, Mixer, and Export. That order gets you from sound to finished file without bouncing between random tutorials.
Do beginners need third-party plugins?
No. Start with stock sounds and stock effects. Add third-party plugins only after you can build a pattern, arrange it, route it to the Mixer, and export a clean file.
Why does FL Studio feel confusing at first?
Most new users expect one timeline to do everything. FL Studio separates pattern creation, arrangement, MIDI editing, and mixing into different windows. Once that map clicks, the program feels much faster.