FL Studio
To make adlibs in FL Studio, record short vocal responses on their own Audio Track and Mixer insert, bring them under the lead, then choose which phrases need panning or effects. Start with the dry performance. A well-placed “yeah” can do more than a long chain on every word.
I would build the part in that order: placement, a clean recording route, level and tone, then a few deliberate effects. This guide uses native FL Studio tools, including a Fruity Delay 3 throw that repeats one selected word without cutting off its tail.
Plan the gaps before adding effects
An adlib answers, comments on or punctuates the main vocal. A double reinforces the same performance; a harmony adds a pitched supporting part. Those roles can meet in one arrangement, but they do not need the same treatment. Use the double-vocal workflow when you want a fuller lead throughout a line.
Here is a simple arrangement example, rather than a recorded result: leave the first line alone, answer the end of the second line, add a short accent in the next gap, and reserve a longer echo for the end of the section. That change in density gives the last response somewhere to go.
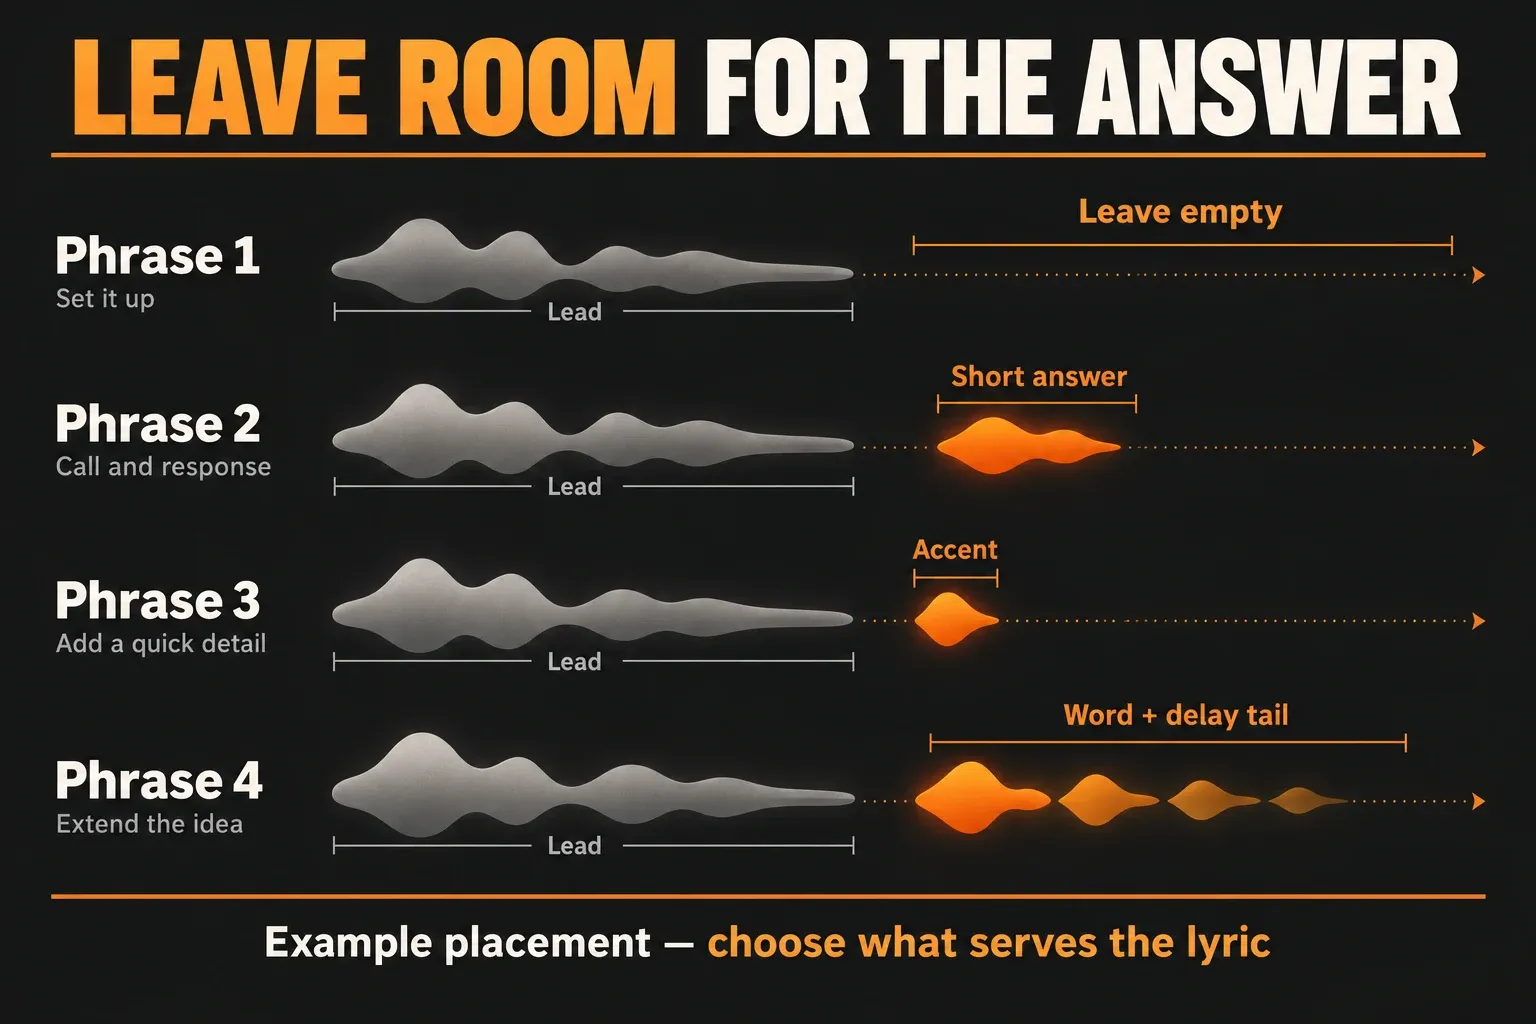
Mark the words that deserve an answer before recording. Try a different register, a shorter delivery or a contrasting tone; choose the version that fits the lyric. Do not fill every pause just because there is room. Audient's guide to vocal layers and adlibs also describes emphasizing particular words to underline a phrase’s message. That is a useful starting point for choosing which responses belong.
Give adlibs their own recording and Mixer route
External audio recording requires FL Studio Producer Edition or higher, as specified in the audio-recording documentation. If your microphone is not ready yet, use the full vocal recording setup first.
- Choose a free Mixer insert and name it Adlibs. Keep the lead on a different insert.
- Right-click an empty Playlist track header and choose Track mode → Audio track, then select the Adlibs Mixer insert. This links the recording lane and its playback route.
- Select your microphone's input on that insert. Use the mono input corresponding to the microphone if your interface offers separate mono inputs.
- Check the recording pickup selector beside the input menu. Choose EXT — External input only for a dry microphone recording.
- Selecting the input arms the insert. Enable Audio in the Record button's recording filter, then use Record and Play to capture the planned responses in the Playlist while listening through headphones. Stop and check the resulting clips before adding effects or another layer.
The pickup choice matters. Image-Line documents EXT as recording directly from the audio interface; MIX also includes audio routed internally to that Mixer track. EXT lets you hear the song while keeping internally routed playback out of the recorded file. It cannot remove backing-track sound that physically leaks into the microphone.
Already have the takes? Open the Audio Clip's Channel settings and use its Mixer/FX target selector to assign it to the Adlibs insert. Moving a clip to a different ordinary Playlist lane does not by itself give it a different Mixer route. The Mixer routing manual describes the Channel settings FX assignment.
If you made an adlib by slicing a copy of the lead's Audio Clip, the pieces may still share one channel. Use the clip menu's Make unique before giving that piece independent channel processing. Image-Line distinguishes Make unique from Make unique as sample: the former reuses the source audio file in a new channel; the latter also creates a separate sample file. A new channel is enough for separate Mixer routing.
Make the dry part work with the lead
First remove unwanted noise between phrases and tidy the starts and ends without shaving off the consonants that make the words understandable. Use short fades where an edit clicks. In current FL Studio, the Audio Clip fade handles sit along the clip's upper edge; enable the fade editing controls if they are hidden.
Set the level with the whole vocal section playing. Bring up the adlibs until their words register, then check whether they pull attention away from the lead. I prefer riding an unexpectedly loud response down to compressing the entire part harder just to catch that one phrase. The broader vocal mixing guide covers the main chain; an adlib does not need every processor from it.
Use EQ for a specific conflict. If the adlib carries unnecessary low rumble, a high-pass filter can remove it. If a bright response masks the lead's consonants, reduce the competing region or darken the adlib rather than automatically boosting the lead. In Fruity Parametric EQ 2, right-click a band's token to choose its Type and Order; the filter types and slopes have different jobs. There is no cutoff frequency that suits every voice and arrangement.
For a deliberately thin response, combine high-pass and low-pass filtering, then judge it at the actual mix level. Keep this as contrast for a phrase, not an obligation for the whole track. Deal with a sharp “s” before sending it into long repeats; the de-essing guide explains that separate problem.
Pan a response for a reason
Keep the lead as the reference point and choose a position for each answering part. One response a little to the left and a later one to the right can create movement without a second take on every phrase. If you want a pair that plays together, record two performances and give each its own route. Duplicating an unchanged clip and panning the copies is not the same musical choice as performing the answer twice.
Check the balance in mono as well as stereo. If the answer becomes distracting, lower or simplify it before adding more width. For melodic adlibs that need pitch correction, the real-time tuning options have their own edition and plugin limits.
Throw one word into Delay 3 without cutting off the repeats
A delay throw sends a chosen word into an echo while leaving the other phrases dry. I would use a dedicated return for this: the dry adlib stays under your control, and the delayed tail can have its own level.
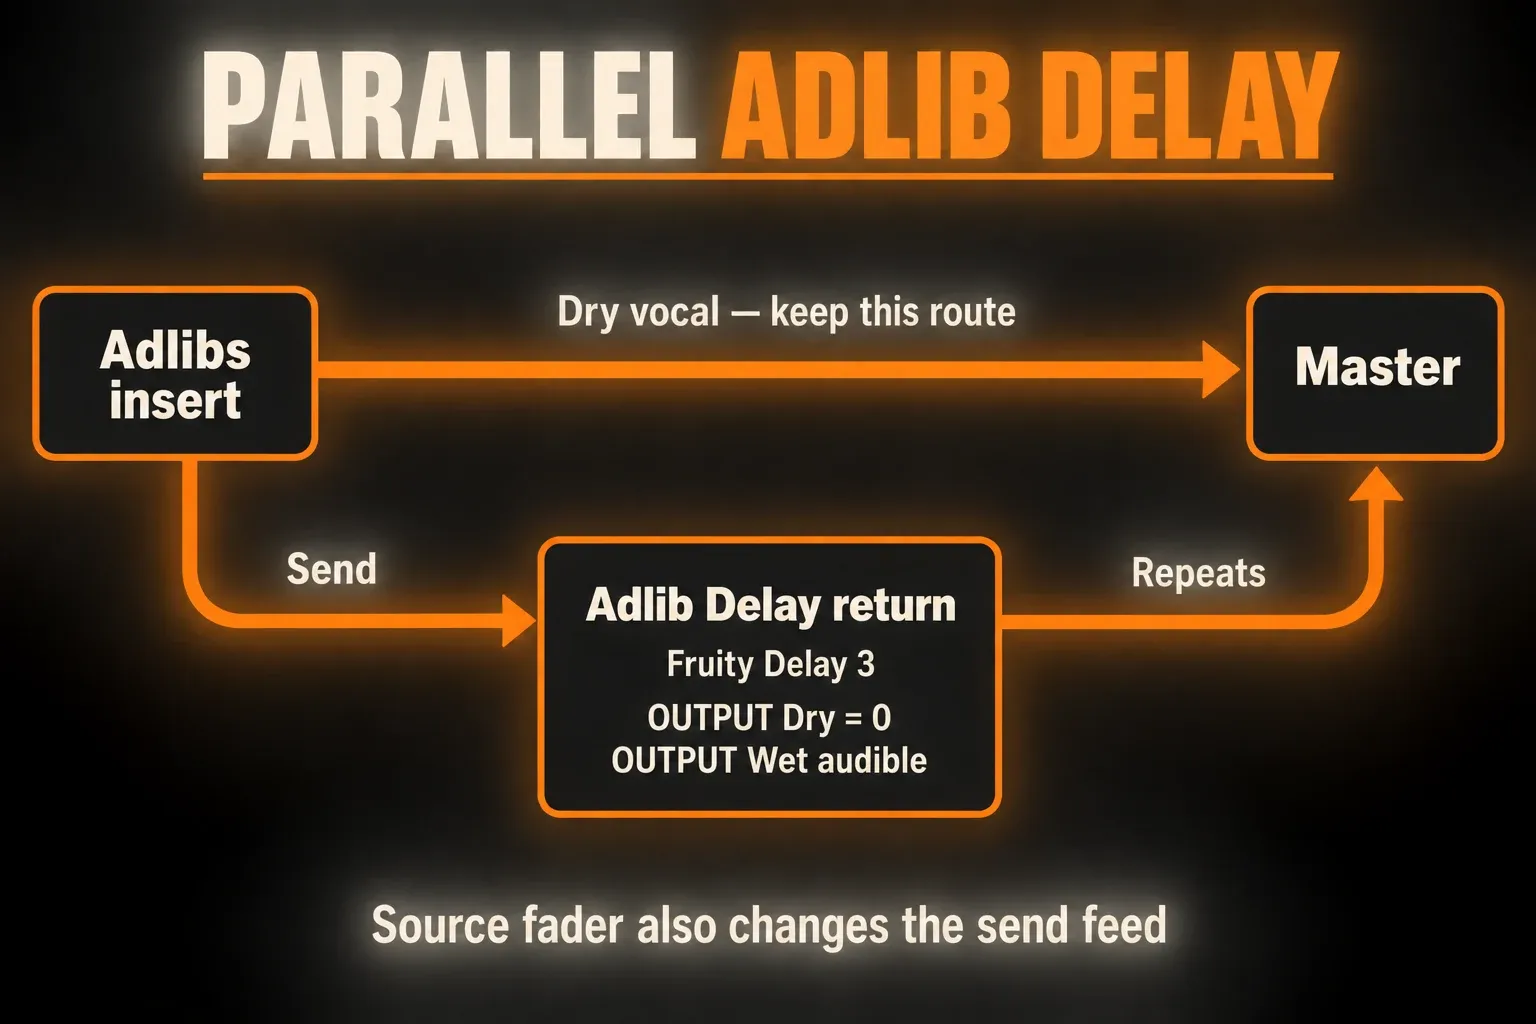
- Choose another free Mixer insert, name it Adlib Delay and load Fruity Delay 3 into an effect slot.
- Select the source Adlibs insert. Click the routing/send switch on the Adlib Delay destination to create an audible send. Keep the source's existing Master route enabled. Do not choose Route to this track only for this parallel setup.
- On Delay 3, set OUTPUT Dry to zero so the return does not add a second dry copy. Leave OUTPUT Wet audible and use the return fader to balance the effect.
- Enable Tempo Sync. Right-click the Time control and choose Set for a musical time value. A quarter-note repeat is one possible starting example; choose the rhythm that fits the gaps in your song.
- Start with modest Feedback Level. The feedback filter can help keep repeats out of the lead's way. Lower the return level while setting it up, then listen for how long the tail occupies the next phrase.
The Mixer's normal sends are post-fader. Lowering the source Adlibs fader also lowers what feeds the delay. Lowering the Adlib Delay return fader changes the audible repeats separately.
Automate INPUT Wet, not the tail's output
Delay 3 has two controls named Wet with different jobs. INPUT Wet controls the signal entering the delay. OUTPUT Wet controls the processed signal coming out. Image-Line specifically describes automating INPUT Wet for selected parts of the audio.
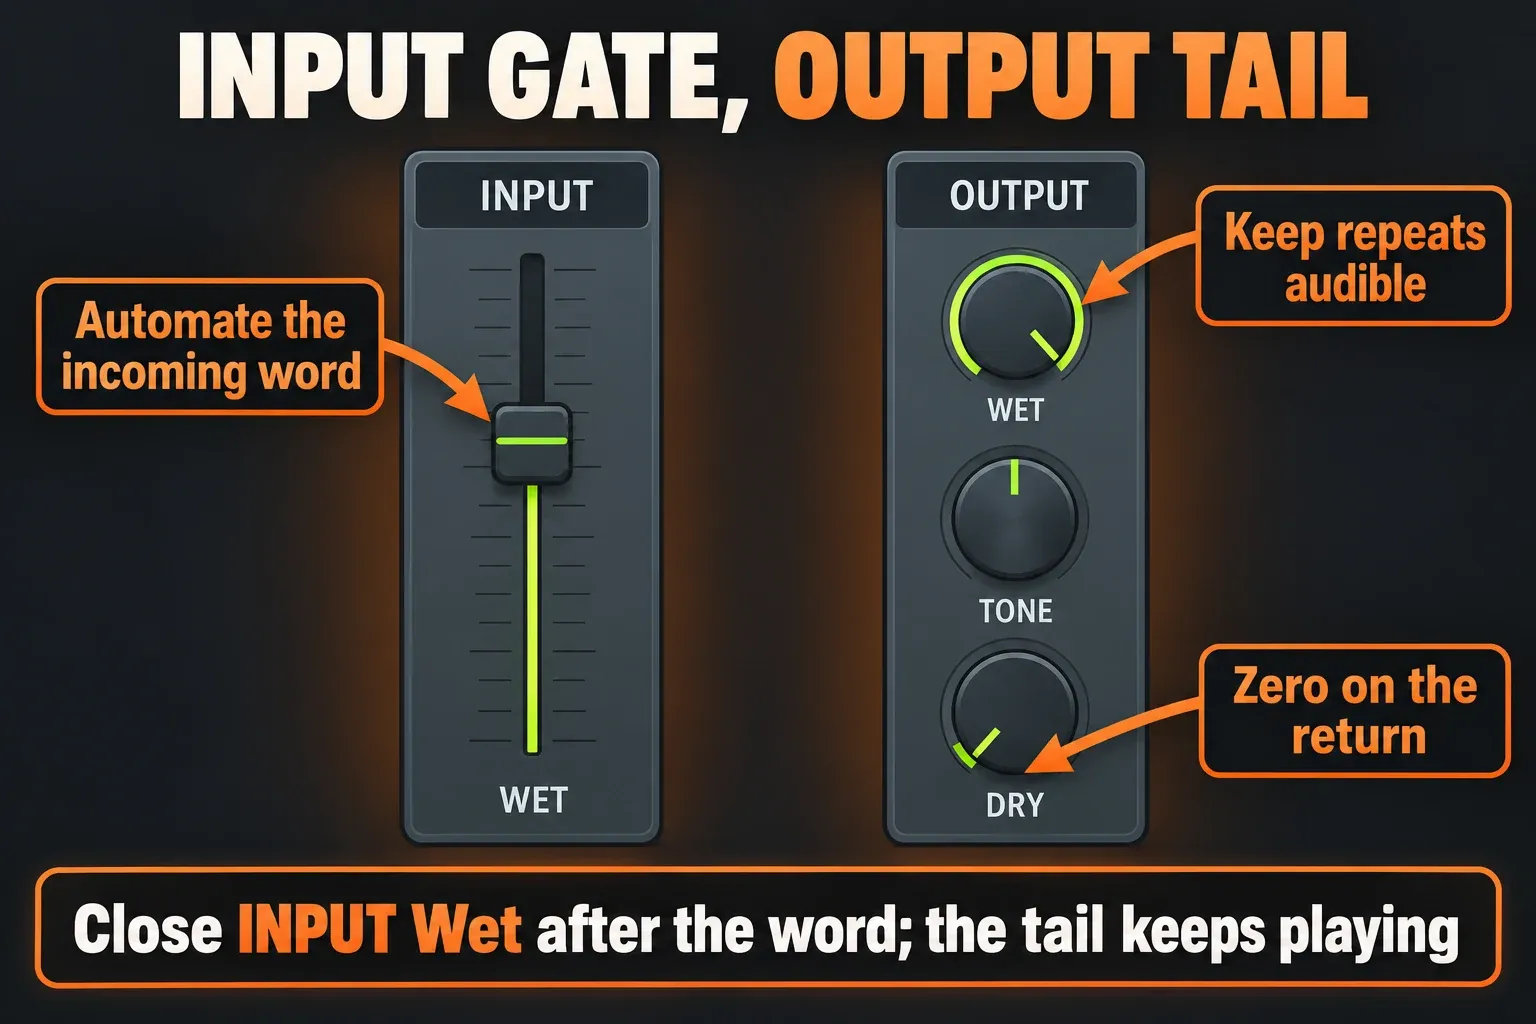
- Set INPUT Wet to zero. Select the relevant time range in the Playlist if you want a short automation clip, then right-click INPUT Wet and choose Create automation clip.
- Shape the envelope so the input stays at zero outside the target word. Place nearby points around the word's beginning and end, with a raised section between them. This opens the input for the word and closes it afterward.
- Use short transitions at the edges and adjust their placement against the vocal. A rise beginning too early can feed the previous syllable; a fall ending too late can feed the next word.
- Play across the phrase boundary. The word should enter the delay, then the repeats should continue while later dry words stay out of it. Check the song's beginning too, so the control does not start open unexpectedly.
The Automation Clip documentation covers creating clips, time-selection length and initialized control values. If the start value is wrong, inspect the automation and the control's initialization rather than adding more processors.
Closing INPUT Wet stops feeding new sound into the delay; it leaves the existing repeats to decay. Turning OUTPUT Wet or the return fader all the way down hides that tail. This is why output-volume automation can sound as if the echo was cut off.
Want ping-pong movement? Choose Ping pong in Delay 3. With a mono source, move Pan (the Offset/Pan control in the Delay Time section) away from center: the manual notes that a centered mono input will not produce the intended bouncing effect. Keep feedback under control. Delay 3 permits feedback above 100%, and filter resonance can increase feedback even when Level is below 100%; neither control is a harmless “more space” knob.
Fix the adlib problems you can hear
| Problem | Check first |
|---|---|
| The lead is inside the new recording | Check the recording insert and its pickup selector. Use EXT for the microphone, and headphones to limit physical playback leakage. |
| Adding an effect changes the lead too | Check whether both clips share a channel or Mixer insert. A separate Playlist lane alone does not isolate their processing. |
| The dry adlib disappears | Check the source's direct Master route. Dry zero belongs on the parallel delay return, not on your only audible path. |
| Every word echoes | Inspect INPUT Wet automation and its starting value. Keep the input closed outside the chosen word. |
| The last repeat stops abruptly | Look for OUTPUT Wet, return-level or mute changes that cut the audible tail. |
| The chorus gets cloudy | Use fewer throws, reduce feedback or darken the return. Preserve room for the next lead phrase. |
| Ping-pong stays in the center | For a mono input, check Delay 3's input Pan and listen to the return in stereo. |
Finish by comparing the section with and without the adlibs at the same main mix level. Keep the phrases that add an answer, a lift or a useful change of texture. If a response only makes the lead harder to follow, move it, shorten it or leave that gap empty.