FL Studio
To record vocals in FL Studio, use a dedicated Playlist Audio Track, select the microphone’s mono input and choose EXT as the recording pickup. Set the interface gain with the loudest planned phrase, choose one headphone-monitoring path, then record and replay a short test before the full performance. EXT keeps FL Studio’s Mixer processing out of the recording; it cannot remove effects already present in the incoming signal.
A take becomes difficult to rescue when the room rings, the singer changes distance between lines, the input clips, or the headphones return a delayed second voice. This guide works through those problems, then shows how to organize purposeful takes and assemble a comp without losing the originals.
Before you start: audio recording requires Producer Edition or higher. In Trial, choose an edition with audio recording enabled. The standard time-unlimited Trial can save projects and export audio, but cannot reopen saved projects until purchase and unlock. Keep needed work open, preserve the recorded files and export a reference before closing; reopening a session is not a Trial backup test.
Record a clean vocal in ten steps
- Prepare the position. Turn off speakers and noisy devices, place a pop filter, and give the singer a repeatable distance from the microphone.
- Build the vocal lanes. Create separate Playlist space for the lead, alternate lead, double, harmony and ad-lib roles you actually need.
- Choose the audio device. Use the interface’s native driver when it is available and confirm the microphone reaches FL Studio.
- Create a dedicated Audio Track. Link an unused Mixer insert to a Playlist Audio Track before starting the recording.
- Select the mono mic input and EXT pickup. EXT captures the interface input without FL Studio Mixer processing; incoming hardware effects remain.
- Set the preamp from the loudest phrase. Adjust gain at the interface, leaving obvious headroom and never allowing the input to clip.
- Choose one monitoring path. Use interface direct monitoring with FL input monitoring off, or software monitoring with the hardware direct path off.
- Record and replay a short test. In Song mode, enable the Audio recording filter, disable Recording starts playback and Wait for Input for this sequence, arm Record and press Play. Stop and replay the test for clipping, plosives, sibilance, room, bleed and timing.
- Capture purposeful passes. Record one complete performance first, then targeted alternatives, doubles, harmonies and ad-libs on their own lanes.
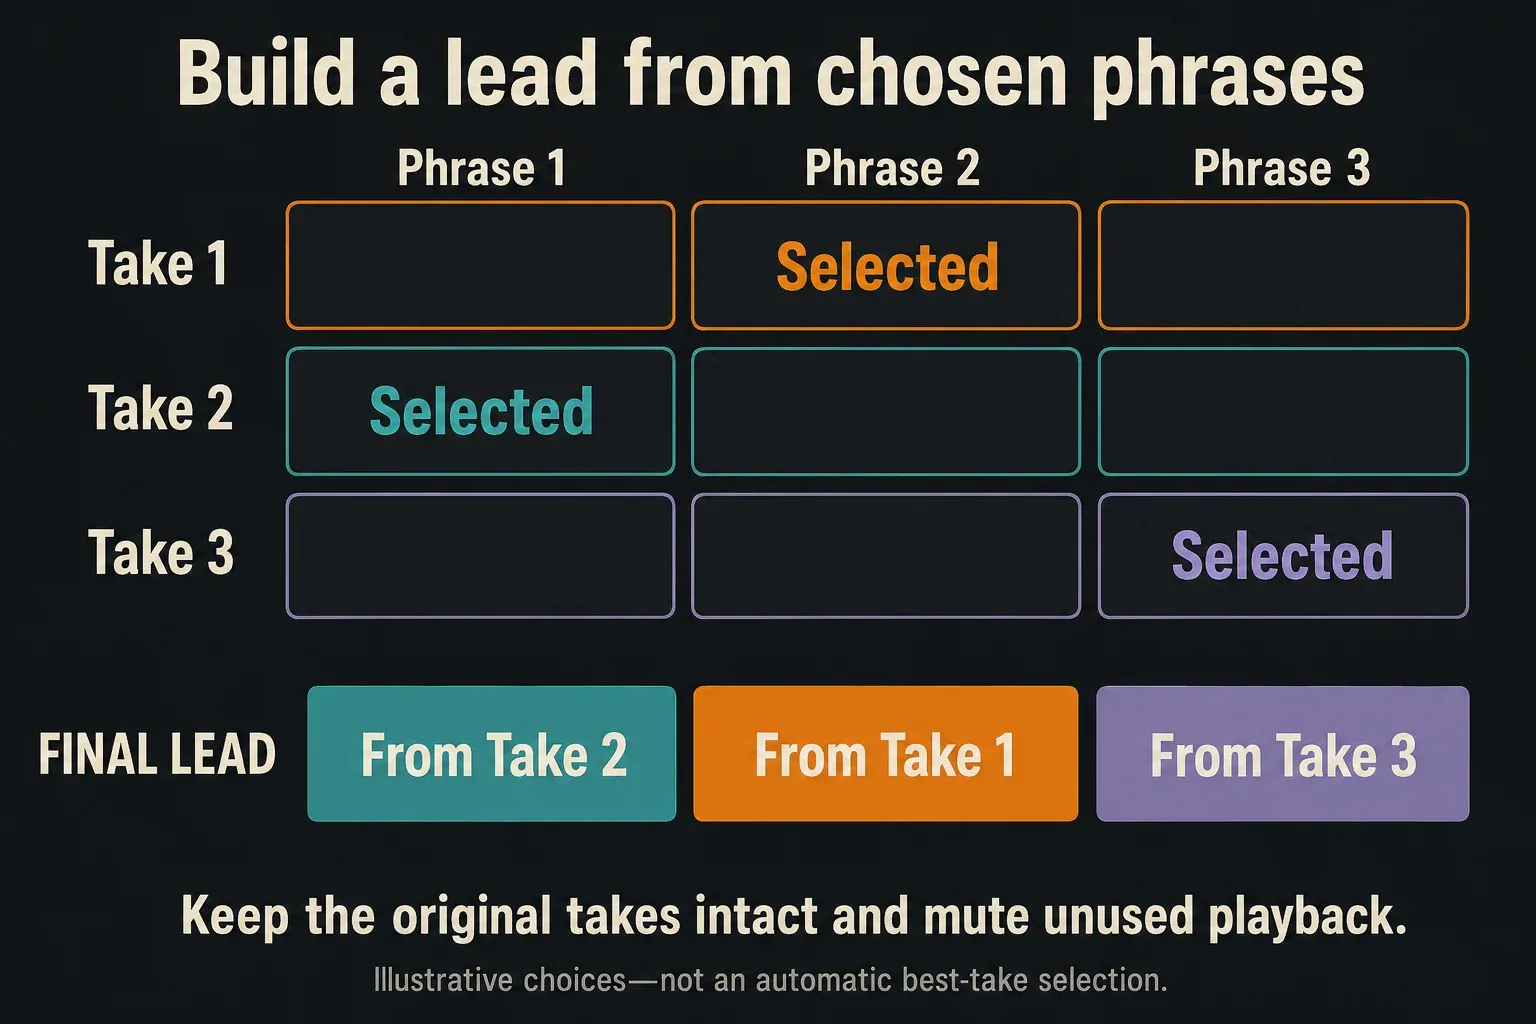
- Preserve the raw takes and build a comp. Choose phrases by timing, pitch, tone, diction and emotion, then hand the clean comp to editing and mixing.
Prepare the room and microphone before opening plugins
A microphone records the room along with the singer. Listen at the intended position before placing the stand: computer fans, air conditioning, traffic, a hard desktop and a bare wall can be more damaging than a slightly imperfect microphone. The current Focusrite vocal-recording guide recommends a quiet space and soft furnishings or curtains to reduce reflections. You do not need to turn a bedroom into a padded box; you do need to move away from the noisiest and most reflective spot.
Start with placement, not a foam-shopping list
Put the microphone where the singer can stand comfortably without facing a close hard wall. A thick curtain, duvet or absorptive panel behind the singer can reduce the reflection that returns toward the front of a cardioid microphone. Keep the laptop or desktop fan off-axis, and mute monitor speakers so the backing track reaches the microphone only through the headphones.
Give the singer a repeatable distance
Shure’s current vocal microphone guide gives roughly 10–20 cm (4–8 inches) as a useful starting range for many singers, not a law. A pop filter controls bursts of air and doubles as a physical distance marker. Moving closer to a directional microphone can add bass through proximity effect; moving farther away captures more room. Choose the tone with a test take, then keep the distance consistent.
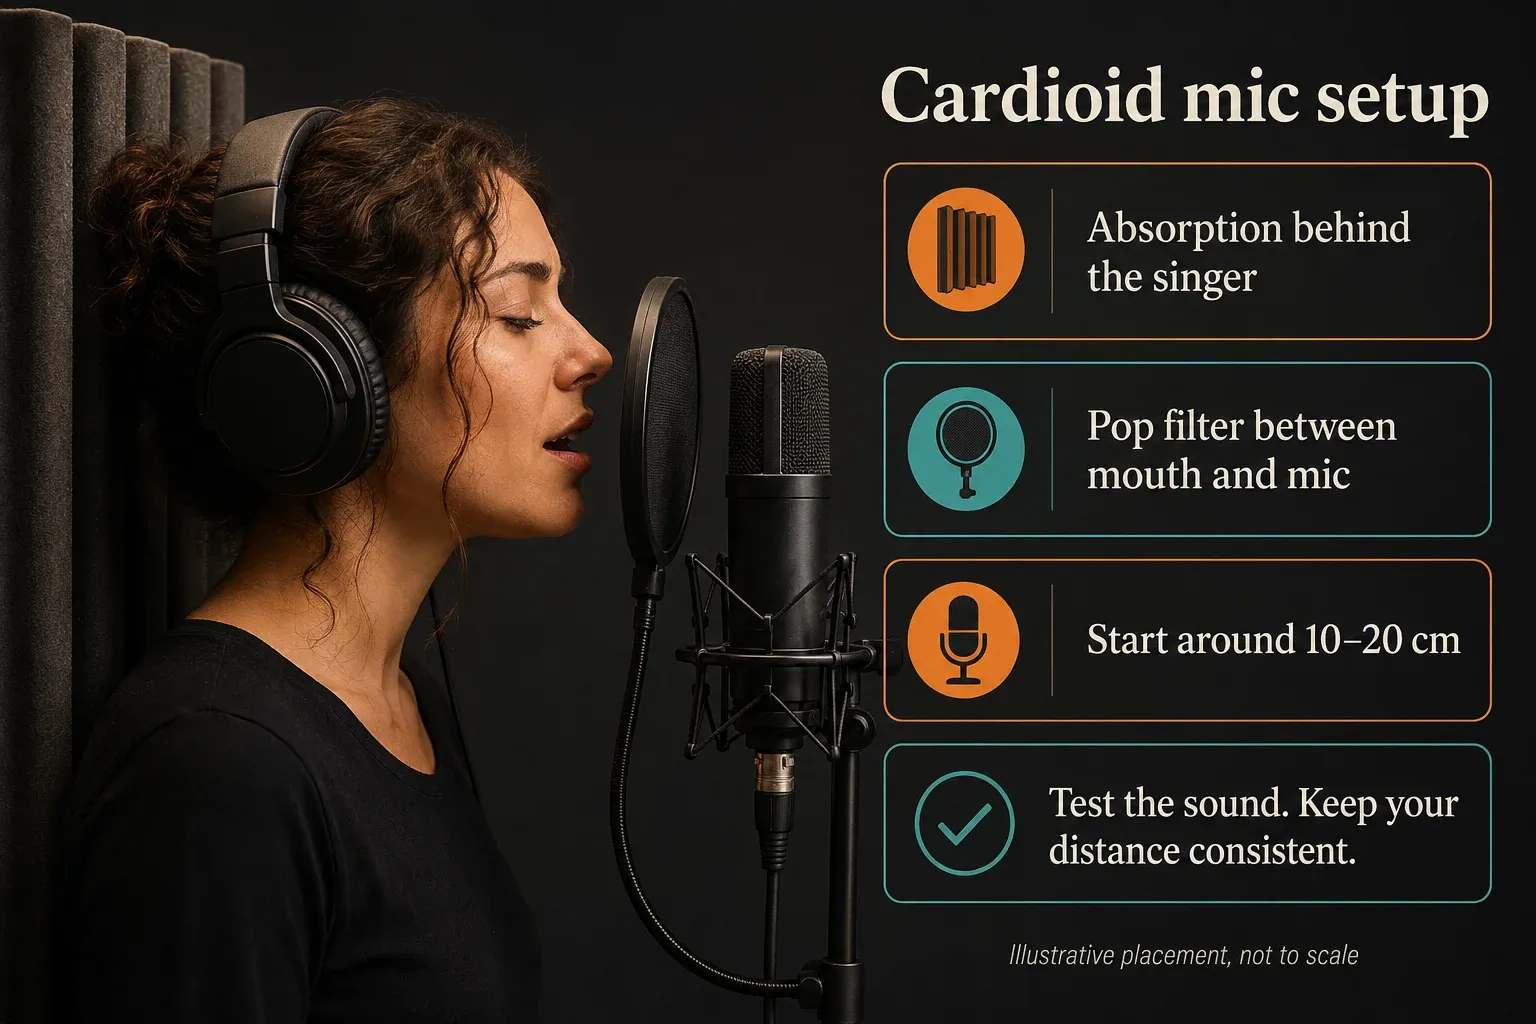
If “S” sounds are painfully sharp or “P” sounds still hit the capsule, try a small height or angle change instead of immediately inserting a heavy de-esser. The same Shure guidance notes that moving the microphone slightly below the direct mouth line can reduce strong sibilance for some singers. Record the same phrase before and after the move; keep the version that sounds more natural.
Build the vocal session before the singer performs
A single lane named “Vocal” works for a test, then collapses when the chorus needs a lead replacement, two doubles, a high harmony and ad-libs. Open the Playlist and reserve only the roles the arrangement calls for. The wider FL Studio Playlist guide covers track navigation and arrangement; here the job is to make every recorded clip identifiable without soloing twenty mystery waveforms.
Use roles that answer a musical question
Start with Lead A and Lead B for complete alternatives. Add Double only where the lead should feel wider or more forceful. Give harmonies their own lane by register, and keep ad-libs separate from the main lyric. A role-based layout prevents an exciting ad-lib from being mistaken for a failed lead take during editing.
Name the project and takes so tomorrow still makes sense
Use a project version that identifies the session, then label clips or tracks with the section and role: CHORUS_LEAD_A, VERSE2_DOUBLE, CHORUS_HIGH_HARM. Do not rename every breath; name the units you will audition. The project-organization workflow explains how to keep session versions and their audio files together.
Route the microphone once and keep the capture path simple
Use a dedicated Mixer insert for the microphone, not the Master carrying the entire song. For an interface on Windows, select its manufacturer’s ASIO driver when available; macOS uses its audio-device options, not a Windows ASIO driver. If a USB microphone and headphones appear as separate devices, follow Image-Line’s USB microphone input/output setup before starting the session.
Set up the Audio Track before pressing Record
Choose an unused Mixer insert and select the microphone’s mono input. Right-click the Mixer track and choose Assign to new audio track(s). Alternatively, right-click a Playlist track header and choose Track mode > Audio track, then select the Mixer insert. Confirm that the insert is armed for disk recording, with its red arm indicator. Naming an ordinary lane “Lead” does not create this connection.
Switch to Song mode. In the Mixer menu, leave Disk recording > Auto-create audio clips enabled so stopped recordings become Playlist clips. Right-click the main Record button and enable Audio. For the manual sequence used here, turn Recording starts playback off and turn the Toolbar’s Wait for Input off. Once gain and monitoring are ready, arm the main Record button, press Play, perform, then press Stop. The Toolbar recording controls explain the alternative start modes; if recording has already started, pressing Play again is not the next step.
For a quick test, Image-Line’s one-click audio-recording route uses the Toolbar microphone icon, into playlist as an audio clip, and an input selection. It creates an Audio Track and starts a four-click count-in, so have the singer and headphones ready before selecting the input.
Choose the mono input and EXT pickup
A single vocal microphone is a mono source. Select the mono version of the interface input so the signal is centered instead of appearing on only one side. Set the recording pickup to EXT. Image-Line describes EXT as the direct external input and recommends it for normal external recording because internally routed audio and Mixer effects are not blended into the file.
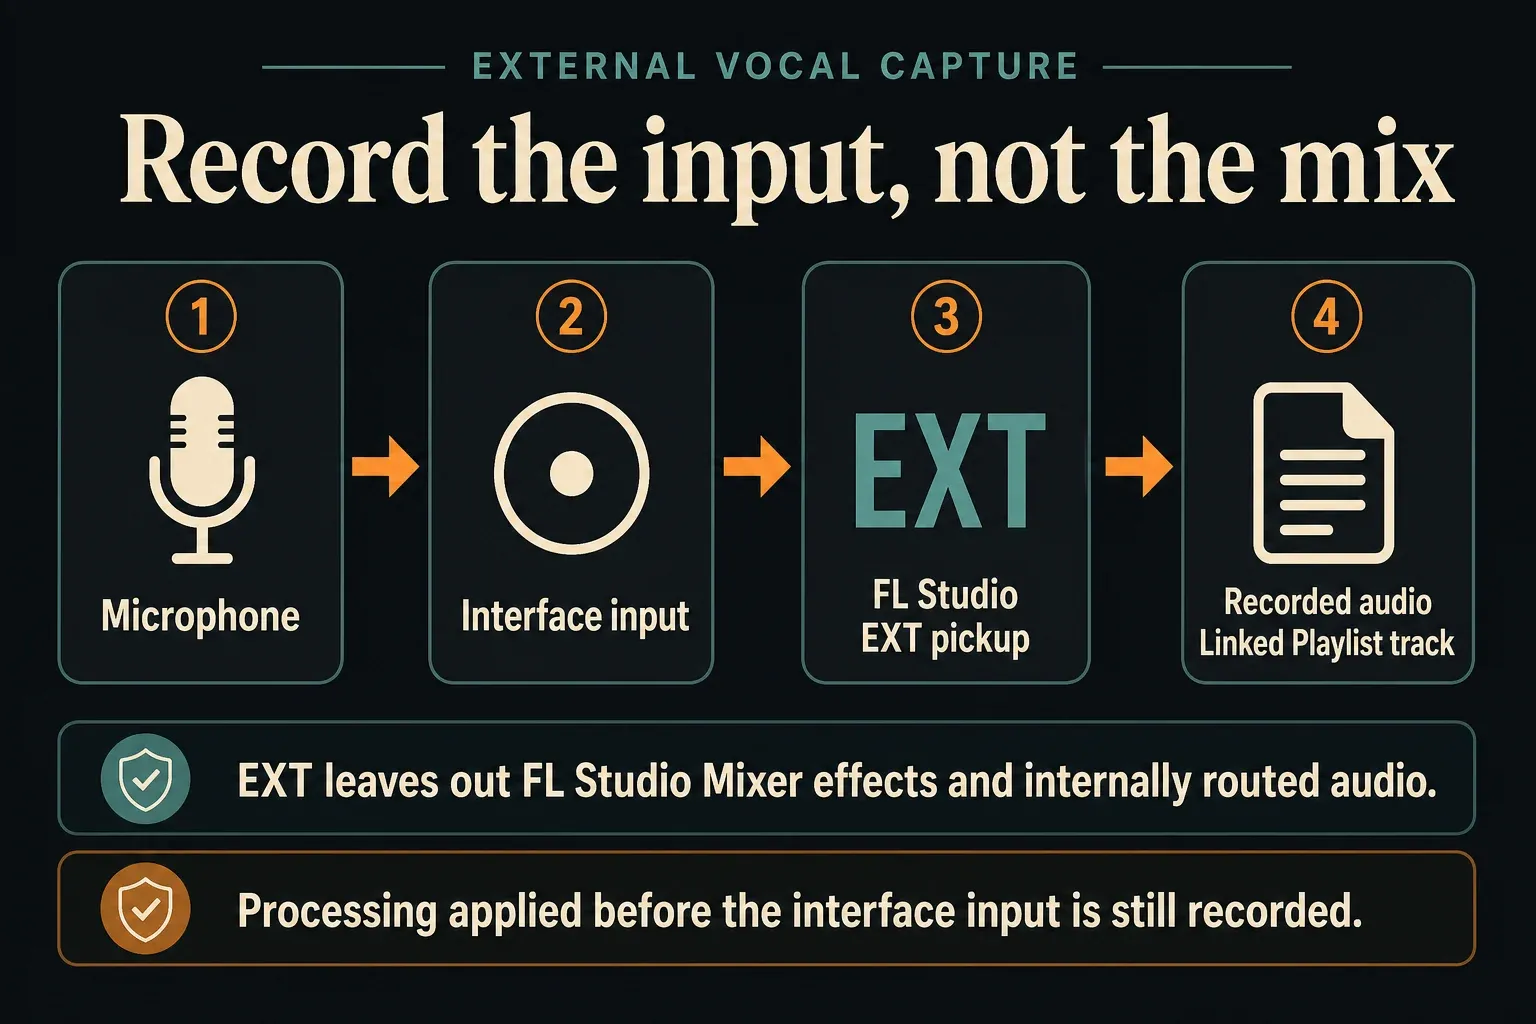
For the complete driver, interface and general signal path, use the FL Studio audio-recording guide. If the input is missing, permission is denied or a test file is silent, use the microphone-input troubleshooting workflow before recording a performance.
Set vocal input gain without chasing a magic number
Ask the singer for the loudest phrase they expect to deliver, at performance distance and intensity. Turn the interface preamp up until the signal is healthy, then leave clear headroom above the highest peak. If the interface input clips, reduce its gain and repeat the phrase. If only the downstream FL Studio output clips, check that processing and output level separately. Focusrite’s guide explains why an overloaded input crushes the waveform; a clipped consonant is not something a quieter Mixer fader repairs afterward.
Set the recording level at the interface
With EXT selected, the interface controls the recorded input level. The Mixer fader controls listening level downstream; it is not the cure for an under- or overdriven preamp. Avoid rigid advice that every singer must peak at one exact number. Interfaces meter differently, vocal dynamics vary, and safety headroom is more valuable than filling the meter.
Test whispers, normal lines and the loudest section
A level that survives a conversational verse may still clip on the chorus. Run three short phrases: the softest intended delivery, an ordinary line and the loudest passage. If the quiet line disappears into room noise, move the singer or microphone before pushing the preamp until the chorus clips.
Choose one monitoring path the singer can trust
The singer needs the beat, enough of their own voice to stay controlled, and no distracting echo. There are two valid paths. What usually fails is hearing both simultaneously: the direct signal arrives first and the software-returned signal arrives later, creating a doubled or comb-filtered voice.
Direct monitoring: the dependable low-latency route
If the interface supports it, direct monitoring sends the microphone input to its headphone output while the same input continues into FL Studio for recording. Focusrite’s direct-monitoring explanation describes near-zero latency, not a universal zero-delay guarantee. Keep EXT selected for recording. In the same input-selector area, set the separate Monitor external input option to Off; this disables the FL-monitored copy, not the recorded input.
Software monitoring: useful when the singer needs effects
For software monitoring, disable the interface’s direct-monitor path. Set FL Studio’s Monitor external input to When armed or On, and listen through the interface output receiving FL Studio. The voice now passes through the Mixer before returning to the headphones. Use a low buffer that remains stable, bypass high-latency processing on the vocal and Master paths, and test the actual project. The FL Studio audio-settings guide explains buffer, driver and underrun trade-offs; there is no single buffer value that suits every system.
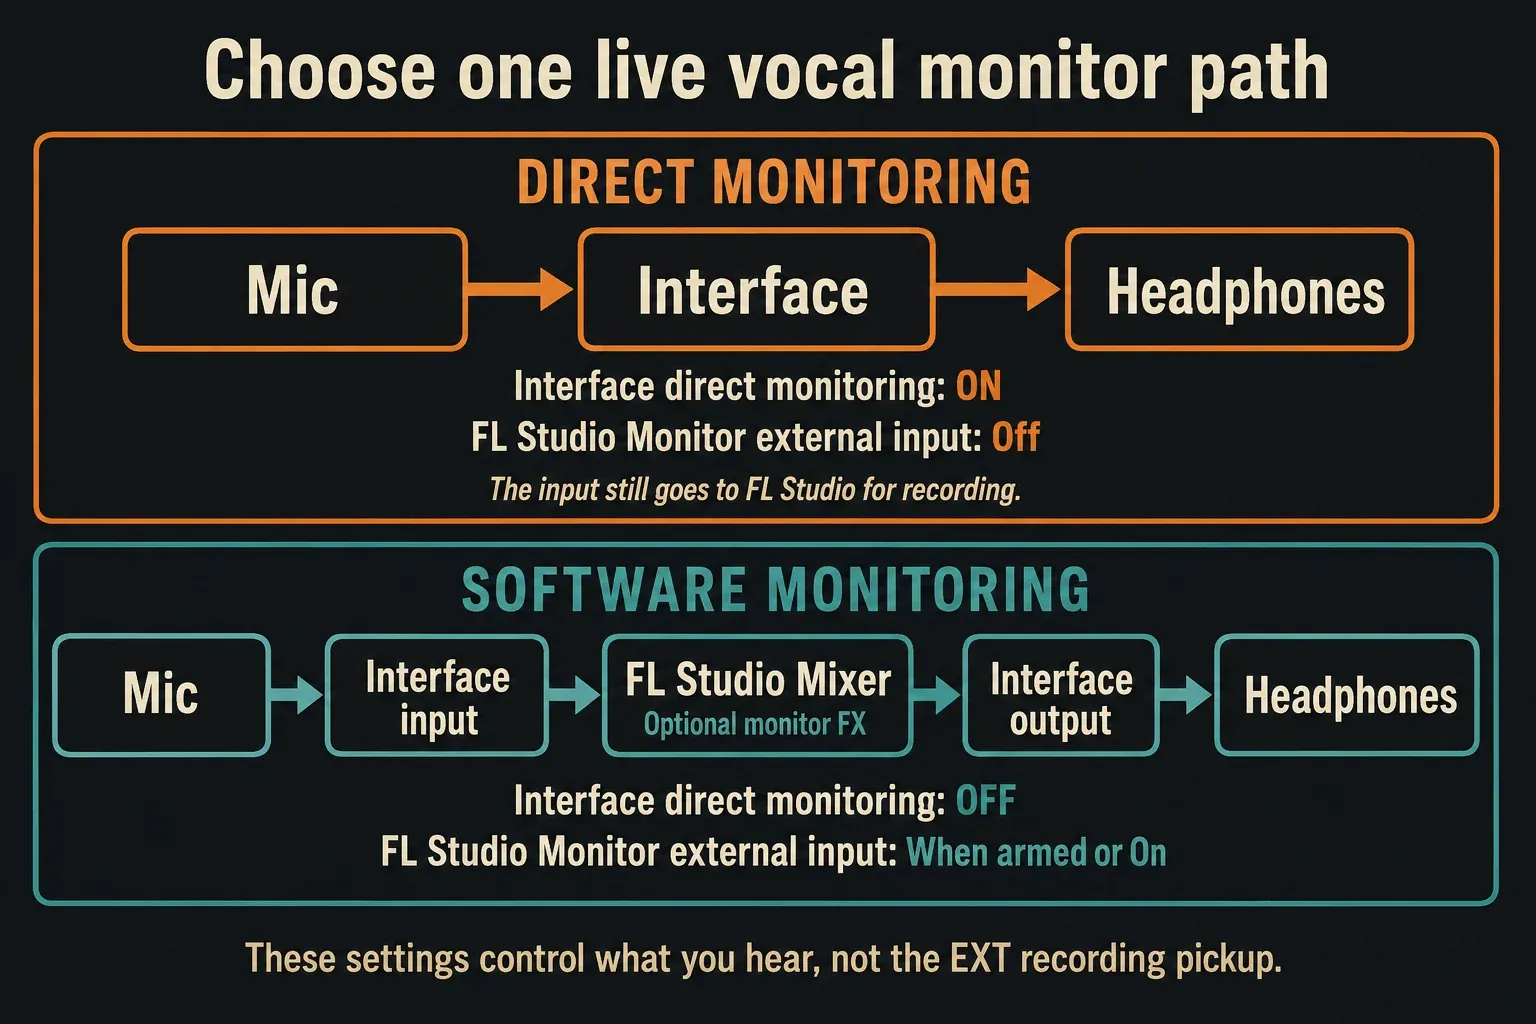
Keep headphone delay separate from recorded-clip alignment. The Mixer’s Disk recording > Latency compensation adjusts recorded placement for input latency. It does not make the live software round trip disappear.
Record dry while the singer hears a comfortable sound
With software monitoring, keep EXT as the recording pickup and add a little reverb to the monitored Mixer path if it helps the performance. The singer can hear that FL Studio processing while the recording captures the external input before the Mixer effects. The recording pickup and monitoring controls have separate jobs.
EXT does not remove hardware EQ, compression or reverb already reaching the selected input. It also cannot turn a wet loopback feed into an unprocessed microphone. Check the interface’s routing and any onboard processing if a supposedly dry test still contains effects. With hardware direct monitoring and FL monitoring Off, FL Studio reverb is not in that direct headphone path; any interface monitor effect depends on the interface’s own features and settings.
Balance the backing track so the singer can hear pitch and consonants without straining. Keep ambience restrained enough to reveal timing and mouth noise. Selecting FX as the pickup deliberately records after the Mixer effect slots; those printed effects cannot simply be switched off afterward. For an editable vocal, choose the sound in the headphones separately from the sound saved to disk.
Make the test take earn its place
Record a short passage containing a quiet line, a hard consonant, an “S”-heavy phrase and the loudest section. Stop and replay it, first alone and then against the backing track. Judge the recorded file, not just the live sound the singer heard.
Check six problems in a fixed order
- Clipping: if the hardware input clips, lower its gain and record again. Flat-topped peaks or harsh distortion are warning signs, but check the interface input rather than assuming every distorted sound is preamp clipping.
- Plosives: low-frequency thumps on P and B call for pop-filter or angle adjustment.
- Sibilance: harsh S and T sounds may improve with a small position change before processing.
- Room: clap-like reflections or a boxy tail call for a different position or more nearby absorption.
- Bleed: if the beat is obvious during pauses, lower headphone level or use better-sealing closed-back headphones.
- Latency: if the singer feels doubled or the clip lands consistently late, diagnose monitoring and alignment as separate issues.
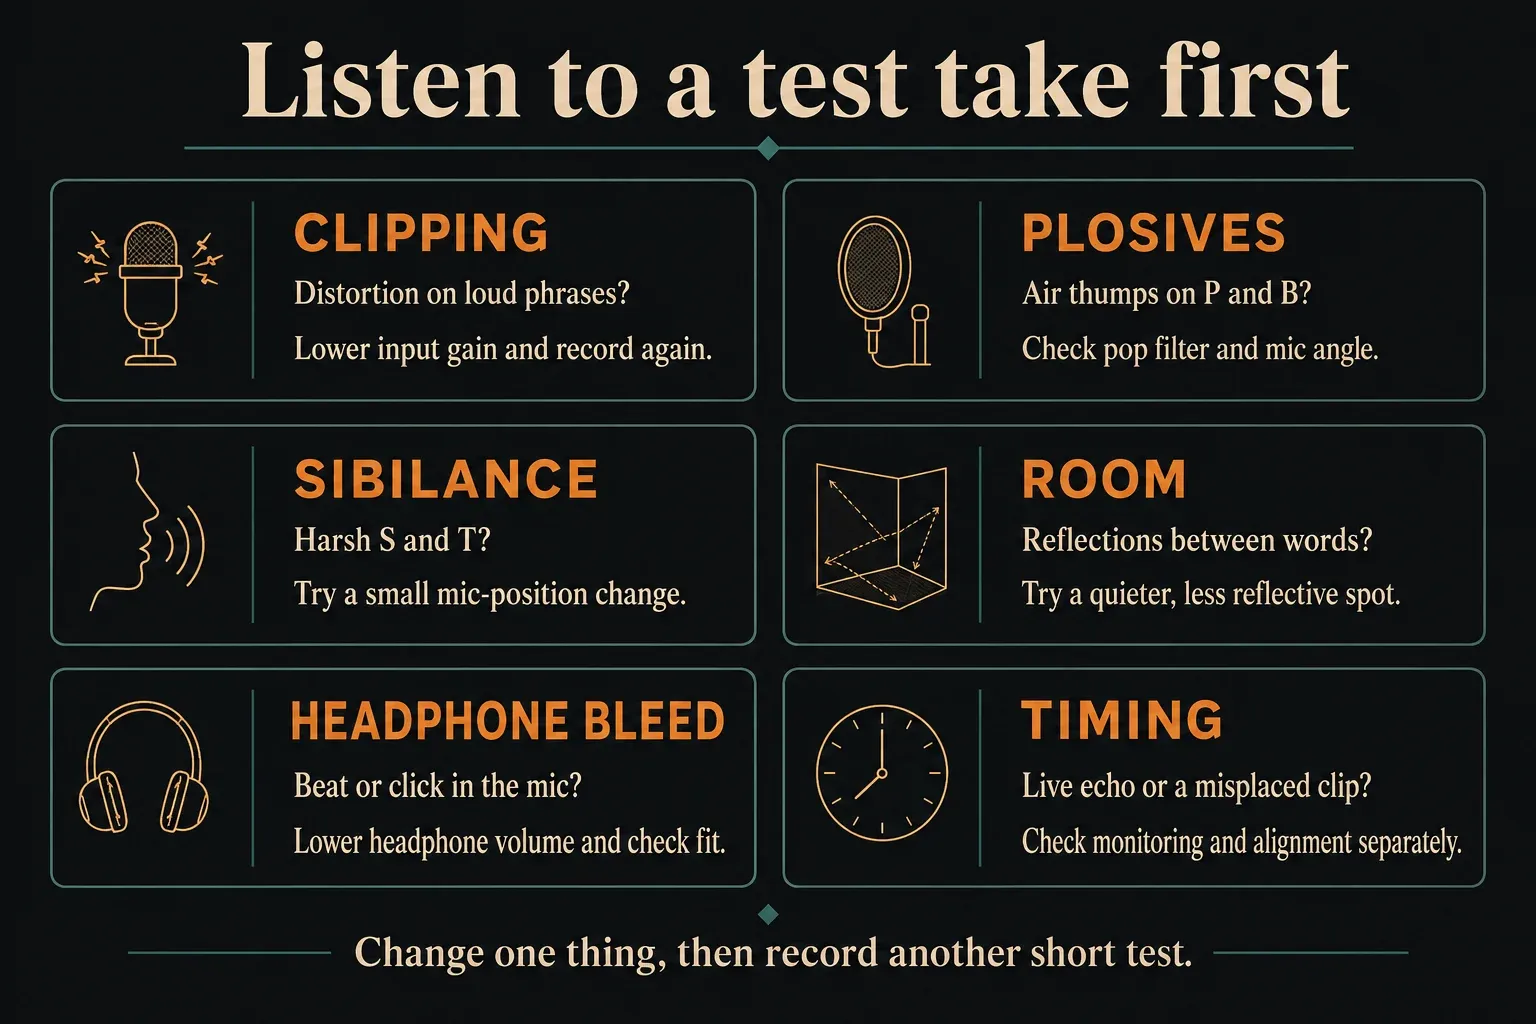
If you change gain, placement or monitoring, repeat the relevant phrase before committing to full takes. Once the result is usable, keep the setup consistent unless the delivery changes substantially. A quiet verse does not prove that a shouted chorus will stay clean.
Capture performances before collecting fragments
Record one complete lead pass first
A full pass reveals the emotional arc, breathing plan and lines that consistently fail. Keep the first useful performance even when it is not technically perfect. A session built only from isolated phrases can be precise but emotionally discontinuous.
Record alternatives with a reason
After the full pass, ask for another complete take with one clear direction: firmer rhythm, softer consonants, more restraint or more energy. Then repair specific lines. Stop when new takes repeat the same strengths and mistakes. “More” is not an editorial decision.
Keep doubles, harmonies and ad-libs honest
A double supports the lead; it is not merely the second-best lead take. Record it as a new performance, matching rhythm and consonant endings intentionally. Give harmonies their pitch role and ad-libs their own spaces. This makes later level, pan and processing decisions far less destructive.
Organize each vocal role in the Playlist
Recordings through a linked Audio Track can appear on child tracks beneath the parent. Keep lead alternatives together, with separate parents for doubles, harmonies and ad-libs. If you want each role to have independent Mixer processing, deliberately assign its Audio Track to the appropriate Mixer insert; names, colors and grouping alone do not set the route.
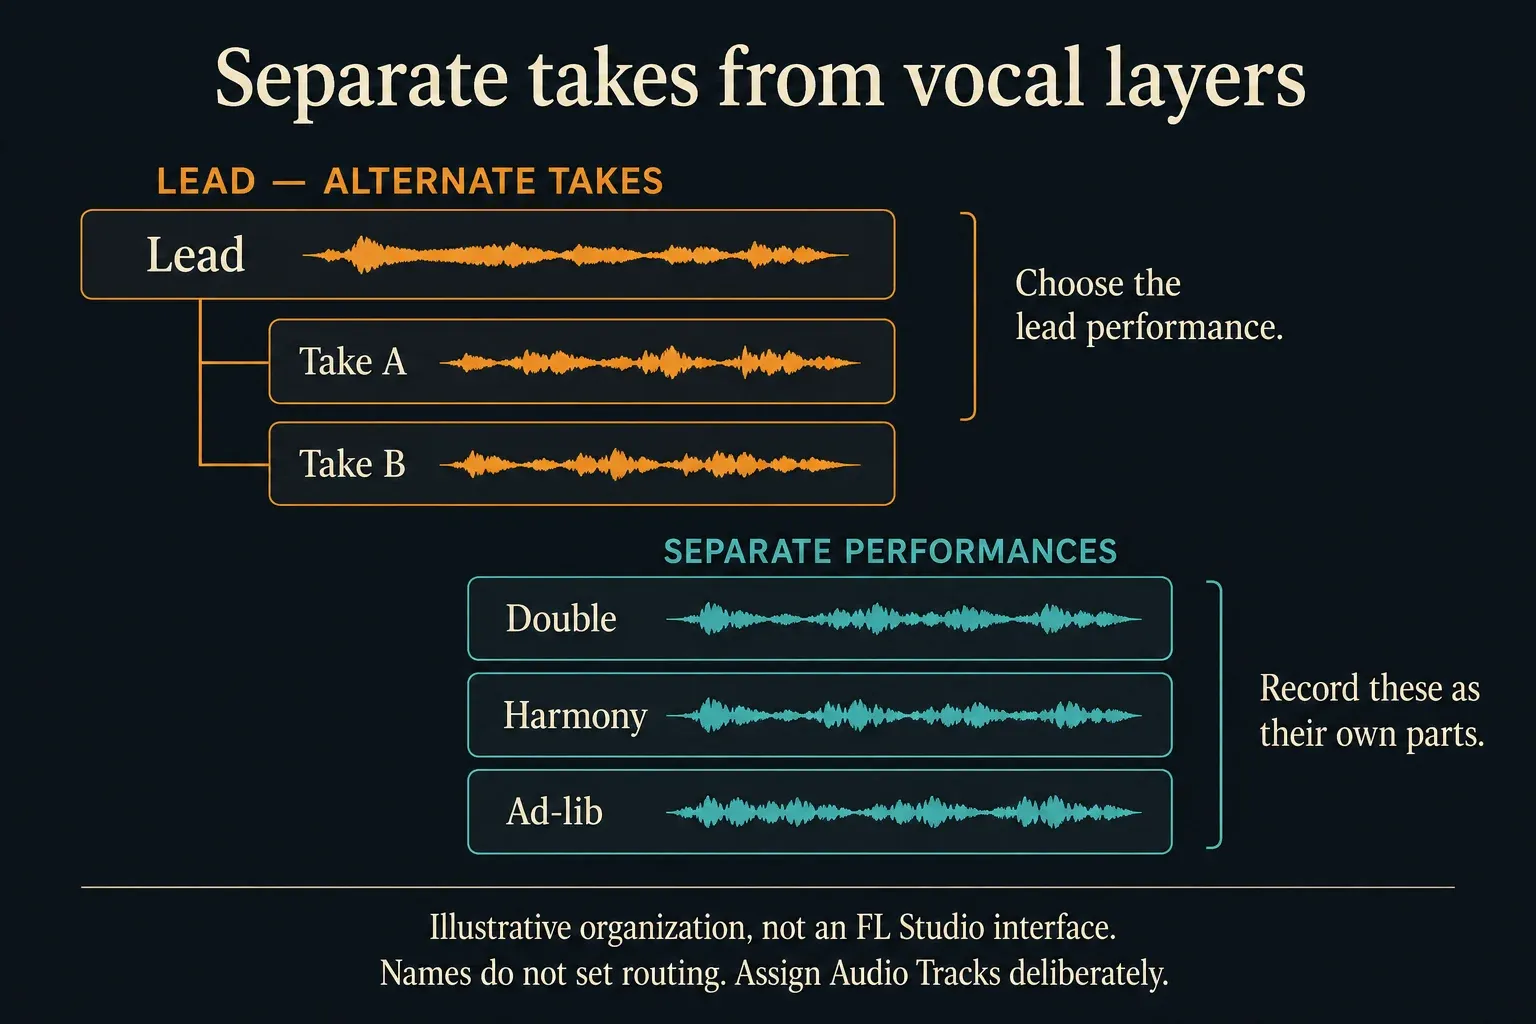
Mute an old take when the singer should not hear it during the next pass. EXT excludes internally routed previous takes from the new recording, but it does not automatically silence their playback. With loop recording, automatic muting and child-track placement depend on the recording options. The FL Studio loop-recording guide explains Loop Record, Blend Record and the Playlist/Edison choices.
Build the comp without destroying the raw performances
Choose phrases by five listening criteria
Audition at a matched listening level and compare timing, pitch, tone, diction and emotion. Loudness can make one take seem “better” even when the phrasing is weaker. Start with the pass that carries the song, then borrow only the phrases that clearly improve it.
Preserve every source before committing
Save a separate project version and preserve the recorded audio files before cutting the comp. Keep raw take lanes muted and untouched, then place copies of the chosen phrases on a comp lane. Leave room for breaths and word endings. Adjust short fades or overlaps where needed and listen across every join; do not assume that a tidy-looking cut sounds continuous. In standard Trial, saving a version still does not let you reopen it before purchase and unlock.
Fix the most common vocal-session failures
The microphone meter never moves
Stop changing vocal plugins. Check the microphone connection, the correct interface input and any power requirements in the microphone’s own instructions, then the selected audio device and operating-system permission. Also check whether the meter is displaying external input while monitoring is Off; a silent-looking meter alone is not a complete recording test. Use the linked microphone troubleshooting guide and replay a short file to confirm capture.
The singer hears a delayed double voice
First check whether direct and software monitoring are both audible. For direct monitoring, set FL Studio’s Monitor external input to Off. For software monitoring, disable the interface’s direct path and use a stable buffer. If the double remains, check delay plugins and additional monitor routes rather than repeatedly lowering the buffer.
The recorded clip is late but monitoring feels fine
Check Disk recording > Latency compensation before dragging every take. The driver’s timing information can also affect placement; Image-Line’s Playback tracking documentation explains the source options. For a repeatable remaining offset, measure a test and use the input’s Audio input delay compensation: positive values move recordings earlier, negative values later. Do not guess a global Offset from one singer’s phrasing. A variable offset calls for driver/timing diagnosis, not a fixed nudge, and none of these placement controls cures live headphone echo.
Reverb is permanently printed into the take
Check whether the pickup was after the effect slots, such as FX, rather than EXT. Then check hardware processing and whether the selected input was a wet loopback feed. Correct the source and pickup, record a new test and retake the line if you need an unprocessed vocal. Turning off a plugin during playback does not remove an effect already printed into the audio.
Hand the vocal to editing and mixing cleanly
When recording is finished, save a new project version and replay the comp from start to finish. Confirm that raw takes remain available, doubles and harmonies are labeled, and unused recording inputs are disarmed. Back up the actual recorded files as well as the project: an FLP alone does not contain those Audio Clip samples. Image-Line’s project-format documentation explains that a zipped project includes used Audio Clip and Channel Sampler samples, but not every external plugin library. Unused raw takes may need a separate file copy. In standard Trial, export the audio you need and keep essential work open until purchase and unlock; do not close merely to test a saved project.
Once the performance is clean and organized, move to the FL Studio vocal-mixing workflow for corrective EQ, compression, de-essing, ambience and level automation. For another capture task, the Recording guides connect microphone setup, MIDI and audio workflows.
Vocal recording checklist
- Quiet position, speakers muted, pop filter fitted.
- Repeatable microphone distance tested on the real delivery.
- Dedicated Mixer insert and Playlist Audio Track.
- Correct mono input, EXT pickup, Song mode, Audio filter and deliberate transport start options.
- Hardware gain tested on the loudest phrase with headroom.
- One monitoring path, comfortable headphone balance, no delayed double.
- Short diagnostic take checked for six capture problems.
- Lead, alternatives, doubles, harmonies and ad-libs kept in distinct roles.
- Raw takes preserved before comping.
- New project version and actual recorded files backed up; Trial reopening limits respected.
FAQ
Can I record vocals in FL Studio Fruity Edition?
Audio recording inside FL Studio requires Producer Edition or higher. Select a recording-capable edition when testing in Trial. The standard Trial can save and export, but saved projects cannot be reopened until purchase and unlock.
Should I record vocals into the Playlist or Edison?
Use the Playlist for full song performances, visible take lanes and a comp that stays aligned with the arrangement. Edison is useful for focused recording and its own loop-take workflow, but it is not required for an ordinary lead-vocal session.
Should vocals be recorded in mono or stereo?
For a single mono microphone input, select the mono version of that interface input rather than its stereo pair. FL Studio places the active input in both left and right Mixer channels, avoiding a one-sided vocal. A stereo microphone or a deliberate multi-microphone setup is a different recording choice.
Can the singer hear reverb while FL Studio records a dry vocal?
Yes, with software monitoring: use EXT for capture and add reverb to the monitored FL Studio Mixer path. EXT excludes that Mixer processing, but not hardware effects or a wet loopback signal already entering the input. Hardware direct monitoring with FL input monitoring Off does not include FL Studio’s reverb.
How many vocal takes should I record?
There is no useful universal number. Start with a complete performance, record alternatives with clear direction, then repair specific phrases and capture the required doubles or harmonies. Stop when another pass no longer adds a meaningfully different choice.