FL Studio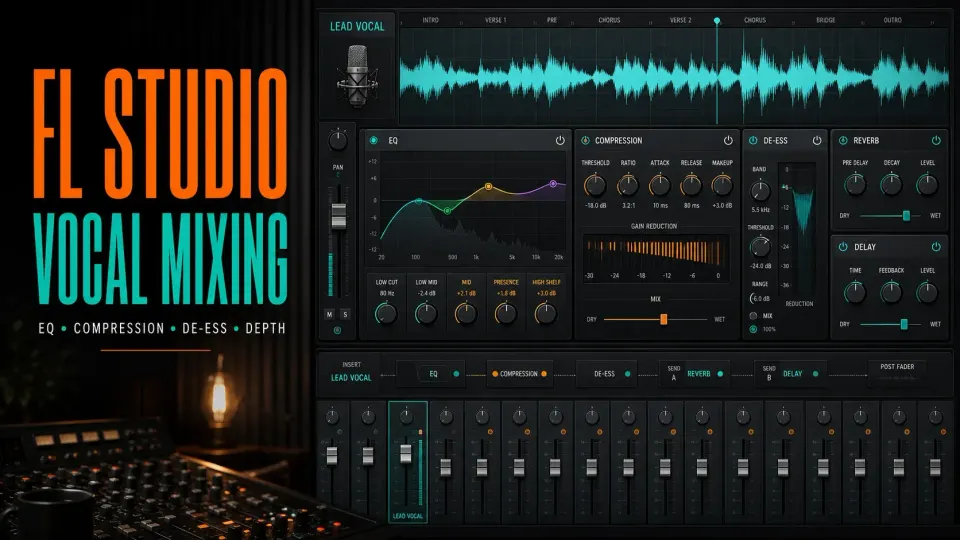
A vocal can be bright, compressed and drenched in expensive effects and still feel detached from the song. The usual culprit isn’t a missing “pro” plugin. The chain is solving the wrong job: room noise with EQ, performance jumps with a limiter, masking with yet another treble boost, or distance with more reverb.
A repeatable FL Studio vocal mix starts before the first effect slot. Edit obvious distractions, give the lead its own Mixer path, hear it against the instrumental, and name the next problem. Then use stock tools for that problem only: Parametric EQ 2 for tone, Fruity Limiter in COMP mode for control, Maximus when sibilance needs selective treatment, and dedicated reverb or delay sends for depth. The FL Studio stock plugins guide covers the wider inventory; this page sticks to the vocal decisions. A preset can save time, but it shouldn’t make the decisions for you.
This guide assumes you have an isolated vocal recording. If all you have is a finished stereo song and you need to pull the singer away from the instrumental, that’s extraction, not mixing, so start with the FL Studio stem-separation guide. Separation can give you a workable vocal stem, but it may leave bleed and artifacts; come back here once you’ve decided the extracted file is clean enough to process.
The chain cannot repair the take
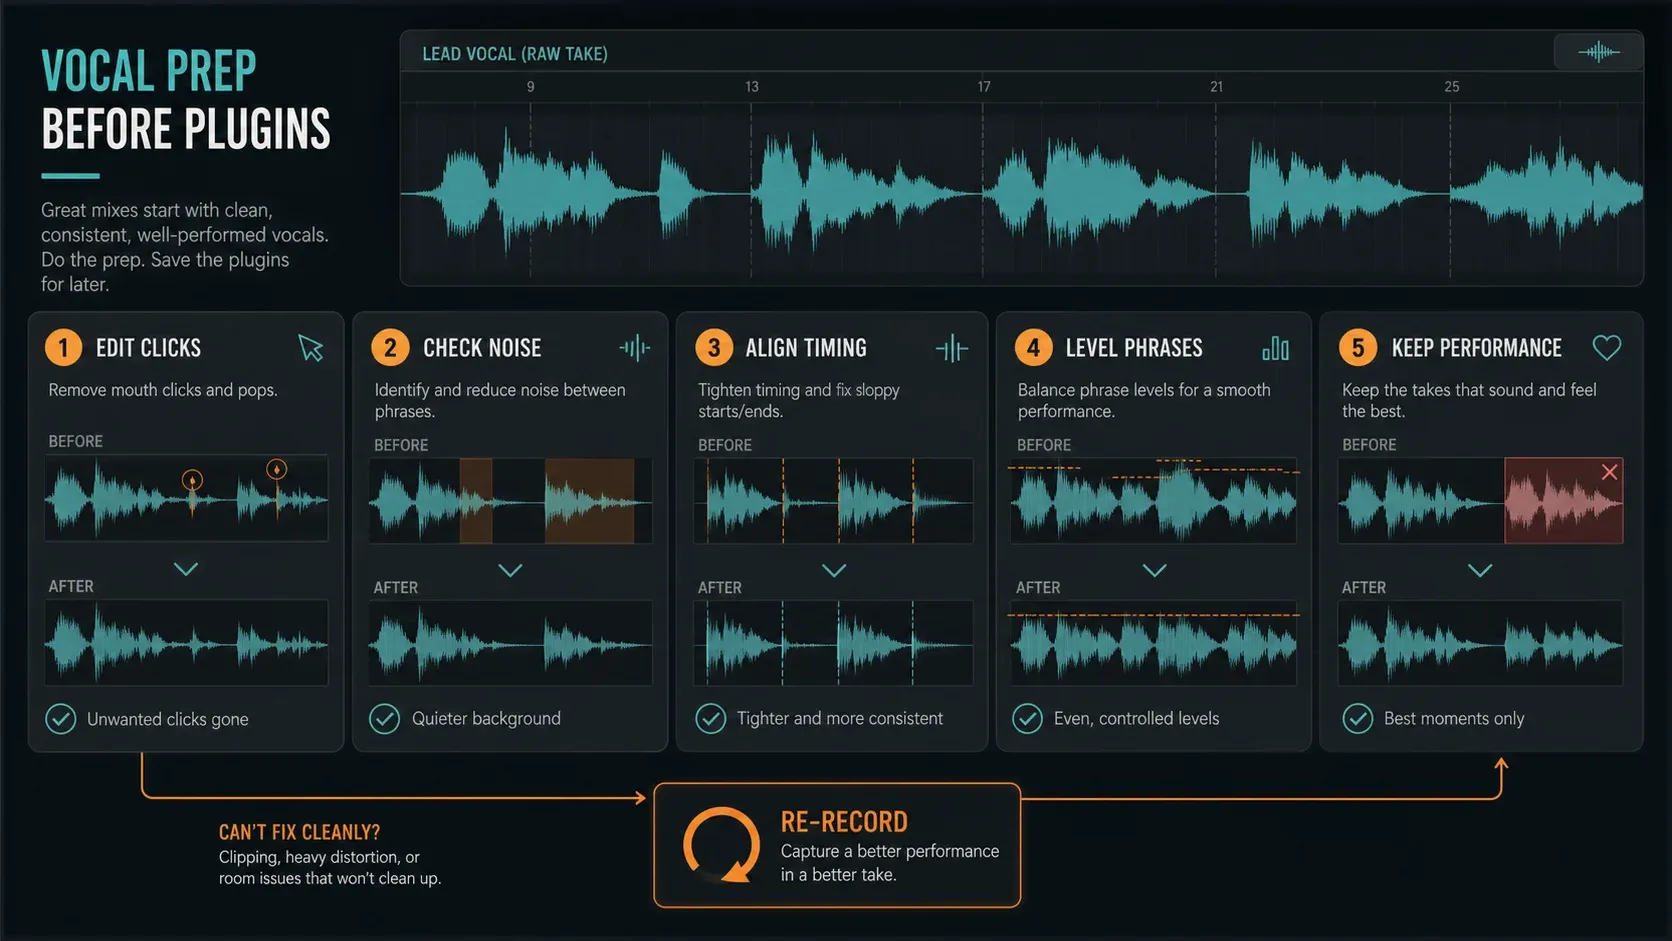
Listen to the raw vocal inside the song before you build anything. Check for clipped words, a noisy room, headphone bleed, uneven mic distance, hard edits, breaths that break up a phrase, and doubles that don’t land with the lead. Processing can reshape those problems, but it can’t turn a damaged recording into a clean performance for free. If several of them need repair, run the RX 12 vocal cleanup workflow before mixing.
Fix the obvious clip boundaries and timing first. Add short fades where edits click. Pull down a breath that steals attention instead of deleting every inhale. If one line jumps out because the singer leaned into the mic, lower that clip or automate its gain before you ask the compressor to control the whole performance around it. A little gentle prep means the later chain can move less and sound more like the singer.
Pitch work is a musical decision too, not an automatic cleanup step. A note that creates tension may be exactly what the singer meant. Correct the moments that pull attention away from the performance and leave the character alone. Monitoring delay while recording belongs in the FL Studio audio settings guide; this page starts with a take that’s already recorded.
Route the lead, doubles and effects before processing
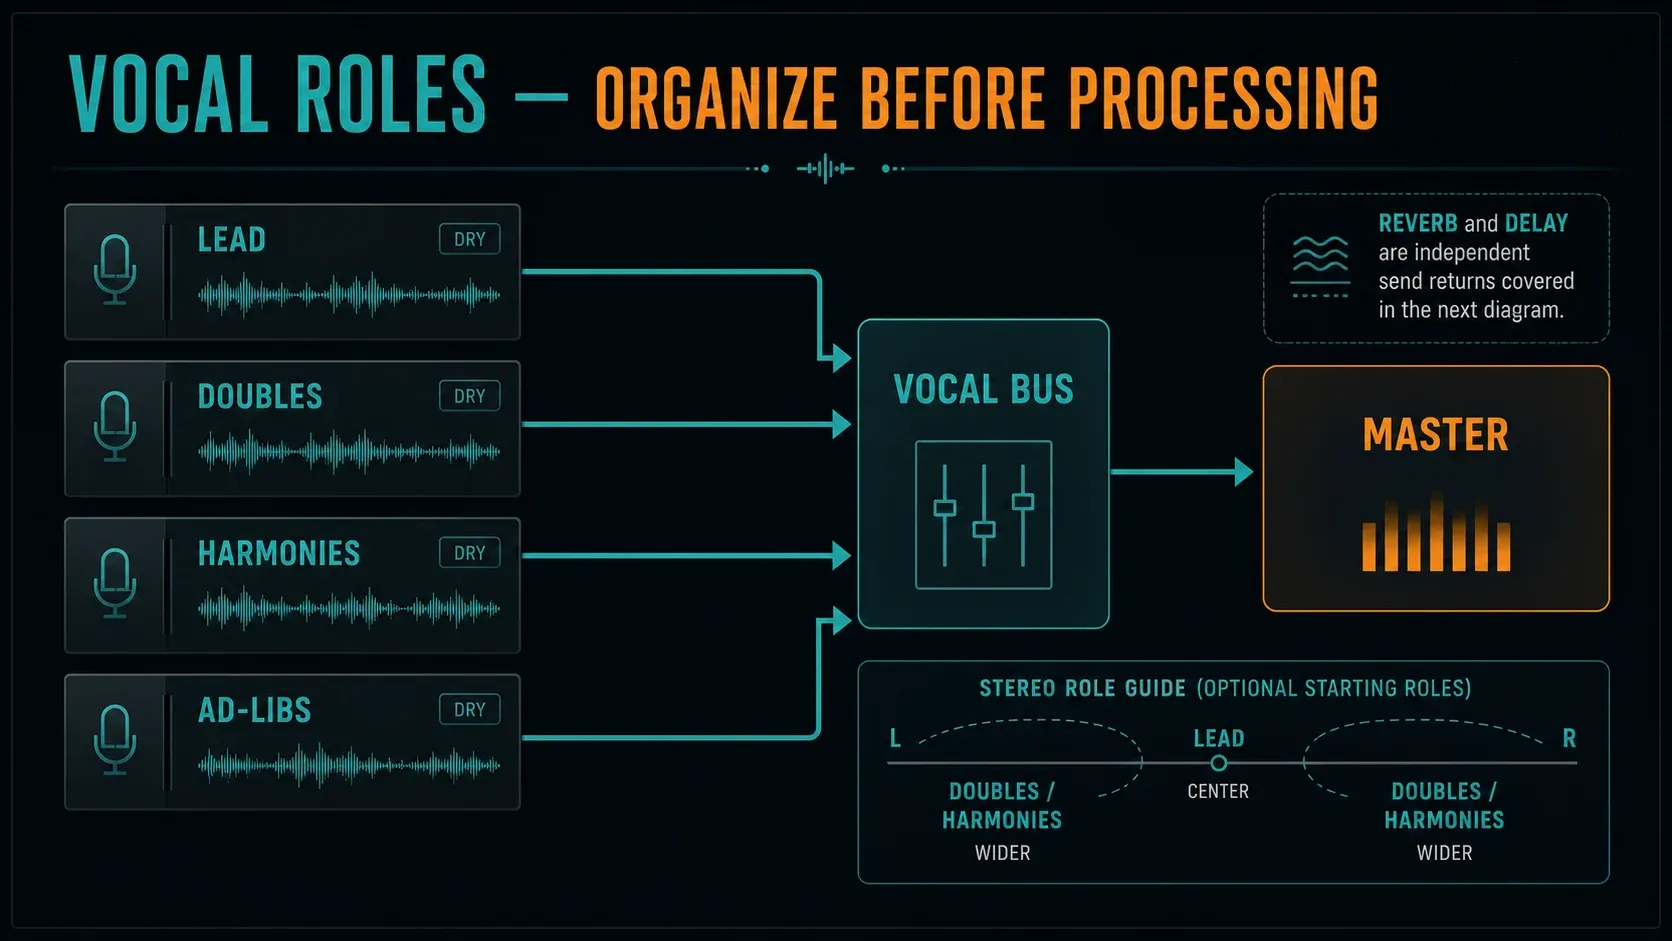
Give the lead vocal its own named Mixer insert instead of leaving it on the Master. Keep doubles, harmonies and ad-libs on separate inserts when they need different tone, width or level. Route them to a vocal bus if one shared fader and some light common processing will make the arrangement easier to control. The full FL Studio Mixer guide covers the routing underneath; here the goal is just to keep each vocal role visible.
| Path | Main job | What should remain independent |
|---|---|---|
| Lead vocal | Intelligibility and emotional focus | Phrase rides, corrective edits, lead-specific tone |
| Doubles and harmonies | Width, weight and arrangement support | Timing, darker tone, lower level, stereo placement |
| Ad-libs | Contrast and movement | Special effects and word-specific automation |
| Vocal bus | One place for overall balance | Only broad changes that help every routed vocal |
| Reverb and delay sends | Shared depth and echoes | Fully wet return tone and separate automation |
Watch for accidental double routes. If a track feeds both the vocal bus and the Master directly, it can get louder than you expect and partly bypass the bus processing. Solo the lead, then use FL Studio’s alternate solo behavior when you need to hear its routed bus and sends together.
A stock vocal chain at a glance
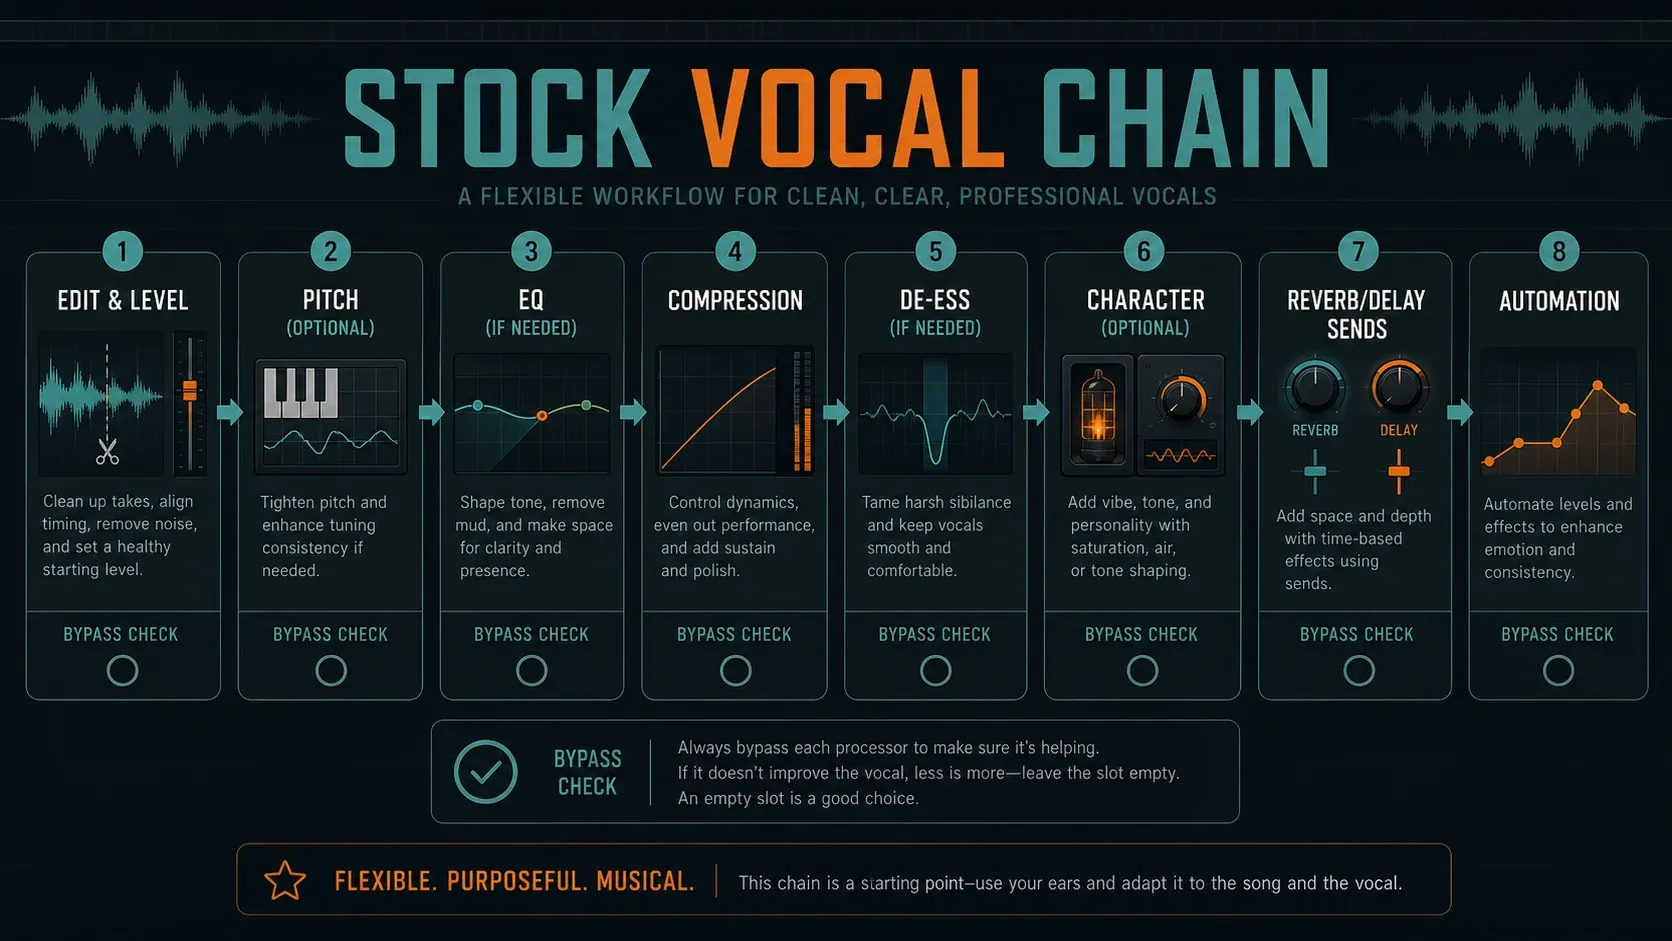
There’s no universal order that survives every recording, but this sequence keeps causes and fixes easy to hear. An empty slot doesn’t mean the mix is unfinished.
| Stage | Question | Possible stock tool |
|---|---|---|
| Edit and level | Are noises, timing or phrase jumps driving later processors? | Playlist edits, clip gain, automation |
| Pitch | Does tuning distract, or is an audible effect intended? | NewTone or Pitcher where available |
| Corrective tone | What resonance or buildup hurts in the song? | Fruity Parametric EQ 2 |
| Dynamics | Which words disappear or jump forward? | Fruity Limiter in COMP mode |
| Sibilance | Do only “s,” “t” or “sh” sounds bite? | Maximus de-essing or manual gain |
| Character | Does the vocal need density, edge or contrast? | Optional saturation or parallel path |
| Depth | Should the vocal feel closer, farther or wider? | Fruity Reeverb 2 and Fruity Delay 3 sends |
| Final rides | Which phrases still miss their intended place? | Volume and send automation |
After each stage, match the processed level closely to bypass. The louder version always wins an unfair comparison. If a fix only sounds impressive because it added gain, take that gain away and listen again.
Correct pitch and timing before shaping tone
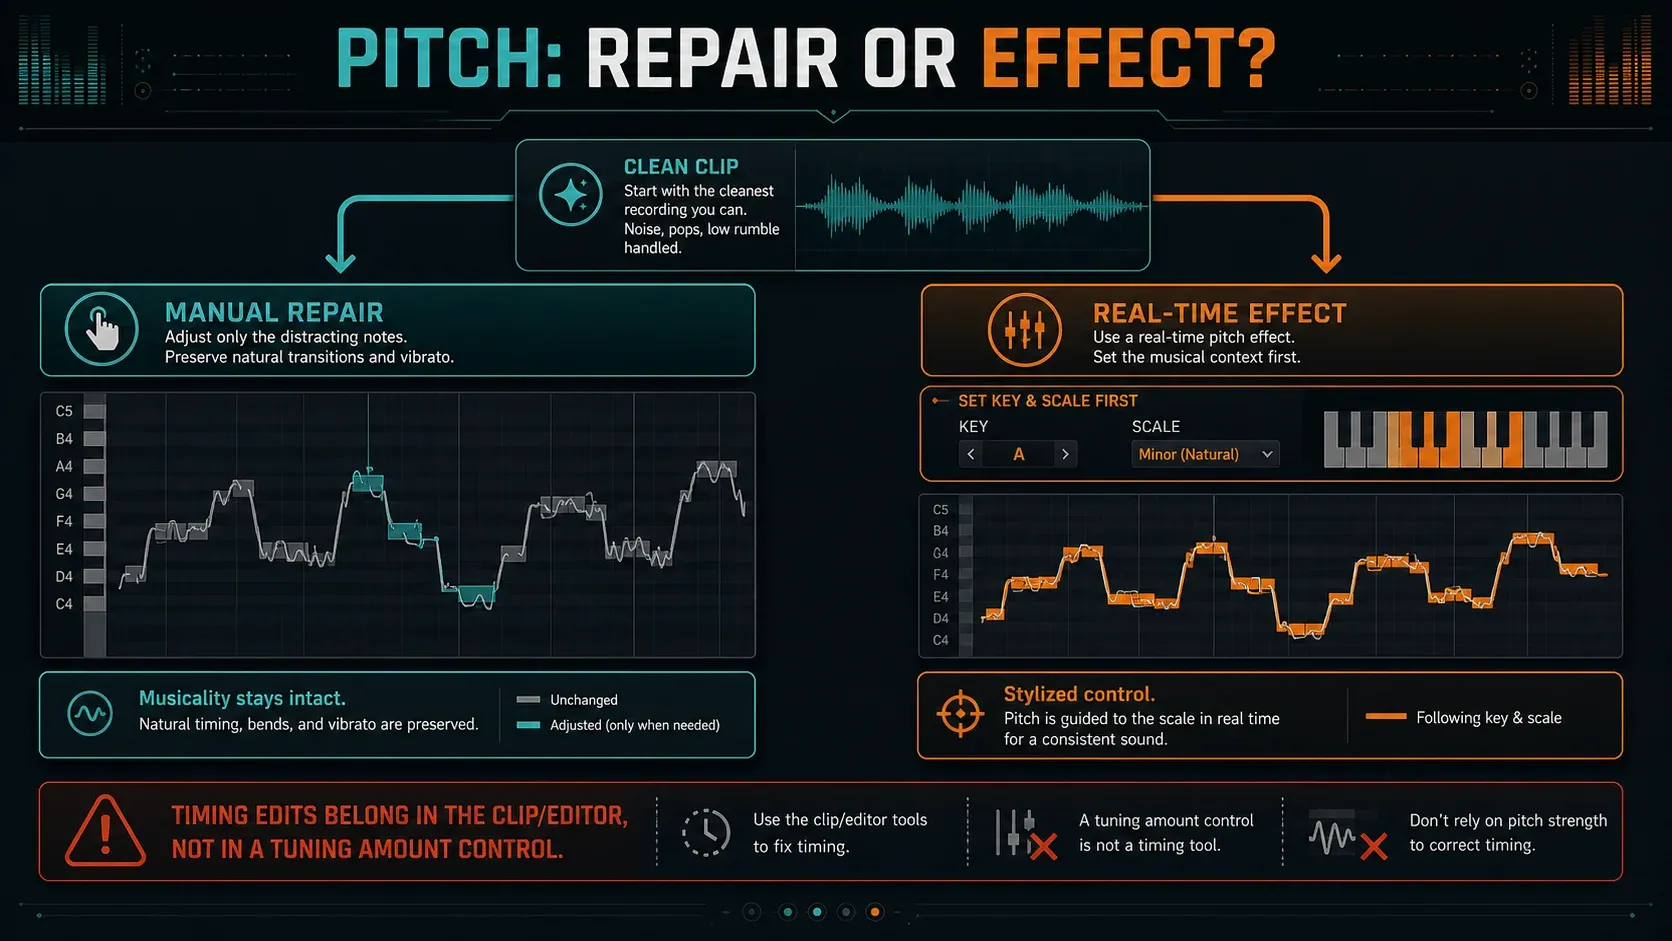
NewTone is an offline pitch-correction and time-manipulation editor. It suits note-by-note repair when you want to see the detected pitch, keep some natural movement and choose what changes. Pitcher is the related real-time route when the tuning sound is part of the performance or fast feedback matters. Set the correct key and allowed notes before judging either one.
Clean the clip first so noise, breaths and rough edit edges don’t confuse the detector. Then decide what you want from it: repair or an effect. Transparent correction usually keeps transitions and variation. An obvious modern tuning sound may tighten both on purpose. Neither is “more professional”; the arrangement decides.
Don’t reach for pitch correction to fix a double that lands late or a consonant that starts ahead of the lead. Align the musical event in the Playlist or NewTone, then listen for phasey or chorus-like interactions. Cloning every waveform perfectly can make a stack sound smaller instead of tighter.
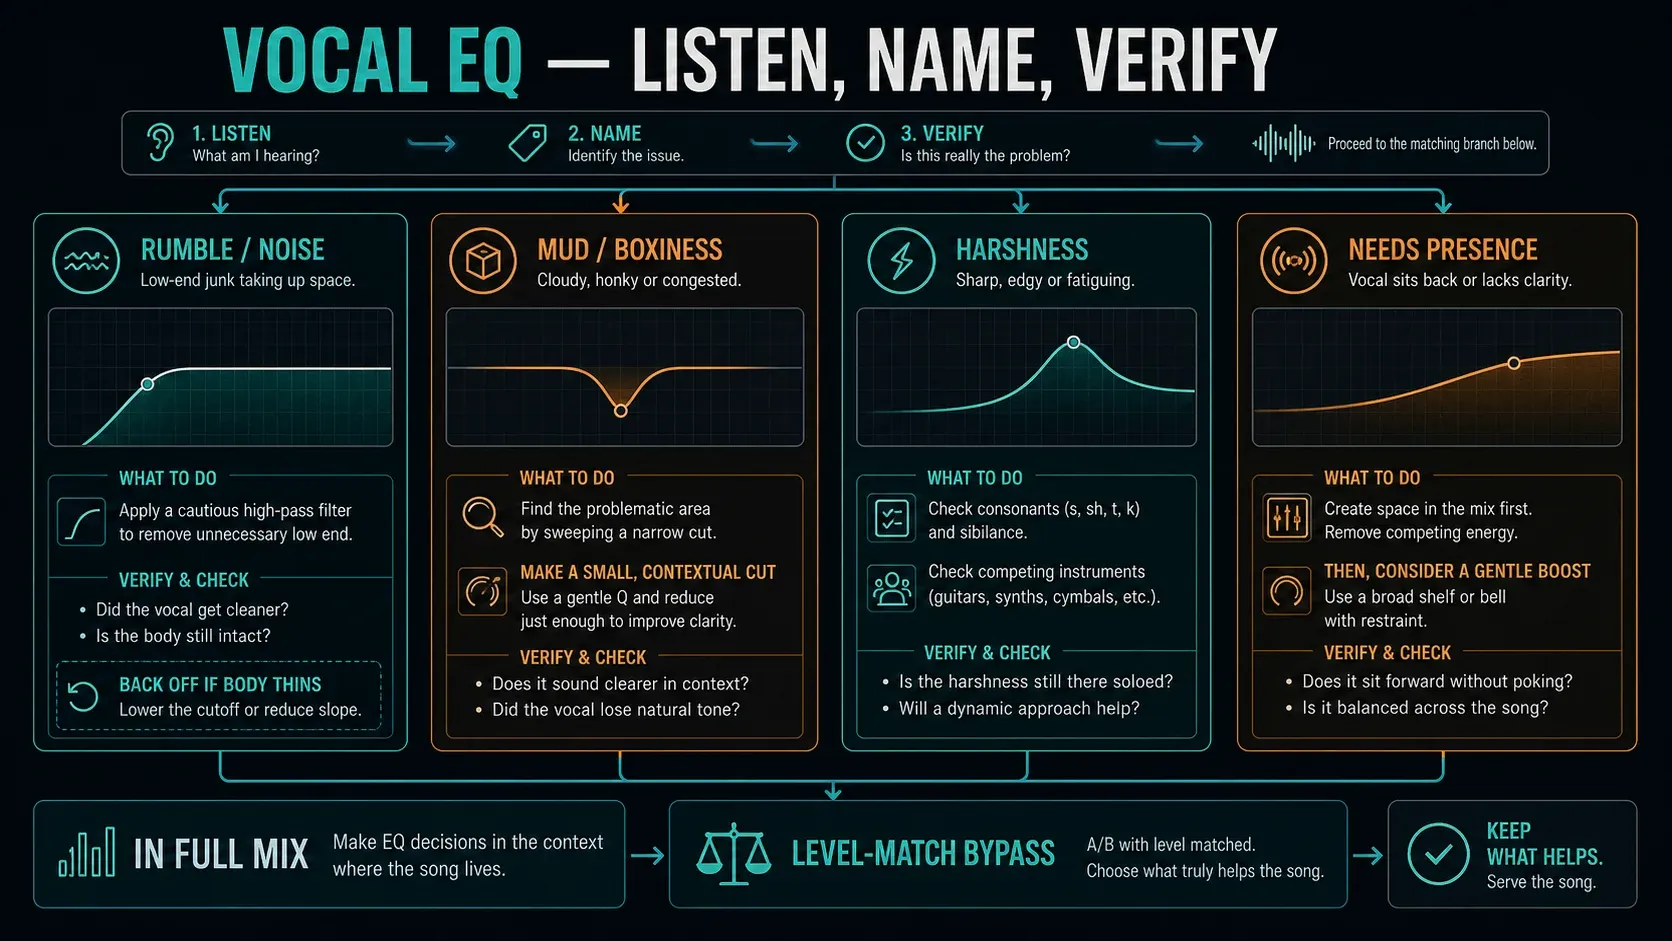
Use EQ to solve a heard problem, not copy a curve
Fruity Parametric EQ 2 offers high-pass, shelf, peaking, notch and other filter shapes. All that flexibility still isn’t a reason to draw the familiar “vocal EQ” curve before you’ve listened.
Start with the whole mix playing. If low rumble or handling noise sits below the useful voice, move a high-pass filter up until the distraction clears, then ease it back down if the body starts to thin. There’s no universal 80 or 100 Hz cutoff: a low male note, close-mic warmth and an empty arrangement each ask something different.
For mud, boxiness or harshness, sweep a moderate bell just long enough to find the area, return the gain to zero, and make the smallest cut that helps in context. A narrow resonance can look dramatic in solo and be harmless in the song. If the vocal needs large boosts over and over to speak, make room in the competing instrument before you turn the voice into a different singer.
EQing tone after compression is fine when the dynamics reveal a new balance. So is doing one broad EQ pass and stopping there. What matters is knowing which stage caused the change.
Compress for consistency without flattening the sentence
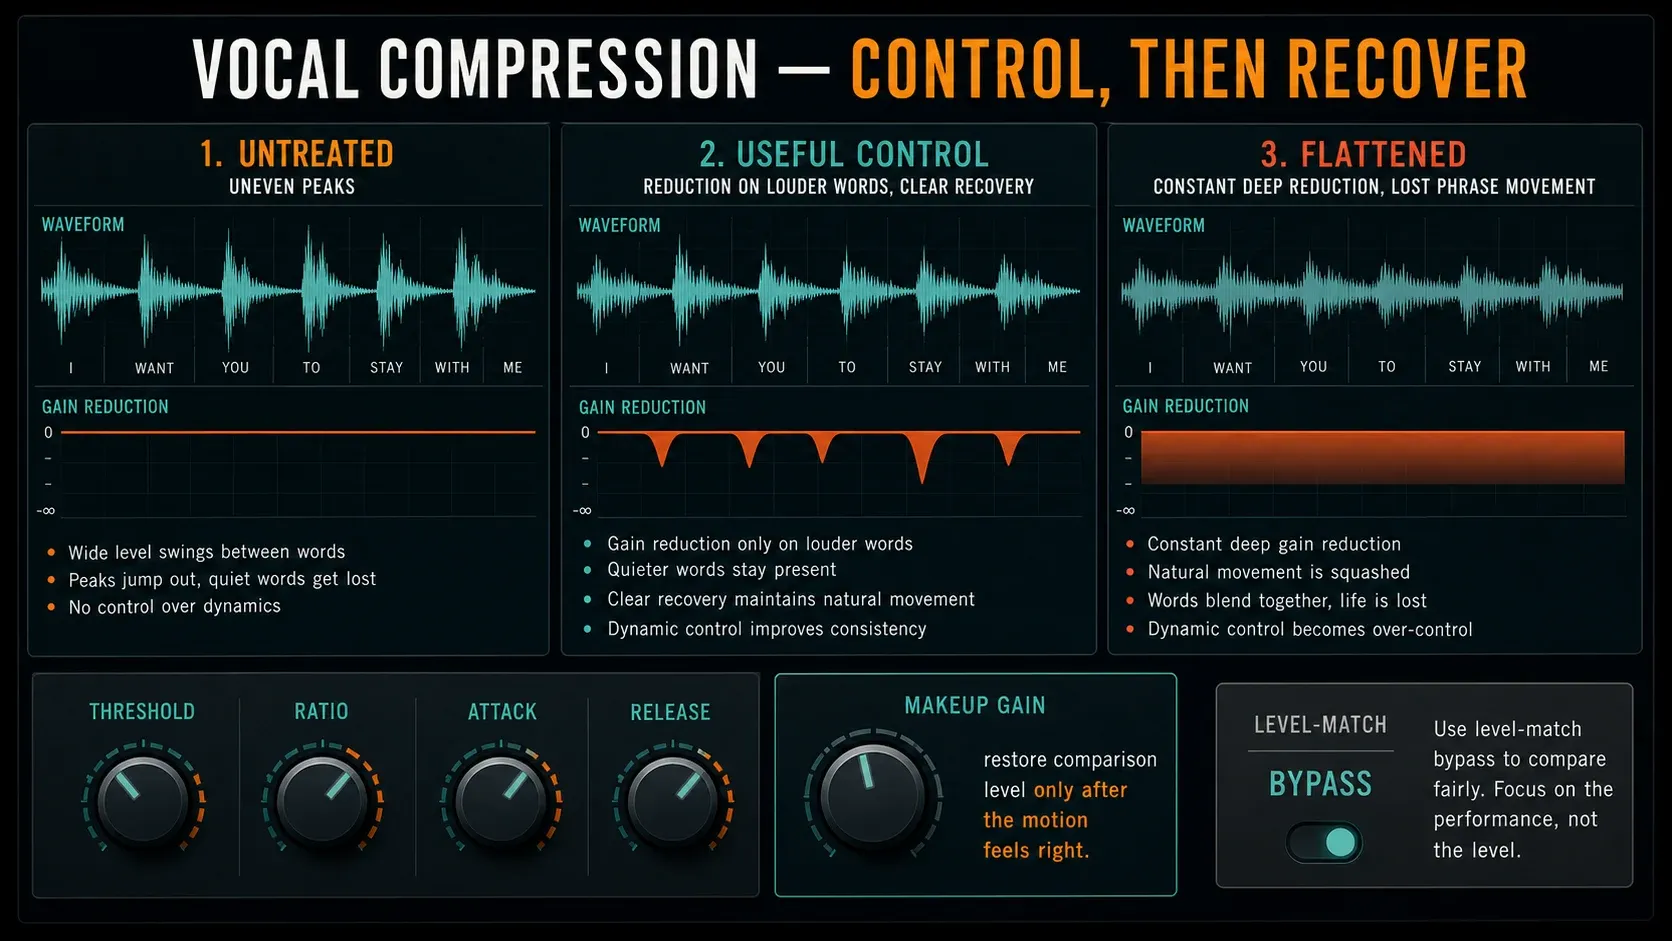
Fruity Limiter becomes a single-band vocal compressor on the COMP tab. Lower Threshold until the louder words enter gain reduction, raise Ratio enough to control the jump, then shape Attack and Release while listening to consonants and phrase recovery. The threshold number alone means little because the recorded level determines when compression begins.
Attack decides how much of each word’s front edge survives. Too fast can make the lead feel small or lispy; too slow lets sharp peaks jump out. Release decides how the level comes back. If it never recovers, the next phrase stays pinned down. If it lets go too quickly, the level can chatter or distort. Watch the display, but let the sentence tell you whether the movement feels natural.
Use makeup gain only once the motion feels right, then level-match against bypass. If a few quiet words are still buried, ride those words instead of lowering the threshold until every breath jumps to the front. One compressor can do a lot; two lighter stages are an option, not a badge of seriousness.
De-ess the consonants without removing the air
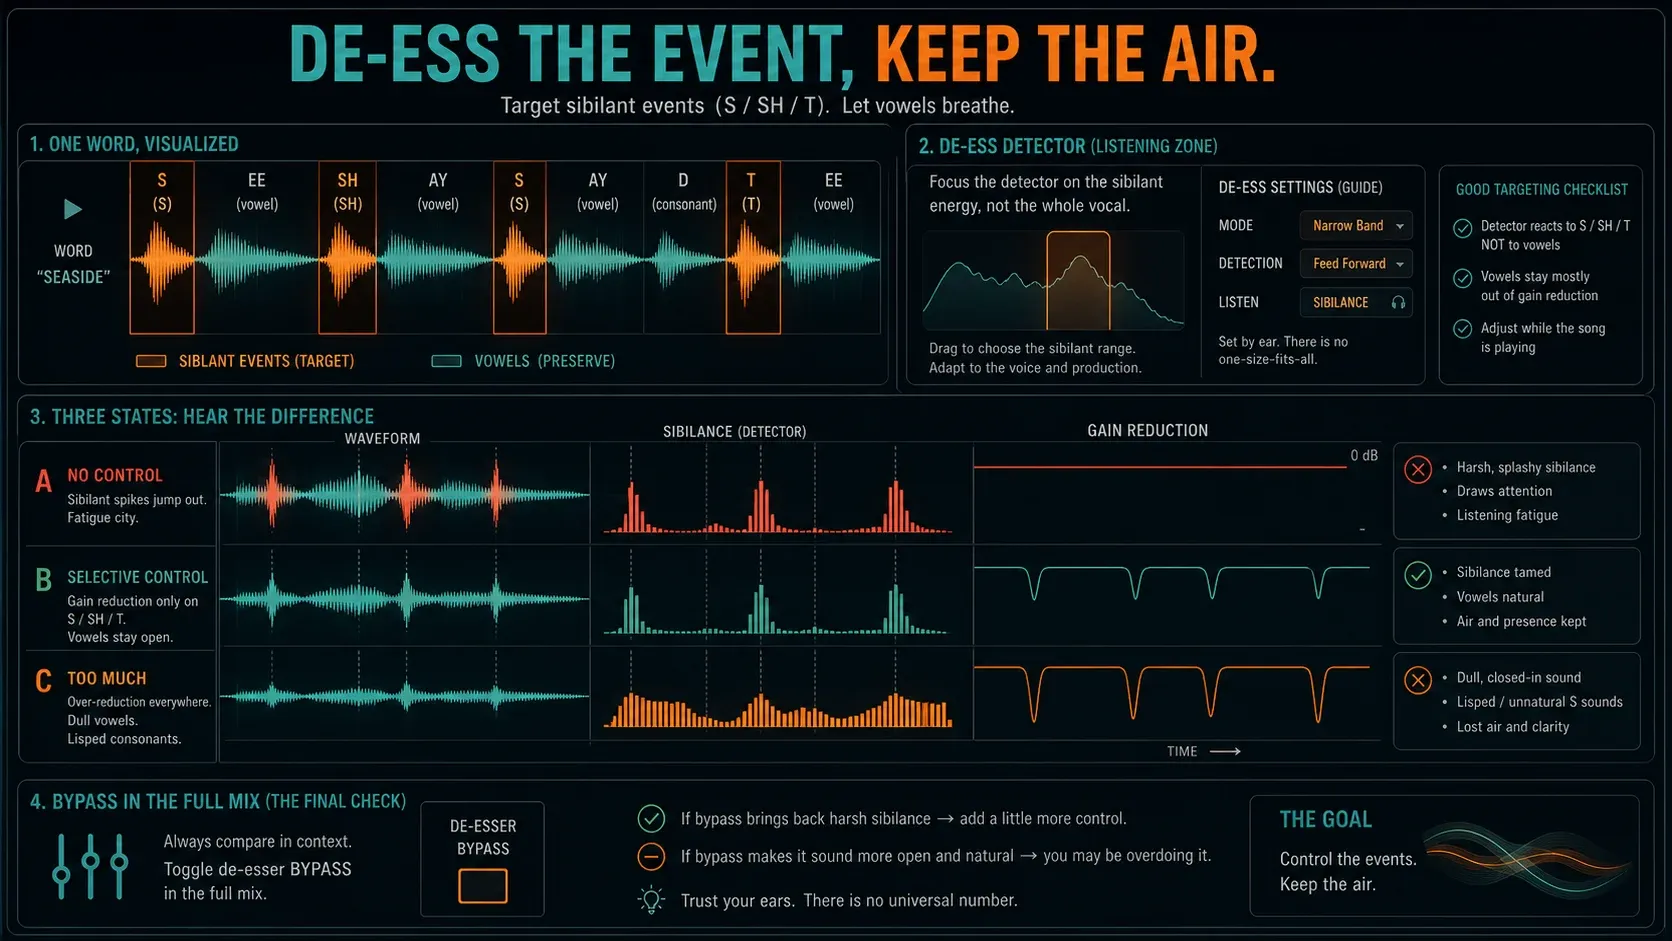
Sibilance is an event, not the whole top end of the voice. A permanent treble cut can dull every vowel while the harshest “s” still slips through. The current Image-Line Maximus tutorial treats de-essing as selective compression of the troublesome high frequencies, applied only when they go past an acceptable level.
Find the actual consonants in this recording. Set the band or detector so gain reduction wakes up on those moments, not on the singer’s whole presence range. Then compare the word in the mix. If “see” turns into “thee,” the cure costs too much. Maximus is included in Producer Edition and up; the FL Studio editions comparison covers the purchase details. Manual clip gain on a handful of sharp consonants remains a precise alternative. The FL Studio de-essing guide covers the detailed Maximus and manual-gain setups.
Make the vocal sit by changing relationships
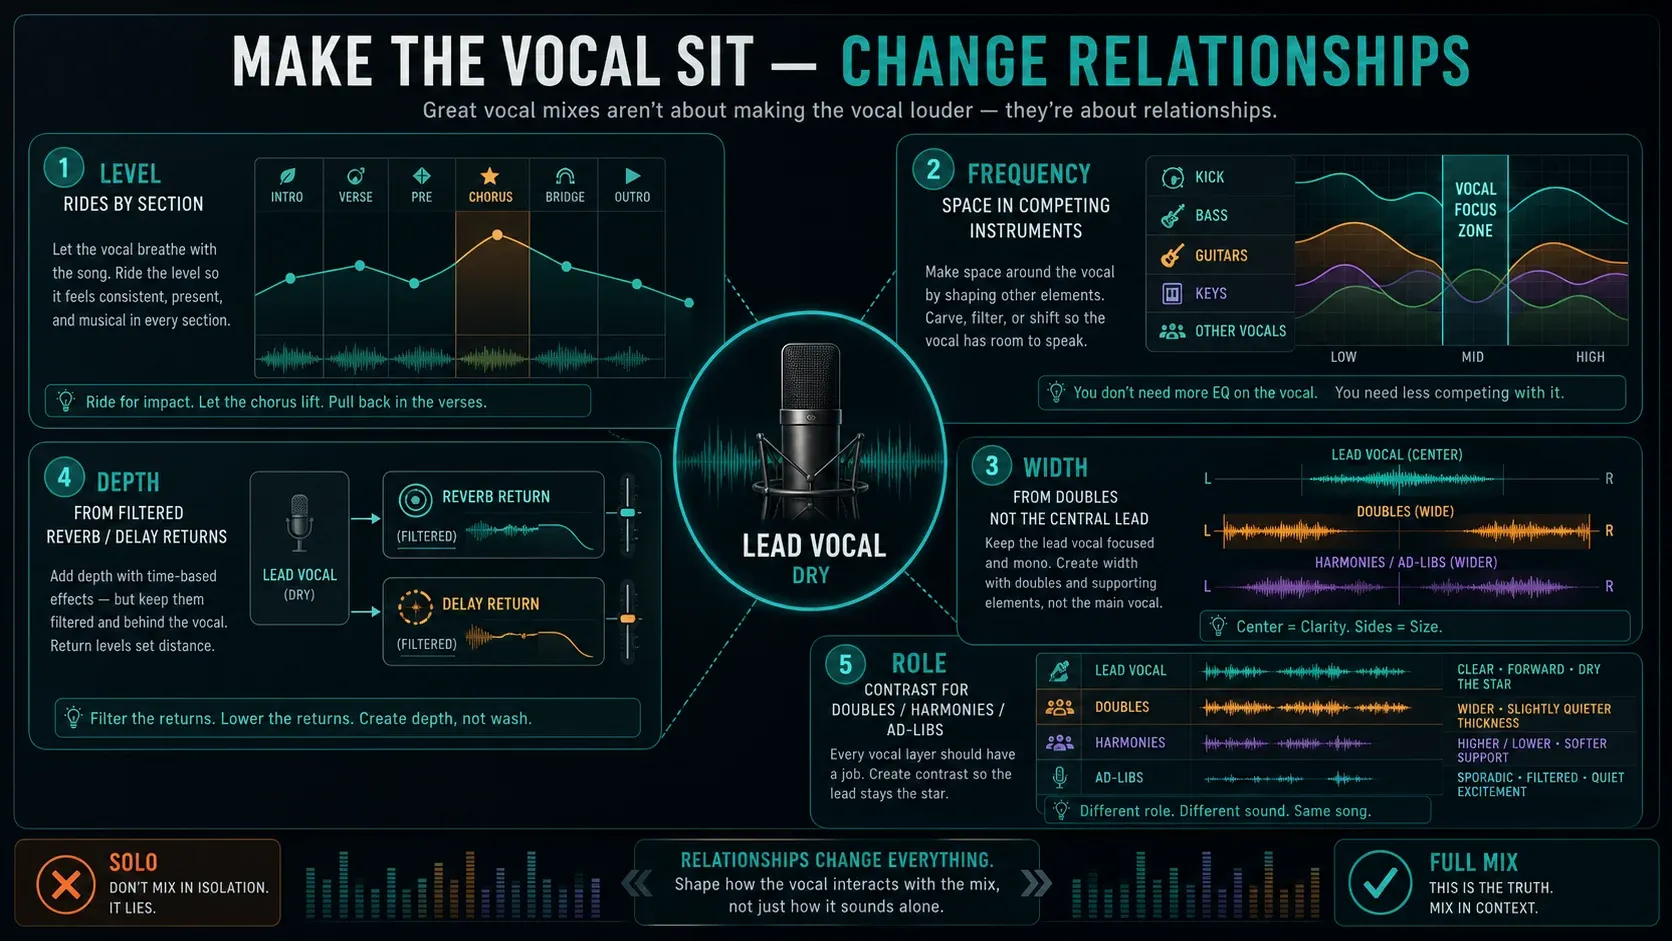
A lead that disappears isn’t automatically too quiet. Check whether the instrumental fills the same midrange, whether a long reverb masks the next word, whether doubles fight the lead, and whether the problem happens in one section or all of them. Solo hides every one of those relationships.
Start with the lead fader. Then try the smallest move between parts: lower a competing instrument, shorten or filter the vocal effect return, darken a double, narrow the support parts, or ride the lead up into a dense chorus. The center lead usually stays steadier when width comes from doubles and effects instead of widening the dry vocal itself.
Rap vocals often need clear consonants and close front-to-back placement, but “rap” does not prescribe a ratio or EQ curve. Pop harmonies may be deliberately smoother and darker. Organize by role, not by a genre preset name. A sparse verse and a shouted hook may need different automation, and the FL Studio automation guide covers phrase rides, send moves and clip editing without turning this chain into a general automation tutorial.
If you want the instrumental to step back only when the lead comes in, the FL Studio sidechain guide covers detector routing and how to pick a method. Try plain balance and arrangement first; ducking can’t stand in for a readable mix.
Build reverb and delay returns that leave the words intact
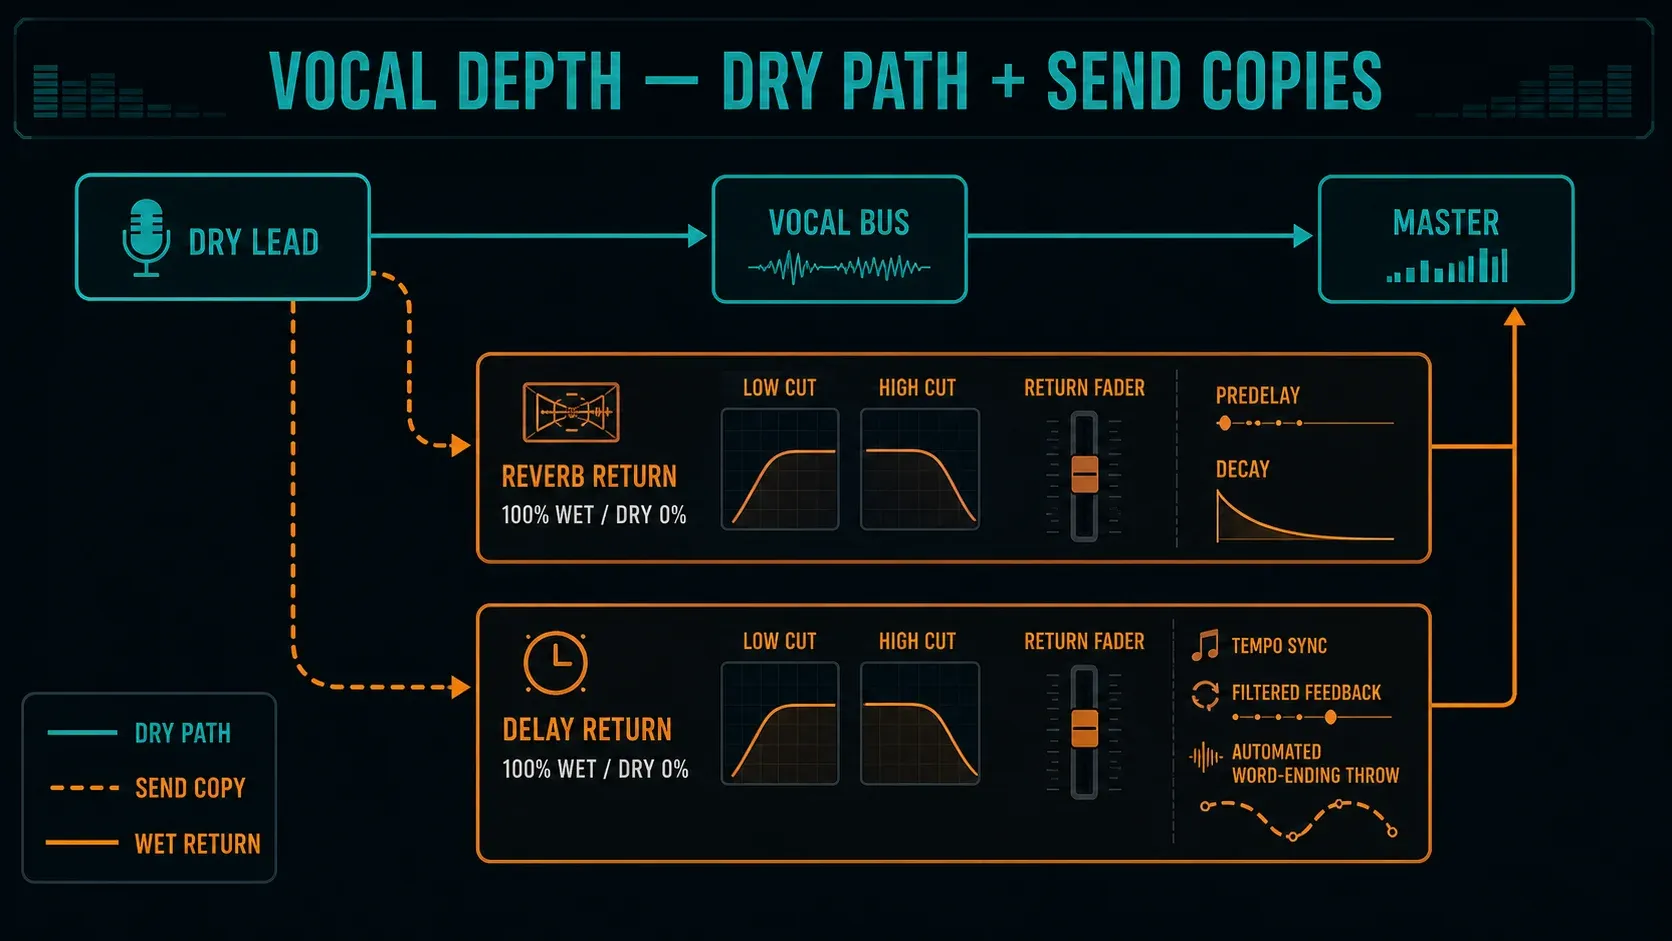
A send keeps the dry lead on its own track and gives the effect its own fader, EQ and automation lane. On a Fruity Reeverb 2 send, Image-Line’s current manual specifies Dry at 0% and Wet at 100%, and you set the amount with the send level. Use low cut, high cut, predelay and decay to keep the return out of the way, instead of picking a room name and calling it done.
Fruity Reeverb 2 can wash out a busy mix in no time. Shorten the decay, filter out low buildup, or add enough predelay that the dry consonant arrives before the tail. A quiet return that you only notice when it’s muted can still be doing exactly the right job.
Fruity Delay 3 can tempo-sync, filter its echoes and automate its wet input. That makes delay throws on word endings much cleaner than running obvious repeats under every line. Keep feedback well short of runaway, filter the return around the lead, and automate the send or wet input only where the arrangement has room.
Load a vocal preset as a state, then make it earn its place
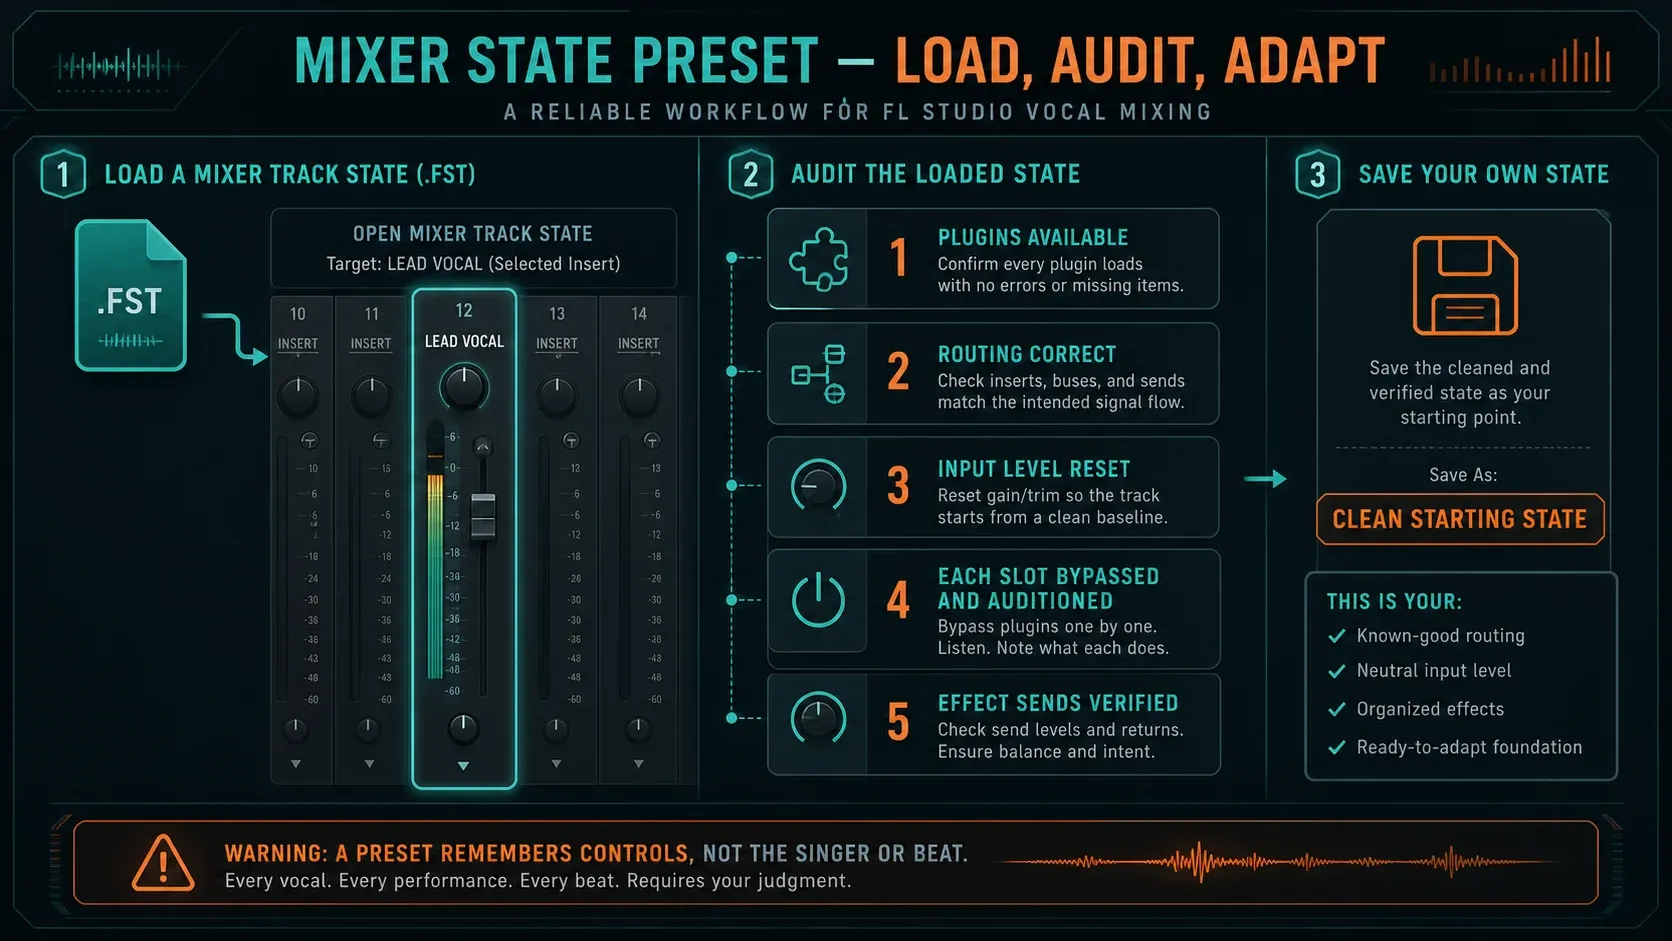
When people ask “how to add a vocal preset to the Mixer in FL Studio,” they usually mean a Mixer track state. Select the destination vocal insert, open the Mixer menu, and use the documented File → Open mixer track state. You can also use Browse states from the same menu. FL Studio state files use the .fst format.
To save your own working chain, select the vocal insert and choose File → Save mixer track state. Image-Line notes that the state includes the track settings and plugin filters. Give it a useful name such as “Lead vocal (clean starting state),” not “Perfect Vocal.” A state can also duplicate the selected track’s FX chain, so check routing, fader position, pan, plugin availability and gain after loading.
Downloaded states can depend on third-party plugins you don’t own, a different FL Studio version, or files stored somewhere else. Missing processors don’t turn the remaining settings into a safe mix. Bypass each slot, check its input level, and rebuild any stage you can’t explain. A preset remembers controls. It has never heard your singer, your microphone or your beat.
| After loading | Question to answer | Common correction |
|---|---|---|
| Routing | Is the vocal feeding the intended bus and Master only once? | Remove accidental parallel or direct paths |
| Input level | Are thresholds reacting to this recording? | Reset gain and thresholds before judging tone |
| Plugin list | Are any processors missing or bypassed? | Replace by job, not brand name |
| Space | Is reverb or delay inserted with unwanted dry signal? | Move to a send or set the mix intentionally |
| Context | Does it help with the instrumental playing? | Delete stages that only impress in solo |
Frequently asked questions
What is a good FL Studio vocal chain order?
Start with editing and clip level, then optional pitch correction, corrective EQ, compression, selective de-essing, optional character, reverb or delay sends, and final automation. Change the order when the recording gives you a clear reason, and leave stages empty when they solve nothing.
Can I mix vocals with only FL Studio stock plugins?
Yes. Parametric EQ 2, Fruity Limiter, Maximus where available, Fruity Reeverb 2, Fruity Delay 3, NewTone or Pitcher where available, plus FL Studio routing and automation cover the core jobs. Third-party plugins can change workflow or color, but they are not a requirement for a controlled vocal mix.
Where should autotune go in an FL Studio vocal chain?
Place pitch correction after the clip is clean enough for reliable detection and before processing that heavily changes pitch cues or adds ambience. NewTone suits selective offline repair; Pitcher suits real-time correction or an audible tuning effect. The intended sound matters more than a fixed slot number.
What compression settings should I use for vocals in FL Studio?
Set Threshold so the intended louder words trigger reduction, choose Ratio for the amount of control, and tune Attack and Release so consonants survive and the gain recovers naturally. There is no universal threshold, ratio or release because performance level and phrasing change the detector behavior.
Why do my vocals sound muddy or thin after mixing?
Mud can come from the recording, overlapping instruments or long effect returns; thinness often follows an excessive high-pass filter, deep broad cuts or fast heavy compression. Bypass stages one at a time in the full mix and fix the first processor that removes more identity than it adds clarity.
How do I add a vocal preset to the FL Studio Mixer?
Select the destination Mixer insert, open the Mixer menu, choose File → Open mixer track state, and load the compatible .fst file; Browse states is another route. Then verify plugin availability, routing, gain, fader position and every active effect before using the state.
Can I mix vocals over a mastered two-track beat?
Yes, but the stereo beat gives you less control over masking and dynamics than separate stems. Leave enough level for the vocal, make small contextual changes, and avoid forcing the voice through extreme processing to fight an already loud instrumental. Whole-song finalization belongs in the FL Studio mastering stage after the vocal balance works.