FL Studio
A vocal feels boxed in, or a bass loses its weight after a high-pass. Before adding another band, decide what you actually want to change. Fruity Parametric EQ 2 gives you seven adjustable filters, a spectrum display and several comparison tools; the useful skill is choosing the right control for one audible problem.
Start with the EQ on the intended Mixer track, choose a filter shape, adjust its frequency and width, then compare at a similar perceived loudness in the song. You do not need a dramatic curve or an EQ on every instrument. This guide covers the current controls documented by Image-Line, including Band Solo, HQ+ and Linear Phase—not a preset that claims to fit every recording.
Use Fruity Parametric EQ 2 in eight steps
- Pick a useful passage. Loop the part where the problem is audible, with the instruments that interact with it playing.
- Load the EQ on the right track. Open a free Mixer effect slot, choose Select and load Fruity Parametric EQ 2. Confirm that the intended source feeds this track.
- Save the starting point. Save the project before replacing settings; use the EQ's Compare down-arrow to keep a spare bank for comparison.
- Name one job. Decide whether you need less rumble, a smaller resonance, a tonal change or space between competing parts.
- Choose the shape. Right-click a band token and choose its Type. A peaking band, shelf and high-pass are different solutions.
- Set frequency and shape by ear. Move the token horizontally for frequency; adjust BW or the filter's Order as appropriate. Change gain only on shapes that have a gain control.
- Make a fair comparison. Use Compare for two settings, or the effect-slot disable switch for processed versus unprocessed sound. Adjust Main Level as needed to bring perceived loudness close.
- Keep only a useful change. Listen in the arrangement, check later processors and the Master, and reduce or remove the move if it weakens the source.
If the plugin is missing from the short list, the effect-slot menu also offers More to open the plugin selector. For routing a source before adding effects, follow the Mixer routing tutorial. Do not replace an occupied slot just to load an EQ.
Find frequency, bandwidth and gain
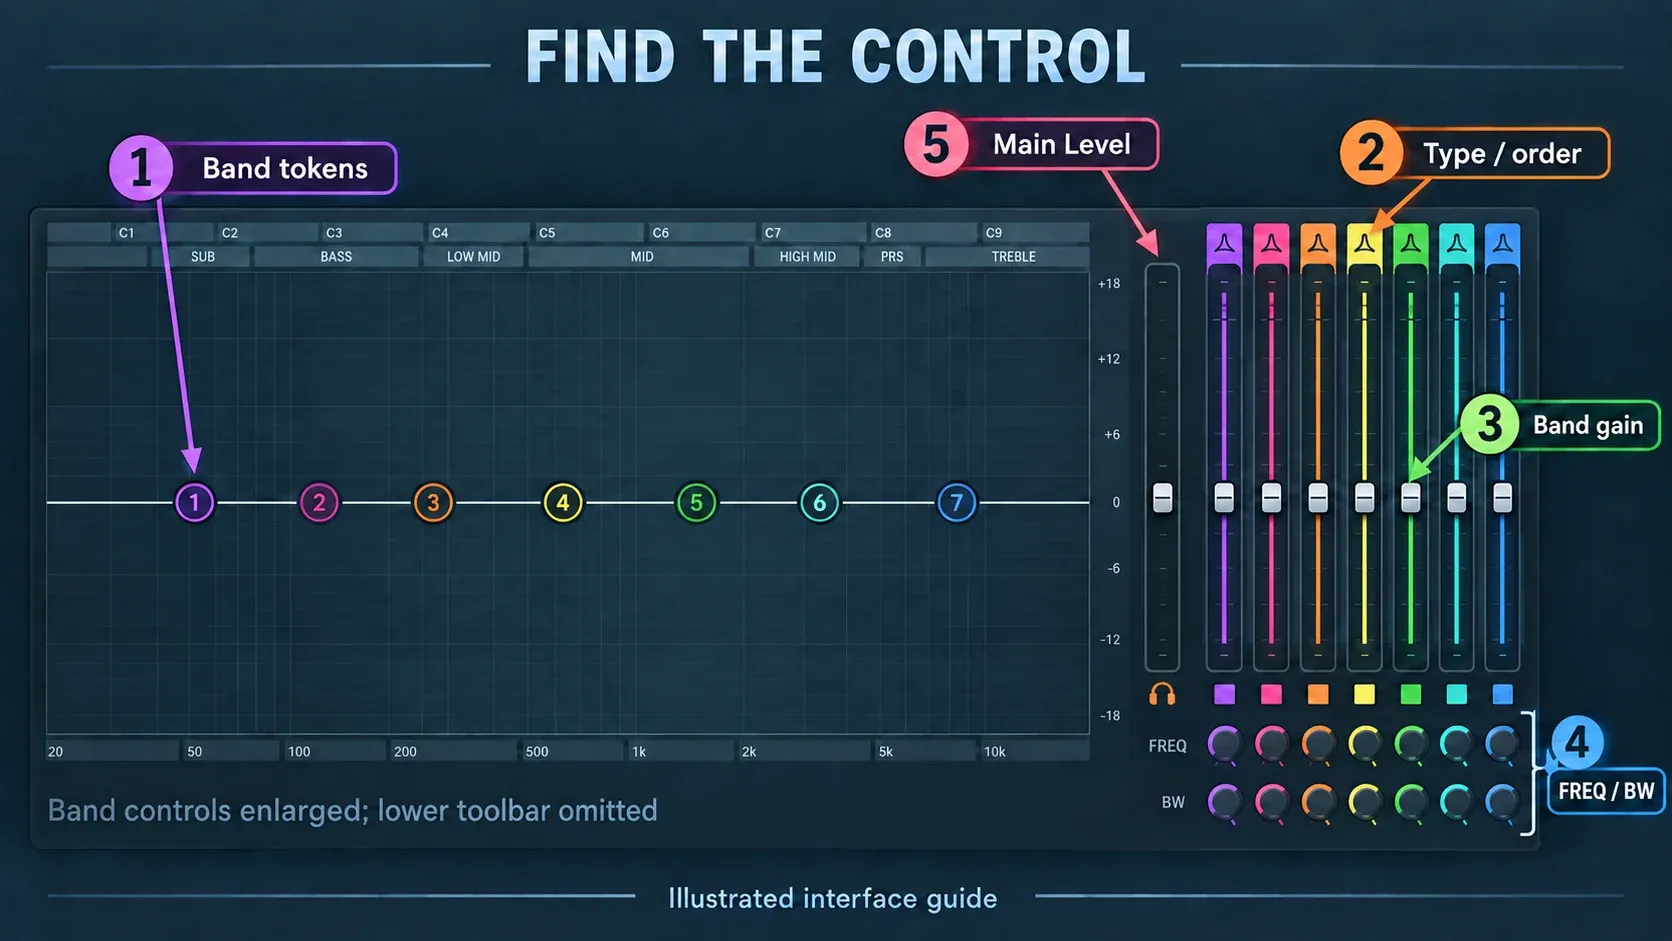
The current EQ2 control reference distinguishes the numbered graph tokens from the controls on the right. Drag a token left or right to move its frequency. With a peaking or shelf band, vertical movement changes gain. The colored vertical faders provide another way to adjust that same band gain.
The FREQ knobs set frequency; BW sets bandwidth. Hover over a token and turn the mouse wheel to change its width, or use its BW knob. Ctrl-click permits finer adjustment, and Alt-click a band resets it. Save a useful setting before resetting it. Right-click a token for Type and Order choices; the shapes and dots above the faders are another way to choose type and slope.
Main Level is the separate global gain control, not an eighth EQ band. It changes the plugin's overall output. A disabled gain fader is normal for Low Pass, High Pass, Band Pass and Notch: those types do not use band gain.
Choose a filter for the problem
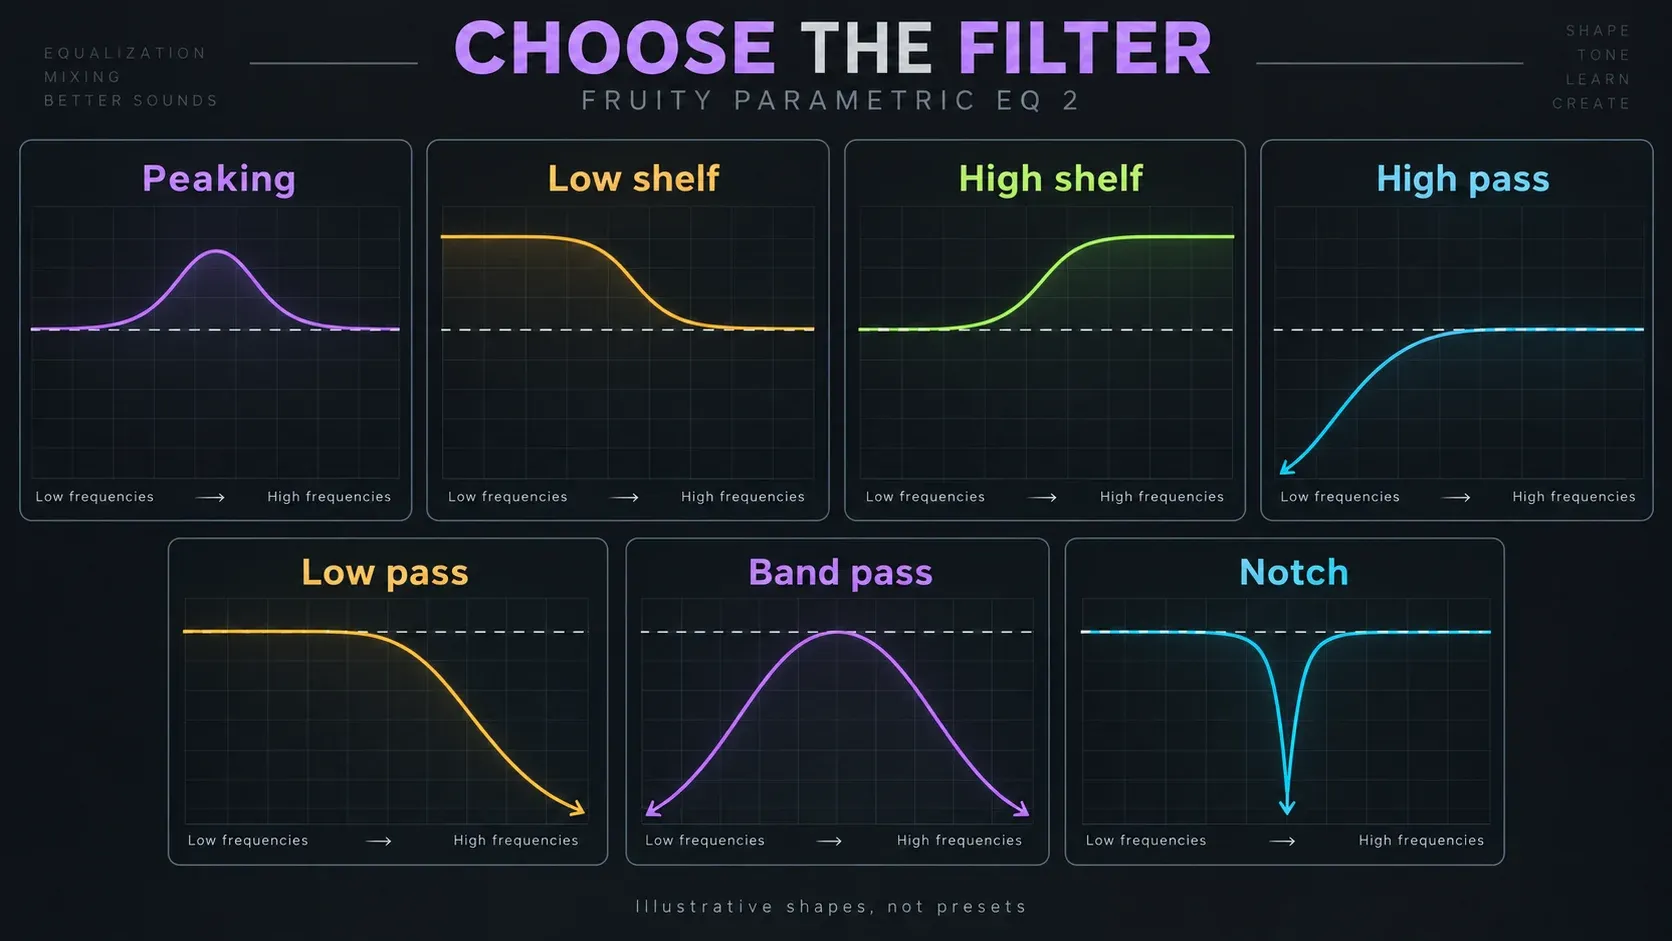
| Filter | What it does | When to try it |
|---|---|---|
| Peaking | Boosts or cuts around a center frequency | A broad tonal adjustment or a focused cut |
| Low Shelf | Raises or lowers the low-frequency region | Change weight without a progressively deeper low cut |
| High Shelf | Raises or lowers the high-frequency region | Change overall brightness |
| High Pass | Attenuates below its cutoff | Remove unwanted low-frequency content |
| Low Pass | Attenuates above its cutoff | Darken a layer or reduce unwanted top end |
| Band Pass | Passes a region while attenuating either side | A telephone-like effect or focused filtering |
| Notch / Band stop | Rejects a region around its center | A stable, narrow unwanted tone |
A low shelf and a high-pass are not interchangeable. The shelf settles at a different level in the lows; the high-pass keeps attenuating as frequency falls. If removing rumble also removes the instrument's body, lower the cutoff or compare a shelf. The right answer can be no filter.
For a kick and bass, listen to them together before deciding which low frequencies to reduce. The 808 and kick guide handles that relationship; an instrument name alone cannot tell you the correct cutoff.
Bandwidth is not filter order
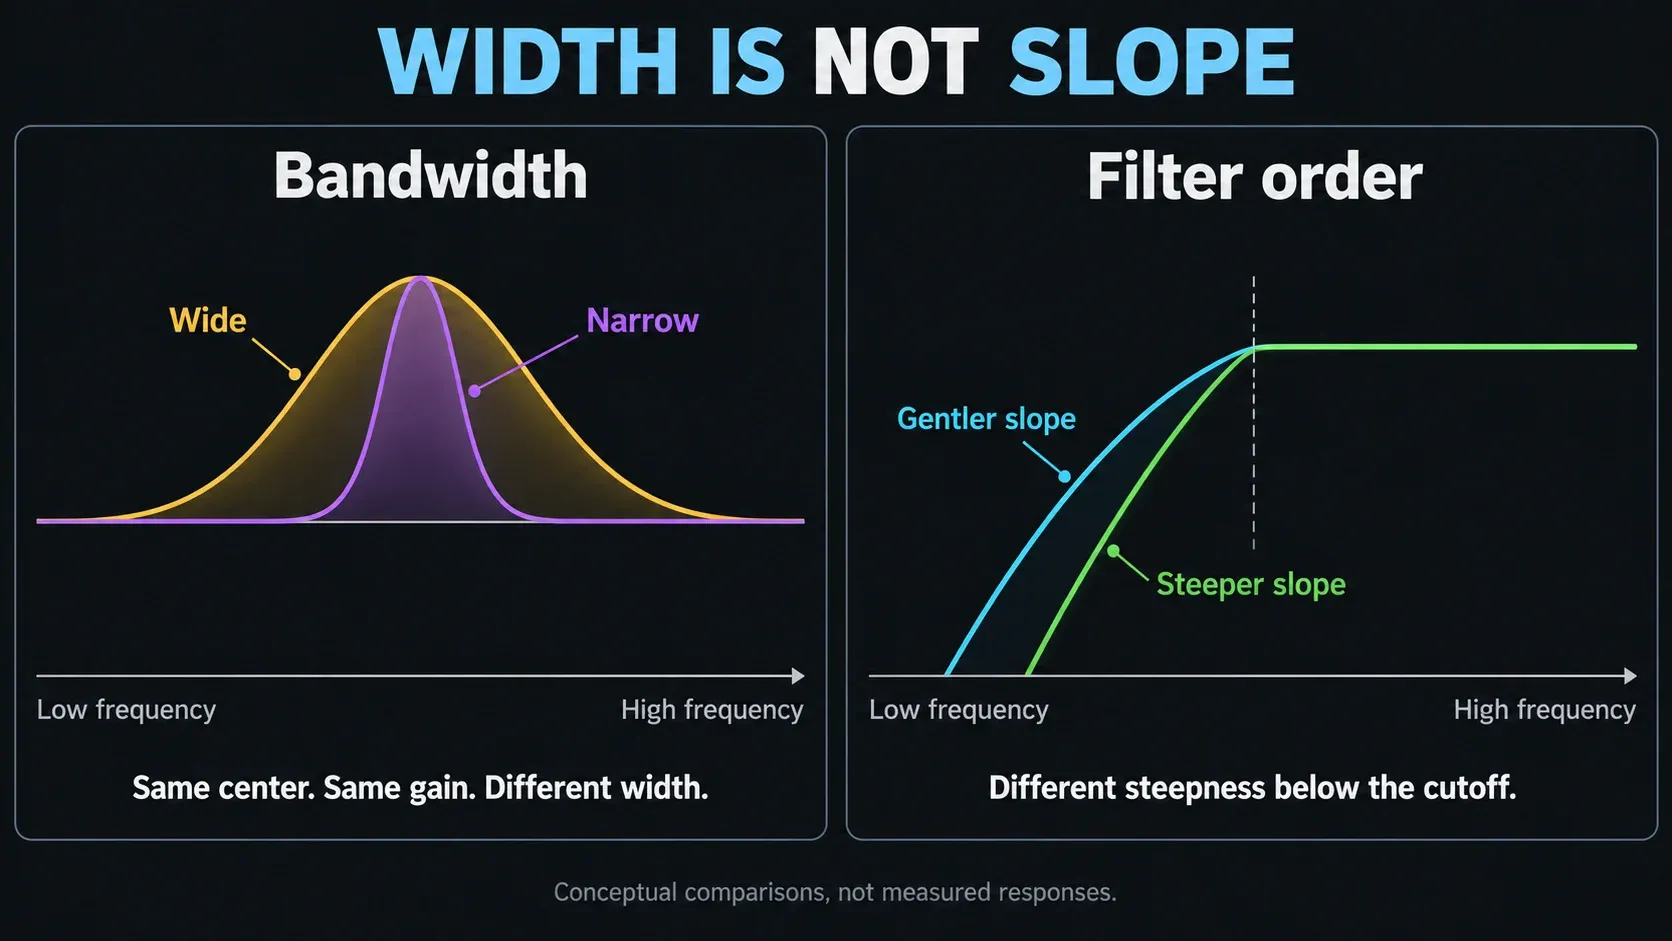
Bandwidth describes the frequency span affected by a band. Compare a wide and narrow peaking band at the same center and gain: the wide one changes more surrounding tone. A tighter cut can spare neighboring frequencies, but it may miss a resonance that moves with the note. Do not widen a destructive cut automatically; first reduce its depth and check whether it targets the right problem.
If another tutorial calls this control Q, look for BW in EQ2. Both concern the band's width, but do not copy numbers blindly between plugins: FabFilter's explanation of Q values notes that their interpretation can differ. Recreate the useful shape and listen, rather than treating matching numbers as matching filters.
Order describes filter steepness. EQ2 lists 12, 24, 36 and 48 dB per octave, corresponding to orders 2, 4, 6 and 8. Its Steep and Gentle versions can have the same eventual slope but differ near the cutoff. Listen to that transition rather than assuming that the largest order removes only unwanted sound.
Band Solo: enable it before holding Shift
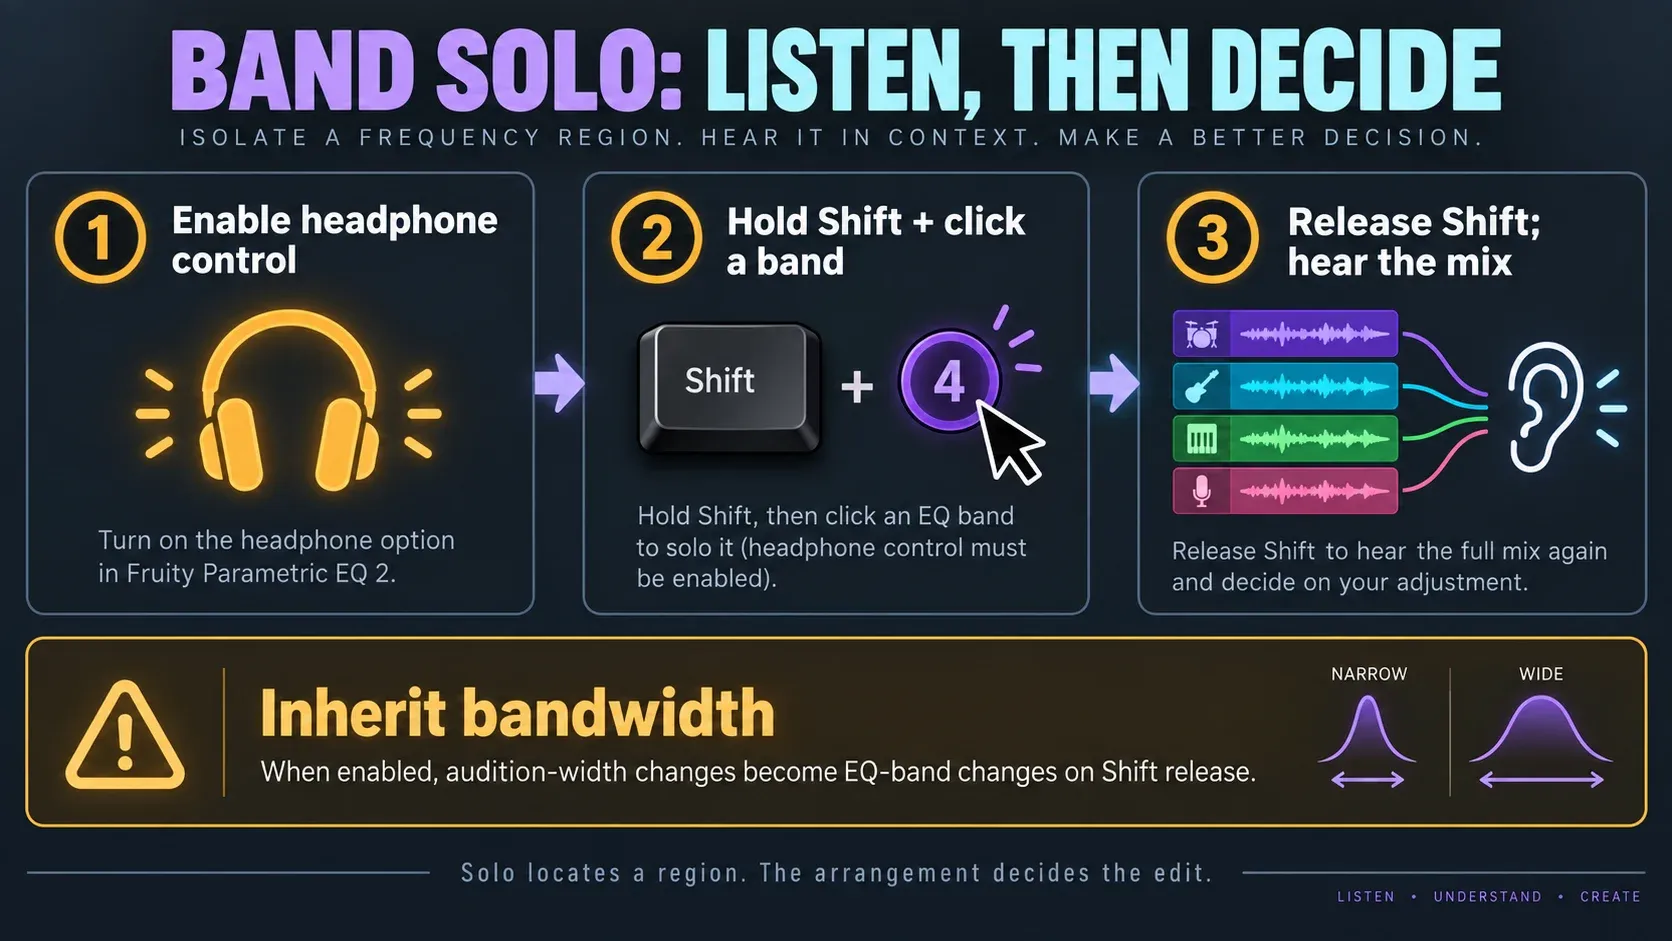
Turn on the headphone control for Band solo on shift, then hold Shift and click a band token. Simply holding Shift without that option enabled is not the complete instruction. Audition briefly at a comfortable listening level, release Shift, and judge any cut in the full signal and arrangement.
Right-click the headphone control to choose the solo behavior. Bandpass uses a steep band-pass around the selected token. Adaptive follows the job of the selected filter: with a high-pass, for example, you hear the low frequencies being removed; with a peaking band, you hear the affected region.
Inherit bandwidth can change your EQ. When it is enabled, bandwidth changes made during Band Solo are applied to the active band when you release Shift. If you only meant to investigate, check that option first. You can move the mouse vertically to adjust audition bandwidth during solo; do not assume those changes will always be discarded.
Read the analyzer without EQing the picture
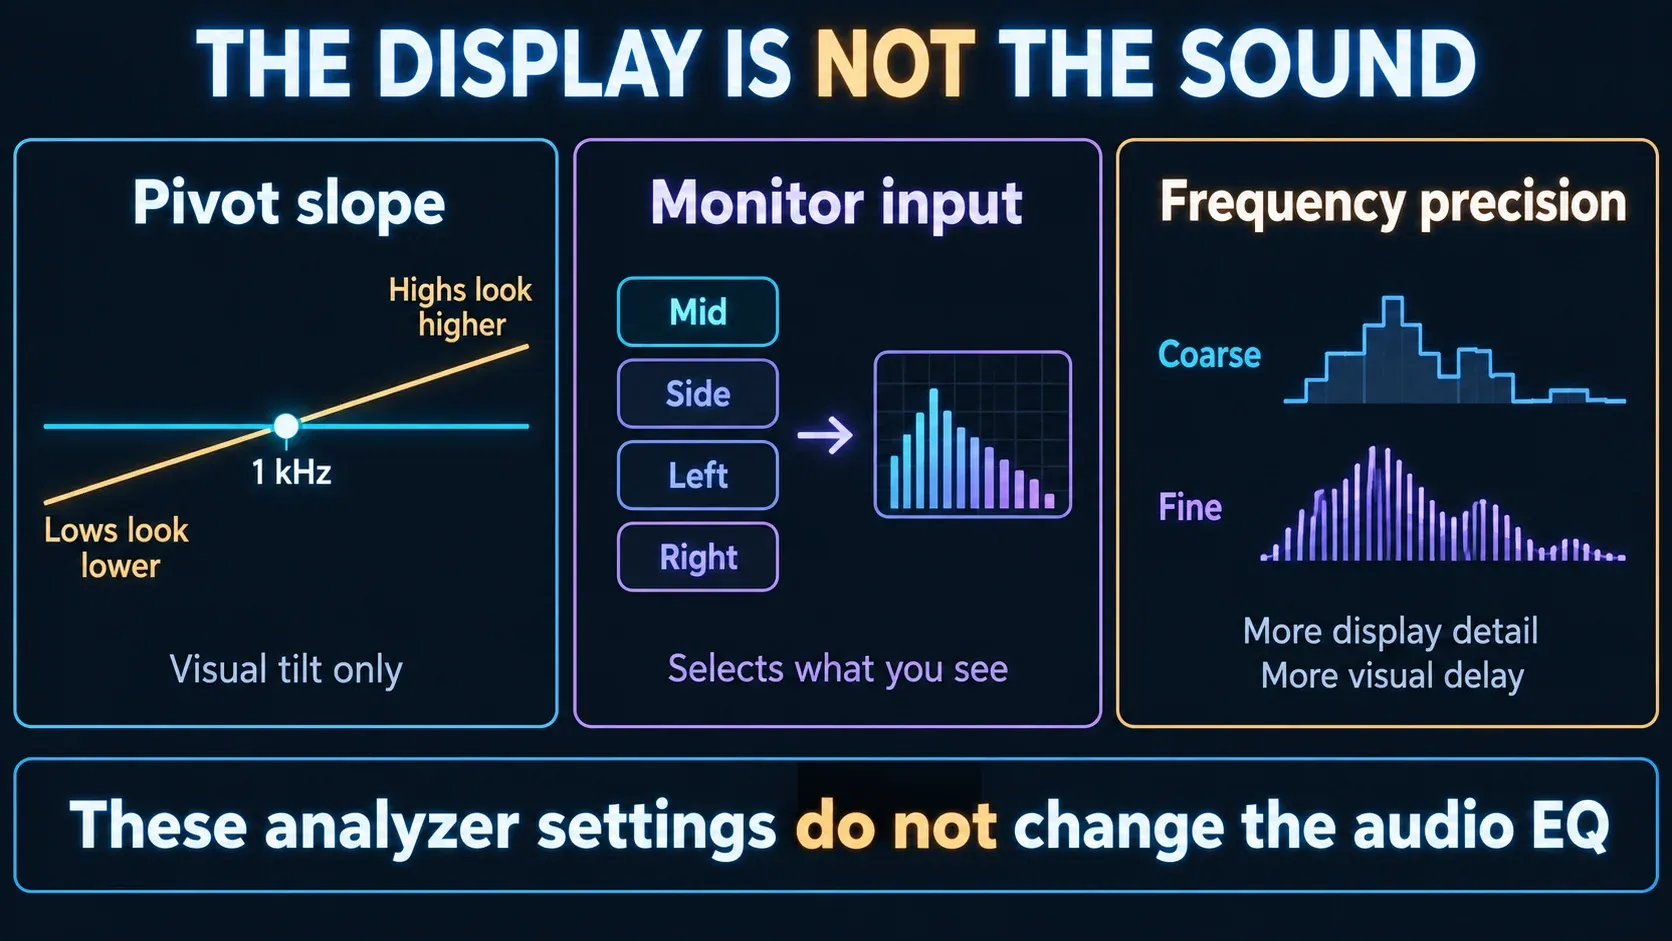
Monitor can display the plugin input, its output, or no spectrum. The histogram shows frequency energy; the heatmap gives another view of that energy over the display. Use them to locate a persistent peak or check whether a filter reaches the intended region—not to make every song draw the same outline.
The default pivot slope is 4.5 dB per octave around 1 kHz. It visually lowers the lows and raises the highs. It does not apply an EQ tilt to the audio. Changing to 0 dB per octave makes white noise appear flat; the manual's 6 dB setting can flatten the displayed harmonic levels of a basic saw wave. Neither is a target curve for every mix.
Mid, Side, Left and Right in Monitor input select the visualization source. They do not turn individual EQ bands into Mid-only or Side-only processors. Separate Mid/Side processing requires an appropriate split and recombination; Image-Line's Stereo Shaper routing example explains that distinction. Use the mono-compatibility check to assess the result, not just the Side display.
Frequency precision in the analyzer changes display detail and display delay, not audio-processing latency. Time smoothing and averaging change how the picture responds. They are different controls from the precision reached by right-clicking LIN.
Compare two settings, then level-match
Click Compare's first down-arrow to save the current EQ settings into the spare bank. Use the up/down-arrow control to swap between that bank and the main one. Editing a parameter while on the spare bank makes it the main bank again. Lock spare state protects the stored comparison from being overwritten.
Compare is not automatically an untreated reference: both banks can contain EQ. For a true plugin bypass, use that effect slot's disable switch, not the whole track's FX switch, which disables all its effects. The slot still passes audio when its effect is disabled.
Bring the alternatives close in perceived loudness with Main Level. Lower it if the processed version is louder; raise it cautiously if cuts made the result quieter, checking downstream headroom. Matching peak numbers alone is not enough, as Image-Line explains in its discussion of peaks and loudness. Then ask whether the vocal reads more clearly, the bass still has weight, or the troublesome tone is actually less distracting.
For levels throughout the chain rather than this one comparison, use the source-to-Master gain-staging guide.
Linear Phase and HQ are different choices
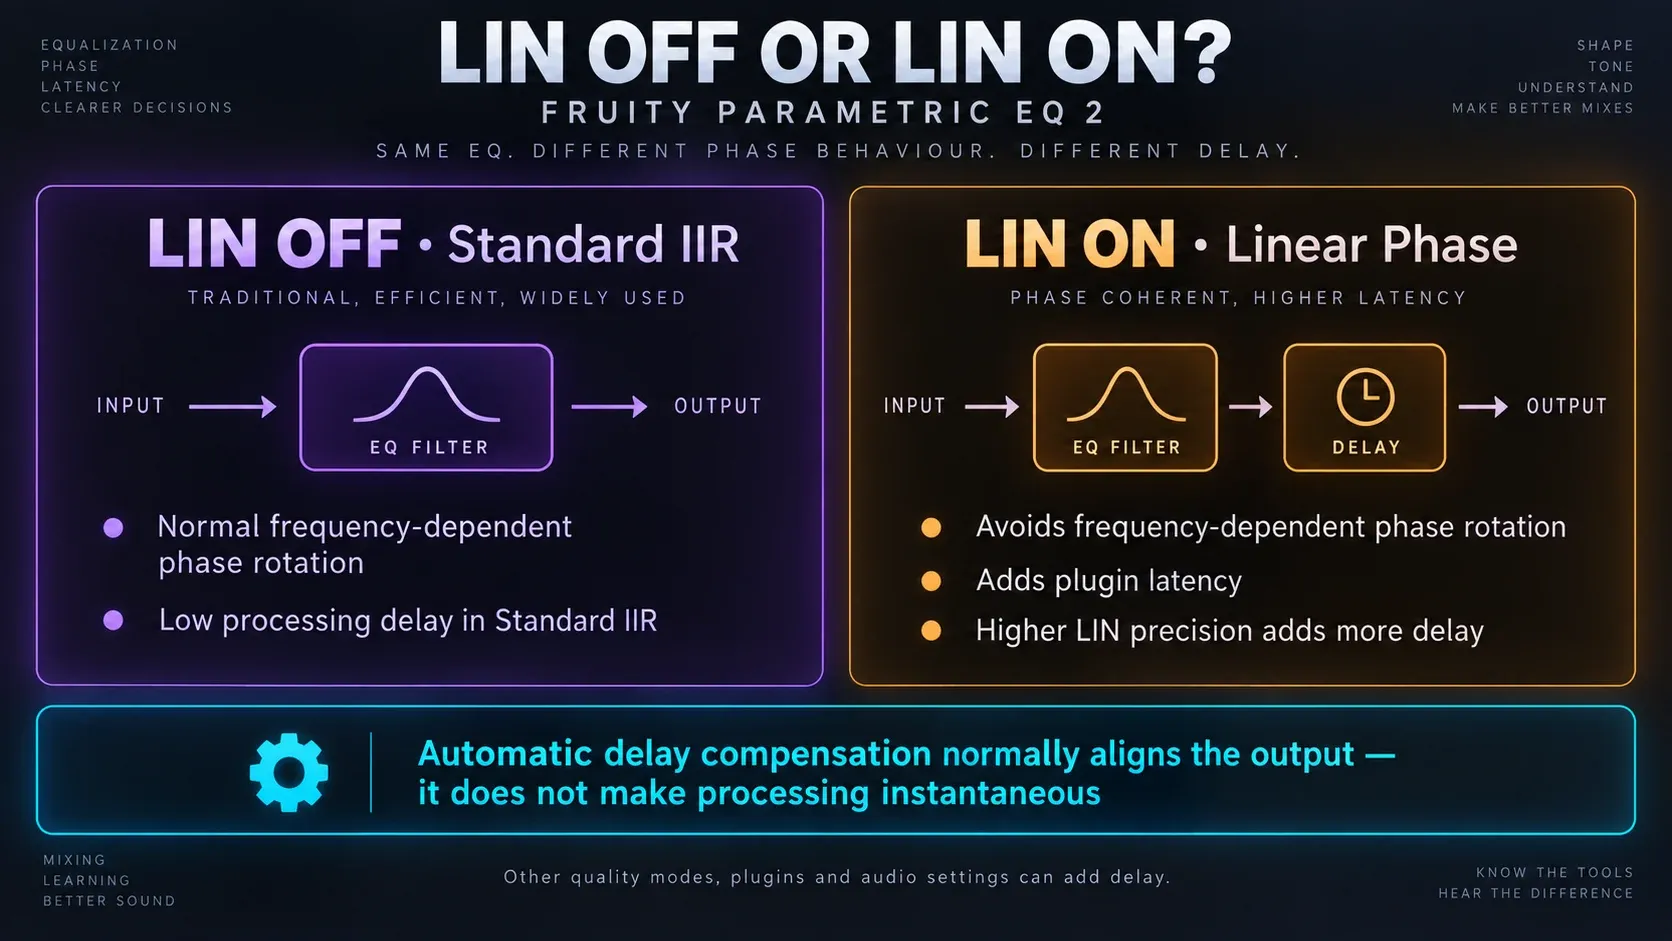
With LIN off, EQ2 uses its Standard IIR filters. Frequency-dependent phase rotation is normal for these filters; it is not evidence that the EQ has broken the audio. It can matter when the processed signal combines with a related dry signal or another correlated path.
LIN switches all bands to Linear Phase processing, adding plugin latency while avoiding that frequency-dependent rotation. Automatic plugin delay compensation normally aligns the processed output in the Mixer; it does not make the processing instantaneous. Right-click LIN for its precision setting: higher precision increases latency. Compare the result in the actual routing instead of treating LIN as a mandatory mastering switch.
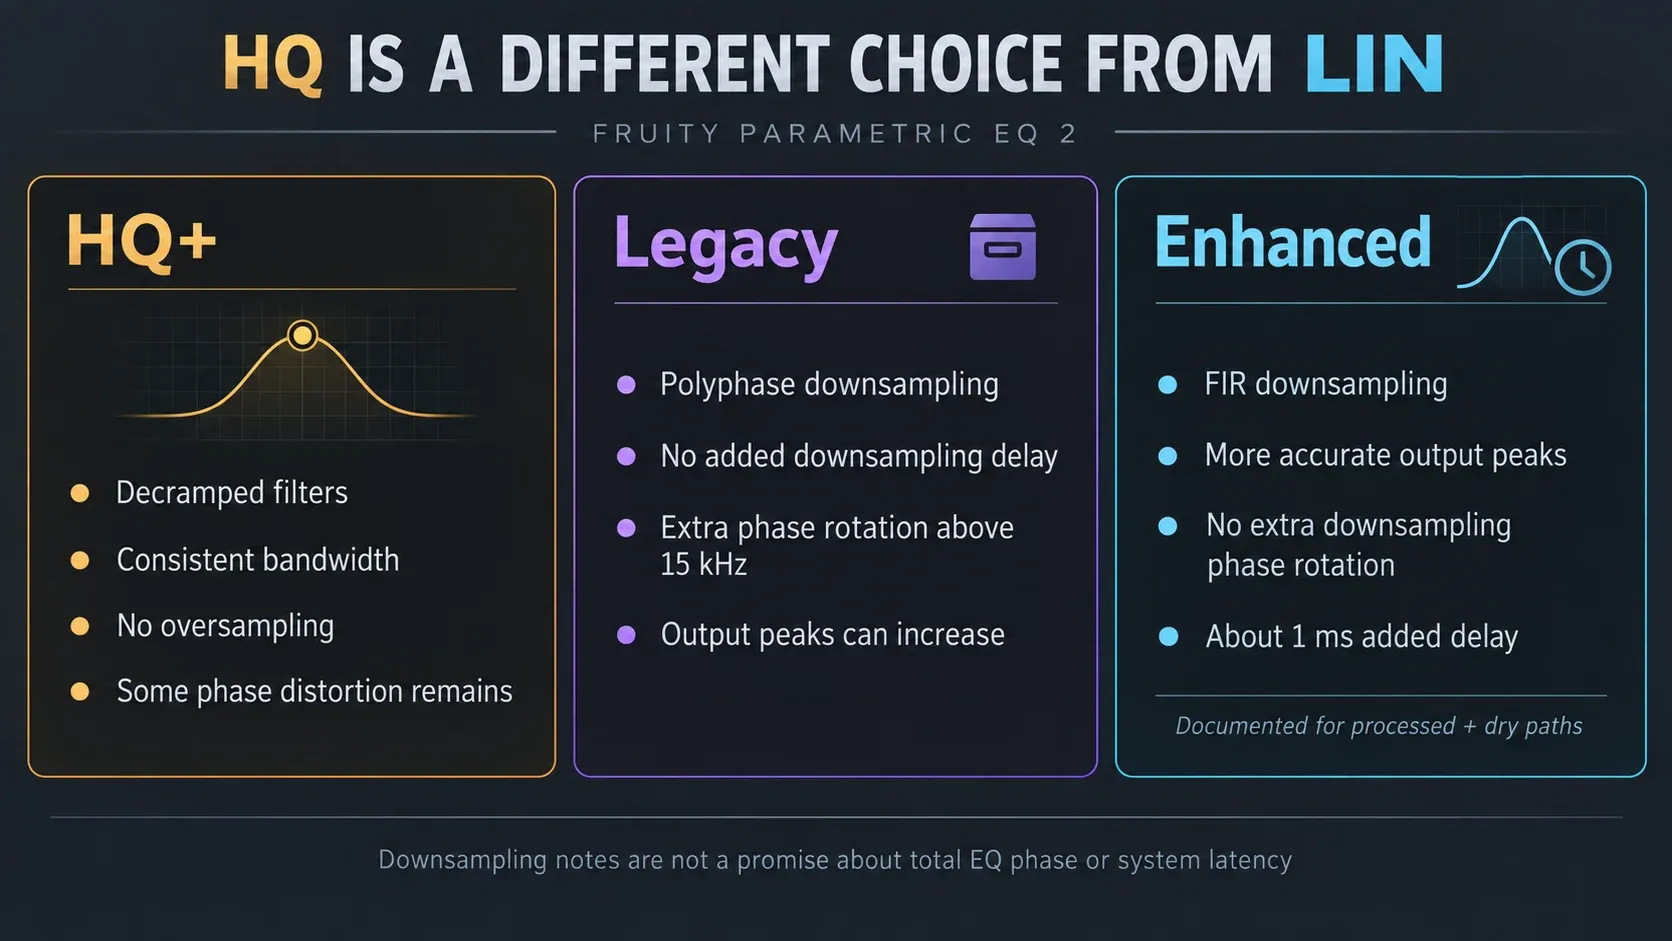
The HQ selector concerns filter-quality and compatibility behavior. It is not simply a third mutually exclusive choice beside Standard and LIN. For ordinary new EQ work, HQ+ is a reasonable starting point; preserve an older project's behavior until you have compared it deliberately.
| HQ choice | Documented behavior | What to consider |
|---|---|---|
| HQ+ | Decramped, consistent-bandwidth filters without oversampling; some phase distortion remains | A current filter option, not proof that every source needs EQ |
| Legacy | Polyphase downsampling; no added latency from that filter, but extra phase rotation above 15 kHz and potentially higher inter-sample peaks | Compatibility with older settings |
| Enhanced | FIR downsampling, more accurate output peaks and no additional downsampling phase rotation; about 1 ms of latency | The manual highlights mixing processed and dry paths |
“No additional downsampling phase rotation” does not mean all EQ bands become linear phase. Likewise, Legacy's latency description is not a promise of zero total system delay. LIN, other plugins and the audio setup still matter.
Automate EQ and diagnose crackles
For a filter sweep, right-click the band's FREQ knob and choose Create automation clip. Image-Line documents this route for native-control automation. Use the Automation Clip workflow for arranging and editing the curve; a low-pass sweep can create a muffled opening without another EQ plugin.
If rapid movements crackle, check the EQ mode and its modulation settings. The manual provides Minimum phase mod speed for smoothing fast HQ filter movement, and a separate Linear phase mod speed whose higher settings cost more CPU. Higher LIN precision adds latency; higher analyzer precision delays the picture. Those are three different tradeoffs, not one quality slider.
Test a slower sweep and compare the affected section after export. If crackling also occurs with the EQ bypassed, follow the broader crackling-audio diagnosis rather than assuming that EQ2 caused it.
Place EQ where the change is needed
Effects process down the Mixer slot stack. An EQ before a compressor changes the signal reaching it, and can change compression when the detector follows that signal. With an external sidechain, the detector may instead follow a different track: the Fruity Limiter sidechain documentation makes that explicit. The compression guide covers threshold, ratio and detector setup.
EQ after compression reshapes the already-compressed audio. A high-pass before saturation can reduce unwanted low-frequency drive; after saturation, it can attenuate frequencies but cannot change how the earlier stage was driven. These are reasons to choose a position, not a rule that every cut belongs before compression and every boost after it.
Four decisions to try in the mix
- Rumble: confirm that the low content is unwanted. Raise a high-pass cautiously, then back off if the intended fundamental or body suffers.
- Broad muddiness: compare a wide peaking cut with a low-shelf reduction. Keep the version that makes room without making the part too small.
- A stable whistle: locate it briefly with Band Solo. Start with a modest cut and choose a width that reduces it without unnecessarily removing neighboring tone.
- Missing brightness: first listen for another instrument masking the source. If the source needs a tonal change, compare a high shelf and a broad peak at similar loudness.
For vocals, EQ is only one part of the vocal-mixing chain. Broadband background noise may need a different approach, covered in the noise-removal guide. Do not keep cutting useful tone to chase a noise problem that EQ cannot separate cleanly.
Before you close the EQ
Check the full arrangement, later processors, shared buses and the Master. If a parallel path becomes hollow, compare alignment and phase relationships; if a cut makes notes disappear, reduce it and reconsider the target. Save a version before resetting a complicated curve. There is no prize for using all seven bands.
Continue through the Mixing hub for the next production decision. If routing and your first project still need work, return to Start here. Final loudness and delivery belong to the mastering workflow, not to this EQ alone.
Fruity Parametric EQ 2 FAQ
What does Fruity Parametric EQ 2 do?
It shapes frequency balance with seven adjustable bands. Each can use a different filter type; peaking and shelf bands have gain controls, while pass and notch types do not use band gain.
Why does Shift not solo my EQ band?
Enable Band solo on shift with the headphone control, then hold Shift and click a band token. Release Shift to leave the audition and check the full signal.
What does Inherit bandwidth do?
When enabled, it applies bandwidth changes made during Band Solo to the active EQ band when Shift is released. Check the option before auditioning if you do not want to change that band.
Can I EQ only the sides with Monitor input set to Side?
No. That choice changes the spectrum visualization, not which stereo component the bands process. Mid/Side EQ needs suitable signal splitting and recombination.
What is the difference between bandwidth and slope?
Bandwidth controls the affected frequency span. Filter order controls steepness; EQ2 offers 12, 24, 36 and 48 dB-per-octave orders, with Steep and Gentle variants differing near the cutoff.
Does pivot slope change the sound?
No. It tilts the analyzer display around 1 kHz. The default is 4.5 dB per octave; it does not boost treble or cut bass in the audio.
Is Linear Phase always better?
No. It avoids the frequency-dependent phase rotation of Standard IIR filtering but adds latency. Compare it when phase relationships matter in your routing; do not select it just because it sounds like a higher quality setting.
What is HQ+?
HQ+ uses decramped, consistent-bandwidth filters without oversampling. Legacy and Enhanced preserve other filter behaviors; Enhanced adds about 1 ms for its downsampling filter. HQ selection and LIN are different controls.
Does Compare automatically compare against the dry signal?
No. It swaps the main settings with a saved spare bank, and both can contain EQ. Use the effect-slot disable switch for plugin bypass and compare at similar perceived loudness.
Should I high-pass every track?
No. Filter unwanted low content when it helps the arrangement. Lower the cutoff, try a shelf or remove the filter if the instrument loses useful weight.