FL Studio
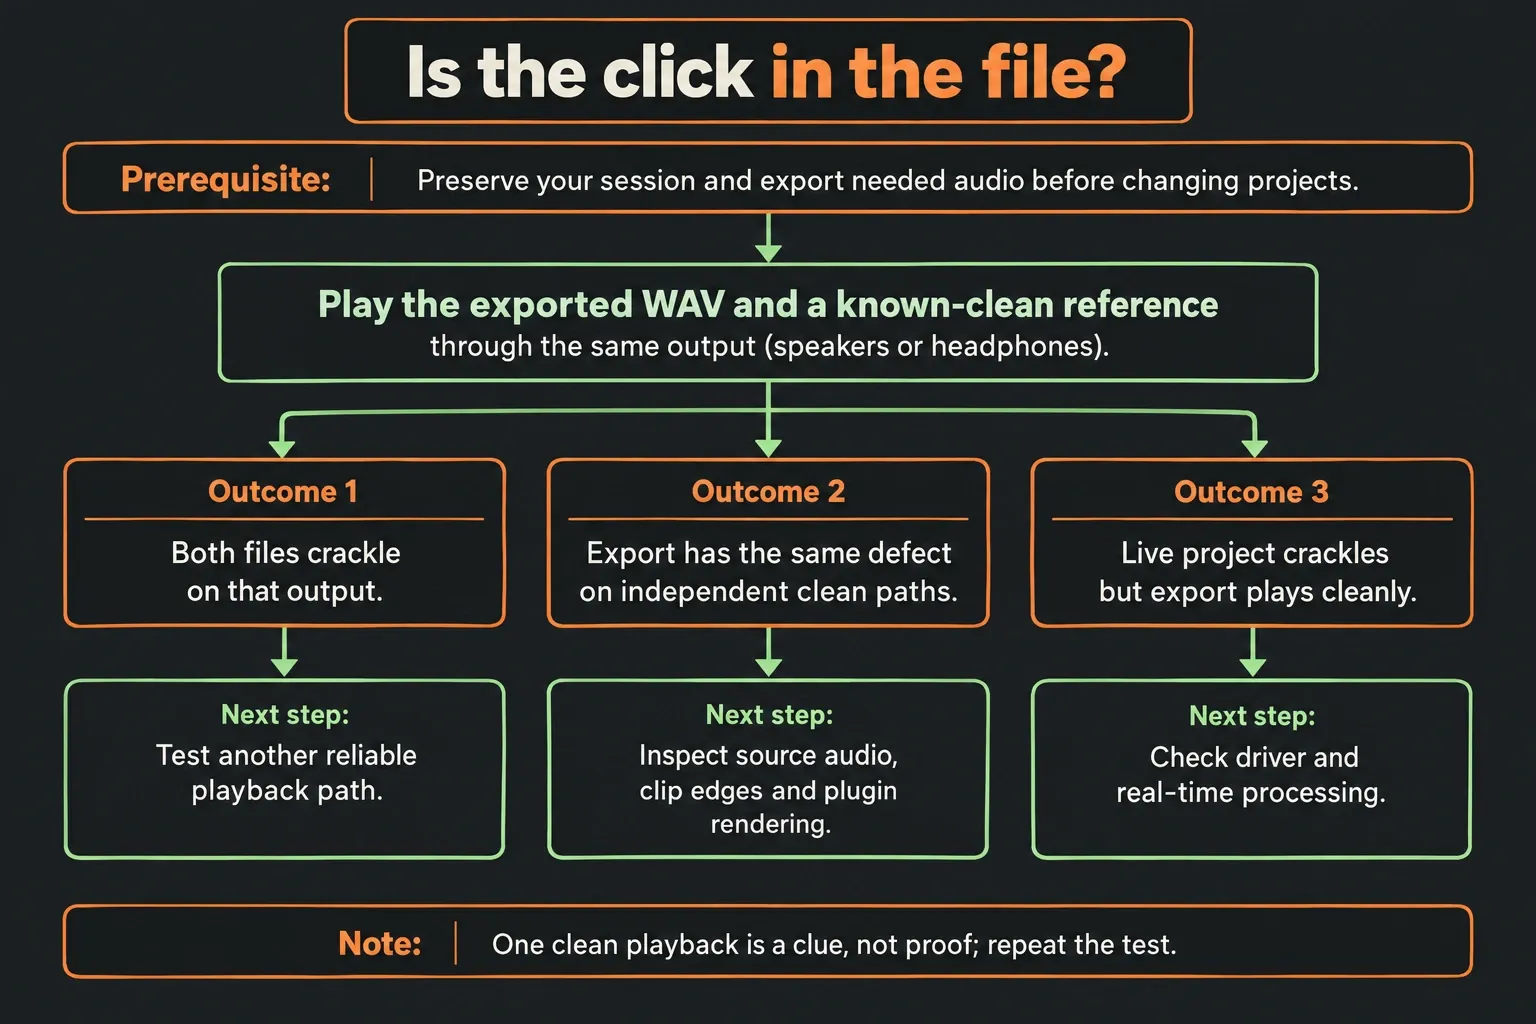
To fix FL Studio audio crackling, start by working out whether the problem is in live playback or baked into the audio. Protect your session, loop the section that fails and compare it with a WAV export played through an output you know is clean. Then test the driver, buffer or plugin that matches the symptom, instead of changing every audio setting at once.
First, identify which kind of crackle you have
Before opening another project, restarting or updating: save a separate project version and keep the original. In the standard FL Studio Trial, export the audio you need while the session is still open. You can save an FLP, but you can't reopen it until you purchase and unlock FL Studio, so saving alone doesn't make it safe to leave that session.
Even a licensed edition can contain native Image-Line instruments or effects running as trials, because they aren't part of that edition. Image-Line's trial-plugin warning says these turn into empty Channels or FX slots on reopening unless you unlock them, and re-saving the reopened project before unlocking loses their settings. Third-party plugin trials have their own rules, so don't assume they behave the same way. Keep the original FLP and render any sounds you need before you remove or replace plugins. Hold on to the source recordings and samples too, because an FLP doesn't archive those files.
With the session protected, run these comparisons:
- Loop the passage that crackles. Note whether the noise follows a musical event, shows up at random or only happens when you start, stop or move playback.
- Export that range to WAV. Play the file and a reference you know is clean through the same output. If both crackle, try another clean device or playback system before you blame the export.
- Once it's safe to leave the session, open an empty test project and play one instrument that comes with your edition. Compare it with the failing project on the same driver and buffer.
| Result | Next useful check |
|---|---|
| Live project crackles; exported file plays cleanly on a reliable output | Check the real-time deadline and driver. |
| The same click remains in the WAV on another clean playback system | Inspect the recorded source, edit boundary, plugin render and output level. |
| Only the input or its monitored return crackles | Compare direct monitoring, software monitoring and a dry recording. |
| Known-clean audio crackles in other apps too | Test the output device, connection and system. |
| One project or a transport action triggers the click | Isolate its plugin path or transport reset behavior. |
Repeat any test that seems to succeed. An intermittent driver fault can vanish for one playback without being fixed. Image-Line's Audio Settings documentation separates live underruns from render faults. Remember that listening to an exported file still goes through a live playback system.
Watch the underrun counter and FL Studio CPU meter
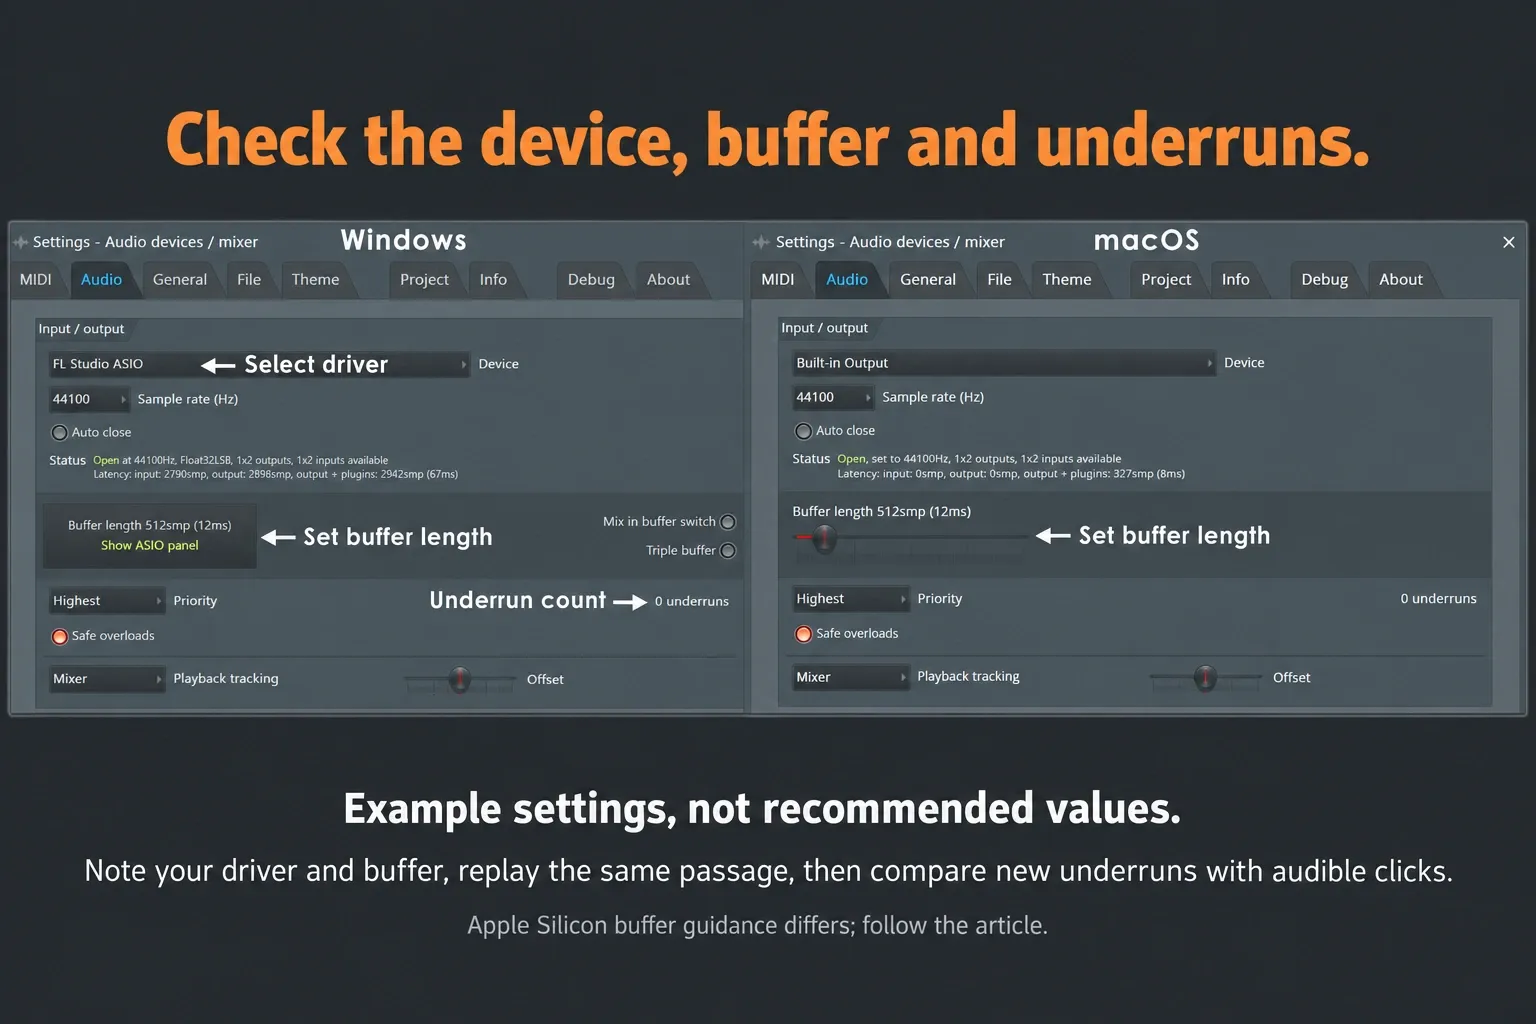
Open Options > Audio settings, note the Underruns count and replay the failing passage. If the count climbs along with audible clicks, the audio buffer is running out of data. Counts that built up while a project or plugin was loading aren't a reason to change settings on their own.
The FL Studio CPU meter shows how much of the buffer's available time was needed to generate its audio. Task Manager and Activity Monitor measure processor use in a different way. A busy processing chain or a system interruption can miss that short deadline even while overall CPU use looks low.
A counter that doesn't move doesn't rule out an underrun, because some driver paths and options, including Mix in buffer switch, bypass it. Listen as well as watching the numbers, and note which driver is selected before you compare results.
Select the right audio driver before raising the buffer
On Windows, use the native ASIO driver made for your interface if there is one. Image-Line recommends it for performance and recording. Get compatible updates from the interface manufacturer, not from a driver-download utility.
Without a native driver, FL Studio ASIO is a handy multi-client option for built-in audio, but it runs through the Windows audio system instead of bypassing it. ASIO4ALL is another one to try, and the detailed Audio Settings manual ranks it ahead of FL Studio ASIO for performance. That still doesn't mean it'll work better with your devices. Activate only the inputs and outputs you need for the comparison.
On macOS, select the Core Audio input and output you intend to use. Check the manufacturer's macOS support before installing interface software. A Mac has no Windows ASIO control panel, so don't go looking for one.
After any driver change, check where you're listening and which input is selected. FL Studio ASIO can use separate input and output devices, so different names aren't automatically a mistake. If you're not sure which route is active, pin it down with the audio device and latency setup guide before comparing crackles.
Test buffer length in controlled steps
A longer buffer gives the audio engine more time, at the cost of more monitoring delay, and it won't cure everything. Image-Line's architecture-specific buffer guidance treats Intel/AMD systems and Apple Silicon differently:
- Intel or AMD: use the Audio Settings manual's 10 to 20 ms range as a starting point for troubleshooting, then try supported steps. It's the vendor's guidance, and a lower setting that stays stable for recording is still fine.
- Apple Silicon: start at 128 samples for a light test project. If you need to, try the supported values of 192, 256, 512 and 1024. Shorter buffers can help bring the performance cores into play. A heavy project that already uses those cores may need a longer buffer from the start, so don't force an overloaded arrangement down to 128.
Write down your current value. In Windows ASIO mode, open Show ASIO panel; on macOS, change the buffer in Audio Settings. Change one supported value, replay the same section several times and check what you hear alongside the counter. Keep the lowest setting that handles your current playing or recording without recurring glitches.
If you try Triple buffer on Windows, keep in mind that it doubles latency and only helps some ASIO drivers that are close to overload. Switch it off again if it doesn't help. Keep separate working values for tracking and for dense mixing, since one number rarely fits both.
Check sample rates along the active audio path
Check FL Studio's sample rate and the rate the selected interface or driver accepts. For a Windows shared-audio path such as FL Studio ASIO, look at the relevant Windows input and output formats too. A native ASIO driver runs its own hardware path, so unrelated Windows devices don't matter for that comparison. On macOS, check the selected devices in Audio MIDI Setup.
Image-Line recommends 44.1 kHz as a default, or 48 kHz where a device requires it. Use a supported rate that suits the session and what you need to deliver. Rates of 96 or 192 kHz add processing work, but they don't automatically cause crackling. Matching rates removes one variable, though a mismatch in a shared-mode setting won't always produce noise.
If you use digital connections or an Aggregate Device, check synchronization against the device documentation. Otherwise, don't change an internal clock that normally works well. A tick on its own won't tell you it's a clock fault.
For stubborn Mac device problems, Image-Line suggests trying an Aggregate Device, especially for recording. Treat it as an optional comparison after the basic device test. Apple's aggregate-device instructions require matching sample rates and explain drift correction for devices that aren't hardware-synchronized. Don't switch on drift correction across the board on a setup that is hardware-synchronized.
Isolate a plugin or a transport-only click
Open View > Plugin performance monitor, or double-click the CPU panel. Close and reopen the monitor to clear old measurements, then reproduce the problem. In the monitor's columns, % is the plugin's share of the audio-buffer deadline, Time is its latest recorded processing time and Peak is the highest one stored. An old peak is a clue; it doesn't prove that plugin caused the click you just heard.
Test one suspect at a time in the protected copy:
- For a Mixer effect, use that slot's enable/disable switch. The effect-slot manual confirms that bypass lets audio keep passing through the track and its other active effects. The slot switch is different from muting the whole Mixer track or turning the slot's mix knob down.
- For an instrument, use its Channel Rack mute control during sequenced playback, then restore it. This stops its Step Sequencer and Piano roll playback, but live MIDI can still trigger it. The comparison can also change downstream load or level; it does not prove that all processing stopped or that the instrument itself is defective.
If a change removes the crackle, test the instrument and its effects separately before blaming one plugin. Preserve its version, format, preset, routing and automation before updating or trying a vendor-supported alternate format. Test replacements in a separate instance or copy; settings and automation are not guaranteed to transfer between formats.
If the click happens only on start, stop or seeking: note the state of Options > Audio settings > Reset Plugins on Transport. If enabled, test it off and repeat that action. Listen for changes in tails, phase or state-dependent playback before keeping the change. The similarly named Reset on transport inside Plugin Performance Monitor only resets its stored measurements.
Use Use fixed size buffers only as a targeted compatibility test for a suspect plugin. The Wrapper documentation says it can help rendering errors or crashes, but can add latency. Do not enable bridging or maximum-size buffer options across every plugin. If the problem is inside a modular chain, trace the connections with the Patcher routing guide.
Separate recording crackle from monitoring delay
For external audio recording in FL Studio, you need Producer Edition or higher. Use the intended input, then compare what you hear while monitoring with the file actually recorded. A delayed or doubled voice does not necessarily mean the recording contains clicks.
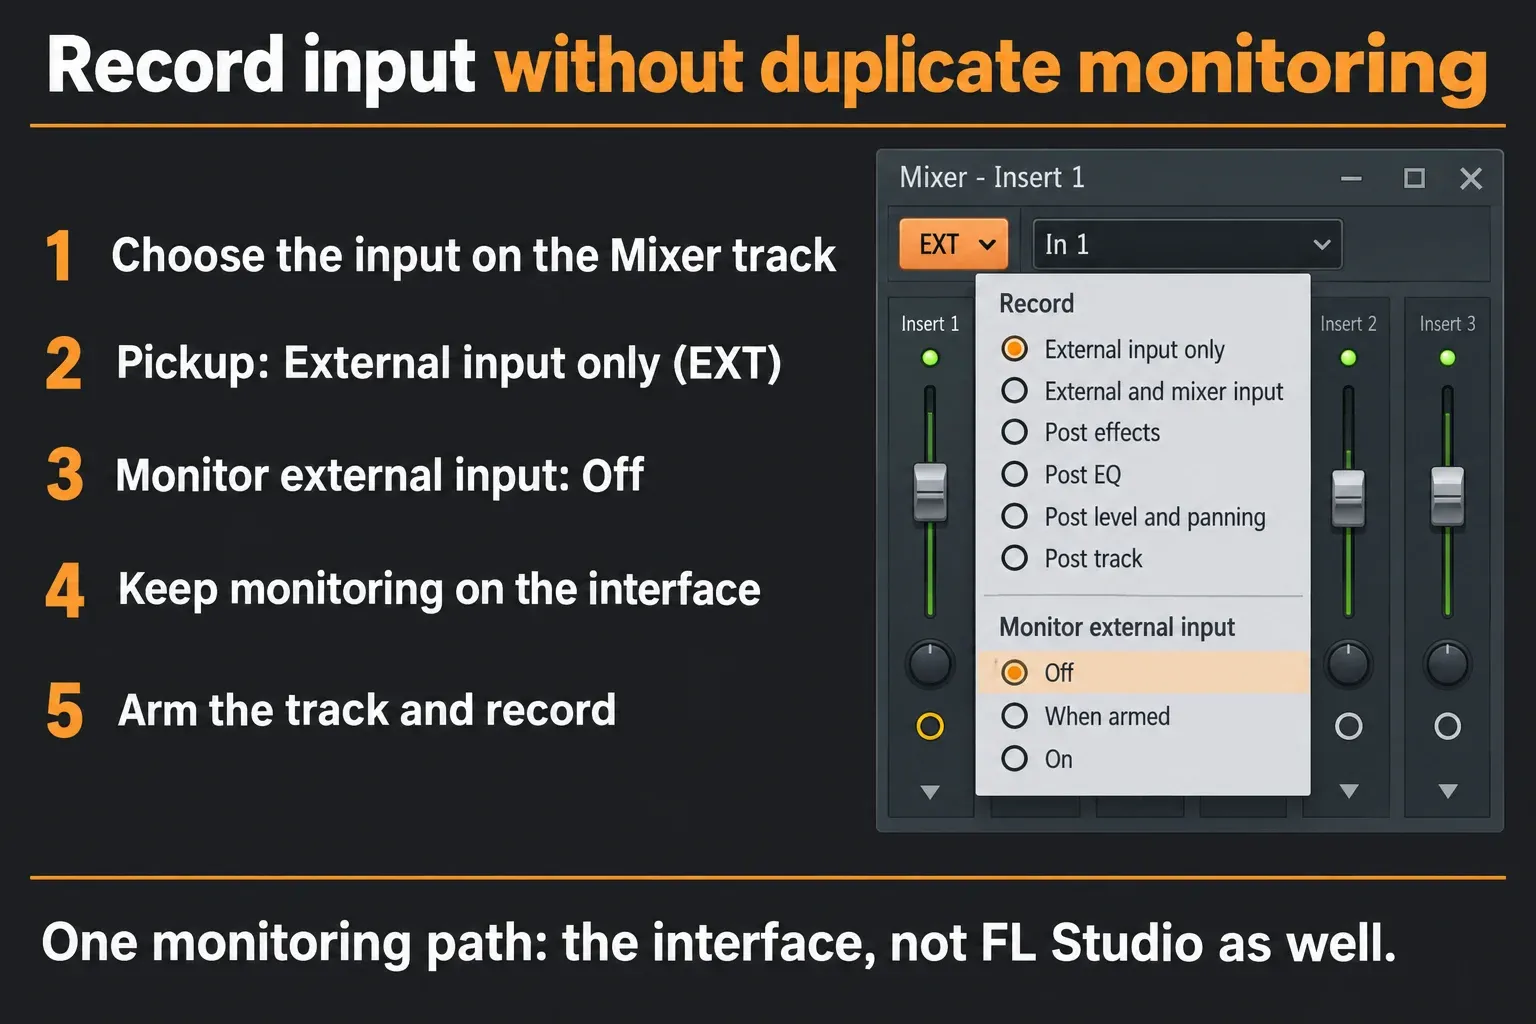
For a dry test recorded into the Playlist, select External input only (EXT) in the Mixer recording pickup selector. Image-Line's recording instructions explain that this captures the interface input before FL Studio effects and excludes internally routed Mixer audio. Set the recording level at the interface. Keep the original takes and listen to the test file on a verified playback path.
If your interface supports direct monitoring, you can hear its input without the round trip through FL Studio. For this Mixer-to-Playlist test, keep External input only (EXT) and set Monitor external input > Off to stop FL Studio's duplicate monitored input. Keep the correct input and recording arm set; do not mute the entire recording track as a substitute. Confirm the recording still captures the intended signal. This is not an Edison recording setup.
If you need to hear FL Studio effects while performing, use software monitoring and test a stable buffer. Temporarily bypass latency-heavy processors on the monitored path. A lighter backing mix may make recording easier, but direct monitoring and a longer buffer cannot repair clicks already captured in a take.
When the dry file contains the fault, compare the input level, cable and a direct USB connection, one at a time. For routing questions, follow the Mixer routing guide.
Reduce project load without losing the sound
Close plugin windows with Alt/Option+F12 and unnecessary background apps first. Lowering voices, oversampling or quality modes may reduce processing, but can change the sound. Note each original value and compare before committing.
Before consolidating, restore the quality you want in the printed audio and check the plugin's own offline-quality options. Audition the rendered result for clicks, tails, timing and routing. Keep the original instrument, patterns and source files recoverable. A muted Playlist clip does not necessarily stop its source plugin processing; do not disable a shared instrument until you have checked every pattern and route that still uses it. Likewise, do not edit or delete a shared sample file to remove one occurrence.
If the audio path is stable but the CPU deadline stays under pressure, continue with the high-CPU troubleshooting workflow. Avoid lowering normal project timing resolution or changing musical routing just to make the meter look smaller.
Check the system when the counter stays still
Play a known-clean file outside FL Studio. If it also crackles, compare another output device and cable. Wired headphones are a useful test against a Bluetooth or interface path, not a promise that every wired device is fault-free.
- For the test, plug the interface straight into a suitable USB port instead of going through a hub.
- Close other apps that use the audio devices, including calls and screen recording, then check the same file again.
- Check the manufacturer's driver and firmware guidance for your model and operating system before you update anything.
- Check power and cooling if performance changes as the laptop heats up or switches power source. No universal CPU percentage or power-plan recipe applies here.
On a Windows shared-audio path, switch off optional Audio Enhancements on the output while you mix. Image-Line notes that system EQ, loudness and spatial processing can affect FL Studio ASIO. If only FL Studio ASIO misbehaves, compare another supported driver on the same device before you think about reinstalling Windows.
Fix clicks that are actually in the export
First confirm the defect is really in the WAV: replay it on a clean system and find the click. Once the current session is protected, you can import the WAV into an empty project to look at it. The same defect at the same spot across several clean playback paths is much stronger evidence than a random pop in one player.
An offline render can take longer than real time, so it doesn't produce the live device-buffer underruns described earlier. Plugin processing-block compatibility is a separate matter. A plugin can render incorrectly, and its wrapper's fixed-size buffer setting sometimes helps. Raising the live hardware buffer won't repair a damaged file.
- At an Audio Clip boundary: try a short fade at that edge and listen to the attack or tail. The Audio Clip manual describes fades and zero-crossing edits. Zero-crossing edits can move the cut away from where you wanted it, and active fades replace the declick modes at that end of the clip. Keep a separate sample copy before editing shared source data.
- With one plugin active: render the same range with and without the suspect effect, or compare the instrument and its downstream effects separately. If the click disappears, you've found a path to look into; it doesn't automatically prove a plugin bug. Try the documented compatibility options and re-render after each change.
- At an overloaded output: check levels before the stage that distorts. Image-Line's mixing guidance separates internal floating-point headroom from the physical output and fixed-depth exports. A 16- or 24-bit render can clip above its limit, and lowering the final fader can't undo distortion that a plugin or recording already created.
FL Studio ASIO has one more trap: with Hard-clip output at 0dB (otherwise limiting will be applied) switched off, Windows limiting can hide output clipping while you listen live. That happens to the live output after FL Studio, not inside the project, and the switch doesn't affect internal processing or rendered files. Check the Master meter even when playback sounds clean, and don't treat a red internal Insert meter on its own as proof of damaged audio.
Use a declicker for noise you've confirmed, not for a playback fault you haven't explained. Aggressive detection can damage musical transients. Once the click is sorted, use the mastering and final export checks to judge the finished output.
Use this repair order and keep the working settings
- Protect the session. Save a separate project version and keep the audio you need before switching projects or restarting. Standard Trial can't reopen saved projects until licensed. Keep any audio you need from trial plugins, and don't overwrite the original project with reopened native Image-Line trial-plugin placeholders.
- Classify the noise. Compare the failing passage, its WAV export and a clean reference. Check the playback path before you call a click printed noise, and only use an empty project once the session is protected.
- Check the deadline and device. Watch Underruns and the CPU panel. Confirm the actual input/output, preferring native ASIO on Windows or the intended Core Audio device on macOS.
- Test the buffer. Use Image-Line's roughly 10 to 20 ms starting guidance for Intel/AMD. On Apple Silicon, try 128 samples for a light project, then supported 192, 256, 512 or 1024 values as needed; heavy projects may need a longer buffer initially.
- Check the active sample-rate path. Confirm a supported rate in FL Studio and the interface, plus relevant shared-system settings or Aggregate Device members. Keep the session's delivery requirements in view.
- Isolate the project fault. Reset monitor measurements and test one effect or instrument path. For start/stop-only clicks, compare Reset Plugins on Transport separately from the monitor's measurement reset.
- Check input or system noise. Compare a dry recording with monitoring, or test a known-clean wired output and direct USB connection. Preserve the original takes and change one condition at a time.
- Repair confirmed file defects. Check source audio, clip edges, plugin render behavior and output clipping. Restore intended print quality before rendering again, audition the result and retain the source project.
If the fault won't go away, note the FL Studio build, OS, interface, driver version, buffer, sample rate and exact trigger for support. A stripped-down diagnostic copy can help, but removing channels also changes routing and load. Keep the original and its media, and check dependencies before reading too much into a cleaner cut-down project.
Don't reset settings as your first repair. If support recommends it, Image-Line's reset procedure tells you to note your settings first and restore custom MIDI, Audio, General and File choices afterward. Diagnostics isn't available in the standard Trial. For a different symptom, pick the matching route in the FL Studio troubleshooting hub.
Frequently asked questions
Why is my audio crackling in FL Studio?
A live buffer underrun is a common cause, but driver faults, plugin behavior, recording defects, clipping and abrupt Audio Clip edges can sound much the same. Protect the session, then compare live playback with an export on a clean output to choose the right test.
How do I stop crackling in FL Studio?
Protect the project and the audio you need first. Loop the failing section, confirm the device and watch the underrun counter. Try a buffer suited to your CPU architecture, then isolate one plugin or input path. If an exported file clicks too, check its playback system before assuming the noise is stored in the file.
What buffer size should I use to prevent crackling?
Use a supported value that stays clean and suits your monitoring needs. Image-Line suggests roughly 10 to 20 ms as a starting point for Intel/AMD. For light Apple Silicon projects, start at 128 samples and try 192, 256, 512 or 1024 if you need to. A heavy Apple Silicon project may need a longer buffer right from the start.
Why does FL Studio crackle when the CPU is low?
Overall CPU use in the operating system can't show whether every short audio deadline was met. One processing chain or a system interruption can cause a glitch even with a low average. Some driver-related underruns also slip past FL Studio's underrun counter, so a low meter or an unchanged count doesn't rule them out.
Why does FL Studio crackle only while recording?
A short monitoring buffer or a problem in the live input path may be to blame. Compare a dry recording with what you hear while monitoring. When recording into the Playlist with External input only (EXT), use the interface's direct monitoring if it has it and switch off FL Studio's Monitor external input, so you don't get a second copy back while recording stays armed. Direct monitoring won't fix defects already captured in the file.
Why is the underrun count increasing but I hear no crackle?
FL Studio can count underruns while a project or plugin loads, and Image-Line says those totals alone don't point to a problem. Note the count before you replay the failing passage and check whether new increases line up with audible glitches.
Why does the exported WAV crackle when live playback is fine?
First rule out a faulty playback device or player by checking the WAV on a clean system. If the defect is still there, look at recorded noise, clip boundaries, plugin rendering and output clipping. Offline rendering isn't affected by live device-buffer underruns, but a plugin's processing-buffer compatibility can still affect the render.
Does increasing buffer size reduce audio quality?
Buffer length is a timing setting and doesn't lower the bit depth or sample rate. It mostly changes processing headroom and monitoring delay, not the fidelity you're aiming for. A plugin whose behavior depends on the buffer can be an exception, so compare the sound after changing it. Quality-mode changes are a separate matter and need checking before consolidation or export.