FL Studio
FL Studio Audio Interface Not Detected: Input Checklist
When FL Studio does not show your audio interface, the useful question is not “which button makes it appear?” Start at the signal path. The interface has to be powered and visible to the operating system, the selected FL Studio driver has to expose its inputs, and a Mixer Insert has to be pointed at the right input pair. A failure at any one of those layers can look like the same silent project.
Image-Line’s Audio Settings documentation makes the key distinction clear: the selected audio driver determines the inputs and outputs FL Studio can use. The Mixer then chooses one of those available inputs for recording. If the device is missing from the driver, the Mixer cannot recover it. If the device is visible in Audio Settings but the Mixer is set to None, the meter will still be silent.
Start with the physical and system checks
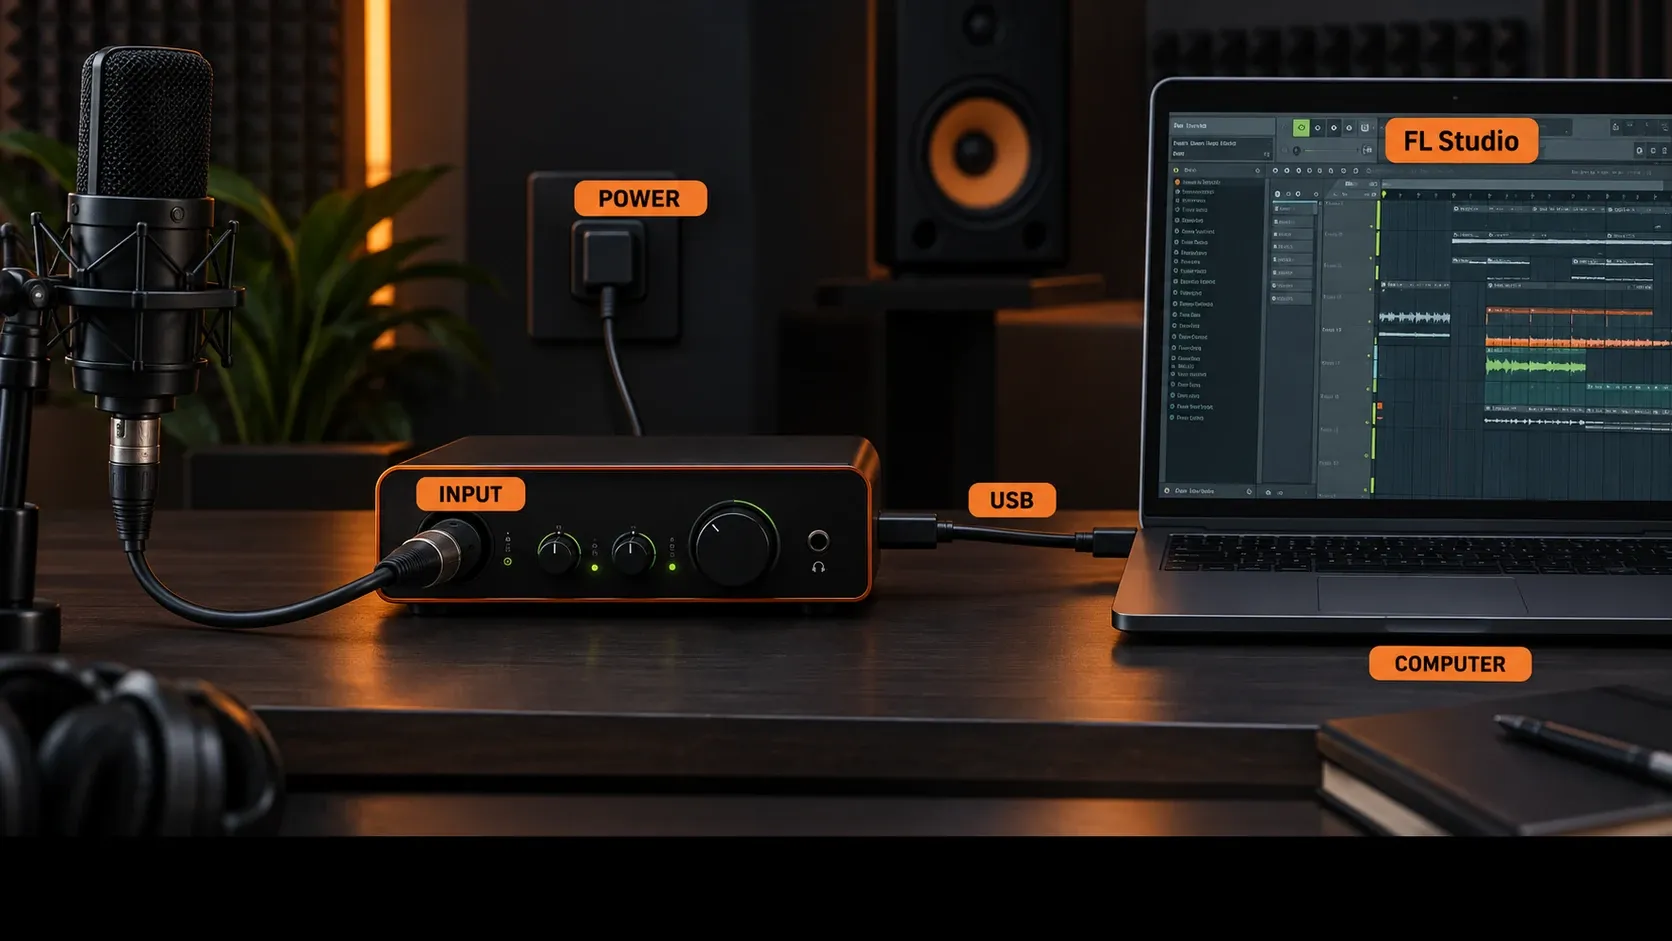
Turn the interface on and check the connection before changing FL Studio settings. The device should have its normal power indication, and the source you want to record should be connected to an input rather than an output. For a microphone, that means the correct input socket and a suitable gain level. For a synthesizer or other line source, use the input pair that matches the cable routing.
Reconnect the USB cable directly to the computer when possible. Hubs, adapters and loose connectors can leave the interface powered but unavailable as an audio device. If the interface has more than one USB mode or driver package, use the mode supported by the manufacturer’s current driver. Avoid changing several things at once; you want to know which layer changes the result.
Next, check whether the operating system sees the interface as an audio device. If it does not appear there, FL Studio cannot make it appear. Resolve the cable, power, driver or operating-system problem first. If the system sees it but FL Studio does not, move to the driver selection below.
Windows: choose the interface ASIO path
On Windows, an external input needs an ASIO path that exposes the interface’s recording channels. Open Options > Audio settings, or press F10, and inspect the Device field. When the manufacturer provides an ASIO driver for the interface, that is the first path to try. Image-Line recommends the OEM ASIO driver when one is available because it is built for that device’s inputs, outputs and timing behavior.
Do not choose a driver by name alone. After selecting it, look at the input and output information that becomes available. A driver can be installed and still expose only a different device, a playback-only path or no usable input pair. If the interface’s channels appear after selecting the OEM driver, keep that driver selected while you configure the Mixer.
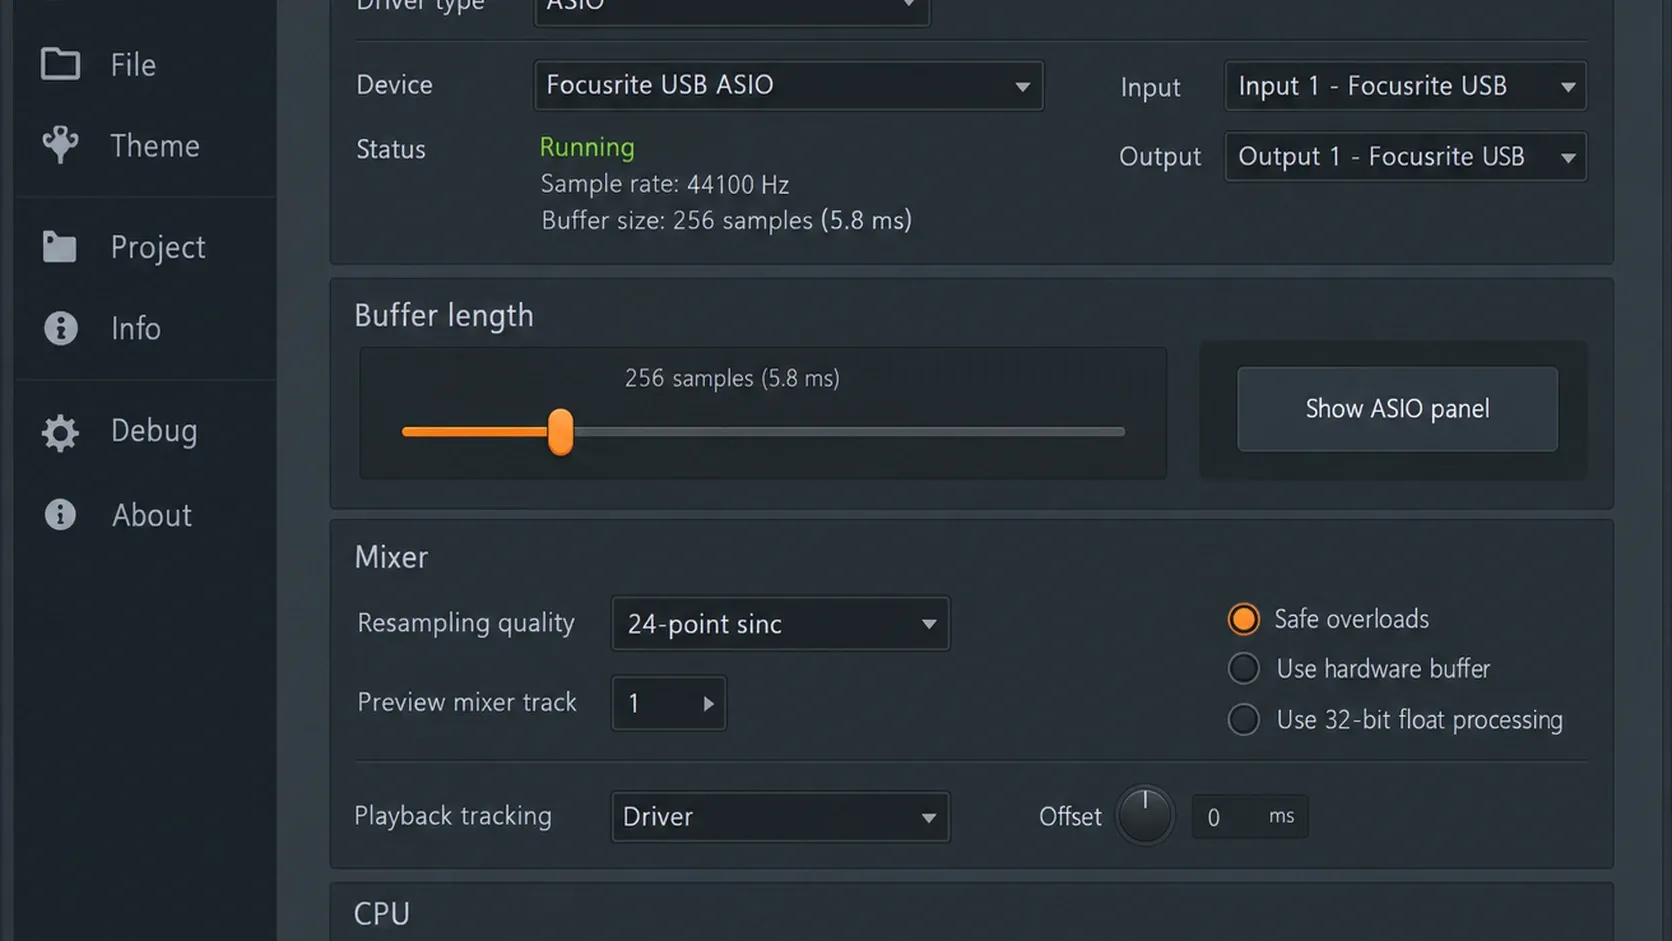
FL Studio ASIO is a compatibility option when the manufacturer’s driver is unavailable or unsuitable. It can be useful for a quick check, but the available inputs and latency behavior may differ from the OEM path. If an input appears with one driver and disappears with another, that is a driver-path difference rather than a Mixer failure.
Close other audio applications temporarily if the selected driver reports that the device is unavailable. Some drivers allow exclusive access, and a browser, video call or other DAW can hold the interface. Reopen Audio Settings after the other application releases it, then check the device list again.
macOS: check Core Audio, Aggregate Device and permission
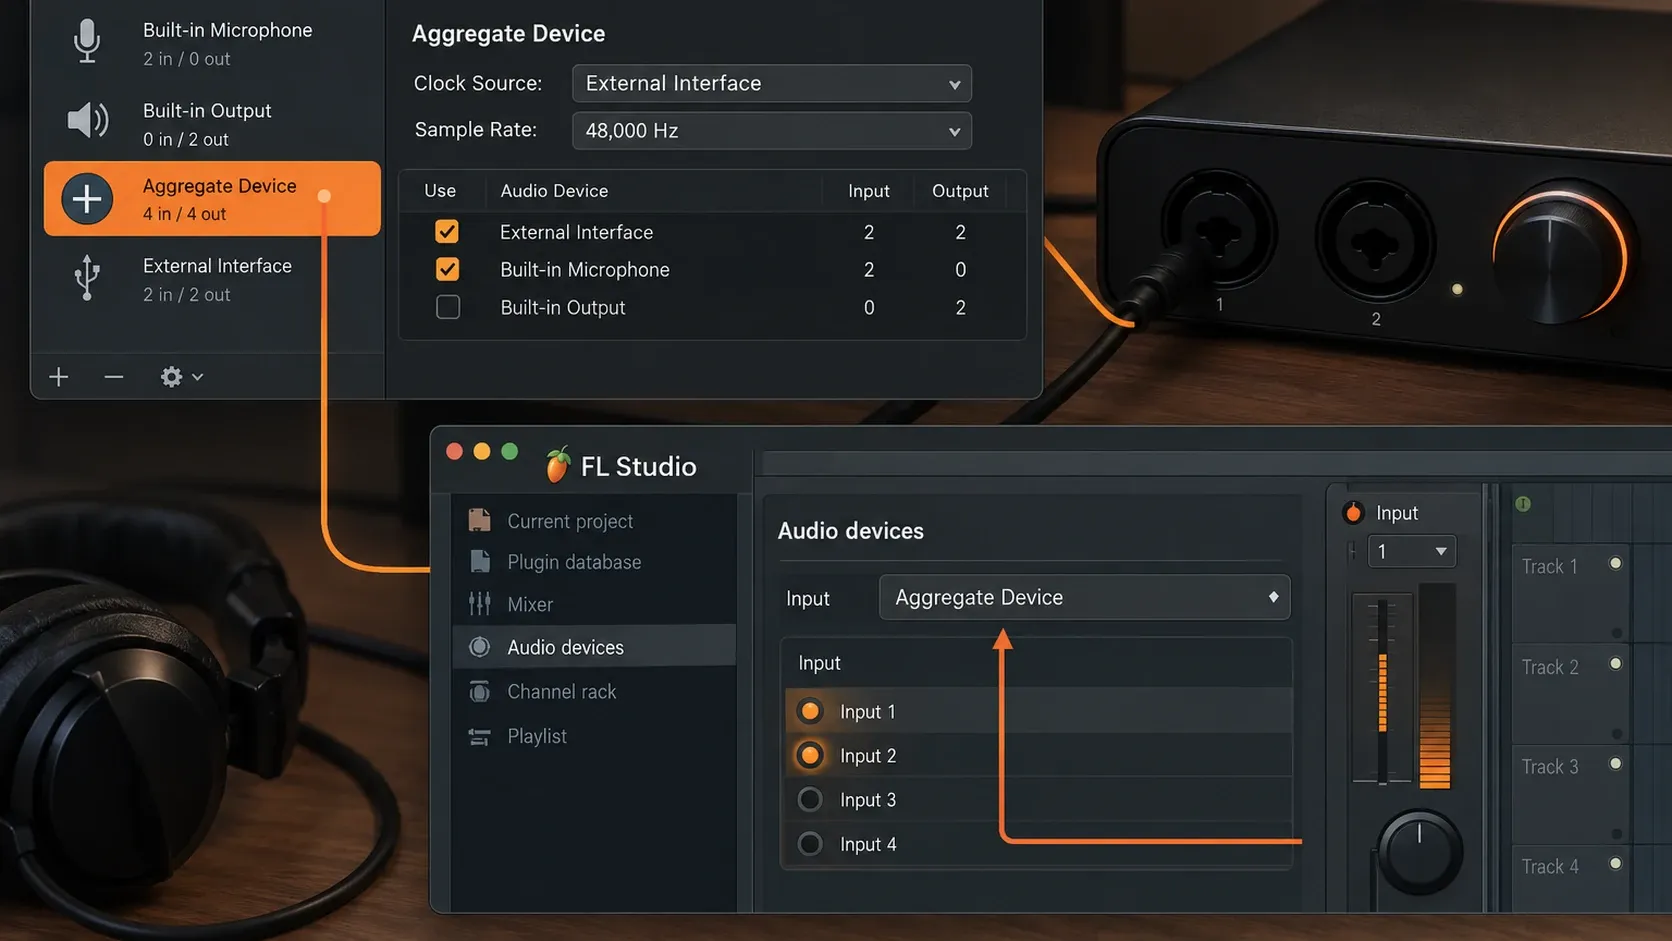
macOS uses Core Audio device paths rather than Windows ASIO drivers. In FL Studio Audio Settings, choose the interface or the relevant Core Audio device, then check which inputs and outputs are exposed. If you combine the interface with another audio device, Image-Line documents the use of an Aggregate Device on macOS. The aggregate must be created in Audio MIDI Setup before FL Studio can select it.
Use aggregation only when you actually need more than one device. A single interface is easier to diagnose as a single Core Audio device. If you create an aggregate, confirm its input and output members and sample-rate relationship in Audio MIDI Setup. A device can be listed while the aggregate exposes the wrong side or an unexpected channel order.
macOS can also block microphone and audio-input access. If the device is present but no signal reaches FL Studio, check the system privacy permission for FL Studio, then restart the application after changing it. Permissions explain a silent input; they do not explain a device that is absent from the operating system entirely.
Set the FL Studio driver before changing the buffer
The buffer is not an input switch. It changes the amount of audio FL Studio processes at a time, which affects latency and stability. It cannot create an input that the selected driver does not expose. Choose the correct device first, confirm the inputs appear, and only then adjust the buffer if you hear delay, clicks or dropouts.
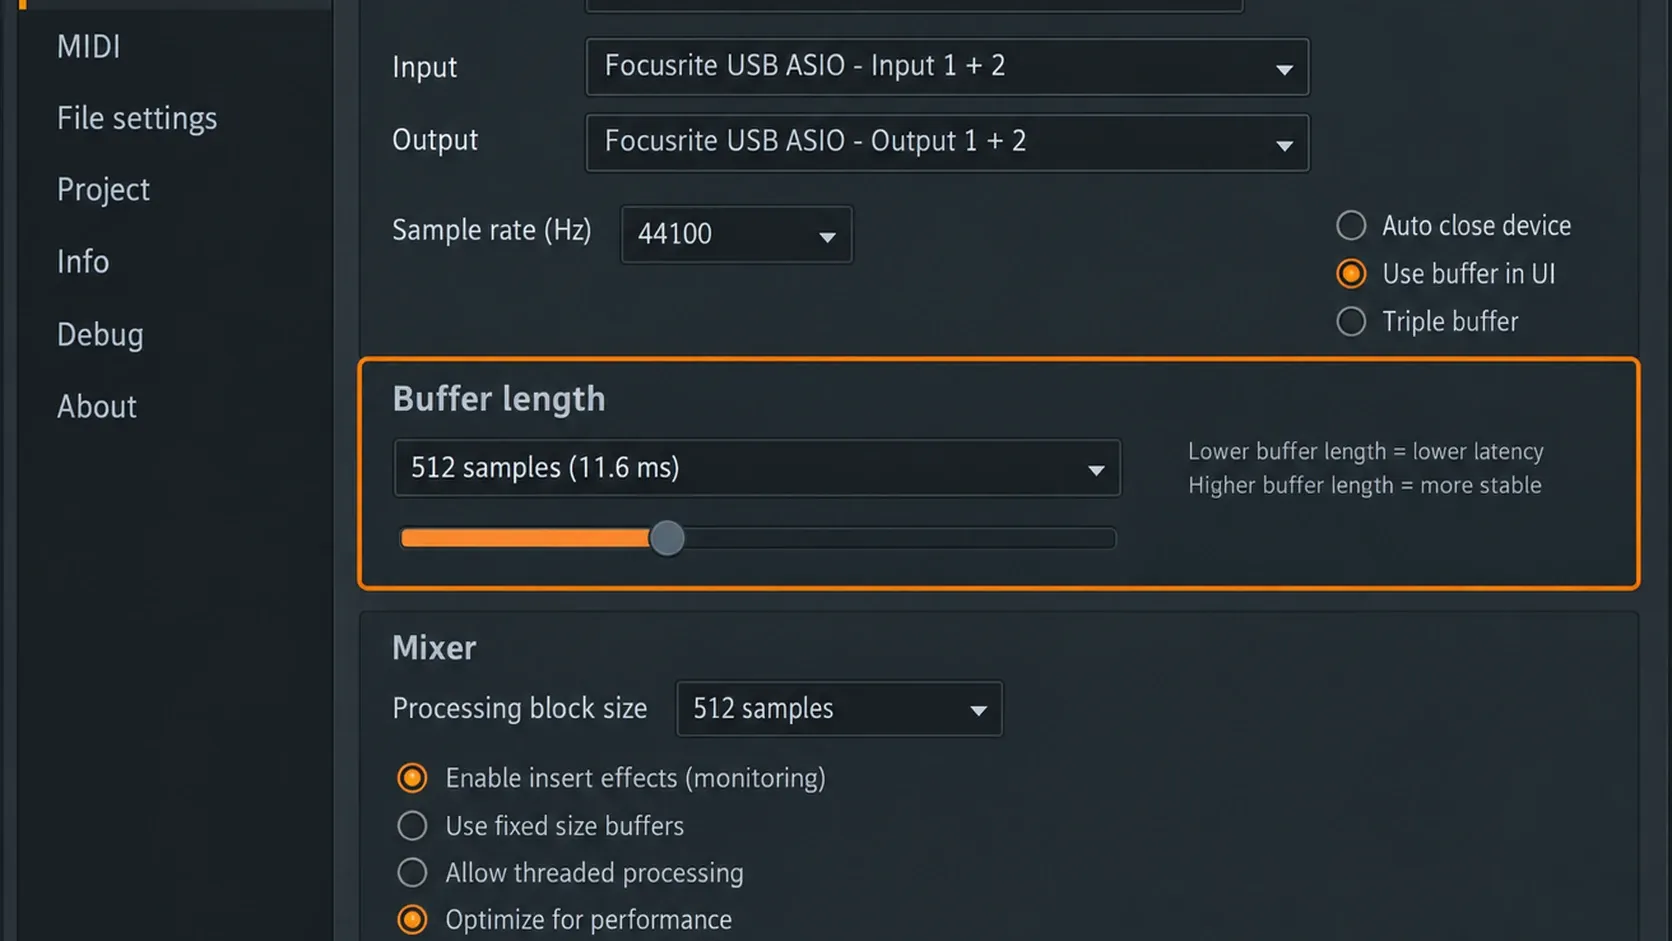
For a normal recording check, use a moderate buffer and leave plugin compensation decisions alone until the input works. A very small buffer can create clicks that distract from the real diagnosis. If changing the buffer makes the device vanish, return to the driver that exposes the interface and treat the buffer issue separately.
Select the interface input on a Mixer Insert
Open the Mixer and select an unused Insert. The FL Studio Mixer manual describes the input menu at the top of the Mixer track. Choose the interface input or stereo pair that carries your source. Do not leave the Insert on None, and do not assume that selecting the interface in Audio Settings automatically assigns a Mixer input.
Use one dedicated Insert for the external source. If the interface exposes inputs 1 and 2 as a stereo pair, choose that pair when the source is stereo. If you are recording a mono microphone or instrument, choose the correct mono input where available and keep the other channel out of the route. The exact names depend on the driver, so read the channel labels rather than guessing from the number.
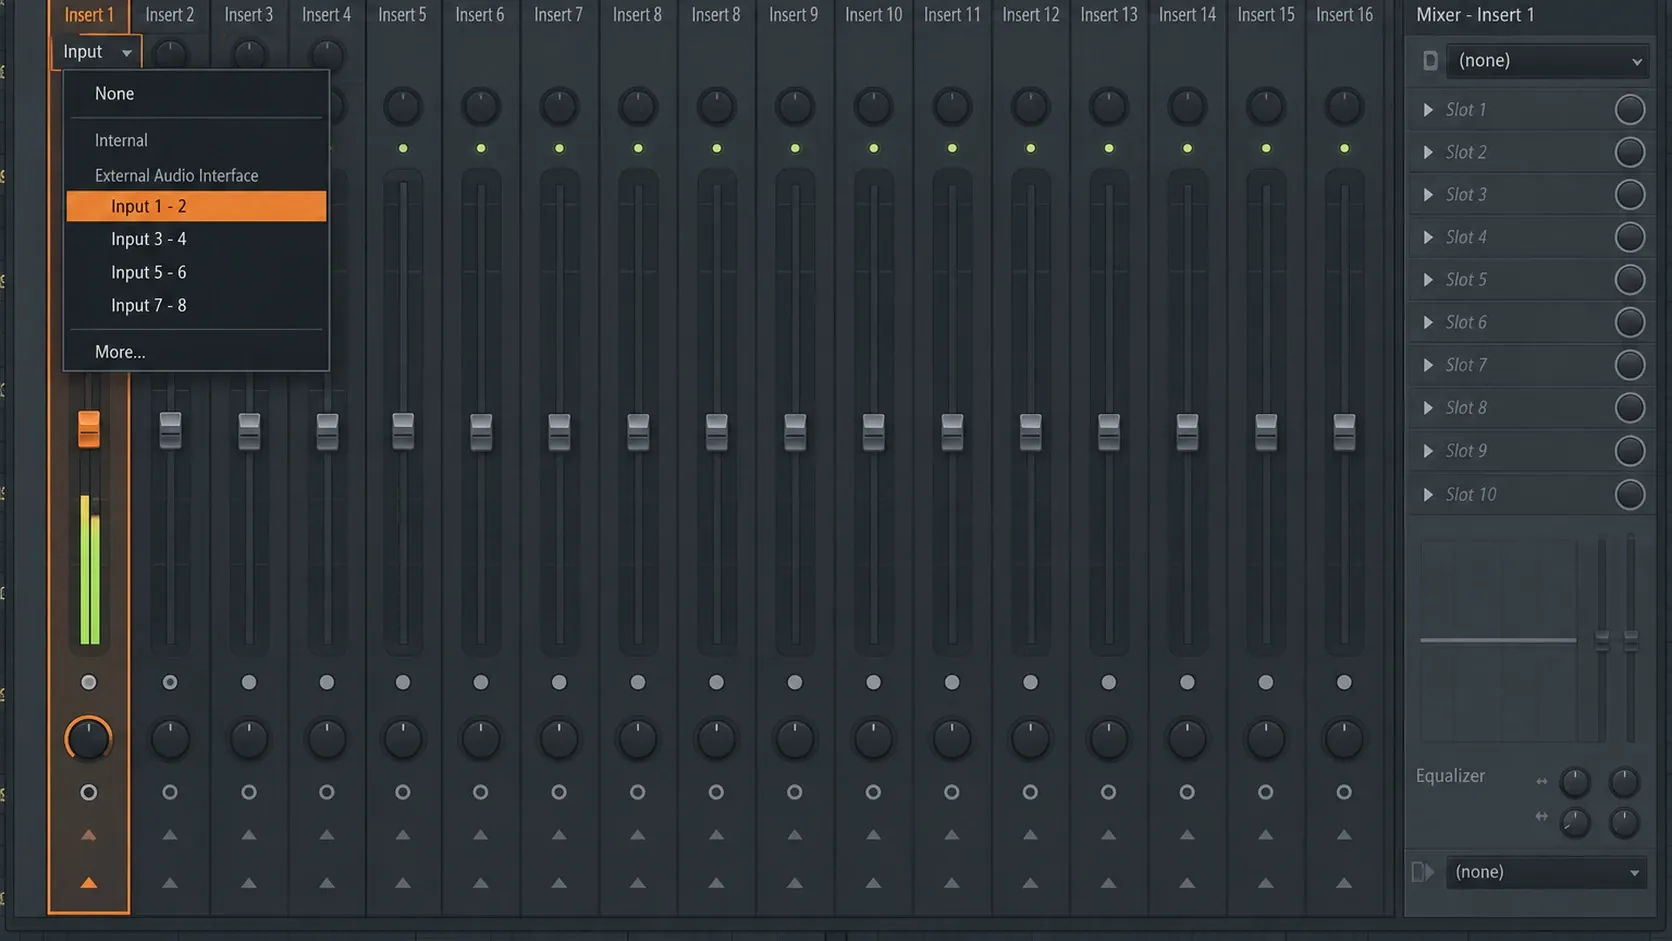
Watch the Insert meter while the source plays. This is the fastest dividing line in the diagnosis:
- If the input is missing from the menu, return to the selected driver and operating-system device.
- If the input is listed but the meter does not move, check the source cable, input gain, permission and the selected channel.
- If the meter moves, FL Studio sees the interface. Continue to the recording destination and monitoring choice.
The Master meter is not proof that the external input is configured correctly. The Master combines the project’s routed audio. The dedicated Insert tells you whether this particular interface input is reaching FL Studio.
Record only after the meter moves
When the Insert meter responds, choose the destination that fits the job. The official audio recording workflow separates focused recording in Edison from recording into the Playlist. Use Edison for a short take you want to inspect, trim or save as a sample. Use the Playlist when the take needs to sit against the project timeline.
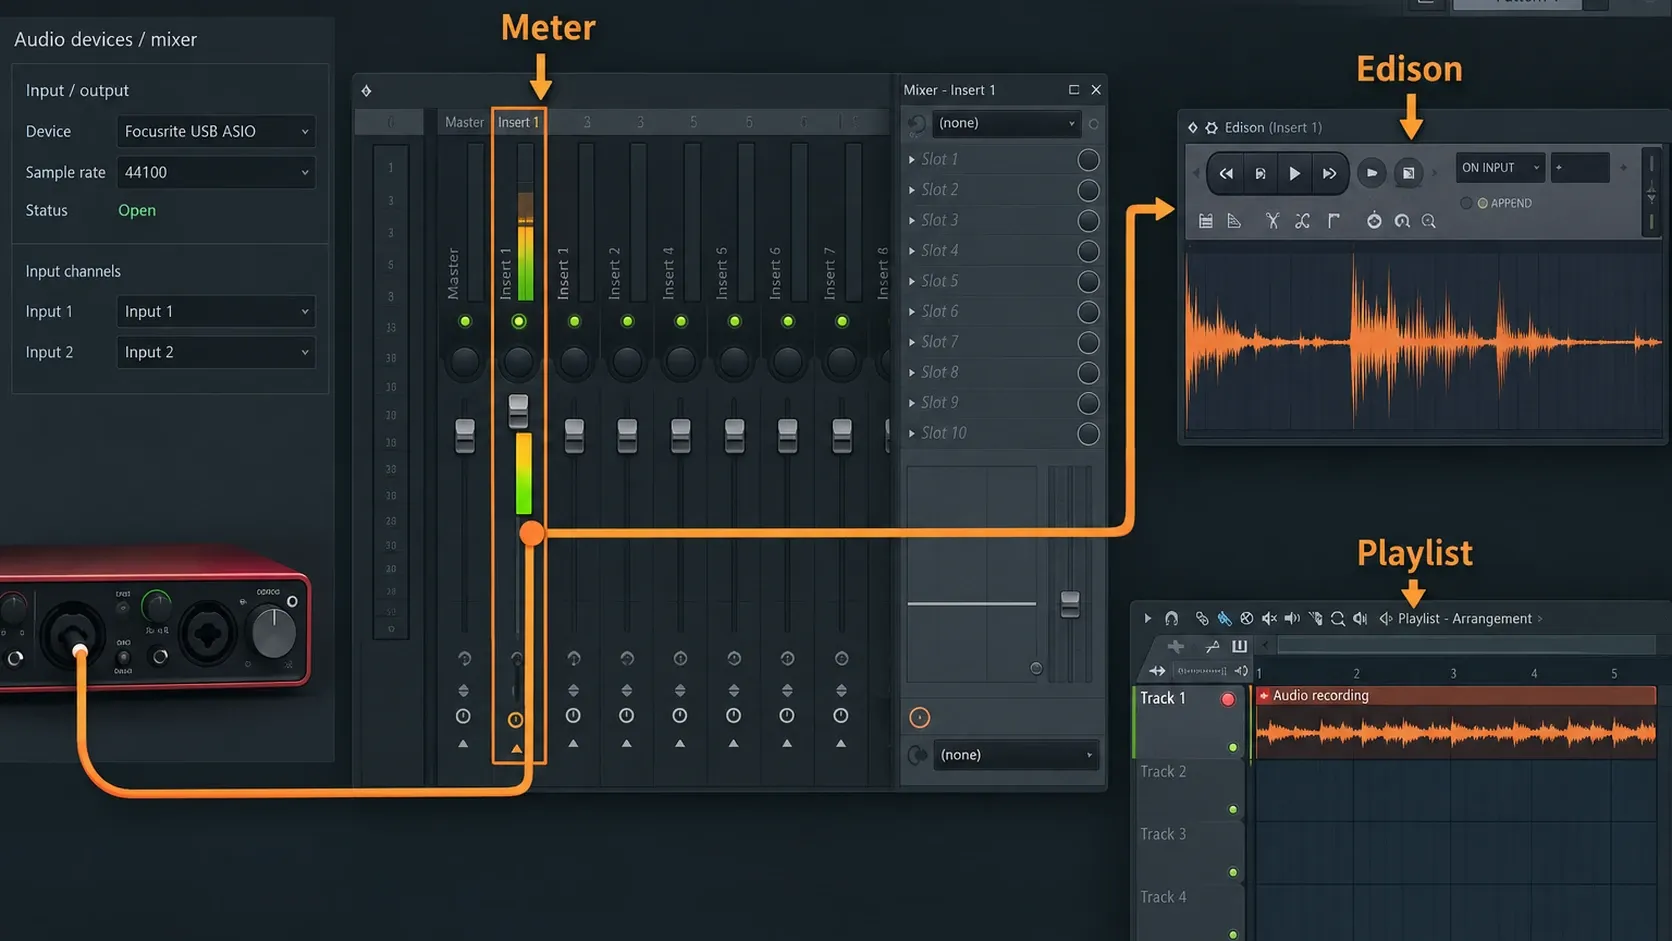
For Edison, load Edison on the Mixer Insert and record the signal there. Keep the source route isolated so you can stop, inspect and save the take without recording the rest of the project. The existing FL Studio Edison guide covers the editing and file-handling decisions after capture.
For the Playlist, arm audio recording and choose the audio recording option that sends the Insert to the arrangement. Record a short test first. Check that the clip is on the expected track and that it contains the interface source rather than the whole Master output.
Fix the common symptoms in the right order
The interface is not in Audio Settings
Check power, cable, operating-system visibility and the manufacturer driver. Reopen FL Studio after the OS recognizes the device. On Windows, try the OEM ASIO driver before FL Studio ASIO. On macOS, check the Core Audio device and any permission prompt. Do not start by lowering the buffer; a buffer change cannot repair a missing device.
The interface is in Audio Settings, but no input appears on the Mixer
Confirm that the selected driver exposes recording channels, not only playback. Some devices expose different channel sets depending on the driver mode, sample rate or aggregate configuration. Re-select the driver, then reopen the Mixer input menu. If the menu still lacks the channels, the problem is between the driver and the device rather than the recording command.
The input is listed, but the Mixer meter is still silent
Check the input socket, cable and gain. Make sure the source is actually producing signal and that phantom power is enabled only when the connected microphone requires it. Choose the channel that matches the physical socket. On macOS, revisit FL Studio’s microphone permission. On Windows, check whether another application has taken exclusive control of the interface.
If the meter remains silent after those checks, open the existing microphone input troubleshooting guide when the source is a microphone. It follows the same signal-first logic but goes deeper into source-specific causes.
The meter moves, but the recording is empty
Confirm that you are recording the Mixer Insert carrying the signal. Check the audio recording filter and the selected Edison or Playlist destination. A moving Master meter does not prove that the correct Insert is armed. Make a short capture, stop it and inspect the resulting waveform before recording a long take.
You hear clicks, dropouts or unstable monitoring
Raise the buffer temporarily and reduce unnecessary load while diagnosing the input. Then check the interface sample rate and the macOS aggregate configuration if one is in use. The existing FL Studio crackling guide is the next stop when the interface is visible and the problem is performance rather than detection.
The recording contains the whole project or a doubled signal
Move the source to a dedicated Insert and monitor one path only. If the same source is heard directly through the interface and again through FL Studio, turn off one monitoring path. If the Master is being recorded, the external input may be mixed with drums, instruments or effects. The clean route is source → interface input → dedicated Insert → Edison or Playlist.
Use this final checklist
Work through these checks in order:
- The interface is powered and its source is connected to an input.
- The operating system sees the interface as an audio device.
- Windows uses the interface OEM ASIO driver when available, or macOS uses the correct Core Audio device.
- FL Studio Audio Settings shows the interface’s input channels.
- A dedicated Mixer Insert is set to the input or stereo pair carrying the source.
- The Insert meter moves before recording starts.
- Edison or Playlist is selected for the job, and only one monitoring path is active.
If the device disappears before step four, stay with the operating-system and driver checks. If it appears but the meter stays still, stay with the physical input, permissions and channel choice. Once the meter moves, the detection problem is finished; any remaining issue belongs to recording, monitoring, timing or performance.