FL Studio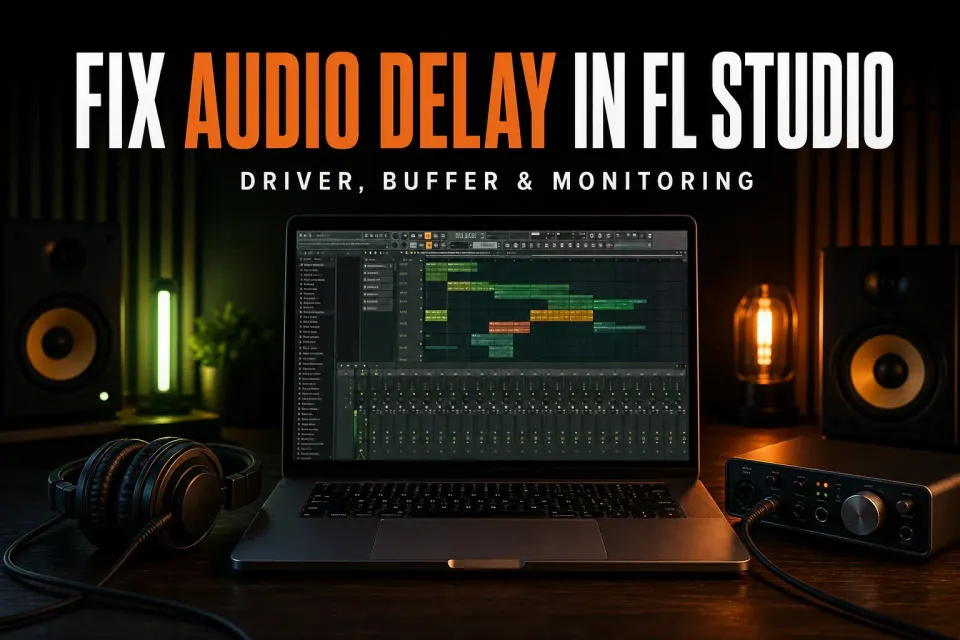
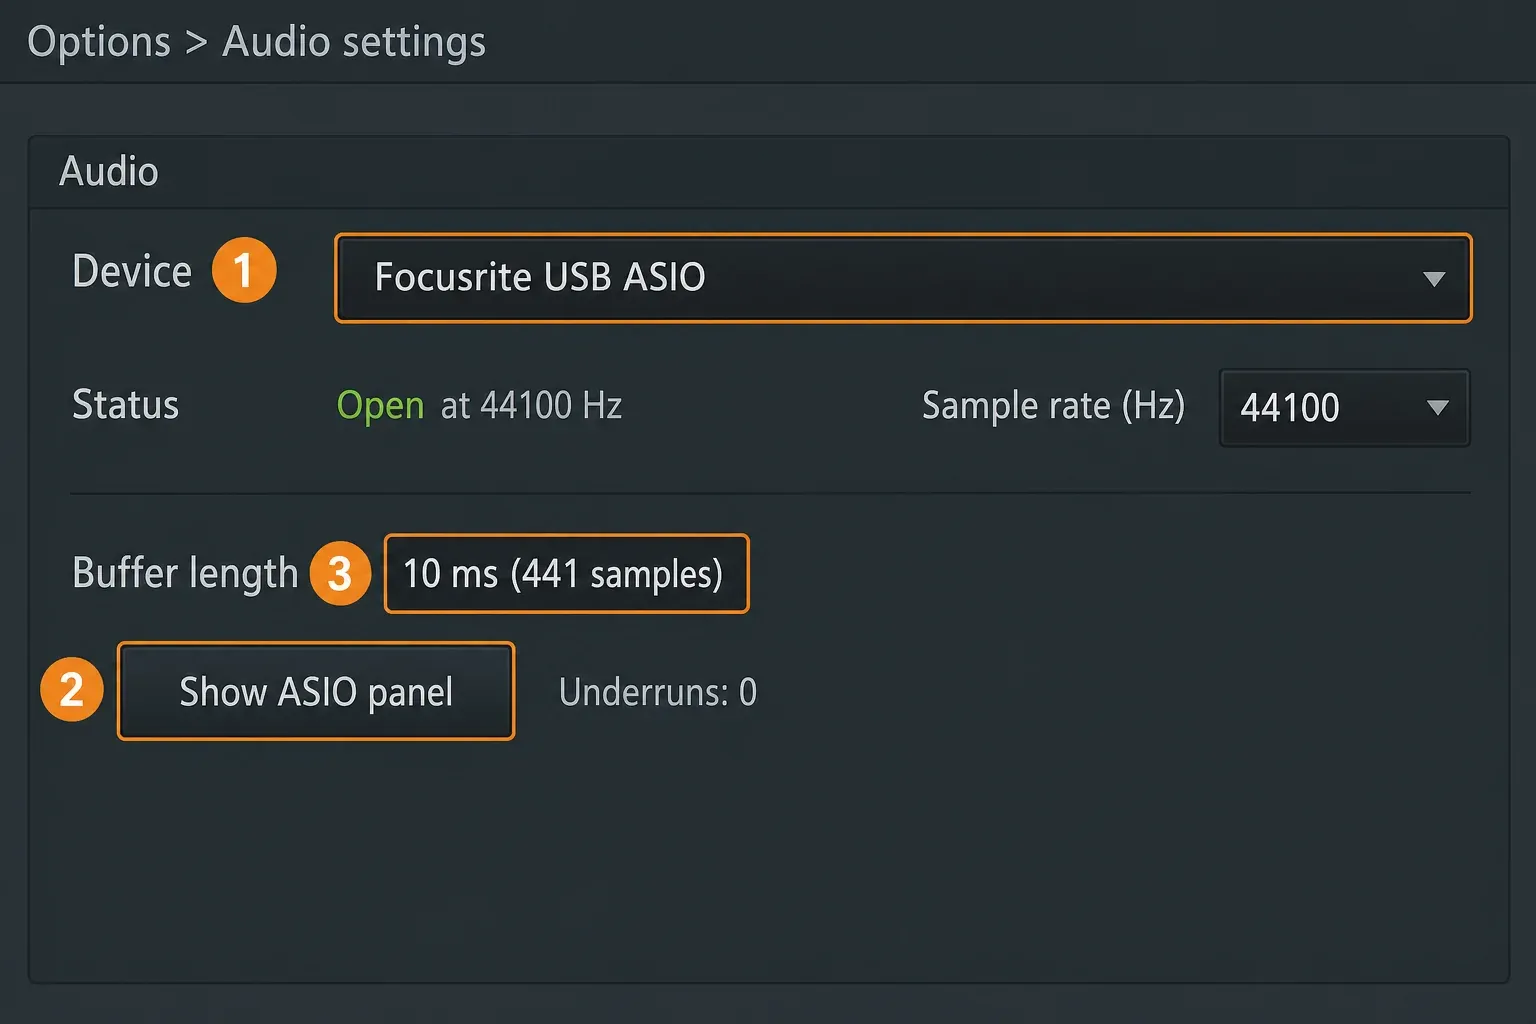
To fix audio latency in FL Studio, open Options > Audio settings first. On Windows, choose the native ASIO driver made for your audio interface. On macOS, use the interface through Core Audio. Then lower the buffer only until the project responds cleanly without clicks or underruns.
What does buffer length do in FL Studio? It sets how much audio FL Studio queues up before playback. A smaller buffer makes live input respond sooner, while a larger one gives the computer more breathing room and cuts down on underruns. If lowering it doesn't fix the delay, the cause is usually the monitoring path, plugin delay compensation, or recording placement, and the buffer itself is fine.
Start here: the four settings that fix most FL Studio delay
- Open Options > Audio settings. You can also press F10.
- Choose the right device. On Windows, select your interface manufacturer's native ASIO driver when one is available. On macOS, select the required Core Audio input and output.
- Set the lowest buffer that plays cleanly. Begin with the CPU-specific values below instead of copying a random number from a video.
- Test in an empty project. If the delay disappears there but returns in your song, check the plugins and routing in the project before changing the driver again.
These steps follow the controls and driver advice in Image-Line's current Audio Settings manual. They also give you a clean dividing line: if an empty project still feels late, look at the driver and buffer. If only one project feels late, look at its plugins and mixer path.
First, identify what “delay” means in your session
People use the same word for four different faults, plus the crackles that can show up when you try to get rid of it. Match the symptom before you change any more settings.
| What you hear or see | Most likely cause | First check |
|---|---|---|
| A MIDI key or guitar note responds late | Audio driver or buffer latency | Device and buffer in Audio Settings |
| Your voice echoes in the headphones | Software monitoring round trip | Direct monitoring and Monitor external input |
| A recorded clip lands late or early | Recording alignment or driver reporting | Latency compensation and input offset |
| The delay appears only in a large project | A plugin or plugin delay compensation | Master and recording-track effects |
| Crackles start when you lower the delay | Buffer underruns | Raise the buffer one step and reduce real-time load |
Getting this right saves time. Recording latency compensation can shift a clip on the Playlist, but it can't make the voice in your headphones arrive any sooner. Direct monitoring can get rid of that distracting headphone echo, but it won't correct a clip the driver places late.
Choose the right FL Studio audio driver
Windows: prefer the interface's native ASIO driver
If you record through a Focusrite, PreSonus, MOTU, Steinberg, RME, Audient, Universal Audio, or another dedicated interface, install the current driver from that manufacturer's site. In FL Studio, open Options > Audio settings and select that device's ASIO entry.
Image-Line currently recommends this order for Windows recording:
- The native ASIO driver supplied for your interface.
- ASIO4ALL v2 when a native driver is unavailable or you need its multi-device routing.
- FL Studio ASIO as the broad compatibility option.
FL Studio ASIO is handy when FL Studio and a browser or another app need to share the Windows audio device. It isn't a direct hardware driver, though. Image-Line notes that its lowest stable latency may be higher than a native ASIO driver's and that recorded takes can land with small placement variations. If a dedicated interface shows up in your device list, its own ASIO driver is the better first pick for recording.
Don't install random “low-latency” driver packs from download sites. Stick to the interface maker's support page or the ASIO options that come with FL Studio.
macOS: Core Audio is already the low-latency path
FL Studio uses Core Audio on macOS, so there's no ASIO selector to hunt for. Pick the correct Input and Output devices in Audio Settings. If you need more than one device at once, create an Aggregate Device in macOS Audio MIDI Setup and select that device in FL Studio.
AirPods and other Bluetooth headphones add their own wireless delay. They're fine for listening, but they make a poor test of live MIDI, vocal, or guitar latency. Apple gives the same mix-or-listen-only advice for Bluetooth devices in its current input-monitoring latency guidance. Plug wired headphones into the Mac or the audio interface while you diagnose the session.
Set buffer length for the job, not for a screenshot
The buffer is a small reserve of audio that FL Studio prepares before playback. A bigger reserve gives the computer more time and means fewer underruns, but live input feels slower. A smaller reserve makes things more responsive and leaves the CPU less room to recover from a demanding plugin or a background spike.
There is no single best FL Studio buffer size. Start here:
| Computer and task | Practical starting point | What to do next |
|---|---|---|
| Windows or Intel Mac, recording or live MIDI | 10 to 20 ms, roughly 441 to 882 samples at 44.1 kHz | Lower only if the session stays clean and you still notice delay |
| Apple silicon Mac | 128 samples | If unstable, move to 192, then 256, 512, or 1024 |
| Mixing a heavy project | Raise the buffer until playback is stable | Return to a lower setting before the next live recording pass |
| Windows Primary Sound Driver fallback | 20 to 50 ms | Move to an ASIO driver if you need responsive recording |
On Windows with an ASIO device, click Show ASIO panel to change the driver's buffer. On macOS, the Buffer length control is available directly in Audio Settings.
The sample value and the time value are related by a simple calculation:
buffer samples / sample rate × 1,000 = milliseconds
At 44.1 kHz, 441 samples is 10 ms. At 48 kHz, 480 samples is also 10 ms. That buffer interval is only one piece of the path: FL Studio's Status readout reports total output latency including plugins, and input conversion plus the trip back to your headphones add more time on top. Don't read a 10 ms buffer as a measured 10 ms round trip.
Image-Line's current performance guidance specifically treats Apple silicon differently from Intel and AMD systems. On Apple silicon, beginning at 128 samples can wake the performance cores more reliably. On Intel and AMD systems, pushing far below 10 ms often raises CPU load quickly without a useful improvement in feel.
Leave Triple buffer off while chasing low latency
Triple buffering can help a few drivers survive heavy CPU load, but it runs one buffer behind and doubles the selected latency. Treat it as a troubleshooting option for underruns, not an everyday recording setting. If you switched it on during an earlier performance fix, turn it off and test again before you change anything else.
Keep sample rates matched
Set FL Studio, the interface input, and the interface output to the same sample rate. For most sessions, 44.1 or 48 kHz is the sensible range. Bumping a project up to 96 or 192 kHz isn't a free latency fix. It piles on real-time processing and can bring back the very crackles you were trying to remove.
If lowering the buffer does nothing, check plugin latency
Open a new, empty project and play the same MIDI keyboard or monitor the same input. If it feels responsive there, your audio driver is probably doing its job, and something in the original project is delaying the monitored path.
Check these places in order:
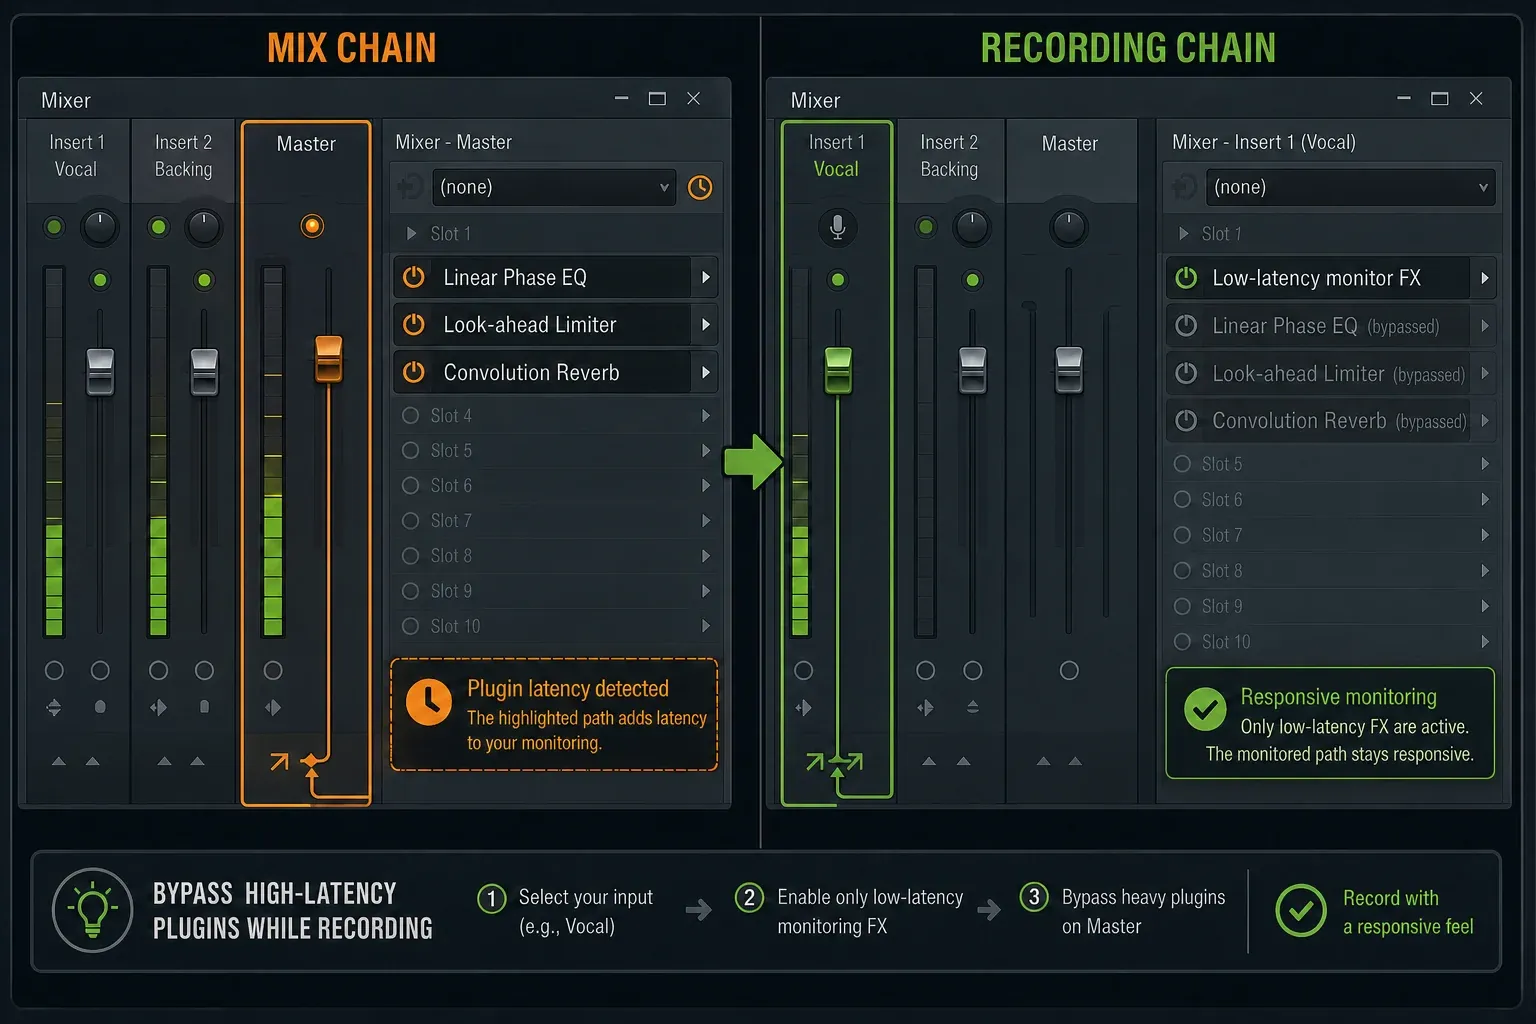
- Bypass effects on the Master.
- Bypass effects on the Mixer track receiving the microphone or instrument.
- Look for oversampling, linear-phase EQ, look-ahead limiting, noise reduction, convolution, pitch correction, and mastering processors.
- Check whether a plugin reports processing latency in its wrapper.
- Re-enable plugins one at a time until the delay returns.
FL Studio automatically compensates for reported plugin delay so tracks stay lined up during playback. That's great for mixing, but the compensated path can feel sluggish while you perform. For a recording pass, use a light monitoring chain or a plugin's low-latency mode where it has one, and save the full mastering chain for playback and export.
If you must monitor through FL Studio in a PDC-heavy project, use the current per-track control instead of disabling compensation for the whole mix. Image-Line's Mixer Track Properties documentation provides Bypass track latency compensation > When recording or not playing. The input track must first be routed to a direct audio-device output. This bypasses PDC on that monitoring path while recording, but it cannot remove the interface's own input/output delay, so treat it as an advanced routing fix rather than the first buffer setting to change.
Don't type in plugin latency values by hand unless a specific plugin reports them wrong and you can verify the offset. Image-Line's Plugin Wrapper documentation also warns that fixed-size buffers can add delay. Those controls are repairs for particular plugins, not settings to switch on in every project.
Fix microphone or guitar monitoring echo
When a vocalist hears a second, late copy of their own voice, the signal is usually making a round trip through the software:
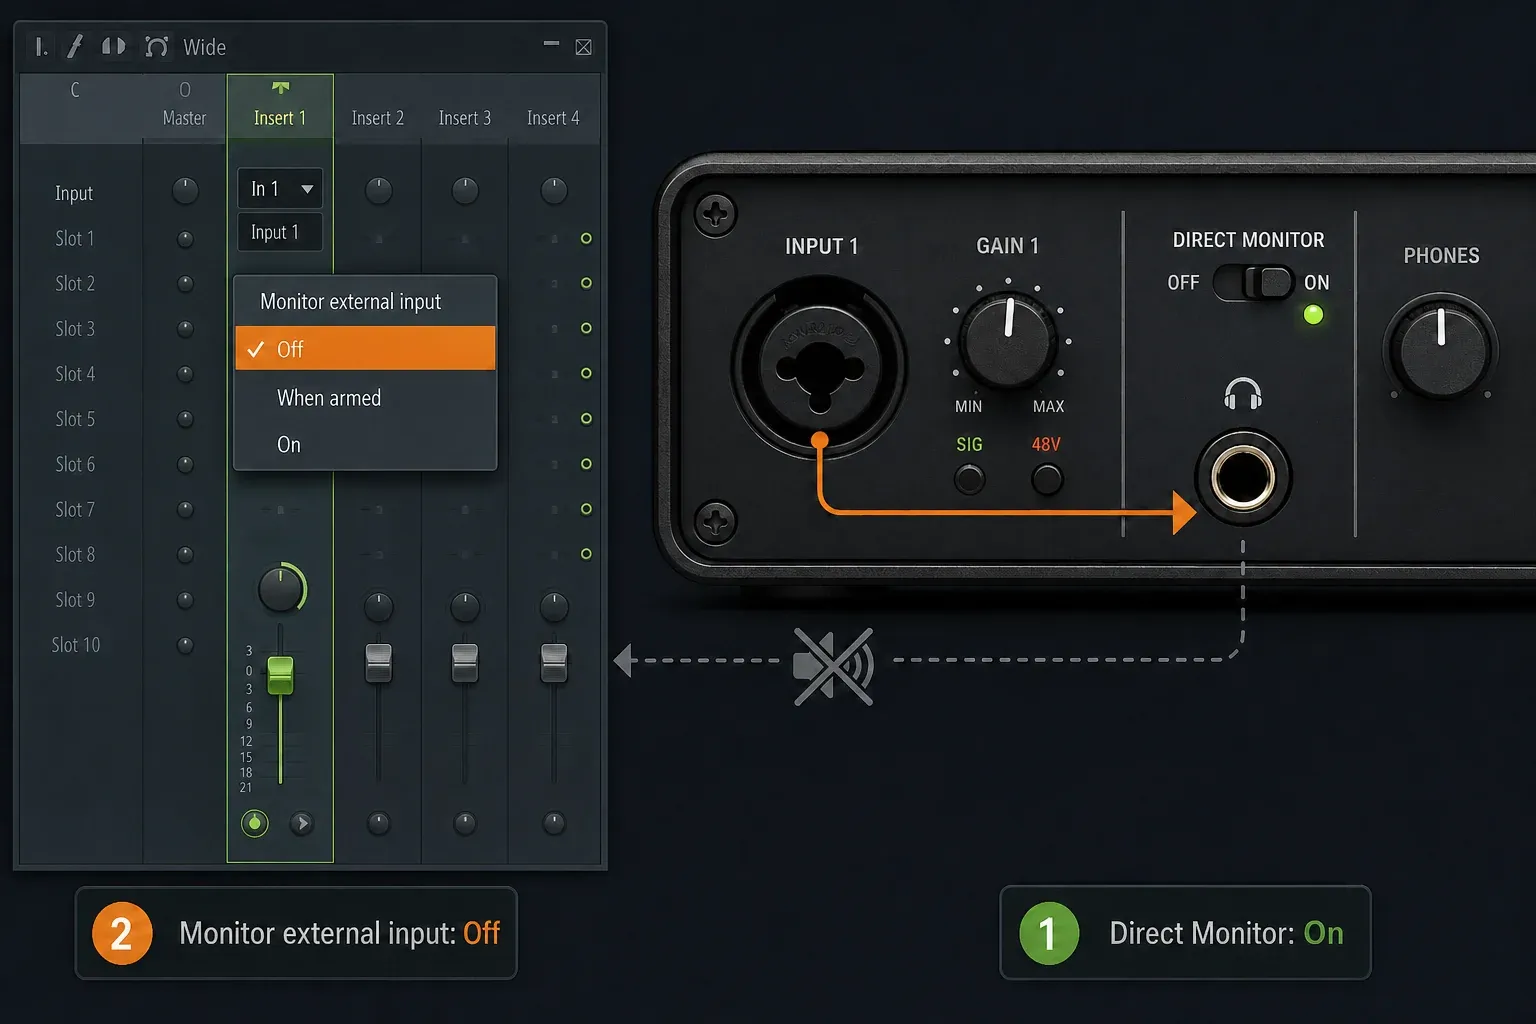
microphone → interface → FL Studio → plugins → interface → headphones
The cleanest fix is hardware direct monitoring, if your interface has it. A Direct Monitor button or an Input/Playback blend knob sends the input straight to the headphones without waiting on FL Studio's audio path.
Use it like this:
- Enable direct monitoring on the audio interface.
- In FL Studio, open the input track's Monitor external input menu.
- Set FL Studio monitoring to Off so you do not hear both the direct signal and the delayed software signal.
- Keep the Mixer track armed and record the dry external input.
The current Image-Line recording guide recommends the same pairing: direct monitoring through the hardware and internal monitoring Off. Recording dry keeps the take editable, and you can put the full vocal or guitar chain back on for playback.
If you need to hear reverb while singing, check first whether the interface mixer offers its own monitor effect. If not, use a light FL Studio monitoring chain and the smallest stable buffer. One heavy look-ahead or mastering chain on the Master can undo every buffer improvement you made.
Fix a recording that lands late or early
A clip that lands in the wrong place is an alignment problem, which isn't necessarily a monitoring problem.
Start with Mixer menu > Disk recording > Latency compensation enabled. FL Studio then removes the reported device latency from the start of the recording so the clip aligns with existing Playlist events. This setting changes recorded placement only. It does not reduce the voice or instrument delay you hear live.
If every take is consistently late or early:
- Confirm that the input and output use the same interface and current native driver.
- Test in an empty project without plugins.
- Record a short physical loopback test if your interface routing allows it.
- Adjust Audio input delay compensation only after you have measured a repeatable offset.
Positive input-compensation values move recorded audio earlier; negative values move it later. Don't guess. A wrong manual value can make an otherwise correct driver overcompensate.
If placement changes from take to take on Windows, switch from FL Studio ASIO to the interface's native ASIO driver before adding a manual offset. Image-Line now documents variable recording placement as a possible FL Studio ASIO limitation.
If the Playlist playhead jumps or recorded takes still land off-grid after checking the driver and Disk recording setting, open Options > Audio settings > Playback tracking. Image-Line says in its Audio Settings manual that changing the tracking source can correct position jitter or recording alignment. With a manufacturer-supplied interface driver, try Driver; Hybrid can help when position indicators or timing remain unstable. Change one setting at a time and compare a short take. Leave the global Offset alone unless the error is consistent across tracks; for a measured delay on one input or an external loopback, use Audio input delay compensation. This affects position and recorded alignment, not the headphone monitoring delay.
Stop crackles after reducing the delay
Crackles, pops, and a climbing underrun counter mean the computer or driver can't fill the current buffer in time. Raise the buffer by one step and test again. Don't leap from a stable session to the lowest number just because it looks better on paper.
If a reasonable buffer still crackles:
- Make sure FL Studio and the interface use the same 44.1 or 48 kHz sample rate.
- Connect the interface directly rather than through an unreliable USB hub.
- Update the native audio driver from the manufacturer.
- Enable multithreaded generator and mixer processing.
- Consolidate or render CPU-heavy instrument tracks before recording.
- Use Smart Disable carefully. It can save CPU, but time-based or long-decay plugins may not behave correctly with it.
This is where latency tuning stops and performance troubleshooting takes over. You're not hunting for the smallest buffer. You want the smallest buffer that stays clean in the project you're actually recording.
Keep the boundary between setup and diagnosis clear. Use the crackling-audio repair order when pops continue at a sensible buffer, the high-CPU guide when the project load stays near its deadline, and the MIDI input checklist when keys do not trigger instruments at all. Once audio and MIDI both respond, build a small test in the first-song tutorial; use the Mixer routing guide when the remaining problem is an input, insert or monitoring path.
A stable FL Studio recording setup in 60 seconds
Before the performer starts another take, check this short list:
- Correct native ASIO or Core Audio device selected.
- Wired headphones connected to the recording interface.
- Buffer low enough to feel responsive, with no rising underrun count.
- Triple buffer off for the recording pass.
- Mastering and look-ahead plugins bypassed.
- Direct monitoring on and FL Studio monitoring Off, if hardware monitoring is available.
- Latency compensation on for recorded clip placement.
- Input and output sample rates matched.
Save a stripped-down recording version of a heavy project if you need to. One rendered backing track and a clean input channel are often more reliable than forcing a finished mix to run at a tiny buffer.
Once the recording path is stable, head back to the FL Studio guides for the next setup or workflow problem, and resist changing several unrelated settings at once.
Frequently asked questions
What buffer size should I use in FL Studio?
On Windows or an Intel Mac, begin around 10 to 20 ms and use the smallest value that does not increase underruns. On an Apple silicon Mac, Image-Line recommends starting at 128 samples, then moving to 192, 256, 512, or 1024 if the project needs more headroom.
Why does FL Studio still have delay after I lower the buffer?
Try the same input in an empty project. If the empty project feels responsive, a plugin or compensated mixer path in the original song is adding latency. Bypass the Master and recording-track effects, then bring them back one at a time.
Should I use FL Studio ASIO or ASIO4ALL?
Use your interface manufacturer's native ASIO driver first. If there is no native driver, ASIO4ALL can provide low-latency and multi-device routing. FL Studio ASIO is the easier multi-client compatibility option, but its stable latency may be higher and recording placement may vary on some systems.
How do I remove microphone delay without muting my recording?
Use the audio interface's direct-monitoring feature, then set FL Studio's Monitor external input option to Off. The input still records, but the headphones receive the immediate hardware-monitor signal instead of the delayed software return.
Why is my recorded audio late or early in FL Studio?
Enable Disk recording > Latency compensation and test with the native interface driver in an empty project. If a measured offset remains consistent, use Audio input delay compensation. Do not use that control to fix live headphone monitoring.
Will a higher sample rate fix FL Studio latency?
Not reliably. A higher sample rate shortens the time represented by the same sample buffer, but it also increases real-time CPU work. Keep FL Studio and the interface matched at 44.1 or 48 kHz, then solve latency with the driver, buffer, monitoring path, and plugins.