FL Studio
The fastest way to learn how to use FL Studio is to finish one small song. In this tutorial you'll build a drum loop, add a bass and a melody, turn the loop into a short arrangement, balance it in the Mixer and export a file that plays outside FL Studio.
Keep the goal small on purpose: a clear 60- to 90-second track, not a release-ready masterpiece. What you're really after is seeing where musical ideas live and how they move through FL Studio. Once that route clicks, the interface stops feeling like five windows that have nothing to do with each other.
This walkthrough sticks to core tools and works for a beat, an electronic sketch or a simple instrumental. It follows the current FL Studio 2026 desktop workflow. Pick any sounds you like; getting the structure right matters more than copying a genre or preset.
Your first song in six moves
- Set a comfortable tempo, save the project, and learn the five working areas.
- Build one bar of drums in the Channel Rack.
- Add a bass line and a simple melody in the Piano Roll.
- Place separate patterns in the Playlist and turn the loop into a song.
- Route the sounds to Mixer inserts and make a clean rough balance.
- Switch to Song mode and export a WAV or MP3 file.
Before you start
If the desktop app isn't installed and unlocked yet, start with the FL Studio installation guide. Then open a new project and plug in wired headphones or speakers. You won't need extra plugins, sample packs or a paid FL Cloud plan for this exercise. If playback reacts late when you tap a key or enter a note, sort out the driver and buffer first with the FL Studio audio settings guide. A new workflow is much harder to learn when every sound shows up half a beat late.
The time-unlimited FL Studio trial is enough to finish and export this tutorial. The catch is that a normal trial can't reopen a saved project once you close it. Our FL Studio edition comparison explains the trial and paid options, so this lesson doesn't have to turn into a buying guide.
Save an FLP right away, even if you own a license. The FLP is your project file, and it's different from the WAV or MP3 you'd send to someone. Use a plain name such as first-song-01.flp, and save numbered versions whenever you're about to try something risky.
This tutorial assumes you've already picked FL Studio. If you're still deciding, the Ableton versus FL Studio comparison weighs the two by beat making, recording, arrangement and live performance instead of reputation. If a connected keyboard shows up but plays no notes, stop here and use the FL Studio MIDI input repair guide, because none of the steps below will make sense while the controller path is broken.
The five parts of FL Studio that matter today
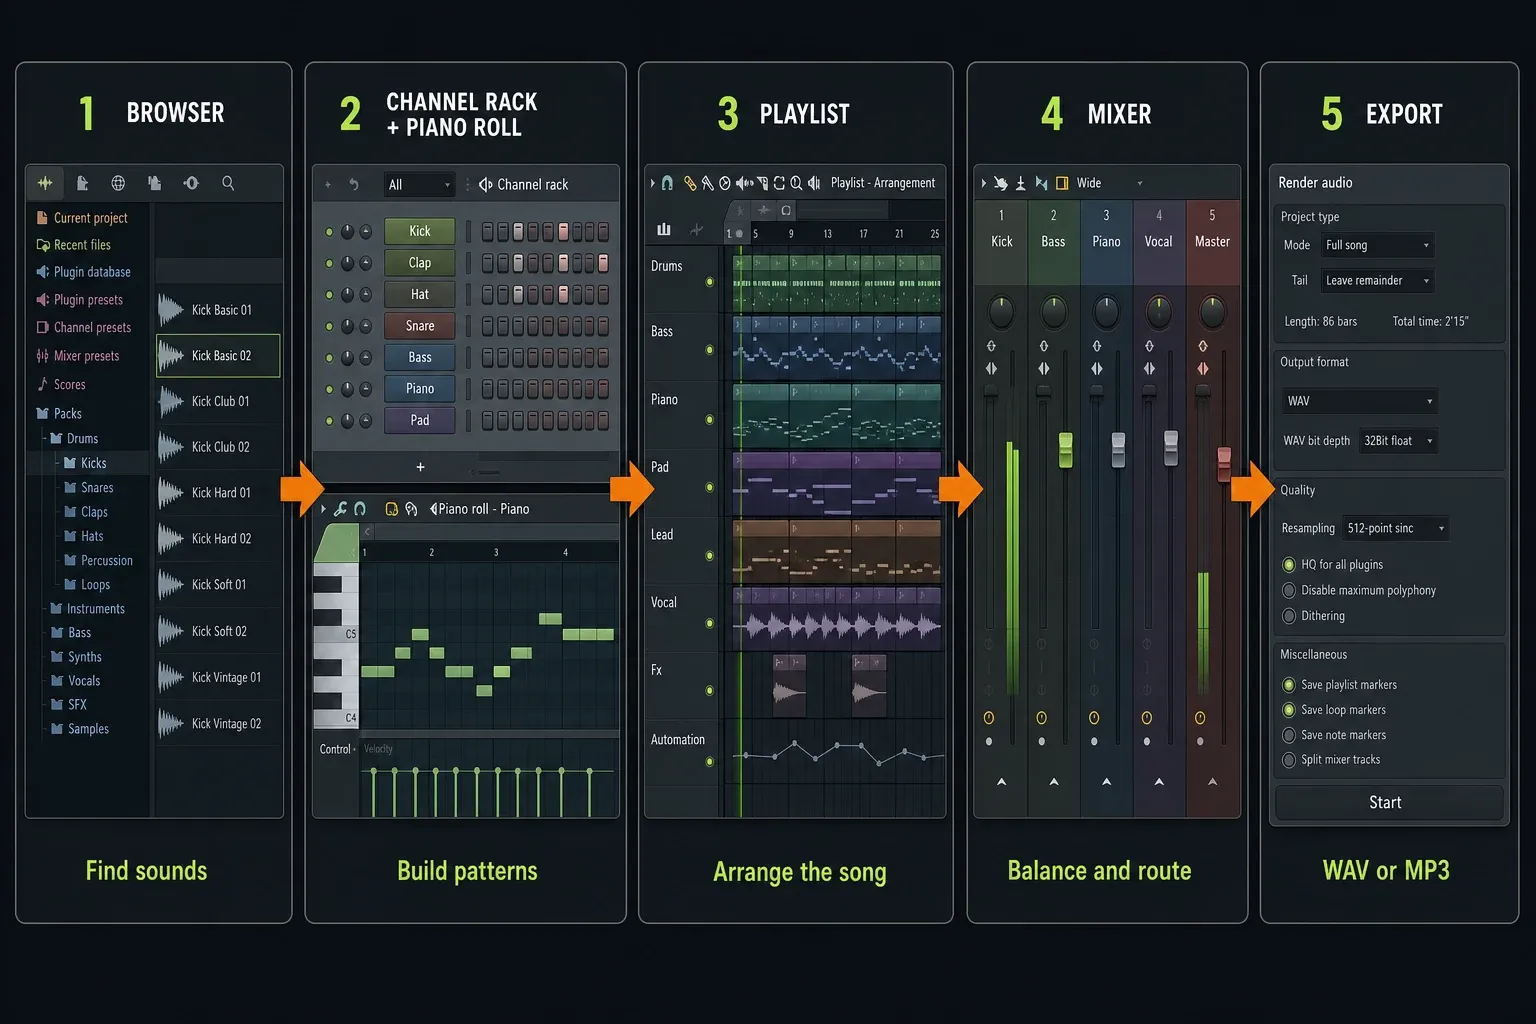
Most menus can wait. Image-Line's own basic FL Studio workflow follows the same path you'll take here, from instruments and patterns to arrangement, mixing and export.
| Area | Job in this project | Beginner mistake |
|---|---|---|
| Browser | Find samples, presets, projects, and plugin content | Dragging in dozens of sounds before deciding what the song needs |
| Channel Rack | Hold instruments and build patterns | Assuming each pattern can contain only one instrument |
| Piano Roll | Write pitched notes with length and velocity | Trying to write a full melody with drum-style step buttons |
| Playlist | Arrange Pattern, Audio, and Automation Clips over time | Assuming Playlist lane 3 automatically feeds Mixer insert 3 |
| Mixer | Control levels, routing, effects, and the final output | Adding processors before the basic volume balance works |
Step 1: set the tempo and save a clean starting point
Set the tempo to 120 BPM for this exercise. There's nothing special about that number, but in 4/4, one beat at 120 BPM lasts 0.5 seconds, which makes the pulse easy to count. If you already have an idea at another speed, use that.
Press Space to start and stop playback. Leave the transport in Pattern mode while you build the first loop. Image-Line's Pattern/Song control documentation confirms the difference: Pattern mode plays the selected pattern, and Song mode plays the Playlist arrangement. Remembering that one switch fixes one of the most common beginner puzzles: “why does FL Studio keep playing the same loop?”
Save again. Ten seconds spent saving now beats trying to work out later which accidental click broke the project.
Step 2: build one bar of drums in the Channel Rack
The Channel Rack and Step Sequencer are made for this job. Each row is one sound source, and in the default 16-step bar each step is a sixteenth note.
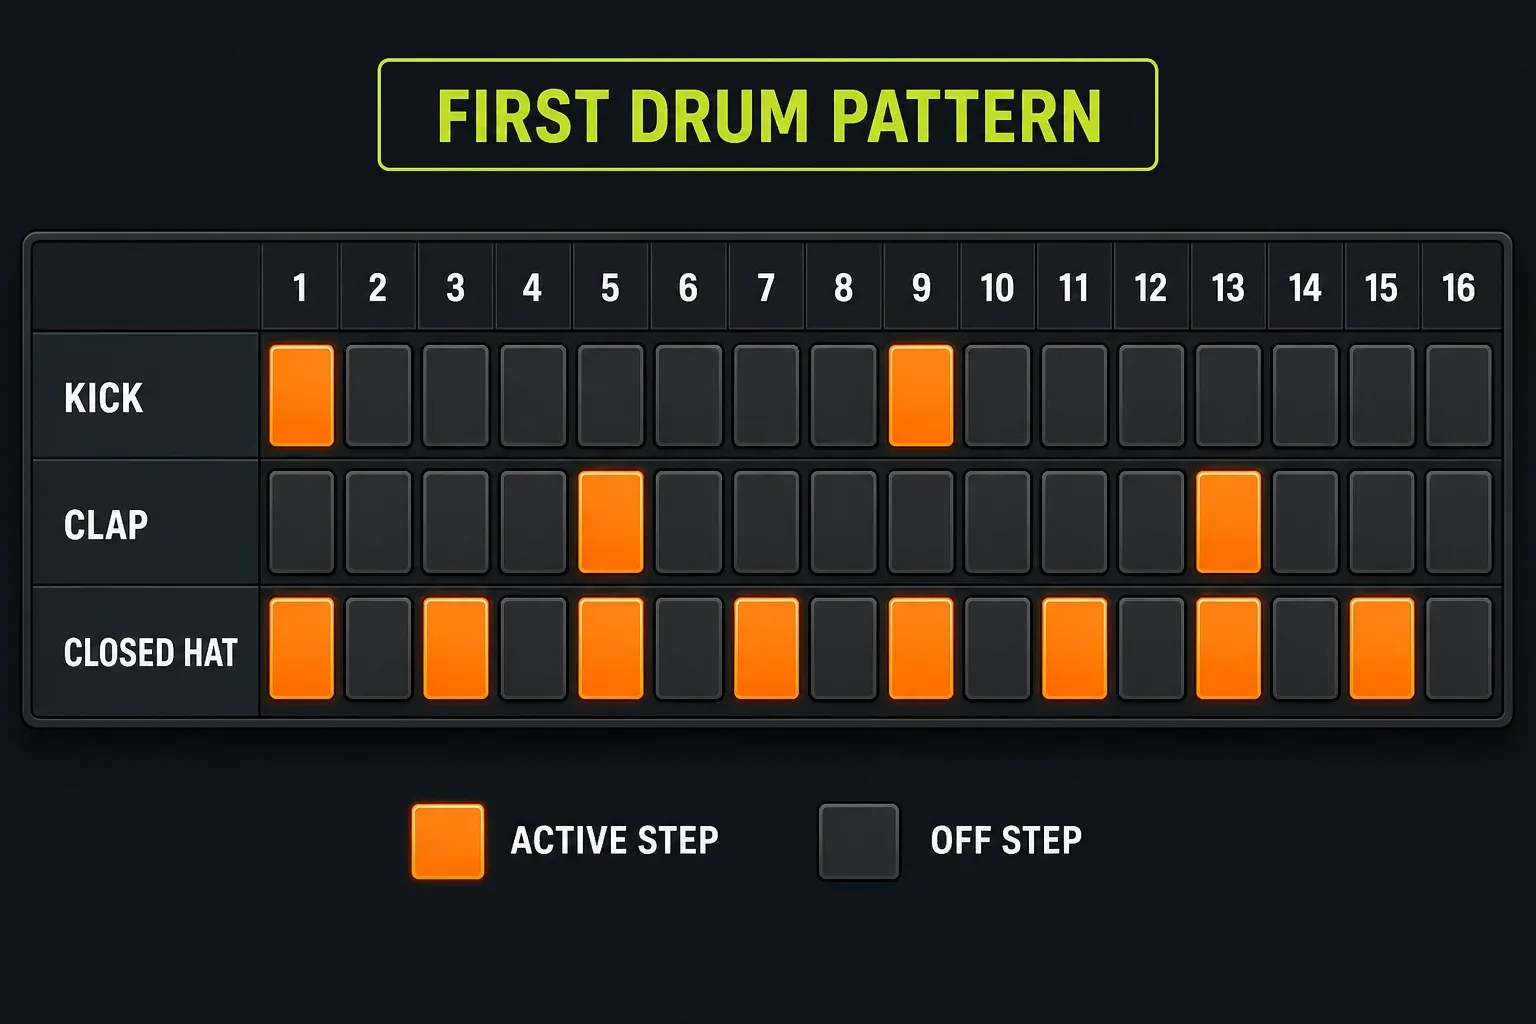
Use the kick, clap or snare and closed hi-hat that are already in the project, or swap in three clean samples of your own. Then program this simple starting groove:
- Kick: steps 1 and 9.
- Clap or snare: steps 5 and 13.
- Closed hi-hat: every second step.
Play the pattern. If the groove feels empty, move one kick or drop a hat before you add more layers. A beginner's drum loop gets muddy from too much far more often than from too little.
Name the pattern Drums. Naming sounds and patterns only feels slow until the day you end up with six copies called Pattern 2.
Step 3: add bass and melody in the Piano Roll
Add one of the included instruments to the Channel Rack and pick a simple bass sound. Create a new pattern called Bass, select the bass channel and open its Piano Roll. If you know a minor scale, use notes from it. If you don't, pick a root note that sits comfortably and build a two- or four-note rhythm around it.
Give the notes clear lengths. The Step Sequencer is great for drums, but pitched parts are easier in the Piano Roll, where you see pitch, length, timing and velocity at once. Tie the bass rhythm to the kick instead of filling every gap.
Create another pattern called Melody. Add a second included instrument and write a short phrase that leaves some silence between ideas. Borrow two or three notes from the bass scale. Music-theory perfection isn't the point here. You're learning that several channels can share the Channel Rack while each pattern decides which note data to play.
Right now, Pattern mode can only audition Drums, Bass or Melody one at a time, and that's expected. The next step is where they become a song.
Step 4: arrange the patterns in the Playlist
Open the Playlist and put the Drums pattern at bar 1. Add Bass and Melody on their own lanes. Playlist lanes are flexible containers and aren't tied to any instrument, but keeping each part on the same lane makes the arrangement easy to read.
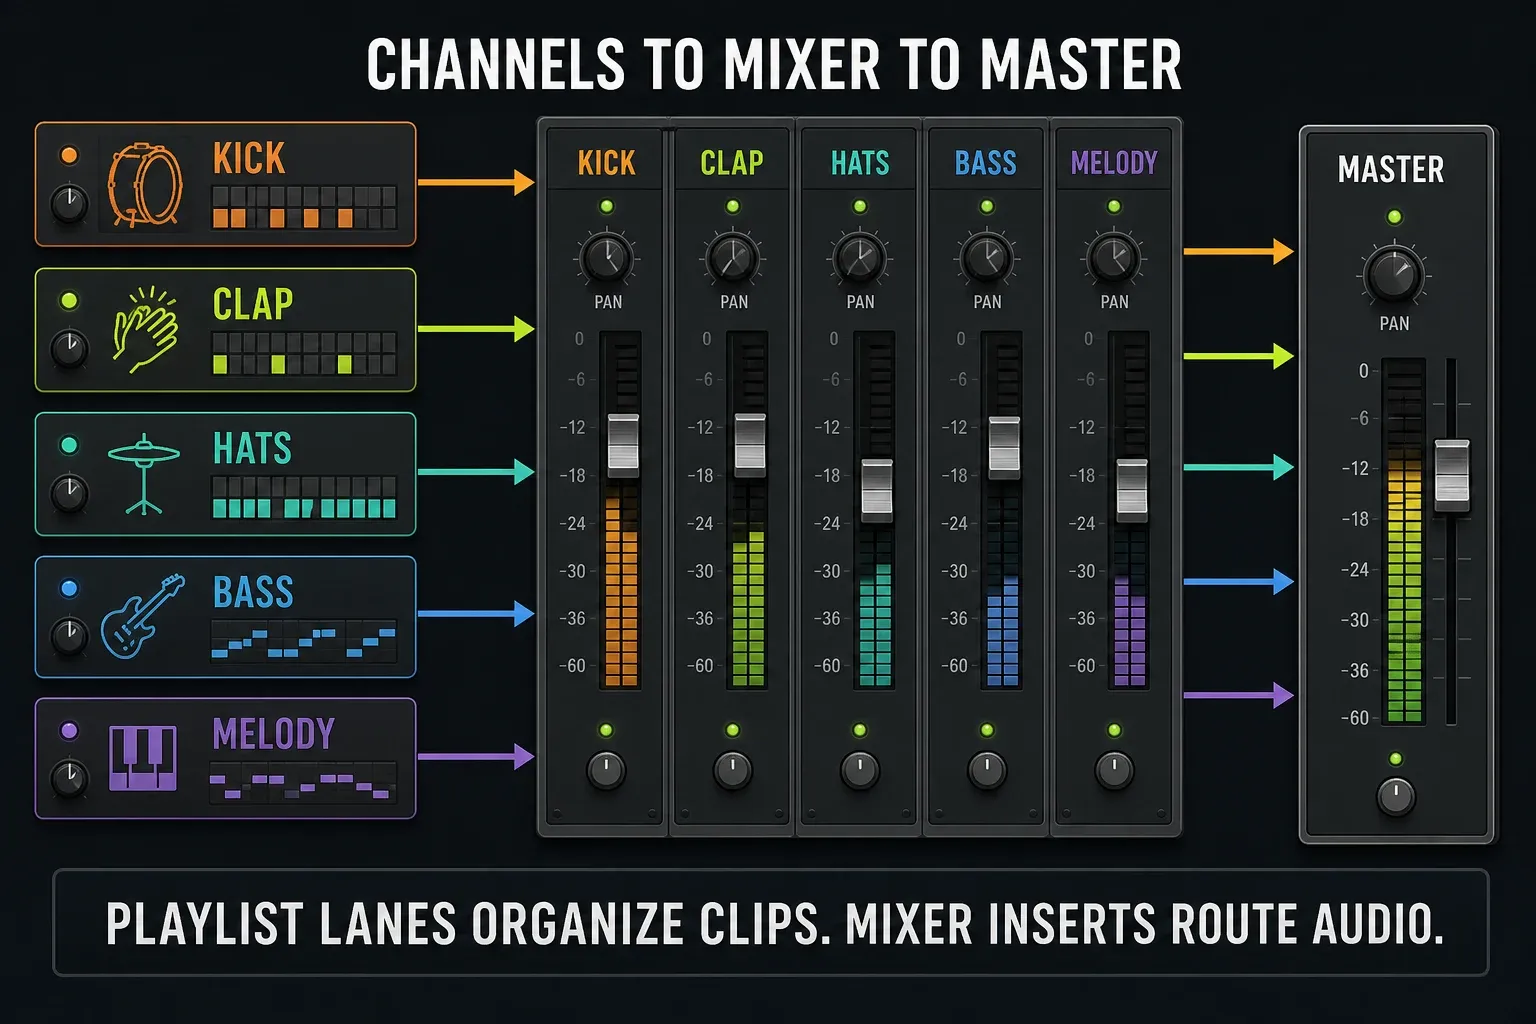
The official Playlist manual points out an important difference: by default, Playlist tracks aren't tied to Mixer tracks. A clip's instrument routing decides which Mixer insert gets its sound. The lane is for visual organization, and the Mixer handles audio routing. Track Mode is the exception, where an Instrument or Audio Track can create a linked Channel–Playlist–Mixer group when you deliberately want a 1:1 workflow.
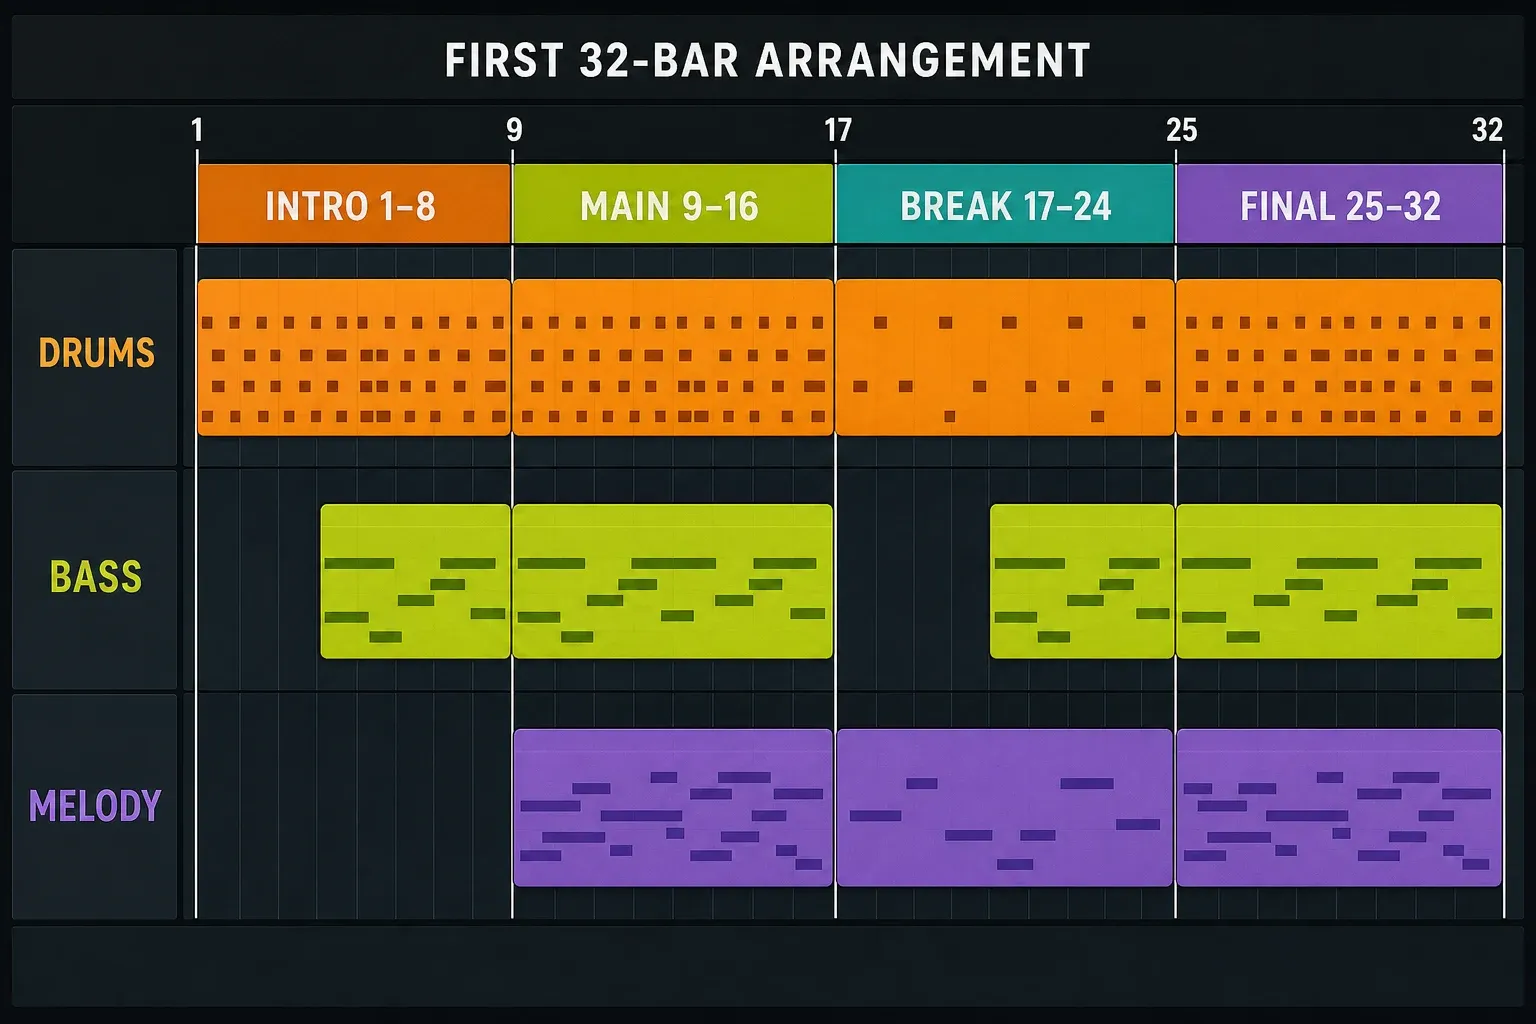
Build a simple 32-bar shape:
| Bars | Parts playing | Purpose |
|---|---|---|
| 1–8 | Drums, then Bass enters | Introduce the groove without revealing everything |
| 9–16 | Drums + Bass + Melody | State the main idea |
| 17–24 | Remove one part, then rebuild | Create contrast without writing new material |
| 25–32 | All parts, with a short ending | Return to the strongest section and stop cleanly |
Switch the transport from Pattern to Song and press Space. If you still hear a single pattern looping, check the Pattern/Song switch before you move clips or rebuild anything.
Step 5: route the sounds and make a rough balance
All audio in FL Studio passes through the Mixer, but a Playlist lane number doesn't pick the Mixer insert. Select each important instrument in the Channel Rack and give it its own Mixer insert. Use clear names such as Kick, Clap, Hats, Bass and Melody.
Play the busiest section, where every part is playing. Pull each insert down far enough that the Master doesn't clip. Then build the balance in this order:
- Set kick and clap at a comfortable listening level.
- Bring in the bass until it supports the kick without burying it.
- Add the melody, keeping it below the point where it gets tiring.
- Add the hats last; they usually need less level than beginners expect.
Do this with the faders before loading any effects. A quiet, balanced first mix teaches you more than a loud chain of presets. The deeper questions about sends, buses, pre/post-fader routing and effect order belong in the dedicated FL Studio Mixer tutorial.
Step 6: export a file that plays outside FL Studio
Save the FLP again, switch to Song mode and play the track from start to finish. Listen for a hanging note, an empty bar you didn't intend or a clip that starts late. Fix those arrangement problems first; export settings won't solve them.
Choose File → Export. The official export guide describes WAV as a lossless production format and MP3 as a smaller compressed one. Use:
- WAV for an archive, later editing or sending the mix to someone who'll process it further.
- MP3 for a quick phone check or easy sharing.
Set the render Mode to Song, not Pattern. Leave Tail on its default Leave remainder setting so a final reverb or delay doesn't get chopped off. FL Studio normally renders whatever reaches the Master, so a sound routed away from the Master can go missing from the file. Open the export once it's rendered and listen to the start, the loudest section and the ending. A render only counts once you've actually listened to it.
If the project does not behave as expected
| Problem | Check first |
|---|---|
| Only one loop keeps playing | Switch the transport from Pattern to Song mode |
| A Playlist lane moves but the wrong Mixer insert reacts | Check the instrument’s Channel Rack-to-Mixer assignment |
| No sound or a long response delay | Use the FL Studio no-sound checklist, then check the driver and buffer if playback is delayed |
| The export is silent or missing a part | Confirm the part reaches the Master and set the render Mode to Song |
| The saved FLP will not reopen in the trial | This is the normal trial restriction; use your exported audio or unlock a paid edition |
What to learn after the first export
Don't start over with fifty plugins. Make a second short song and work on one skill: tighter drum timing, a clearer bass line, a cleaner arrangement or more deliberate levels. Repeating the process is what turns the workflow into muscle memory.
Use the FL Studio guide library as your map. After this first export, learn the shortcuts you will use every session, then move on to Mixer routing, automation, vocal recording, mixing and mastering. Each of those has its own page, because squeezing them in here would make the beginner route harder to follow.
Frequently asked questions
Is FL Studio hard for beginners?
The interface feels unusual because patterns, Playlist lanes and Mixer inserts are separate things. It gets much easier once you've finished one project and understand the path from Channel Rack to Playlist to Mixer.
Can I make a full song in the FL Studio trial?
Yes. The trial can create, save and export a complete song, but the normal trial can't reopen a saved project after FL Studio closes. Export important work before closing, or unlock a paid edition.
Why does FL Studio keep playing the same pattern?
The transport is probably in Pattern mode. Switch to Song mode to hear the clips arranged across the Playlist.
Are Playlist tracks the same as Mixer tracks?
No. Playlist tracks arrange clips over time, while Channel Rack instruments and audio clips are routed to Mixer inserts for level and effects.
Should a beginner use samples or stock plugins?
Use whichever gets a clear idea onto the timeline fastest. A few included drum samples and one or two stock instruments are plenty for this tutorial, and buying more sounds won't teach you the workflow.
Should I export WAV or MP3 from FL Studio?
Export WAV for a lossless archive, for collaboration or for further processing. Export MP3 when you want a smaller file for quick listening or sharing.