FL Studio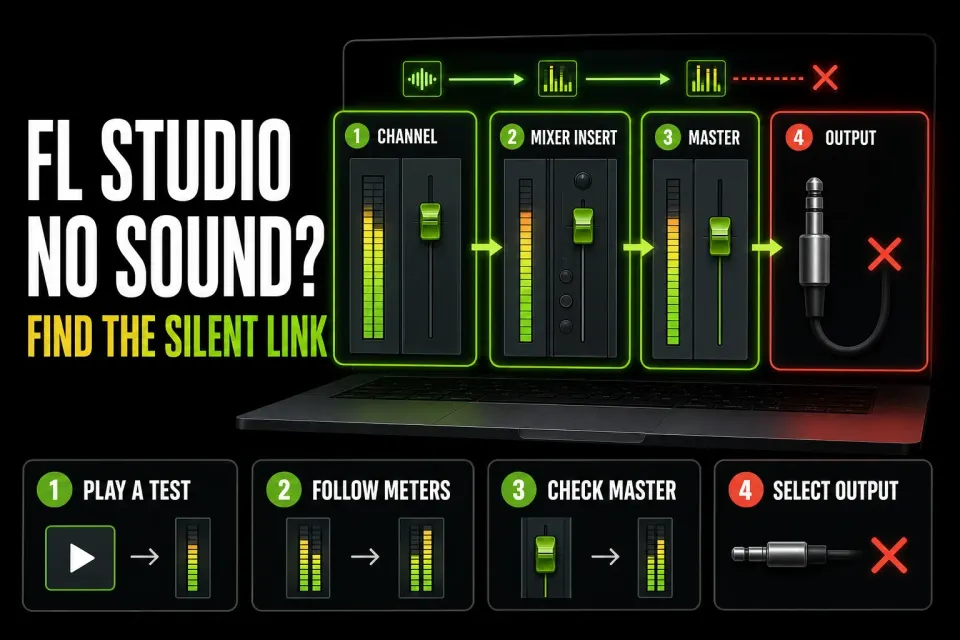
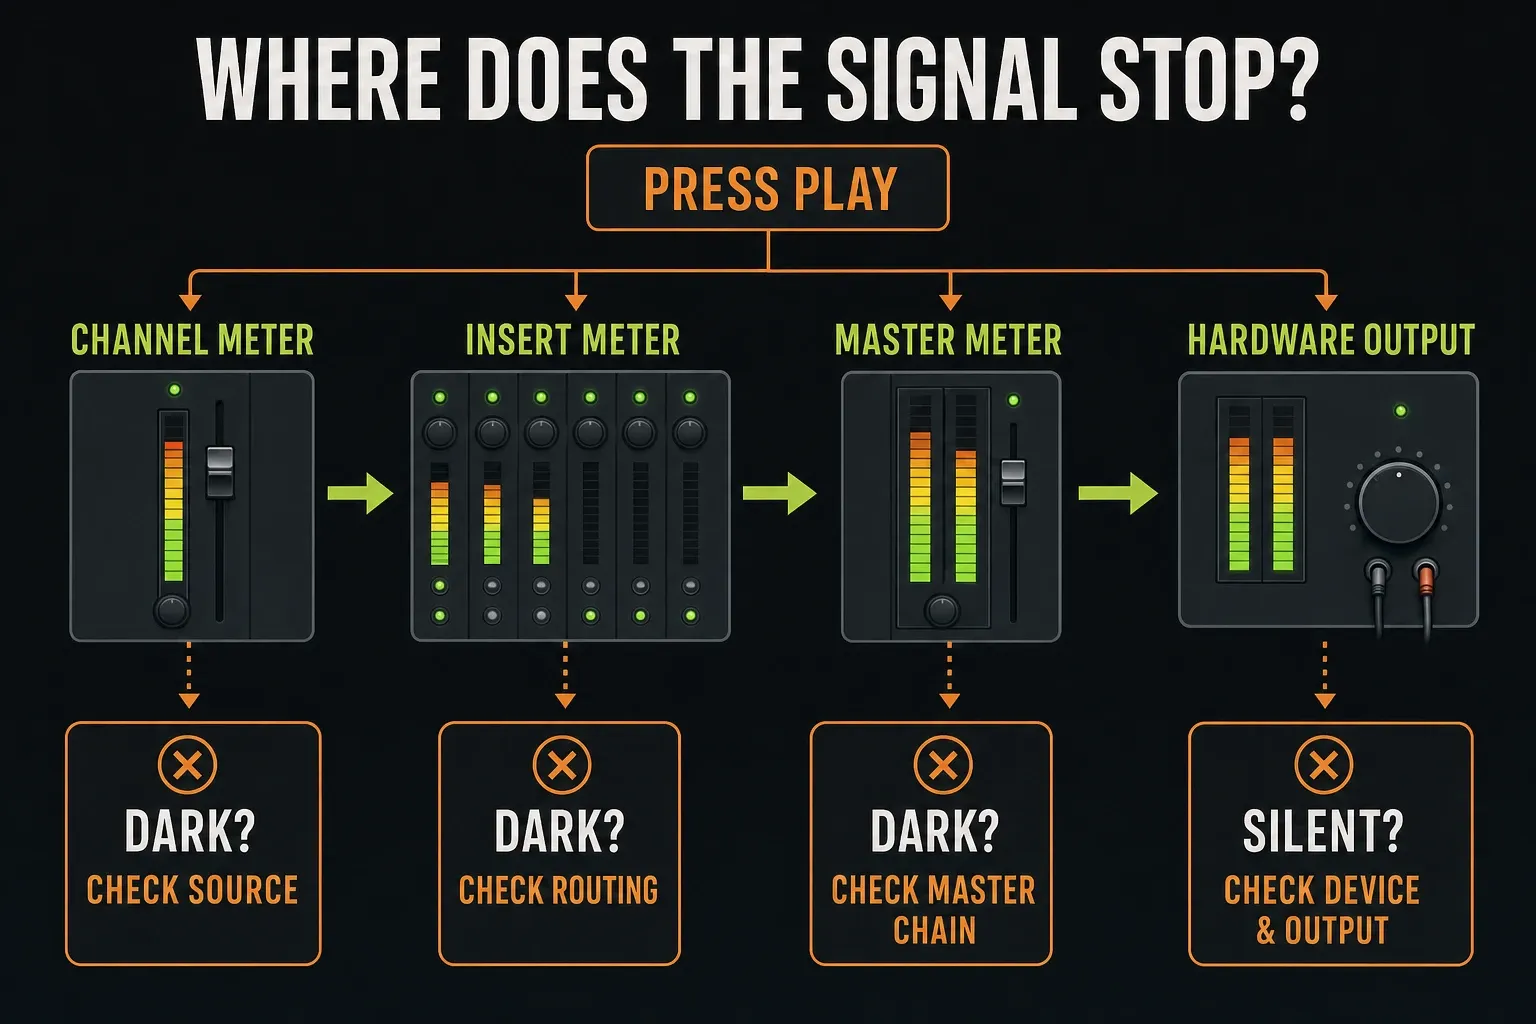
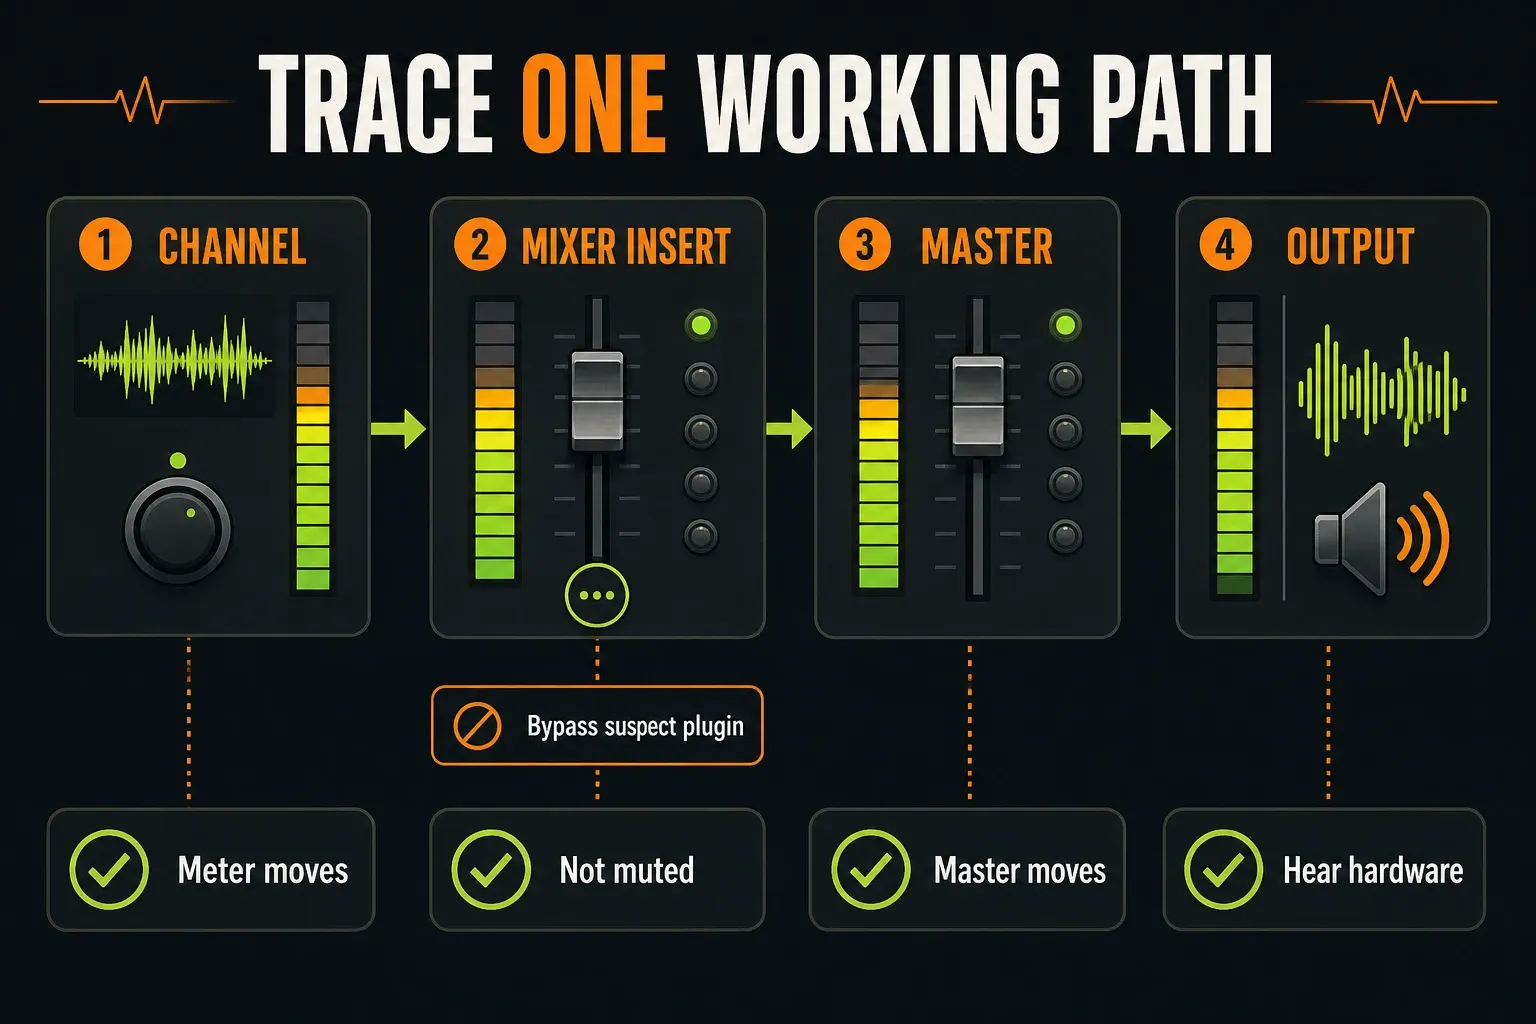
When FL Studio has no sound, turn the listening level down, check PAT/SONG and play a known sound. Follow its assigned Mixer track to the Master. If the source track moves but the Master does not, inspect routing, mute and effects. If the Master moves but you hear nothing, check the toolbar Monitor Volume, selected audio device, Master output and headphone or speaker path. If playback will not start, check the audio driver’s Status before diagnosing the project.
Change one thing at a time. Reinstalling a driver won’t fix a muted Channel, and twisting every Mixer knob won’t send sound to headphones plugged into a different output.
Start with the first meter that stays dark
| What you see | Where sound stops | Check next |
|---|---|---|
| No source-track meter | Playback, source or inactive audio driver | PAT/SONG, notes or clip, mute, plugin and driver Status |
| Insert moves, Master stays dark | Internal Mixer route | Send to Master, mute/solo, effect chain and faders |
| Master moves, no audible output | Device or hardware path | Toolbar Monitor Volume, Audio Settings, Master external output and hardware |
| Only one project is silent | Saved project state | Routing, plugins, automation and Master chain in that project |
| Sound disappears when switching apps | Device-release behavior | Auto close and driver sharing |
Test with a native generator or a sample you know well. A missing third-party preset only adds another unknown. Read the meters as clues, and don’t start rerouting every track because of them: a Channel may already go straight to the Master with no separate Insert.
Prove that the project is actually generating audio
Check the transport mode first. PAT plays only the selected pattern, and SONG plays the Playlist arrangement. An Audio Clip sitting in the Playlist won’t play just because PAT is looping an empty pattern. Select SONG and put the playhead over the clip, or pick a pattern that actually holds notes. The official transport controls explain the difference.
Choose one instrument in the Channel Rack and open its Piano roll. Stop playback, then click a key on the Piano roll’s vertical keyboard to audition a note; the preview keyboard does not work while playback is active. After that, test a pattern containing notes. Watch the assigned Mixer track, which may be the Master itself. If it stays dark, check Channel mute and volume, whether the generator is enabled, and whether its preset or sample actually loads.
An Audio Clip needs audible source data under the playhead. Zoom into the waveform and make sure Clip gain isn’t at silence, a fade hasn’t swallowed the whole region and an automation curve isn’t holding the level at zero.
MIDI activity isn’t audio. The input indicator can light up for controller data as well as notes, and received data may go unhandled. Pick a working instrument and audition it inside FL Studio first. Use the MIDI troubleshooting guide when the controller isn’t reaching or controlling the instrument you meant.
Follow the Channel into the correct Mixer Insert
FL Studio’s Playlist lanes aren’t automatically the same as Mixer tracks. A clip can sit on Playlist Track 5 while its Channel routes to Mixer Insert 12. Open the Channel Settings or the Channel Rack routing selector, note the assigned Insert number and watch that meter.
The Image-Line Mixer manual explains that newly added Channels normally reach the Master unless you redirect them. A direct Channel-to-Master route is perfectly valid. For a Channel assigned to an Insert, follow the real bus chain instead of assuming it goes straight to Master.
If the expected track stays dark, check the assignment before you change it. In a saved test copy, try a simple route you know works. An ordinary audible send and a sidechain-only connection behave differently: a sidechain signal needs a receiving plugin and isn’t automatically mixed into the destination’s audible output. Don’t randomly assign hardware outputs to every Insert.
Check the toolbar Monitor Volume separately
The toolbar Monitor Volume isn’t the Mixer Master fader. It can turn down what you hear even when the mix itself is fine. Hover over the control to identify it, then raise it slowly with your hardware volume kept low. According to the current toolbar manual, this control is saved per project, doesn’t affect rendered files and can’t be automated. That’s why it’s worth a look when one project is silent but an export sounds normal.
Check mute, solo, fader and automation state
Look at the Channel, the assigned Insert and the Master. Make sure none of them is muted and the relevant faders sit above silence. Clear any accidental solo that leaves out the source or one of its buses. A muted send or bus can silence several Channels even while their own meters move.
Automation can take over automatable volume and mute controls when playback starts. Check the relevant Automation Clips, initialized controls and event automation, and watch whether a fader jumps as the silent section plays. That’s separate from the toolbar Monitor Volume, which can’t be automated. Don’t delete all automation just to test one suspect control.
The Mixer routing guide explains inserts, sends and buses in full. Here the goal is narrower: find the first meter that gets signal and the next one that doesn’t.
Bypass plugins one stage at a time
A generator can go silent before it reaches the Mixer, and an effect or Master plugin can also stop the signal. Bypass one effect at a time along the failing path. If it makes no difference, restore it before testing the next one. Keep the listening level low, because bypassing dynamics processing can bring sound back suddenly and loudly.
Look for plugins that failed to load, missing samples, output controls at zero, and gates waiting for an input or sidechain. If native trial plugins were replaced on reopening, do not overwrite the original project: unlock the missing plugins first. Image-Line warns that reopening and re-saving before unlocking can lose their stored settings. The trial-plugin rules differ from a third-party vendor’s demo restrictions. For a missing Native Instruments product, follow the Native Access and FL Studio scan route.
If FL Studio turns unstable or the project won’t open reliably, switch to the dedicated project recovery workflow. When a project opens normally but stays silent, trace it first.
If the fault follows whichever Mixer track you select, check the Current (C) track too. Effects there process the selected track, and a stray processor on this utility track can muddy the diagnosis.
Confirm the Master reaches an external output
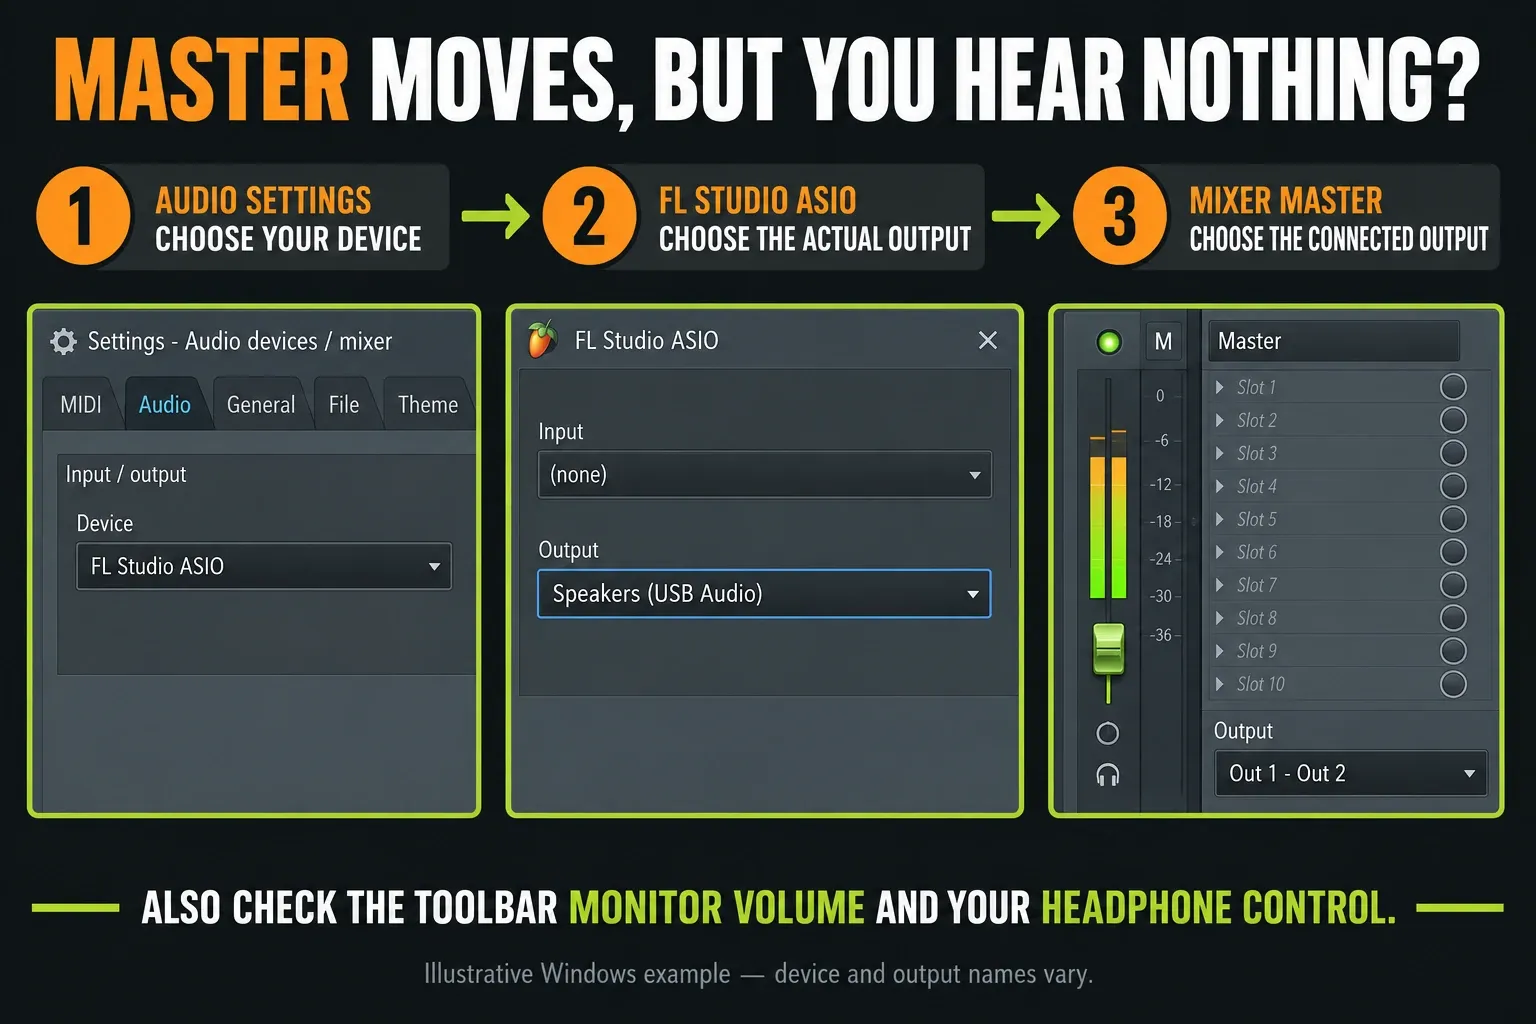
For the usual Master-based listening route, select Master and look at its external Output. Choose the pair that feeds your monitors or headphone mix; output names depend on the interface and driver. An intentional direct-to-hardware Insert route is a separate case, so don’t take it apart just because the Master isn’t involved.
Other Mixer Inserts normally route internally to the Master, so they don’t each need a hardware output. Sending every track straight to an interface can bypass expected Master processing, double signals or push audio to sockets nobody uses.
If picking the connected output brings the sound back, save the corrected project without overwriting your rollback copy. Note any interface setting you changed as well, since not every device can save presets.
Select the real playback device in Audio Settings
Open Options > Audio settings, or press F10 and select the Audio tab. Choose the driver for the hardware you intend to hear. On Windows, prefer the interface manufacturer’s ASIO driver when available; FL Studio ASIO is a useful general playback option. On macOS, choose the intended Core Audio output. Check Status: a device that has not initialized needs attention before a stationary playhead or dark meter can tell you much about the project.
The Audio Settings documentation notes that FL Studio ASIO may need an explicit Output selected when [Default output] does not work. Open its panel and select the actual speakers, headphones or interface endpoint you use.
Changing the operating-system default while FL Studio is open may not move an exclusive or dedicated driver to the new device. Re-select the driver or its output, then play the known test sound again.
Check the interface, headphones and operating system
Make sure the interface is powered, recognized and connected directly enough to stay stable. Turn up its headphone or monitor control slowly. Check that headphones are plugged into the jack that knob controls, and that monitors are connected to the selected output pair.
Test another application through the same hardware, allowing for drivers that cannot share a device. If that path also fails, check the operating system and hardware. If other applications work but FL Studio is silent, recheck its selected driver, Master output and toolbar volume. Windows app volume is relevant to Windows-audio paths such as FL Studio ASIO; it is not a universal control for a native hardware ASIO driver. If playback works but a microphone or guitar records silence, use the audio-recording signal path.
If Bluetooth is involved, try a wired output as a controlled comparison and select that device explicitly in FL Studio. That isolates the listening route, though it doesn’t prove Bluetooth caused the problem.
Match a sample rate the device accepts
Check sample rate after the device and routing path are correct, especially when the driver status says the output failed to initialize. FL Studio’s Sample Rate setting controls the Mixer playback rate, while the selected driver reports which rates the hardware supports. Image-Line recommends 44,100 Hz where possible. If the device panel reports the current rate as unsupported, choose a supported value and let the driver reopen.
Don’t change several rates, buffer controls and clock settings at once. First prove the correct device and output are selected. A rate change is a targeted fix for hardware that can’t start or reports a mismatch, and it won’t cure silence in general.
Fix sound that stops when FL Studio loses focus
If audio works until you click another application, inspect Auto close in Audio Settings. Image-Line’s no-sound support note identifies this setting when FL Studio stops outputting audio outside the foreground and tells users to disable it.
Driver sharing matters too. Image-Line says FL Studio ASIO is fully multi-client on most machines, so FL Studio and another application can usually play through it together. Some interface drivers run in exclusive configurations. Choose the behavior that fits the recording job, and don’t push several applications through an exclusive path and then conclude the project is broken.
Diagnose one silent project
Protect the current session before testing another project. In Trial, you can save but cannot reopen a saved project until you purchase FL Studio. Render needed audio before leaving it. In licensed FL Studio, save a separate version, check any trial-plugin warning, then open a new empty project and load a native generator. If that works, the device path is probably functional. Return to the problem project and compare:
- PAT/SONG selection and toolbar Monitor Volume;
- Master external output and fader;
- Master plugin chain;
- Channel and bus routing;
- mute, solo and automation state;
- missing plugins or samples;
- project-specific audio-device assumptions.
A silent template may contain deliberate monitor or stem outputs for different hardware. Keep it intact while you test a simple source-to-Master-to-output route. The source may pass through an Insert or go straight to Master. Undo unrelated diagnostic changes once you’ve found the fault.
Separate silence from crackling and latency
A larger buffer can help with underruns, but it’s the wrong first move when every meter is dark or the Master has no output. If sound exists but clicks or breaks up, use the crackling-audio diagnosis. If live monitoring lags, use the audio-settings guide.
Keeping those symptoms apart saves you from a familiar loop: the buffer goes up, monitoring gets slower, the wrong output stays silent and the original problem is still a mystery.
Use this no-sound recovery order
- Keep listening volume low and protect the current session before changing projects, especially in Trial.
- Check PAT/SONG and play a known native sound; if transport will not run, check driver Status.
- Follow the source’s actual Mixer assignment, including a valid direct-to-Master route.
- Check mute, solo, faders and automation at the failing stage.
- Bypass one effect at a time, restoring tests that make no difference.
- Check the separate toolbar Monitor Volume.
- Confirm the normal Master route reaches the connected external output.
- Select the intended driver and actual output in Audio Settings.
- Check interface power, headphone/monitor controls and applicable OS volume.
- With a safe saved copy in licensed FL Studio, compare a new project, then restore unrelated test changes and save the actual fix.
Continue through the FL Studio troubleshooting hub once sound is back. Diagnose the next symptom from evidence, and drop the emergency settings you tried along the way.
Frequently asked questions
Why does FL Studio show Master activity but make no sound?
Check the toolbar Monitor Volume as well as the Master external output, Audio Settings device, driver output and physical headphone or speaker path. A moving Master meter does not guarantee that the selected listening output is audible.
Why is only one FL Studio project silent?
Compare PAT/SONG, toolbar Monitor Volume, Master output and effects, routing, mute, automation and missing assets. In licensed FL Studio, save a separate copy before simplifying routes. A successful new-project test only suggests that the global device path works.
Why does my MIDI keyboard show activity but produce no sound?
The indicator can register MIDI controller data, not just notes, and the input may be unhandled. Select a working Instrument Channel, audition a note inside FL Studio, then follow its actual Mixer assignment and listening output.
Why do my headphones work elsewhere but not in FL Studio?
FL Studio may be using a different driver or output pair. Select the intended device in Audio Settings, choose the actual output in its driver panel and confirm the Master routes to the headphone-connected pair.
Should I reinstall FL Studio when there is no sound?
Not first. Trace the meters, routing, Master output and audio device. Reinstall only after a clean project and verified hardware path still fail and evidence points to damaged application files.