FL Studio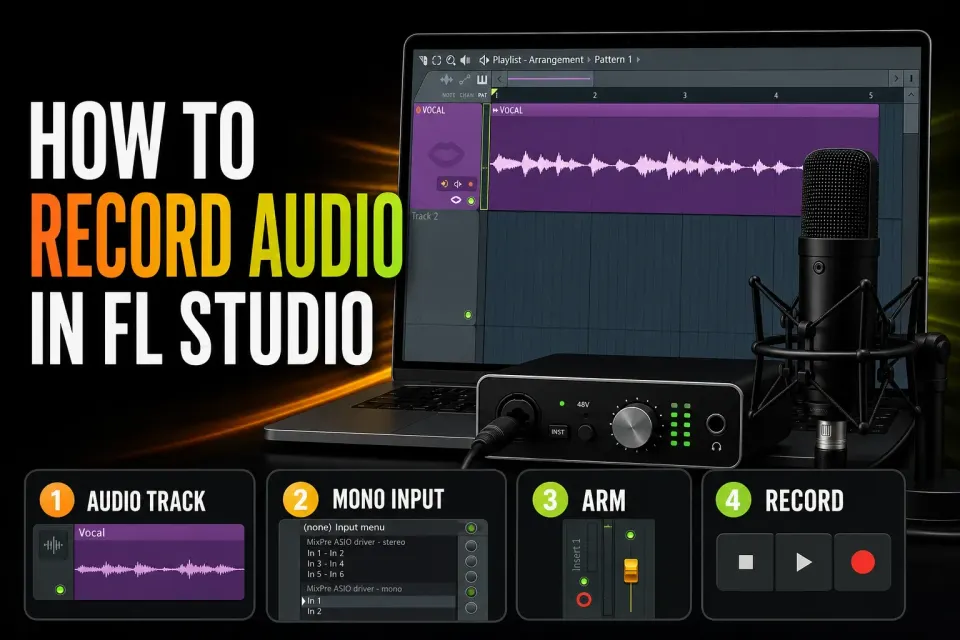
To record audio in FL Studio, select your audio device, choose its input on a Mixer insert, arm that insert and the main Record button, then press Play in Song mode. Use an Audio Track so the take lands on a named Playlist lane, and make a short test recording before you capture the whole performance.
This guide covers a microphone, guitar, hardware synth or any other external audio source. To capture keyboard notes instead, use the MIDI recording walkthrough, and if the controller does not register at all, start with the MIDI input checklist. Keep in mind that a hardware synth’s MIDI connection carries no sound unless the device also sends audio over that same connection. If the sound comes from a browser or another app instead, follow the computer-audio recording route; you need a virtual cable or interface loopback before that signal can appear as a Mixer input.
Check your edition before starting. External audio recording requires Producer Edition or higher, and Trial mode follows whichever edition you pick at startup. The edition and Trial restrictions matter when saving too: you can save a Trial project, but you cannot reopen it until FL Studio is purchased and unlocked. Export the audio you need before saving the Trial project and before closing the session, and never treat an FLP alone as your audio backup.
Quick route: record into the Playlist
For the first take, set up the path by hand so recording starts exactly when you expect:
- Connect your source and headphones. In Options > Audio settings, select the recording device. On Windows, prefer its manufacturer’s ASIO driver when available.
- Choose where new recordings will be stored in Options > Project general settings > Project Data Folder. Keep the Trial warning above in mind before saving the project.
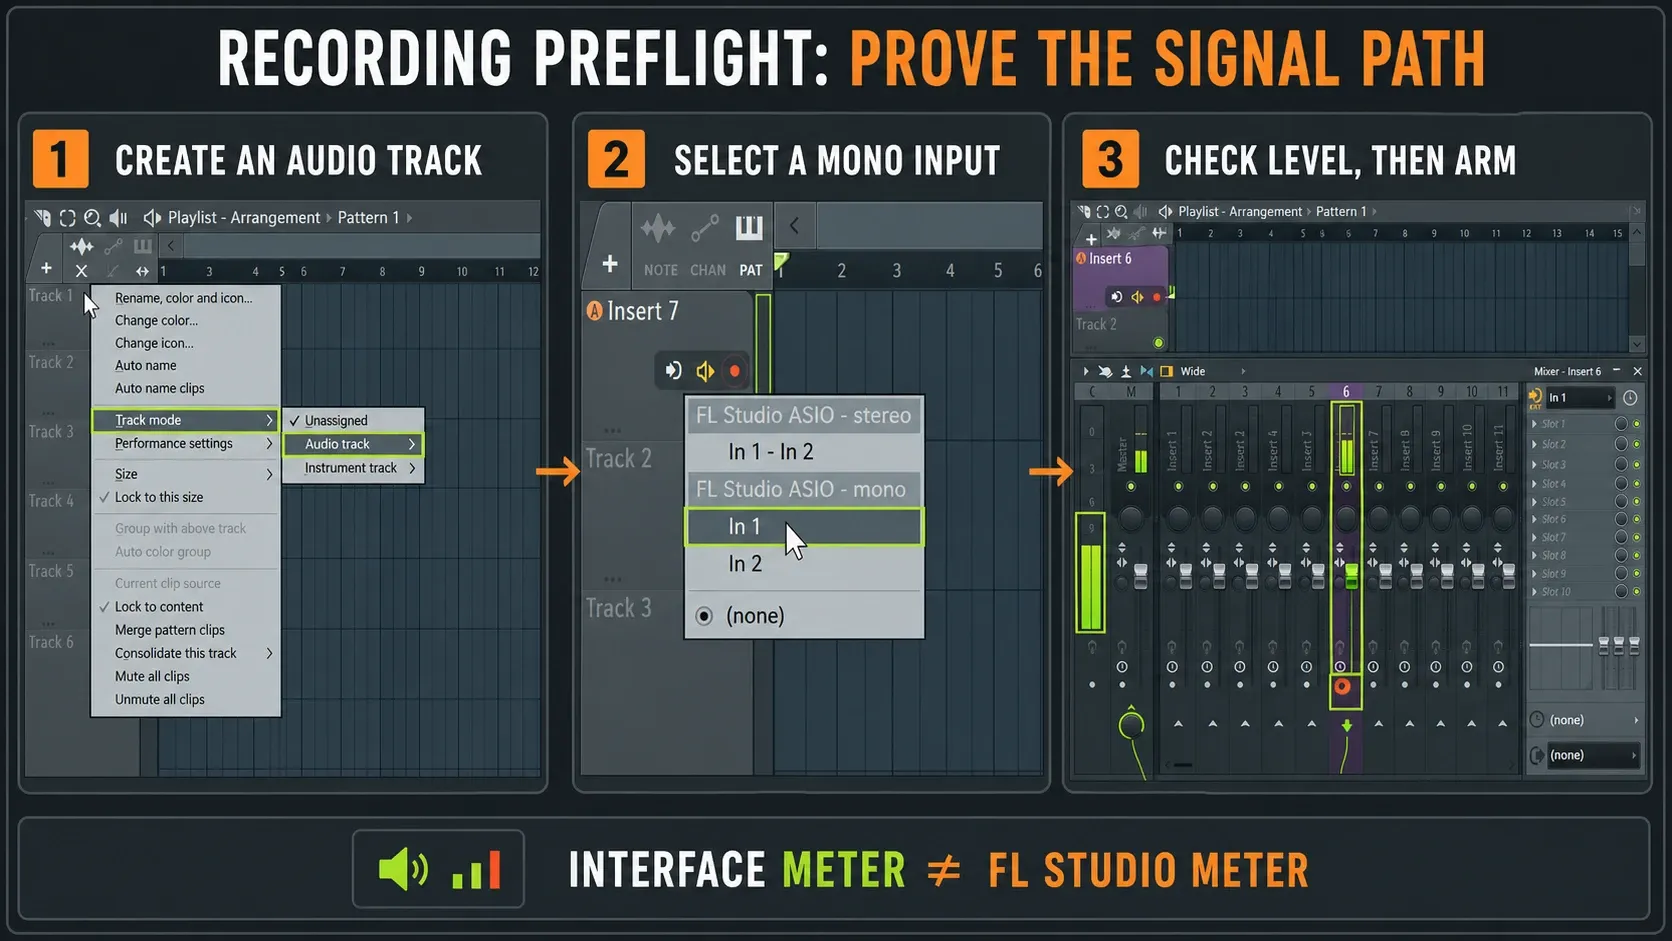
- Right-click an unused Playlist track header and choose Track mode > Audio track, then the Mixer insert you want to use. Name it for the source.
- On that Mixer insert, select the connected hardware input. Choose a mono input for one microphone or mono guitar signal; use the appropriate stereo pair for a stereo source.
- Set the recording pickup selector beside the input to EXT. Check the interface gain during the loudest phrase and leave room for louder peaks. Confirm that FL Studio receives the signal.
- Enable the insert’s disk recording icon. Right-click the main Record button and tick Audio. Switch to Song mode and enable Mixer menu > Disk recording > Auto-create Audio Clips.
- Place the playhead before the performance. Click the main Record button to arm it, then Play. Perform a short test and press Stop.
- Disarm recording, listen to the resulting Audio Clip and locate its WAV file. Check the beginning, level and timing before committing to a full take.
There is also a shortcut: click the toolbar’s One click recording microphone icon and choose Into the Playlist as an audio clip. It creates an Audio Track and opens the input selector, and Choosing the input starts a four-click count-in and then recording, so finish the device, gain and file-location checks first. The official audio-recording procedure explains both routes.
Set the audio device before the Mixer input
The Mixer can only offer inputs from the active audio device. On Windows, pick an ASIO driver, and for dedicated hardware the interface maker’s own driver comes first; FL Studio ASIO is a compatibility option and does not promise the lowest latency. On Mac, select the interface through Core Audio.
On current macOS, open System Settings > Privacy & Security > Microphone and allow FL Studio. Apple documents this microphone permission setting. Where a Mic Mode selector is available, pick Standard for recording music, as Image-Line recommends, and skip the voice-isolation processing.
USB microphone plus separate headphones or speakers? Those may be two different audio devices. On Windows, FL Studio ASIO can take its input from one device and its output from another, and ASIO4ALL can combine several inputs and outputs. On Mac, an Aggregate Device can combine the microphone with a separate playback device. The component devices need matching sample rates and sensible clock/drift settings, so follow Apple’s aggregate-device setup instead of changing unrelated system settings.
Choose a buffer that stays stable and feels comfortable to perform through. The duration it displays is not the full round-trip delay. The Audio Settings guide keeps driver, buffer, monitoring and alignment decisions apart. If a finished mix is straining the computer, use a lighter tracking project or run through the high-CPU checks before blaming the microphone.
Choose the right Mixer input and prove the level
Use a normal Mixer insert dedicated to the source, not the Master that carries the whole mix. In its input menu, pick the hardware socket you connected. A single microphone on one side of a stereo pair will sound one-sided, but choosing the matching entry in the lower, mono input list sends that source to both the left and right channels of the stereo Mixer track. For a stereo synth output, pick the intended stereo pair instead.
Set the interface’s input gain while performing the loudest phrase. Pulling down a Mixer fader cannot undo clipping that already happened in the input converter. Leave enough headroom for a louder syllable or pick attack. What you want is a clean, audible recording; no single “perfect” peak number exists.
EXT means the disk recording takes only the external input. It leaves out the insert’s effects, fader moves and any other internally routed tracks, and its recording level is set at the interface. The recording pickup reference separates EXT from MIX, which includes internal inputs, and FX, which also includes the insert effects.
You can hear effects while capturing dry audio with EXT. If you deliberately record with the FX pickup, that processing is baked in, and playing the clip back through the same effects can process it a second time. Keep the route simple until the dry take works. The Mixer signal-path guide helps when the source ends up on an unexpected insert or output.
Record a clean take into the Playlist
Check both recording controls: the Mixer insert’s disk icon and the main Record button. In Song mode, with Audio enabled in the recording filter and Auto-create Audio Clips on, press Play and record, then stop. The linked Audio Track gives the recording a predictable Playlist lane and plays it back through the associated Mixer insert.
You can record without that explicit lane link, but then FL Studio looks for free space where the new clip will not overlap anything. If you recorded in Pattern mode, look for an Audio Clip Channel instead of expecting the take to appear in the song. In neither case has the WAV necessarily vanished.
Listen back with the live input quiet. Check that the opening consonant or pick attack is intact and that the take sits well against the backing track. Turn off the main recording arm before normal playback. If you want inserts to disarm after each take, enable Mixer menu > Disk recording > Auto-unarm; otherwise keep an eye on those disk icons yourself.
To keep files manageable, use Store relative to the project file or an explicit Project Data Folder, or right-click the Mixer track’s recording icon to pick a filename and location. The Project Data Folder options treat new recordings differently from samples already stored elsewhere. When collecting an existing session, use the project-folder walkthrough.
On an unlocked installation, save a new version and reopen it to check that the audio files are found, and keep the WAVs with the project backup. Trial users should follow the export warning above instead, since an FLP that cannot be reopened yet makes a useless recall test. Plugins running in Trial mode bring their own recall restrictions too.
Playlist or Edison: choose by the job
Use Playlist recording for long performances and takes that need to sit against the song, because it records to disk. Use Edison for focused capture, trimming and picking a region before sending it into the arrangement. Edison records at its position in a Mixer effect chain and keeps audio in memory, so it makes a poor default for hours of continuous recording.
For a short Edison recording, load it into the source insert before any effects you do not want printed. Select the hardware input and leave it feeding the insert. In Edison, choose Now and arm its Record button for immediate capture, or use On play to start with FL Studio’s transport. The Edison recording controls also offer On input for a start triggered by level.
Check Edison’s For setting before recording. A finite time or file-size limit wraps around and overwrites earlier audio once it is reached. Allow enough time for the take and watch the recording counter. Stop the transport if needed, then turn off Edison’s Record button. Select the region you want and left-click Send sample to Playlist; with nothing selected, it sends the whole sample. Save any important captured audio to a file as well.
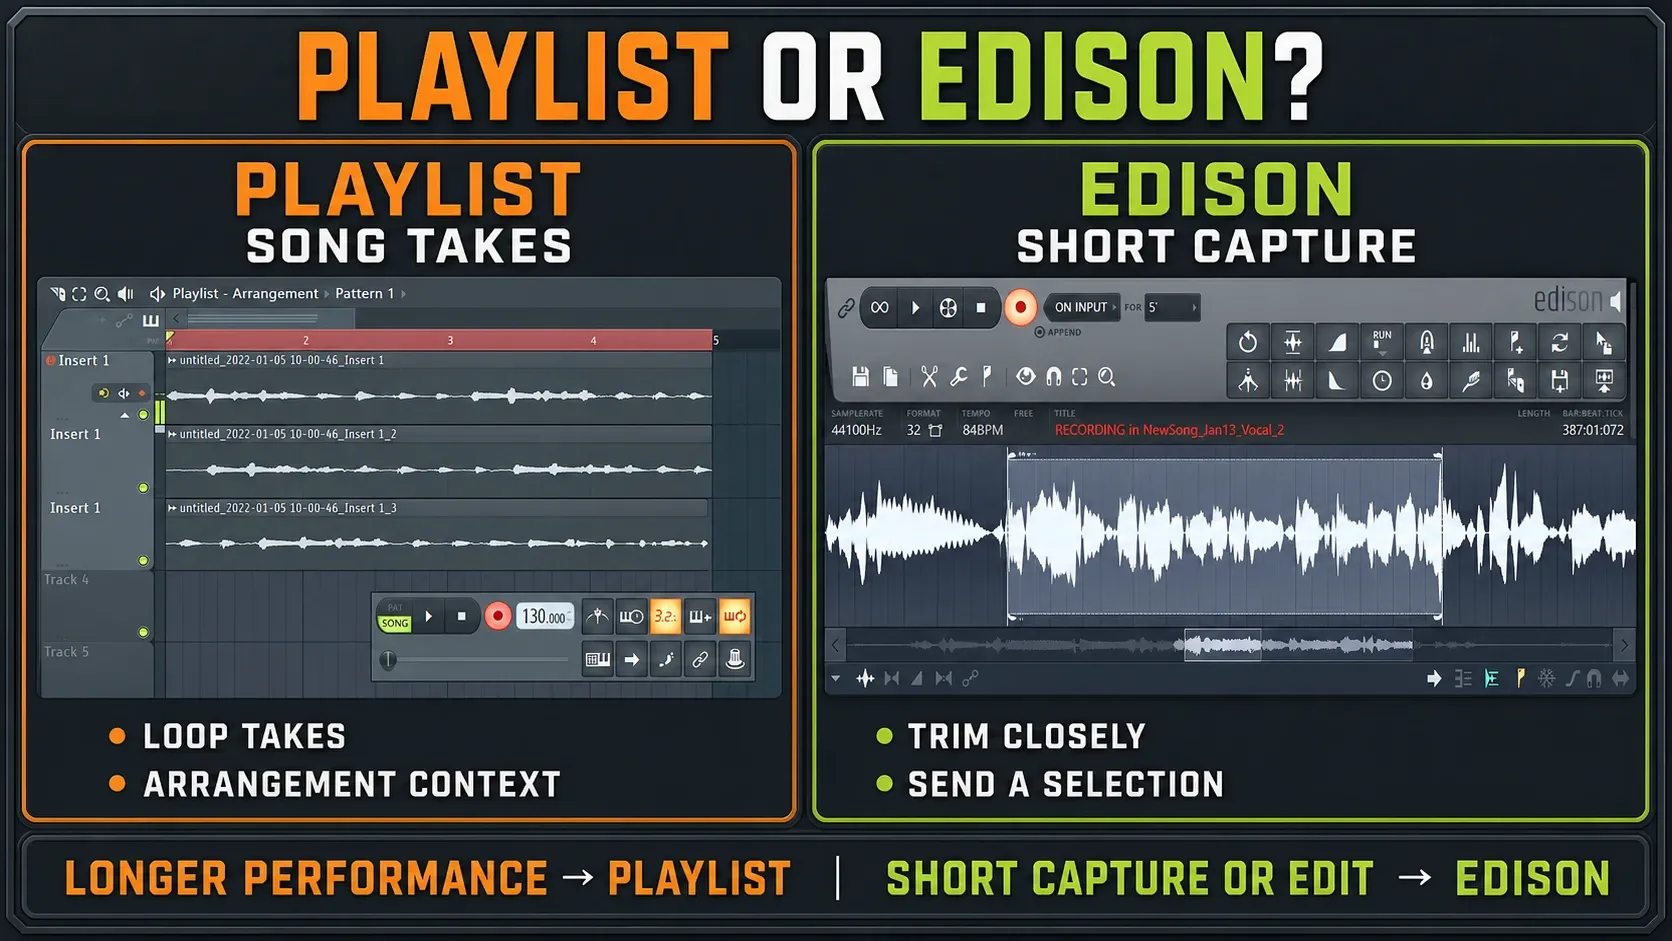
For repeated Playlist takes, select the song section and turn on Loop recording. Switch Blend recording off if you do not want to hear earlier takes on each pass. That setting only controls playback of those takes, while EXT is what keeps other internally routed audio out of the new disk recording. If a heavy project glitches at loop boundaries, add a lead-in bar before the performance. Edison’s On play mode is another way to collect takes with loop markers and then send the chosen region to the Playlist.
Monitor without a doubled or distracting voice
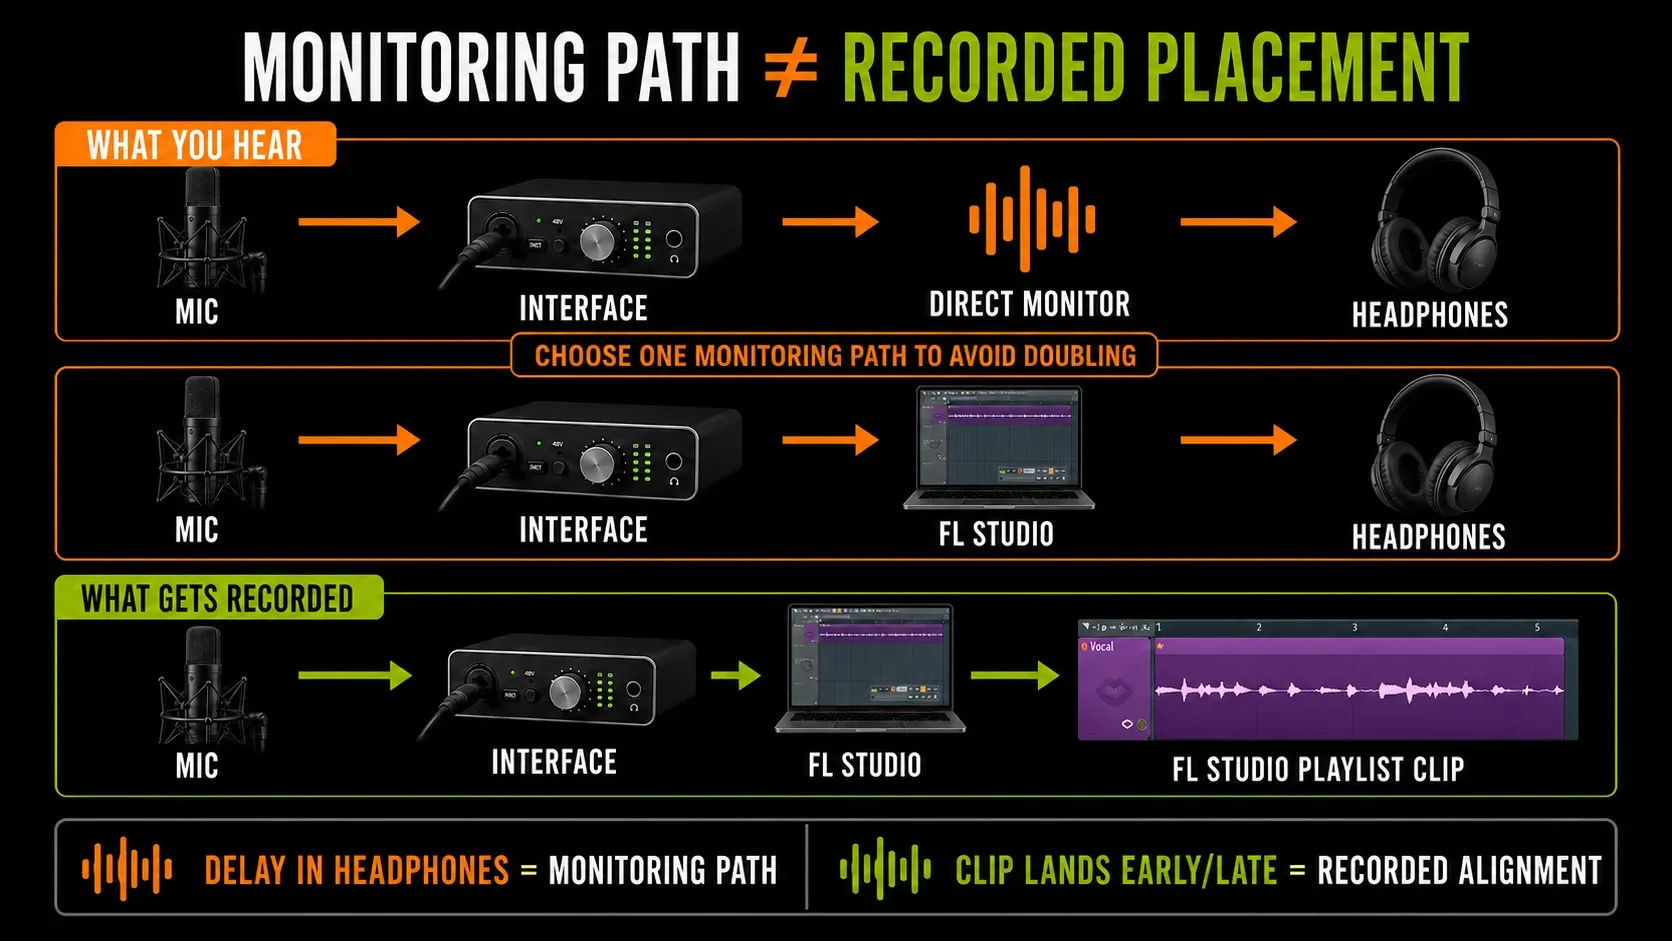
Software monitoring sends the input through FL Studio and back to the headphones, picking up the buffer and any plugin delay on the way. Direct monitoring, if your interface has it, keeps that listening path inside the hardware and bypasses FL Studio’s effect chain. Wear headphones while recording a microphone to cut speaker feedback and backing-track bleed.
If you hear a doubled voice, check whether both monitoring paths are on. For software monitoring, turn off the interface’s direct monitor. For EXT disk recording with hardware direct monitoring, open the pickup selector and set Monitor external input > Off so the duplicate live signal stops coming back through FL Studio. Leave the hardware input selected so the disk recording still has its source.
Edison is different: it needs audio at its FX slot. To use hardware monitoring while recording into Edison on this dedicated insert, leave Monitor external input on and pull the insert’s fader all the way down to silence its software output. Edison records before the fader, so this does not change its recording level. Bring the fader back up when you want to hear playback through that insert, and don’t confuse this with switching off the input that feeds Edison.
Fix the right recording problem
The input meter does not move
Check the cable, interface input mode, selected audio device, microphone permission and Mixer input. Hearing the source through direct monitoring does not prove FL Studio is receiving it. For Edison, confirm that audio reaches its slot and that its own recording mode is armed, because the disk recording icon alone does not start Edison.
The performer hears a delayed copy
Lower the buffer only while playback stays stable, bypass high-latency processing, or use direct monitoring. If a smaller buffer makes the audio break up, follow the crackling-audio checklist. A comfortable headphone mix and a correctly placed recorded clip are two separate checks.
The recorded clip lands late or early
Test with a clear rhythmic source in a light project. Check Mixer menu > Disk recording > Latency compensation for this external recording path. If a repeatable offset remains, the Mixer’s Audio INPUT delay compensation moves recorded audio earlier with positive values and later with negative ones. Measure the discrepancy rather than typing in a guess.
If the position changes from take to take, a fixed offset will not help. Try the interface’s native ASIO driver where one exists and review Playback Tracking. To rescue a performance you already have, the audio-nudging guide covers precise movement, though it will not fix the driver for good.
The recording contains the beat or metronome
For disk recording, choose EXT and the real source input, and avoid an interface loopback feed. For Edison, keep the backing track off the insert that feeds its FX slot, because the disk pickup selector does not isolate Edison’s input. Headphones reduce acoustic bleed into the microphone, but they cannot remove a beat that arrived through digital routing.
The waveform is clipped
Lower the hardware input gain and record again. A limiter or lower Mixer fader cannot reconstruct peaks lost before FL Studio received the signal. Saving as 32-bit float only changes the file format; it does not raise the interface converter’s capture bit depth or undo hardware clipping.
Recording stops after one bar or starts again unexpectedly
Loop recording can fall back to a one-bar length when the Playlist is empty and no time selection is set. Turn Loop off for a continuous take, or select the section you want. If every press of Play creates another recording, check the main Record arm, the Mixer disk arms and Edison’s Record button one by one. Loading Edison before selecting the input can switch off automatic disk arming, so never assume both methods are active, or inactive, together.
Move from tracking to editing and mixing
Keep the original recorded files before cutting a performance. Start with a short fade at an audible edit click, then use the Workflow hub for Playlist and timing work. For a vocal session, the vocal-recording guide covers the narrower tracking decisions, and the vocal mixing guide starts from a vocal that is already recorded. If harsh consonants are what is left, use the de-essing workflow.
The Recording hub ties the wider capture workflow together. Before a full session, record ten seconds, stop, listen and find the audio file. That tiny check catches a wrong input or a missing recording arm while it is still cheap to fix.
Frequently asked questions
Can FL Studio Fruity Edition record vocals?
External audio recording requires Producer Edition or higher; Fruity Edition does not include that workflow. Trial mode follows the selected edition, but saved Trial projects cannot be reopened until FL Studio is purchased and unlocked.
Should I record vocals into the Playlist or Edison?
Use the Playlist for long song performances recorded to disk. Edison suits shorter captures, editing and repeated takes with loop markers. Check its For limit so earlier audio is not overwritten, then send the chosen selection to the Playlist.
Why is my FL Studio recording only on the left side?
A mono source may have been recorded through a stereo input pair. Choose the matching hardware input from the mono list so that source reaches both left and right channels of the stereo Mixer track. A genuinely stereo source needs its intended stereo pair.
Should I record with vocal effects on?
For dry disk recording, use EXT pickup and add effects later. You can hear the insert effects through software monitoring without printing them. FX pickup commits processing and can lead to double processing on playback; Edison instead records at its FX-slot position.
Where does FL Studio save recorded audio?
Disk recordings use the selected recording location or project data settings. Choose a Project Data Folder or a filename from the Mixer recording control and verify the WAV. Edison captures into memory, so save the audio to a file or send it into the project and keep the resulting files with your backup.