FL Studio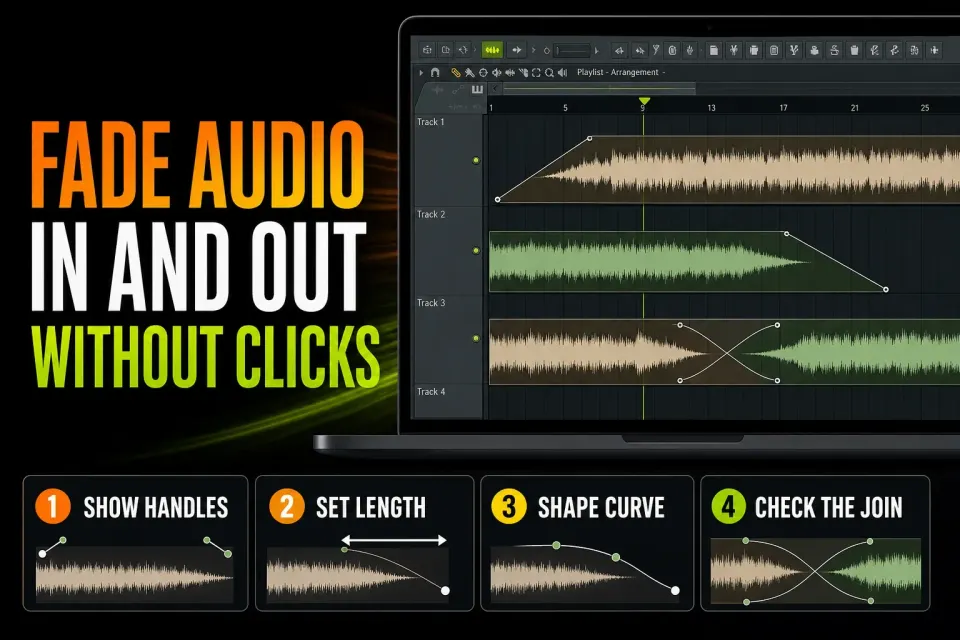
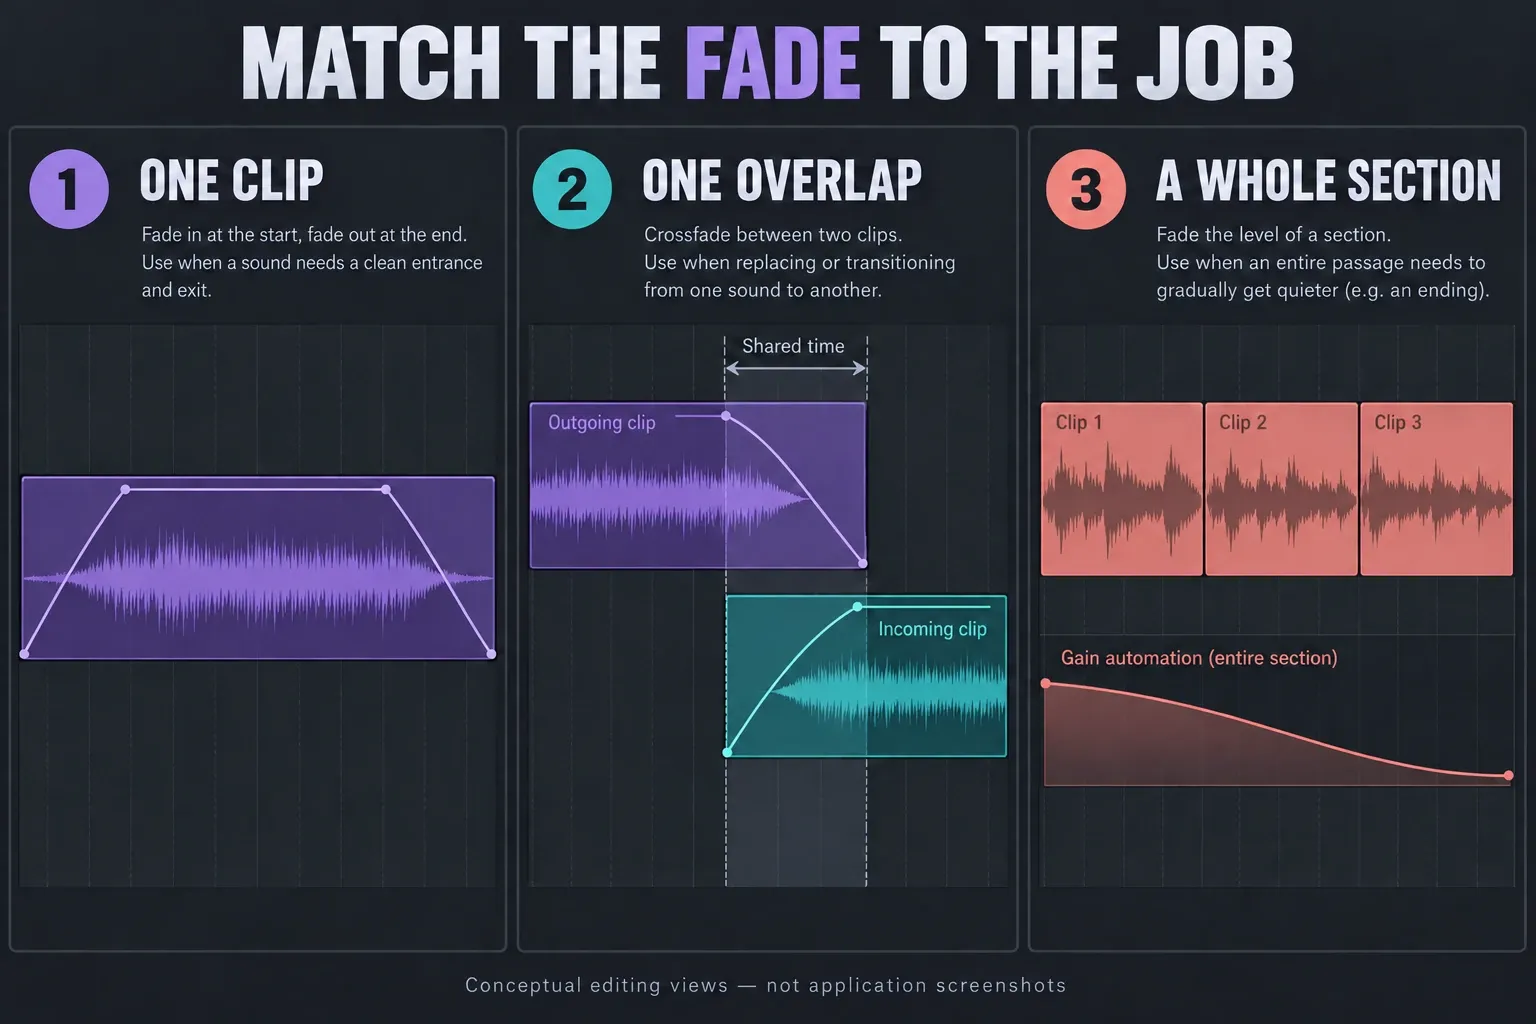
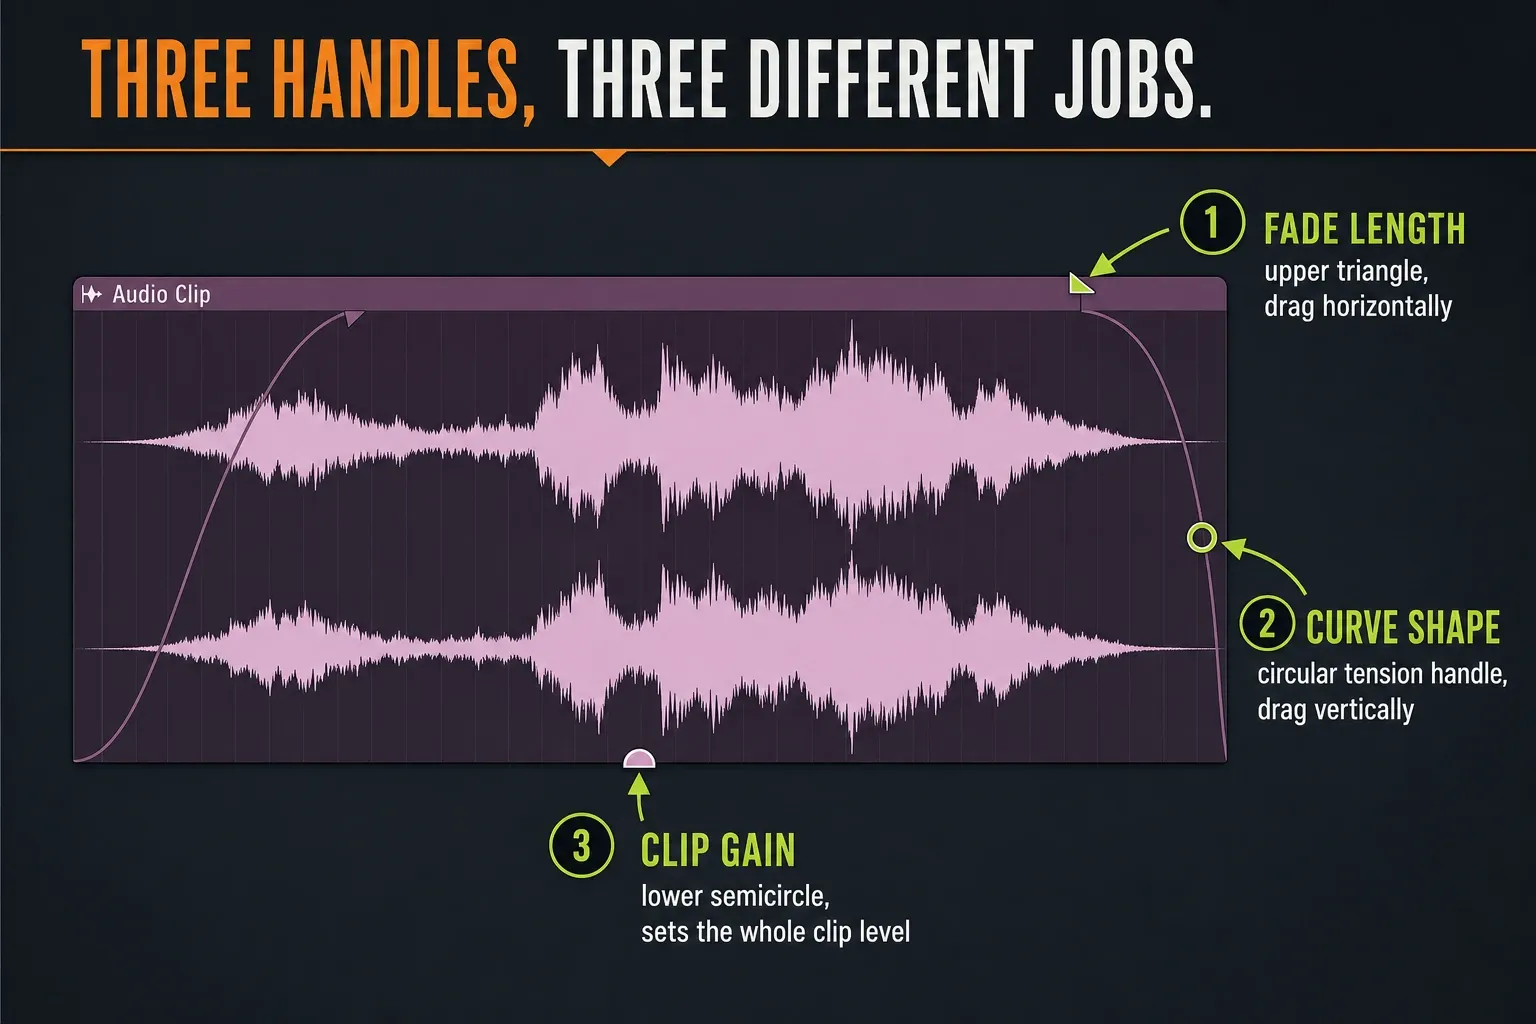
To fade in and out in FL Studio, show the Audio Clip fade controls with Shift+F, then drag the small triangles on the clip’s upper-left or upper-right edge. Drag horizontally to set fade length. Drag the circular curve handle vertically to change the fade curve. For two overlapping clips, use a crossfade. For a whole channel or song section, use an Automation Clip.
The key decision is scope. A Clip fade fixes one audio boundary, while automation moves a level across the arrangement. Using the bigger tool for every tiny edit makes the project harder to read, and using a tiny Clip fade for a full mix transition makes your intention harder to control.
Choose the fade method by the editing job
| Job | Use | Why |
|---|---|---|
| Soften one clip’s start or end | Audio Clip fade handles | Fast, per-instance and visible on the waveform |
| Join two recordings or takes | Crossfade | One source falls while the other rises |
| Move a vocal, instrument bus or effect return | Channel or Mixer automation | The move follows the signal, not one piece of audio |
| Fade the complete song | Master-level automation with care | The whole mix follows one deliberate curve |
| Remove a cut click | Very short fade or declicking | Smooths the discontinuity without changing the phrase |
Show the Audio Clip fade handles
Open the Playlist and make sure Audio Clips are the focused clip type. Press Shift+F to toggle Show fade editing controls. Image-Line also exposes the control in the Audio Clip Focus area near the upper-left of the Playlist.
If you still can’t see handles, make sure the item is an Audio Clip and not a Pattern Clip or Automation Clip. Zoom in enough to reveal its edges. Stacked clips can make the wrong item feel selected, so click the waveform you mean before dragging.
The Image-Line Audio Clip manual describes these as per-instance controls: five Playlist copies of the same source can have five different fades. You do not need Make unique just to adjust one copy’s fade. The instructions here follow the current desktop interface; older versions may not show the same controls.
Create a clean fade-in
- Move the pointer to the upper-left corner of the Audio Clip.
- Drag the triangular handle to the right.
- Loop the start both with the preceding sound and in isolation.
- Drag the curve handle vertically until the entrance feels natural.
- Check that the fade did not remove the consonant, pick or drum transient you meant to keep.
A very short fade can remove a click, while a longer one changes the arrangement. On a vocal, the best start may sit just before the first breath or consonant; on a cymbal swell, the curve may need most of the clip. Judge the musical entrance instead of setting every handle to the same grid distance.
Create a fade-out without cutting the tail
Use the upper-right triangle and drag left. Listen past the visible phrase, because reverb, delay and instrument release can carry on after the obvious waveform peak, and a short fade can make the room collapse unnaturally. If the boundary belongs to a freshly printed file, recheck the tail choices in the track-consolidation workflow before hiding a bad render with a long fade.
Don’t mistake the fade triangle for a trim or stretch edge. On an overlapping Clip with unused source audio past its visible edge, dragging the lower part of the vertical line under the fade handle can extend both the Clip and its fade. That only works when the source material exists; it can’t recreate a tail that was never rendered. Keep an eye on the Hint Bar and waveform while you drag.
For a final vocal edit, check the fade inside the full vocal mixing workflow. A breath that sounds distracting in solo may be the only natural bridge into the next line.
Separate fade length, curve and Clip gain
The upper triangles set the duration, the circular tension controls set the shape, and the lower semicircle changes Clip gain. They sit close together, but each one answers a different question.
- Length: how long the transition lasts.
- Curve: where most of the level change happens inside that time.
- Gain: the overall level of that clip instance.
Use a smooth S curve for a gentle start and finish, or a single curve when the change needs to arrive earlier or later. For an exact duration, right-click the fade handle and choose Type in value...; its unit is milliseconds. Copy/Paste value can repeat that duration elsewhere. If the whole Clip needs a timing offset instead, nudge the audio rather than lengthening its fade.
If the fade jumps along the grid, check Snap fade handles in the fade-control menu. To temporarily bypass snapping, click and hold the handle first, then press Alt while dragging. On Mac, Alt is Option. The order matters: Alt/Option-clicking a handle resets it. Do not use that reset gesture when you only wanted a finer drag.
Crossfade two clips at an overlap
Place the outgoing and incoming Audio Clips so they overlap. With Automatic crossfades turned on, FL Studio can build the fade relationship at the overlap. You can also right-click a fade handle and choose Create crossfade when the selected clip overlaps another.
Listen through the middle as closely as you check the start and finish. Two similar takes can comb-filter or get louder when both play at once, and two unrelated sounds may lose energy if both curves dip too hard. The default linked behavior is built to hold level steady, but it can’t make different recordings match in phase, tone or loudness.
For vocal comping, put the join where both takes have steady tone and as little consonant clash as possible. A crossfade can smooth the handoff, but it can’t fix a syllable that changes timing or pronunciation between takes.
Before you accept the join, run three quick checks. Does the word or instrument attack happen only once? Does the background noise stay steady through the overlap? Does the combined level sound believable from the listening position? A waveform can look symmetrical while the room tone swells or a consonant doubles. Move the cut, pick another take or shorten the overlap when the source material doesn’t cooperate.
Shape linked crossfade curves
When the two overlapping fades have matching tension values, their curve handles link. In the linked-crossfade controls, a vertical drag moves the crossover left or right; Shift changes its vertical position, and Ctrl separates the handles. Resetting the tensions can link them again. These are tension controls, not the triangles that set duration. Watch both envelopes and listen through the overlap.
Start near the center of the overlap and move the handoff toward the cleaner source. If one take has a breath, click or room change, let the other take carry that moment. Keep the overlap only as long as it needs to be, since a long crossfade between phase-related recordings can add more coloration than a short one.
Fix automatic crossfades that do not appear
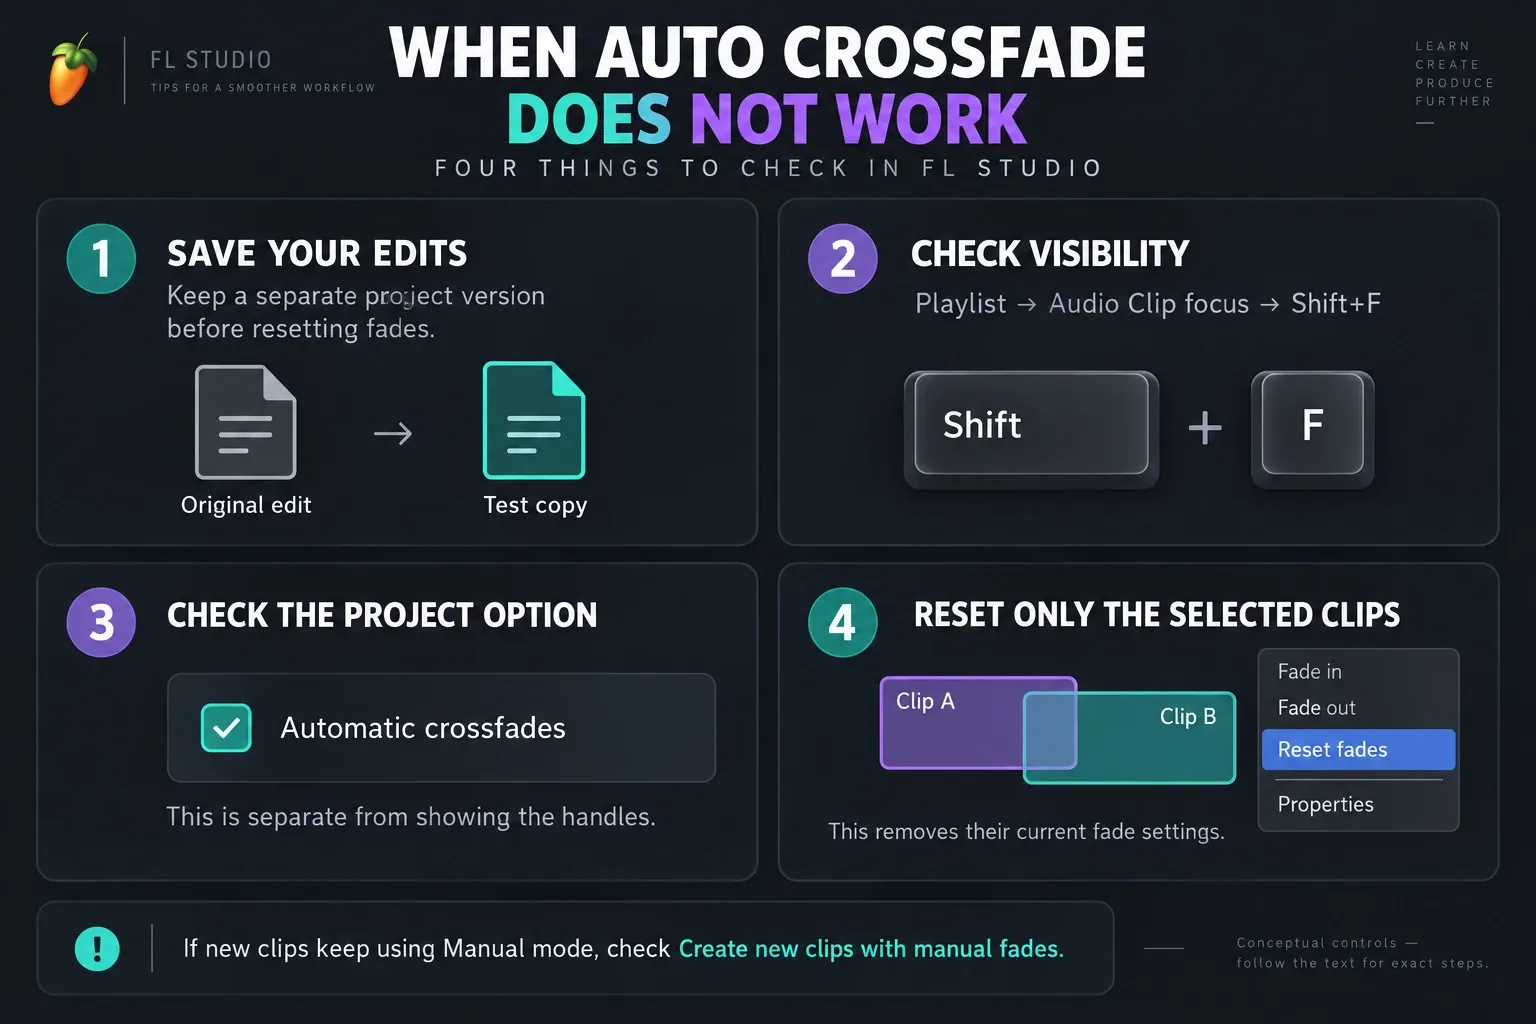
First tell hidden controls apart from missing fades. Shift+F shows or hides the controls, but it doesn’t turn on Automatic crossfades. Check the project option before resetting an edit. If the option is on and the overlap still doesn’t crossfade, one or both ends may be in Manual mode, and even a zero-length fade can be Manual.
Save a separate project version before you use Reset fades. Select only the Clips involved, open an Audio Clip menu and reset those fades only if you really want to throw away their current settings. Manual mode exists to protect deliberate fades, so it isn’t necessarily a fault.
Reach Automatic crossfades by right-clicking the fade-controls icon, or through Project Settings > Playlist. If new Clips repeatedly arrive in Manual mode, check Create new clips with manual fades in the fade-control menu. Changing that creation default is separate from resetting existing Clips.
After a deliberate reset, move the two Clips apart and overlap them again. For an individual overlap, right-click a fade handle and use Create crossfade. To stop unwanted automatic overlaps, turn off Automatic crossfades for the project; hiding the handles is not the same action.
Keep your intentional manual edits intact. A setting change should fix the specific overlap without quietly replacing fades elsewhere in the song.
Remove clicks without hiding a bad edit
A click often shows up when a cut jumps from one waveform level to another, and a short fade smooths that jump. The Playlist’s zero-cross option can also pull slice or resize edits toward a spot where the waveform crosses zero, though it may shift the exact cut position.
Use the shortest fade that gets rid of the boundary. If the click stays, check the edit, DC offset, overlapping audio and plugin chain. The Mixer signal-flow guide helps you separate a Clip boundary from processing that clicks further down the chain.
At an edge with an active Audio Clip fade, that fade replaces the declicking mode; it does not stack a second declick envelope at that same edge. The two ends are independent, so one end can use a Clip fade while the other uses declicking. Several child Clips share Channel Settings, which means that panel alone may not show each child’s actual edge state. Inspect the Playlist envelope and listen, as described in the Audio Clip declicking notes.
Use automation when the fade belongs to a section
A Clip fade follows that clip instance. If a vocal phrase spans several edits, or a bus must leave the chorus gradually, automate a stable level control instead. Image-Line’s Automation Clip documentation explains how clips link to controls and live in the Playlist; the FL Studio automation guide covers creating the clip, shaping points and avoiding surprise links.
For a channel, a dedicated gain stage keeps your fade apart from the static mix balance. Where you put it matters: fading before a reverb lets its existing tail ring on, while fading after that effect turns the tail down too. For a full ending, check every return that reaches the output, not just the dry instruments.
Fade the complete song with a dedicated gain control
For a mix whose audible paths all reach the Master, Fruity Balance provides a Volume control intended for level automation. Place it after the Master effects you want the fade to turn down, leave Balance centered, and confirm no audible path bypasses it. This is an optional arrangement choice, not a mastering preset.
- Select the intended ending range on the Playlist ruler.
- Right-click Fruity Balance’s Volume control and choose Create automation clip. The selected range sets the new Clip’s span.
- Keep the first point at the current level. For the last point, turn Volume to silence, copy that control value and paste it into the final automation point. Do not assume a generic percentage means 0 dB.
- Shape the curve, play in Song mode from before the fade and listen through the reverb and delay tails.
- Render a short test with the same output processing and play the file outside FL Studio. Confirm the ending is actually present in the export.
The toolbar’s Monitor Volume is not a substitute: it cannot be automated and its changes do not affect renders. If the level jumps back after you remove an Automation Clip, check Browser > Current project > Patterns > Initialized controls. Removing a Clip from the Playlist does not necessarily remove its channel, links or stored starting value. See the automation guide’s reset and linking checks before deleting unrelated automation.
Preserve the original before testing. In FL Studio Trial, saving is allowed but reopening requires purchase, so render needed audio before closing. In a licensed host, resolve any unowned trial-plugin warning before reopening and never overwrite the original after reopening with missing plugin states.
Do not confuse a fade with gain staging
Clip gain sets the working level of one item, Mixer faders balance routed channels, and a fade describes change over time. If a clip is 9 dB too loud for its whole length, fix its level first, then design the entrance or exit.
In the same way, a final fade won’t fix a clipped or over-limited master. Finish the balance through the mastering workflow, then listen to the ending at normal and low monitoring levels.
Run this fade quality check
- The chosen control matches one clip, an overlap, a channel or the full arrangement.
- The fade controls are visible and attached to the intended Audio Clip.
- Length and curve were adjusted as separate decisions.
- The first useful transient or consonant remains intact.
- Reverb and delay tails end naturally.
- A crossfade does not create a level bump, hollow phase or doubled word.
- Automatic mode and visibility were checked separately; intentional manual fades were preserved before any reset.
- The boundary is click-free in solo and in context.
- Clip gain, Mixer balance and fade movement are not being used interchangeably.
Continue through the Workflow hub once the seam is clean. The best fade is usually the one nobody notices.
Frequently asked questions
Where are the fade handles in FL Studio?
Open the Playlist, focus Audio Clips and press Shift+F to show fade editing controls. The fade-length handles are triangles on the upper-left and upper-right edges of each Audio Clip.
Why is automatic crossfade not working in FL Studio?
Check Automatic crossfades separately from Shift+F visibility. Manual fades can block automatic changes, even at zero length. Preserve the project, select only the involved Clips and use Reset fades if you intend to discard those fade settings. Also check Create new clips with manual fades when the problem returns on new Clips.
Should I use fade handles or an Automation Clip?
Use handles for one Audio Clip boundary and crossfades for overlaps. Use an Automation Clip when a channel, bus, effect return or whole song section must change level across time.
How do I remove a click at an audio cut?
Apply the shortest fade that smooths the discontinuity and consider slicing near a zero crossing. If the click remains, inspect overlapping audio, DC offset and processing rather than hiding the problem with a long fade.
What is the difference between Clip gain and a fade?
Clip gain changes the overall level of that Playlist instance. A fade changes level over time at its start or end. Set the working level first, then shape the transition.