FL Studio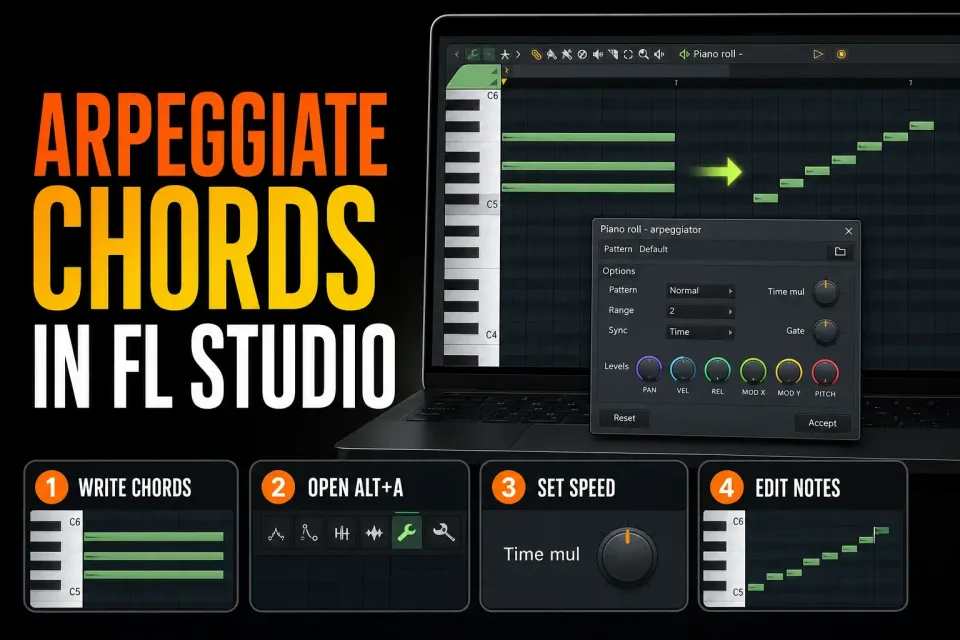
To arpeggiate in FL Studio, write or record a chord in the Piano roll, select its notes, then press Alt+A on Windows or Option+A on macOS. The Piano roll Arpeggiator turns the chord into editable notes. If you’d rather keep the chord intact and let FL Studio generate the arpeggio during playback, use the Channel Settings arpeggiator instead.
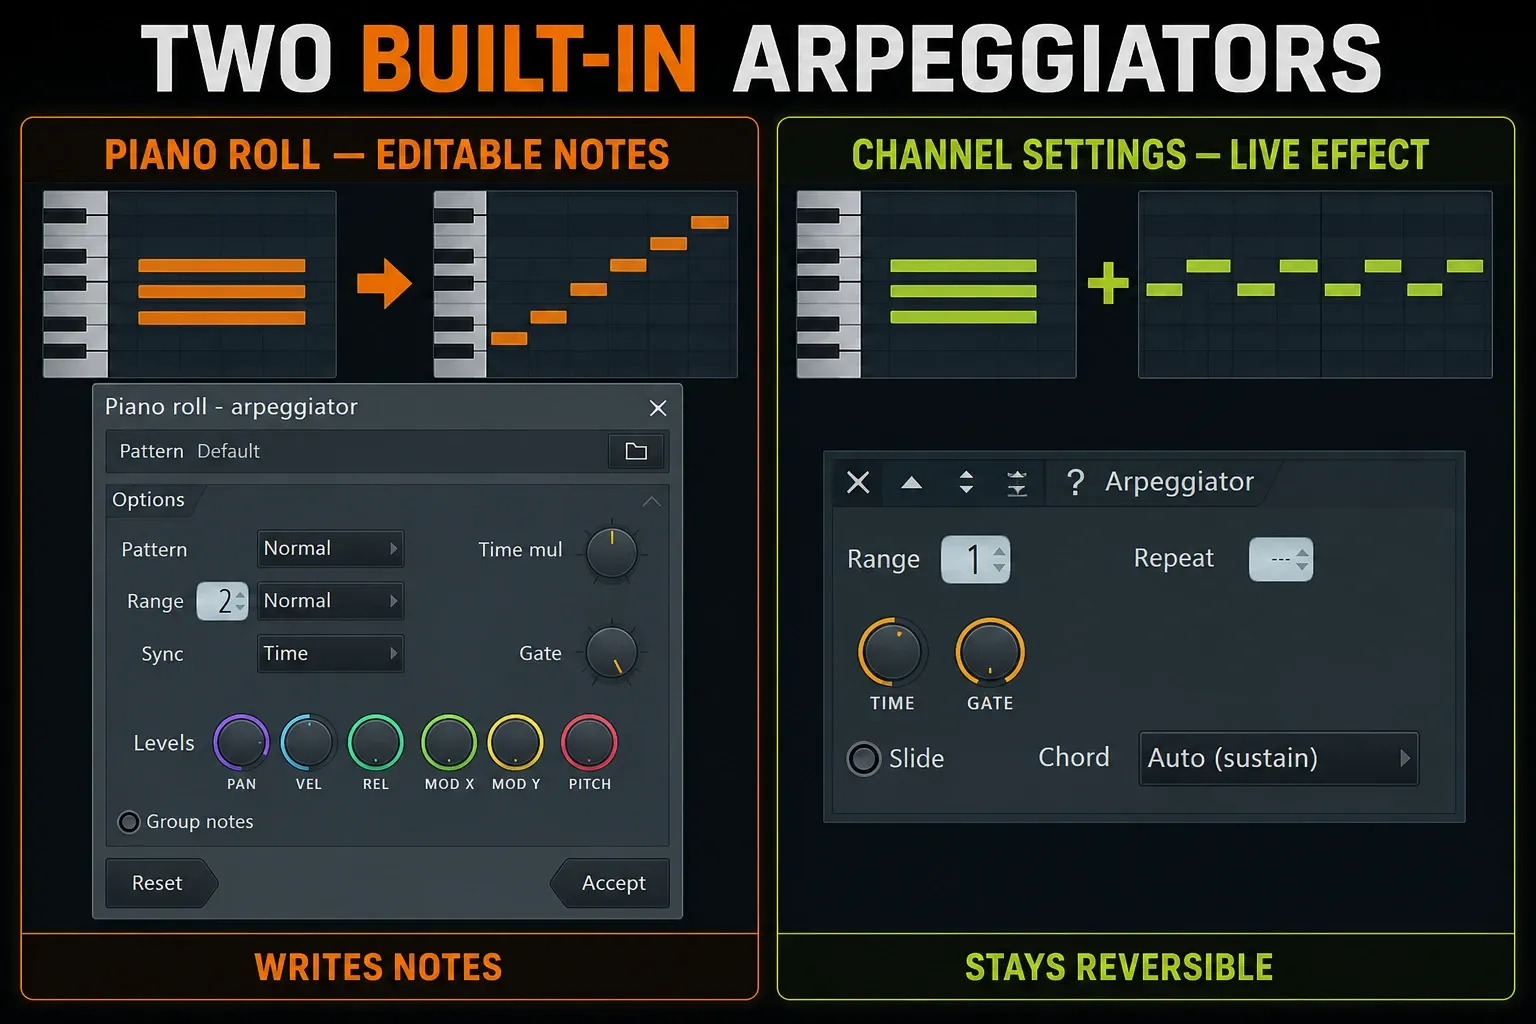
The two routes sound alike, but they leave your project in different states. One prints the rhythm as notes you can move one by one. The other stays real-time and reversible. Settle that choice before you touch speed, direction or octave range.
Choose editable notes or a live arpeggio
| You need | Start with | What remains after setup |
|---|---|---|
| Notes you can delete, tie, move and vary | Piano roll Arpeggiator | Ordinary editable notes |
| A reversible effect while chords stay readable | Channel Settings arpeggiator | Original chord notes plus live processing |
| A programmable event pattern inside a modular patch | VFX Sequencer in Patcher | An event-routing system |
| A plugin’s own preset arp | The plugin arpeggiator | Behavior depends on that plugin |
Those first two are the sensible defaults. Patcher and plugin-specific sequencers go much deeper, but they’re a poor place to start when the real job is “make these three chord notes play one after another.”
Prepare a chord the arpeggiator can read
Open an instrument’s Piano roll and place a chord long enough to cover the phrase you have in mind. For a quick test, use C, E and G starting and ending together. Overlap matters if you want the live arpeggiator to read those notes as a held chord. The Piano roll score tool can also process single notes, because its preset decides the rhythm and pitch changes, so it isn’t limited to blocked chords.
Get the harmony right before you add motion. Play the blocked chords through the progression and listen against the bass. An arpeggiator exposes a wrong chord tone more clearly, since it repeats that note on its own. Moving fast won’t fix bad harmony.
If you’re still getting to grips with how the Channel Rack, Pattern and Playlist fit together, build the first eight bars with the beginner project workflow before adding a second note-generating system.
Use the Piano roll Arpeggiator with Alt+A or Option+A
- Open the Piano roll for the instrument that holds the chords.
- Select the chord notes you want to transform. If nothing is selected, the command may reach further into the score.
- Press Alt+A on Windows or Option+A on macOS. You can also choose Tools > Arpeggiate from the Piano roll menu.
- Load or check an arpeggio pattern, then preview the result while the dialog is still open.
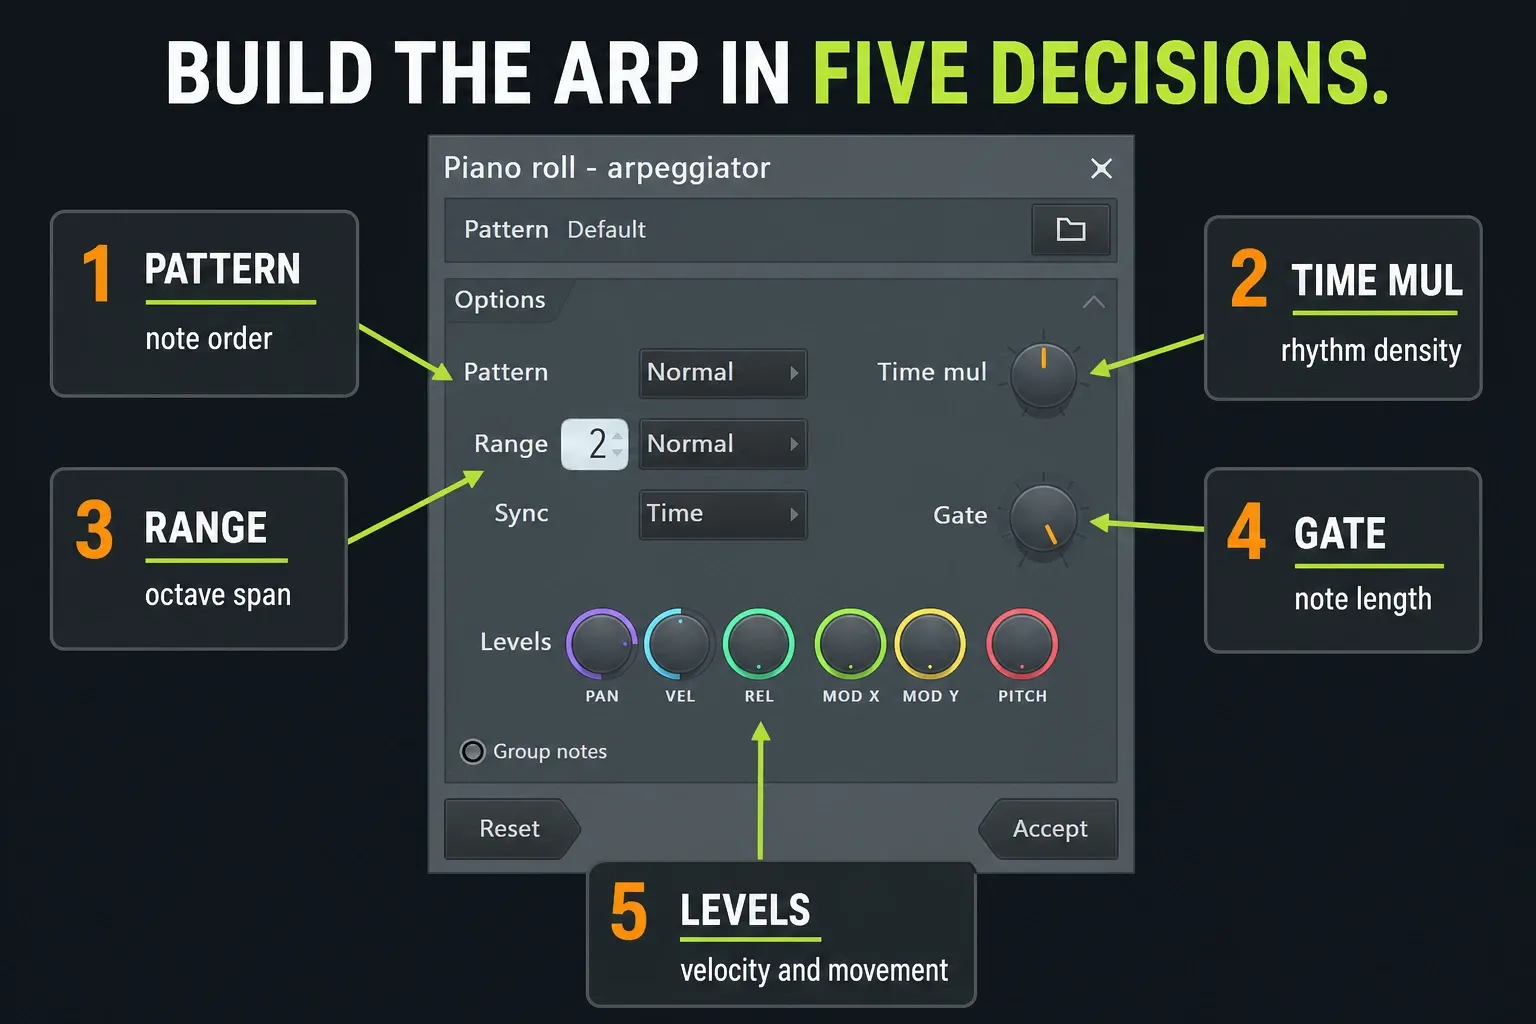
- Set Time multiplication, range, direction and Gate in that order.
- Click Accept only after the last chord change and bar boundary still land where they should.
The Image-Line Arpeggiator manual describes this as a non-real-time tool. Accept writes the changed notes into the Piano roll and leaves no arp effect running. Use project History to undo a result you don’t like, and duplicate the source Pattern before experimenting if you want to keep both versions. A duplicate Pattern keeps the note data but doesn’t copy every Channel setting.
Pick the pattern before changing every control
The selected FL Studio Score (.fsc) provides the pattern that transforms the source notes. Use the folder button next to Pattern to load one. Start with a simple shape and look at the notes it generates. Some presets do more than play your existing chord tones, because custom arp scores can transpose the source notes as well as change their rhythm.
Normal follows the score as written. Flip vertical reverses its vertical relationship. Alternate switches between the normal and flipped versions on each repetition. Try those three before you reach for a more complicated preset.
A preset gives you a starting shape; whether it fits your progression is something you have to hear. Audition all four chords, not only the first. If an unexpected pitch shows up, check the selected score and the generated notes before changing the harmony. You can fix one printed note without throwing away the whole phrase.
Set speed with Time multiplication
Time multiplication stretches or squeezes the loaded score pattern. The official tool offers whole-number relationships: slower multiples one way and faster divisions the other. Think about how dense the notes should feel instead of hunting for a magic knob position.
Take a simple three-note order repeating at sixteenth-note spacing: the cycle has three events, while a quarter-note beat holds four sixteenths. So its accent rotates against the beat unless something restarts the cycle. That can give you nice movement. Check the last generated note before every chord change, because no single knob position guarantees a complete cycle.
Don’t use the arpeggiator to fix a performance that was simply recorded off the grid. That kind of timing correction belongs to the quantize workflow. The arp tool creates an order and a rhythm the blocked chord never had.
Check Sync when the pattern stops or restarts unexpectedly
The Piano roll tool’s Sync option decides what marks the end of its loop. It has nothing to do with the audio driver or MIDI clock. In the documented Sync modes, Time disables repetitions, Block treats all notes turning off as the loop boundary, and Chord uses one chord note turning off.
If an arp won’t repeat across a held chord, check Sync before you keep turning Time multiplication. If it restarts early, look for source notes that end at different times. Keep the test chord’s notes the same length, compare Block and Chord, then pick the behavior that suits the phrase.
Keep octave range under control
Range sets the octave span of the generated movement. Start with one octave for a restrained bass, pluck or accompaniment, then try a wider span if the phrase wants it. One octave is only a starting point, and plenty of instruments sound great across more. The preset and range pattern shape the final pitches too.
Check the highest and lowest generated note against the patch. A short pluck may sound clean across three octaves, while a sampled instrument may show awkward stretching and a bass can drift out of the range that supports the song. More range doesn’t automatically mean more music.
Keep the two Pattern controls apart. The score Pattern mode changes its normal/flipped behavior, and the Range pattern decides how it moves through octaves. Normal repeats low to high, Flip repeats high to low, and Alternate goes low–high–high–low. Listen at the turnarounds before you blame an unexpected accent on off-grid timing.
Use Gate for articulation, not tempo
Gate shortens the generated notes. Lower values give detached, staccato pulses and leave room for delay or reverb. Longer values join the notes and can create legato when the instrument supports it. Gate doesn’t change how often new notes start; Time controls that spacing.
Listen to the synth envelope. A long release can make short MIDI notes overlap in sound even though the note events don’t. A slow attack can hide much of a fast phrase. Adjust the patch’s articulation and the note lengths together, and don’t reach for heavy compression just because the individual pulses are hard to hear.
Add velocity and pan movement after the notes work
The Piano roll tool’s Levels controls blend the source score’s per-note properties with those in the loaded pattern. Turning a control to the right brings in more of that pattern’s matching property. Velocity, pan and pitch changes only help if the instrument responds to them, and third-party plugins don’t necessarily support every FL Studio per-note property. Try a small change before building a phrase around it.
For a more human pulse, make one or two notes in the cycle quieter, then shift the emphasis at a phrase boundary. For deliberate stereo motion, keep the bass centered and move the higher notes gently. If the pattern needs a bigger repeating parameter change, the automation guide gives that movement its own visible lane in the arrangement.
Use Channel Settings for a live, reversible arp
Open the instrument’s detailed settings and go to the Miscellaneous, or wrench, page. In its Arpeggiator section, choose Up for a simple test. The Channel Settings manual lists Off, Up, Down, Up-Down, a second Up-Down that repeats the highest and lowest notes, and Random. Choose Off to stop the Channel arp without deleting the source notes.
Right-click the arp’s Time knob and choose Set for its timing presets, then adjust the arp Gate for note length. Don’t mix these up with the separate Time section on the same page, which has its own note-truncation Gate. Start with a simple patch, a one-octave Range and a held chord so you can hear each change clearly.
Choose Auto when the live arpeggiator should use the chords in the Channel’s note data. Auto (sustain) has an important exception: with Range set to 1, it leaves monophonic sequences unarpeggiated. If a single held note won’t pulse, check that combination before you call it a fault.
None works differently: it moves in 12-semitone octave steps within the selected range. The other Chord presets impose predefined chord shapes and don’t arpeggiate the incoming chords the way Auto does. If the output stops sounding like your harmony, check this selector first.
Slide needs an instrument that supports FL Studio’s slide behavior, and the Channel slide/portamento mechanism doesn’t work with VST/AU instruments. A plugin may have its own glide controls, which are a separate feature. Repeat works together with Range: it sets how many times a note or arpeggio chord repeats before moving to the next octave. Change one setting at a time and replay the same two chords.
Commit the live arpeggio when you need editable notes
A live arp is quick to audition, but you can’t really edit a single generated note until you capture it. In the Channel Rack, right-click the instrument’s Channel button > Burn MIDI to > New pattern. The Burn MIDI instructions also offer Current pattern, which writes back into the current Pattern. When keeping the blocked chords matters, go for a separate result.
Put the driving notes in that Channel’s Piano roll first. Burn MIDI doesn’t just record whatever you play live on a keyboard; with no input notes, you may get a message that the selected channel has no notes to burn. With native Channel arpeggiation, FL Studio then asks whether to disable Arpeggiator and Echo. Accept the right disable action so the captured notes aren’t processed twice.
Keep the original source Pattern named and out of the active arrangement while you audition the printed version. Don’t mute their shared instrument Channel just to silence the source Pattern, because that can silence the result as well. Disabling the Channel arp also affects other Patterns that use that Channel. If another section still needs live processing, keep a separate project version or give that section its own cloned instrument Channel, and check its settings before you carry on.
Now edit the printed phrase: remove a doubled turnaround, lengthen one passing note, or leave a rest before the next section. Compare the sound before and after capture, since the first burn isn’t always right.
If you’re on FL Studio Trial, you can save a project but cannot reopen it until purchase. Render needed audio before closing the session. If a licensed host warns about trial plugins you don’t own, unlock them before reopening the project. If it opens with their states missing, don’t save over the original.
For a VST/AU arp, two things have to be true: the plugin must output its generated MIDI, and its Wrapper must have a MIDI Output port selected. That port doesn’t have to be routed anywhere for Burn MIDI to see the output. Image-Line warns that many instrument plugins don’t expose their internal arp notes at all, so hearing an arp doesn’t prove MIDI output support.
Inside Patcher, the note-generating module also needs a green Events connection to To FL Studio with a MIDI port selected. An audio cable alone can’t pass those notes. The Patcher routing guide covers the difference between event and audio paths. If MIDI output isn’t available, use a native note-generation route, or record audio when all you need is the sound and editable note events don’t matter.
Choose a live route for changing the arp during playback
The Alt/Option+A dialog edits notes and then closes; it doesn’t stay in the project as a plugin. After Accept, no Piano roll arp keeps running, so there’s no Time multiplication knob to sweep through the arrangement. Edit the generated notes for deliberate variations, or use the Channel arp or a suitable Patcher/plugin setup when the generating rule has to stay live. Check whether the control you picked can really be automated instead of assuming every arp parameter can be linked.
Turn a loop into a four-bar musical phrase
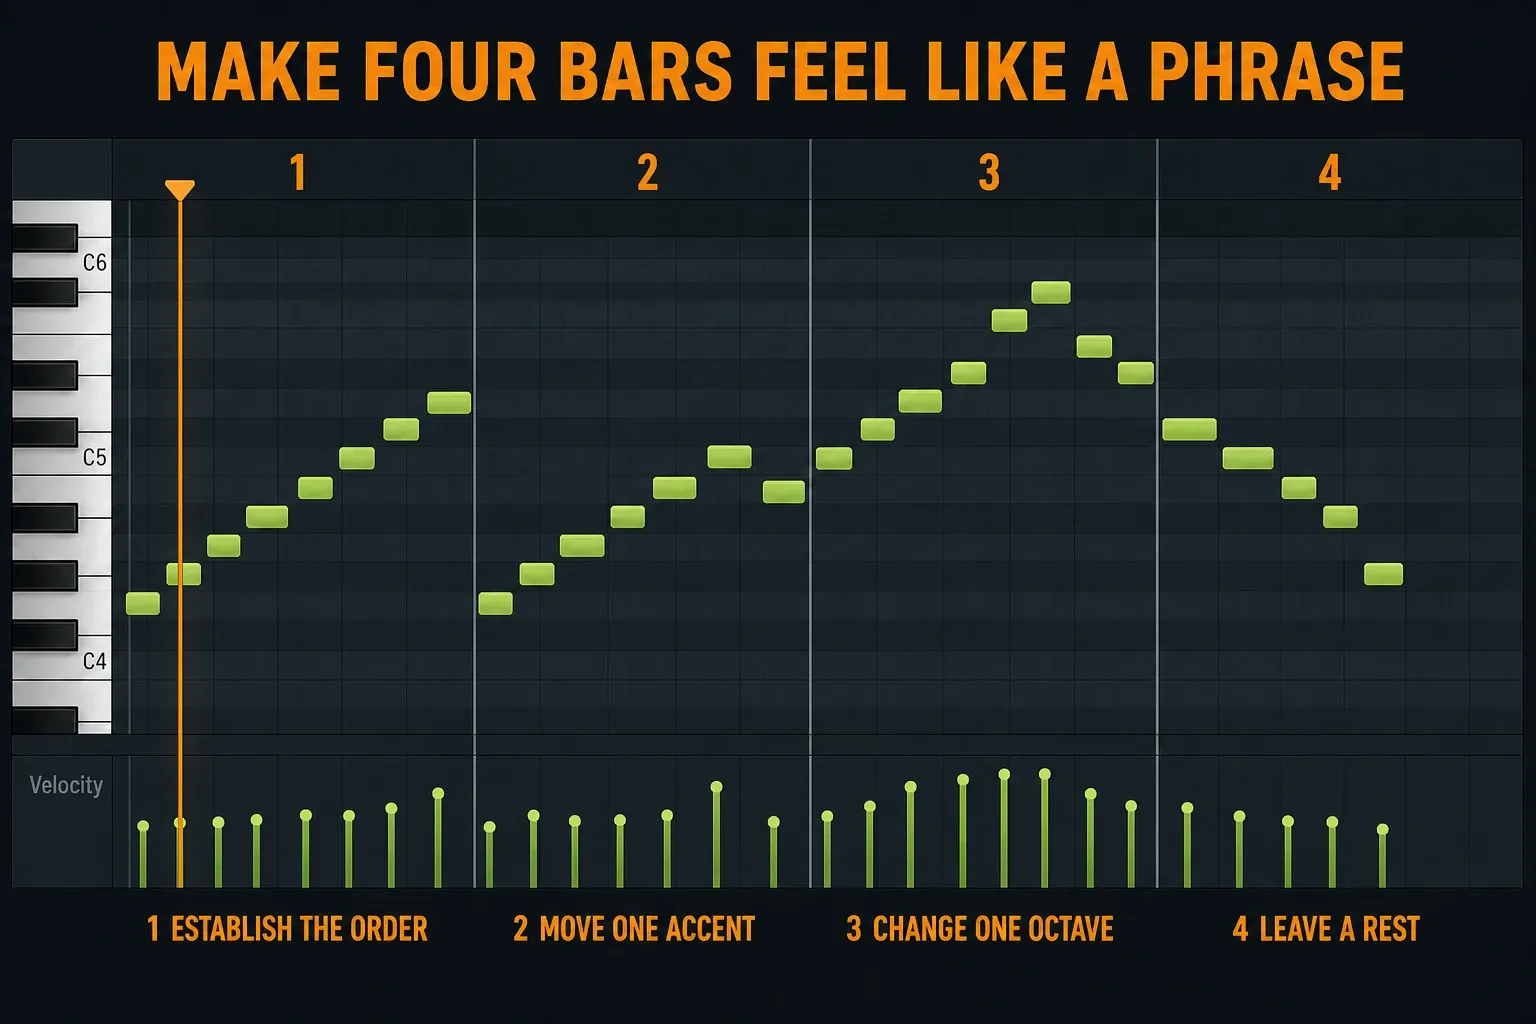
An arpeggio gets tiring when every bar answers the same way. Keep the harmony easy to follow, then change just one decision per phrase. The wider Pattern-loop arrangement workflow explains when to share a stable Pattern and when to make only the variation unique.
- Bar one establishes the basic order.
- Bar two changes one velocity accent.
- Bar three raises or removes one note near the end.
- Bar four leaves a rest or shortens the final cycle before the next section.
Those edits give the phrase direction without hiding the chord progression. Once the live result is printed, the Piano roll shortcut reference speeds up selecting, duplicating and moving notes.
Fix common FL Studio arpeggiator problems
| Symptom | Likely cause | Useful fix |
|---|---|---|
| Alt/Option+A changes more notes than expected | No precise selection | Undo, select the intended chord region and reopen the tool |
| Only one pitch repeats | Channel Chord mode or offline score pattern does not match the intended chord | Check Auto and overlapping chord notes for the live route; inspect the loaded score and Sync for the Piano roll route |
| The pattern jumps outside the patch’s useful register | Range is too wide | Reduce octave range or edit printed notes |
| The rhythm sounds smeared | Long Gate, release or delay tail | Shorten articulation before changing speed |
| Live arp doubles after burning | Printed notes still pass through the active arp | Disable the Channel arpeggiator after capture |
| Third-party arp cannot be burned | Missing MIDI output support, output-port setup or driving notes | Check plugin MIDI support, Wrapper Output port and Piano roll input; use native generation if the plugin cannot expose its notes |
Know when Patcher is the better next step
Stick with the two basic routes until you need a programmable step pattern, note filtering or scale handling that stays live. VFX Sequencer in Patcher takes incoming notes or chords and sends its generated sequence to a connected instrument. Route the input into the sequencer and its note output into the instrument. Add the separate host event-output connection described above only when you want to capture those notes with Burn MIDI.
A four-note loop that feels repetitive isn’t a reason to move to Patcher. Print the simple arp and edit the phrase first. A modular graph earns its place when the rule itself has to stay live; ordinary Piano roll notes are clearer the rest of the time.
Run this arpeggio quality check
- The blocked chord progression sounds correct before processing.
- The chosen tool matches the need for editable notes or a live effect.
- The pattern completes or turns around intentionally at chord changes.
- Time multiplication creates the intended density.
- The octave range stays inside the instrument’s useful register.
- Gate and the synth envelope produce clear articulation.
- Velocity or pan movement supports the pulse without masking weak notes.
- A burned Pattern does not pass through the live arp a second time.
- The fourth bar creates a reason to hear the first bar again.
Continue through the FL Studio Workflow hub once the note pattern works. Your next move is usually arrangement, automation or editing, and rarely another random arp preset.
Frequently asked questions
What is the shortcut to arpeggiate in FL Studio?
Open the instrument’s Piano roll, select the chord notes and press Alt+A on Windows or Option+A on macOS. That opens the Piano roll Arpeggiator, which writes editable notes when you accept the result.
Why is the FL Studio arpeggiator playing only one note?
First check which tool you’re using. In the Channel arp, make sure it’s set to Auto (not None or an unintended chord template) and that your chord notes overlap. Auto (sustain) with Range 1 leaves a monophonic sequence unarpeggiated. In the Piano roll tool, look at the selected score pattern and the Sync mode, because a preset may repeat one pitch or stop instead of looping.
Can I turn the Channel Settings arpeggiator into Piano roll notes?
Yes. Add source notes to the instrument’s Piano roll, then right-click its Channel Rack button and choose Burn MIDI to > New pattern. Disable the live arp when prompted and listen to the result. Third-party plugins must expose generated MIDI and have a Wrapper MIDI Output port selected, and many internal plugin arps don’t expose it.
What is the difference between Gate and arpeggiator speed?
Speed sets when generated notes start; Gate shortens how long they last. The instrument’s envelope affects what you hear too, since a long release can make separate MIDI notes sound joined. When a rhythm sounds smeared, change note length and patch articulation separately.
Should I use the Piano roll or Channel Settings arpeggiator?
Use the Piano roll tool when you want note events you can see and edit. Use Channel Settings when you want to audition a live reversible effect and keep the source chords intact.