FL Studio
To quantize MIDI notes in FL Studio, open the correct Piano Roll, select the notes, set Global Snap, then press Shift+Q to align their starts without changing their lengths. For partial correction or a groove template, open the full Quantizer with Alt+Q on Windows or Option+Q on Mac. Decide what should move before accepting the edit: the attack, the release, or both.
Keep a copy of any performance you might want to compare. In the Playlist, open the Pattern Clip’s top-left menu and choose Make unique before changing just that instance. The Playlist manual explains the difference between cloning and copying clips: ordinary duplicates can still share the same Pattern data. Our pattern looping guide shows how to keep an original and an edited variation independent.
This guide edits notes, not the timing inside a recorded waveform. If the whole audio clip needs to move, use an audio-clip nudge. Editing individual attacks inside recorded audio is another job, such as time warping in NewTime, and Piano Roll shortcuts can’t quantize those waveform transients.
Choose Snap before choosing a quantize command
Global Snap sets the timing grid that basic quantize uses. If a hi-hat part has sixteenth notes and you quantize it to quarter notes, FL Studio can’t know the missing detail was intentional. It just sees target lines and pulls notes toward them.
Match the intended subdivision: 1/4 beat for straight sixteenths, 1/3 beat for three subdivisions per beat, or 1/2 beat for eighths. The Piano Roll menu reference lists these divisions and confirms that both quick commands use Global Snap. Set the Piano Roll’s local magnet to Main when you want its editing grid to follow that same global setting. Changing Snap alone does not retroactively correct a take.
Use the three Piano Roll quantize commands deliberately
Quick Quantize applies basic grid alignment to selected notes. The current manual lists Ctrl+Q on Windows and Option+Command+Q on macOS; use the Piano Roll menu if another shortcut context has focus. Quick Quantize can change note starts and ends, so it may alter performed durations.
Quick Quantize start times, Shift+Q, moves note start times and keeps their played lengths. That’s often the safer first pass for chords, bass and melodic parts where the played lengths matter. Keep in mind that each release moves along with its start and won’t stay at its original timeline position.
Quantize, Alt+Q on Windows or Option+Q on macOS, opens the advanced Quantizer. Use it when you need partial strength, sensitivity, velocity/duration influence or a groove template. Ignore tutorials that call Shift+Q the full dialog; current Image-Line documentation assigns it to start-time quantizing.
Select the phrase first. With nothing selected, both quick commands hit every note and slide in the current Piano Roll, and most Piano Roll tools also work on the whole score. Preview the full Quantizer’s result and check the first and last notes before you accept it. If you opened the wrong instrument’s editor, use the Piano Roll guide to trace the Channel and Pattern first.
Use Strength and Sensitivity without guessing
Strength is a section, not one master “humanize” percentage. Its Start time knob blends the original onset with the quantized target, and the farther right you turn it, the more correction you get. A lower setting keeps some of the performed offset. No single percentage is musical for everything, so audition a short phrase against the rhythm section and stop once the timing problem is gone.
Sensitivity decides how close a note’s start or end has to be to a target before it gets quantized. Turning it right widens that range. A narrower range can leave distant events alone, but the tool can’t tell a deliberate anticipation from an equally distant mistake, so select important exceptions yourself.
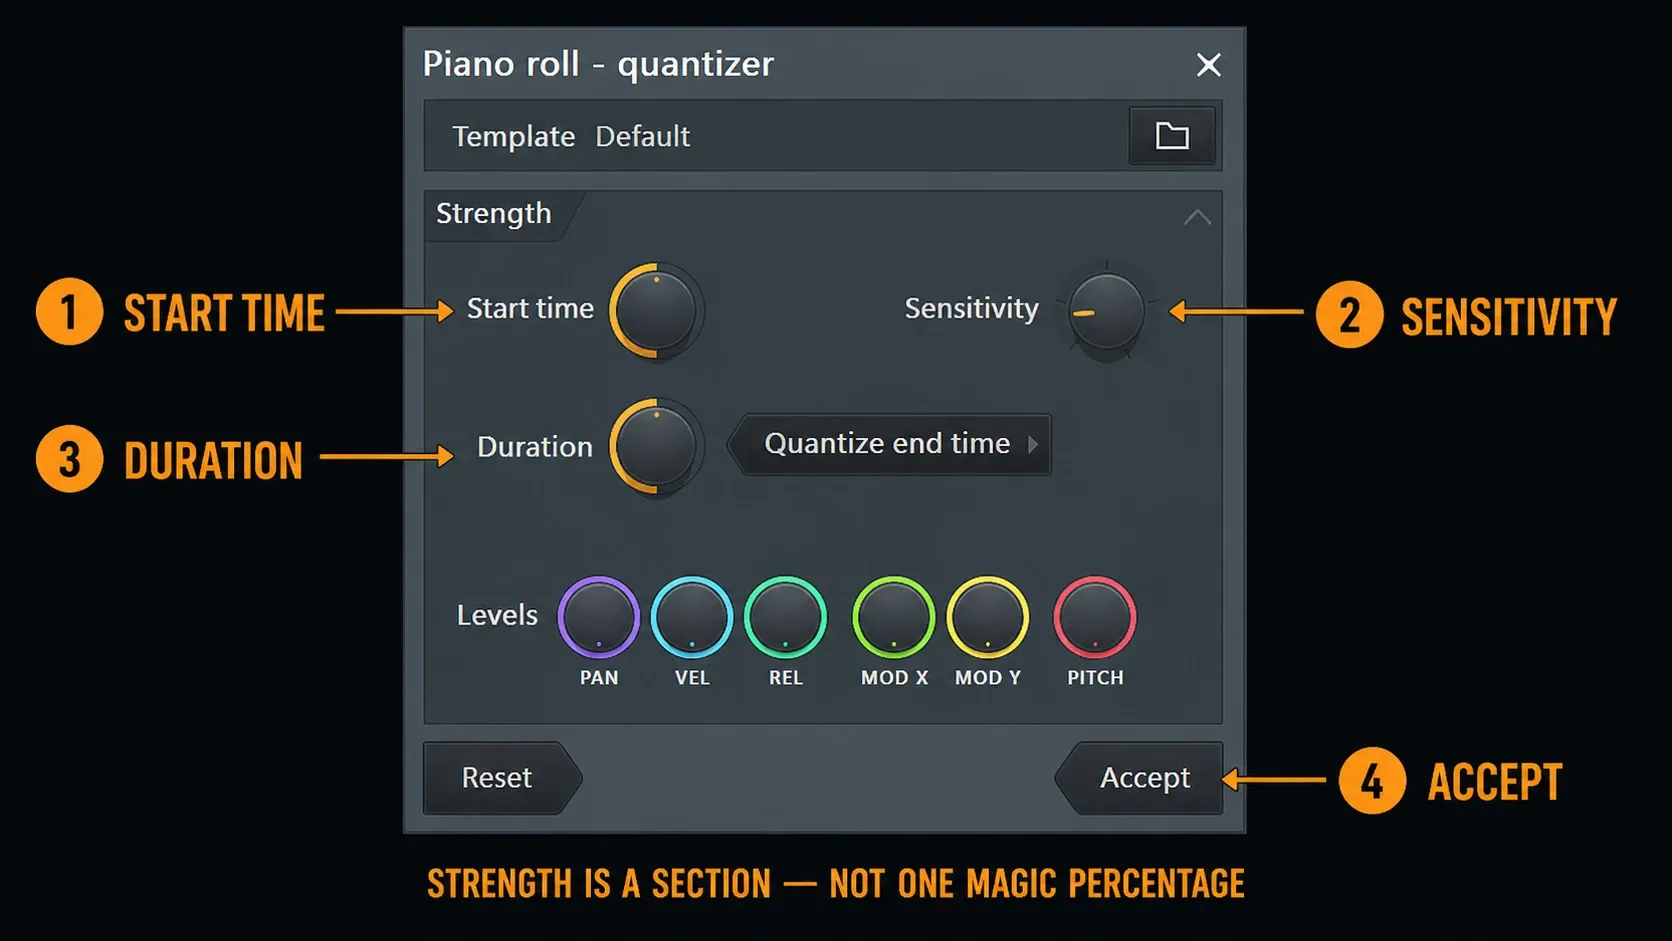
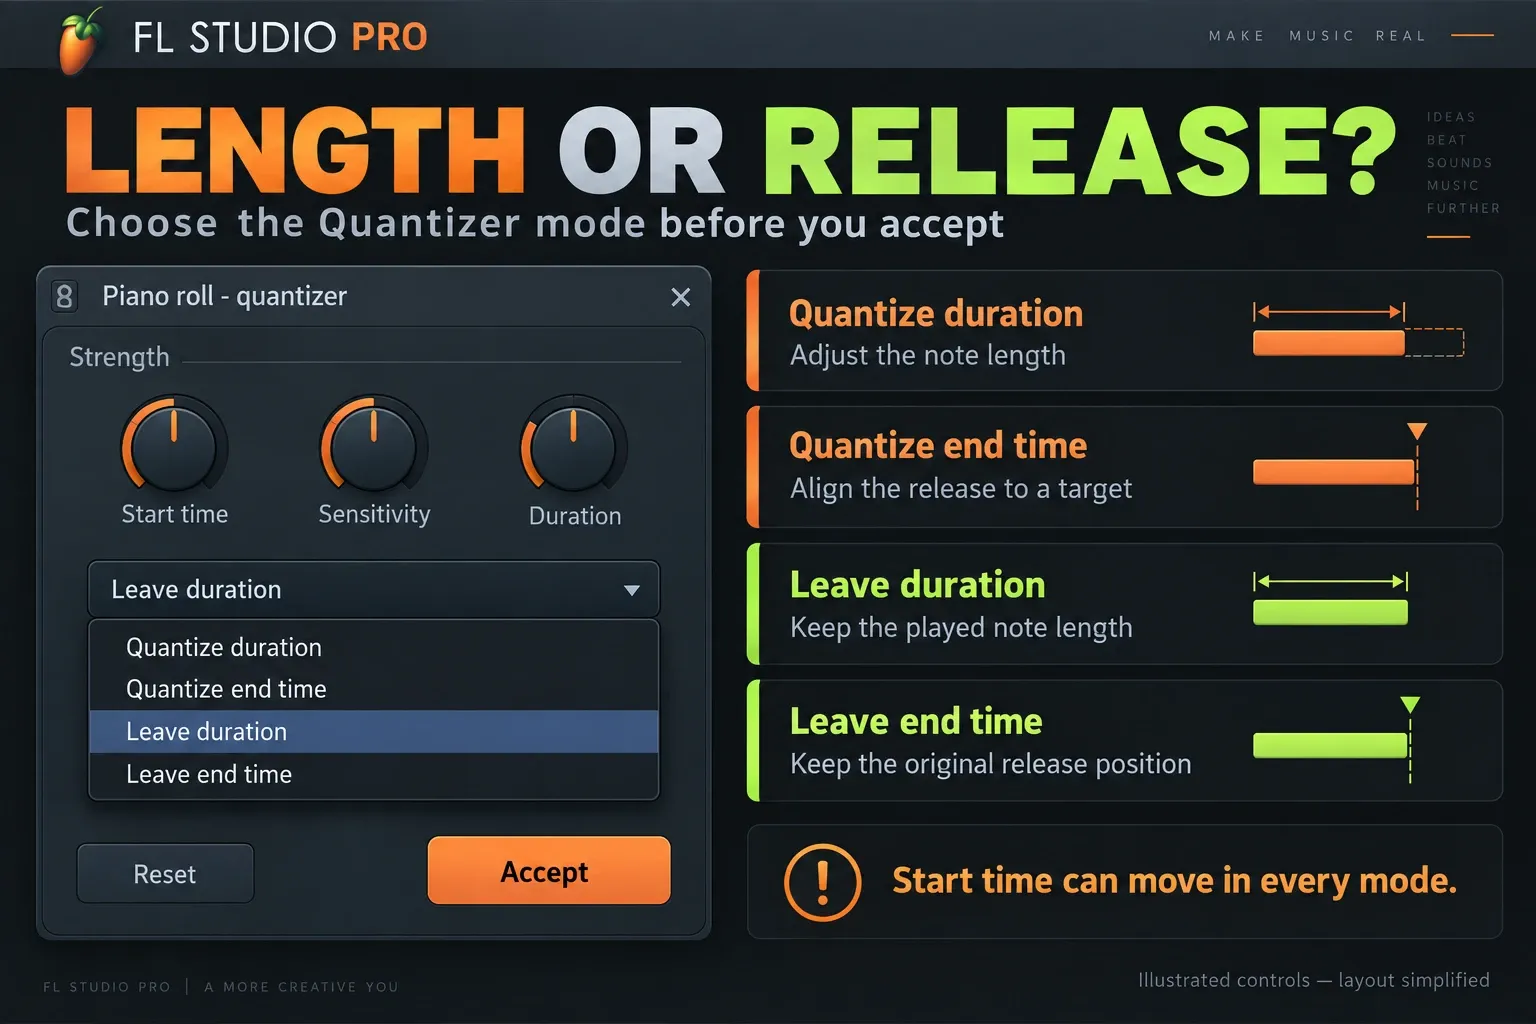
The Quantizer reference separates the four duration modes. Start time can be quantized in every mode, subject to the timing controls; these choices decide what happens to the other end of the note.
- Quantize duration: adjusts note length to the grid.
- Quantize end time: aligns the release position to a grid target.
- Leave duration: preserves played length, so the release moves with a corrected start.
- Leave end time: preserves the original release position, so moving the start changes the length.
The Duration knob blends original and quantized length; in Quantize end time mode it blends release positions instead. Choose Leave duration when the played lengths are already right, instead of setting Duration low and hoping every release stays put. The Levels knobs can blend note properties with a template. Leave those near the original values when you only want timing correction.
Quantize with a groove template
The Quantizer reads FL Studio Score files (.fsc) as groove templates. Use its Browse button to load one, then inspect the vertical red target lines. Those template targets can differ from a straight Global Snap grid. To build a groove, arrange a short reference score in the Piano Roll and use its menu’s File > Save score as, then load that FSC through the Quantizer. Importing a MIDI file into the Piano Roll is not the same operation.
Template note positions and lengths set the timing targets, and their pitches are ignored for that purpose. Target starts are pulled toward nearby template starts, and the same goes for ends. Zero-velocity template notes can delete notes. Check the template and undo if notes disappear after you apply it. A silent template note isn’t a harmless placeholder.
Try the groove on one phrase with gentle timing and level changes. A great hat feel can clash with a bass part when you copy it everywhere. For the separate Channel Rack control and what it covers, see Global Swing and per-channel response. Don’t stack swing and a template without listening to what they do together.
Quantize MIDI while recording
For input quantizing, set the Global Snap selector to a Step or Beat division, or Bar. Right-click the main Record button and inspect the available options: Note start time, Note end time and Leave note duration. Image-Line’s MIDI recording instructions explain these combinations. To tighten attacks while keeping played lengths, use start-time quantizing with Leave note duration rather than independently snapping both ends.
To record without input quantizing, set Global Snap to None, Line or Cell. Changing just the Piano Roll’s local magnet is a different switch. Make sure the Record menu’s Note recording filter is on, keep Step Editing off for normal Piano Roll recording, and check that Record to step sequencer isn’t forcing the performance into zero-length steps.
An input-quantized take is already corrected by the time you look at it, and you can’t count on getting the original timing back. If you’re unsure, record freely and edit a copy. Use the MIDI recording walkthrough to pick the destination Pattern and capture a take before you correct it.
If the controller creates no notes at all, quantize won’t help. Work through the MIDI controller setup and input checklist first.
Quantize drums, chords and melody differently
For drums, fix the anchors first: the main kick and snare relationship. Hats and percussion often carry the push, swing or drag, so forcing every onset onto the same rigid subdivision can strip out the groove you were after.
For chords, keep note length and the spread between fingers as separate questions. Shift+Q protects the first but not the second, and snapping several attacks to one target can flatten a rolled chord. Leave a deliberate spread alone, select only the misplaced notes, or use partial Start time correction. The MIDI humanizing guide covers velocity and Strum when the job is shaping a performance instead of correcting one.
For melody and bass, protect pickups and notes that lean into the next beat. Select the obvious misses instead of treating the whole take as guilty. If an entire MIDI performance is consistently off, first rule out accidental input quantizing; the recording reference also documents Playback tracking Offset for system-related timing errors. Quantizing every take won’t diagnose monitoring latency.
For a deliberately repeating broken chord, settle the note order and range before you correct timing. The built-in arpeggiation workflow builds the sequence, and quantize should only tighten the result when the rhythm really needs it.
The beginner project route shows how the Piano Roll relates to the Pattern and Playlist. Quantize the right Pattern before you copy it through the arrangement.
Fix quantize results that sound worse
Several notes collapsed onto one beat
The Snap interval is too coarse, or the performance was farther from the intended targets than the grid can infer. Undo, choose a finer or correct triplet division, and quantize a smaller selection.
Chord releases changed
If you mean the played lengths, use Shift+Q or the full tool’s Leave duration mode. If you mean the original absolute release positions, use Leave end time instead. Those are different requests: preserving length while moving the start also moves the end.
The groove disappeared
Undo, lower Start time Strength, reduce Sensitivity, or correct only the anchor notes. Timing differences are not automatically mistakes.
Only some notes moved
Check selection and Sensitivity. Notes outside the sensitivity range may remain where they were by design.
Shortcuts do nothing
Give the Piano Roll focus and open its Tools menu to verify the command. The shortcut guide explains editor context. If notes still do not move, check that they are selected, the Snap or template target is different, Start time is not at the original-only setting, and Sensitivity includes the intended events.
Notes disappeared after loading a groove
Undo and inspect the FSC template for zero-velocity notes. Also zoom in to check whether several notes have landed on top of each other. A missing event and two overlapping events need different fixes.
Correct the misses before tightening the whole performance
Start with the notes that are clearly wrong: a kick on the wrong side of the beat, a chord onset that breaks the phrase, or one bass note that arrives after the transient it should support. Select those events and fix them first, then listen to the untouched notes around them. That way the useful push and drag stay audible, and a full-strength command doesn’t get to decide that every difference from the grid is a mistake.
If what’s left affects a whole phrase, preview partial timing correction on that phrase. Compare note starts separately from ends and velocity, because a cleaner attack doesn’t justify changing an accent that already works. Keep the independent Pattern variation clearly named. Compare in the arrangement, not just in solo: the better result supports the drums, bass and vocal together.
Make a correction you can still explain
Compare the edited Pattern with the untouched copy inside the full arrangement. Check the first note, chord releases, velocity accents and any intentional anticipation. If you can’t say what improved, the correction may only look cleaner.
The Piano Roll & MIDI hub ties together note editing, recording and performance shaping. Use the Workflow hub when the corrected Pattern is ready for arrangement. Quantize should help listeners hear the idea as you intended, without erasing the decisions that made it a performance.
One last practical test: turn the monitoring volume down and tap along with the pulse. The corrected anchors should feel easier to find, while pickups and expressive releases still lean into the next phrase. If every note looks tidy but the pulse feels less convincing, restore the copy and make a smaller correction.
Frequently asked questions
What is the FL Studio Quick Quantize shortcut?
In the Piano Roll, the current manual lists Ctrl+Q on Windows and Option+Command+Q on macOS for Quick Quantize. Use the Piano Roll menu when another shortcut context has focus. Quick Quantize follows Global Snap.
How do I quantize only note starts?
Select the notes and use Shift+Q, Quick Quantize start times. It aligns onsets to the current Snap grid while preserving performed note lengths.
What does Alt+Q do in FL Studio?
Alt+Q on Windows, or Option+Q on macOS, opens the advanced Piano Roll Quantizer with Strength, Sensitivity and groove-template controls.
Can FL Studio quantize while I record MIDI?
Yes. Input quantizing uses recording options and Global Snap. Record without it when you may want to preserve and compare the original performance timing.
Why does quantizing make my performance sound robotic?
The grid may be wrong, Start time correction may be too strong, or intentional offsets may have been treated as mistakes. Undo and correct a smaller selection or use partial timing correction. Start-time-only quantizing preserves note lengths, but it can still flatten an intentional spread between chord attacks.