FL Studio
To connect a MIDI keyboard to FL Studio, plug it in before opening the app, then go to Options > MIDI settings or press F10. Select the keyboard in the Input list, click Enable, pick its supported Controller type (or a generic controller if there’s no named profile) and play a key. The MIDI activity light should blink.
A blink proves FL Studio received some MIDI data, though not necessarily the notes you meant to play. If the keyboard is missing from Input, refresh the list and check whether your operating system sees it. If it’s listed but doesn’t respond, check Enable, the input port and the controller mode. If activity appears without sound, confirm that key presses send note messages before you test the instrument and audio output.
Start with the exact MIDI symptom
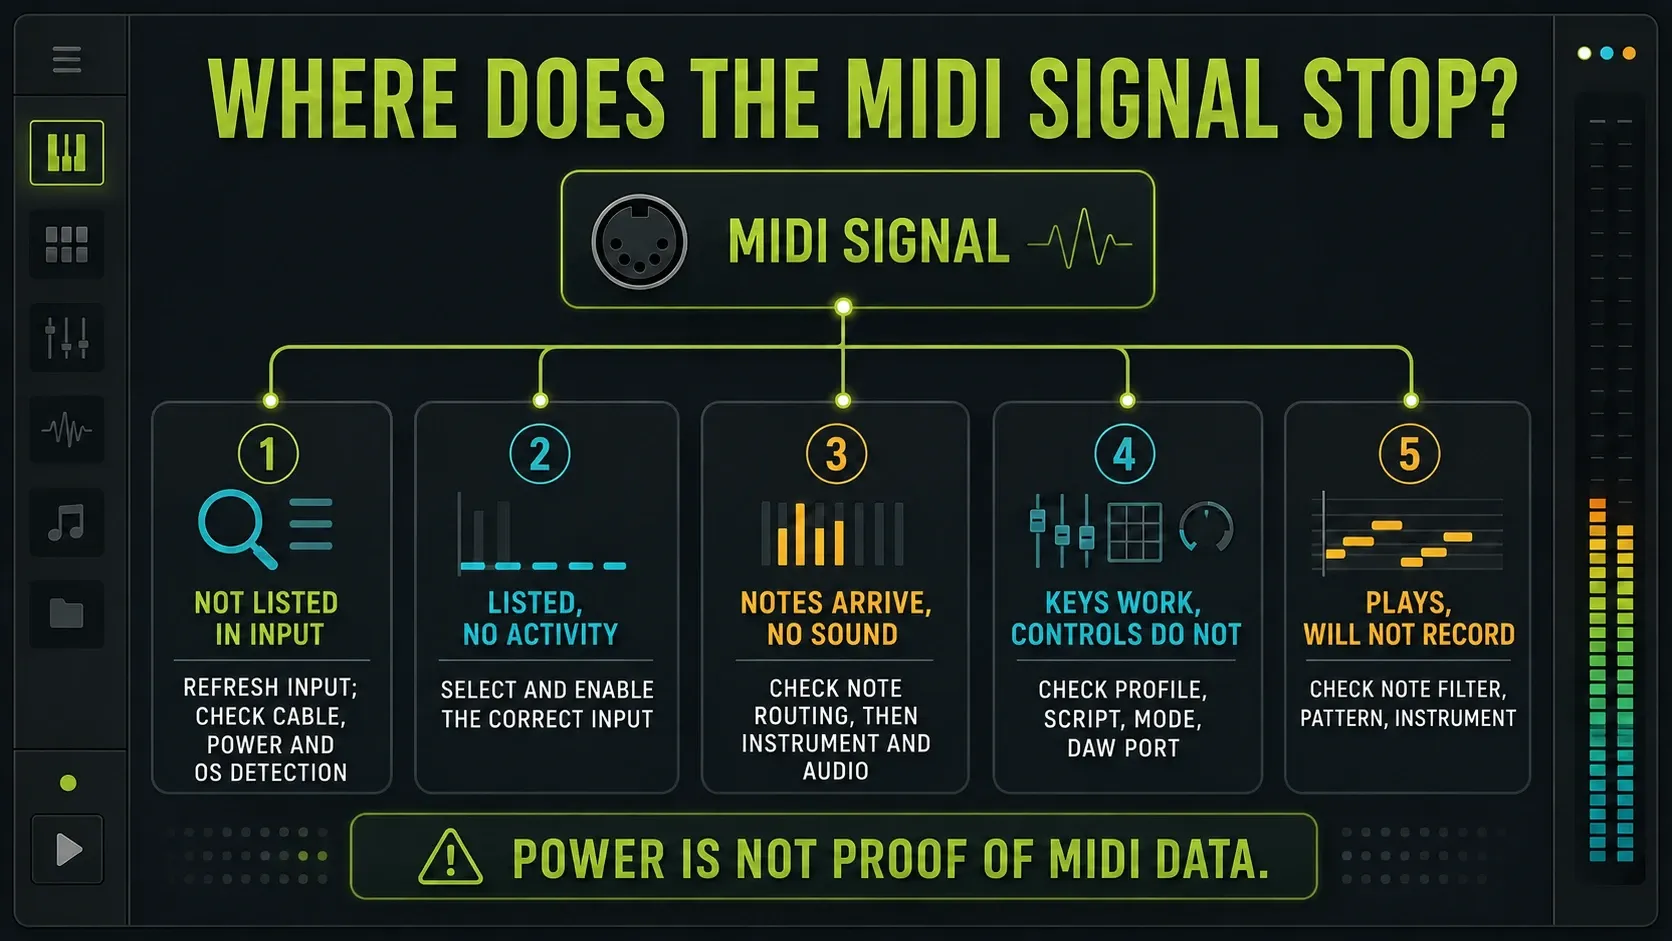
A controller can light up and still send no usable MIDI. Before you reinstall anything, press a key and watch the Main Panel with an instrument channel selected. Then find your result below.
| What you can prove | What to check next | Next branch |
|---|---|---|
| Controller is absent from the Input list | Device refresh, cable, power and OS detection | Refresh Input, then check the OS connection |
| Device is listed, but no activity light appears | Disabled or wrong FL Studio MIDI input | Enable and test the correct Input |
| Note messages arrive, but there is no sound | Note routing, instrument and audio output | Confirm the note destination, then test sound |
| Keys work, but pads, knobs or transport do not | Controller profile, script, DAW port or mapping | Use the device-specific control branch |
| Instrument plays, but notes are not recorded | Record filter, Pattern or selected channel | Fix the recording path |
If notes already play but feel late, head to the FL Studio audio settings guide. A missing MIDI input and a delayed sound call for different checks.
Use the connection your keyboard actually provides
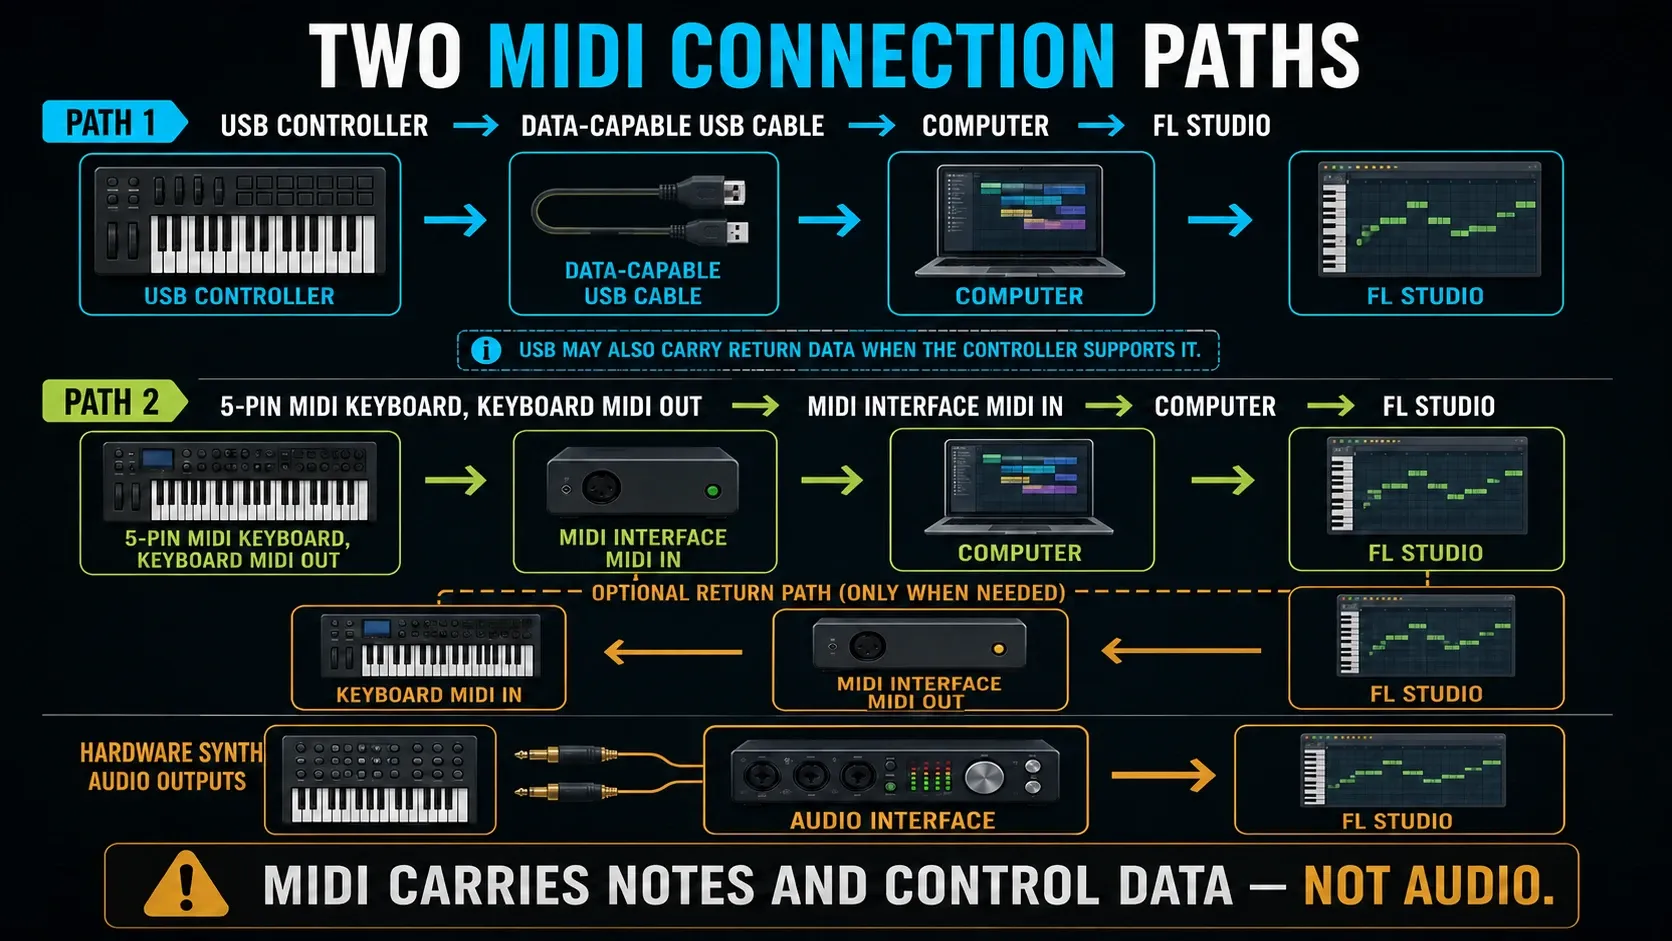
A USB controller normally plugs straight into the computer and sends MIDI data over that cable. A keyboard with only round five-pin MIDI sockets needs a MIDI interface: run the keyboard’s MIDI OUT into the interface’s MIDI IN. If you also want FL Studio to play the hardware keyboard, add the return path from the interface’s MIDI OUT to the keyboard’s MIDI IN.
The Image-Line MIDI Setup Wizard keeps control data and sound apart: MIDI carries notes and controller messages, never the audio you hear. To record a hardware synth, run its audio outputs into an audio interface, or use its USB audio connection if that model has one. Yamaha’s MX connection guide shows an example of audio and MIDI sharing one USB cable. A controller with no sound engine of its own plays a software instrument and has no synth audio to send.
For a first diagnosis, plug USB hardware into a port on the computer itself instead of a passive hub. It’s a test of power and connection, and plenty of powered hubs work fine. If the direct connection works, add the hub back later and test it separately.
Let the operating system detect the controller before FL Studio
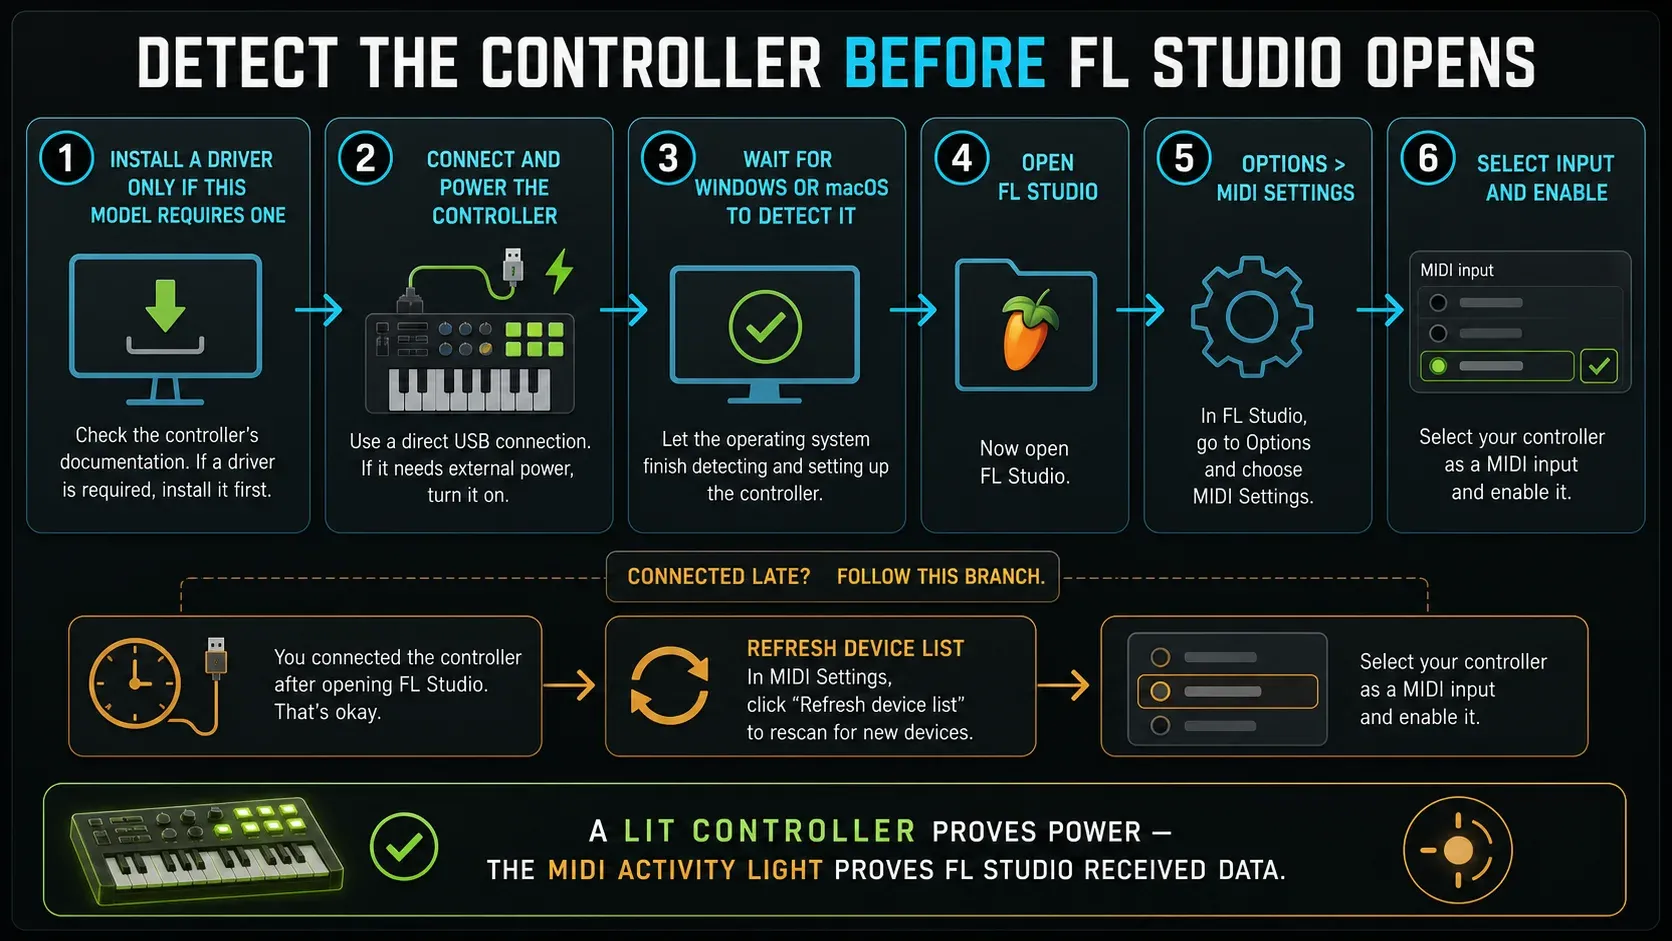
Many keyboards are class-compliant and use the operating system’s built-in MIDI driver. Check your model’s setup guide before installing a separate driver, because it may be required, or recommended for features such as using several MIDI apps at once. Connect the keyboard, switch it on and wait for Windows or macOS to finish recognizing it. Open FL Studio after that.
Image-Line’s setup order matters, because the Input list is built from devices the operating system has already detected. If you plugged the keyboard in after FL Studio opened, use Refresh device list. If it’s still missing, close FL Studio, unplug and replug the controller, wait for OS detection and reopen the app.
On macOS, open Applications > Utilities > Audio MIDI Setup, then Window > Show MIDI Studio. Apple recommends rescanning the MIDI connection if the interface is missing. With a five-pin keyboard, look for the USB MIDI interface; the keyboard’s own model name may never appear. On Windows, check Device Manager and the controller vendor’s setup guide. A lit screen proves the device has power, not that MIDI was detected.
Connect the MIDI keyboard in four moves
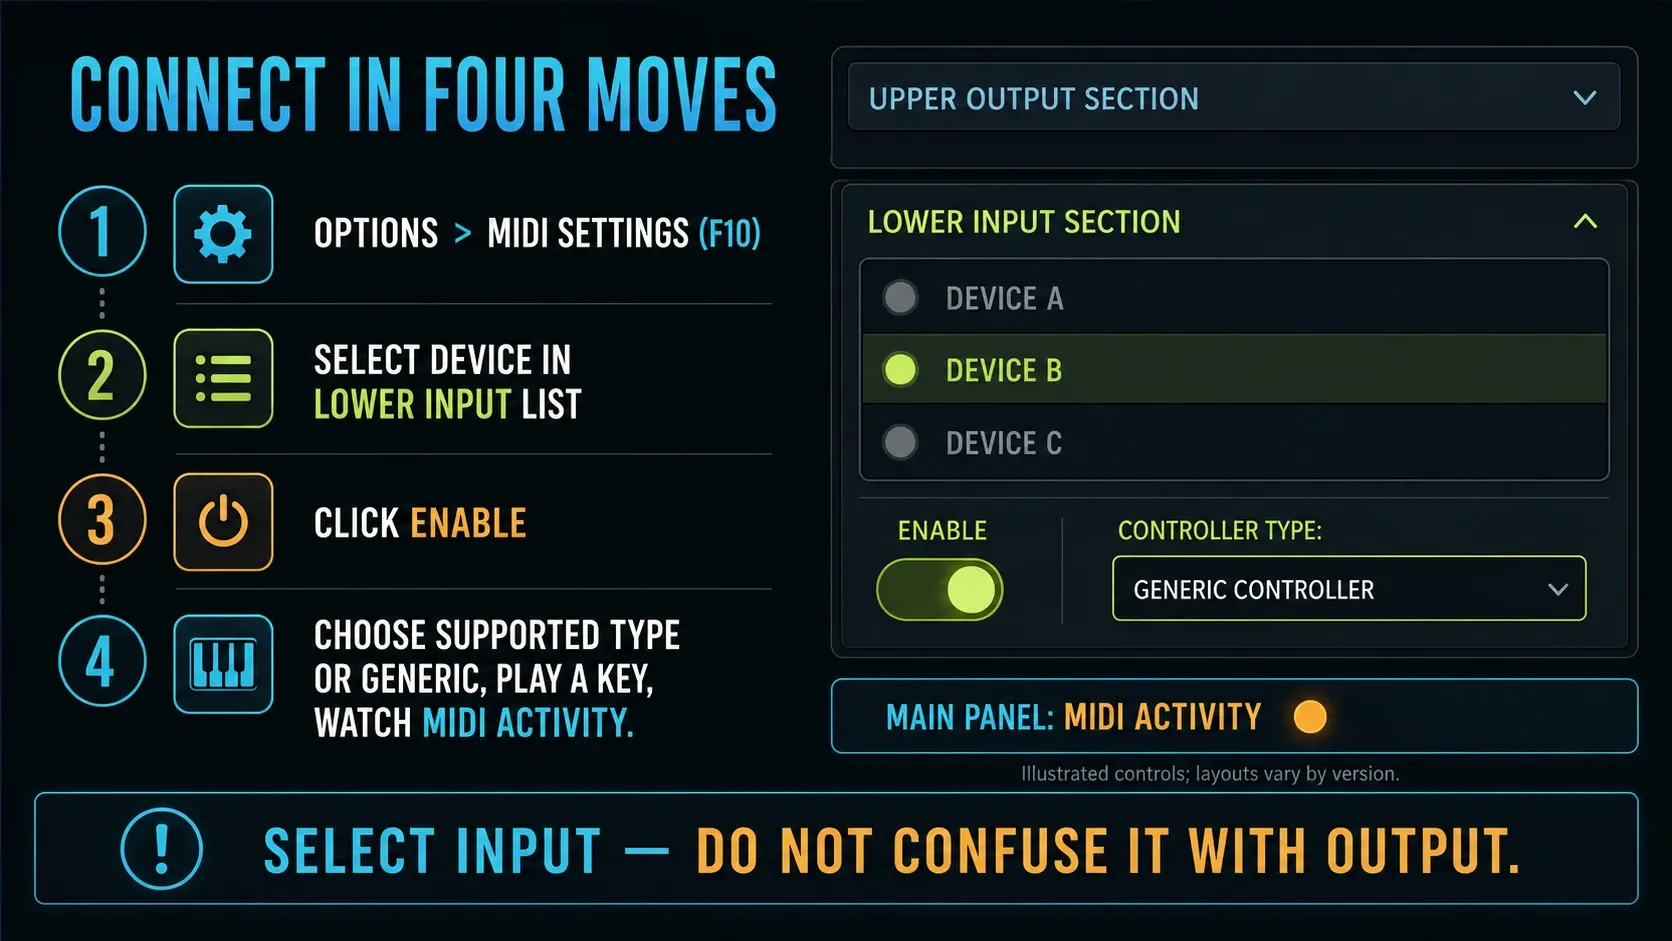
Open Options > MIDI settings or press F10. In the lower Input area:
- Select the keyboard or the MIDI interface receiving its five-pin cable.
- Click Enable for that selected input.
- Choose the exact supported Controller type or script when the manufacturer documents one; if there isn’t one, use the generic-controller option.
- Select an instrument in the Channel Rack, play a key and watch the MIDI activity light.
The Image-Line MIDI Settings manual, checked September 13, 2026, documents Input, Enable and Controller type, with the activity light on the Main Panel. Don’t enable every Input and Output entry. A controller may expose separate ports for notes and DAW commands, so set each one up according to the manufacturer’s guide.
Generic controller is not a failure
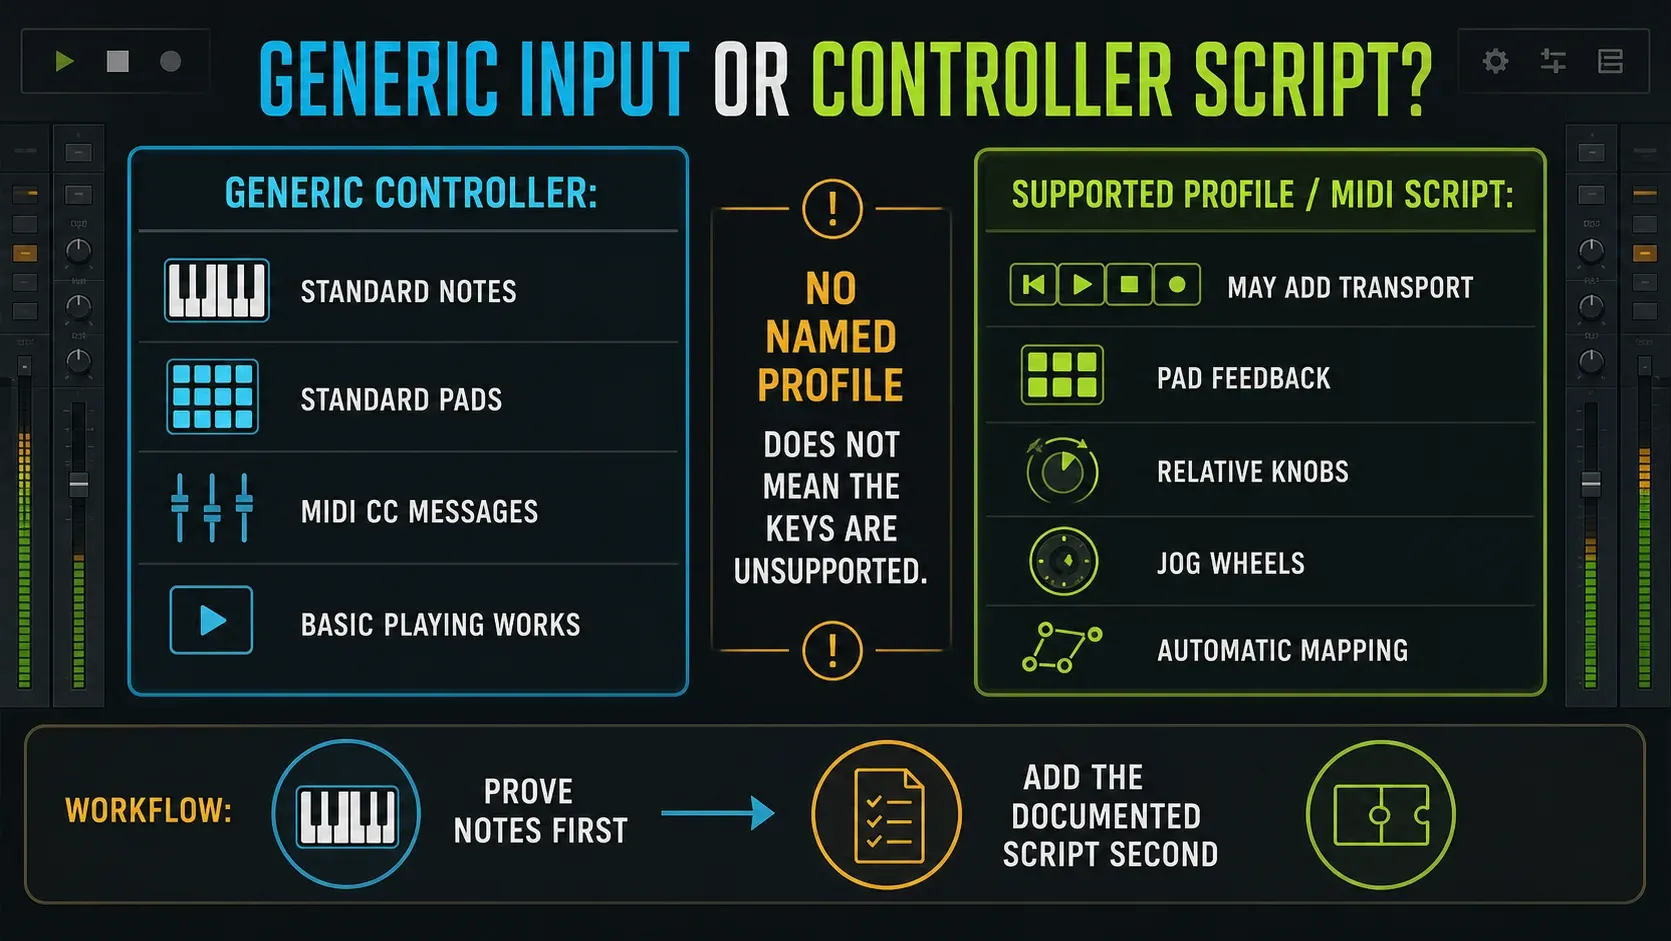
Image-Line says FL Studio supports generic USB/MIDI controllers. A keyboard that’s missing from the named Controller type list can still play instruments and send standard notes or control-change messages. “Generic” just means FL Studio has no ready-made map for that device’s special features; the keys themselves are fully supported.
A supported profile or MIDI Script can add transport buttons, jog wheels, pad feedback and other device-specific controls. The preconfigured controller reference explains why ordinary MIDI notes can work even when the special controls aren’t set up. What a profile adds depends on the model.
Start with notes. Once the keys reliably play a selected instrument, install or update the documented script and select it under Controller type. If the profile needs a newer FL Studio build, use the official update path in the FL Studio installation guide. Doing it in this order stops a script problem from looking like a dead USB connection.
Use the activity light and Debug log as proof
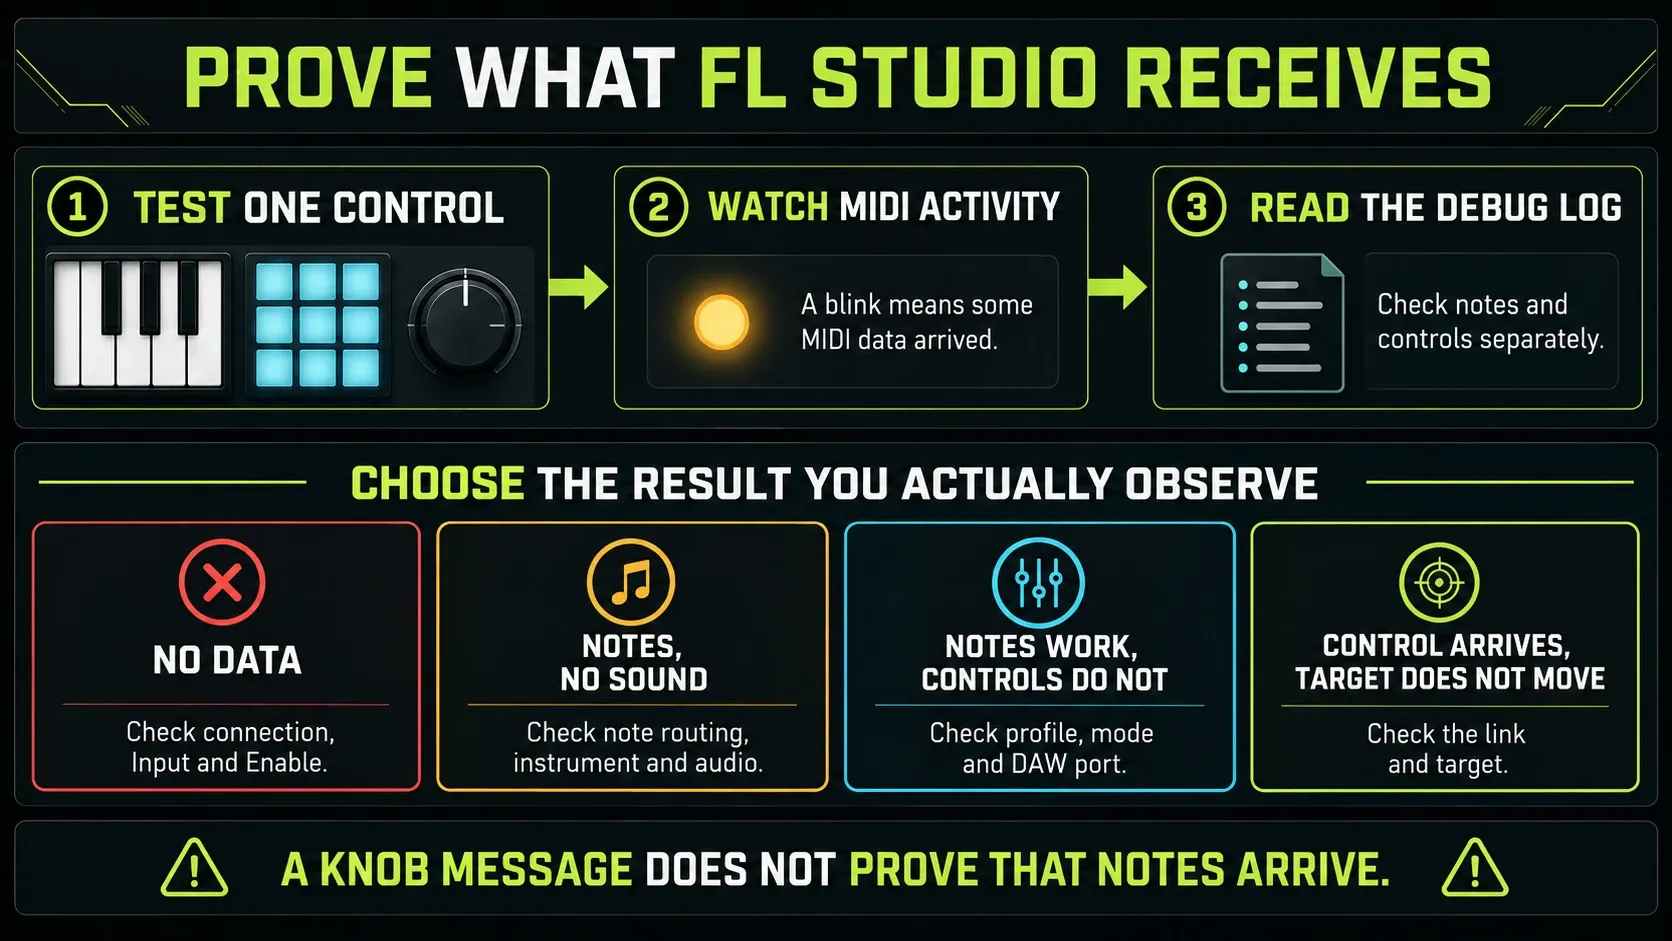
Test one key, then one pad, then one knob while you watch the MIDI activity light. To see what actually arrived, open the Debug panel in System Settings and repeat the test with the panel open. Look for a note message from the key; an unrelated control-change message doesn’t prove the keys work.
One note getting through doesn’t prove the transport buttons work, and a knob message doesn’t prove the knob is linked to the right parameter. Keep each test separate: which physical control did you move, what message arrived, and did the intended instrument or parameter respond?
- No light and no log event: stick with the connection, Input and Enable.
- Note event arrives, no sound: check note routing, the instrument and audio output.
- Notes arrive, controls do not: check profile, script, mode and DAW port.
- Controls arrive but move nothing: check the actual link or focused target.
If the MIDI controller is missing from Input
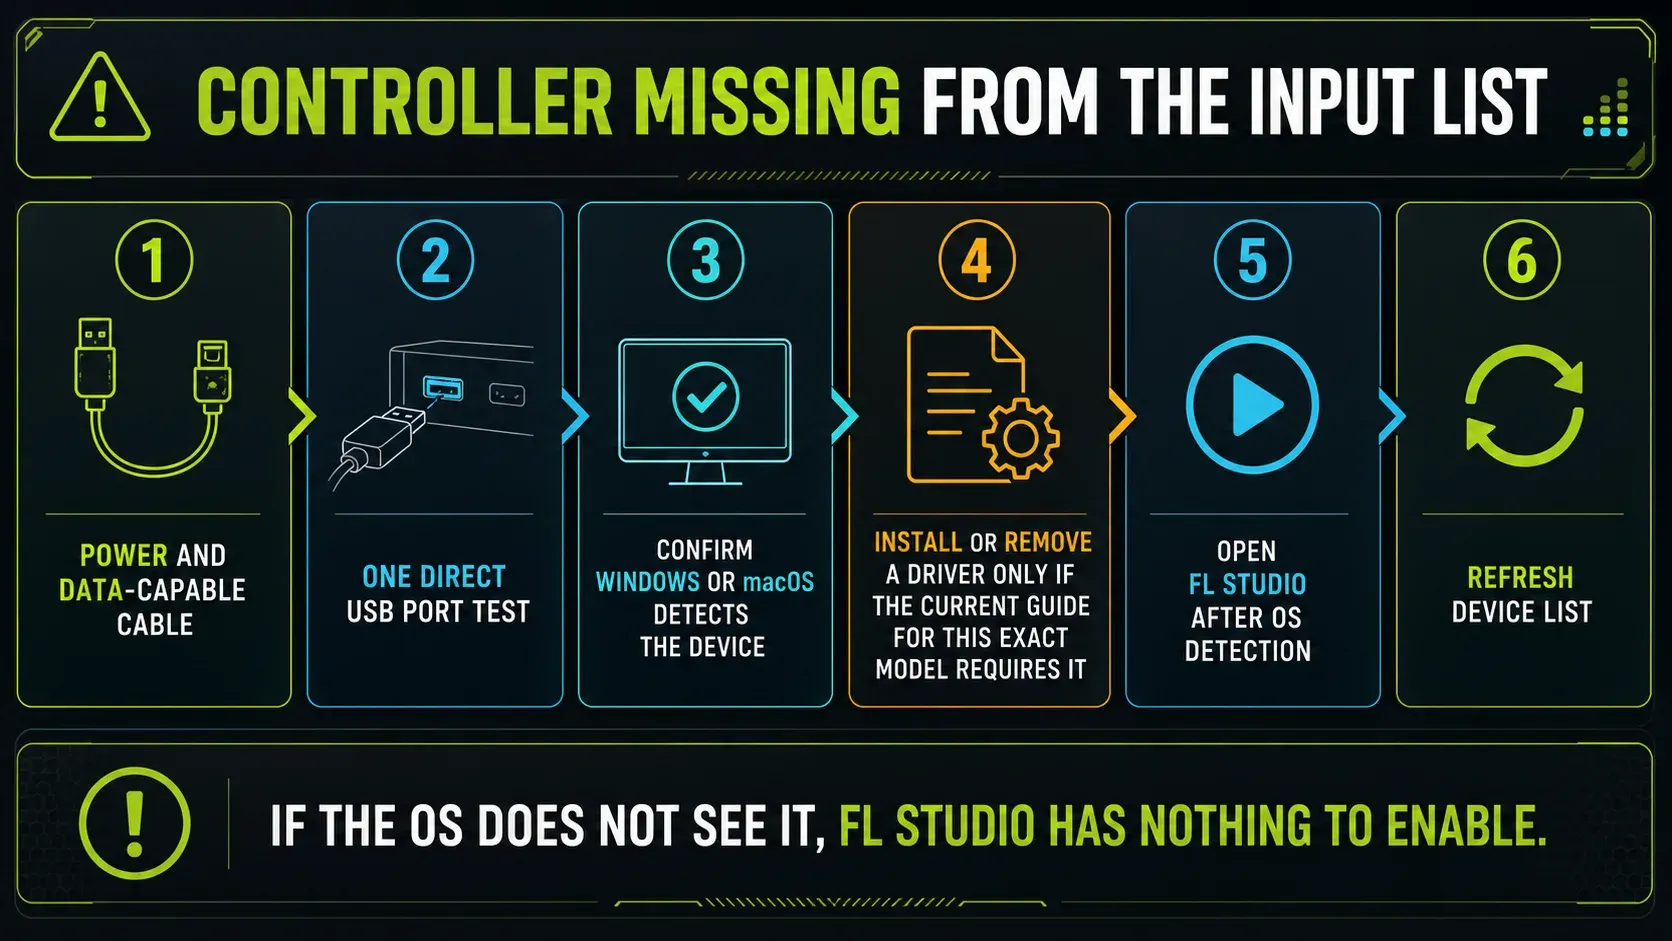
First click Refresh device list. If the controller still isn’t there, check the connection and operating-system detection before changing FL Studio mappings:
- Power the controller and use a USB cable you know carries data, since some charging cables only carry power.
- Try one direct USB port with the right data cable. If you can’t avoid an adapter, test one you know works and is compatible.
- Confirm the operating system lists the MIDI device.
- Install or remove a vendor driver only as the current guide for that exact model says.
- Close and reopen FL Studio after OS detection, then click Refresh device list.
If the operating system sees the interface but FL Studio doesn’t, close any other DAW, standalone instrument or controller editor that may have grabbed the MIDI port exclusively, then refresh again. Driver and firmware changes have to match your exact model. A vendor might recommend removing an old driver for a newer class-compliant controller, for example, but that’s no reason to remove every MIDI driver.
If FL Studio itself freezes or closes only while the controller is connected, you’re dealing with more than a missing input. Protect the project and use the FL Studio crash recovery guide before changing drivers broadly.
If the device is listed but the activity light stays dark
Select the exact row under Input (not the device with a similar name under Output) and confirm Enable is on. Also check that Options > Enable MIDI remote control is selected. Click Refresh device list, then test one key again.
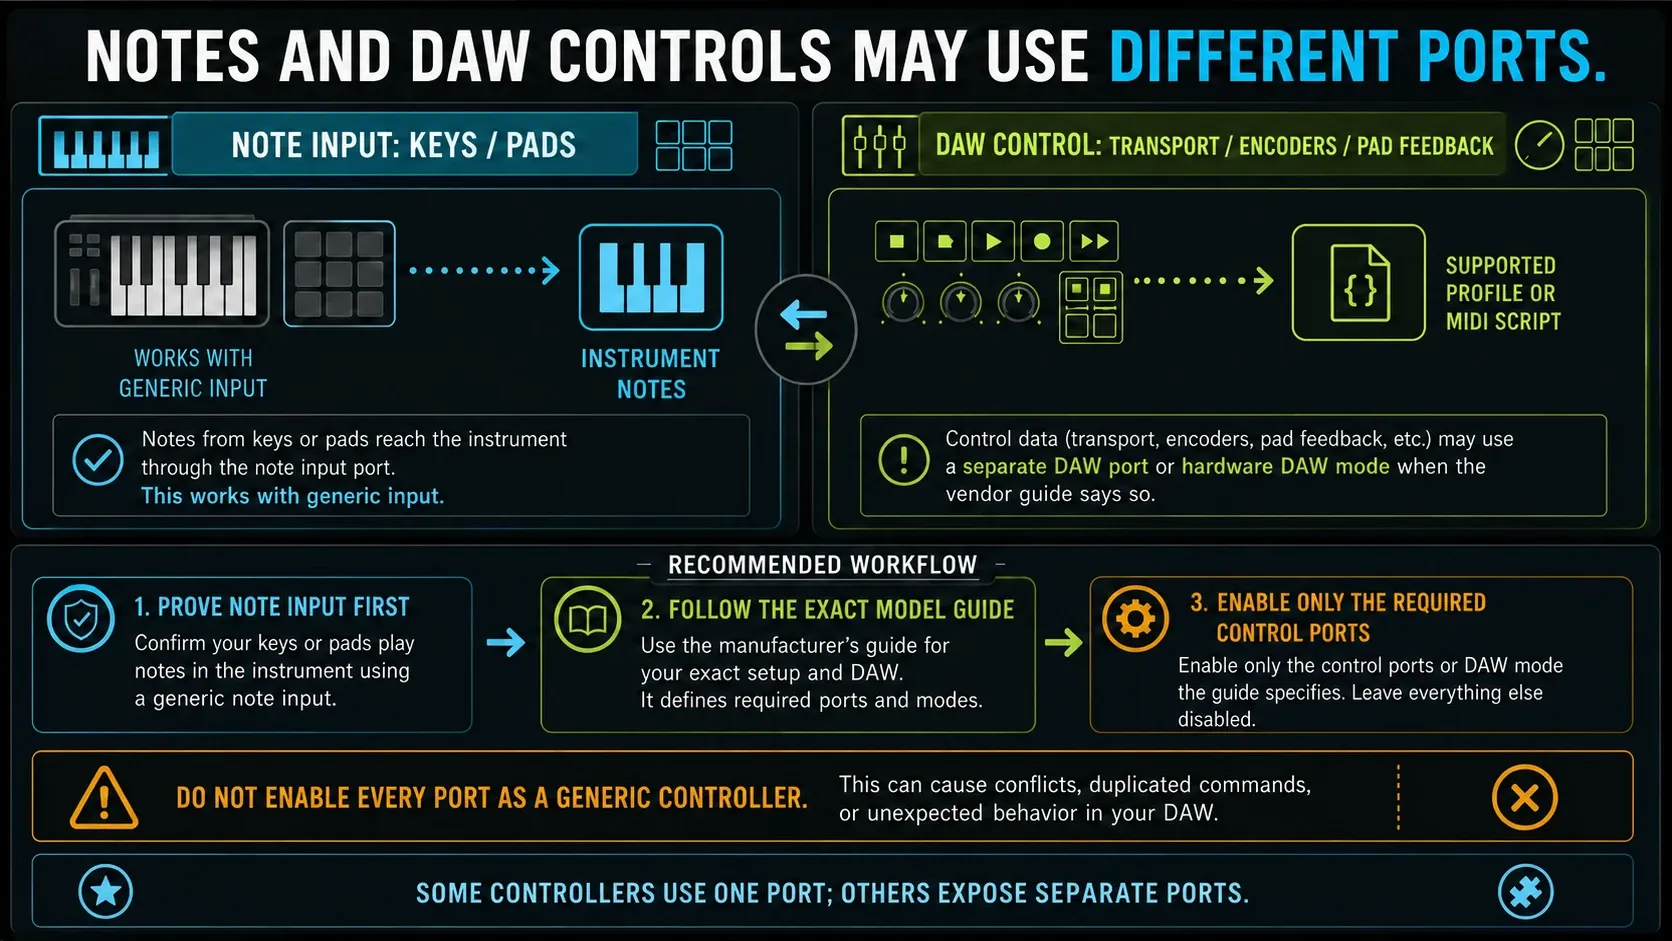
Controllers with several entries may expose a normal MIDI port, a DAW-control port and sometimes a legacy or virtual port. Start with the port the vendor names for the keys. Don’t assign a random profile to every entry. If the controller has a hardware DAW/Preset switch, set it to the mode the current FL Studio setup guide for that device specifies.
If the row remains unresponsive, close any standalone editor, synth or second DAW that may have opened the same MIDI port exclusively, then refresh. Change one condition and retest; closing six apps and reinstalling two drivers at once leaves no useful result.
If MIDI activity appears but the keyboard makes no sound
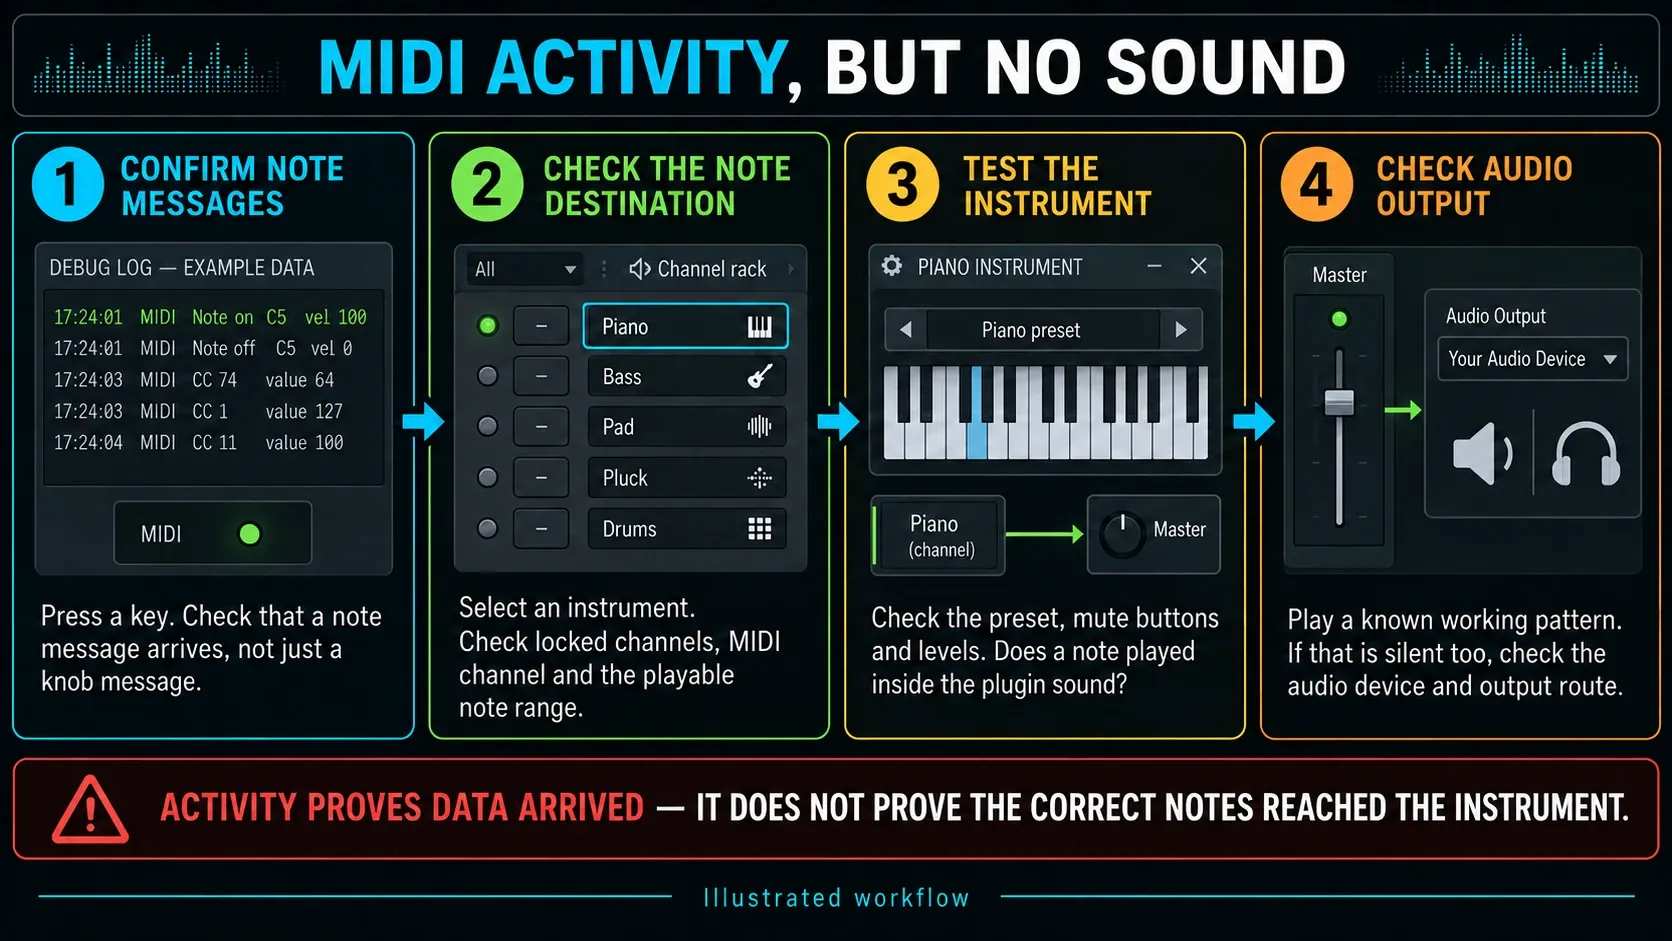
Start in the Debug panel: do key presses produce note messages? If only knobs send data, stay with the controller’s note port, hardware mode and input settings. If notes arrive, add a stock instrument with a playable preset and select it with its Channel Rack selector. Opening a plugin window is not always the same as selecting it for live MIDI.
The Channel Rack manual distinguishes the channel selector from the plugin button when Auto select linked modules is off. Check whether the controller is locked to a different instrument, whether its MIDI channel has a special assignment, and whether the notes fall inside the preset’s playable range. Try a note inside the plugin: if that sounds but the physical key does not, keep investigating note routing.
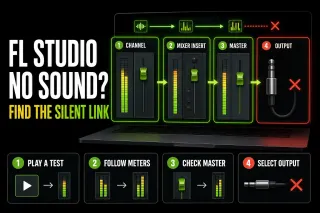
Next check the instrument preset and volume, its Mixer track and the Master output. The Channel Rack mute button affects pattern playback, not live MIDI input; do not treat that button alone as an explanation for silent live keys. Play an existing pattern with known sound. If that is silent too, use the FL Studio no-sound checklist. Once notes reach the right instrument, reinstalling the keyboard is not the first fix for a silent audio output.
If keys work but pads, knobs or transport do not
If a pad sends notes but FPC stays silent, first check that the on-screen pad plays a loaded sample. Then compare the note the hardware pad sends with the note FPC has assigned. The FPC pad-mapping controls include Learn for a single pad and Map notes for a whole bank. A pad hitting an empty or differently mapped note is a different problem from missing MIDI input.
Working keys prove the basic note port works. Special controls may depend on a named Controller type, an updated MIDI Script, the controller’s DAW mode or a second input/output pair. Image-Line notes that specially supported controllers may need matching Input and Output port numbers, while separate devices shouldn’t share a port in a way that causes conflicts.
No port number works everywhere, so follow the current guide for your model. Akai’s current MPK mini IV setup, for example, documents separate MIDI and DAW ports, matching Input/Output numbers within each pair, a controller script and a hardware DAW preset. That’s a useful pattern to recognize, but other keyboards may need something different.
For a normal FL Studio knob, right-click the target, choose Link to controller and move the hardware knob. For VST/AU controls, the external-controller linking guide offers Last tweaked and Browser methods when direct right-click linking isn’t available. Project links override global links, and changing the MIDI channel a global link uses can break that assignment. Move on to the FL Studio automation guide when you’re ready to record those movements.
If the instrument plays but notes are not recorded
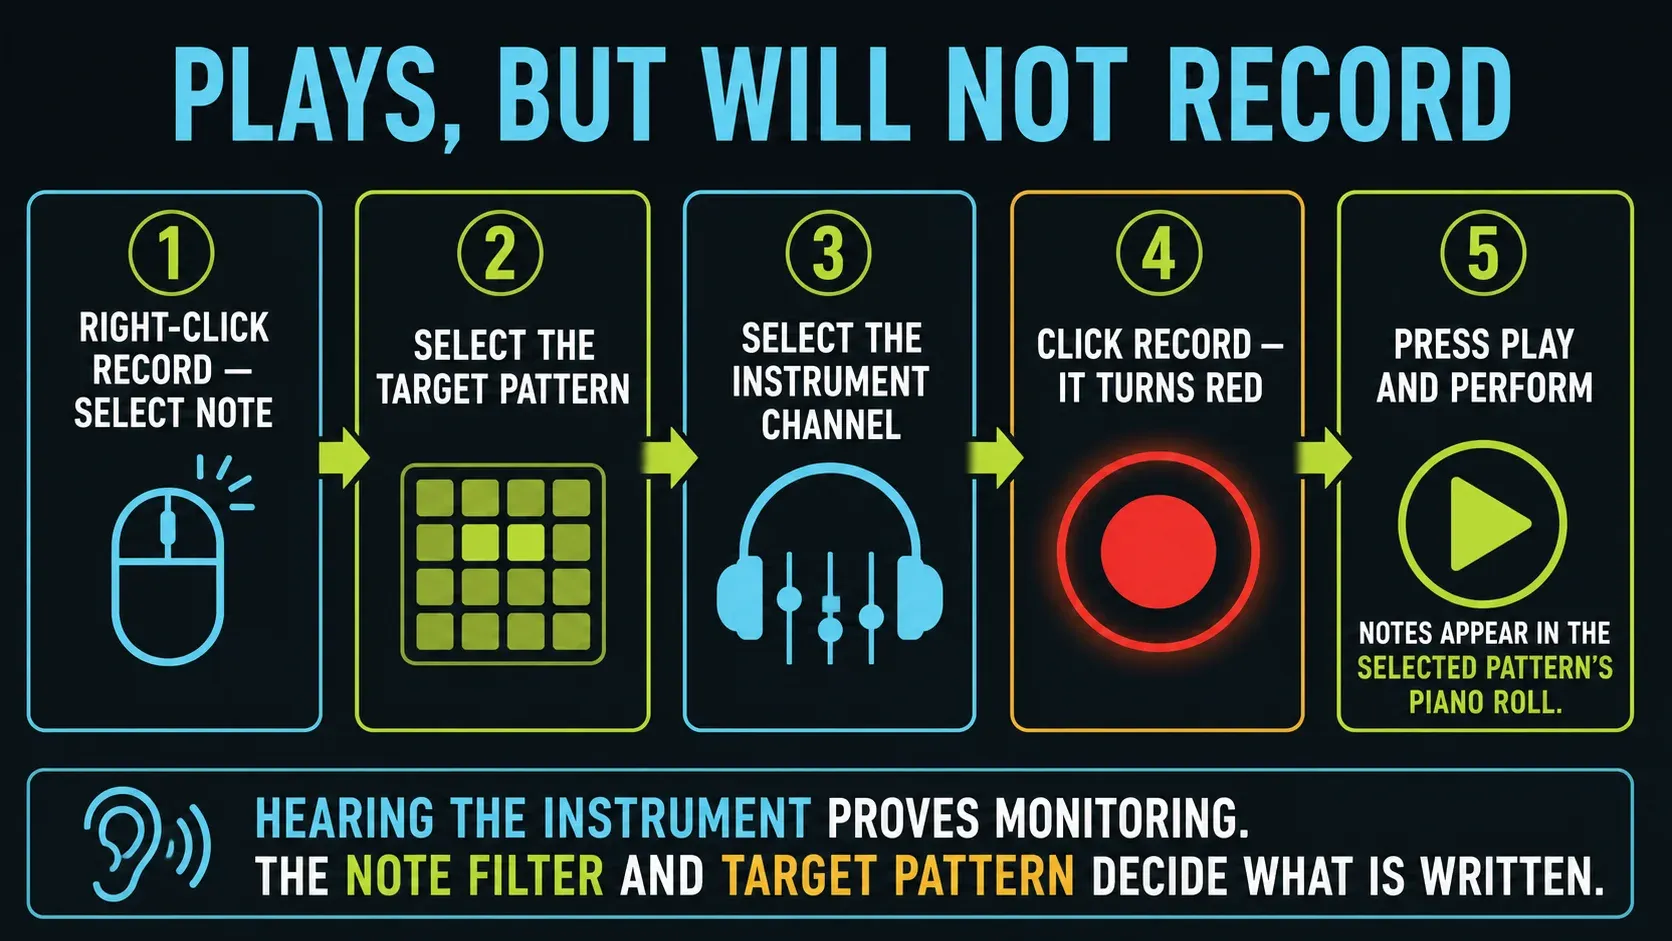
Hearing an instrument and recording notes are two separate results. Right-click Record and enable Notes (called Note in the older recording guide). For a safe test, pick an empty Pattern and the intended Instrument Channel. Switch off Step Editing, Record to step sequencer, Recording starts playback and Wait for input, then arm Record and press Play. Piano roll recording is disabled in Performance Mode, so use a normal project when you’re chasing missing recorded notes.
Image-Line’s current Note/MIDI Recording manual explains that Pattern mode records into the selected Pattern and its Piano roll, while Song mode can place the resulting Pattern Clip in the Playlist once recording stops. If you hear the instrument but see no notes, check the filter and the selected Pattern before going back to drivers.
If this is your first project, follow the FL Studio beginner project. If notes record but land on the wrong grid positions, look at input quantization and note timing next. Recording the audio from a hardware synth is a separate job from recording these MIDI notes.
Fix velocity, sustain, pitch bend and mod controls separately
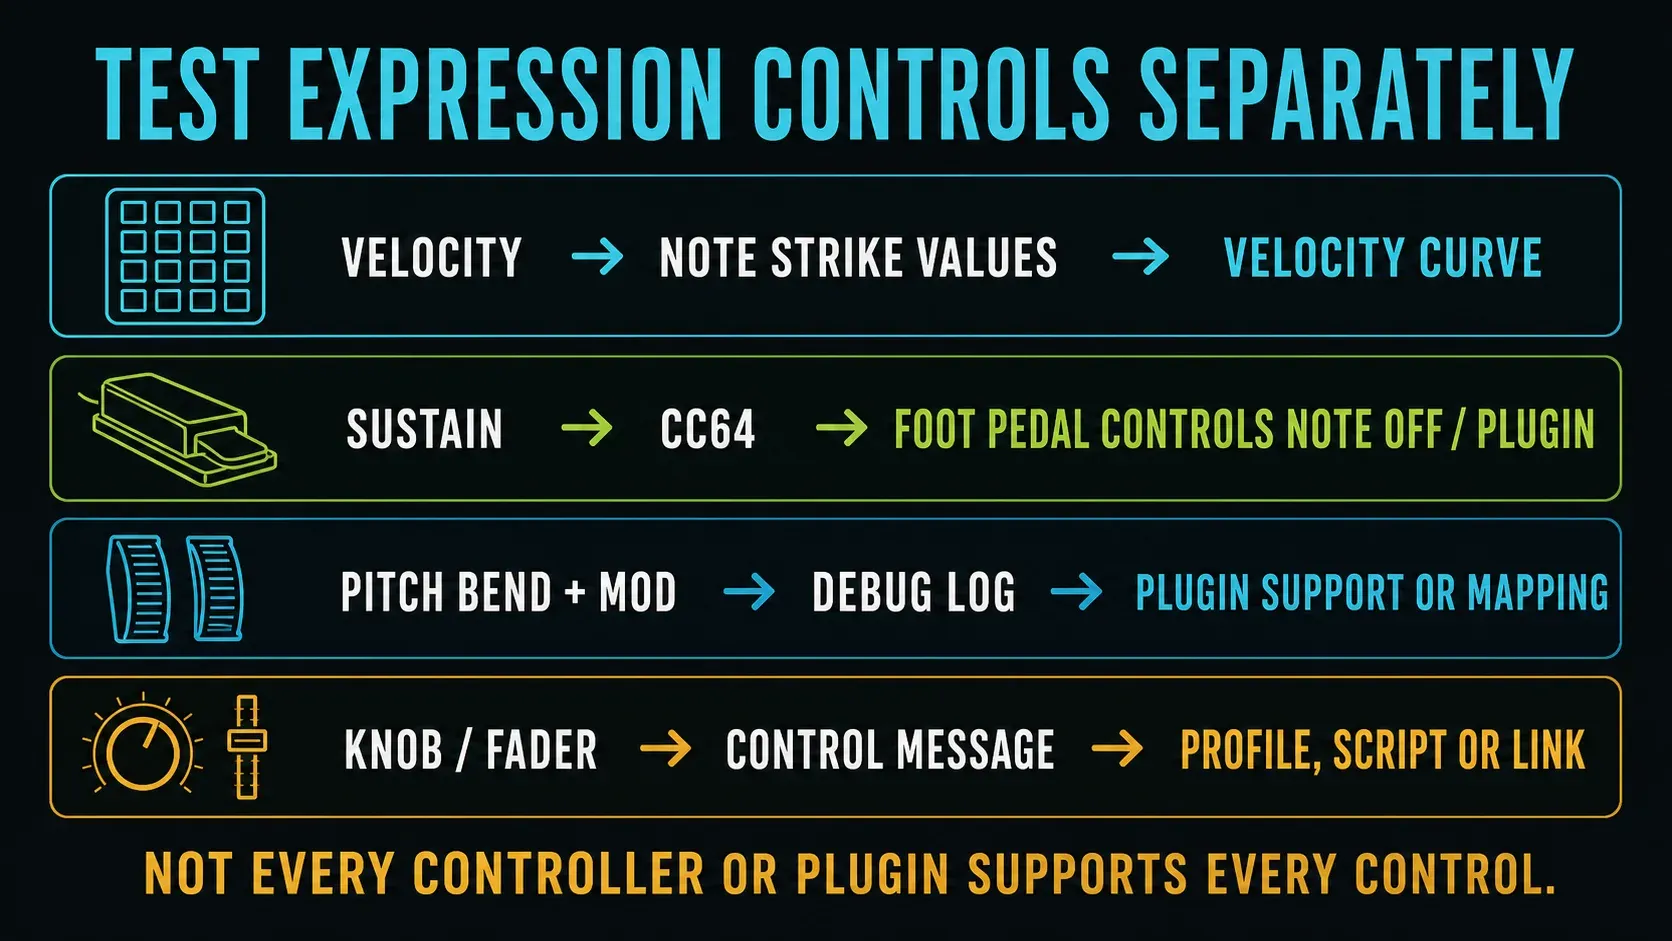
Don’t lump every expression problem under “MIDI not working.” Velocity is part of the note data, sustain normally uses CC64, pitch bend has its own message type, and a linked knob may send a control-change value through a script or custom mapping.
| Control | Proof to collect | FL Studio branch |
|---|---|---|
| Velocity | Different key strikes arrive with different values | Check Link note on velocity to and the velocity curve |
| Sustain pedal | CC64 changes when pedal is pressed/released | Check Foot pedal controls note off and plugin behavior |
| Pitch bend / mod wheel | Debug log shows the wheel message | Check plugin support, controller mode and mapping |
| Knob or fader | A control message arrives | Check Controller type, script or Link to controller |
Image-Line documents that Foot pedal controls note off captures CC64 inside FL Studio, so a plugin that needs the sustain message itself may need that option switched off. Test the pedal with one stock instrument before you rewrite mappings for every plugin.
Keep multiple MIDI devices from colliding
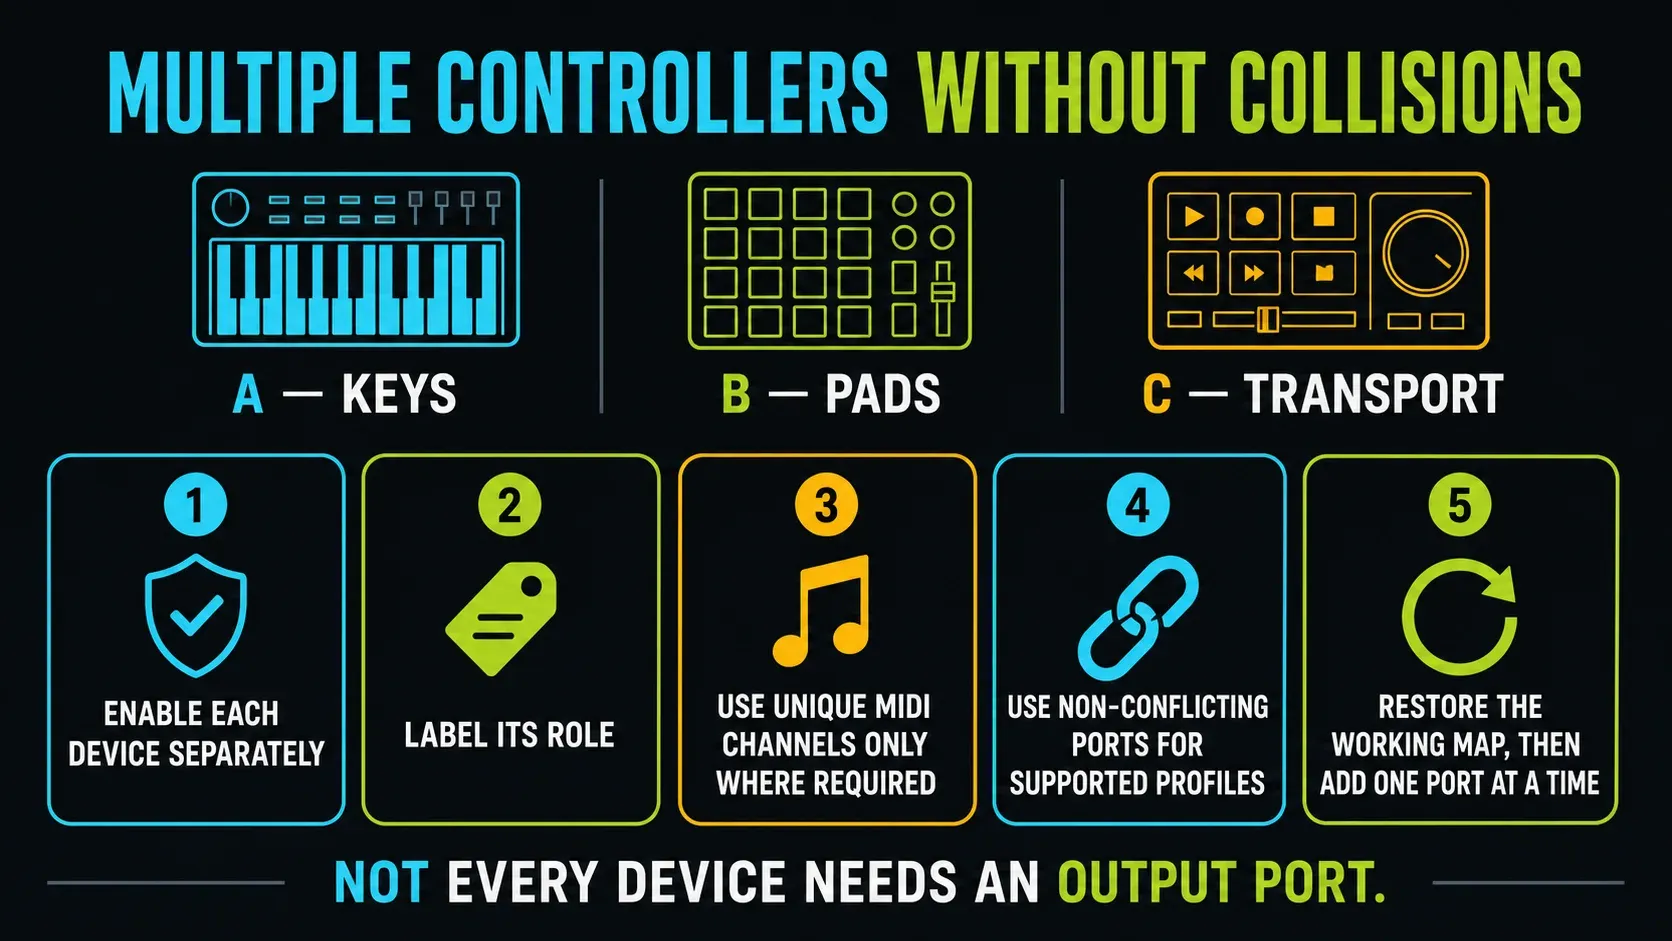
Enable each controller separately and write down its job: keys, pads, transport or external synth. FL Studio can use several controllers, but special profiles may depend on unique MIDI channels or port assignments. Don’t copy one controller’s port map onto another just because it worked in a video.
For basic instrument playing, the selected Channel Rack instrument is the cleanest first test. For special feedback and transport, match Input and Output only where the supported profile asks for it. If adding a second controller breaks the first, disable the new entries, restore the map that worked and add one port at a time.
Use this MIDI keyboard recovery order
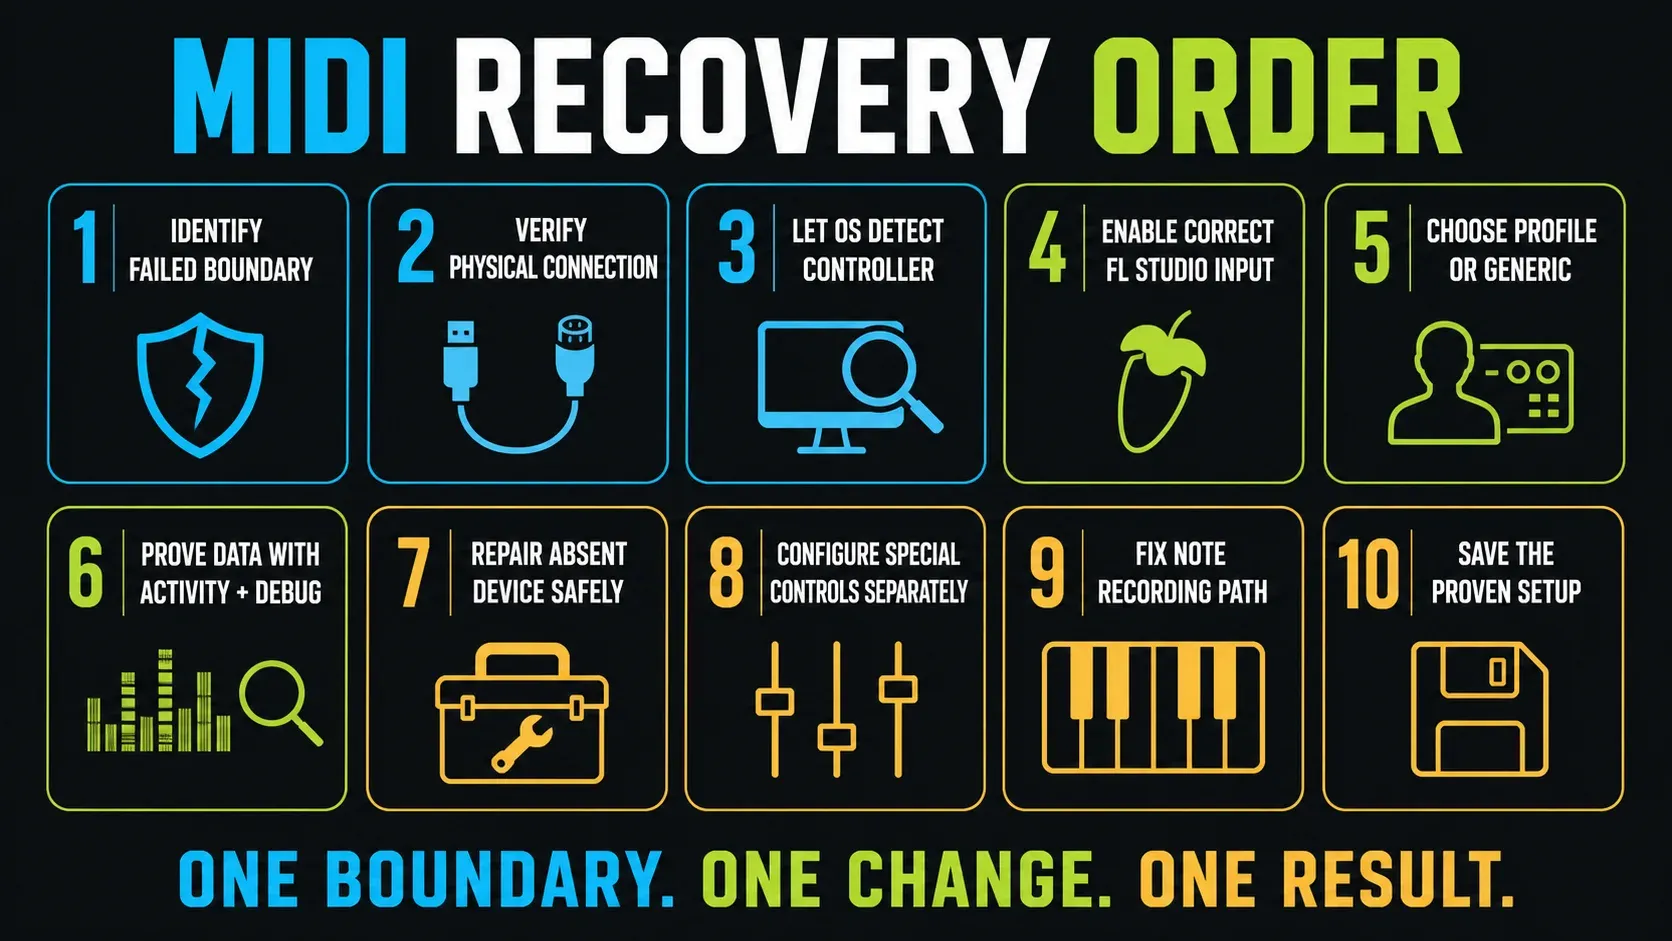
- Identify whether the device is absent, silent, partly working or only failing to record.
- Connect with a known data cable and test one direct USB port or the correct five-pin MIDI path.
- Let Windows or macOS detect the controller before opening FL Studio.
- Open Options > MIDI settings, select the correct Input and click Enable.
- Choose the documented Controller type or a generic controller for basic note input.
- Select an instrument and use the activity light plus the Debug log to prove data is arriving.
- If the device is absent, refresh the list and follow only the current driver/firmware guide for that model.
- If notes work but controls don’t, check the control mapping first, then use a script, hardware mode or DAW port where the device guide calls for it.
- If sound works but recording does not, enable the Note filter and select the target Pattern and instrument.
- Save the working port, mode and script choices before you add another controller or custom link.
Stop changing settings as soon as the failed test starts working. Write down the working port, profile and hardware mode so you can restore them later. For a different kind of failure, like silent playback, crashes or crackling, pick the matching route in the FL Studio troubleshooting hub.
Frequently asked questions
How do I connect a MIDI keyboard to FL Studio?
Connect and power the keyboard before opening FL Studio. Open Options > MIDI settings, select it under Input, click Enable, choose the documented Controller type or a generic controller, select an instrument and play a key. The MIDI activity light should blink.
Why is my MIDI controller not showing in FL Studio?
The Input list only shows devices the operating system has already detected. Try a data-capable cable and a direct USB port, confirm Windows or macOS sees the controller, then reopen FL Studio or click Refresh device list. Follow your exact model’s guide for required or recommended drivers.
Why does my MIDI keyboard light up but not work?
Power doesn’t prove a working MIDI connection. Select the exact device under Input, click Enable and watch the MIDI activity light while you play. If nothing happens, check the cable, OS detection, the port and the controller mode.
Why does FL Studio receive MIDI but make no sound?
The activity light may be reacting to a knob instead of a note. Check key presses in the Debug panel, then check the selected instrument, locked note routes, MIDI channel and playable range. If the right notes arrive but the instrument stays silent, test its preset, Mixer routing and audio output.
Why do the keys work but transport buttons or knobs do not?
Keys can work before the other controls are mapped. A knob sending standard MIDI control data may only need Link to controller. Transport buttons or device-specific features may need the supported profile, a MIDI Script, DAW mode or a separate port. Follow the setup guide for your model.
Why can I play notes but not record them?
Enable Notes in the Record button’s recording filter and select an empty test Pattern and the intended Instrument Channel. Turn off Step Editing, Record to step sequencer, Recording starts playback and Wait for input, then arm Record and press Play. Check that Pattern’s Piano roll after stopping. Performance Mode disables Piano roll recording.
Should MIDI Input and Output use the same port number?
Only when the supported controller profile or vendor guide asks for a matched pair for feedback or DAW control. The number itself does nothing special. Keep different device roles and required port pairs apart to avoid conflicts.
Does a MIDI keyboard carry audio into FL Studio?
MIDI itself carries note and control data and no audio. Some keyboards also send USB audio over the same cable. For a synth without USB audio, connect its audio outputs to an audio interface to record its internal sounds.