FL Studio
To lower FL Studio CPU usage, find the plugin or signal path that is running out of time, then test one reversible change. There is no single switch that gives FL Studio more CPU. Enable Multithreaded generator processing and Multithreaded mixer processing, check Allow threaded processing for compatible plugins, and remember that these controls help only when the project contains work that can run in parallel. Double-click the CPU panel to open the Plugin performance monitor and identify expensive plugins before changing settings. A heavy synth, long effects chain or unnecessary realtime processing can exhaust the audio deadline while the computer still has spare capacity.
Keep the original project safe. If you use the standard Trial, save the project and export needed audio before opening another project or restarting FL Studio; saving alone does not make the session reopenable. The steps below separate sustained project load from short spikes and explain when threading, Smart Disable, consolidation or a different buffer actually helps. If the main symptom is clicks rather than a persistently high CPU panel, use the crackling-audio diagnosis alongside these tests.
Read the FL Studio CPU meter before Task Manager
FL Studio’s CPU panel measures time pressure: how much of the available audio-buffer interval the processing used. A reading around 90% means there’s very little time left before the next deadline. It doesn’t mean 90% of every processor core is busy. Image-Line explains the difference in its CPU and Memory panel documentation.
| Readout | What to use it for |
|---|---|
| FL Studio CPU panel and graph | Spot sustained pressure and brief peaks in realtime audio processing. |
| Task Manager’s overall CPU utilization | Check whole-system activity; it averages differently from FL Studio’s short audio deadlines. |
| Activity Monitor’s overall CPU summary | Use System, User and Idle for the computer-wide view. Do not treat an individual process row as the same readout. |
| Plugin performance monitor | Find instruments or effects worth testing individually. |
A low overall system reading doesn’t rule out an overloaded audio path. On a Mac, Apple’s CPU monitoring instructions treat the overall summary separately from the process list. Compare like with like, and judge success by stable playback as well as by the FL Studio graph.
Why FL Studio does not spread one chain across every core
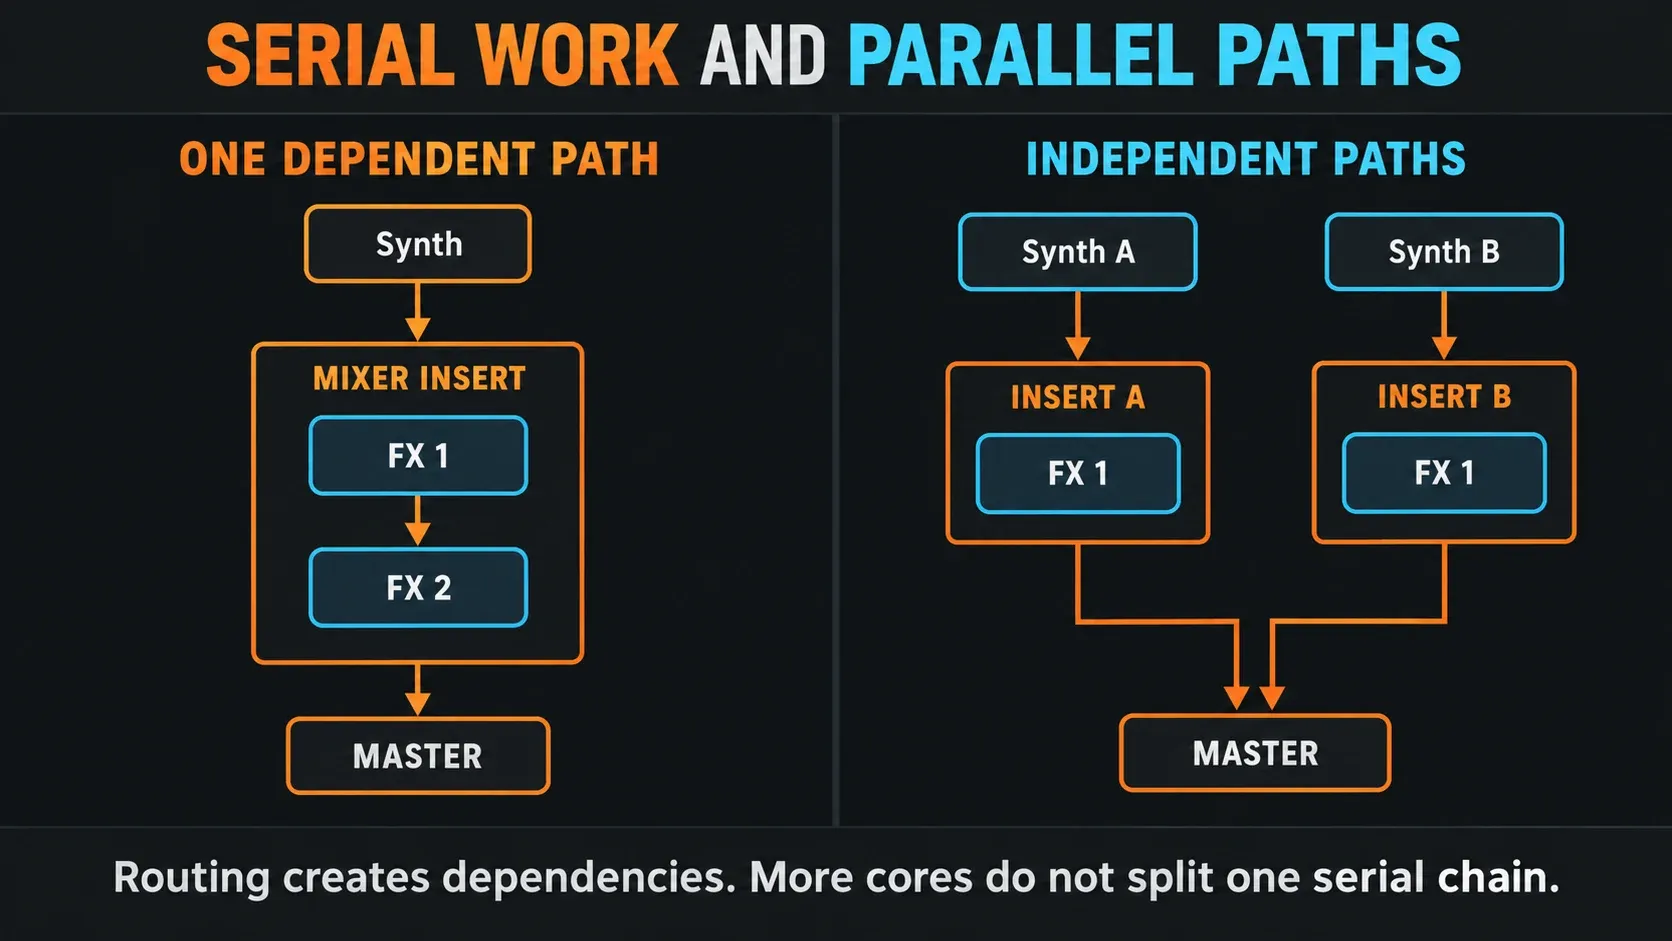
A synth has to produce audio before its first effect can process it, and the next effect needs that result in turn. When several routes feed a bus, that bus waits on all of them. Those dependencies limit how much work can happen at the same time.
Image-Line’s multicore support explanation says FL Studio can use the cores your processor provides, but only if the project contains work that can run in parallel. Independent instruments and Mixer paths give it that chance. Turning on threading won’t chop one long dependent chain into a separate job for every core.
That’s why more cores won’t automatically rescue one expensive instrument. First figure out whether the bottleneck is that single path or lots of independent paths fighting for time.
Make a repeatable CPU test before optimizing
Save a protected original and a separate working copy. Keep the original samples and plugin states available, because a project filename alone doesn’t back up every dependency. Make changes only in the working copy while you diagnose.
Check plugin licenses even if you own FL Studio. Native Image-Line plugins outside your license can still run in Trial mode. Image-Line’s trial-plugin warning explains that reopening can leave an empty channel or effect slot. Export needed audio while the plugin still plays and unlock it before testing project recall. If it has already disappeared on reopening, do not resave over the file retaining its settings. Preserve that untouched file and reopen it after unlocking.
Using the standard FL Studio Trial? Save the project and export the audio you need before closing it or opening another project. The standard Trial cannot reopen its own saves until you purchase FL Studio; full plugin recall also requires the licenses for the plugins used. Image-Line’s licensed-collaborator workflow requires someone who owns the needed products to open and resave the file for each return session. It does not permanently unlock Trial saves. Do not end a needed session just to compare an empty project.
- Loop the busiest chorus, drop or transition. Use the same playback start for each test.
- Close floating plugin windows with
Alt/Option+F12. - Record the FL Studio build, operating system, audio device, buffer and sample rate.
- Watch several repetitions. Separate a load or autosave spike from pressure that persists throughout the loop.
- Change one item, repeat the comparison and listen through the transition and release tails.
Keep changes that give you repeatable headroom without hurting the music. If a lower-load setting changes a sound you need, undo it. The goal is reliable playback, not the smallest possible number.
Find the actual heavy plugin
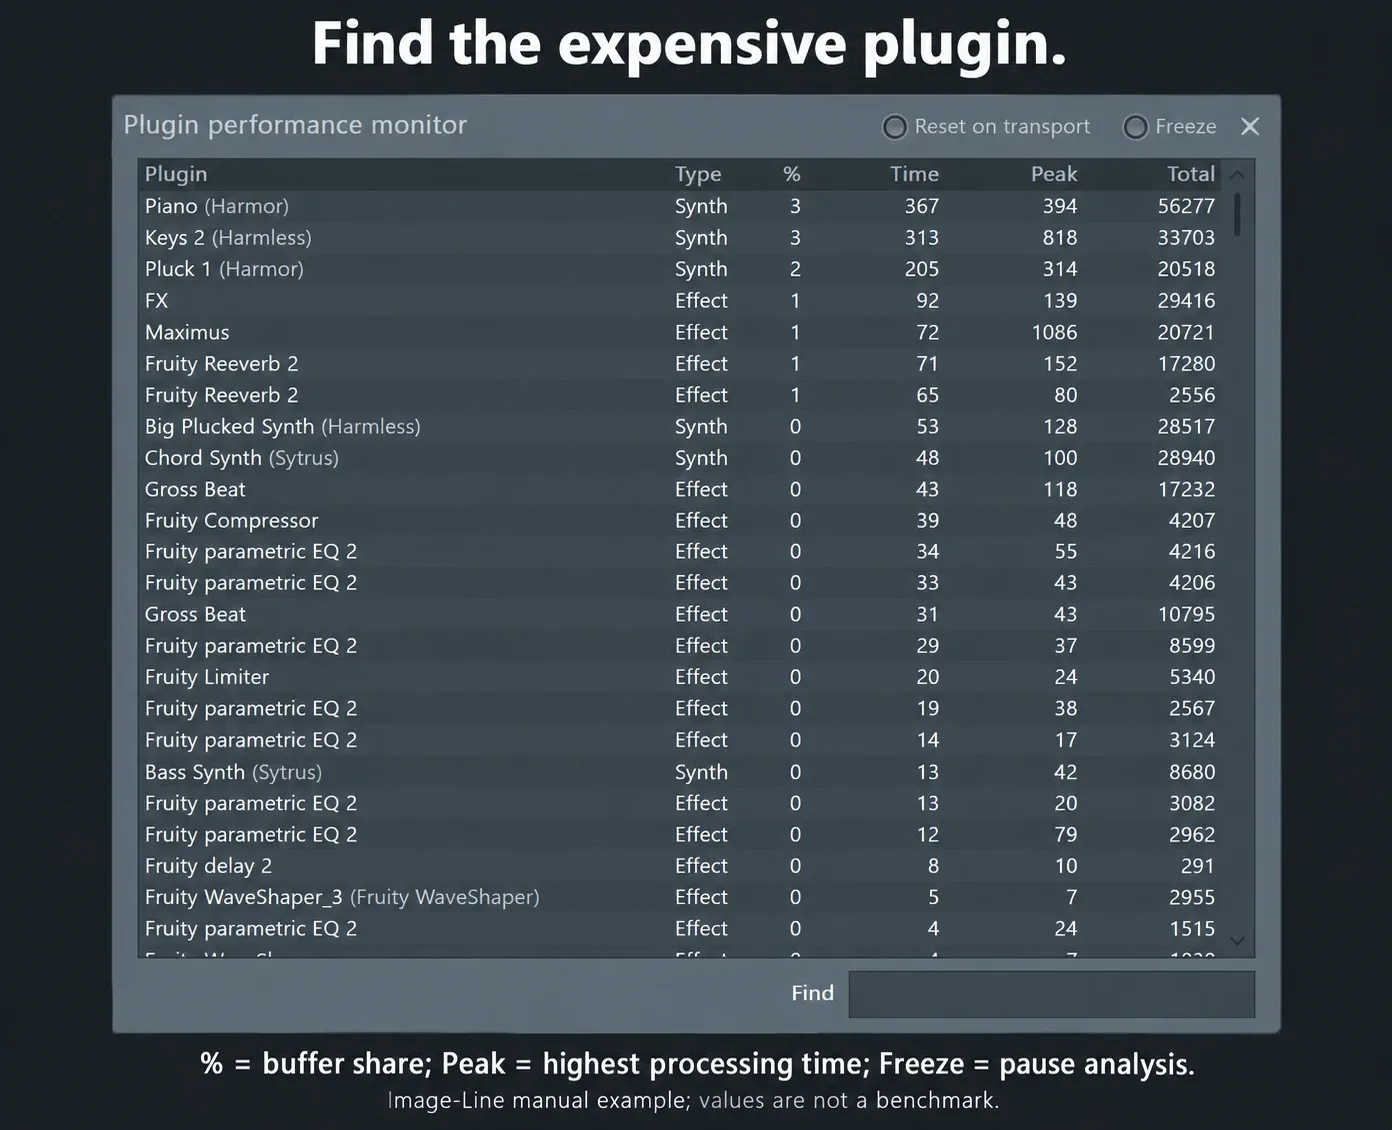
Double-click the CPU panel or choose View > Plugin performance monitor. Click a column header to sort the results. The monitor’s documented columns have different meanings: % is a share of the buffer interval, Time is the latest recorded processing-time measurement, Peak is the highest measured processing time, and Total accumulates processing time. Peak is not another CPU percentage.
Compare equal listening periods. Closing and reopening the monitor resets all its measurements. Reset on transport resets stored peak values on play and stop, and Freeze pauses the analysis. Compare Total over the same measurement window.
In the working copy, disable one suspect and play the section again. For a Mixer effect, use its own effect-slot enable/disable control. Turning the wet mix down isn’t the same as disabling the effect. An internal bypass can behave differently from the host control, so check the monitor instead of assuming all processing stopped.
For an instrument, use its Channel Rack mute control to stop its sequenced notes, then replay the same section. Stop playing any live MIDI input too: Channel mute does not block it. This is a note-playback comparison, not a guarantee that every part of the plugin has stopped processing. Watch the monitor and restore the channel before testing the next suspect.
If the load drops, look closer at that plugin and its route. If it doesn’t, treat the result as inconclusive: intermittent work, downstream processing or the way the plugin handles bypass can blur the comparison. Restore the plugin before the next test.
- Test lower realtime oversampling or quality, if the plugin offers it.
- Reduce unnecessary unison, overlapping voices or release length.
- Close an animated plugin interface when you are not editing it.
- Check the developer’s compatible build before updating; retain the working version and presets until recall is verified.
- Render a settled expensive part when continued instrument editing is unnecessary.
Check the three multithreading locations
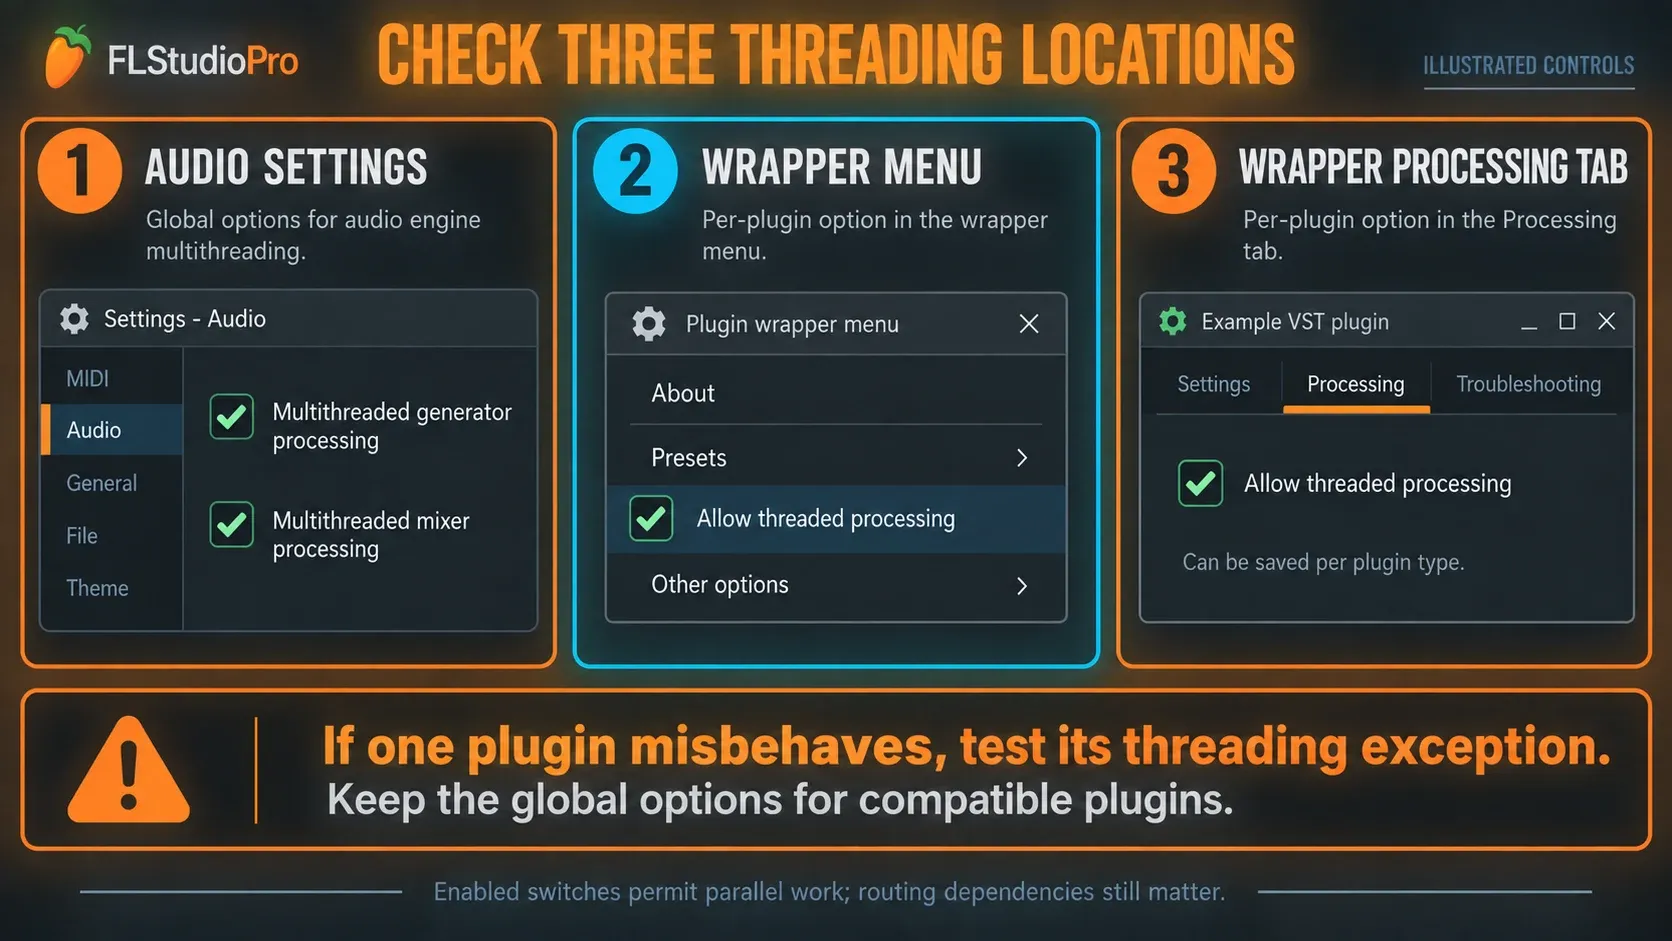
There are four named controls across three locations: two global Audio Settings controls and two wrapper controls. Image-Line’s Audio Settings reference explains how they work together. For VST/AU plugins, check the additional Processing tab where available.
| Location | Control | Normal starting point |
|---|---|---|
| Options > Audio settings | Multithreaded generator processing; Multithreaded mixer processing | Enabled for compatible instruments and effects. |
| Plugin wrapper menu | Allow threaded processing | Enabled unless that plugin needs an exception. |
| Wrapper Processing tab | Allow threaded processing | Check the per-plugin-type setting as well. |
If one plugin behaves worse with threading, test an exception for it instead of disabling threading across the whole project. Wrapper processing options can be saved per plugin type, so a persistent change can reach later instances and projects. Write down what you changed and roll back a workaround that didn’t help.
These controls allow parallel processing. They can’t remove the dependencies built into the music’s signal path.
Build more independent Mixer paths
Keep expensive instruments on separate Mixer inserts when they don’t need to merge early. Routing them through several shared serial buses creates dependencies, and adding buses just to tidy the screen can make a heavy project harder to process.
That’s no reason to give up on buses, sends or sidechains. A shared reverb can replace several duplicate effects, and a drum bus may be essential to the sound. Test the actual route instead of assuming every extra connection is bad.
Use the Mixer routing guide to trace inserts, buses and sends. If the chain lives inside a container, the Patcher routing walkthrough helps you see where branches join back up. Keep a changed route only if it improves the same-loop comparison and the mix still sounds right.
Consolidate the part that buys the most headroom
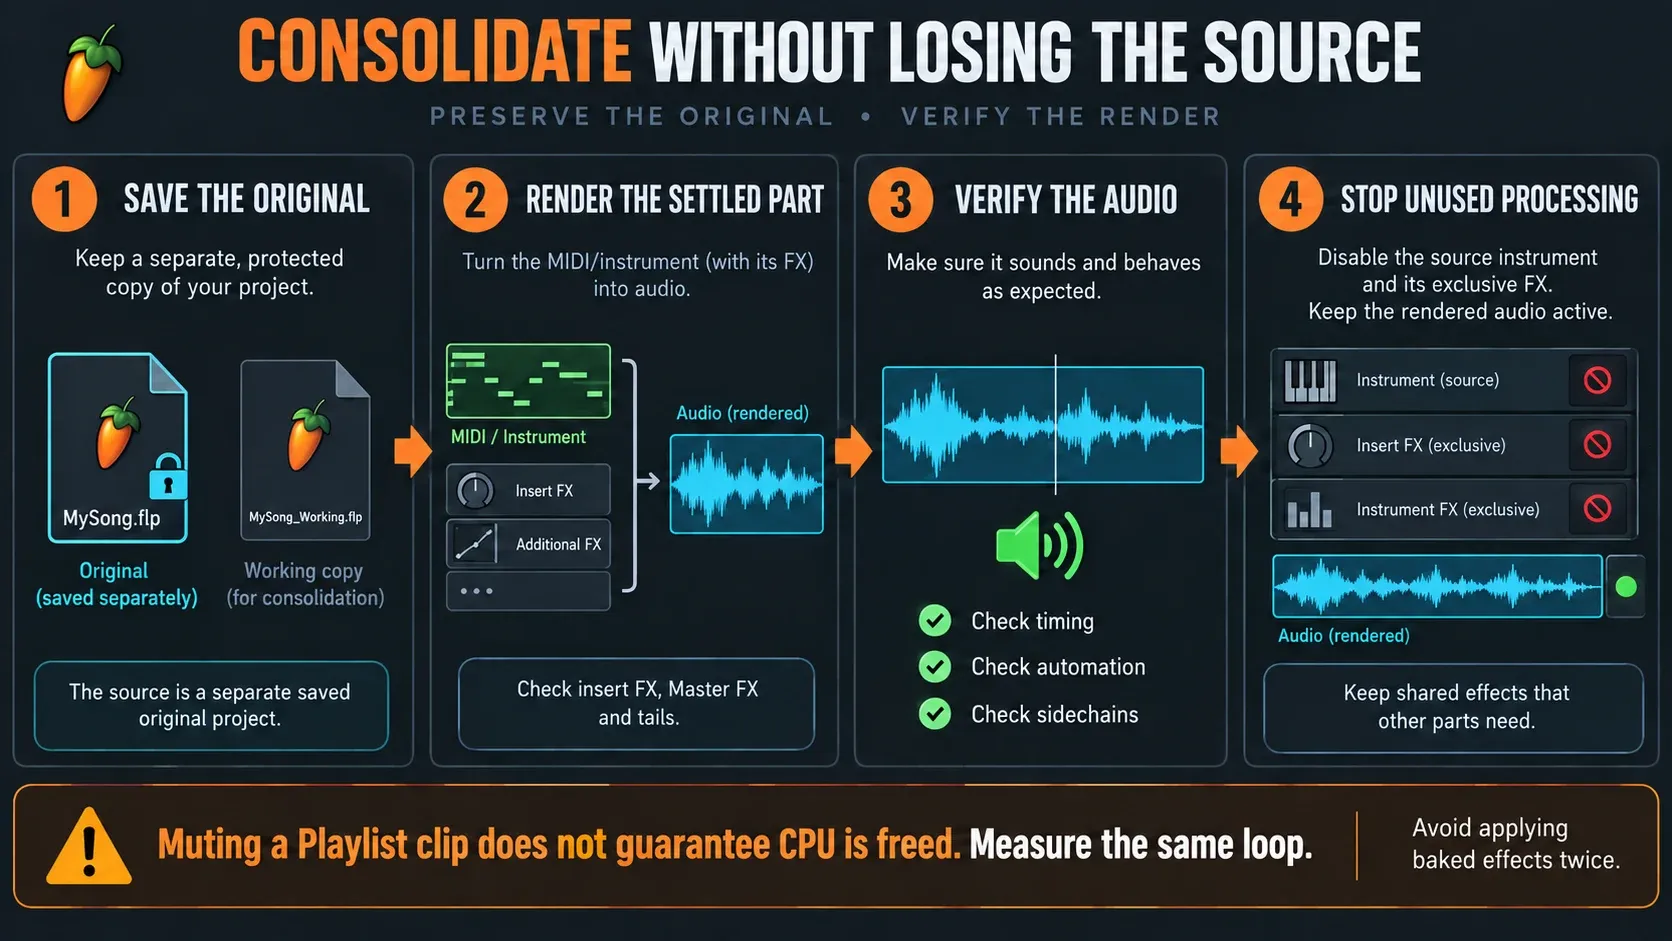
Once the part is settled, check which clips occupy its Playlist lane. Right-click that lane’s track header and choose Consolidate this track. The command renders the clips on that Playlist track, not just the instrument part you have in mind. The Playlist documentation explains the render operation. Start with the part identified by the performance monitor, not whichever track is easiest to bounce.
Preserve the separate original project before changing the source. If you temporarily lowered plugin quality or oversampling, restore the settings you want in the printed part before consolidating it; check the plugin’s own offline-render options too. Check the render range, tails, automation and sidechain-dependent behavior. An outside sidechain trigger may be absent from a track-only print. Compare a short render with the live pumping or ducking. If it differs, keep the source active until you have a render that includes the required trigger and destination. Decide which insert and Master effects to bake, then route the audio so those effects are not applied twice. The consolidation guide explains effect routing, tails and source checks, including when sidechains need a different render workflow.
Listen to the rendered audio in the full arrangement. Only then disable the source instrument if no other unrendered pattern or part needs it, and disable processing used exclusively by the rendered source. Keep shared effects and routes that other parts still need. Muting a Playlist clip does not guarantee CPU is freed; verify the monitor after the change.
A rendered Audio Clip can be cheaper to play back than a demanding live instrument chain, but it is not the same editing surface. If you need to change the patch or notes later, return to the protected source and render again.
Reduce voices and real-time quality where the ear allows
Dense chords, long releases and unison can keep many synth voices active at once. Use the instrument’s own polyphony and quality controls where available. Do not assume a Channel setting limits every third-party instrument in the same way.
Try fewer unison voices or a shorter release, then listen at comparable loudness. A buried tail may be expendable; a held note that gives the chorus its movement is not. Oversampling and high-quality modes can also cost processing time, but changing them may alter tone or latency.
Restore the intended quality before a consolidation you plan to keep, as well as the final bounce, and check the resulting audio. If a part was already printed with temporary lower-quality settings, render it again from the preserved source; changing final-export quality does not undo processing baked into that Audio Clip. FL Studio’s live interpolation and export interpolation are separate; render-quality switches do not override every third-party plugin’s settings. Use the export-quality settings guide when deciding what the finished file needs.
Use Smart Disable, then protect the plugins it breaks
Enable Smart disable in Audio settings. In Tools > Macros, find Switch smart disable for all plugins under Misc and run it to enable the plugin switches. The global option and the individual plugin states work together. Smart Disable can reduce idle processing; it does not consolidate tracks.
Listen through starts, transitions and release tails. Image-Line’s Wrapper reference warns about time-based, envelope-based and long-decay plugins. If a tail disappears or an effect loses timing, turn Smart disable off for that plugin. For a persistent exception, where available, deselect Wrapper Processing > Allow smart disable. In the wrapper’s Settings > Options, Autosave remembers these settings for later plugin loads by default; use Save if Autosave is disabled.
Smart Disable is temporarily off during rendering. Do not assume a live-playback improvement will speed up export, or that a clean export proves the live transitions are safe.
Remove hidden overhead from stretching and bridging
Realtime Stretch and Stretch pro are useful when tempo or duration changes during playback. For a fixed-tempo clip that does not need realtime stretching, test a suitable offline mode and listen for timing, pitch and transient changes. If other copies need their current algorithm, use Make unique from the Clip menu before changing the mode. This separates the Audio Clip channel while reusing the original audio file. The Sampler’s stretch-mode reference distinguishes precomputed offline processing from processing on the fly.
Offline stretching doesn’t mean a new audio file was exported. Resample isn’t a pitch-preserving substitute either, since it ties playback speed and pitch together. Follow the time-stretching guide if a clip changes key or stops following tempo properly.
A plugin bridge adds a processing layer. Go for a supported native build when practical, but keep the working plugin, preset and automation safe before you change architecture or format. On a Mac, the Apple Silicon plugin guide separates native plugins, Intel translation and whole-host Rosetta mode, which are three different settings.
Don’t migrate a stable session just because a different format sounds newer. Measure the suspect, test recall in a copy and keep the change only if it fixes the problem.
Choose buffer and sample rate for your system
For Apple Silicon, Image-Line recommends starting at 128 samples and testing 128, 192, 256, 512 or 1024 as needed. A very heavy project already using the performance cores may need a longer buffer from the outset. Treat 128 as a starting recommendation, not a mandatory reset for a project that is already stable. On Intel/AMD systems, a longer buffer may help a heavy mix, while live playing needs the smallest setting that remains stable.
At 44.1 kHz, 512 samples come to about 11.6 ms for one buffer. That’s arithmetic, not your measured round-trip latency: conversion, driver buffering and plugins can add delay on top. The audio-device and latency setup guide walks through device, buffer, plugin-delay, monitoring and recording-alignment checks.
44.1 or 48 kHz is a practical starting point for ordinary music work. Higher rates raise processing demand, so choose them for a real production requirement and never as a CPU fix. Keep FL Studio and the device configuration consistent, including shared OS audio settings where they apply.
Check idle and intermittent CPU spikes
A stopped transport doesn’t prove every plugin is idle. Live inputs, internal generators, tails and open interfaces can still need work. Close unused plugin windows and check the performance monitor before you blame stopped-project CPU on hardware.
If a spike occurs specifically when pressing Play or Stop, test turning off Audio settings > Reset plugins on transport. Image-Line’s optimization checklist identifies this as a possible source of start/stop glitches with VST plugins. It is different from Reset on transport in the performance monitor, which clears stored peak measurements. Restore the audio setting if the test does not help or changes plugin behavior.
| Pattern | Useful next check |
|---|---|
| Spikes near saves | Compare autosave timing with the spike. Keep backup protection; do not turn it off as a permanent CPU fix. |
| Performance changes on battery power | Compare the OS power mode and power source with the same project settings. |
| A high-resolution project behaves worse | Check Timebase (PPQ), but do not reduce it in the original project. |
| Load rises while other apps are active | Save their work, close unnecessary tasks and repeat the test. |
| Memory pressure or paging rises | Investigate sample memory and storage separately from the audio CPU deadline. |
Image-Line’s performance checklist flags autosave timing and high PPQ as possible contributors. PPQ means pulses per quarter note: the project’s event resolution, not its audio sample rate. Image-Line warns that settings above 192 PPQ can increase CPU load substantially. The Project General settings document a default of 96 PPQ and warn that lowering it mid-project can move notes and clips onto the coarser grid. Test only in a copy and check the arrangement afterward. Use the autosave and recovery guide to retain dependable backups.
On macOS, check Battery or Energy power modes; available choices depend on the model. Test out of Low Power Mode before buying hardware. On Windows 11, compare the appropriate mode under Settings > System > Power & battery. More performance can cost battery life or fan noise. No power-mode change guarantees that an overloaded plugin chain will become stable.
Know when a CPU upgrade will help
Strong single-thread performance matters for the longest dependent chain, and extra fast cores help when the project has enough independent work. That makes core count alone a poor buying rule.
Once the original is safely stored and Trial restrictions won’t endanger an open session, compare the suspect plugin in a separate simple project. Use the same preset, notes, buffer and sample rate. One heavy instance points toward plugin or per-path limits; many manageable instances together suggest a different kind of workload. Neither test is a complete hardware benchmark.
More RAM helps when memory pressure and paging are the problem. It won’t make a serial plugin chain calculate any faster. Likewise, changing Keep on disk trades storage access against memory use, so don’t switch it off everywhere when RAM is already tight.
Compare machines with a representative project and the buffer you actually need, not just a general-purpose benchmark. If FL Studio really closes or refuses to open the file, switch to the crash and project-recovery steps; that’s a different failure from a high meter during playback.
Use this CPU recovery order
- Save a protected original and working copy; preserve needed Trial audio before ending the session.
- Compare the same busy section with the same device, buffer and sample rate.
- Find heavy plugins in the performance monitor and test one suspect at a time.
- Check global and wrapper threading, then inspect routing dependencies.
- Test voices, realtime quality and Smart Disable; restore any change that damages sound or timing.
- Restore the intended render quality, consolidate settled parts, verify the audio and stop only unused source processing.
- Check unnecessary realtime stretching, plugin bridging and intermittent background load.
- Test buffer and sample rate appropriately for your system and live-playing needs.
- Consider hardware only after identifying the bottleneck with a repeatable comparison.
Stop changing settings once the project plays reliably and still sounds right. Make a note of the adjustment that worked. For a different symptom, the Troubleshooting hub points you to the matching repair path.
Frequently asked questions
How do I allow FL Studio to use more CPU?
Keep generator and Mixer multithreading enabled and check Allow threaded processing in the wrapper menu and, where available, the additional Processing tab for compatible plugins. Independent Mixer paths allow parallel work, but no switch splits one dependent chain across every core.
Why is FL Studio CPU high when Task Manager is low?
FL Studio measures time pressure within short audio-buffer intervals. Task Manager’s overall utilization averages processor activity differently. One late audio path can exhaust its deadline while the computer has spare capacity elsewhere.
How do I lower CPU usage in FL Studio?
Save a working copy, compare the same busy section and use the performance monitor to identify suspects. Test one plugin, quality setting or route at a time. Consolidate settled expensive parts and use Smart Disable with exceptions for plugins that lose tails or timing.
Does FL Studio use multiple CPU cores?
Yes. FL Studio can use multiple available cores. How much useful parallel work it finds depends on the instruments, plugins and routing dependencies, not just the number of cores in the computer.
Why does one plugin make FL Studio CPU jump?
Dense synthesis, overlapping voices, oversampling, bridging or compatibility problems can make a plugin expensive. Compare the same passage with the suspect disabled in a working copy. A lower load is a clue, while an unclear result does not prove the plugin is innocent.
Should I turn Smart Disable on?
It is worth testing in projects with inactive plugins. Enable the global option and plugin switches, then listen through starts and tails. Exempt any plugin whose timing or sound breaks. Smart Disable is temporarily off during rendering.
Does more RAM lower FL Studio CPU?
Not directly. More RAM can help when memory pressure causes paging, but it does not make one serial plugin chain process faster. Check memory pressure separately from FL Studio’s audio deadline.
What CPU is best for FL Studio?
Choose strong single-thread performance and enough fast cores for your actual projects. Test a representative workload at the buffer you need. The largest core count does not guarantee the best realtime performance for a long dependent chain.