FL Studio
Reach for Patcher when you want one channel or Mixer slot to hold a combination of plugins you can reuse. This FL Studio Patcher tutorial builds three small setups: serial effects, a dry/processed parallel blend and two instrument layers. After that, it wires up a Surface macro, limits what it actually outputs and makes it available to project automation.
When Patcher earns the extra window
Image-Line’s Patcher manual describes a container that loads as either an instrument or an effect. The Map holds the plugins and their connections, and the Surface gives you selected controls without opening every plugin.
| Starting point | Usual input | Use it for |
|---|---|---|
| Channel Rack generator | Notes and controller events | Layered instruments and keyboard splits |
| Mixer effect slot | Audio from the Mixer track | Serial chains and parallel effects |
Those are just starting points; the container can host other things too. An instrument inside an effect-slot Patcher can receive events through a matching MIDI Out port, as the manual’s “Events or MIDI to FX plugins” section explains. For your first layered sound, though, the Channel Rack route takes less setup.
According to Image-Line’s current edition comparison, Patcher comes with Fruity Edition, Producer Edition, Signature Bundle and All Plugins Edition. Owning Patcher doesn’t license every instrument or effect inside a preset, so check those dependencies separately. The FL Studio editions guide covers the wider purchase decision.
Protect your work before changing or saving a patch. In the FL Studio host trial, export important audio before saving or closing, because you can save a project but can’t reopen it until you purchase FL Studio.
Native Image-Line plugins carry their own trial restriction, even in a paid host, and an installed plugin isn’t necessarily one you own. Read the trial-plugin warning when you save. Image-Line says buying and unlocking those plugins before reopening keeps their original settings, while reopening and re-saving before unlocking loses the trial-plugin settings.
Leave the original project untouched, and don’t overwrite it once missing trial modules show up. Before you remove or replace a working module, keep a separate project copy and, where it makes sense, an audio render. These precautions follow Image-Line’s host-trial and trial-plugin rules.
Read the Map before drawing a cable
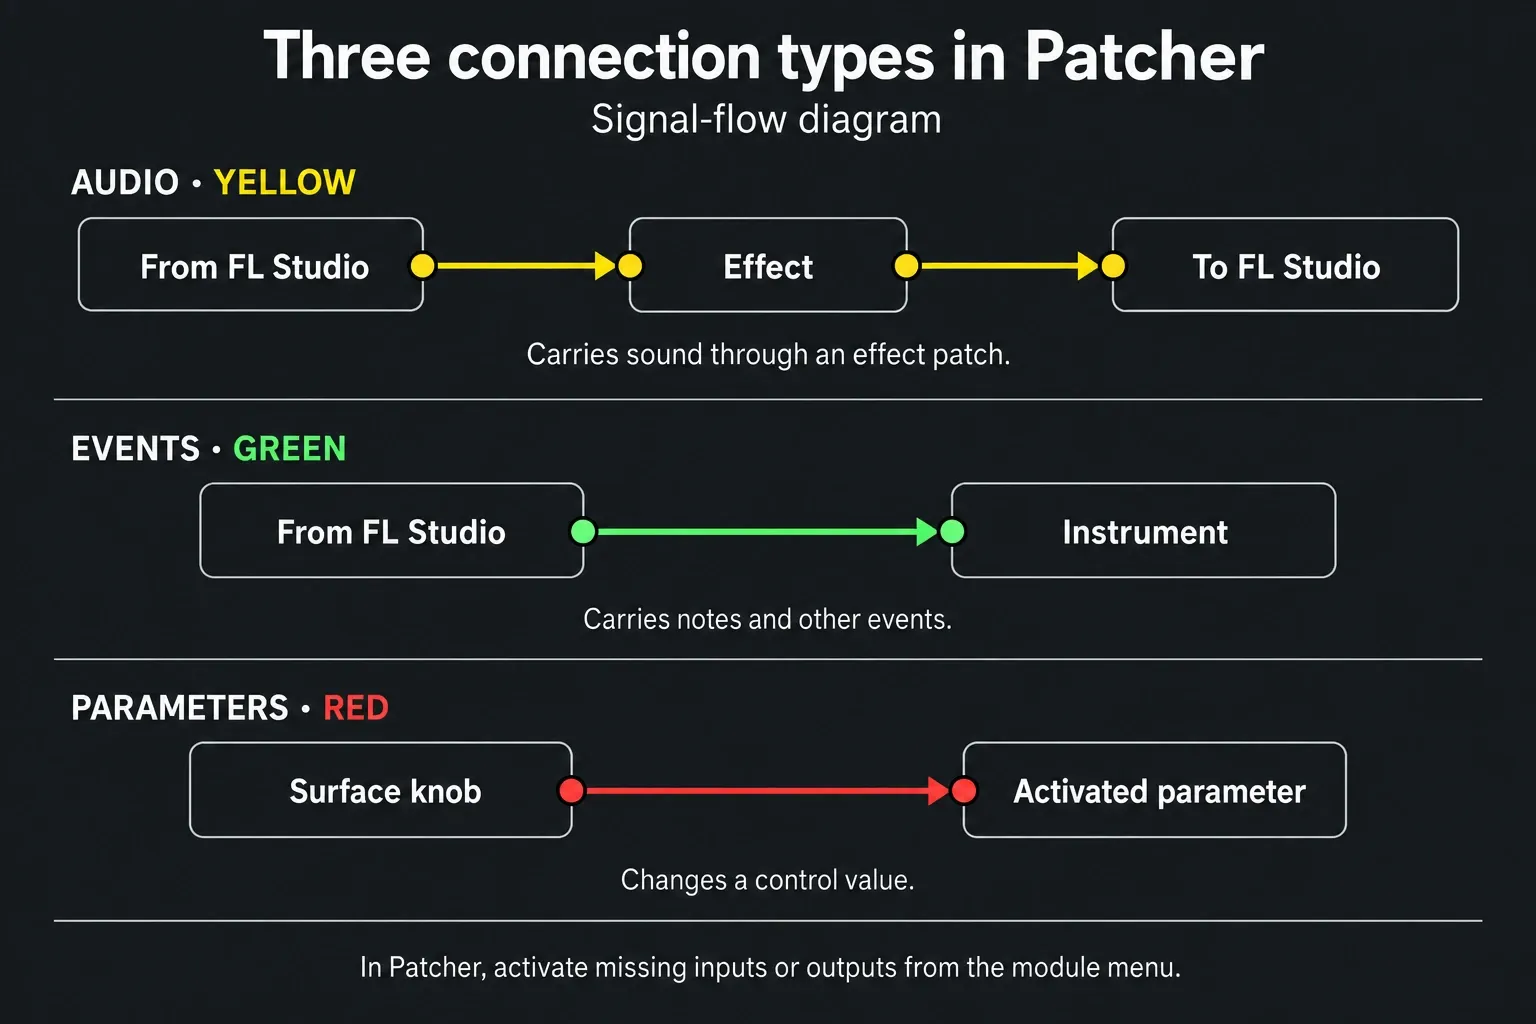
From FL Studio feeds audio into the container, and To FL Studio takes its output. Modules accept inputs on the left and send outputs from the right. The three data types do different jobs:
- Yellow: audio.
- Green: notes and events.
- Red: parameter values and internal automation.
Drag between compatible connectors, or drop a cable onto the middle of a module to pick a target from the popup. Right-click a module and use its Inputs or Outputs menu to switch on a missing node. Hover over a node to see its name in the Hint Bar.
The Audio, Events and Parameters filters change what you see, while the connections stay exactly as they are. A hidden red line can still be controlling a plugin. To break one connection, drag its input end into empty Map space and let go. Check the remaining routes afterward, especially where several cables meet.
Build 1: a clean serial effect chain
Here’s a complete first build: one effect Patcher, two processors and one route to the output. Pick effects you already own and understand, such as an EQ followed by a compressor. Start at a comfortable monitoring level.
- Check that the host and both effects are licensed for the work you want to keep. If you’re on trials, export important audio before saving or closing, keep an untouched original and don’t re-save after reopening with locked trial plugins.
- Load Patcher into an unused Mixer effect slot on a track that carries audio. Start playback and open the Map.
- Right-click empty Map space, choose Add plugin and add your first effect. Connect the yellow output of From FL Studio to that effect’s audio input.
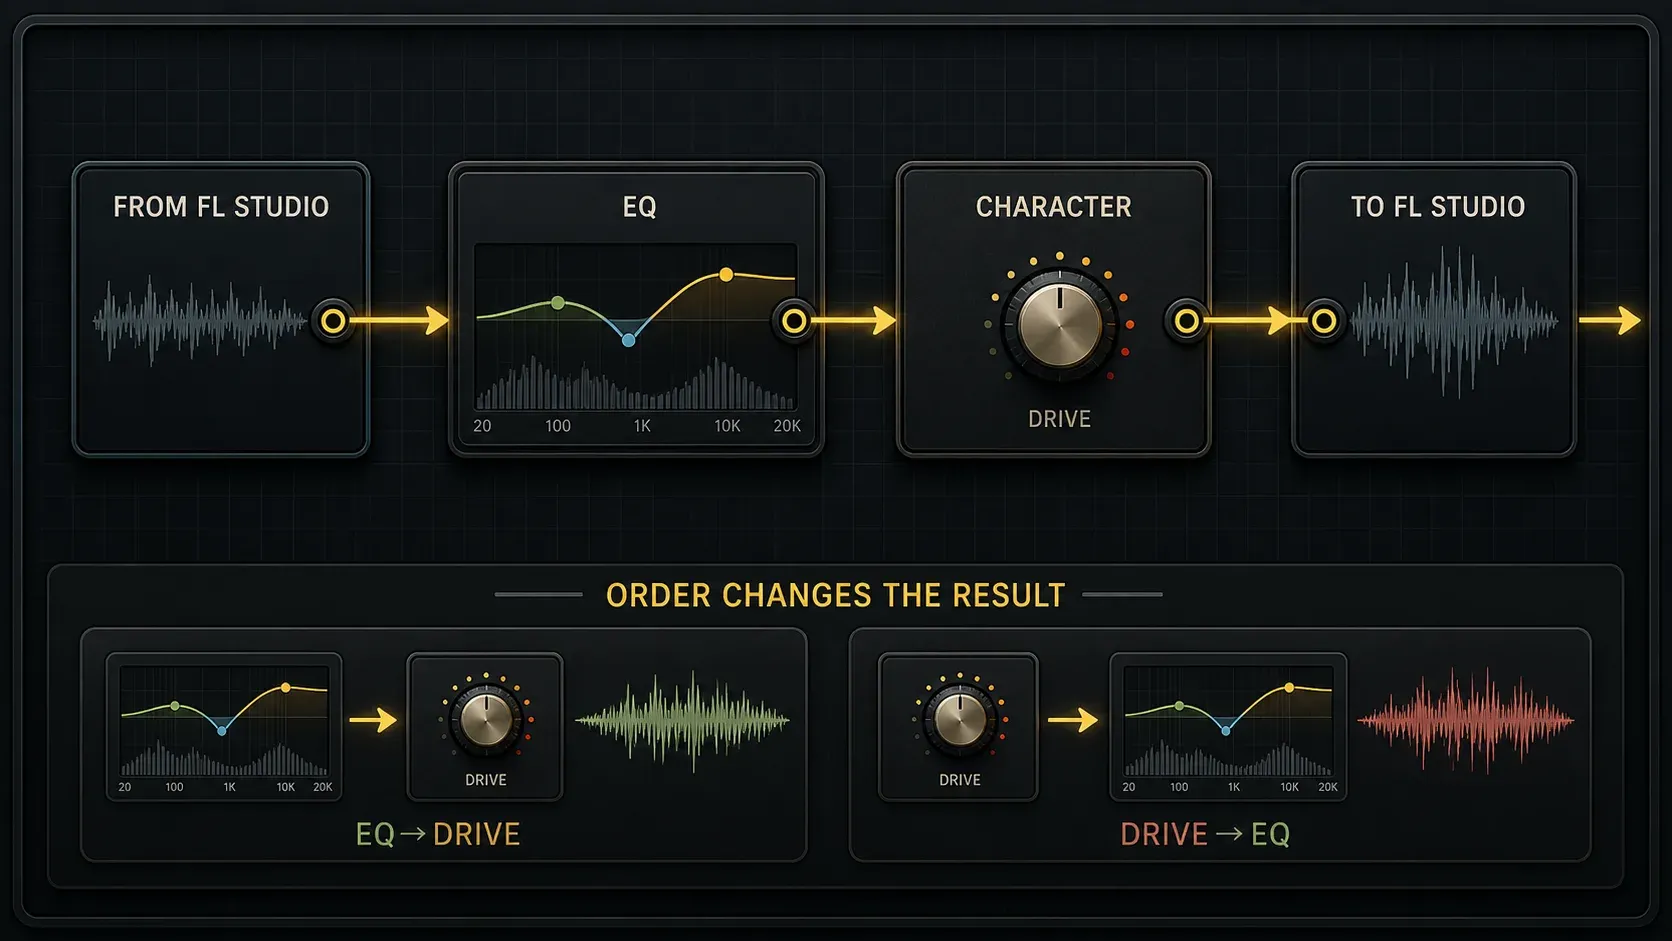
- Add the second effect. Connect the first effect’s yellow output to the second effect’s audio input, then connect the second effect’s yellow output to To FL Studio.
- Check every yellow connection. If there’s a direct cable from From FL Studio to To FL Studio, or any other route skipping either processor, remove that bypass by dragging its input end into empty Map space. Keep only the serial route you intended.
- Play the source, open each effect and confirm its changes reach the output. Adjust the processing and output level, then compare Patcher against the bypassed slot at similar loudness.
- Rename the modules by their role. If the chain works and you’ve covered the license safeguards above, choose Save preset as from Patcher’s wrapper menu and save a separately named user preset. Keep the original project and its dependencies.
Processor order matters. EQ before distortion changes what drives the nonlinear stage, while EQ afterward shapes the spectrum that comes out. Only change the order when you can say what you expect to hear, then compare at matched level.
For sends and buses between tracks, use the FL Studio Mixer workflow. There’s no need to move an ordinary track chain into Patcher unless reuse, branching or a shared macro makes it easier to manage.
Build 2: a parallel processor without accidental doubling
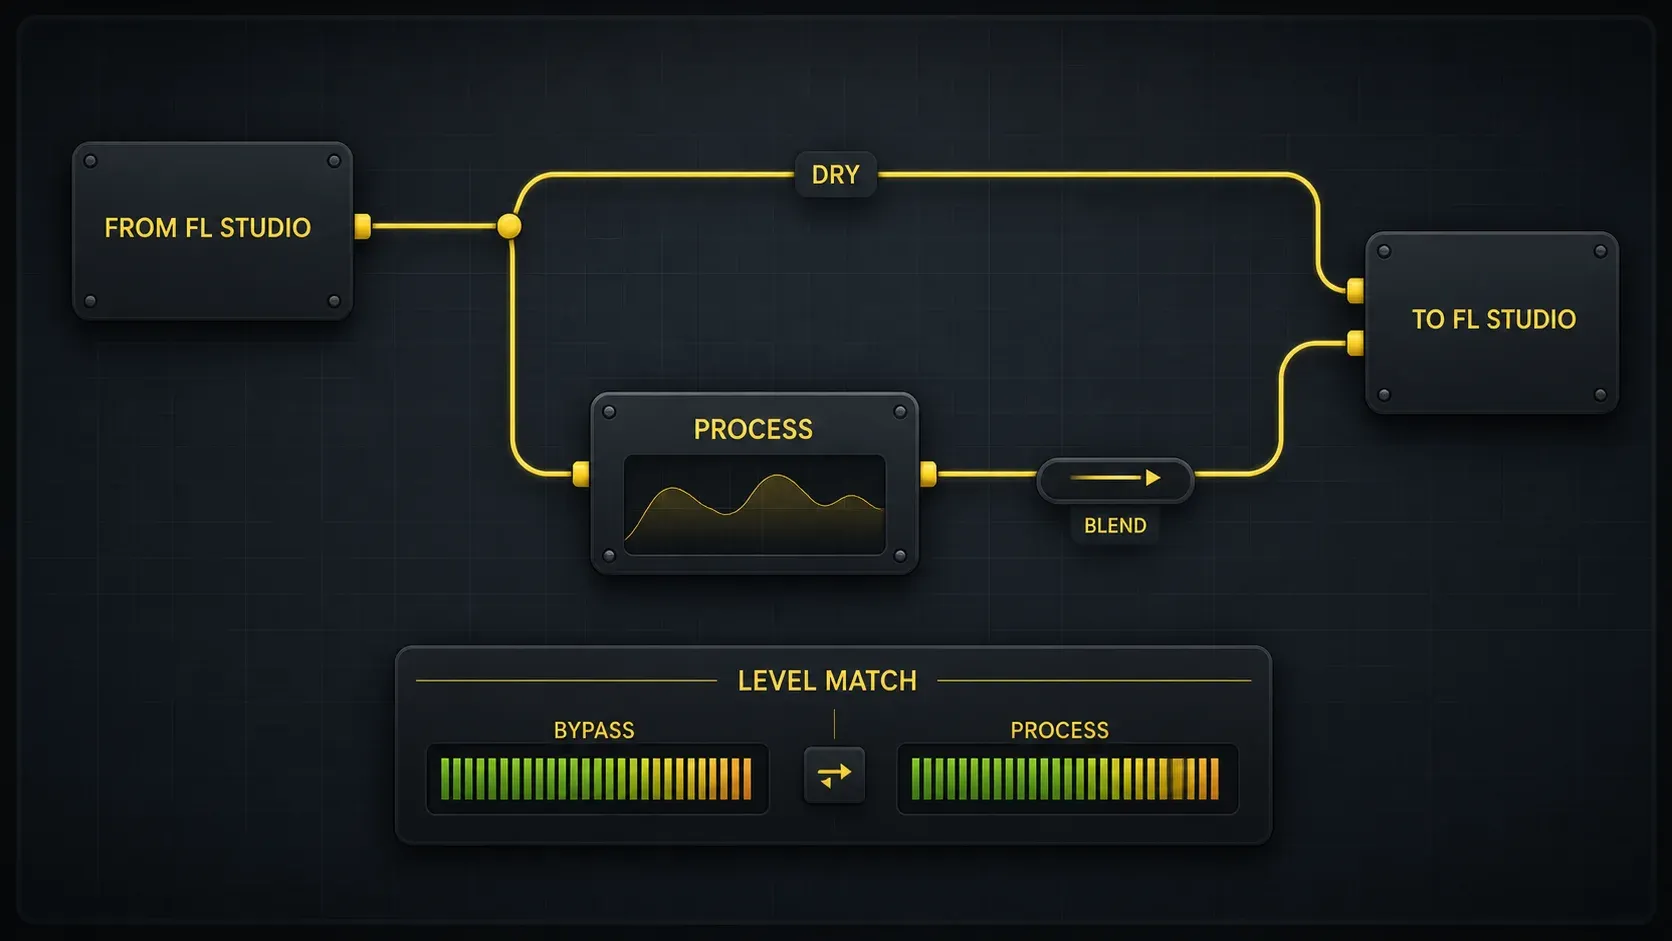
Start a separate effect Patcher. Run one yellow cable straight from From FL Studio to To FL Studio for the dry branch. Add a processor, feed the input into it and connect its output to the same destination. Unlike in the serial build, this direct dry path is deliberate.
Click the arrow in the middle of the processed branch’s audio cable and drag up or down to lower its level; the Hint Bar shows the value. Bring the branch in gradually while the dry path plays. Two full-level copies of similar audio can make the output louder without making the processing any better.
For an effect with separate dry/wet controls, such as a reverb or delay, set the parallel branch to wet-only when you want the direct cable to be the only dry source. A compressor or other processor may not have that control, so check its actual settings instead of hunting for a universal “100% wet” switch.
| Check | What to establish |
|---|---|
| Dry path | The original reaches the output once. |
| Processed path | The branch adds the intended effect at a controlled level. |
| Combined output | The comparison with bypass is not decided by extra loudness. |
Right-click the Map and choose View > Latency to see reported processing delays in milliseconds. Patcher compensates latency automatically, but timing compensation doesn’t undo the processing itself. EQ phase shifts, polarity changes, deliberate delay and modulation can still change a parallel blend. If the sound turns hollow, solo each branch and check its processing before adding a guessed delay correction.
Feeding a compressor’s detector input is a separate routing job. Use the sidechain guide when you want another signal to trigger compression.
Build 3: layer two instruments in one channel
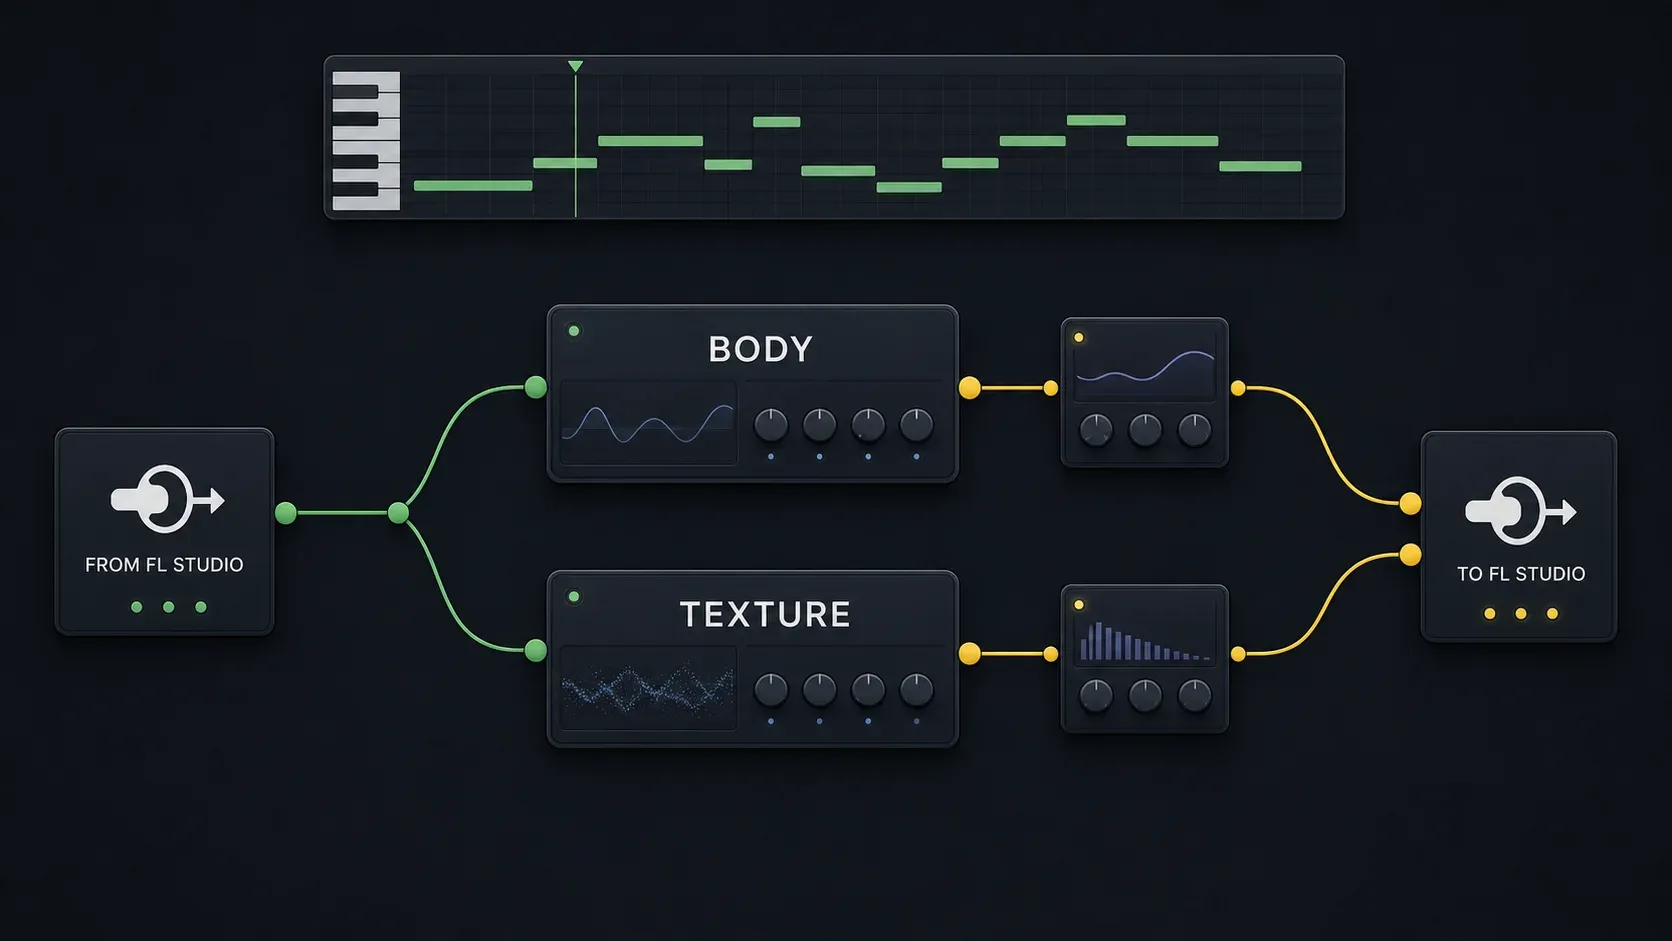
Load Patcher in the Channel Rack. Add two available generator plugins that can run inside Patcher. Connect the green event output of From FL Studio to both generators, then connect each generator’s yellow audio output to To FL Studio. Check the existing connections before adding cables. Now one Piano roll plays both instruments.
Give each layer its own job, for example a centered body and a quieter upper texture. Turn their output levels down before you combine them. You can drop an effect into either audio path without touching the shared note feed. If you use the sound from the Sytrus Reese bass tutorial as one layer, first make sure Sytrus is available under your license.
Ordinary layering doesn’t need a VFX module. Use VFX Keyboard Splitter only when different keyboard or velocity zones should go to different destinations; both its keyboard and velocity mappings apply. Use VFX Key Mapper for note changes such as transposition or remapping. These VFX tools live inside Patcher and won’t load in an ordinary Channel or Mixer effect slot.
Turn the useful controls into a Control Surface
The default Patcher includes a Control Surface. Open its Surface tab, click + and add a knob. Use Edit mode to place and rename it, then leave Edit mode to play with it. The Control Surface reference describes the available controls and editing options.
Open a native target plugin and right-click the desired control, then choose Activate. For a VST or AU plugin, right-click its Map module and choose the control under Inputs > Parameters. On the Map, drag the Surface control’s red output to the target’s activated red input, or onto the module’s middle and select the target. This connects a control value, not audio.
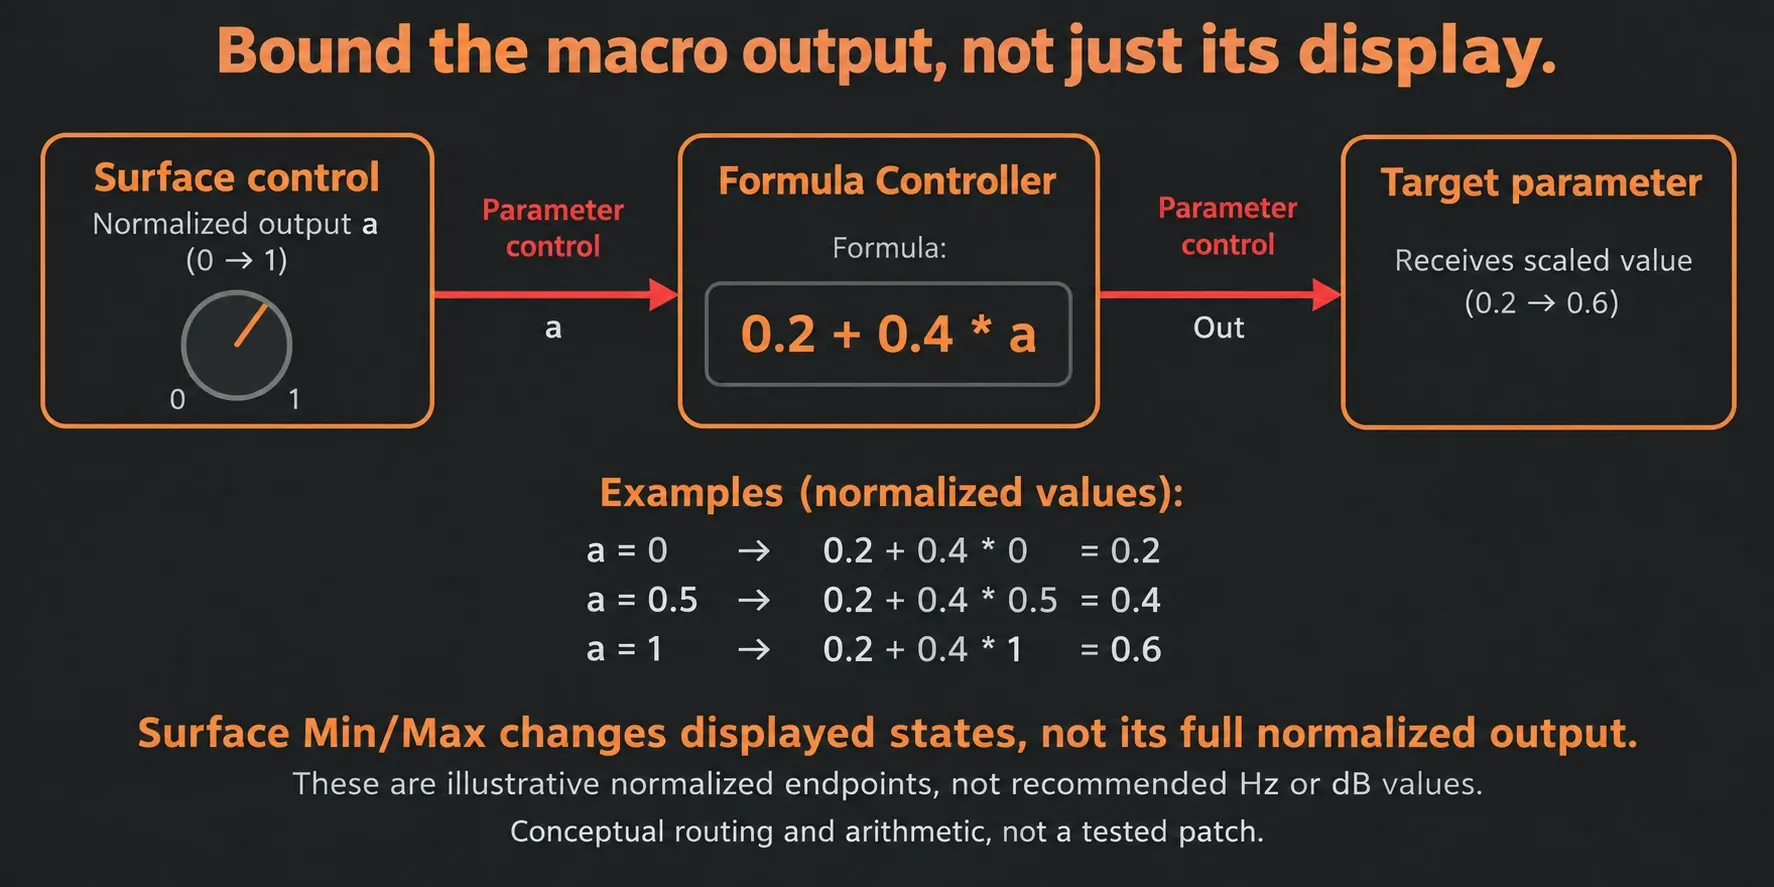
Limit the output, not the display. Patcher’s manual warns that a Surface control’s minimum and maximum values change its displayed steps or states; its output still spans 0% to 100%. To send a smaller range to a target, insert a mapping stage.
Here is a bounded example using Fruity Formula Controller’s documented arithmetic. It maps a full knob turn to 20%-60% of a target’s normalized control range. Those are demonstration endpoints, not recommended cutoff, gain or resonance settings.
- Add Fruity Formula Controller to the Map. Right-click its module and activate
Inputs > Parameters > 1. a parameterandOutputs > Controllers > 1. Out. - Connect the Surface knob’s red output to the Formula Controller’s activated
ainput. - Open Formula Controller, enter
0.2+0.4*aand pressCompileor Enter. Confirm the messageCompiled ok. - Remove any direct Surface-to-target link for that same parameter. Connect Formula Controller’s
Outto the target’s activated red input instead. - Turn the Surface knob to 0%, 50% and 100%. The formula outputs 0.2, 0.4 and 0.6. Check the Formula Controller Monitor and the target’s own display. If the Monitor trace doesn’t update, start playback.
A normalized percentage won’t map to a linear frequency or decibel scale. Pick endpoints by how the target actually responds, at a safe level. For reversed movement, 0.6-0.4*a gives the same bounds running the other way. One Surface output can feed several mapping stages when different targets need different limits.
Activate useful parameters and automate one macro
Linking a Surface output to a plugin and exposing the Surface knob to FL Studio automation are two separate steps. Once the internal route works, leave Surface Edit mode and right-click the Surface knob itself. Choose Activate, then right-click it again and choose Create automation clip. Name the control before you create the clip so you can find it in the project.
To automate a native plugin inside Patcher directly, right-click its control, choose Activate, then right-click again for Create automation clip. For VST/AU controls, activate the parameter through the module’s Inputs > Parameters menu, then right-click the new red input node and create the clip. The Patcher automation instructions separate these two routes.
For a mapped macro, automate the Surface knob and leave its downstream target alone. Play through the full movement and check that the target stays inside the range you chose. Use the FL Studio automation guide for Playlist selection, curve editing and project-level control behavior.
Patcherize an existing plugin without replacing it
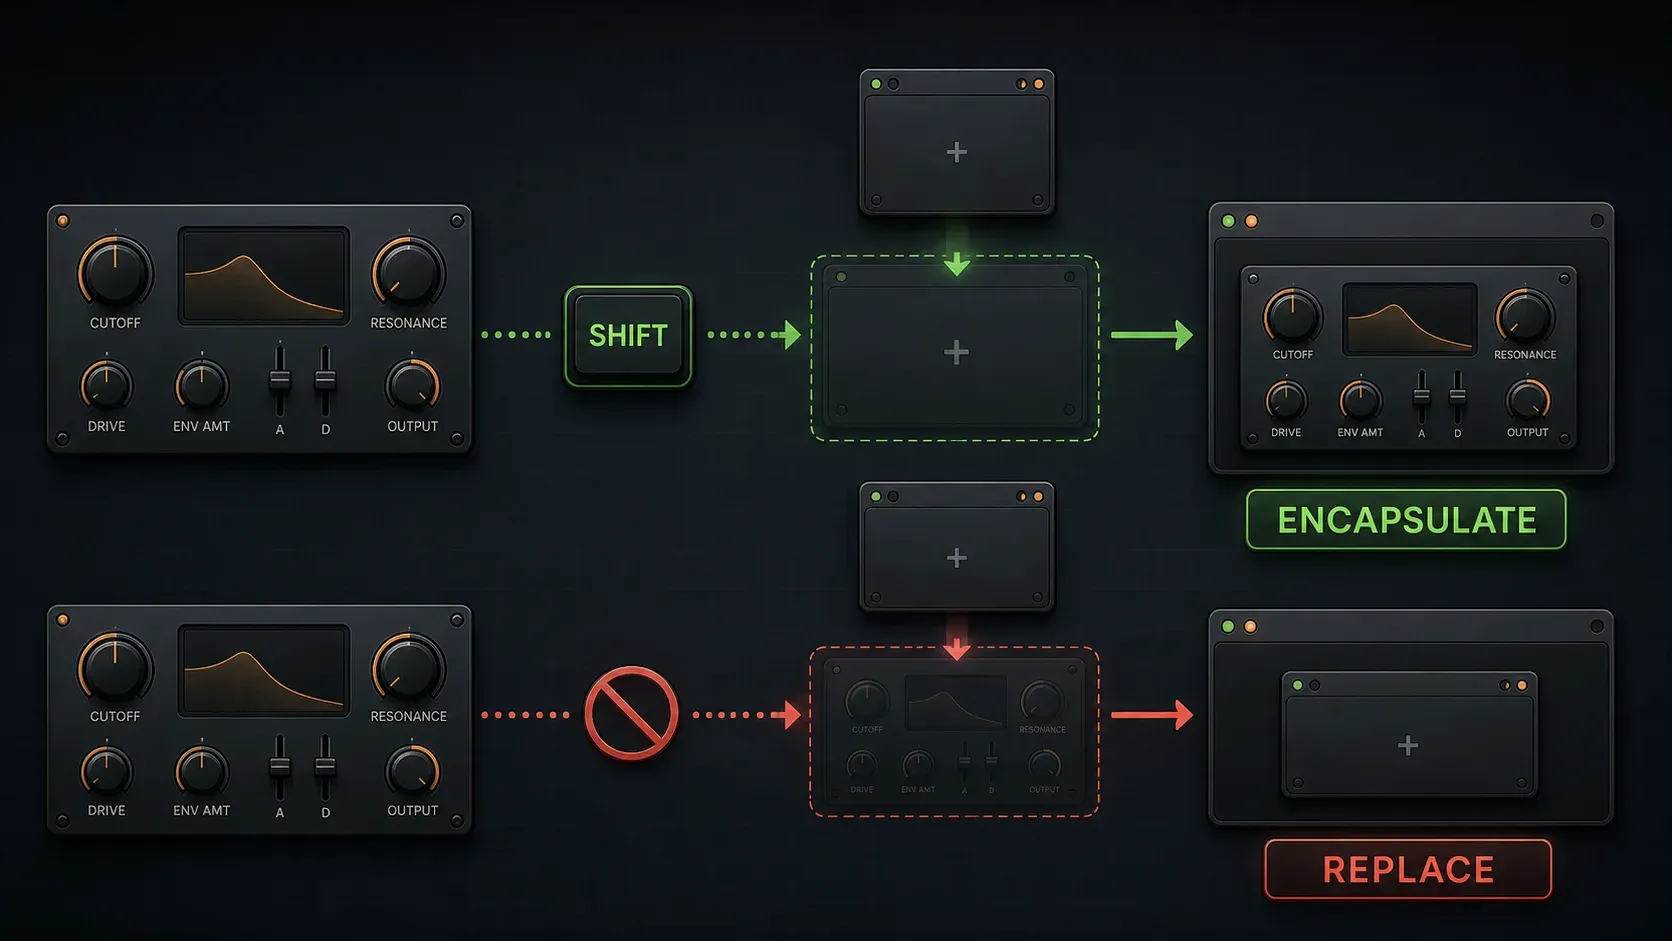
To wrap one existing Channel Rack plugin, use the Patcherize command from the Channel button’s right-click menu. Or hold Shift while you drop Patcher onto the existing Channel Rack plugin or Mixer effect slot. Without Shift, dropping Patcher replaces the target instead of wrapping it.
Apply the license and backup precautions above before you change valuable work. After wrapping, open the Map and confirm the original plugin and its settings are there. This wraps only the target plugin; external Mixer effects, sends and connected tracks aren’t pulled in. Add any further modules on purpose and check the route after each one.
Save, install and audit Patcher presets
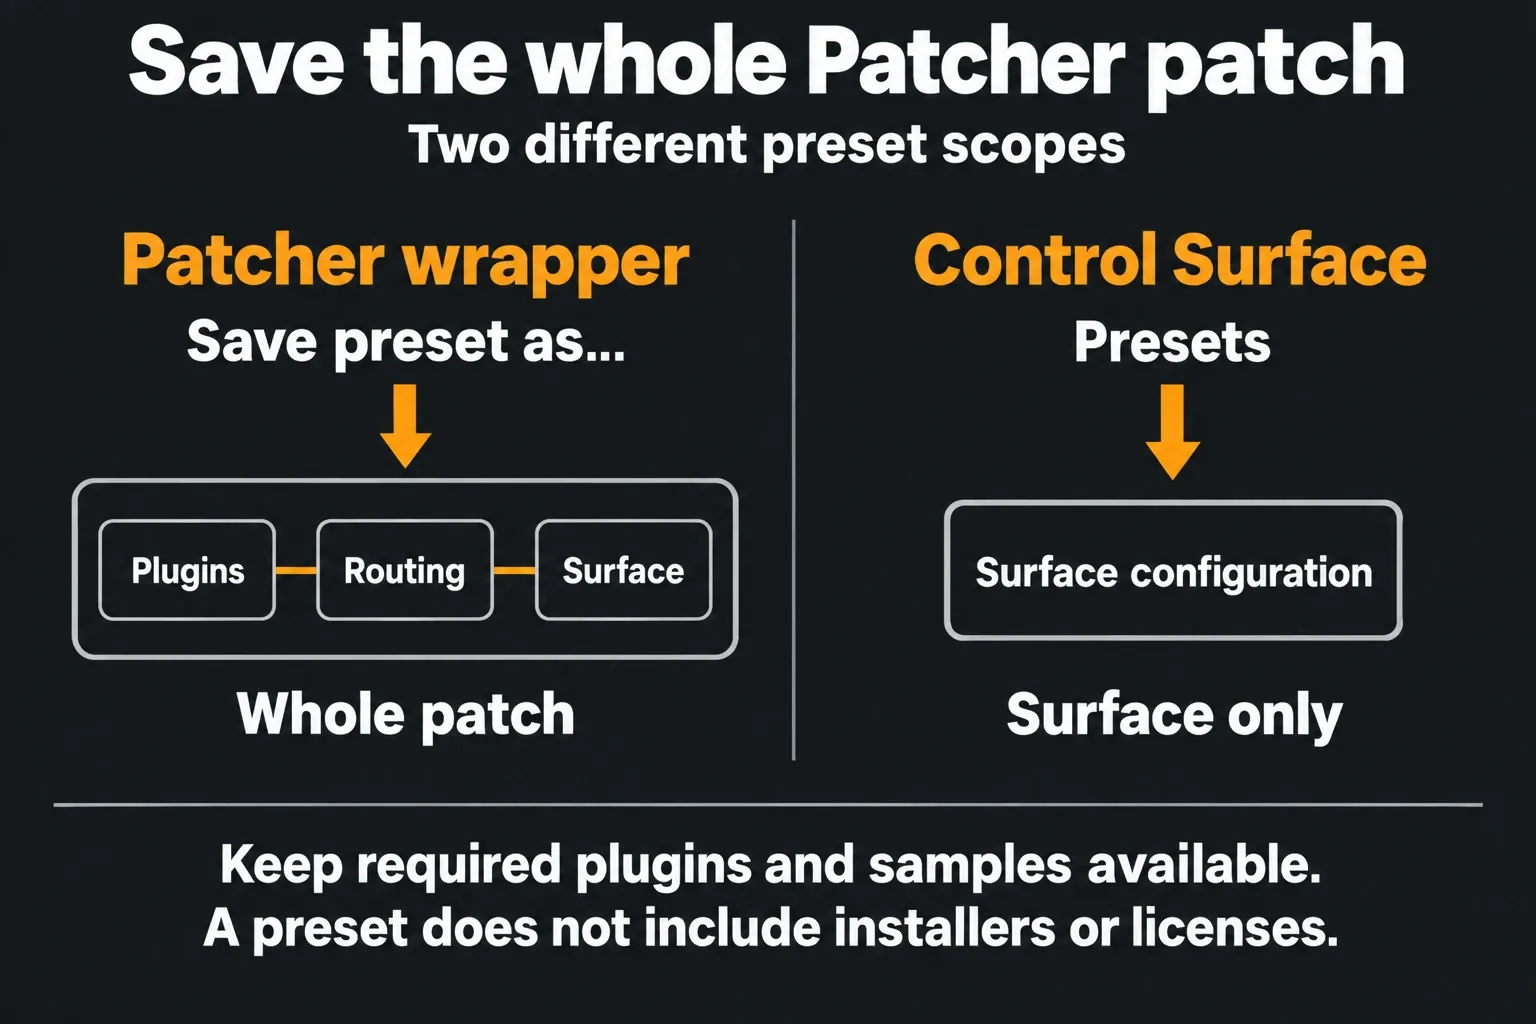
Use Save preset as from Patcher’s wrapper menu to save the complete patch, including its plugins, routing and Surface. Saving from the Control Surface’s own Presets menu only saves that Surface configuration. Give the whole-patch preset a name that tells you its role and whether it’s an instrument or an effect.
FL Studio’s .fst format stores generator and effect preset state. Keep that separate in your mind from plugin installation files, licenses and external sample libraries, because a downloaded Patcher preset may not include every dependency.
For a downloaded preset you trust, check its required FL Studio version, plugin formats and sample content. Keep the .fst file in your own preset folder, never on top of a factory file. Drag that folder from your system’s file manager into FL Studio’s Browser. For an instrument preset, add a new Patcher channel and drag the .fst file from the Browser onto it. For an effect preset, drag it onto an unused Mixer effect slot. A new channel or unused slot means you won’t replace a sound or effect that already works. Check every module and confirm sound reaches the output before using the preset in a project.
If a module is missing, identify the exact plugin before you replace it. It could be a native Image-Line plugin you don’t own, an unavailable third-party plugin or format, or missing sample content. Keep an untouched original. Don’t re-save a reopened project with locked trial plugins and expect their settings to come back; follow the trial-plugin restoration warning before going further.
Troubleshoot silence, doubled level and heavy maps
| Symptom | Check first |
|---|---|
| Effect patch is silent | Follow the yellow path to To FL Studio; check muted connections and plugin output. |
| Instrument does not play | Check the green event feed and each generator’s yellow output, then check its license and loaded sound. |
| Macro does nothing | Check target activation, Surface output and any Formula Controller input, compiled expression and Out connection. |
| No automation option on Surface knob | Leave Edit mode, activate the Surface control itself, then right-click again. |
| Parallel blend jumps in level | Check for duplicate dry paths and lower the processed branch before comparing. |
| Preset has missing modules or sounds | Check native licenses, third-party dependencies, formats and samples. Preserve the original before changing anything. |
| Audio breaks up | Open View > Performance and identify the expensive modules or dependent chain. |
Right-click the Map and choose View > Performance. Module percentages use FL Studio’s audio-buffer workload measure, meaning the share of buffer time needed to calculate each module’s audio. They’re different from the operating system’s CPU percentage. The summary splits module work, Patcher input/output processing and other overhead.
Auto-arrange modules lays out processing dependencies in columns. With multithreading on and resources to spare, independent modules at the same dependency depth can run together, while later stages have to wait for their inputs. Just dragging icons into columns doesn’t change those dependencies. Check Multithread plugins on this map and each relevant module’s Allow threaded processing; the manual notes that some third-party compatibility cases may need the latter switched off.
Keep a separate copy before you remove branches to compare performance. Moving a serial chain into Patcher won’t make dependent processing run in parallel or promise lower CPU use. Once the route works, go back to the Sound Design guides for the next musical task instead of stacking more modules onto a sound that’s already done.
Frequently asked questions
What is Patcher in FL Studio?
Patcher is a container, used as an instrument or an effect, that connects plugins and controls into a setup you can reuse. The Map holds the audio, event and parameter routes, and the Surface exposes the controls you choose.
Is Patcher included in every FL Studio edition?
Yes. Image-Line’s current edition comparison includes Patcher in Fruity Edition, Producer Edition, Signature Bundle and All Plugins Edition. That doesn’t license every plugin inside a preset, so check native Image-Line and third-party dependencies separately.
What do the Patcher connection colors mean?
Yellow carries audio, green carries notes and events, and red carries parameter values. Right-click a module to switch on missing inputs or outputs. The display filters hide links but leave them connected.
How do I make a parallel effect in Patcher?
Keep one dry audio path from From FL Studio to To FL Studio and add a second path through the processor. Lower the processed cable’s level, avoid an accidental extra dry signal and compare the combined output with bypass at similar loudness.
How do I link a Patcher Surface knob to a plugin?
Activate the target parameter and connect the Surface knob’s red output to its input, either directly or through a mapping stage. To automate the Surface knob from FL Studio, activate that knob separately, then right-click it again and choose Create automation clip.
How do I save a Patcher preset?
Use Save preset as from Patcher’s wrapper menu to save the whole patch. The Surface’s own preset menu only saves its configuration. Check plugin licenses and keep an untouched original, and don’t re-save a reopened project with locked trial plugins, because their settings can be lost.
How do I install a Patcher preset?
Check the preset’s source, required FL Studio version, plugin formats, licenses and samples. Add its folder to FL Studio’s Browser by dragging it in from your system’s file manager. Drag an instrument .fst preset onto a new Patcher channel, or an effect preset onto an unused Mixer effect slot. Confirm every module works and keep the original files.
Why is my Patcher preset silent?
Check the audio route to To FL Studio, the event feed to the generators, any muted connections and the loaded sounds. Missing or unlicensed native plugins, third-party plugins or sample content can also stop a preset from working. Keep the original before you replace modules.