FL Studio
Build this Sytrus Reese bass from two saw-like operators, a small pitch difference and one low-pass filter. The part worth learning is which matrix cells carry the sound. Once that route works, you can shape the movement, check the bass in mono and save a preset to load into other projects.
This guide uses native Sytrus inside desktop FL Studio. Start with a short bass phrase and keep your monitoring at a comfortable level. The diagrams show the connections, and the named controls in Sytrus let you follow each step.
What makes a Reese bass move
Two similar, harmonically rich voices at slightly different frequencies drift in and out of line with each other, so their sum keeps changing in level and tone. Saw-like waves make that movement easy to hear because they’re full of harmonics a filter can shape. Two voices make a good first build, though plenty of Reese sounds use more.
Write a one- or two-bar phrase with a held note and a few different pitches. The held note shows off the beating, and the other notes tell you whether the movement suits the whole riff. A centered pair can still dip in level as the voices interfere, so panning both to the middle won’t give you a steady sub.
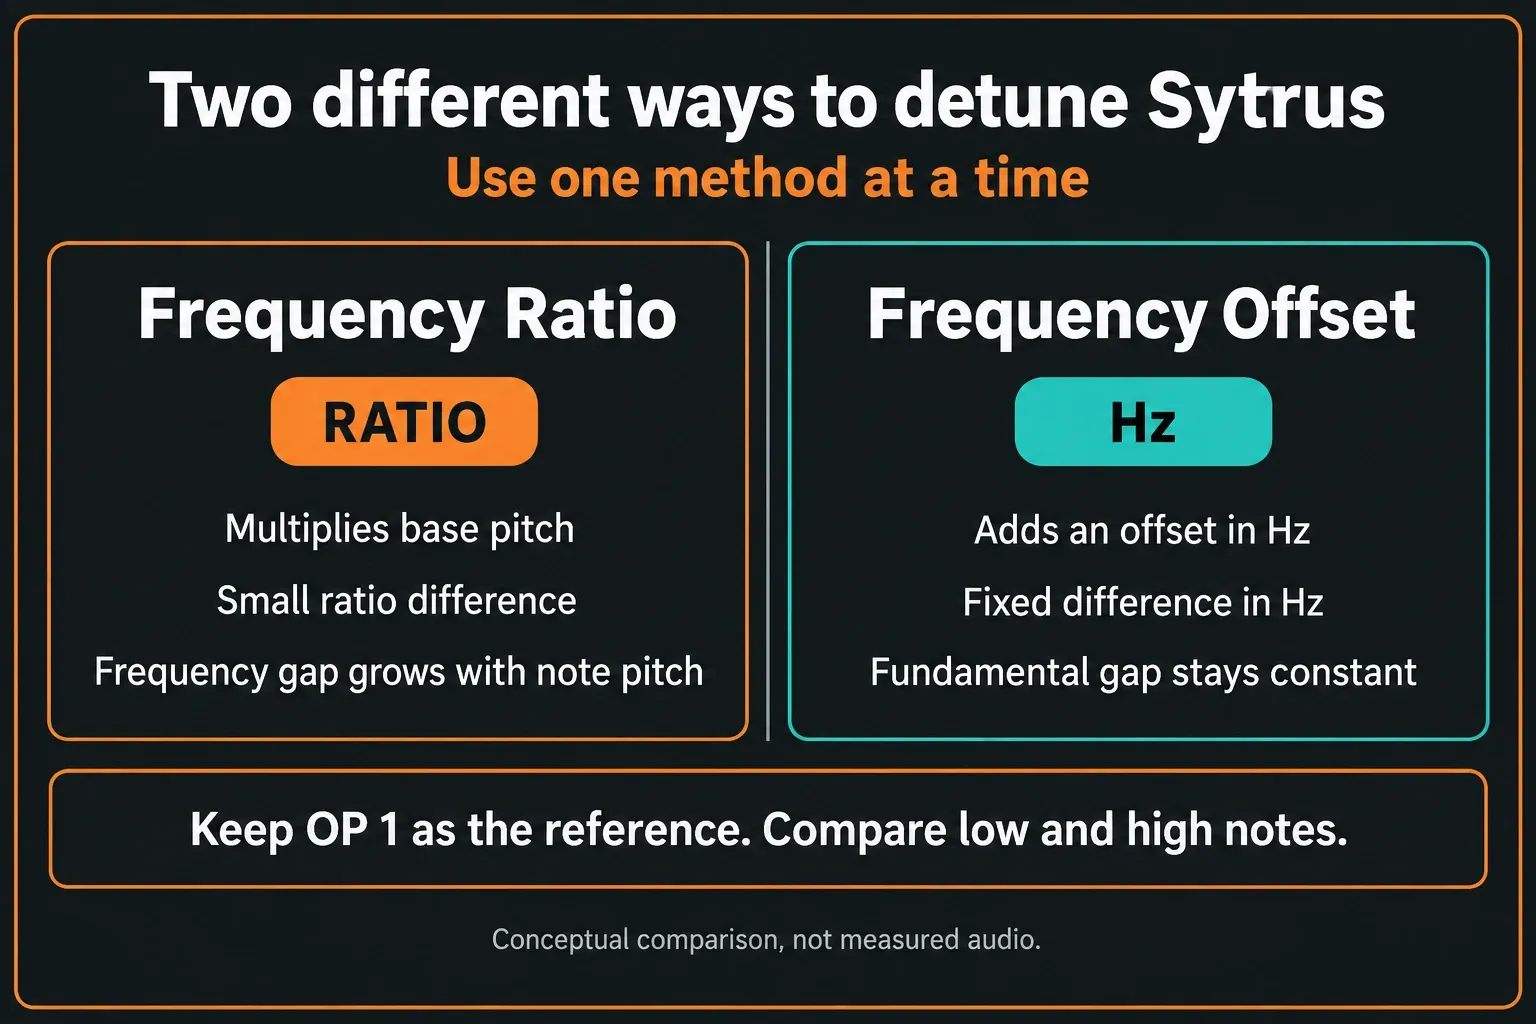
The detune control matters. A small difference in Frequency Ratio creates a frequency gap that widens as the played pitch rises. A fixed difference in Frequency Offset adds the same number of hertz on every note. We’ll use ratio detuning first, then look at how the two options differ.
Open Sytrus and reset to a known starting point
Add Sytrus as a generator through FL Studio’s Add menu or Plugin Picker. Image-Line’s edition comparison, checked September 17, 2026, includes Sytrus in Producer Edition, Signature Bundle and All Plugins Edition; it is not included in Fruity Edition. Our FL Studio editions guide covers the wider purchase decision.
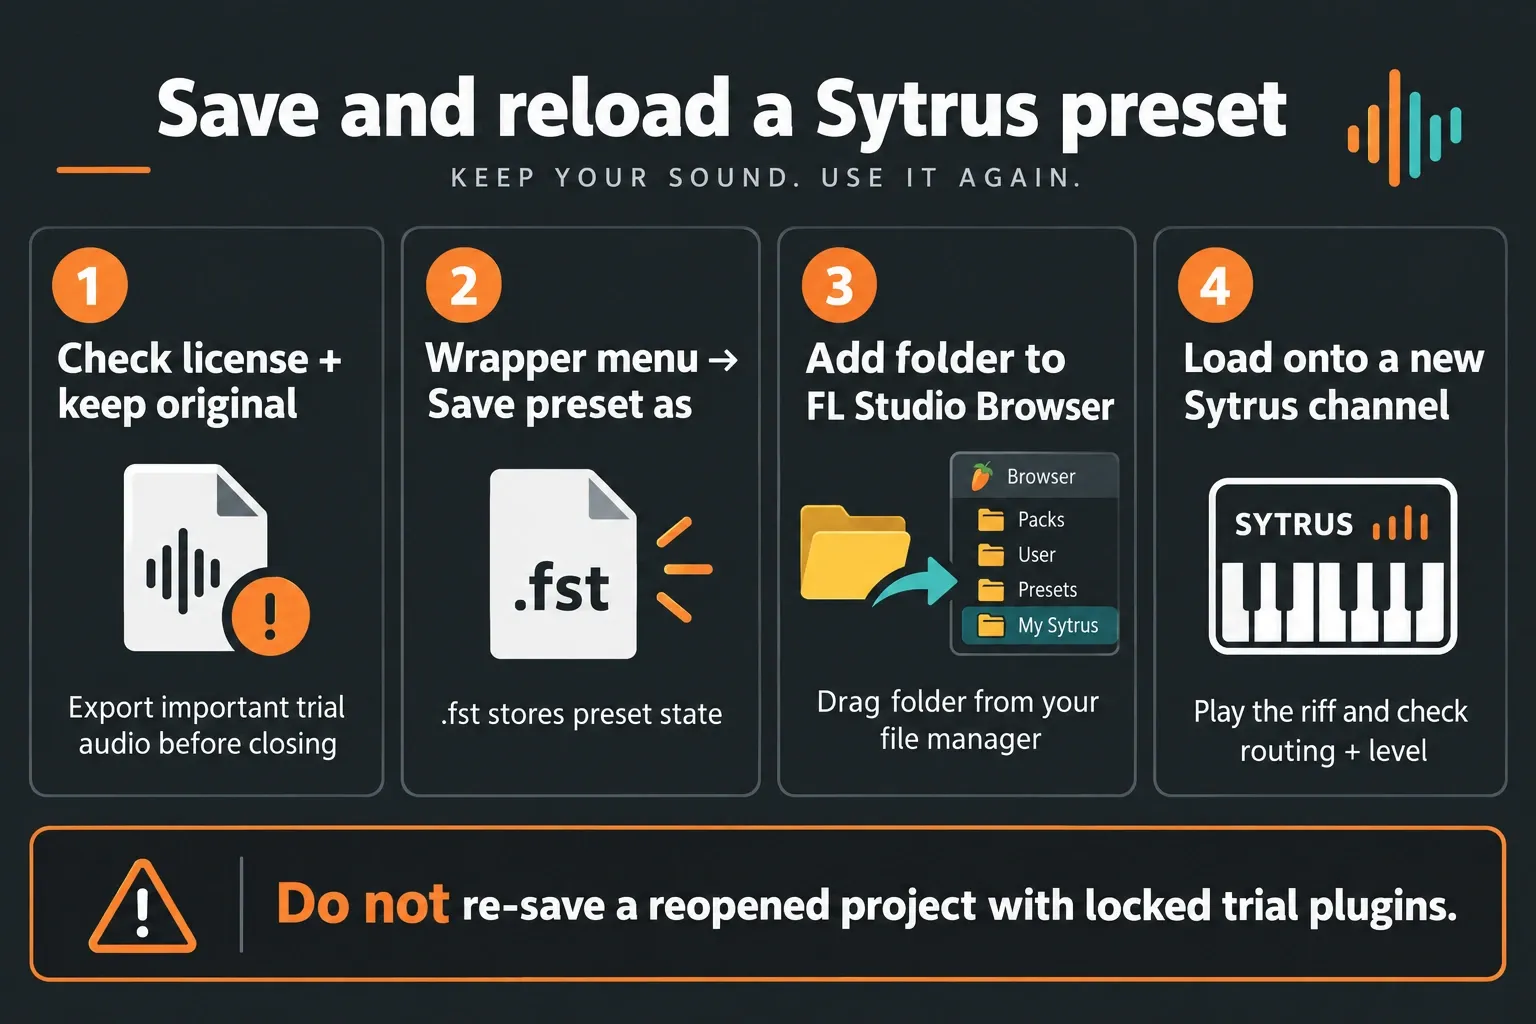
Protect the original before loading Default or saving. Use a new channel for this build and keep an untouched copy of existing work. In the FL Studio host trial, export important audio before saving or closing, because projects can be saved but can’t be reopened until you purchase FL Studio.
Native Image-Line trial plugins carry their own restriction, even in a paid host. Image-Line says buying and unlocking them before reopening keeps their original settings, while reopening and re-saving before unlocking loses them. Read the saving warning and follow the current trial and restoration rules. An installed Sytrus instance doesn’t prove it’s licensed.
In the new Sytrus instance, select the Default preset. Image-Line’s Sytrus tutorial describes its plain sine output, with OP 1 going straight to OUT. Play the phrase and make sure you can hear it before changing the route.
Sytrus has six operators, three filters, an effects module and a matrix. For now, use OP 1 and OP 2 as sources, FILT 1 to shape the tone and the matrix to connect them. Leave optional effects and global unison off while you get the basic sound in place.
Read the modulation matrix as a signal map
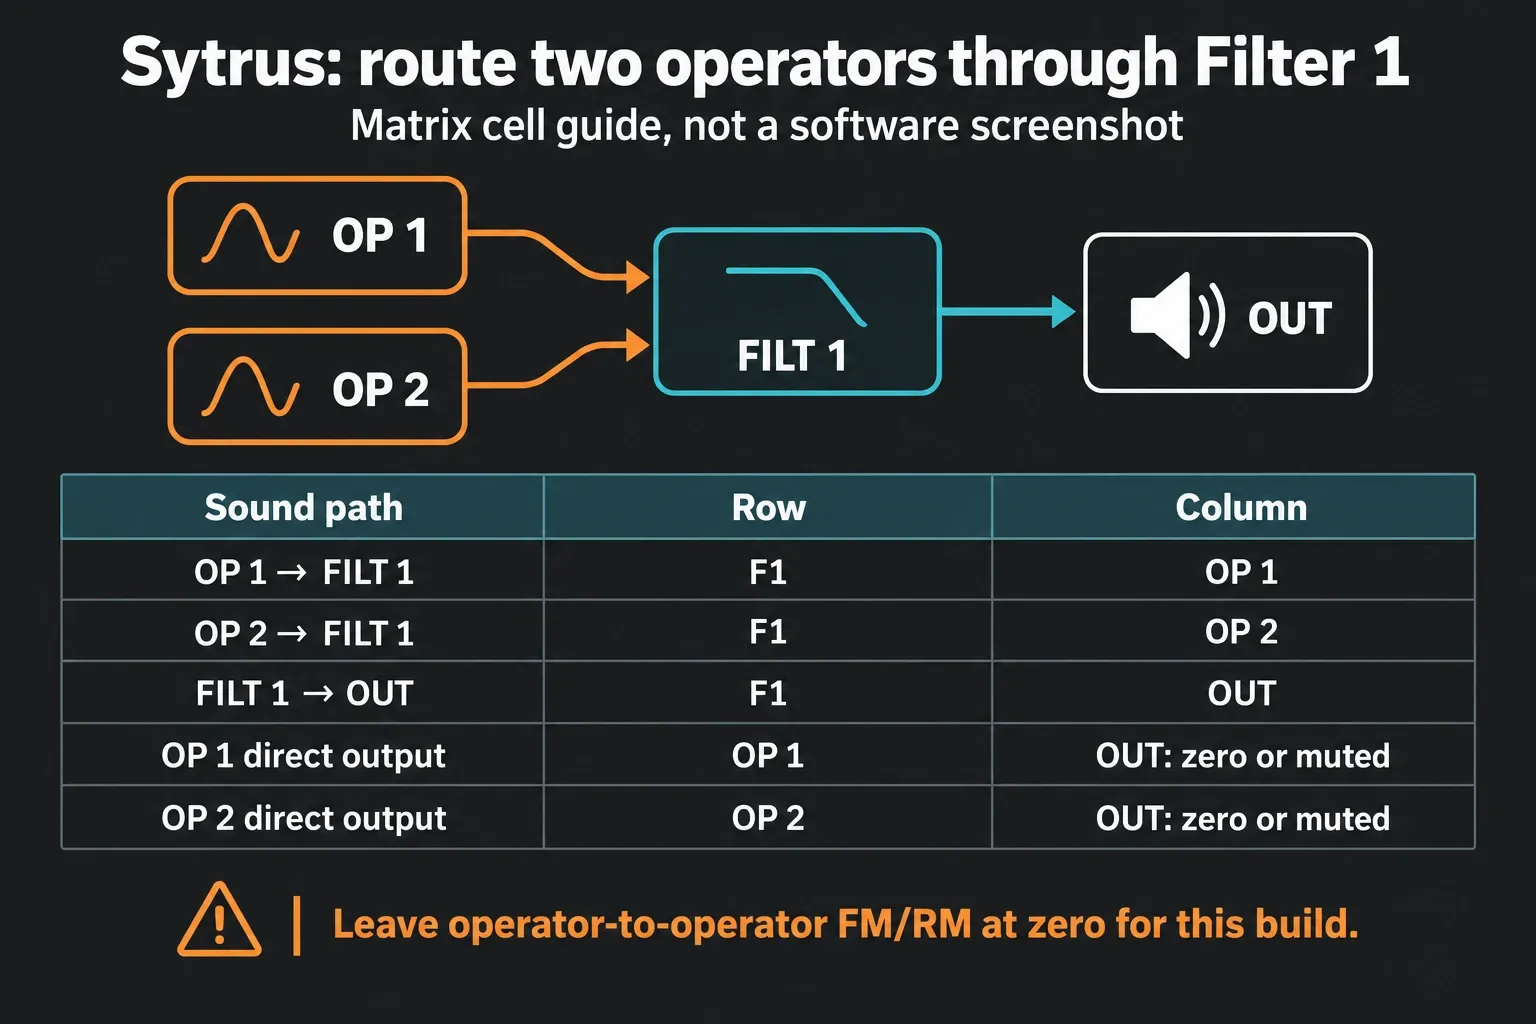
Read the matrix in sections. In the FM/RM section, the row names the operator receiving the signal and the numbered column names the operator modulating it. In the filter-send section, rows F1–F3 name the receiving filters and the numbered columns name the source operators. The PAN, FX and OUT columns on the right work differently: each row sets that module’s pan, effects send or direct output.
Sytrus’s modulation matrix reference documents this distinction. For a subtractive Reese, leave operator-to-operator FM and RM amounts at neutral zero and use these cells:
| Sound path | Matrix row | Matrix column | Action |
|---|---|---|---|
| OP 1 into Filter 1 | F1 | OP 1 | Raise the positive send gradually. |
| OP 2 into Filter 1 | F1 | OP 2 | Raise when adding the second voice. |
| Filter 1 to output | F1 | OUT | Keep an audible positive output. |
| OP 1 direct output | OP 1 | OUT | Set to neutral zero or mute. |
| OP 2 direct output | OP 2 | OUT | Keep at neutral zero or mute. |
Matrix zero sits in the middle position. Turning a knob fully left can send an inverted signal, which is different from switching the route off. Alt-click resets a matrix knob to neutral, and right-click mutes or unmutes it while keeping its value. When the small labels are hard to read, hover over a cell and check the Hint Bar.
Set up OP 1 → FILT 1 → OUT first, then mute OP 1’s direct OUT cell. A filter output stays silent if nothing feeds it, and an operator-to-filter send stays silent if the filter has no route out. Keep levels low while you make each connection.
Build the first rich voice in Operator 1
Open OP 1 and set SH to 50%. Starting from Default, that’s the midpoint Image-Line’s subtractive tutorial uses to make a sawtooth wave. Check the waveform preview and play the phrase; the source should now sound brighter and richer in harmonics than the original sine.
Leave OP 1’s pitch settings as they are, so it serves as the reference. The documented default Frequency Ratio is 2. Don’t turn it down to 1 just because the display looks like an octave selector, because halving the ratio drops the pitch by an octave.
If the notes click or pile up badly, use the operator’s VOL → ENV articulation, enable that envelope and adjust its attack and release to suit the phrase. Aim for a quick but clean start and enough release to stop without a sudden cut. MAIN’s envelope offsets only work when the matching envelopes are in use, so they won’t replace enabling an operator envelope.
Add Operator 2 and tune the beating by ear
Open OP 2, set SH to the same saw-like starting shape and start with the same Frequency Ratio as OP 1. Leave its Frequency Offset alone. Raise the OP 2 send in the F1 row / OP 2 column and keep OP 2’s direct OUT at zero. Both operators now feed the same filter.
Nudge OP 2’s Frequency Ratio by dragging a final display digit up or down. The operator pitch documentation describes this digit-based adjustment. Hold a low note and listen for the movement, then play the highest note in the riff. If the upper notes move too fast or the pitch center gets vague, shrink the ratio difference.
No detune value works for every riff. Balance OP 2 with its filter-send level. Similar voices at equal levels can interfere more deeply, while a quieter second voice softens the level dips. Mute its send for a moment to hear what it adds.
For a different behavior, try Frequency Offset in a separate version. Set both ratios back to the same value, keep OP 1 as the reference and change only OP 2’s offset. This control adds a fixed amount in Hz. A fixed offset difference keeps the gap between fundamentals the same across the keyboard, which a fixed ratio difference doesn’t. The harmonics, filter and note envelopes still color the movement, so compare the full phrase.
Shape the tone in Filter 1
Open FILT 1 and choose the LP low-pass type. Select an active bandwidth setting such as x1 instead of OFF. Start with modest resonance and bring CUT down until the brittle top calms, then open it back up enough for the movement to stay audible next to the drums. RES emphasizes the area around the cutoff; judge it across several notes before you settle on a value.
For a moving cutoff, pick the filter’s CUT → ENV articulation, enable the envelope and check the cutoff ENV amount. The filter controls separate the base cutoff, resonance and envelope/LFO amount. A static filter is fine if the detune already gives you enough movement.
If the filter hardly changes the sound, look for direct operator-to-OUT paths first, then check the selected filter mode and its articulation. If the patch is silent, check both operator sends and F1’s OUT cell. The minimum cutoff setting doesn’t mute the sound, so some leftover low end doesn’t mean the route is broken.
Keep the low foundation centered before adding width
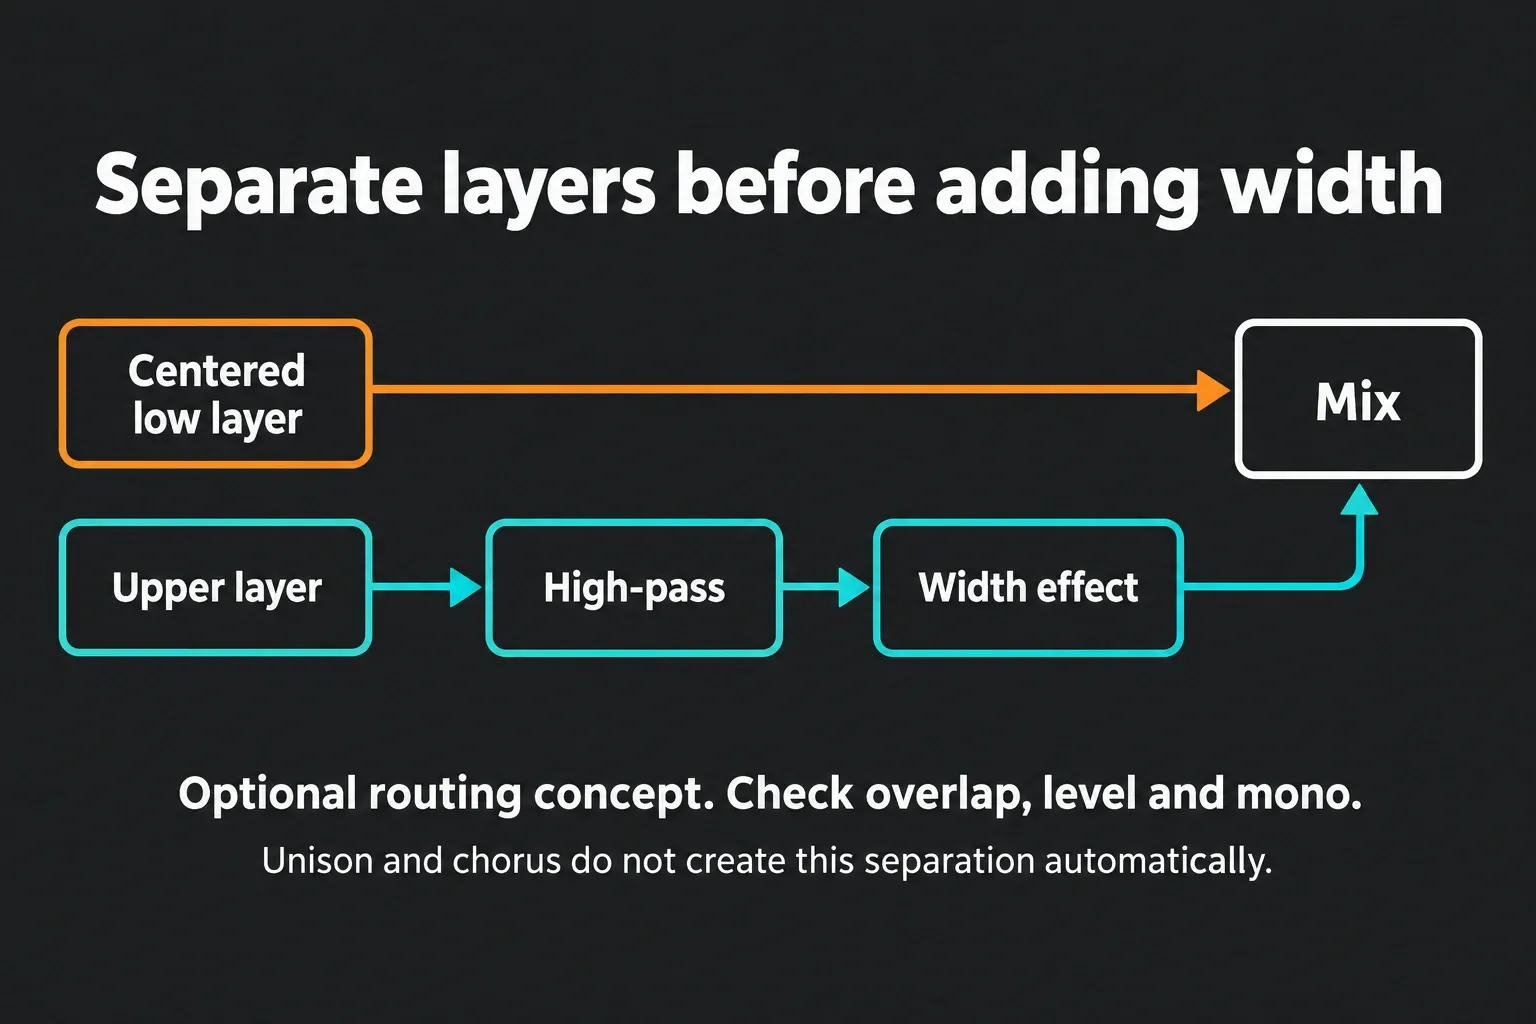
Keep the first version of the patch centered and check it in mono before adding width. Centered panning doesn’t guarantee a steady level: two detuned operators can still beat and partly cancel inside a mono signal. If the bottom keeps disappearing, reduce the detune, lower the second operator or add a separate steady low layer.
MAIN’s global unison adds more voices. ORD sets the voice count, PN their panning variation and PT their pitch variation. It acts on the patch’s voices as a whole, low end included. The OSC unison option merges voices before a single filter path and gives mono unison with no stereo spread. Keep the first version simple before comparing these options.
Internal chorus needs a signal path too. For this filtered patch, raise the F1 row / FX column send before expecting the FX module to do anything. Set the chorus ORD and VL controls, then balance the effects against F1’s direct OUT level. The Sytrus effects reference explains these controls. Compare at similar loudness and check mono again.
Neither global unison nor chorus leaves the lows alone automatically. If you want separate treatment, keep a centered low layer and high-pass a separate upper layer before widening it. Use the FL Studio Mixer workflow to route and balance them. Set the overlap by listening in the arrangement, because no single crossover suits every bass.
Add character without losing the patch
Save a separate version before you change the synthesis method. To have OP 2 frequency-modulate OP 1, select FM and adjust the cell in the OP 1 row / OP 2 column. Keep OP 1 routed into FILT 1 so the modulated carrier reaches the output. Start with a small amount and compare; you’re now adding modulation on top of mixing two voices.
For distortion inside the filter module, use its optional waveshaper: switch it on with ON and work with AMP and MIX. Not every filter type offers the same drive control. Change one thing at a time and compare at similar loudness before adding more processing.
For movement across the song, use FL Studio automation on suitable controls such as filter cutoff. FM/RM matrix knobs can’t be automated directly. Image-Line documents operator VOL as a way to vary FM amount, but in this patch OP 2 is also an audible layer, so moving its volume can change both jobs. Keep the base preset useful without leaning on a project’s automation clips.
Test the Reese in the full song
Route Sytrus to a named Mixer insert and balance it against the kick, drums and other instruments. Sort out timing and level before reaching for more effects. If the kick still needs room, compare the options in the sidechain guide; final loudness work belongs to the later mastering stage.
| Problem | Check first | Useful next action |
|---|---|---|
| No sound | Operator sends and F1 OUT | Trace the complete route, then check envelopes and channel/Mixer level. |
| Filter barely changes the tone | Direct operator OUT and filter mode | Remove bypass paths; inspect CUT and its articulation. |
| Movement speeds up on high notes | Frequency Ratio difference | Reduce it, or compare equal ratios with a small Hz offset in a separate version. |
| Low notes dip even in mono | Interference between operators | Reduce the second voice or detune; consider a separate low layer. |
| Sound loses weight when summed to mono | Unison, chorus and wide layers | Reduce width and compare the centered version. |
| Chorus seems inactive | F1 FX send, chorus ORD and VL | Establish the effects route and check its contribution. |
| Kick is hard to hear | Timing, level and low-frequency overlap | Adjust the arrangement and balance before adding processing. |
Play the whole riff quietly, in stereo and in mono, and on smaller speakers if you have them. Listen for clear notes and useful movement next to the drums. Keep a version before big changes so you can compare without losing the sound that already works.
Save your Sytrus preset and install trusted FST files
Once you’ve dealt with the license precautions, open the plugin wrapper menu and choose Save preset as. Give the preset a useful name and save the project separately. The wrapper preset commands separate saving from Browse presets, which opens the preset list in the Browser.
The Channel Settings manual calls the matching command Save channel state as and recommends the default location FL Studio suggests so presets can be detected. FST stores generator or effect preset state. It isn’t an audio export, a plugin installer or a license.
- For a trusted downloaded Sytrus FST, check its source and required FL Studio version. Keep the original project and avoid overwriting factory presets.
- Put the file in a user folder and drag that folder from your system’s file manager into FL Studio’s Browser.
- Add a new Sytrus channel, then drag the FST from the Browser onto it. A new channel means you won’t replace a sound that already works.
- Play the riff, inspect the matrix, unison and FX, and reset the level before using the preset in the song.
The Browser’s folder and preset workflow supports these loading actions. Its online Presets library is a separate managed system that downloads compatible content to the right location on its own. Don’t move managed content just because a loose FST needs a user folder.
Keep an untouched source in case Sytrus is locked or missing when you reopen a project. Don’t re-save that project until you’ve sorted out trial-plugin ownership and unlocked it. Once the sound is safely saved, the Sound Design guides cover the next task, and Patcher helps when you want to package instruments, effects and controls together.
Frequently asked questions
How do I open Sytrus in FL Studio?
Add Sytrus through the Add menu or Plugin Picker. Image-Line’s current comparison includes it in Producer Edition, Signature Bundle and All Plugins Edition, but not Fruity Edition. Check the license and use a new channel before loading Default.
What is the easiest way to understand the Sytrus matrix?
Read it in sections. FM/RM rows are receiving operators and columns are modulators. Filter-send rows are receiving filters and numbered columns are source operators. In PAN, FX and OUT, each row controls the corresponding module. For this patch, use F1 row / OP 1 column, F1 row / OP 2 column and F1 row / OUT column.
How much should I detune a Reese bass?
Make a small change to OP 2’s Frequency Ratio while OP 1 stays as the reference, then compare low and high notes. No single value works everywhere. A fixed ratio difference makes the fundamental beat faster as pitch rises; a fixed difference in Frequency Offset keeps the same Hz gap across notes.
Should a Reese bass be mono or stereo?
Start centered and check mono before adding width. Two centered detuned voices can still beat and dip in level. Unison and chorus don’t isolate the upper frequencies on their own, so use deliberately separated layers if the lows and the upper sound need different processing.
How do I save a preset in Sytrus?
Use Save preset as in the plugin wrapper menu and keep the FST in the proposed user preset location. Check the license and preserve the original project. Do not re-save a reopened project with locked native trial plugins, because their settings can be lost.
How do I add or install Sytrus presets?
For a trusted Sytrus FST, check its required version, keep it in a user folder, add that folder to FL Studio’s Browser and drag the file onto a new Sytrus channel. Check the sound and level. Content from the online Presets library follows its separate automatic installation workflow.
Why does my Sytrus Reese bass sound thin?
Check operator interference, filter settings, stereo effects and masking from the kick. A centered pair can still lose level through beating, and stereo processing can lose more when summed to mono. Pull back the second voice or the width and compare the whole riff before you add distortion.