FL Studio
Fruity WaveShaper turns level into shape. The horizontal axis is input amplitude, the vertical axis is output amplitude, and the line between them decides what happens to every level that passes through the plugin. Leave the line as a straight diagonal and the mapping is 1:1. Bend it and you can create gentle saturation, hard clipping, asymmetrical distortion, expansion or stranger level-dependent effects.
The plugin is included in every current FL Studio edition, according to Image-Line’s edition comparison. The hard part is not finding it. The hard part is separating the sound of the curve from the sound of extra level. A reliable workflow starts with a simple line, controls input with Pre, matches output with Post, and adds complexity only when you can name what the curve should change.
What Fruity WaveShaper actually does
Image-Line describes Fruity WaveShaper as a distortion effect that maps input to output with a flexible spline-based graph. That wording matters. WaveShaper does not wait for a threshold and then apply attack or release. It performs the same mapping whenever the same instantaneous input value arrives.
This makes it different from time-dependent dynamics. A compressor can react to level over time; WaveShaper changes the waveform according to the curve in front of you. It can still reduce peaks or increase density, but it reaches that result through static nonlinear mapping rather than a detector and timing circuit.
That distinction also explains why drive level matters so much. The curve can stay unchanged while the result changes dramatically because louder input reaches a different part of the map.
Read the interface as one signal path
The graph occupies most of the interface because it is the processor. The controls below it decide how the signal reaches that graph, how much of the shaped signal you hear, and how the output is cleaned up.
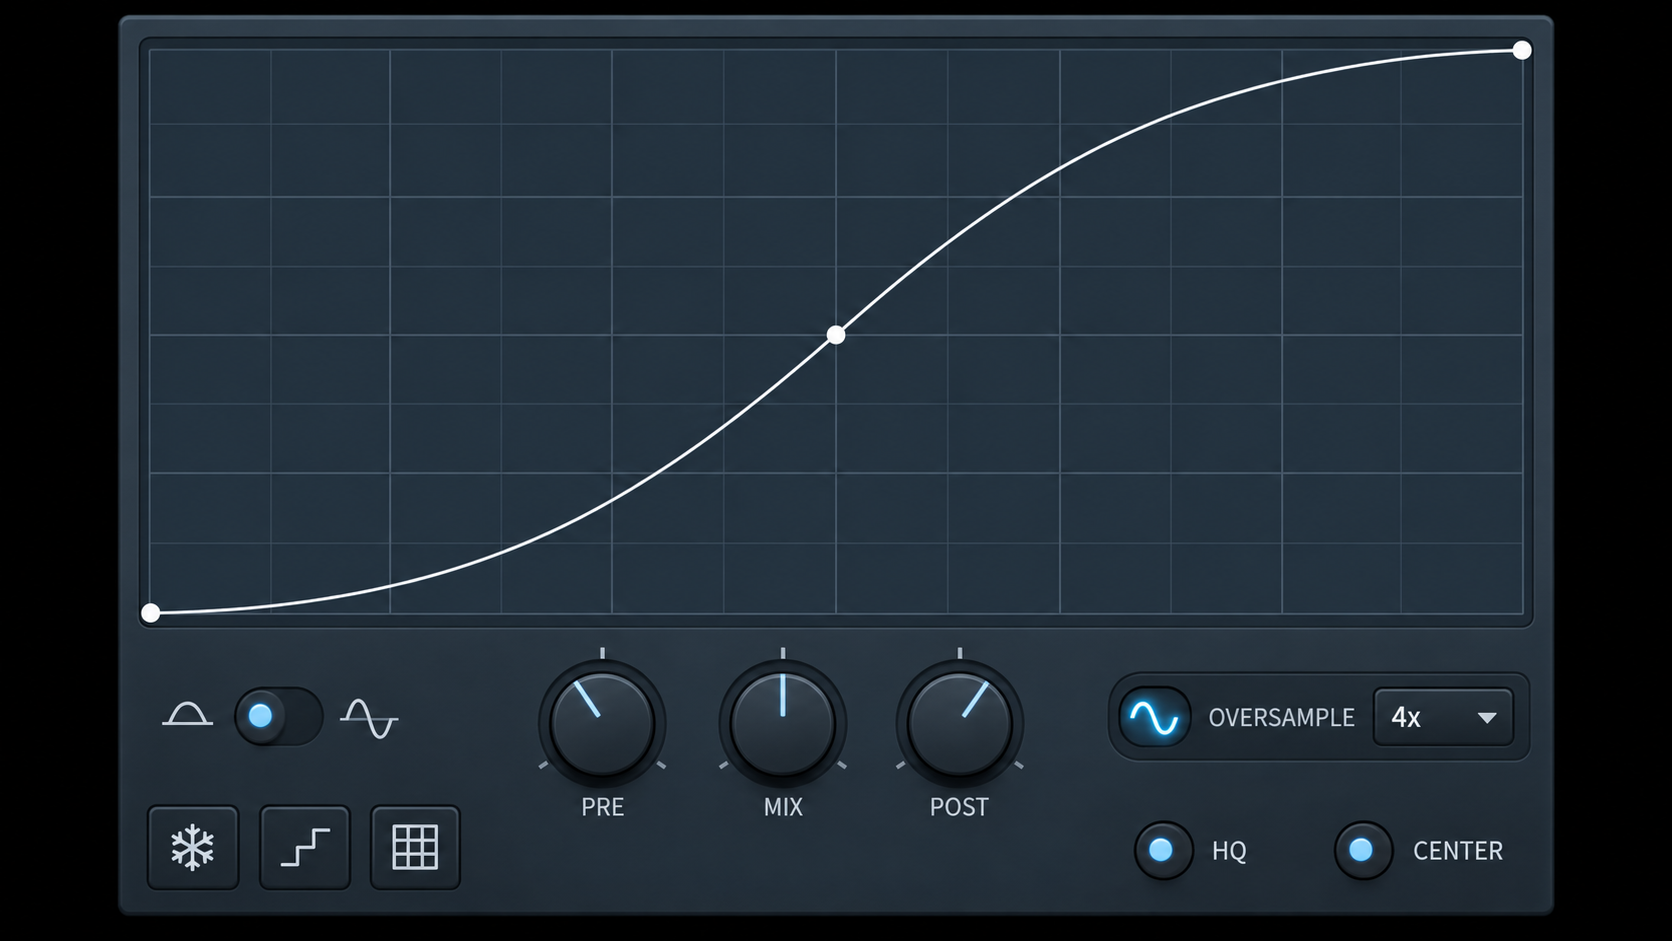
- Unipolar/Bipolar: switches between one shared shape and independent shaping of the positive and negative halves.
- Pre: raises or lowers the level entering the curve.
- Mix: balances dry input and processed output.
- Post: changes level after the curve.
- Smoothing: reduces noise caused by fast modulation of Pre, Mix and Post.
- Oversample: runs the nonlinear stage at the selected higher factor and downsamples afterward.
- HQ: keeps the WaveShaper output active below the normal CPU-saving cutoff documented at −85 dB.
- Center: removes DC offset from the final output.
The official Fruity WaveShaper manual is the authority for those controls and the graph-editing gestures.
Follow Pre → curve → Mix → Post
A useful mental model is a four-stage path. Pre decides which part of the curve the signal reaches. The curve remaps that level. Mix combines the shaped path with the original input. Post sets the final level.
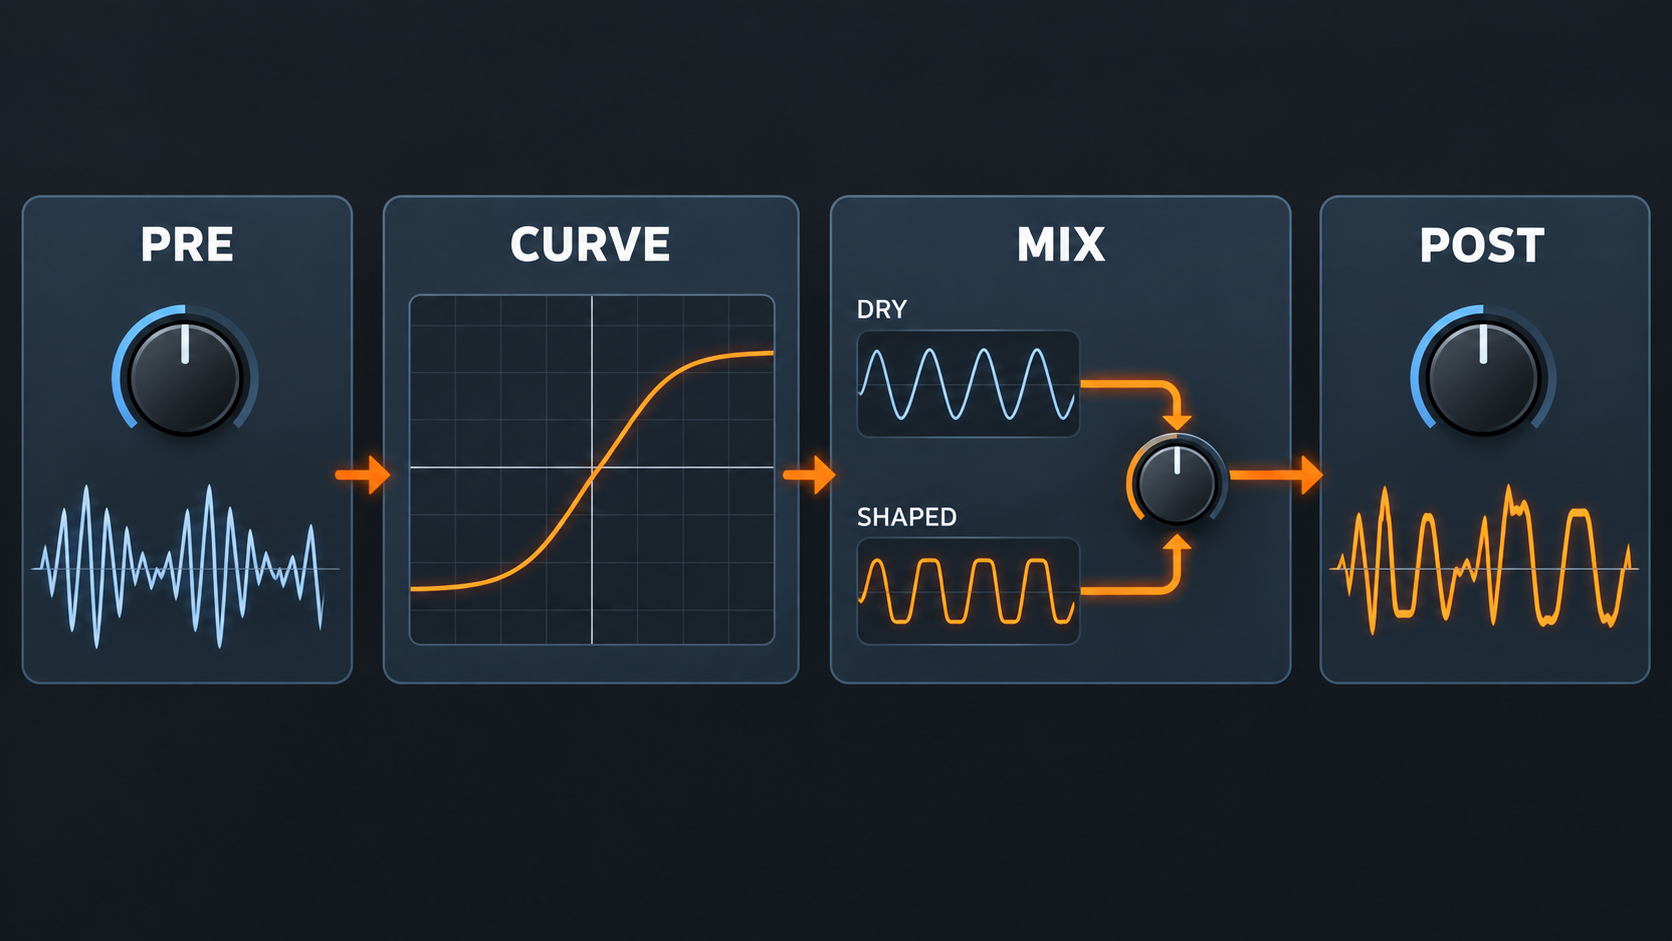
These controls can imitate one another at first. More Pre can sound like more distortion. A more severe curve can also sound like more distortion. More Post can make either version feel more impressive because it is louder. Change one stage at a time.
For a first pass, keep Mix fully processed, leave Post near neutral, and use Pre to move the signal into the bend. Once the curve behaves as intended, use Post to make an honest bypass comparison. Add dry signal with Mix only when parallel blending serves a clear purpose.
Learn the 1:1 line before drawing distortion
A straight line from bottom-left to top-right means input equals output. A point on the lower half maps a quiet input to a quiet output; a point near the upper-right maps a strong input to a strong output. The slope and shape tell you how gain changes as the input rises.
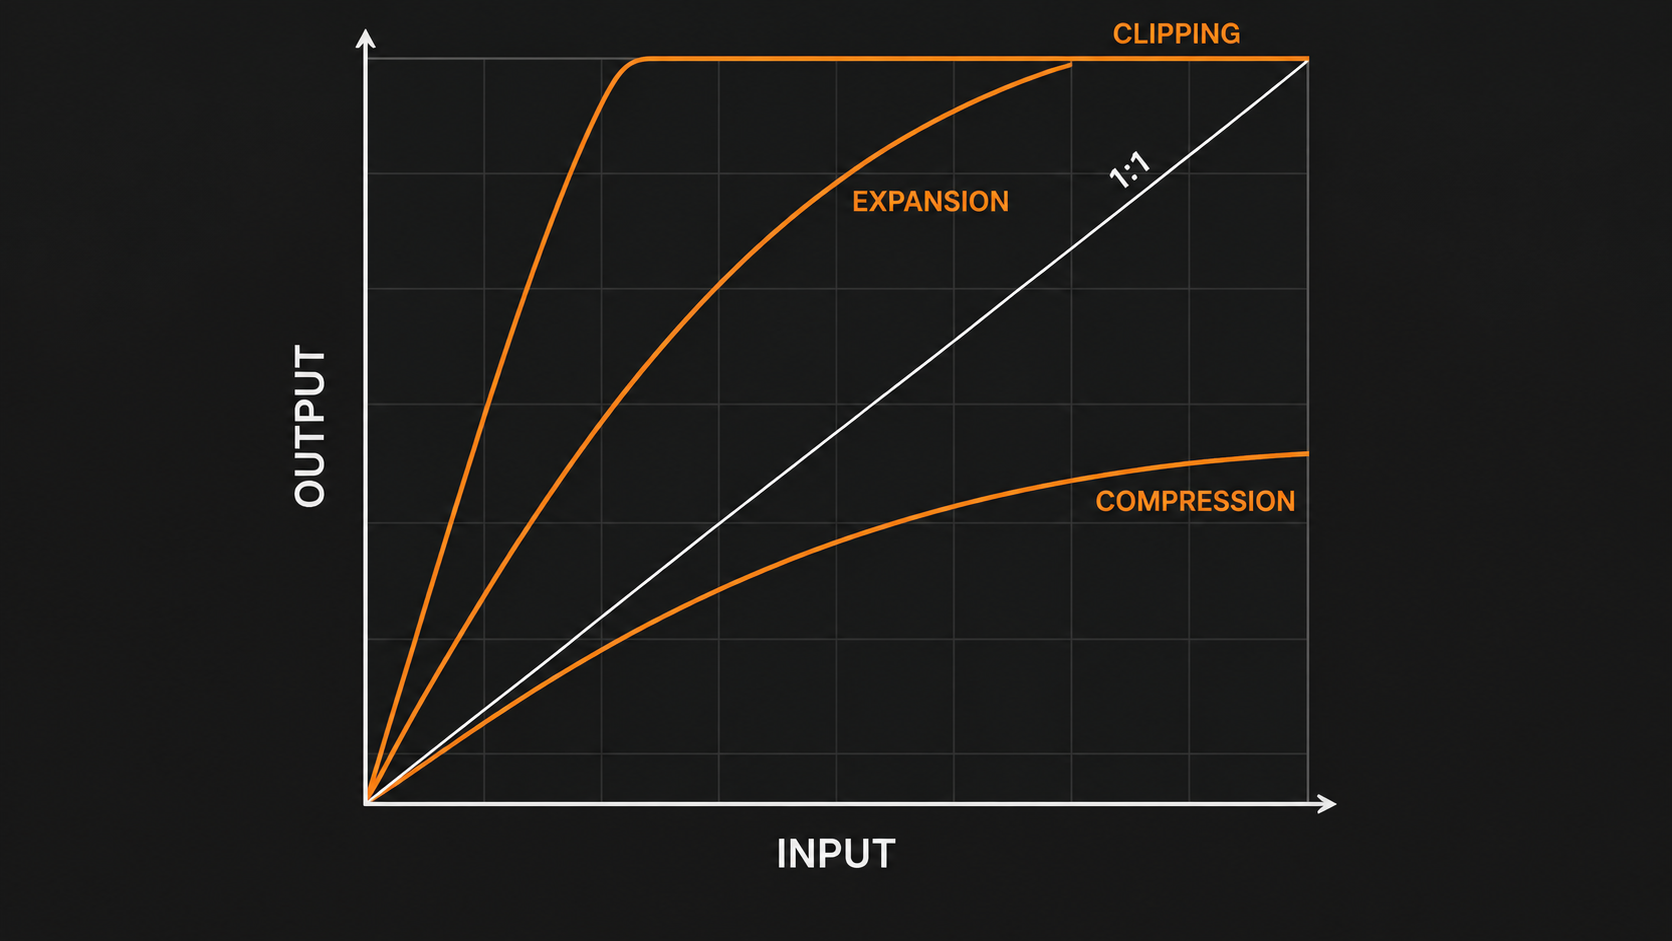
- A curve below the diagonal outputs less level than the input at that point.
- A curve above the diagonal outputs more level than the input at that point.
- A curve that gradually flattens near the top compresses high amplitudes into a smaller output range.
- A horizontal top prevents stronger input from producing a higher mapped output: clipping.
- A sharp change in slope creates stronger nonlinear behavior than a broad, smooth bend.
The graph is not a timeline. Left-to-right does not mean earlier-to-later. It means lower-to-higher input amplitude.
Build soft saturation with one broad bend
For a gentle shape, begin with the straight diagonal and add as few points as possible. Keep the low-level region close to 1:1, then bend the upper portion so stronger amplitudes rise more slowly toward the top. A smooth transition spreads the change across a range instead of creating one abrupt corner.
Use Pre to decide how often the signal reaches the bend. If only the strongest transients touch it, the effect behaves like peak rounding. If most of the waveform lives inside the bend, the change becomes constant and more obvious. This is a level decision, not a magic curve preset.
Do not compensate with Post until the character is right. Otherwise louder output can hide the point where the curve became too aggressive.
Create hard clipping by flattening the ceiling
Hard clipping is the clearest possible mapping: above a chosen input level, the output stops rising. On the graph, the upper section becomes horizontal. The lower that ceiling begins, or the more Pre you add, the more of the waveform is flattened.
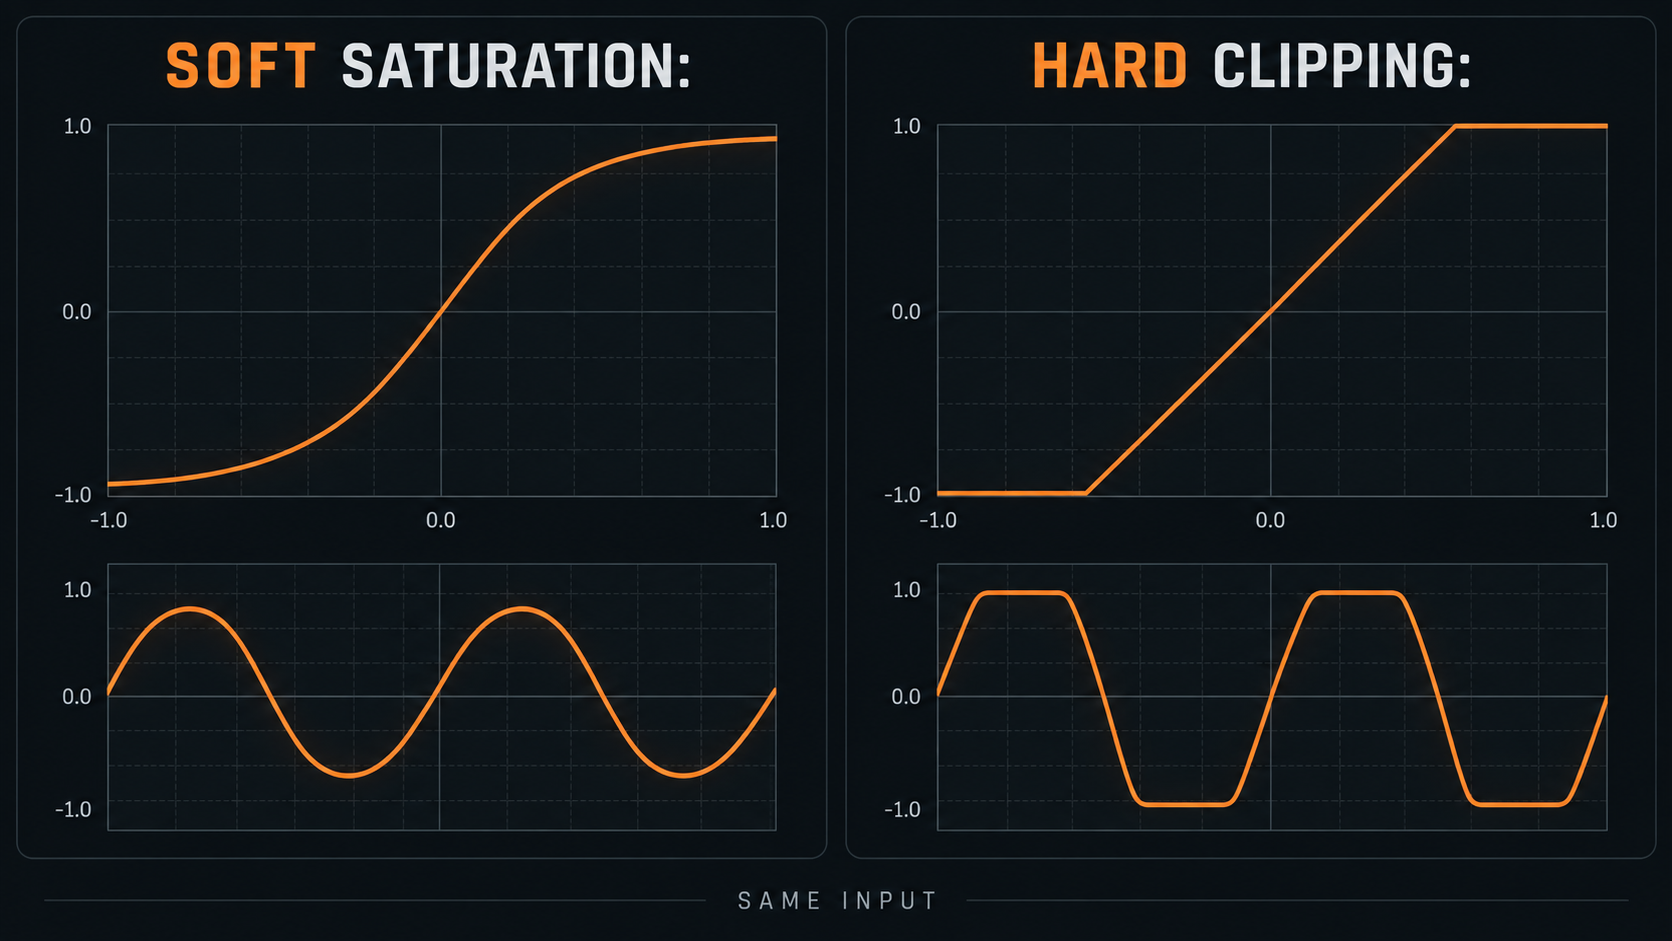
A sharp ceiling is useful when clipping is the intended sound. It is a poor repair for a routing or gain problem you have not diagnosed. The FL Studio clipping guide covers unwanted overload and red-meter diagnosis; WaveShaper belongs after you have decided that nonlinear peak shaping is the treatment.
If you need a quick fixed soft-clipping workflow, the dedicated Fruity Soft Clipper guide is simpler. WaveShaper earns the extra editing when you need control over the transition, symmetry or level map.
Set Pre, Mix and Post without chasing loudness
- Reset to a simple curve. A straight 1:1 line gives you a known starting point.
- Set Mix fully processed. This lets you hear the curve without dry-path ambiguity.
- Raise Pre slowly. Stop when the intended peaks or body enter the nonlinear section.
- Adjust the curve. Change one point or one tension handle, then listen for the exact part of the signal that moved.
- Lower Post. Bring active output close to bypass level before judging punch or clarity.
- Use Mix last. Blend dry signal only if parallel shaping improves the balance.
Automating Pre or Mix can turn a stable curve into a moving effect. Image-Line’s Smoothing control exists specifically to reduce noise from fast modulation of Pre, Mix and Post. The broader FL Studio automation guide covers clip creation and control management; keep the modulation slow enough to serve the arrangement rather than produce unintended zipper noise.
Use Bipolar mode for asymmetric shaping
In Unipolar mode, one map is applied equally to waveform values above and below the zero crossing. That is the safer default when you want symmetrical saturation or clipping. Bipolar mode lets you shape the positive and negative halves independently.
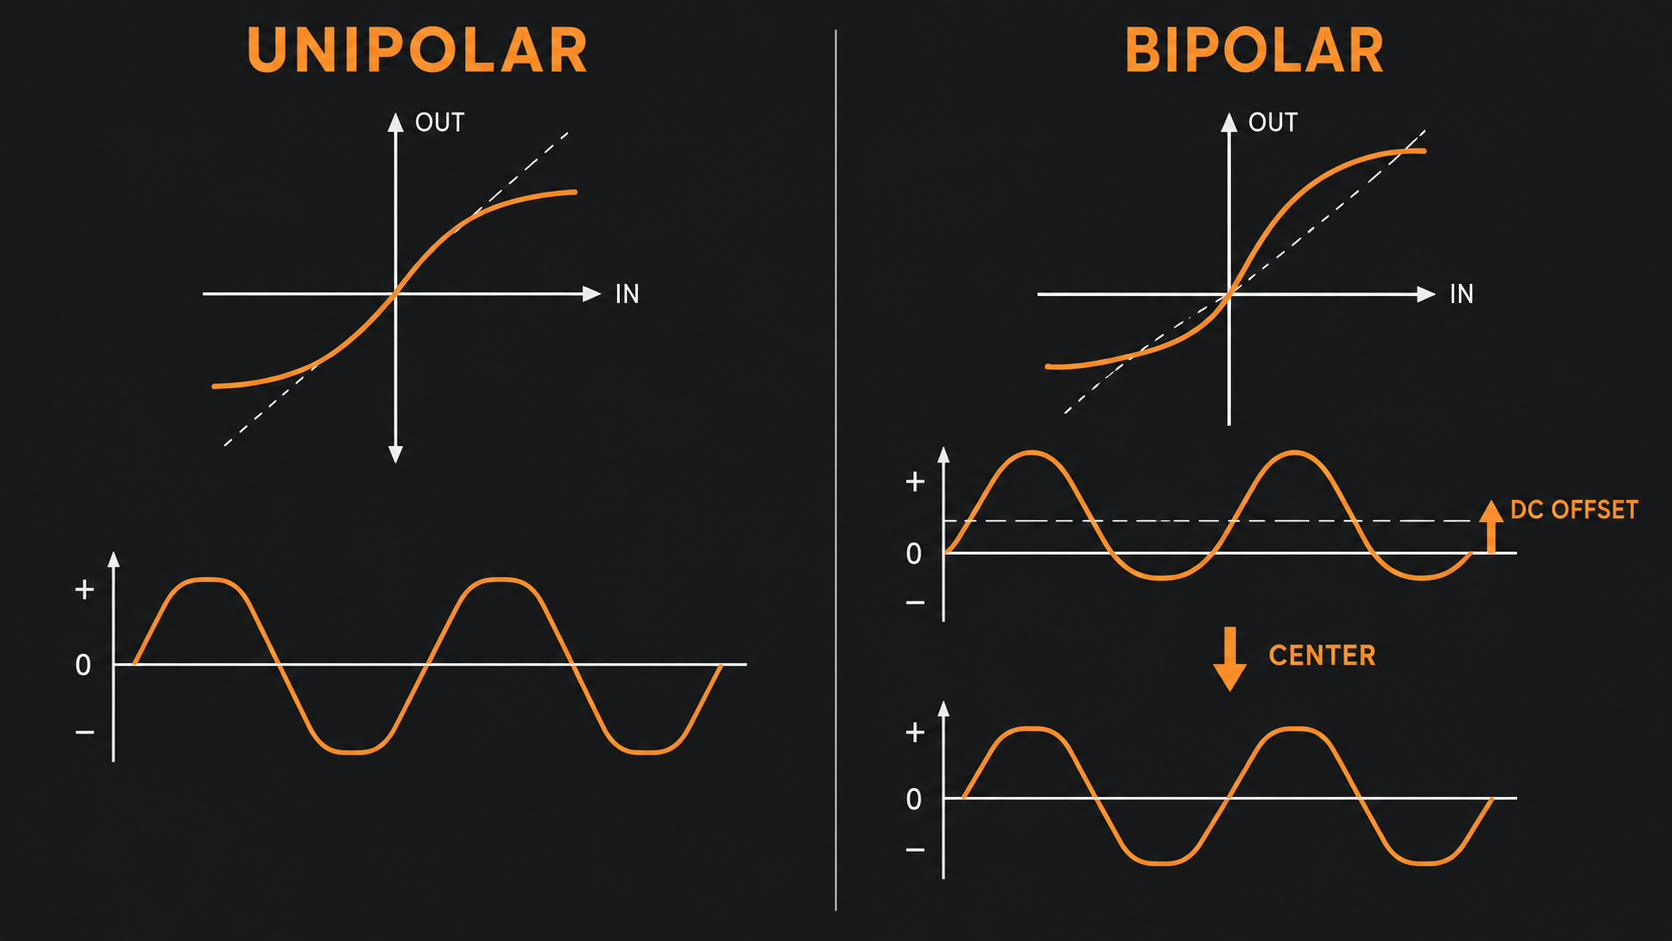
Asymmetry changes the waveform because the positive half no longer receives the same mapping as the negative half. That can create a useful tonal change, but it can also move the average output above or below the zero line. Image-Line labels that condition DC offset.
Enable Center when asymmetric shaping produces an unwanted offset. Do not treat it as a substitute for understanding the curve: compare the centered and uncentered result at matched level and keep the asymmetry only when it has an audible purpose.
Use Oversample, HQ and Smoothing for specific risks
Nonlinear processing can create frequencies that do not fit cleanly below the project’s Nyquist limit, which may fold back as aliasing. Fruity WaveShaper’s Oversample control raises the internal processing factor, applies the distortion, then downsamples. Image-Line says this helps avoid aliasing artifacts, if any.
Use the lowest setting that gives a clean enough result for the job. Higher factors increase processing cost, and oversampling does not turn an unsuitable curve into a suitable one. Compare at matched level because a small tonal change can be misread when the output also moves.
HQ solves a different edge case. With HQ off, WaveShaper can stop producing output below the documented −85 dB CPU-saving point. That very low-level cutoff can become audible if later effects add substantial gain. HQ keeps the processor active down to silence.
Smoothing is for fast modulation of Pre, Mix and Post. It does not soften corners in the graph; change the graph or its tension handles for that.
Edit points, segment types and tension deliberately
Right-click the line to add a control point. Drag a point to reposition it. Image-Line documents Shift for locking vertical movement and Ctrl for locking horizontal movement while dragging. Delete a point from its context menu, or use Alt plus left-click.
Each segment can use one of three types:
- Single Curve: covers linear, ease-in and ease-out shapes through tension.
- Double Curve: covers linear, ease-in-out and ease-out-in shapes.
- Hold: creates abrupt hold or pulse behavior.
The selected segment is the one before the control point whose menu you opened. Drag its tension handle to reshape the spline; right-click the handle to reset it to a straight line, and hold Ctrl for finer adjustment.
Freeze locks a finished map and hides the handles. Snap places moved points on the nearest graph step. Step lets you draw a stepped freehand curve; it does not make the graph follow song time.
Apply the curve to a named part of the sound
Drum peaks
Start with symmetrical shaping. Let the body stay near the 1:1 line and bend only the upper range. Increase Pre until the strongest hits reach that bend, then match Post. If the transient loses its identity, reduce drive or soften the bend before adding dry signal.
Bass and 808 material
A broad curve can add upper harmonics as level rises, but low-frequency material exposes DC and asymmetry problems quickly. Begin in Unipolar mode, check Center if you later use Bipolar shaping, and compare the low end at matched output. A curve that sounds exciting in isolation can crowd the mix when every sustained note remains in the nonlinear region.
Bus or master placement
Keep the curve modest and ask whether it is controlling isolated peaks or reshaping most of the mix. Constant contact is a different choice from occasional peak rounding. If you need conventional limiting behavior with release control, use a limiter. If you need separate frequency bands, use a multiband processor.
Make bypass answer the right question
Set Post so the processed path is close enough to bypass level that loudness does not decide the comparison. Then listen for three changes: transient shape, sustained density and tonal balance. If the active version only wins when it is louder, the curve has not yet proved its value.
Mix can complicate the check because dry and processed paths may reinforce or cancel differently. Judge the fully processed curve first. Add parallel blend after you understand the shaped path on its own.
Choose WaveShaper only when you need its map
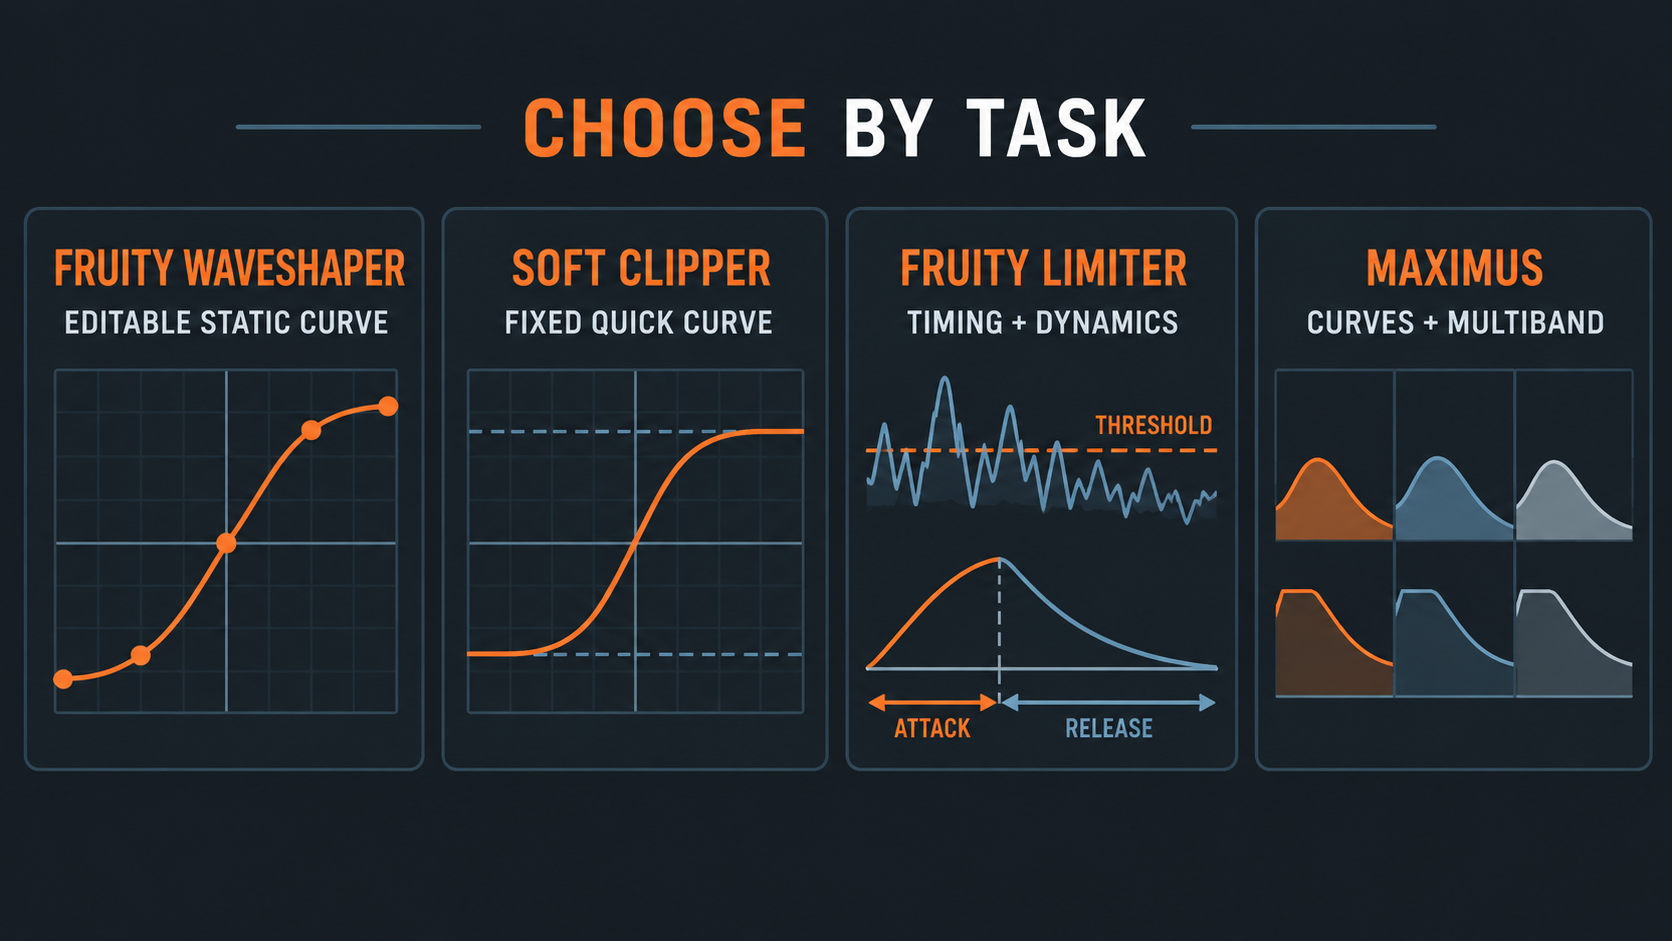
- Fruity WaveShaper: choose it for a custom static input/output curve, asymmetric shaping or precise transition design.
- Fruity Soft Clipper: choose it when a simple THRES and POST workflow is enough.
- Fruity Limiter: choose it for conventional limiting or compression with time behavior. The Fruity Limiter compression guide explains threshold, ratio, attack and release.
- Maximus: choose it when the job needs editable level envelopes, timing and possibly separate bands. The Maximus guide covers that larger system.
WaveShaper is also the wrong tool for detector-driven ducking. If one track must reduce another according to a control signal, follow the FL Studio sidechain guide instead of trying to draw the behavior into a static curve.
Fruity WaveShaper troubleshooting by symptom
Nothing changes
Confirm that Mix includes the processed path and that the input reaches a part of the graph that departs from the 1:1 line. Raise Pre carefully or move the bend into the active input range. Do not change both at once.
The result is much louder
Reduce Post and compare again. A curve above the diagonal can add level, while Pre and Post can add more. Separate tone from gain before deciding the shape is better.
The sound is brittle or metallic
Reduce the sharpness of the curve and the amount of Pre first. Then compare Oversample settings. Oversampling may reduce aliasing artifacts, but it cannot rescue an unnecessarily severe map.
The low end leans or meters behave strangely
Check whether Bipolar shaping made the positive and negative halves unequal. Enable Center and compare. If the offset disappears but the desired tone remains, keep the correction active.
Automation crackles
Enable or increase Smoothing for fast Pre, Mix or Post modulation and simplify the automation shape. Graph tension is unrelated to parameter zipper noise.
The transient disappears
Reduce Pre, raise the clipping region or replace the flat ceiling with a gentler bend. If you need recovery between hits, switch to a dynamics processor with timing controls.
A practical Fruity WaveShaper checklist
- Start from the straight 1:1 line.
- Name the level range you want to change.
- Use Pre to move the signal into that range.
- Build the curve with as few points as possible.
- Use Unipolar for symmetrical work; use Bipolar deliberately.
- Check Center after asymmetric shaping.
- Use Oversample for aliasing risk, HQ for very low-level continuity, and Smoothing for fast control modulation.
- Match Post before comparing bypass.
- Add Mix only after the processed path makes sense on its own.
- Choose Soft Clipper, Fruity Limiter or Maximus when their simpler or time-dependent workflow fits the task better.
Fruity WaveShaper becomes predictable when you stop treating the graph as a distortion preset and start reading it as a level map. One input level enters, one output level leaves. Control what reaches the bend, keep the curve simple, and make every comparison at a fair output level.