FL Studio
Maximus becomes much easier once you stop treating it as four compressors that must all be active. Start with one: the MASTER band. Shape its input-to-output curve, use PRE to move the signal through the useful part of that curve, set the timing, and use POST to compare the result at a fair output level. Add LOW, MID and HIGH only when one frequency range is controlling the dynamics of everything else.
That approach turns Maximus from a wall of controls into a sequence of decisions. Image-Line describes it as a multiband maximizer, with independent processing for three frequency bands and a final wide-band MASTER stage. It is included in FL Studio Producer Edition and above, and the official Maximus overview particularly recommends it as the last effect on the Master Mixer Track when creating a final master. It is not limited to mastering, but complexity should have a reason.
This guide explains the complete signal path, the editable compression envelope, timing, crossovers, saturation and a repeatable setup that does not depend on copying a preset.
What Maximus actually does
Maximus combines level control, compression, limiting, expansion, gating and saturation in one processor. The central idea is not a fixed compressor ratio. You draw how each input level should map to an output level, then decide how quickly the gain envelope should react.
There are four independent compression envelopes:
- LOW: processes the band below the low crossover.
- MID: processes the range between the two crossovers.
- HIGH: processes the band above the high crossover.
- MASTER: processes the three recombined bands as one full-range signal.
Each LOW/MID/HIGH band can also apply saturation and level changes before the bands reach MASTER. This means a preset can change the signal in several places at once. When you need to understand a result, reduce the number of active stages and rebuild the chain deliberately.
Read the interface in five zones
The interface is dense, but its layout follows the signal path. Use these zones:
- Analysis display and envelope: the large panel where you read level activity and edit the selected band’s input/output mapping.
- Band tabs: LOW, MID, HIGH and MASTER select which compressor and band controls you are editing.
- PRE, POST and saturation: level into the selected processing curve, level after it, and a separate nonlinear stage.
- Envelope timing: attack, release, sustain and detection controls determine how the mapped gain change behaves over time.
- Global and crossover controls: shared LMH mix/delay, crossover frequencies and input high-pass filtering define how the multiband path operates.
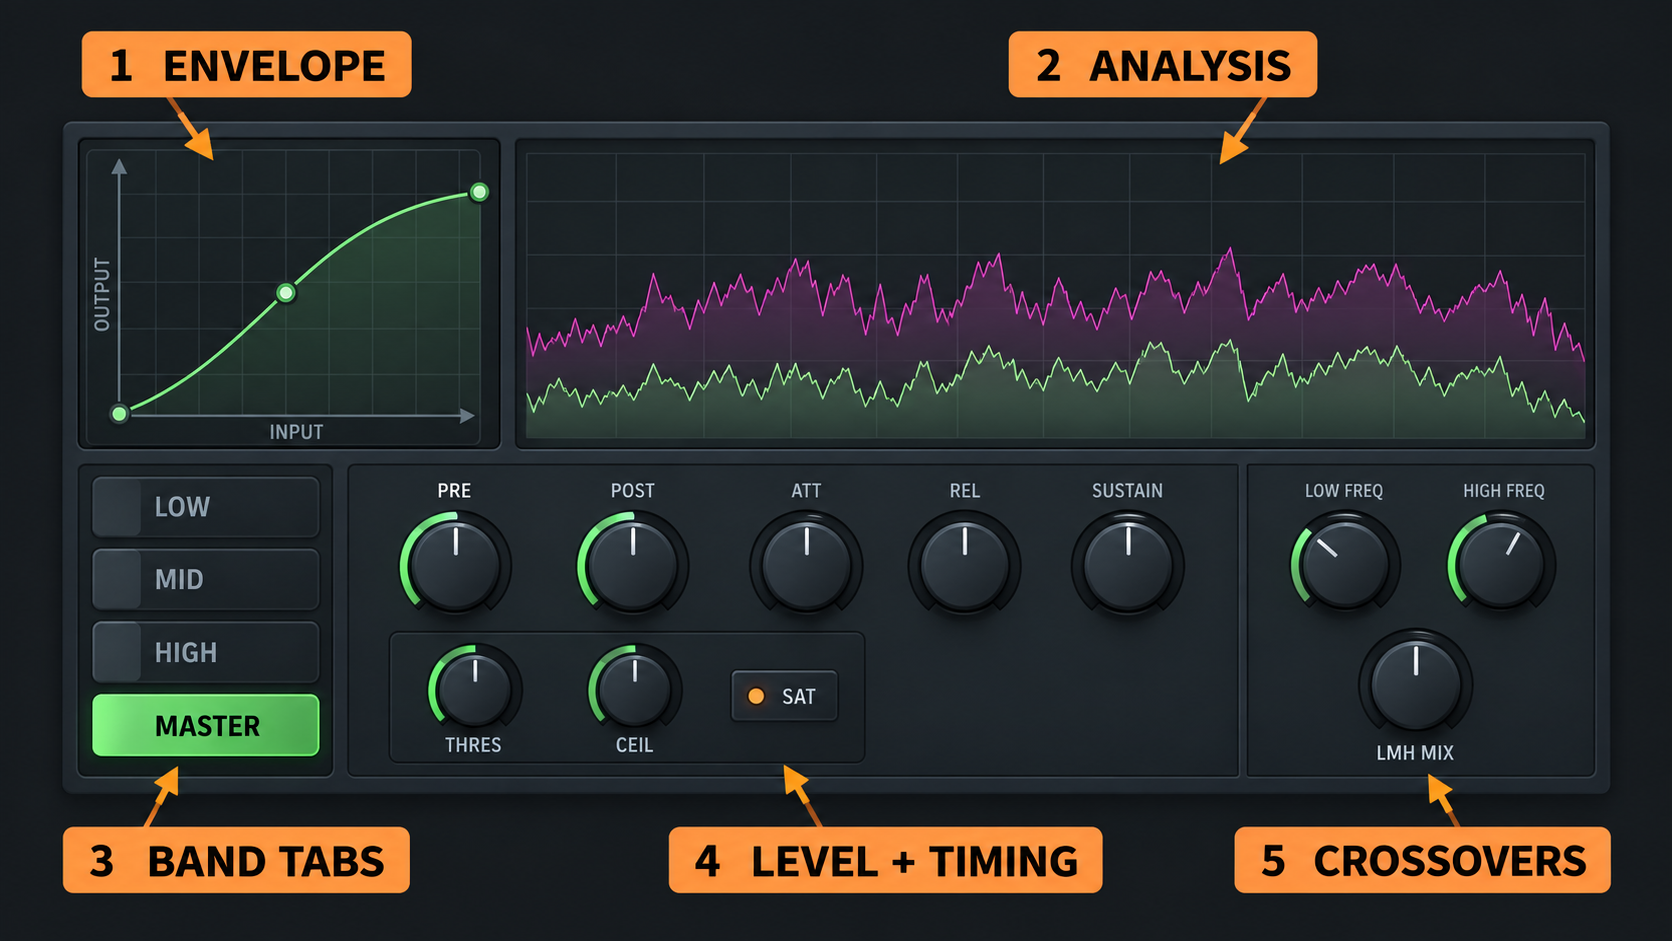
The selected tab matters. Turning PRE while MASTER is selected is not the same as changing PRE on LOW. Before changing any control, name the band you are editing and the stage that receives it.
Follow the Maximus signal path
The documented path starts with a variable high-pass filter. The signal then splits into three user-defined frequency bands. LOW, MID and HIGH can be processed independently, after which they are recombined and sent through the MASTER compressor.
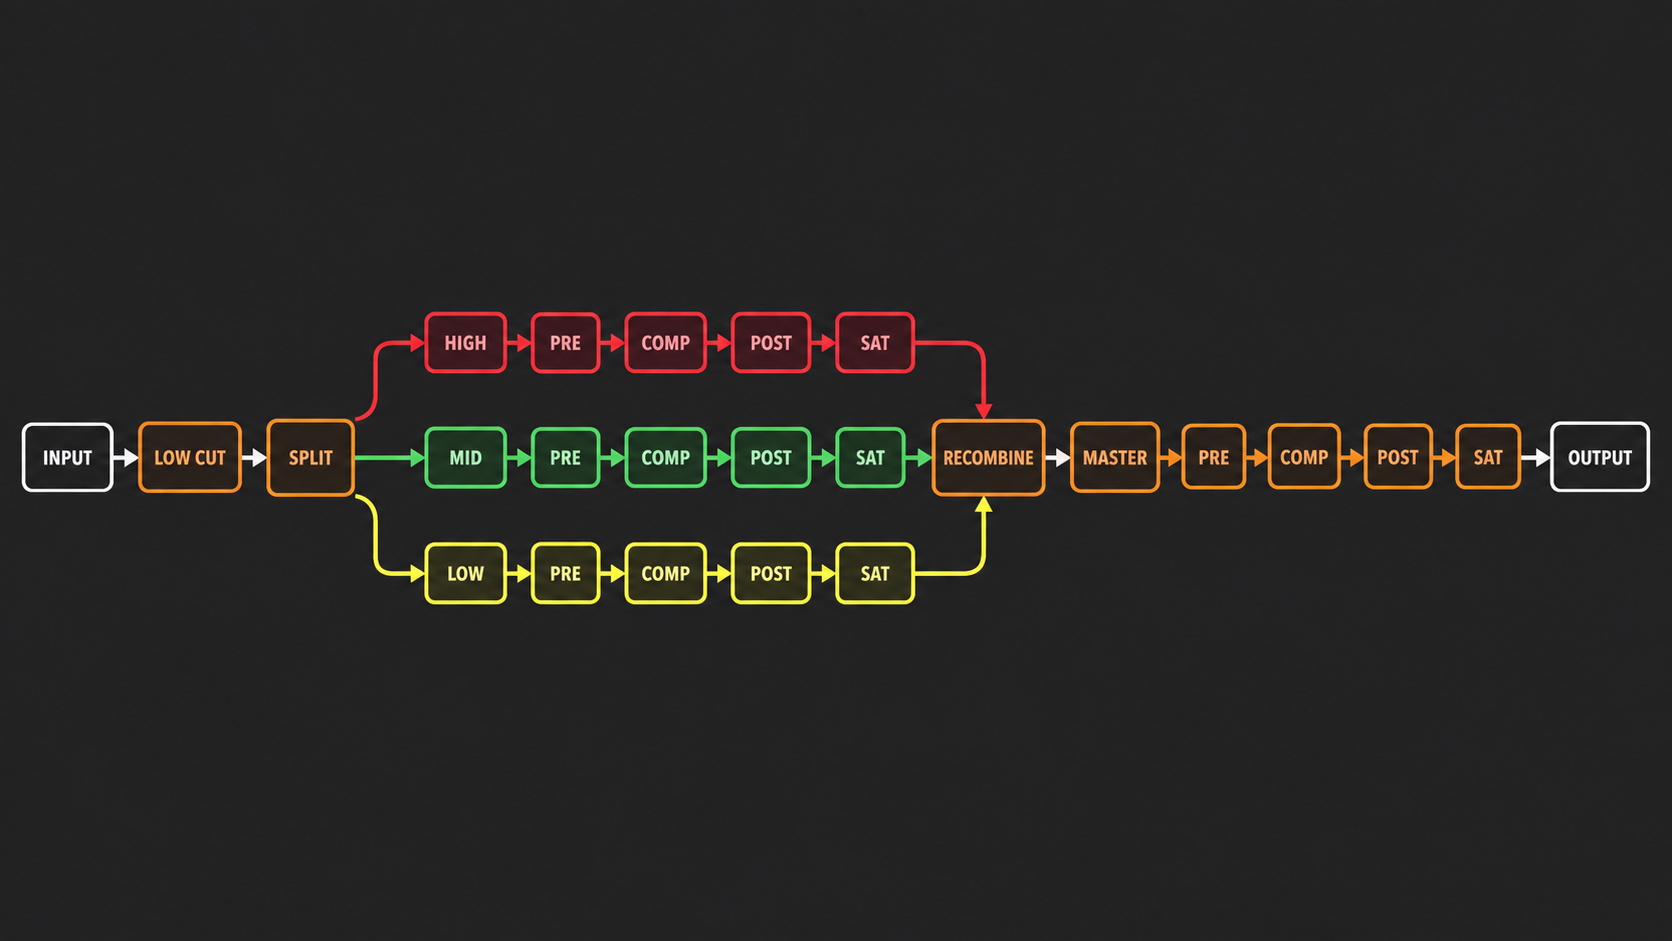
This order explains several common surprises. MASTER can still reduce or limit the sum even when a sub-band looks controlled. A boosted LOW band can make the recombined signal hit MASTER harder. Turning off a compression envelope does not necessarily remove saturation or gain changes from that band.
The band switches also require care. COMP OFF disables the selected compression envelope while leaving the rest of that band active. The band OFF state removes that band from the path. For a single-band setup, use COMP OFF on LOW, MID and HIGH so their audio still reaches MASTER without their compression envelopes operating.
The compression envelope replaces threshold and ratio knobs
Maximus does not use the conventional compression threshold and ratio controls found in many compressors. Its compression threshold is the point where the editable curve leaves the 1:1 diagonal. The slope after that point defines how additional input becomes output.
The graph maps input on the horizontal axis and output on the vertical axis:
- A 1:1 diagonal passes the level unchanged.
- A shallower slope above a point creates downward compression.
- A horizontal section creates limiting because more input no longer produces more output.
- A steeper section expands differences instead of reducing them.
- A low-level section that stays at the bottom can act as a gate.
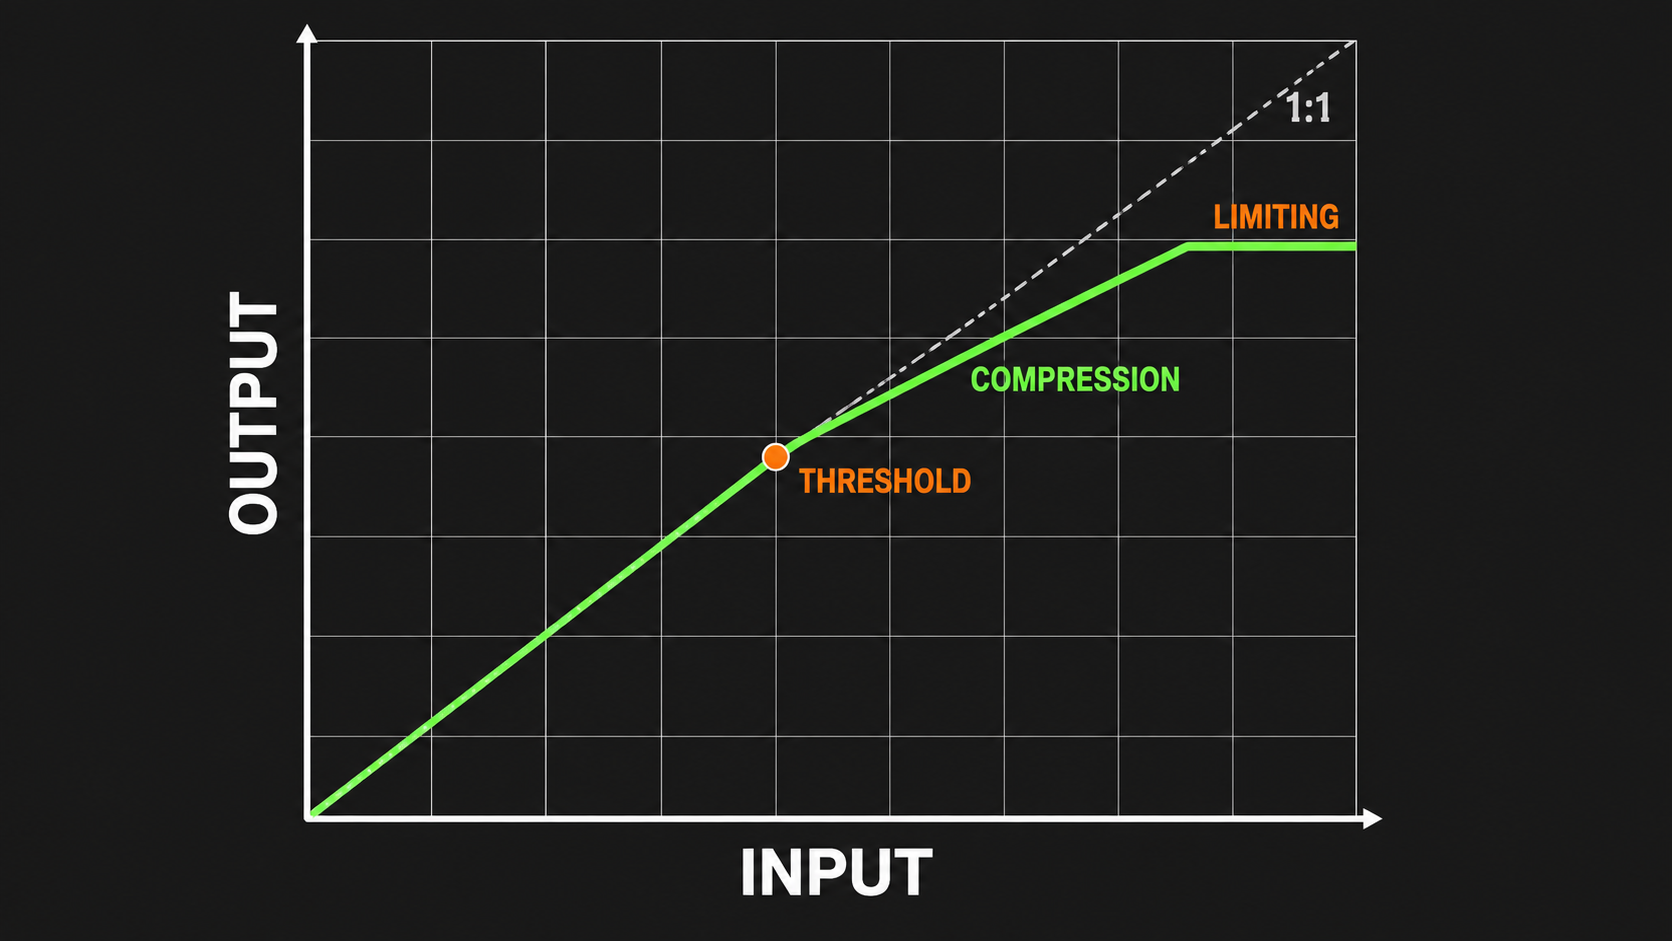
The Maximus controls documentation describes four independent envelopes and their interaction with PRE, POST, attack and release. Draw the simplest curve that solves the problem. Extra points create extra level-dependent behavior that becomes harder to diagnose.
Start Maximus as a single-band processor
A single-band start is the cleanest way to learn the plugin and often the right way to use it on one instrument, a drum bus or a controlled master.
- Load a neutral starting state rather than a dramatic mastering preset.
- Select LOW, MID and HIGH in turn and set their compression envelopes to COMP OFF. Do not mute the bands.
- Select MASTER.
- Begin with a 1:1 diagonal envelope.
- Add one point where compression should begin and make the slope above it shallower.
- Use PRE so the loud parts actually cross that point.
- Set attack and release according to the transient and sustain you need to preserve.
- Use POST to match the processed output to the bypassed signal before judging the tone and dynamics.
PRE and the curve solve the same alignment problem from different directions. PRE moves the audio across the graph; editing the curve moves the active region across the audio. If nothing happens, the signal may never reach the section that changes output. If everything sounds flattened, too much of the signal may live inside that section.
Upstream balance still matters. The FL Studio gain-staging guide explains where to correct levels before a dynamics processor. Do not use Maximus PRE as a substitute for repairing a Mixer chain that is already overloaded.
Set attack, release and look-ahead without mixing them up
Attack controls how quickly the selected envelope responds when the signal arrives. Release controls how it returns after the trigger level falls. Short timing can follow rapid waveform changes and become audible as distortion; longer timing follows the broader volume envelope and usually produces smoother gain movement.
The practical questions are straightforward:
- If the transient disappears, the response may be too fast or the curve too severe.
- If the next hit stays pulled down, release may be too long.
- If low-frequency hits make the whole mix breathe, use less gain reduction, revise release, or consider a justified multiband split.
- If the output chatters or sounds rough, lengthen the timing before adding more curve points.
Look-ahead is related to attack but not identical across the plugin. On MASTER, ATT also contributes to the look-ahead delay. The ATT controls for LOW, MID and HIGH do not set their look-ahead; the shared LMH DEL control does that so the three bands stay synchronized. Image-Line documents total Maximus look-ahead/latency as the MASTER ATT time plus LMH delay.
That delay is useful for controlling fast peaks, but it is not free. On a non-master Mixer track, long look-ahead can require correct plugin delay compensation. Do not add delay simply because the option exists.
Move to multiband only for a frequency-specific problem
Full-range compression reacts to whichever part of the signal crosses the curve. A heavy kick can therefore trigger gain reduction that also lowers the vocal brightness, snare crack or high-frequency detail. Multiband compression separates those regions so the low event does not automatically control every frequency.
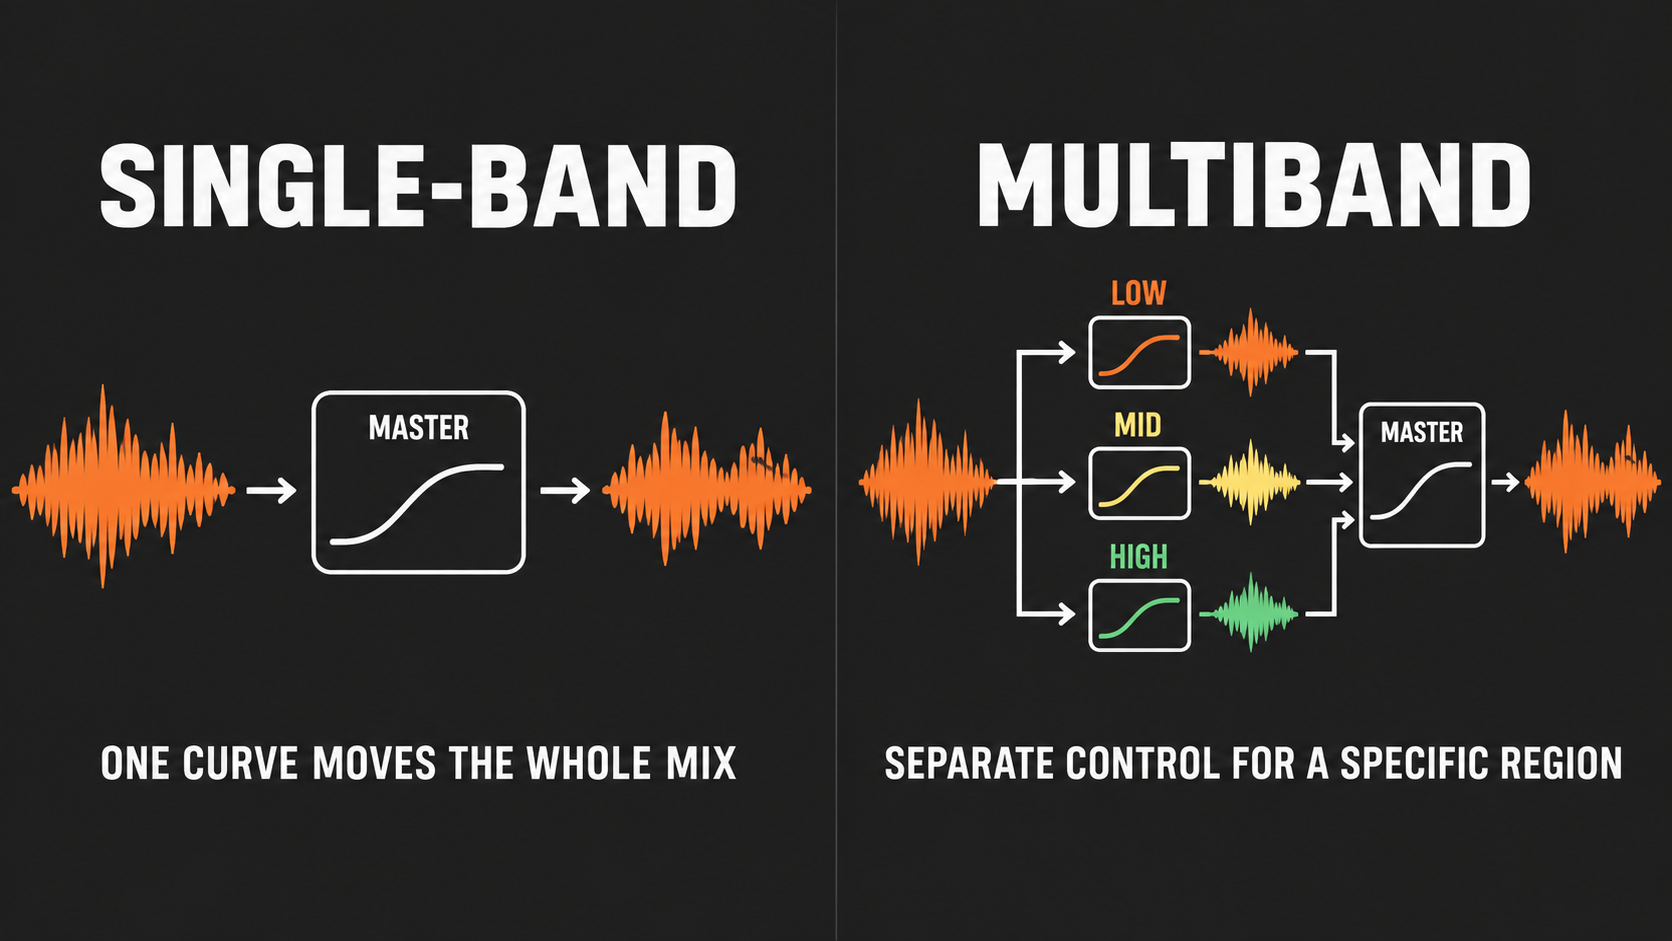
That benefit comes with more decisions and more ways to damage the balance. Add a split only when you can finish this sentence: “When this frequency region becomes excessive, I want to change its dynamics without moving the other regions.” Good examples include controlling intermittent low-end weight or reducing a narrow sibilant band. The dedicated FL Studio de-essing guide owns the complete sibilance workflow; the broader FL Studio vocal-mixing guide shows where that decision sits in the full chain. Maximus is one split-band option within it.
If the problem exists all the time rather than only when the level changes, use EQ first. A static tonal imbalance does not automatically need a compressor.
Place crossovers around behavior, not round numbers
The LOW FREQ and HIGH FREQ controls define the boundaries feeding the three band envelopes. Start by finding the region whose dynamics differ from the rest of the material. Place boundaries so that region is contained without splitting one important sound across bands unnecessarily.
Then check the result in context:
- Soloing a band can help identify its contents, but the decision belongs in the full mix.
- If a crossover makes a kick lose its body or separates vocal consonants from the voice unnaturally, move the boundary.
- If neighboring bands receive nearly identical curves and timing, the split may not be earning its complexity.
- If low-end transients feel smeared, compare the available crossover modes rather than assuming one is always correct.
Image-Line notes that the normal IIR mode is often sufficient. Linear-phase filters preserve phase relationships across the split but use more CPU and add delay relative to IIR. Choose from the actual problem: phase behavior, transient feel, latency and processing cost.
Do not confuse saturation THRES with compression threshold
The saturation section has its own THRES and CEIL controls. These do not replace the threshold point in the compression envelope.
- Compression threshold: the point where the input/output envelope leaves the 1:1 line.
- Saturation THRES: the level at which the selected band enters the saturation behavior.
- Saturation CEIL: the soft saturation ceiling, representing the maximum amplitude of the modeled nonlinear stage.
Keep saturation neutral while building the compression behavior. Once the envelope, PRE/POST and timing are understood, add saturation as a separate choice. This order makes it possible to tell whether a denser sound came from dynamic gain reduction, added nonlinear color, louder output or all three.
Use Maximus on the master with a controlled sequence
On the master track, Maximus should solve a defined finishing problem rather than supply instant loudness. A controlled sequence looks like this:
- Correct the mix balance before Maximus. The wider FL Studio mastering guide covers the complete chain and monitoring decisions.
- Start on MASTER in single-band mode.
- Use a gentle curve or limiting section that only the intended peaks reach.
- Set timing so transient control does not turn into constant gain movement.
- Match POST output to a comparable bypass level.
- Add LMH bands only if the full-range detector creates a clear frequency-dependent problem.
- Recheck the master at normal listening level and at a lower level where loudness bias is less persuasive.
The official Maximus tutorials warn that extreme limiting can remove dynamic information and introduce saturation-like effects. Occasional peak control and constant curve contact are different results. If most of the song is living in the limiting section, revisit PRE, the curve and the mix feeding it.
Make a fair bypass check and choose the simpler tool
A louder output often feels clearer and more exciting even when the dynamics are worse. Use POST to bring the processed path near the bypassed level, then compare three things: transient shape, tonal balance and movement between hits or phrases. The goal is not a mathematically perfect match; it is a comparison that does not reward Maximus merely for being louder.
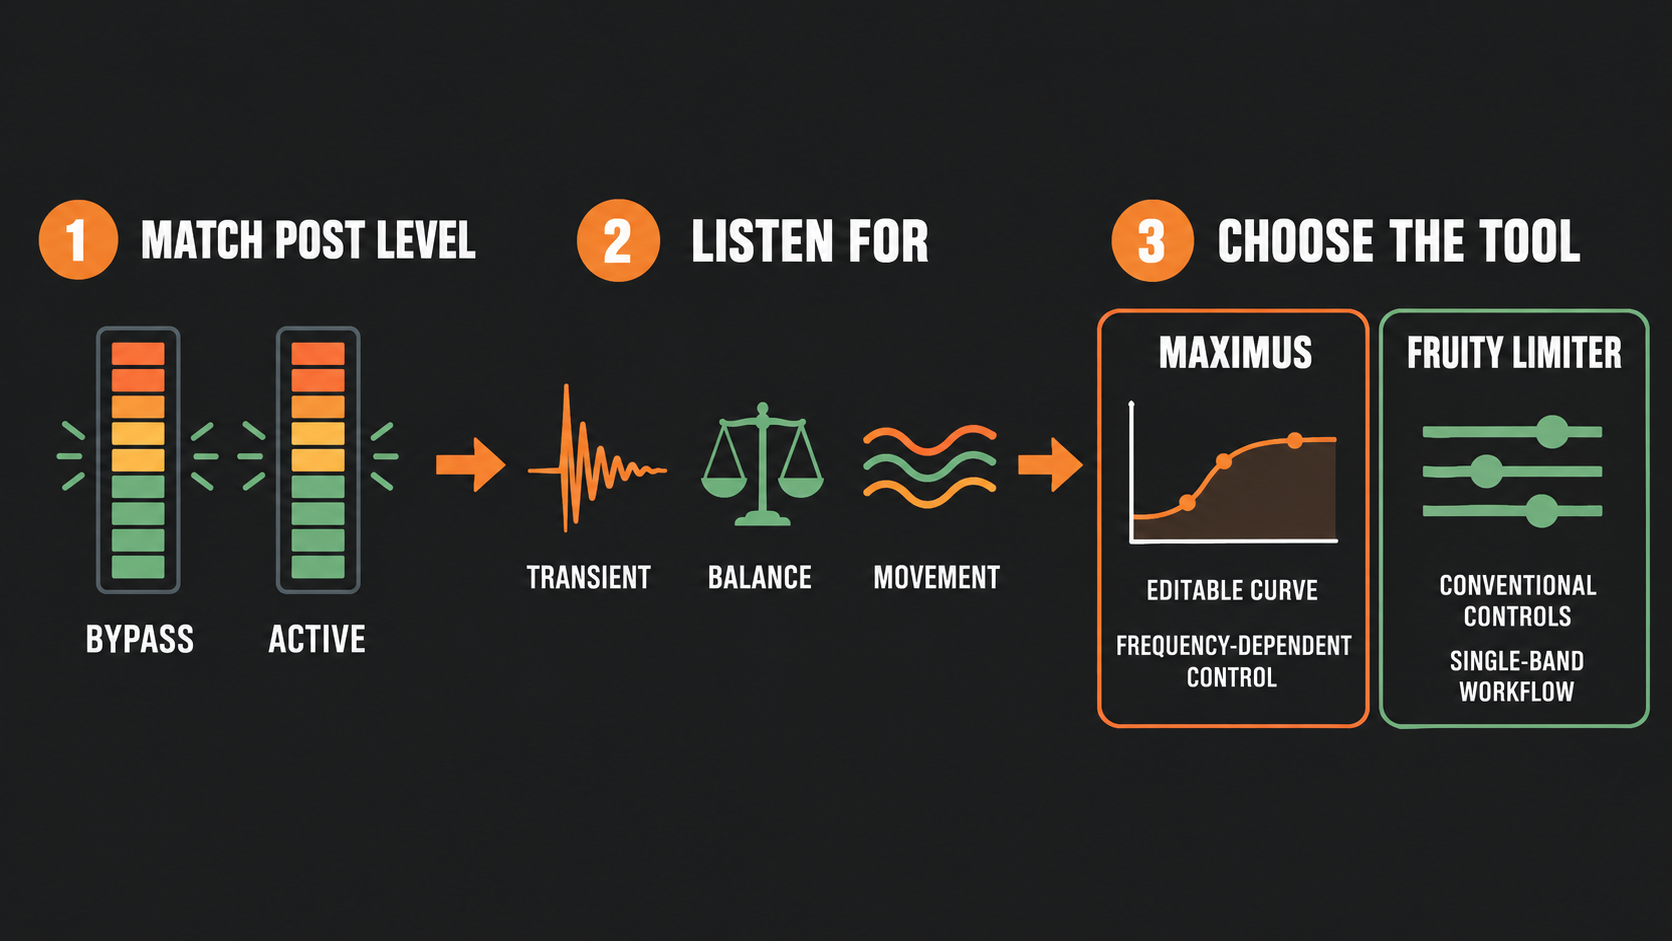
Choose Maximus when you need an editable level map, independent band behavior, specialized release shapes, parallel LMH blending or one processor that can move from compression into limiting. Choose Fruity Limiter when you want a conventional threshold, ratio, knee, attack and release workflow on one signal. Image-Line itself recommends Fruity Limiter or Fruity Compressor for ordinary kick or bass compression. The Fruity Limiter compression guide covers that simpler control model in detail.
The broader FL Studio stock plugins guide can help when the real decision is whether dynamics processing, EQ, clipping or another native tool fits the task.
Maximus troubleshooting by symptom
Nothing changes
Confirm the intended band is selected, its compression envelope is active, and the signal reaches the part of the curve that departs from 1:1. Increase PRE carefully or move the curve into the signal’s active range. Check that you did not edit LOW while listening for a MASTER change.
The mix pumps with the kick
Reduce the amount of full-range gain reduction and retune release first. If the low-frequency event truly needs independent control, add a LOW split and keep the MID/HIGH behavior simpler. Do not reach for three aggressive band curves at once.
The output is brighter, duller or tilted
Check PRE and POST on every active band, saturation, crossover placement and whether one band is spending more time in compression. Equal-looking curves do not guarantee equal behavior because each band receives different material.
Transients still pass the limiter
On MASTER, inspect ATT because it contributes to look-ahead. For LOW/MID/HIGH limiting, inspect LMH DEL and the longest band attack. Also confirm the limiting section is actually reached. A horizontal curve above the signal’s peak range cannot control it.
The result sounds distorted
Separate possible causes: very short attack/release, a severe curve, high PRE, active saturation, or repeated limiting in a sub-band and again on MASTER. Neutralize saturation and return to one active envelope, then restore stages one at a time.
Bypass sounds weak even though the mix is better
This is usually a comparison problem. Lower POST until active and bypassed paths are close enough in level to judge punch, balance and motion. Then decide whether the processing earns its place.
A practical Maximus checklist
- Name the exact problem before choosing bands.
- Start with MASTER and keep LOW/MID/HIGH compression off.
- Use one simple departure from the 1:1 envelope.
- Move the signal with PRE or move the curve; do not change both blindly.
- Set attack and release from transient and sustain behavior.
- Remember that MASTER ATT and LMH DEL handle different look-ahead paths.
- Add crossovers only for frequency-dependent dynamics.
- Treat saturation THRES/CEIL as a separate stage.
- Use POST for a fair active/bypass comparison.
- If a standard compressor explains the job more clearly, use Fruity Limiter.
Maximus is powerful because it lets you design the relationship between input level, output level, frequency and time. The same freedom makes it easy to create several interacting problems. Build from one band, one curve and one audible purpose. Add complexity only when the mix tells you exactly what the next stage must do.