FL Studio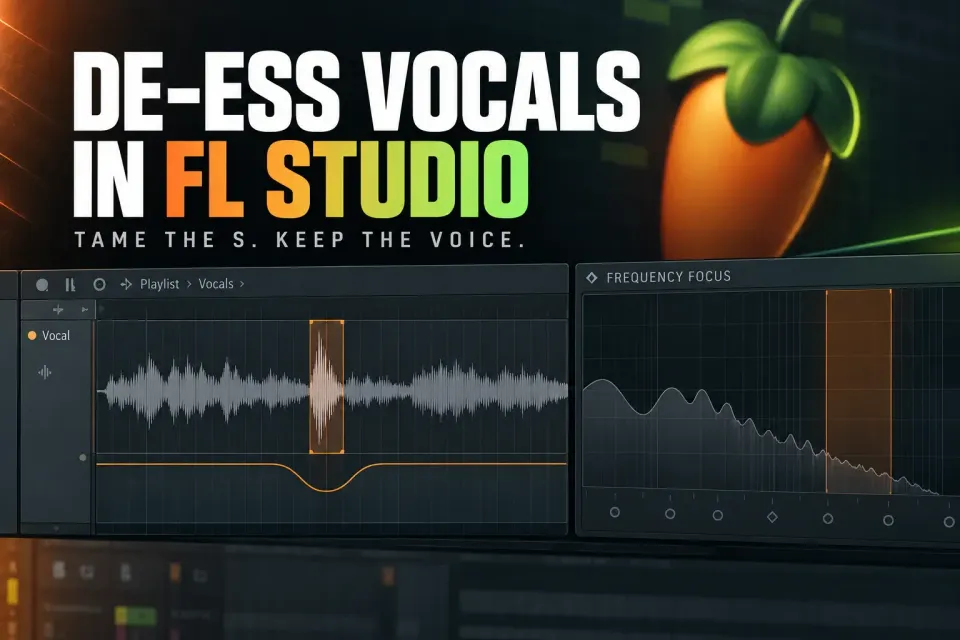
To de-ess vocals in FL Studio, tame the sharp consonants without draining the life from the rest of the phrase. Maximus → De-esser Split Band is a handy stock starting point, but its active sibilance compressor is MID, not HIGH. Tune that band to the recording and compare at matched level. For a few isolated consonants, a small local Clip gain edit gives you direct control without adding another processor.
Choose the right fix before opening a plug-in
Solo the vocal for a moment to find the problem, then go back to the full mix before deciding how much control it needs. A steady spray of sharp S, SH, CH or T sounds calls for dynamic de-essing or multiband compression. A single harsh consonant just needs a small level edit. A recording that sounds thin and brittle all the way through may need broader tonal work, and that’s a different problem from sibilance.
A de-esser can’t rebuild a clean take from clipping or strip a room out of a recording. If you can get another take, fix the setup and record a clean replacement. If you can’t, keep the original and treat those repair problems separately from the sharp consonants you can deal with here.
- Repeated sibilance: use Maximus or a multiband compressor.
- One or two harsh syllables: lower those clips or automate gain.
- Harsh vocal on every word: go back to the microphone position, room reflections and the overall EQ balance.
- Harshness only after mastering: check what the limiter or a high-frequency boost is exaggerating before you add a second de-esser.
Put the de-esser on the vocal insert
Send the vocal to its own Mixer insert and put the de-esser before effects that spread or repeat the sibilance, such as bright reverb and delay. If heavy compression makes the S sounds jump out, put the de-esser after that compressor. If the raw recording is already painfully sharp, tame it first and only add a lighter second stage if the later chain brings the problem back.
The practical test is simple: bypass one plug-in at a time while the whole arrangement plays. The FL Studio Mixer guide covers insert routing, and the full vocal-mixing workflow shows where de-essing sits among cleanup, compression, EQ and ambience.
Start with Maximus De-esser Split Band
- Save a project copy, send the isolated vocal to its own insert and load Maximus into an effect slot.
- Choose De-esser Split Band from the preset menu. Loop several words with troublesome consonants, not only one loud S.
- Select MID and switch on SOLO for now. In this preset, LOW is COMP OFF, MID is ON, and HIGH and MASTER are OFF. The MID region reaches up into the highs because HIGH is switched off.
- Move the LOW frequency boundary to find the lower edge of the harsh region. It’s a different control from the separate LOW CUT input filter.
- Use MID PRE to push the consonants into the compression curve, and balance it with POST. Adjust the curve if you need to, and leave the saturation THRES knob alone, because it isn’t a compression threshold.
- Switch SOLO off, compare the whole vocal at matched loudness, and check the quiet words as well as the loud ones.
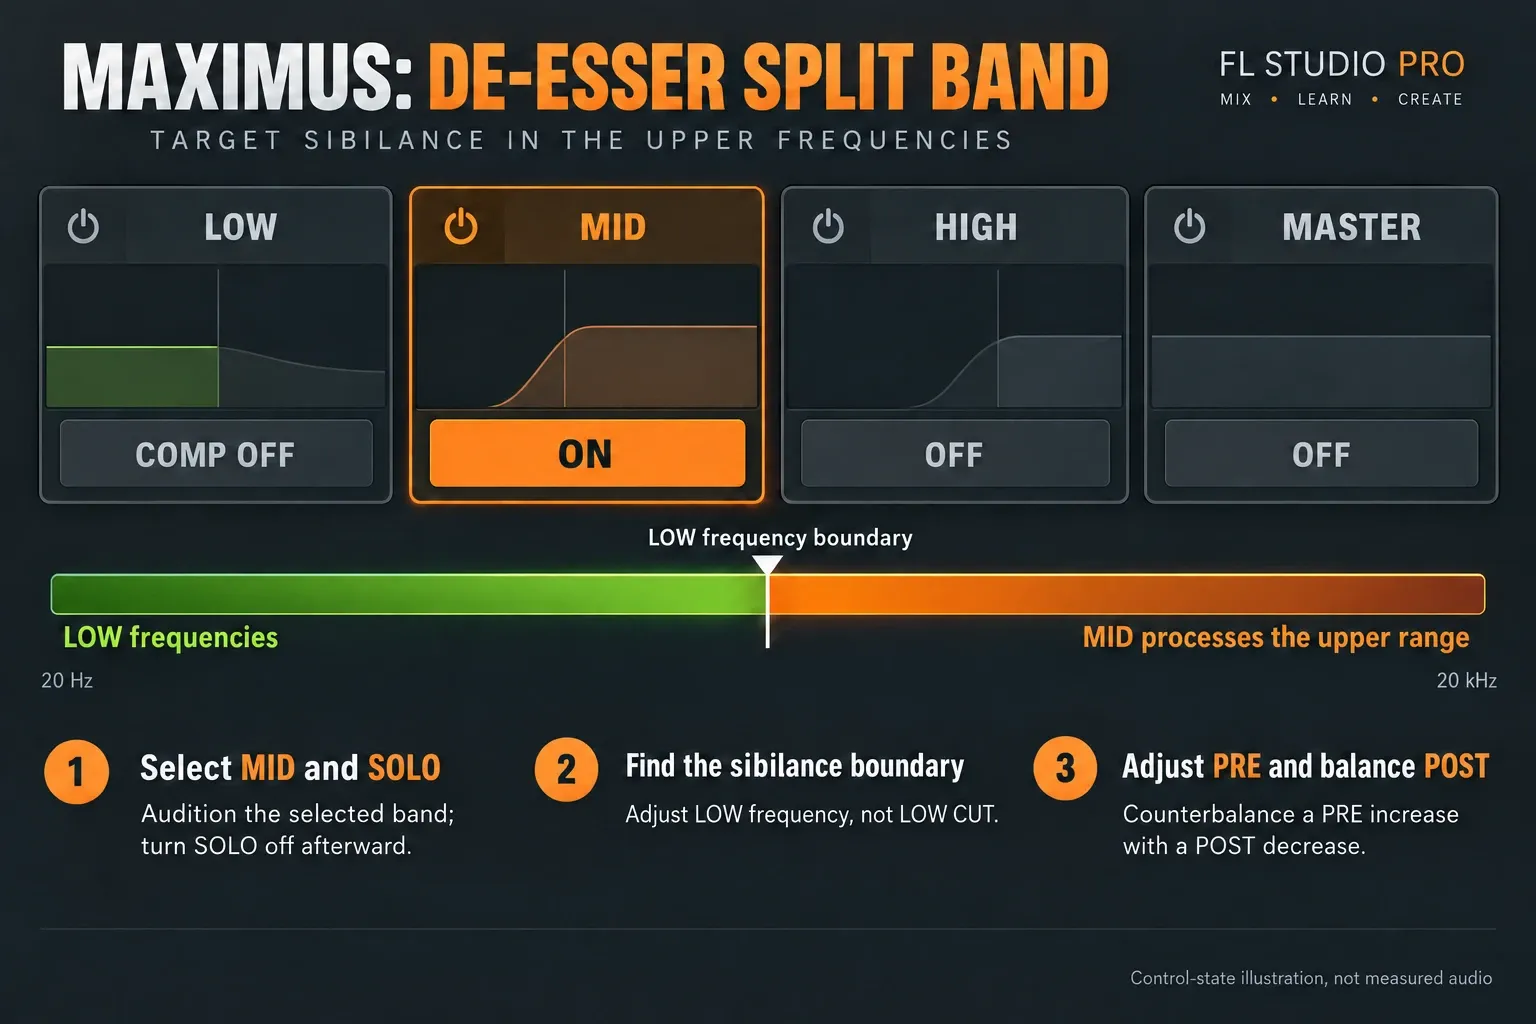
The Maximus manual lists it in Producer Edition and above, and an installed trial copy doesn’t prove your license includes it. The documented Split Band setup uses the MID compressor for the upper frequencies, so generic advice to select HIGH describes a different setup. Save before loading another preset, so an experiment doesn’t wipe out the settings you wanted to keep.
Find the sibilant band by ear
Don’t borrow a frequency from another singer and assume it fits. Audition the controlled band briefly to find the consonant energy, then bring back the full vocal. A boundary that takes in too much useful vowel tone can make ordinary words trigger unwanted reduction. The detector reacts to level in that region; it has no idea what the letter S is.
Image-Line’s older de-essing explanation uses roughly 4–12 kHz as a search area and separates a narrow peaking band from an upper shelf. Treat that range as a place to start listening, since some voices fall outside it. A narrow whistle and a broad spray may need different bandwidths. The Split Band preset above uses MID for its upper region, so don’t switch to HIGH just because the sound is high-pitched.
Set threshold and gain reduction without creating a lisp
Maximus has no conventional compression threshold and ratio knobs. In its compression envelope, the point where the line bends away from the straight input/output relationship sets where gain control starts, and the shape sets how strong it is. Use PRE/POST or reshape that envelope so the troublesome consonants get controlled while ordinary words stay natural. The knob labelled THRES belongs to saturation, not to this compression threshold.
Listen to the front and tail of each consonant while you adjust ATT and release. REL2 and SUSTAIN can also stretch the response, so REL alone may not explain what you hear. Catch the sharp onset without dulling the next vowel. If the result chatters, distorts or sounds lispy, ease off the reduction and revisit the timing instead of assuming the fastest settings are best.
No number of decibels is universally “correct”. Watch the gain-reduction display, but trust what happens to the pronunciation. A clean pass sounds like the same singer at a comfortable distance. An overworked one turns S into TH, makes the air vanish or makes the top end pump. Compare at matched loudness, because a quieter output can seem smoother even when the processing isn’t better.
Use Fruity Multiband Compressor as the stock alternative
Fruity Multiband Compressor gives you a more familiar layout of threshold, ratio, knee, attack, release and gain for each of its three bands. For an upper-band de-esser, set LOW and MID to Bypass (not Muted) and leave their gain controls neutral, since gain still works in Bypass. Keep HIGH Active and tune its threshold and timing to the harsh consonants instead of compressing every bright word.
The Fruity Multiband Compressor reference shows four cutoff controls, including separate edges for neighboring bands. Start from their aligned snap positions, because gaps can remove frequencies from the sound instead of just leaving them uncompressed. Check the recombined vocal, look at the separate LIMITER, and use the C meter to watch gain reduction. Don’t let an unwanted limiter or band-gain change pass for successful de-essing.
Manually lower isolated consonants
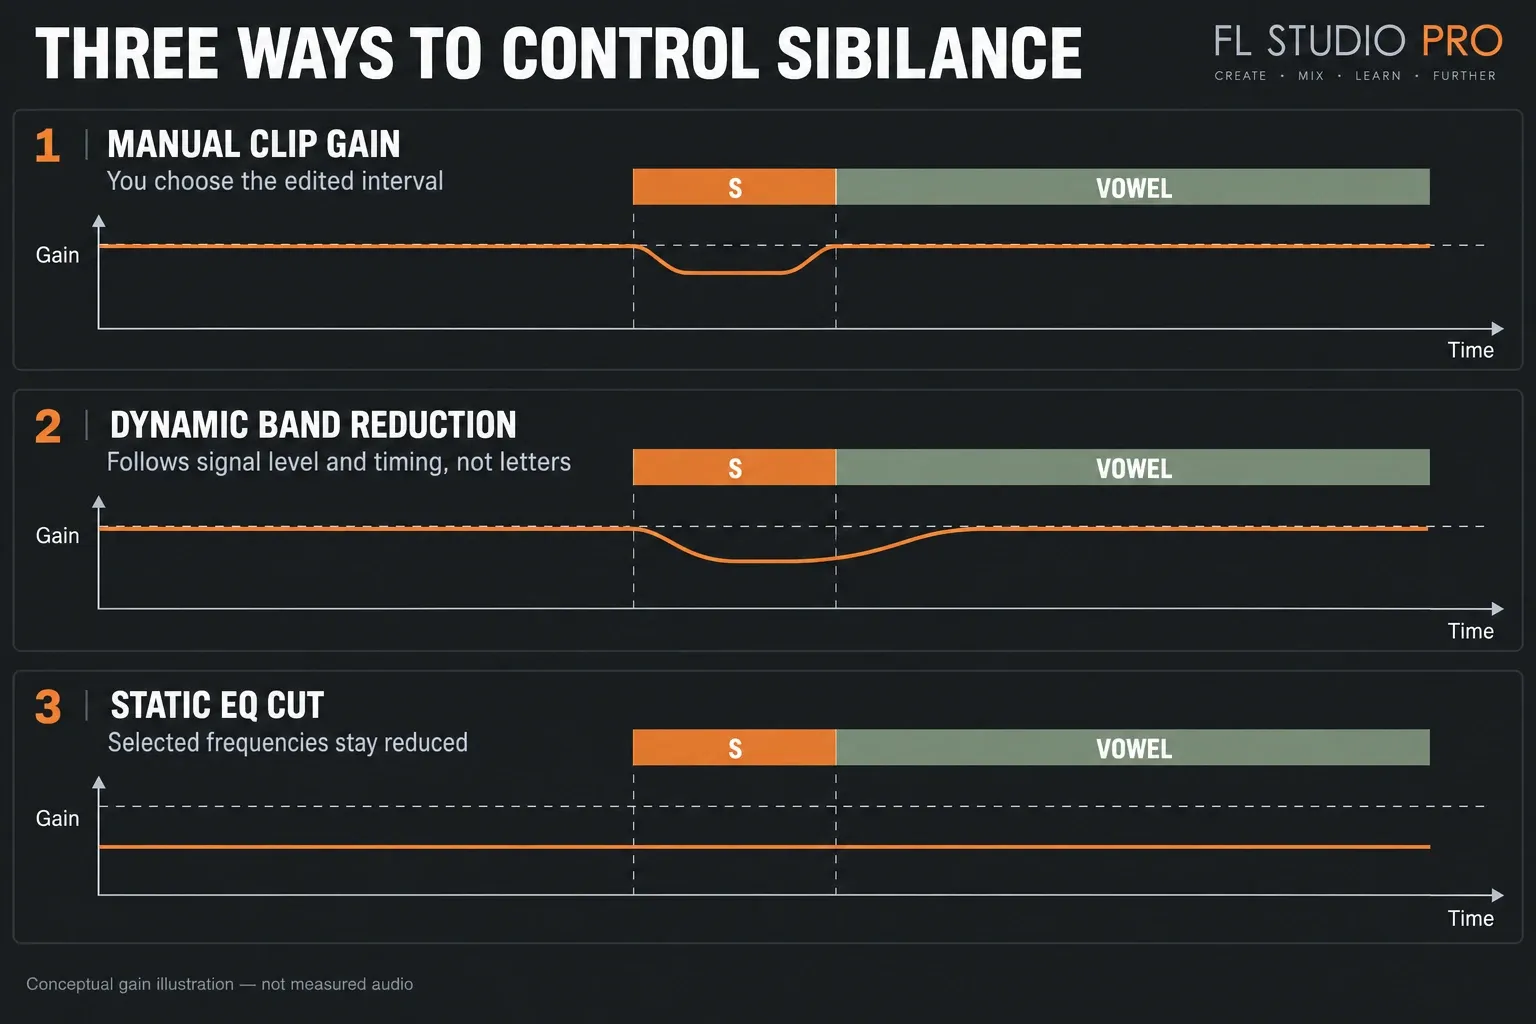
For a handful of aggressive syllables, keep the original take and split the Playlist Audio Clip around the problem consonant. Select only that segment and drag its bottom semicircular Clip gain handle down; its menu also lets you type a dB value. This local control is separate from the shared Channel volume. Keep the edit narrow enough to spare the vowel that follows, and listen for a missing syllable instead of judging by the waveform alone.
When trimming an edge, switch Stretch clips off if you mean to trim and not stretch. Zero-crossing edits can help at boundaries but may shift them. Show the fade controls with Shift+F while the Playlist is focused, then add only the short fades you need. Hold Alt after clicking a fade handle to skip snapping; Alt-clicking first resets it. Active fades replace declicking at their ends. The fade and declick guide explains those checks, and volume automation is another way to make a deliberate local level change.
Manual editing takes longer on a dense performance, but it leaves every other bright moment untouched. It also helps before a de-esser: tame one extreme spike by hand, then let gentler dynamic processing handle the rest. Listen through each transition at normal speed, because an edit that looks neat can still sound like a dropped syllable. Only once the edits are approved should you consolidate the vocal to a new audio file, keeping the original take recoverable.
Avoid the static-EQ trap
A permanent high-shelf or bell cut lowers the chosen frequencies on vowels, breaths and quiet detail as well as on the offending S. That can be right when the whole recording is too bright, but it isn’t dynamic de-essing. Image-Line’s own de-essing tutorial draws the same line: frequency-selective compression kicks in when the sibilant region crosses a threshold, while an EQ cut works all the time.
If the de-esser still has to work extremely hard, fix the chain around it. Pull back an aggressive presence boost, shorten a bright reverb, check whether saturation is adding upper harmonics and compare with the original recording. One well-aimed correction is easier to control than several processors fighting over the same consonant.
Separate sibilance from broad vocal harshness
A good setting controls the troublesome consonants without holding down every bright word. It can still react to vowels, breaths, noise or cymbal bleed if they cross its detection threshold. If unrelated instruments or a reverb return show up at this insert, trace what’s actually feeding it. A harsh phrase that stays aggressive through the vowels may need a tonal fix or a better source, not harder de-essing.
Compare several words, not one dramatic “S.” Different consonants can peak in different places, and a setting that fixes a close, bright line may dull a softer phrase. Bypass at matched loudness, then go back to the full vocal-mixing chain so you judge it against the instrumental, compression and ambience listeners will actually hear.
Check the vocal in the mix and on small speakers
Listen at low volume, then on headphones and a small speaker. Sibilance can hide on dark monitors and get exhausting on earbuds. Check the loudest chorus, the quietest verse and any doubles or ad-libs separately, because copied settings may overprocess a softer layer. Bypass at matched level and listen for both comfort and clarity.
De-essing processes a vocal; it can’t pull one out of a mix. If the voice sits inside a finished stereo song, ask for the isolated track first. If you can’t get it, stem separation may give you usable material, but check for bleed and altered consonants before processing. Once the vocal works, the mastering guide covers the final balance, and you shouldn’t use the master bus to fix a problem that only affects one singer. The stock-plugin map and Mixing hub fill in the surrounding workflow.
If the de-esser seems to do nothing
Check the selected band and its mode before you make the curve more aggressive. Is MID still ON in the Split Band preset? Is SOLO off for the full-signal comparison? Does the input reach the working part of the envelope? Is LMH MIX blending in dry input? Trace the vocal through the insert and check effect-slot bypass or an accidental parallel route. A moving graph alone doesn’t prove the version you’re hearing is processed.
If monitoring starts lagging, separate plugin delay from audio-driver problems. Maximus look-ahead involves LMH DEL and MASTER ATT, and the ordinary MID ATT control is a different setting. Save a copy before changing the timing or preset, and compare the resulting sound instead of adding look-ahead out of habit.
Save a version that can be recalled
Keep the original vocal and a separate project version before you consolidate or commit any processing. After rendering, listen to the file for fades, syllable edges and doubled effects. Reopening a licensed project copy is a useful recall check before you remove dependencies.
FL Studio Trial can save an FLP but can’t reopen it until you buy; export the audio you need while the session is still open. In a licensed host, trial plugins you don’t own may turn into empty slots on reopening. Unlock them before reopening to keep their saved settings. Resaving while those settings are missing can lose them, so keep the original project file.
Frequently asked questions
Does FL Studio have a stock de-esser?
Yes. Maximus includes a De-esser Split Band preset and comes with Producer Edition and above. That preset uses MID for the sibilance region. Fruity Multiband Compressor is another stock option; check that any plugin you use is licensed so saved projects recall properly.
What frequency should I use for de-essing?
No single frequency suits every voice. Monitor and sweep the controlled band until it catches the harsh consonants without grabbing too much vowel tone.
Should the de-esser go before or after compression?
Put it after a compressor when that compressor makes sibilance jump out. If the raw recording is already very sharp, use gentle control before compression and check again afterward.
Why does my de-esser make the vocal sound dull or lispy?
The controlled region may include useful vowel tone, or the compression may be too strong or hold on too long. Reduce the amount, check the attack and release behavior, and compare at matched output level. In Maximus, adjust the compression envelope or PRE/POST, not the saturation THRES knob.
Is clip gain better than a de-esser?
Clip gain is a precise option for a few isolated consonants. Dynamic de-essing saves you manual edits when the problem keeps coming back, but it can also react to other loud sounds in its band. Choose based on the recording and listen to the result.
Why does the preset use MID for high-frequency sibilance?
In De-esser Split Band, HIGH is switched off and MID reaches up into the upper range. Select MID and tune its LOW frequency boundary. Despite the name, the band isn’t confined to the middle of the audible spectrum.
Which Maximus knob sets the de-esser threshold?
There’s no conventional compression threshold knob. The compression envelope sets the operating curve, and PRE changes how the signal meets that curve. Balance POST when you change PRE. THRES controls saturation, not the compression threshold.