FL Studio
FL Studio has no plugin called a saturator, so vocal saturation comes from a gentle distortion stage. Load Fruity Fast Dist or Fruity WaveShaper on the vocal's own Mixer track; both come with every edition and both have their own Mix control. Put it after the compressor and the de-esser and before the reverb and delay sends. Start with the effect fully processed, raise the drive only until the vocal sounds denser, back the Mix off, then lower the output until the vocal is about as loud with the effect on as with it bypassed. Last, play the loudest lines to check for harsh esses and the quiet gaps for breaths and noise that came up with it.
"Add some saturation" is a common mix note, and it gets confusing the moment you search the plugin list. You'll find Fast Dist, Blood Overdrive, WaveShaper, Soft Clipper, the SAT knob in Fruity Limiter and a few more, and most tutorials pick one without saying why or where it goes. Below I compare the stock options by edition and blend control, show where saturation sits in a vocal chain, set up Fast Dist, WaveShaper and Blood Overdrive on a vocal, build a parallel saturation track with FL Studio's own routing, and finish with fixes for the usual problems: harsh esses, lifted breaths, fizz, mud and a vocal that only got louder.
What saturation does to a vocal
The Fruity Limiter manual describes saturation as a type of amplitude distortion usually associated with tube amplifiers, tape or analog circuitry: as a waveform exceeds what a system can carry, its shape is rounded or bent, and that mild distortion increases as the input approaches the maximum. Two practical points follow from that definition.
First, bending the waveform adds frequency content that wasn't in the recording. Music Guy Mixing's vocal saturation guide describes saturation as adding overtones, and its before and after view of one vocal shows a stronger 500 Hz to 2 kHz region (with a bit more below 200 Hz) after a third-party saturator. That's where the "thicker" and "more present" descriptions come from. The example uses one specific plugin, so read it as a picture of the idea rather than a rule for every stock tool.
Second, saturation depends on level. Loud words drive it harder than quiet ones, so one setting can be subtle on a verse and obvious on a belted chorus. It also tends to make the track louder, and a louder vocal usually wins a quick comparison even when the tone got worse. That's why level matching runs through every setup below.
Your compressor may already be doing some of this. Image-Line's page on levels, mixing and clipping notes that compressors "can add 'saturation' (high frequency distortion) to sounds when over-driven". If the vocal already sounds dense after heavy compression, check that before adding another stage.
Which stock plugin to use for vocal saturation
The FL Studio edition comparison lists Fast Dist, WaveShaper, Blood Overdrive, Soft Clipper, Fruity Limiter, Distructor and Soundgoodizer as included in all editions, while Maximus starts at Producer Edition. For a vocal, the column that matters most is the blend control, because a light blend is usually the goal and three of these plugins don't have one.
| Plugin | Own blend control | What to watch on a vocal |
|---|---|---|
| Fruity Fast Dist | MIX | Image-Line pitches it at bass and kicks, so keep the drive light |
| Fruity WaveShaper | Mix | Nothing changes until you bend the curve |
| Fruity Blood Overdrive | None | Output can jump in level; built-in filters before and after the drive |
| Fruity Soft Clipper | None | Only works on what crosses its threshold, so loud lines saturate first |
| Fruity Limiter (SAT) | None | SAT comes after the compressor and limiter inside the plugin; look-ahead can cause phasing in a blend |
| Distructor | Mix on each module | A modular four-slot effect built around distortion; easy to push past saturation on a lead vocal |
| Soundgoodizer | Big knob (input vs compressor output) | A multiband compression shortcut, not a dedicated saturator |
| Maximus (Producer Edition and up) | LMH mix | Two saturation types per band with their own gain; more to set up |
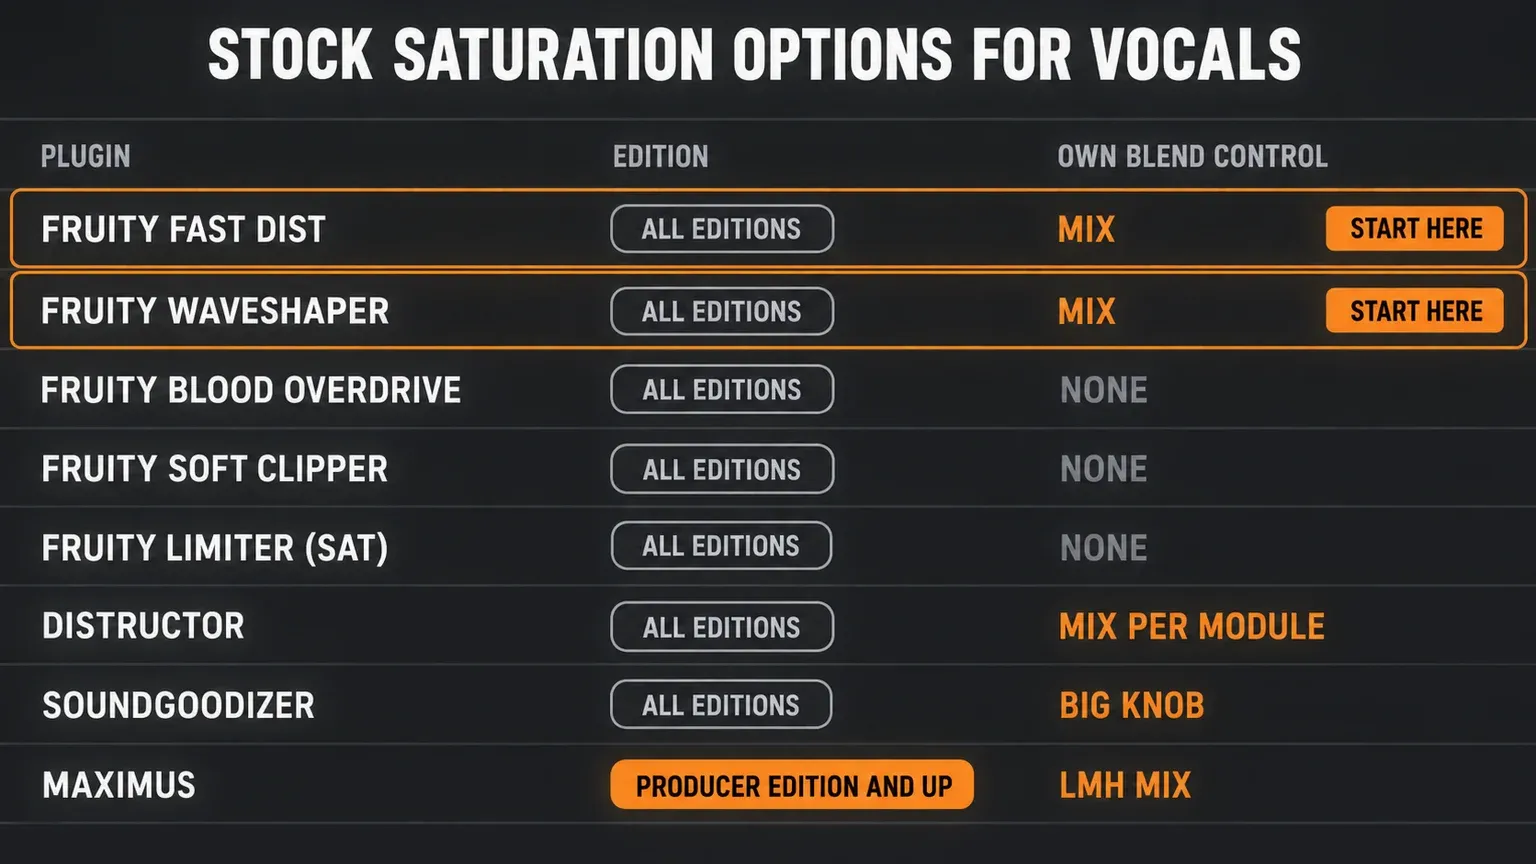
For most vocals I'd start with Fast Dist or WaveShaper. Both have their own Mix control, both come with every edition, and both are simple enough that you can tell what each control is doing. Blood Overdrive is the third choice when you want filtering around the drive. Our overview of the stock plugins worth learning first puts these in the context of the rest of the toolset.
Forum users have argued about this for years. In a July 2014 Image-Line forum thread, the opening post compared Fruity Limiter, WaveShaper and Maximus and preferred Maximus' saturation, which only helps if your edition includes Maximus. In a September 2024 thread on saturation and glue, a reply suggested Soft Clipper. Both threads are about mixing in general rather than vocals, so the table judges each tool by what a vocal needs.
Where saturation goes in a vocal chain
Each Mixer track has ten effects slots, and audio runs through them in order from slot 1 to slot 10. Image-Line's effects slots manual warns that "the order of effects can have a dramatic impact on the sound so think carefully about the order in which effects are applied." For saturation on a vocal, three placement decisions matter most.
- After the de-esser. When you saturate the whole range or the highs, Sage Audio's guide to saturating vocals says "it's important to de-ess first", so the sibilance is under control before it hits the drive. Our guide to de-essing vocals in FL Studio covers the stock options.
- After compression. Saturation reacts to level, so a compressed vocal drives it more evenly from quiet lines to loud ones. Put the saturator first and the compressor reacts to the denser, saturated signal instead. Both orders can work; I'd start after compression because the result is easier to predict.
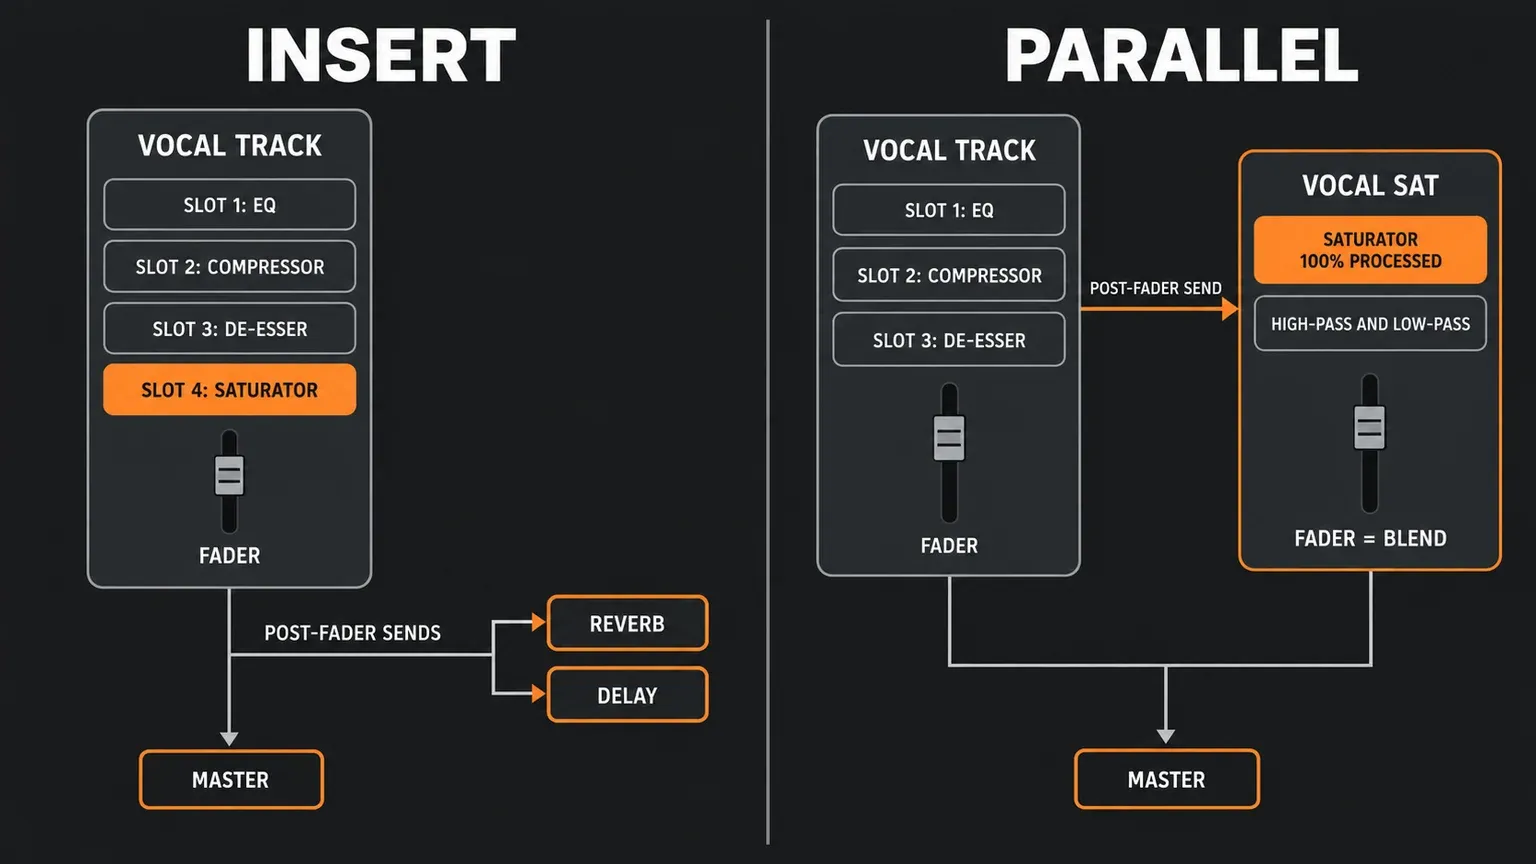
- Before reverb and delay. Sage Audio also advises against placing the saturator after "temporal processing, like delay or reverb", because it then has trouble saturating the fundamental, and treats saturated delay taps as a creative exception. In FL Studio the built-in Send switches take the audio after the effects stack and the track fader, so a saturator in the vocal's slots also colors what reaches your reverb and delay returns. Our guide to reverb and delay sends sets up those returns.
An EQ in front of the saturator changes what it works on. A high-pass before it keeps low rumble and plosive thumps from being driven; our Fruity Parametric EQ 2 guide shows how to set one. Sage Audio calls a boost before a single-band saturator an emphasis technique: the boosted range hits the saturator harder, so that range gets more of the effect.
Put together, that's the same order as the chain in our guide to mixing vocals in FL Studio: corrective EQ, compression and de-essing first, optional character next, then the reverb and delay sends.
Set up Fast Dist on a vocal
Image-Line's Fast Dist manual page calls it a CPU-friendly distortion and suggests it on bass and kicks "for a gritty and punchier effect". On a vocal you use the same five controls far more gently:
- Load it in the right slot. On the vocal's Mixer track, add Fruity Fast Dist to the slot after your compressor and de-esser.
- Turn MIX fully right. According to the manual, that's where you "hear only the distorted sound", which makes the drive easier to judge.
- Leave PRE in the middle. The middle position "means 100% volume". Raise it only if you need more level going into the distortion.
- Move THRES in small steps. THRES "changes both the level at which the signal is distorted and the strength of the waveshaping distortion applied". Stop when the loudest lines sound denser rather than gritty.
- Compare A and B. The switch picks between two distortion types, and the manual's only guidance is "choose by ear".
- Back MIX off. Bring the dry signal back in until the effect sits under the vocal instead of on top of it.
- Lower POST to match the level. Flip the slot's disable switch on and off and turn POST down until the vocal is about as loud with Fast Dist on as with it off.
Fast Dist has no tone controls. If the drive brings up harshness or low mud, put an EQ after it or switch to Blood Overdrive, which has filters on both sides of the drive.
Use WaveShaper when you want to shape the curve
WaveShaper is the more precise option. Its graph maps input level on the horizontal axis to output level on the vertical axis, so a straight diagonal line leaves the vocal unchanged and only a bend adds saturation. Our Fruity WaveShaper guide shows how to draw a gentle curve with one broad bend, so here are the vocal-specific points:
- Bend the top, not the bottom. Keep the low-level part of the line close to straight so quiet syllables pass almost untouched, and bend the upper part so only louder material gets shaped.
- Use Pre, Mix and Post for their own jobs. Pre raises the level going into the curve, Post sets the output level, and Mix, according to the WaveShaper manual, brings in more of the processed signal as you turn it right.
- Try Oversample on a grainy top end. The manual says oversampling "helps to avoid aliasing artifacts, if any".
- Check the line when nothing changes. If it's still straight, nothing is being shaped.
Blood Overdrive and Soft Clipper have no Mix knob
Blood Overdrive has the most useful tone controls of the stock options for a vocal, and its manual page explains why you need them. Image-Line says it "works particularly well with Guitar sounds" and that the built-in filter lets you overdrive non-guitar audio "that would otherwise produce poor results". The controls run in signal order:
- Pre Band and Color. Pre Band filters the audio before the overdrive and Color sets where that filter cuts. Use them to keep the brightest part of the vocal out of the drive.
- Pre Amp and x100. Pre Amp sets the drive. The x100 switch multiplies its level by 100; for light vocal saturation I'd leave it off.
- Post Filter. A low-pass after the drive that Image-Line calls "another option for cleaning up the distortion". Pull it down if the vocal turns fizzy.
- Post Gain. Brings the level back down. At maximum it leaves the original level after distortion.
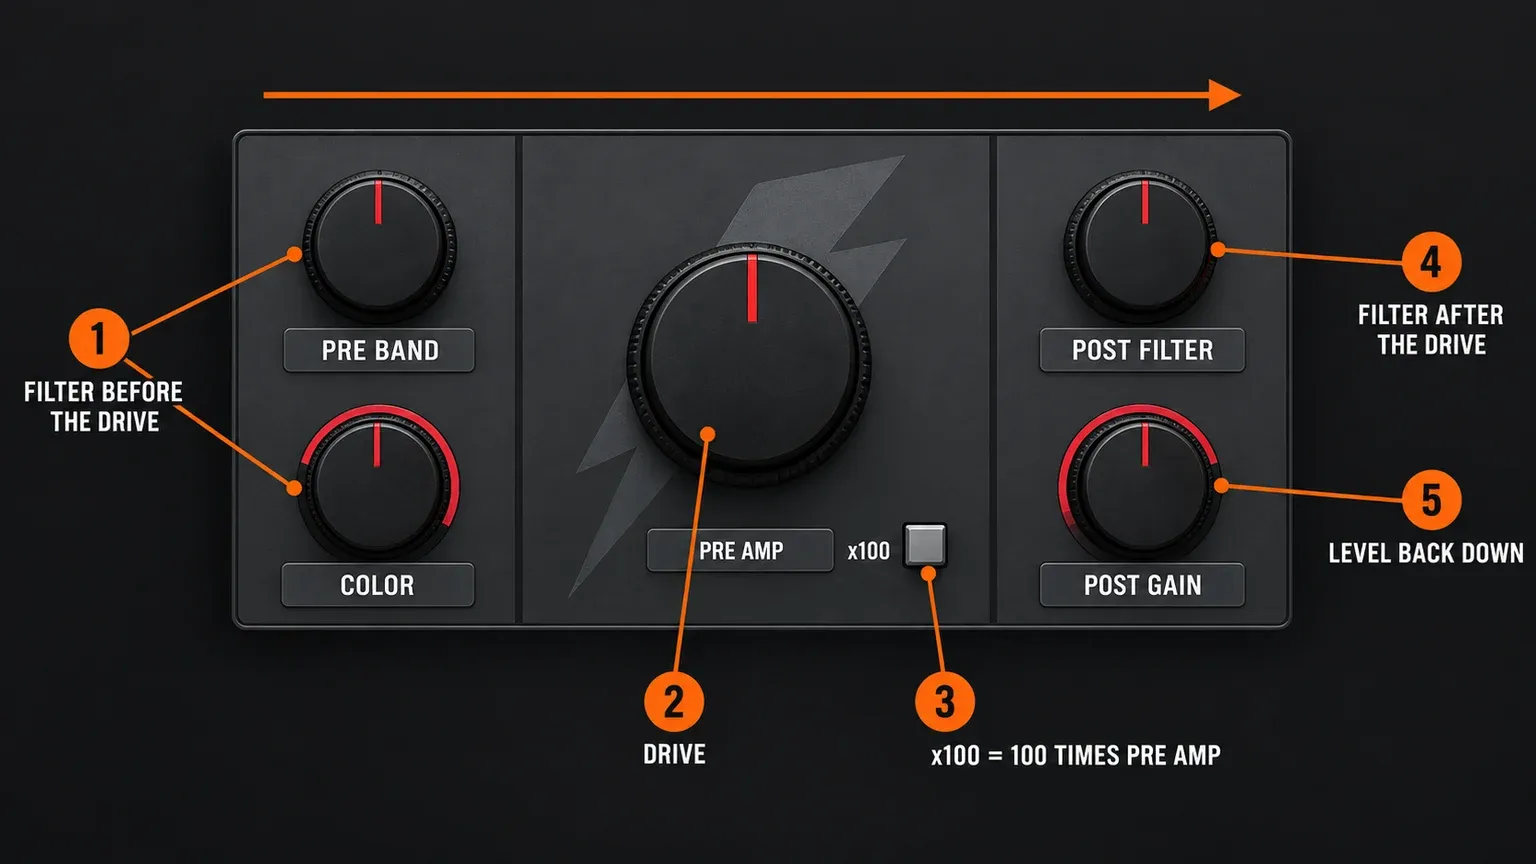
Level matters more here than with Fast Dist. After pre-amplifying and clipping, the manual says the signal "can be up to 300% louder than the input", and it's specific about the fix: "If the output is too loud, don't reduce the input to the plugin, use 'Post Gain', otherwise you will remove the distortion sound."
Fruity Soft Clipper is simpler, with a threshold and a post gain. Its manual page explains that the soft-knee compression causes saturation once the level exceeds the threshold, that "a little saturation brings 'warmth', too much can sound distorted", and that whether you hear it depends on the level going in. On a vocal that means a loud chorus can saturate while the verse barely touches it. Our Fruity Soft Clipper guide covers setting the threshold.
Neither plugin has a Mix control, and neither does Fruity Limiter. You can blend them in two ways. The first is the slot's own Mix Level knob: fully left is 0% effect and fully right is 100%. The effects slots manual adds that plugins usually have their own wet/dry mix and says "Normally leave this at 100% and control the Wet/Dry mix from within the plugin." These three are the exception, because there's no wet/dry control inside them to use. Keep POST or Post Gain for level, though; as our gain staging guide puts it, the slot's Wet/Dry control is no substitute for output gain. The second way is the parallel track in the next section, which works with any plugin.
If you blend Fruity Limiter's SAT with the slot knob, watch its attack. The Fruity Limiter manual ties the limiter's attack to a look-ahead delay and says that, to avoid phasing when you mix the output with the dry signal, you set the attack to 0 ms or turn on Plugin delay compensation > Automatic in the Mixer menu. Our guide to Fruity Limiter's controls and timing shows where SAT sits in its signal flow.
Build a parallel saturation track
Parallel saturation leaves the vocal track alone and blends a fully saturated copy underneath it. It's the better route when you want heavier drive without losing the clean vocal, when the plugin has no Mix control, or when you only want to saturate part of the vocal's range.
- Pick an empty Mixer track. Name it something you'll recognize later, such as Vocal Sat.
- Send the vocal to it. Select the vocal's Mixer track, then click the Send switch on the new track. The Mixer manual notes you can then adjust the send volume with the knob that replaces the switch.
- Load the saturator on the new track. Set its Mix fully processed so this track carries only the saturated signal.
- Filter it. A high-pass and a gentle low-pass on this track keep the drive in the midrange, away from the lows and the esses. Sage Audio splits a vocal into three parallel bands as a substitute for a multiband saturator; one filtered track is the simple version of that idea.
- Blend with the fader. Start with the new track's fader down, raise it until the vocal thickens, then pull it back a little.
Because those Send switches are post-fader, volume automation on the vocal also changes what reaches the parallel track, so the blend keeps its proportion as the vocal rises and falls. Our guide to routing in the FL Studio Mixer covers sends and buses in more detail.
If you want to tap the vocal at a specific point in its effects stack, say after the compressor but before a later EQ, use Fruity Send instead. The Fruity Send manual describes it as a pre-fader send that can extract audio from any point in a Mixer track's effects stack. To link it, select the vocal's Mixer track, right-click the Send switch on the target track and choose "Sidechain to this track", then right-click Fruity Send's Send to control and pick that track. Its Dry control starts at 0%, so turn it up if you still want to hear the vocal on its own track.
For a version that fits in one slot, our Patcher guide builds a dry and processed parallel blend inside a single effect.
If the blend sounds hollow, thinner or phasey instead of thicker, check the timing between the two paths. FL Studio uses a per-track delay for Plugin Delay Compensation to line up tracks that their effects have delayed, and Fruity Limiter's look-ahead is one documented source of that kind of delay.
How to tell when it's enough
Saturation is easy to overdo because each small step sounds better than the last, mostly because it's louder. These checks keep the comparison fair:
- Use the slot's disable switch. It turns the effect off without muting the audio passing through, so you can flip it during playback without touching anything else on the track.
- Match the level first. Set POST, Post Gain or the parallel fader so on and off are about equally loud, then decide.
- Play the loudest line. If the esses spit or words crack, the drive is too high or the de-esser sits too late in the chain.
- Play the quiet gaps. Saturation tends to flatten peaks relative to quieter material, so once the level is matched, breaths, room tone and noise can sit higher than before.
- Turn the monitors down. At low volume, a vocal that only got louder stops sounding better.
- Judge it in the mix. Music Guy Mixing suggests blending a light amount for "bite" and keeping saturation conservative when a vocal feels thin, which is a sensible default for a lead vocal.
Fix common vocal saturation problems
| Symptom | Likely cause | What to try |
|---|---|---|
| No audible change | WaveShaper line still straight, drive too low, or Mix turned toward dry | Bend the curve, add a little PRE or Pre Amp, check the plugin Mix and the slot Mix Level |
| Harsh, spitty esses | Sibilance is driving the saturator | De-ess before it, lower the drive, low-pass after it with Post Filter or an EQ, or filter the parallel track |
| Louder, not better | Output not level matched | Lower POST or Post Gain until on and off are equal, then judge again |
| Breaths and room noise come up | Peaks flattened, so quiet parts rise after level matching | Use less drive, clean up breaths and noise before the saturator, or move the drive to a parallel track |
| Grainy or fizzy top | Too much drive, or too much top end going into it | Less drive, Post Filter or an EQ low-pass after it, Oversample in WaveShaper |
| Muddy or boomy | Low end is being driven | High-pass before the saturator, use Blood Overdrive's Pre Band and Color, or high-pass the parallel track |
| Chorus distorts, verse stays clean | Saturation follows input level | Compress before the saturator, ride the vocal level into it, or automate the drive |
| Great in solo, lost in the mix | Amount set in solo | Set the final amount with the full mix playing |
If the meters are going red rather than the tone getting thicker, you may be looking at real overload instead of saturation. Our FL Studio clipping guide shows how to find where it happens.
Using a third-party saturator instead
Many of the tutorials that come up for this topic use FabFilter Saturn 2, Soundtoys Decapitator or Softube Saturation Knob. The same rules apply to any of them: put it after the de-esser and compressor and before the sends, match its output to the bypassed vocal, and check the loudest and quietest lines. If you're adding one, our guide to installing plugins in FL Studio covers getting it into the plugin list.
Quick answers
Does FL Studio have a saturation plugin?
Not one called a saturator. Fast Dist, WaveShaper, Blood Overdrive, Soft Clipper, Fruity Limiter's SAT and Distructor all saturate, and all of them come with every edition.
Should saturation go before or after compression on vocals?
I'd start after compression and de-essing so the drive stays even across loud and quiet lines. Before the compressor works too, but then the compressor reacts to the saturated signal.
What can I use for vocal saturation in Fruity Edition?
Everything in the table except Maximus, which starts at Producer Edition. If your edition has it, our Maximus guide covers its bands and saturation controls.
Should I use the slot Mix knob or the plugin's own Mix?
Use the plugin's own Mix when it has one, as Image-Line advises. The slot's Mix Level knob is the option for Blood Overdrive, Soft Clipper and Fruity Limiter, which don't.
Can Soundgoodizer saturate vocals?
Soundgoodizer is a simplified Maximus whose big knob blends the plugin's input with its compressor output. It's a quick multiband compression shortcut rather than a saturator, so for a saturation stage you control, use Fast Dist or WaveShaper. Our Soundgoodizer guide covers when it does suit a vocal.
Whichever plugin you pick, the setting comes down to one comparison: bypass the saturator, match its level, and play the loudest and quietest lines. If the vocal is denser and still clean at both ends, you've got it.