FL Studio
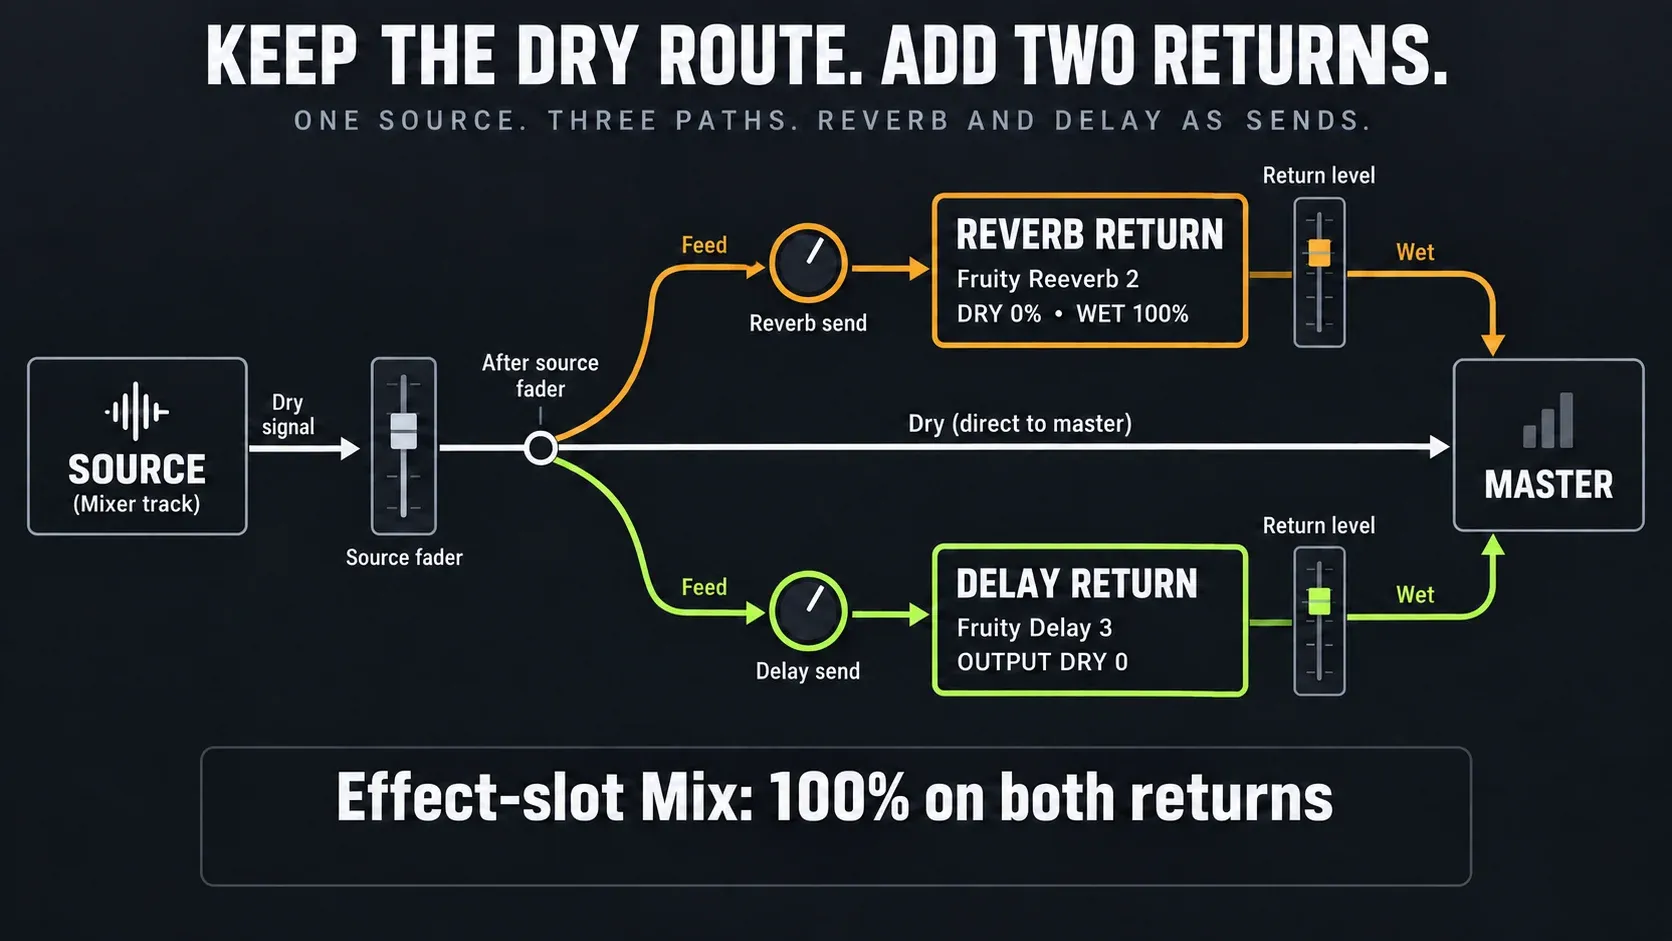
Your vocal needs space, but turning up reverb makes the words harder to follow. Reverb and delay sends in FL Studio let you keep the direct sound on its main route and add a separate, adjustable effect. Use two Mixer tracks as returns, make their effects wet-only, and feed them from each source with the routing knobs.
The distinction to keep in mind: a source send changes one track's contribution; a return fader changes the shared effect. Normal Mixer sends follow the source fader. Fruity Send gives you a different option when the copy must leave earlier in the effects chain.
Build reverb and delay sends in eight steps
- Choose the returns. Pick two unused Mixer tracks and name them Reverb and Delay. Work with playback stopped while establishing unfamiliar routes.
- Keep the main paths. Confirm both returns feed the Master. Keep the source's existing main route, whether direct to Master or through its intended bus.
- Load the effects. Put Fruity Reeverb 2 on Reverb and Fruity Delay 3 on Delay. Leave each effect slot's Mix at 100% and its effect enabled.
- Remove duplicate dry audio. Set Reeverb 2 DRY to 0% and WET to 100%, with ER adjusted to taste. Set Delay 3 output Dry to 0 and make sure its input Wet and output Wet are raised enough to pass echoes.
- Connect one source. Select its Mixer track by the label. Left-click the routing switch beneath the desired return to create a normal audible send. Do not choose a route that removes the source's main path.
- Set the feed cautiously. Check the new send knob before playing; do not assume it starts at zero. Start with a low send and return level, then raise them while listening.
- Balance the shared effect. Use the source send for that source's amount and the return fader for the combined effect. Add other sources only when they need the same room or echo.
- Check the result. Mute the return track briefly to hear its contribution, then restore it. Check dry clarity, tails, feedback, final output and any automation through the full phrase.
Insert, bus or send: follow the audio
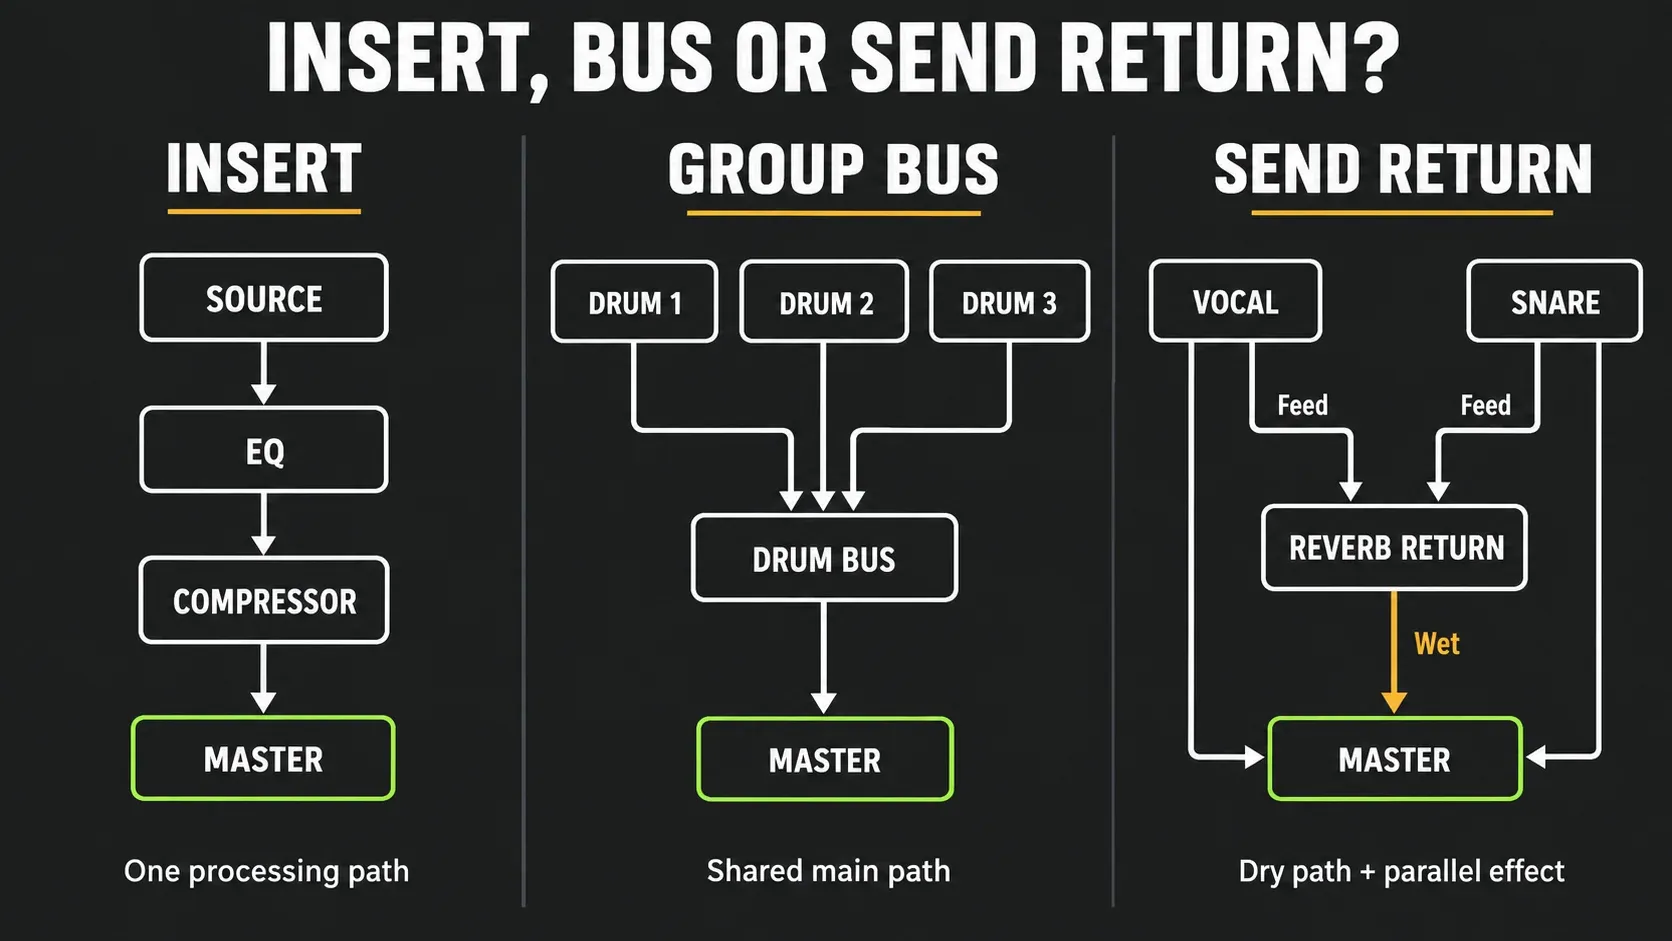
An insert effect works in one track's processing path. A group bus becomes a shared main path for several tracks. A send return adds a parallel path: the source continues to its normal destination while a copy goes through the effect.
You do not need a special return-track type. An ordinary Mixer Insert can do the job. The Mixer routing guide explains the wider layout; here, keep one simple test in mind. Muting Reverb should remove its contribution without silencing the direct vocal.
Create and connect the return tracks
Rename the two empty tracks before building links: Right-click track label → Rename / color. Load each plugin from an empty effect-slot menu. Click its loaded name to open the controls. The track names help you distinguish destinations when returning to a source later.
The Image-Line Mixer reference places the routing controls beneath the destination tracks. Select the source, then click the switch under Reverb; a level control appears for that connection. Repeat under Delay. Selecting another source shows that other source's routing, not a global reverb amount.
Keep the source's main route. A sidechain-only link does not provide ordinary audible input to the reverb by itself, and an exclusive route can remove a path you meant to keep. Neither is the normal parallel-send setup described above. Both returns should reach the Master without feeding back into their sources.
Make Fruity Reeverb 2 wet-only
On the Reverb return, set DRY: 0% and WET: 100%. Those are the send settings in the Fruity Reeverb 2 manual. ER is a separate early-reflection level; adjust it for the character you want rather than treating it as another dry control.
DRY at zero removes the original from this plugin's output, not from the source track's main route. WET controls the reverberant component. The source send and return fader then determine how much of that shared space joins the mix.
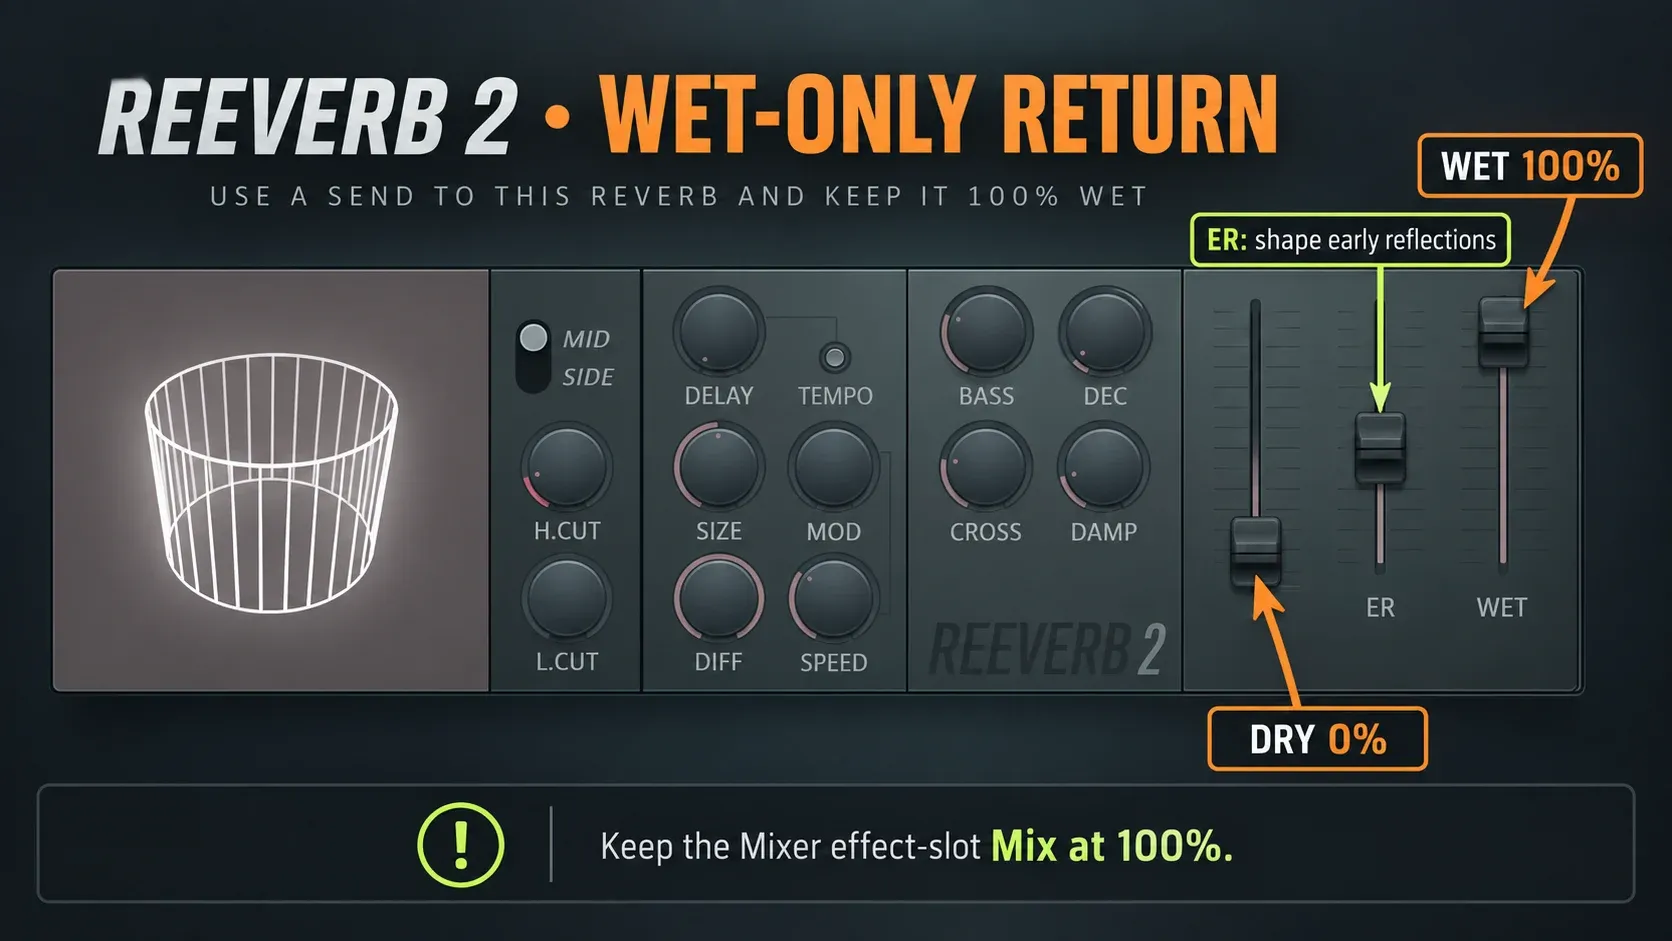
If a centered or mono source produces little reverb, check the MID/SIDE selector as well as levels. SIDE processing needs stereo difference in the input. It is not a universal wider-reverb switch. Start with MID for this basic routing exercise, then make a deliberate mode choice.
Separate Delay 3's input and output levels
Fruity Delay 3 has three relevant level controls, not one mix knob. Input Wet feeds its processing; output Wet sets the processed output; output Dry passes the original. Set Output Dry: 0 on this return, and check that both Wet controls are open enough to hear the effect. These roles are documented in the Delay 3 parameter reference.
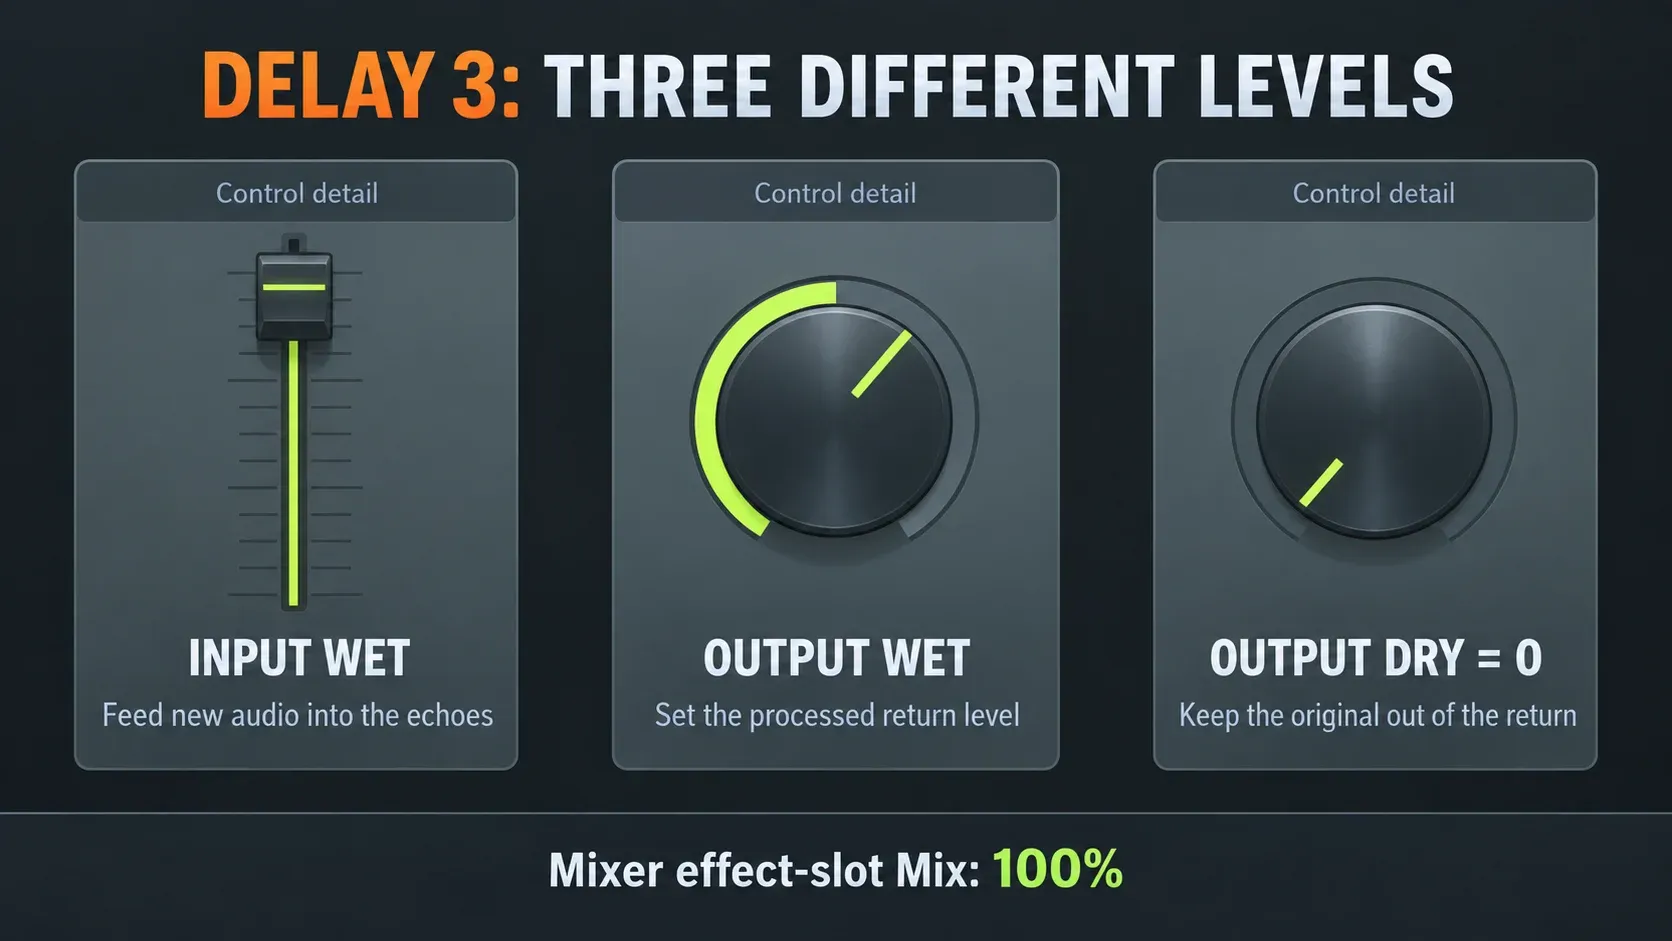
Turn on Tempo Sync when echoes should follow the project. With sync selected, Right-click Time → Set offers musical timing choices; listen for gaps between phrases instead of treating one note value as compulsory. Check the delay model too: Off removes delay while leaving other processing available.
Feedback Level returns echo into the process. It can exceed 100%, and filter resonance can raise overall feedback even below that setting. Keep the feed low while choosing it. If the return starts building uncontrollably, mute the return first, reduce Feedback and resonance, then cautiously resume listening.
Check slot Mix before blaming the routing
There are two wet/dry layers. The plugin has its own controls, and the Mixer effect slot has a Mix knob. Keep the reverb or delay slot at Mix: 100% for a wet-only return, then remove dry inside the plugin. Slot Mix at 100% alone does not make a plugin wet-only; lowering it can blend unprocessed slot input back into the return.
The Effects Slots manual also explains why bypass can surprise you: disabling an effect does not stop audio passing through its slot. Bypassing the only reverb on a return can therefore expose a second dry copy. To compare the mix with and without that return, mute the return track rather than disabling its effect or the track's whole FX stack.
The same check belongs after loading a preset. Do not assume a preset preserves the wet-only settings you just made. A louder vocal after a preset change may be a dry-routing change, not better ambience.
Choose the right level control
If only the lead vocal has too much delay, lower the lead-to-Delay send. If every source has too much delay, lower the Delay return fader. Those moves affect different parts of the mix. The vocal mixing workflow helps with the direct chain; this parallel routing should support its clarity.
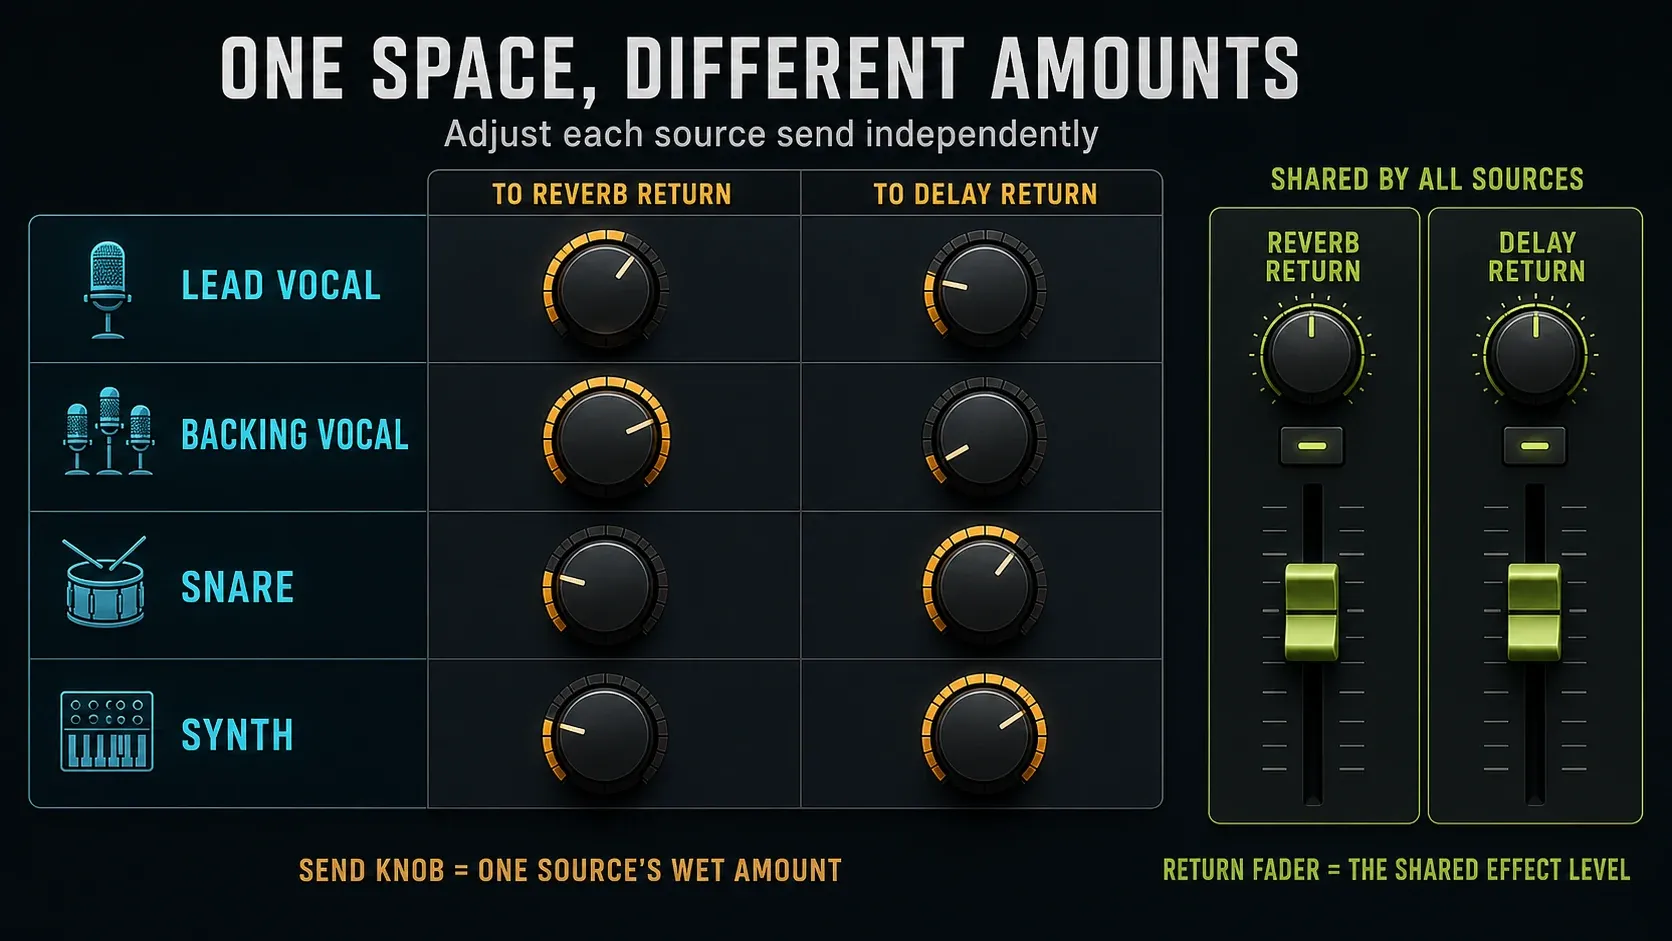
A shared return also means shared timing, tone and processing. It is useful when several sources should belong to the same space. Create another return when a part genuinely needs a different decay, rhythm or automated treatment; two returns are a teaching setup, not a limit.
Why does the effect change with the source fader?
Normal Mixer sends take audio after the source effects stack and fader. Lowering that fader reduces both the direct sound and new audio feeding the return. A reverb tail or delay repeat already inside the effect can continue; the plugin is not emptied simply because its input becomes quieter.
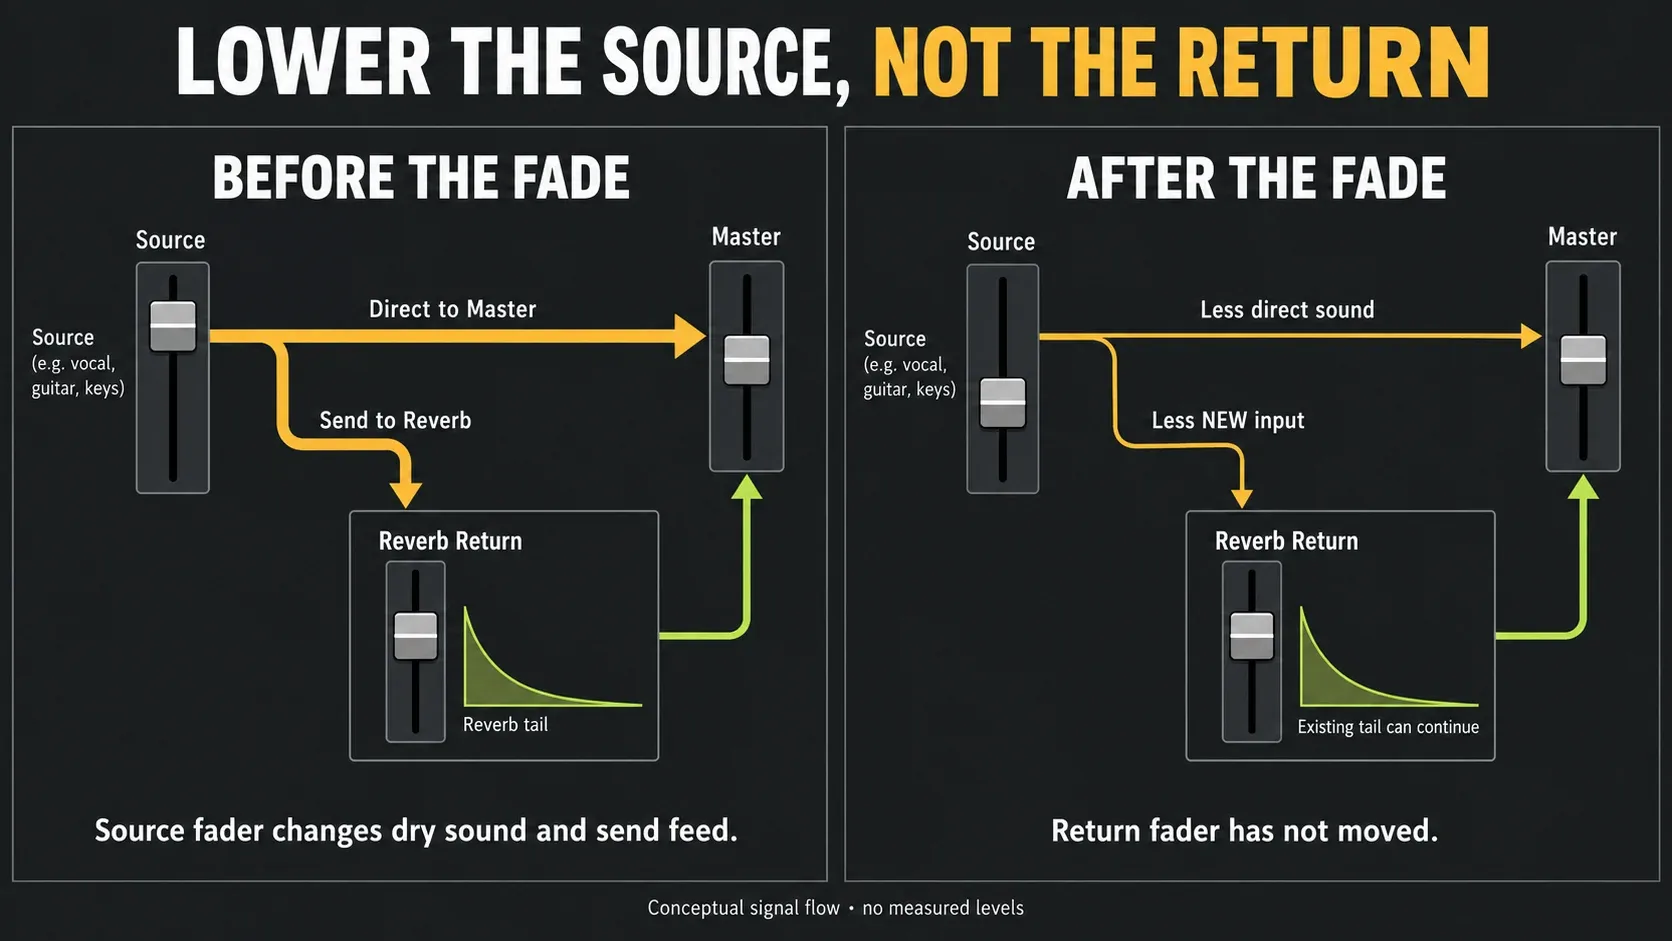
This keeps a source's feed following its balance, but does not promise an identical perceived dry/wet ratio. Existing tails and level-dependent processing complicate that relationship. Re-check the effects after major fader rides, using the gain-staging walkthrough if you need to trace a level change.
Use Fruity Send for a pre-fader copy
Use Fruity Send when later source-fader moves should not change the feed, or when the copy needs to leave before a particular effect. Its slot position determines which earlier processors are included. Pre-fader does not mean independent of every upstream volume change.
The Fruity Send manual gives this setup:
- Select the source Mixer track. Right-click the destination return's routing control and choose
Sidechain to this track, keeping the source's main route intact. - Load Fruity Send at the intended point in the source effects stack.
- Right-click its
Send toselector and choose the linked return. - Set Fruity Send
Dry: 100%when the source must continue through later slots and its fader. Its default Dry is 0%, which can silence that onward path. - Raise Fruity Send's Volume cautiously to feed the return. Leave the ordinary Mixer send at zero so an additional post-fader copy does not join it.
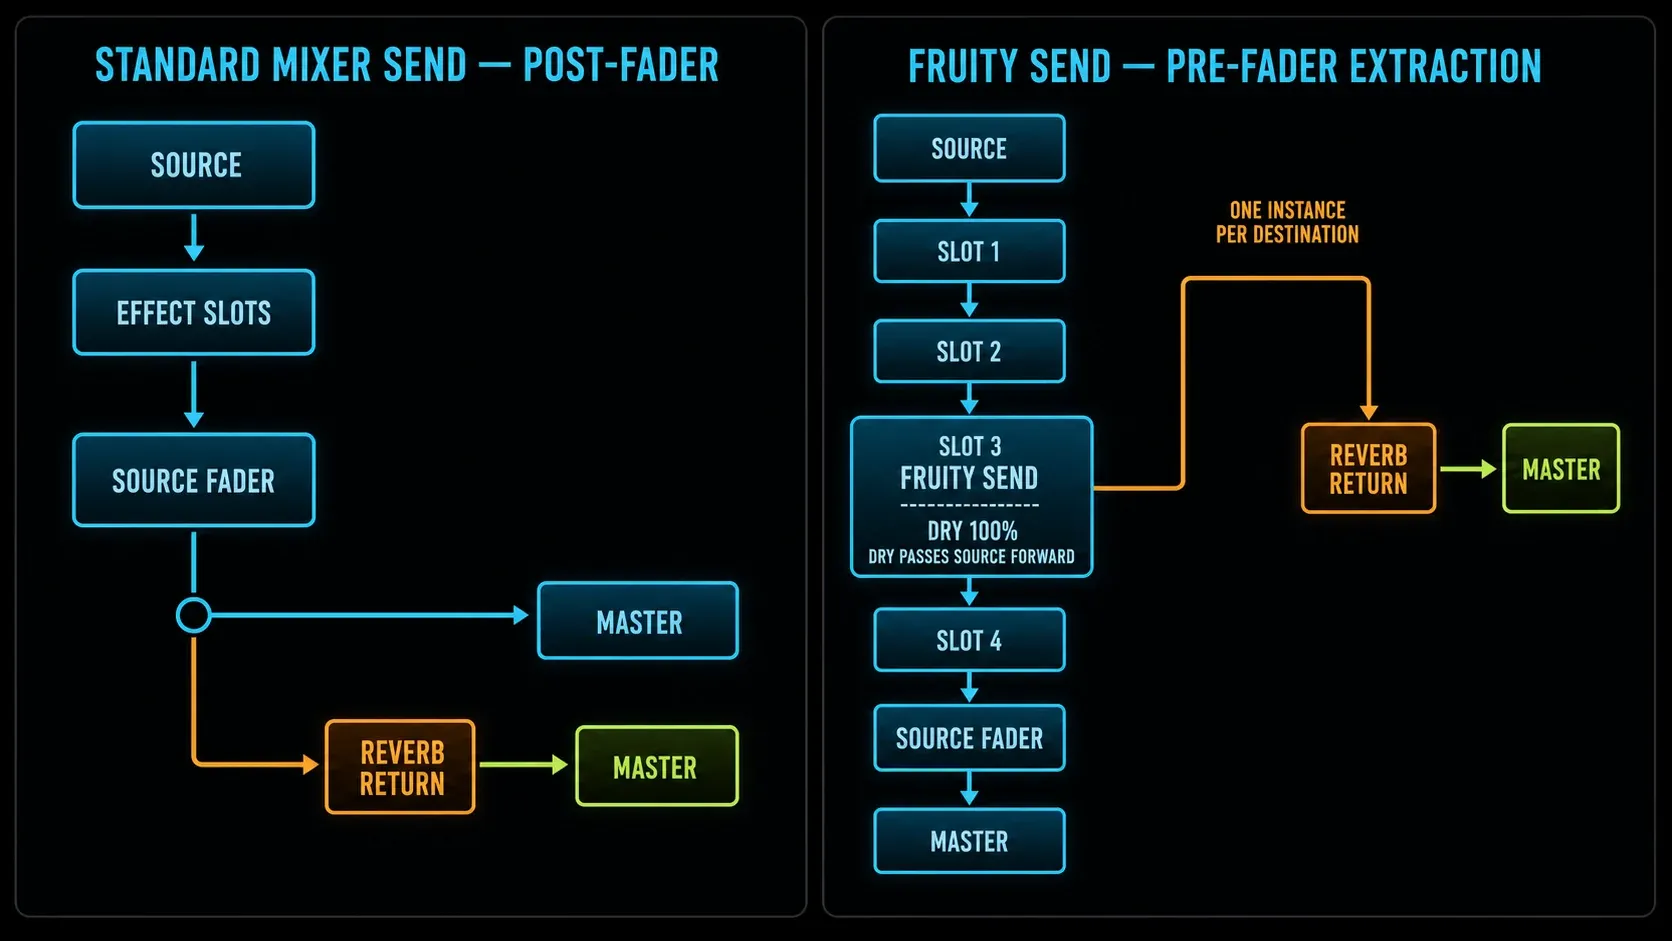
Use a separate Fruity Send instance for another destination. Keep pass-through enabled in each instance when you want the main source path preserved. Image-Line blocks this plugin on the Master and prevents feedback-loop sends; do not try to route the return back to its source.
The sidechain link here makes the destination available to Fruity Send. It is not automatically compressor ducking. For a vocal that should turn down a reverb while words are present, follow the separate sidechain compression workflow.
Automate one word, not every source
For a delay throw, select the source and right-click its send knob, then choose Create automation clip. Keep the send at zero before the chosen word, raise it over that word, and bring it back to zero afterward. Play through the transition: zero stops new feed but need not cut existing echoes. Leave a small baseline send only if you also want quieter echoes on the surrounding words.
Native control automation and Playlist range behavior are described in the Automation Clip documentation. The automation editing guide covers shaping and troubleshooting the clip. Check the start-of-song value too; creating an Automation Clip initializes the control's current value.
Delay 3 input Wet is another feed control, but on a shared return it affects every source entering that plugin. The return fader affects the combined audible return, including existing tails. Use source-send automation for one source; use a dedicated return if its whole effect needs separate movement.
Process and audition the wet path
EQ after the reverb shapes its output; EQ before it shapes its input. With delay, an external EQ after the plugin is not the same as Delay 3's feedback filter, which affects echoes on each loop. Choose the location that addresses the problem, then use the Parametric EQ 2 controls guide to make the filter change.
Compression after the effect controls the combined return. Compression before it changes the feed, not echoes already circulating inside the plugin. If you add a compressor, compare the timing with the Fruity Limiter guide. One loud source can make a shared processor react to the whole return.
To inspect wet sound alone in this simple direct-to-Master example, temporarily disconnect the source's direct Master route while leaving its send active. Do not mute the source or pull down its post-fader level: that also changes the feed you are trying to hear. Restore the original direct route immediately afterward. If the source reaches Master through a bus, identify that dry branch instead of blindly disconnecting tracks.
Reeverb 2 SEP changes the wet stereo signal. Delay 3 Ping pong alternates stereo channels; a mono input needs its Pan adjusted to create that bouncing effect. Check the stereo separation options and perform a mono compatibility check before keeping an impressive solo sound that weakens in the mix.
Keep tails and output under control
Several sends can build up more level than one. A high internal Insert meter is not automatically clipped audio: FL Studio's floating-point path has headroom. Plugins can still distort, and hardware output or fixed-depth export can clip. The official level guidance distinguishes these cases. If you hear unwanted distortion, find the first bad stage with the clipping diagnosis, rather than hiding it later.
Listen after the last note as well as during the chorus. In export settings, Tail → Leave remainder extends the render for decays; Cut remainder cuts at the chosen endpoint. The render Tail documentation explains the options. Check the actual file through the song export workflow; selecting an option is not proof the entire tail survived.
Troubleshoot one path at a time
- No effect: check the selected source, normal audible link, send level, plugin enable state, both wet levels where applicable, return fader and route to Master. A sidechain-only link is not the normal reverb input.
- Unexpected dry or louder sound: check plugin Dry, slot Mix and effect bypass before changing the source balance.
- Pre-fader source disappears: inspect Fruity Send Dry pass-through and the source's main route.
- Delay feeds every phrase: check which control the automation targets. Input Wet on a shared return is not a per-source selector.
- No distinct repeats: check Delay Model Off, input/output Wet, Time, Feedback and whether diffusion is smearing the echoes.
- Reverb disappears on a mono source: inspect Reeverb 2 SIDE mode before adding gain.
- Feedback grows: mute the return to stop listening to the buildup, reduce Feedback and resonance, and restart at a low level.
- Mix washes out: reduce the relevant send, shorten the effect or change its tone. Use the return fader when the whole shared effect needs less level.
Finish with the direct parts understandable, the effect audible where it belongs, and the intended tails intact. The Mixing library connects the next processing decisions; if basic track setup is still the obstacle, return to Start here before adding more routes.
FL Studio reverb and delay send FAQ
How do I create a reverb send in FL Studio?
Use an empty Mixer track as a Reverb return, load Reeverb 2, set DRY to 0% and WET to 100%, and leave slot Mix at 100%. Keep the return routed to Master and the source's main path intact, then create a normal audible source-to-return send and raise it cautiously.
Should a reverb send be 100% wet?
For this parallel setup, keep dry audio out of the return. In Reeverb 2 use DRY 0% and WET 100%, with ER adjusted separately. Leave the Mixer effect-slot Mix at 100%, then balance the effect with source sends and the return fader.
Which Dry control should I turn down in Delay 3?
Set output Dry to zero. Input Wet feeds the effect and output Wet controls processed output; both must allow enough signal through to hear echoes. Keep the effect slot enabled with Mix at 100%.
Are normal FL Studio sends pre-fader or post-fader?
Normal Mixer sends are post-fader. Fruity Send extracts a copy from its position in the source effects stack, before the source fader. Earlier effects and upstream level changes can still affect that copy.
Why does lowering the source also lower its reverb?
The normal send follows the source fader, so it receives less new input. A tail already inside the reverb can continue. Use Fruity Send if the feed specifically needs independence from that later fader.
Why is the return adding dry sound?
Check the plugin's Dry control, the slot Mix and whether the effect is bypassed. A bypassed slot still passes audio. Mute the return track when comparing its contribution, instead of bypassing the only wet effect.
How do I automate a delay throw for one vocal word?
Automate that source's send knob up over the word and back down afterward. Existing echoes can continue. Delay 3 input Wet can also control feed, but on a shared return it affects all sources entering the plugin.
How can I hear only the wet return?
In a simple direct-to-Master layout, temporarily remove the source's direct Master route while leaving its send active, then restore the route after listening. Muting the source or lowering its normal post-fader level also changes the feed.
Why did Fruity Send silence my source track?
Its Dry control defaults to 0%, blocking onward pass-through. Set Dry to 100% when the original must continue through later slots and the source fader, and confirm its main route remains connected.
Should EQ go before or after the return effect?
Before the effect, EQ changes its input; after it, EQ shapes its output. That is different from a delay's internal feedback filter, which acts on each loop. Choose the position that fixes the masking or tone problem you hear.