FL Studio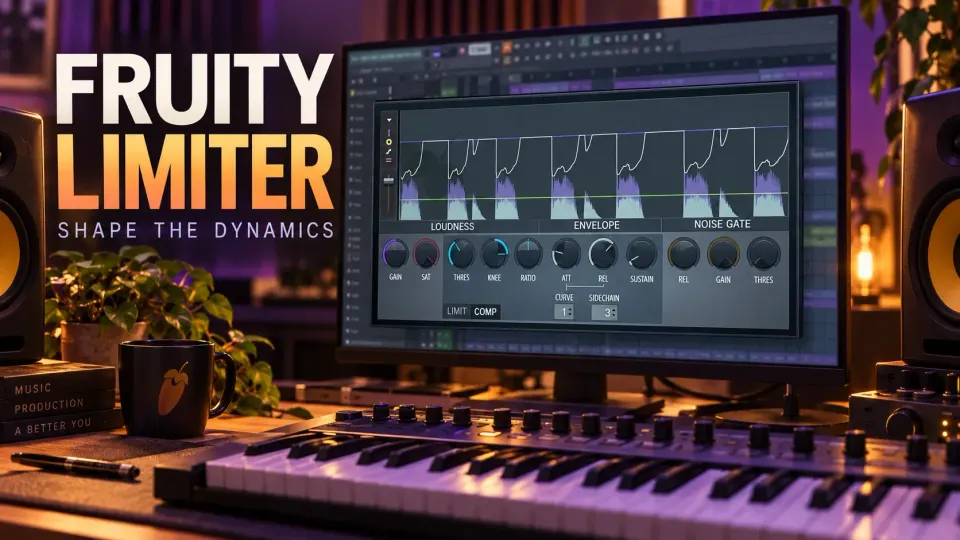
To use Fruity Limiter as a compressor, open COMP, lower Threshold into the source's blue RMS input trace and raise Ratio above 1:1. Adjust Attack and Release until the gain reduction serves the sound, then match perceived loudness before deciding whether it helped. A busier display is not a better mix.
There is one catch: COMP does not switch off the limiter, gate or saturation stages. Those processors follow the compressor. This guide separates their jobs so you can hear what you are changing, without copying a preset whose input level bears no resemblance to yours.
Compress with Fruity Limiter in eight steps
- Name the problem. Play a phrase containing both loud and quiet events. Decide whether you need steadier level, a different transient or deliberate pumping.
- Load the right instance. Select the Mixer track carrying that source and choose Fruity Limiter from an empty effect slot. Open COMP to expose its compressor controls.
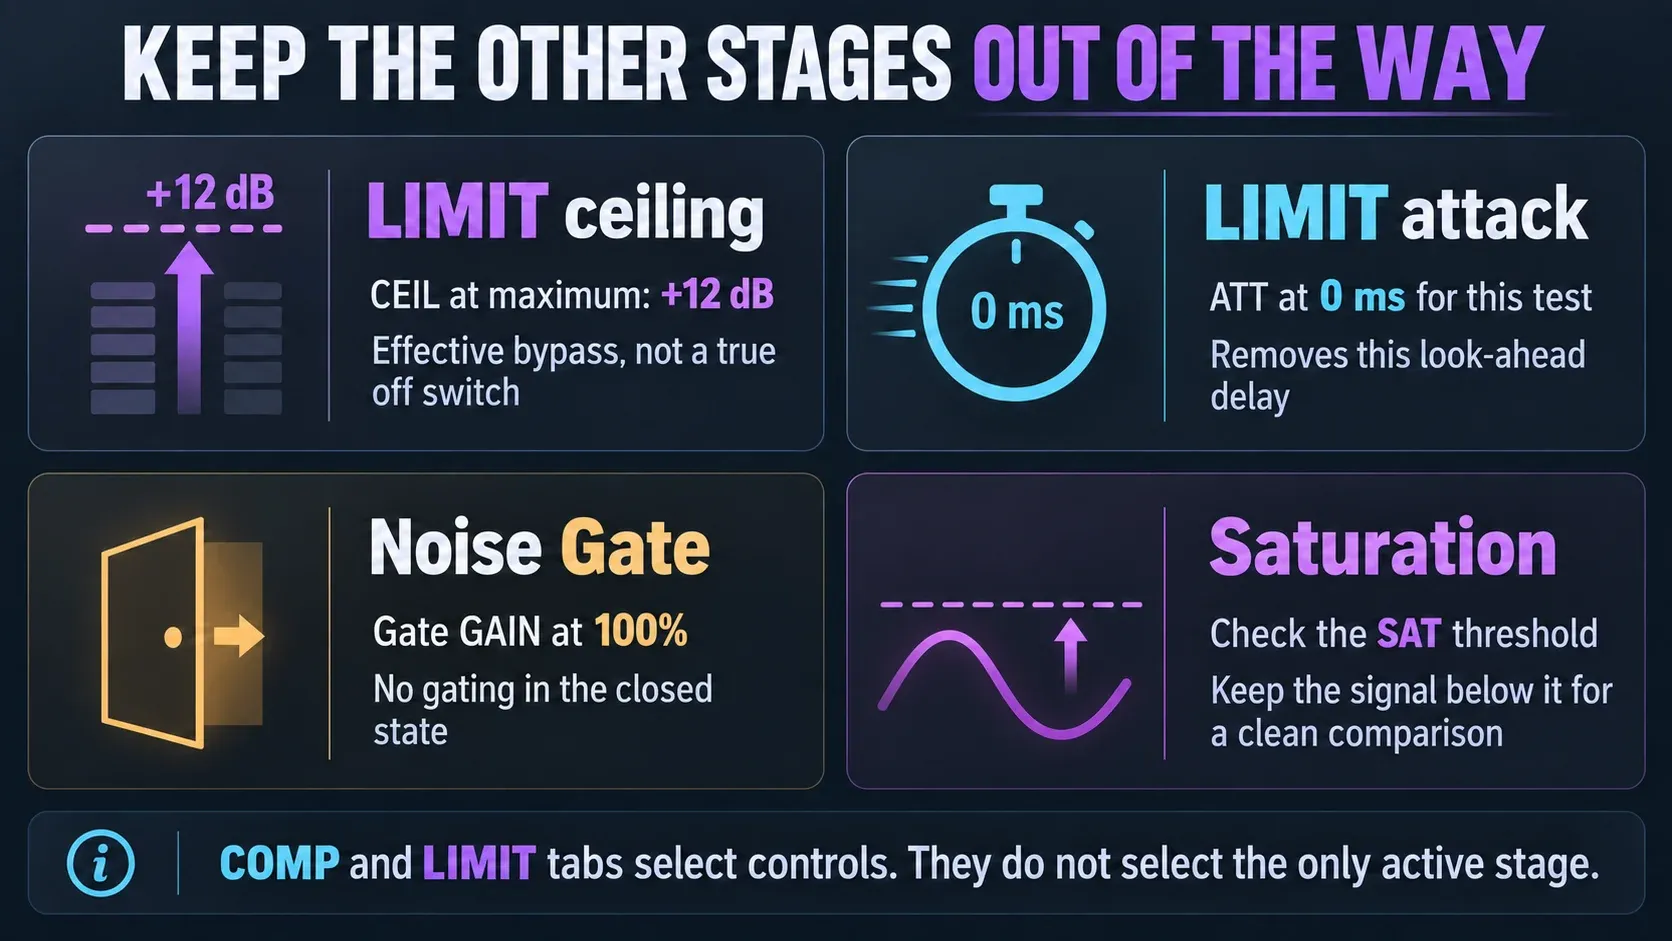
- Check the later stages. For this comparison, set LIMIT CEIL to +12 dB and LIMIT ATT to 0 ms, keep the signal below CEIL and SAT, and set Noise Gate GAIN to 100%. This is an effective limiter bypass, not a true off switch.
- Set the compression amount. Return to COMP, raise Ratio above 1:1 and lower Threshold while watching the blue RMS input and white gain envelope. Stop when the intended events receive useful reduction.
- Choose the transition. Adjust Knee for a harder or softer entry into compression. It changes the transition around a level threshold, not the attack time.
- Tune the response. Adjust COMP Attack and Release against the phrase. Change Sustain or Curve only when the averaging or envelope shape needs attention.
- Compare fairly. Adjust the purple Gain up or down to approach the bypassed version's perceived loudness. Re-check CEIL, SAT and downstream peaks after changing Gain.
- Keep a useful result. Bypass only this effect slot, replay the same phrase and listen in the full mix. Keep compression only if the original problem is better controlled.
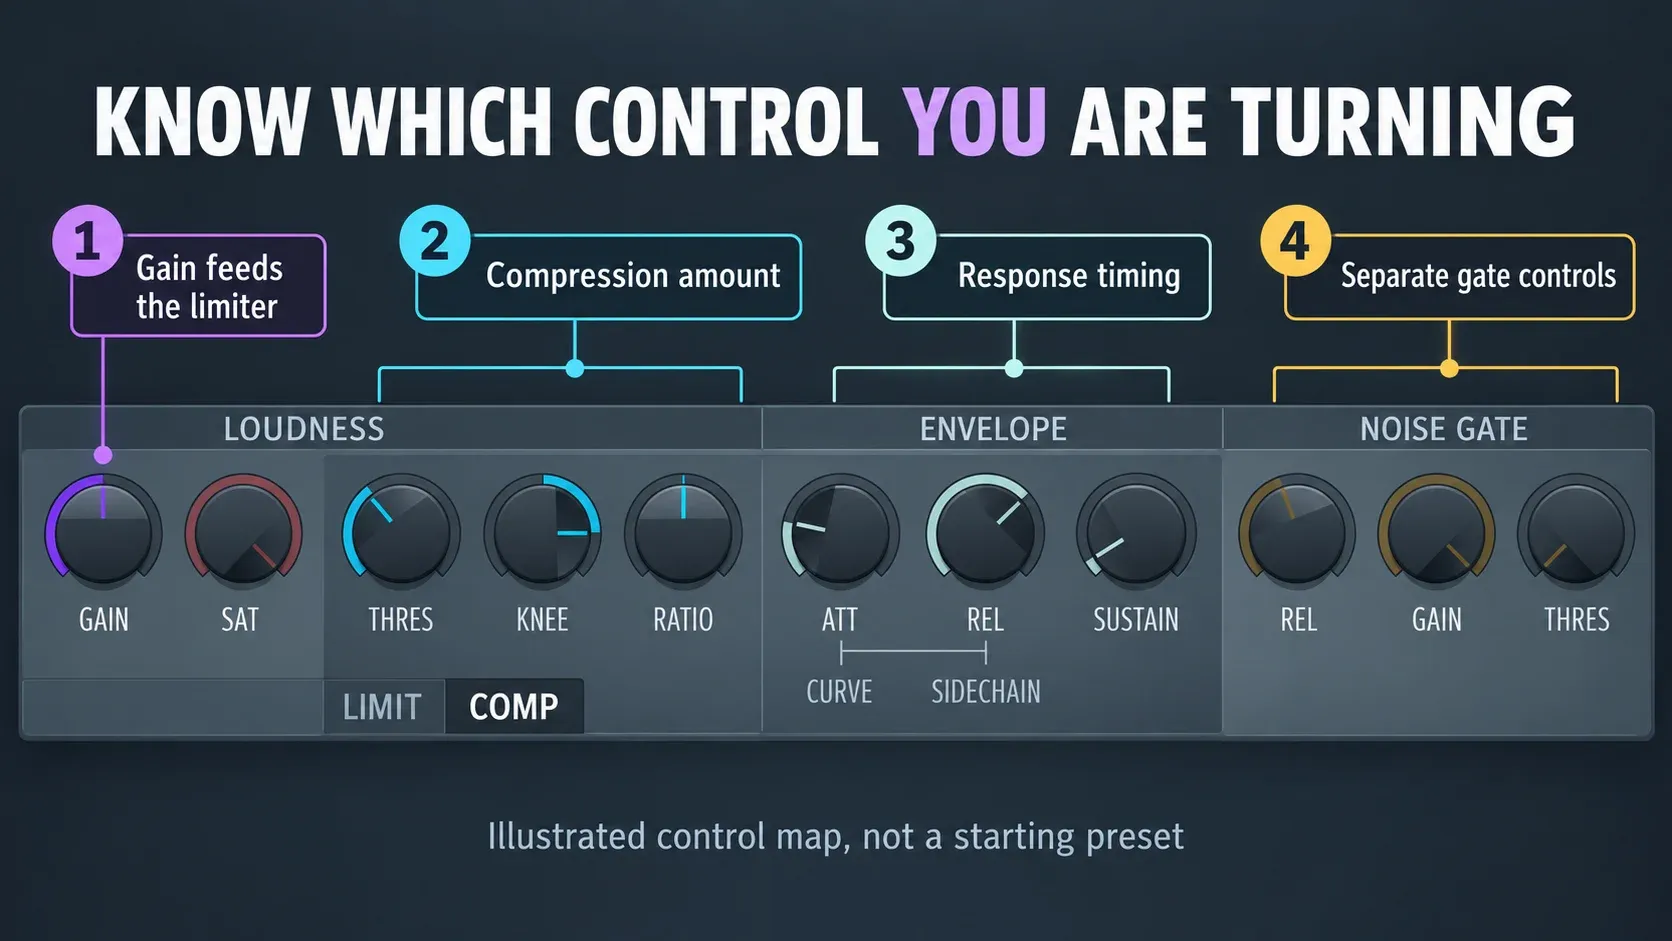
Load the plugin and follow the signal
Use the Mixer track that actually receives the instrument or recording. In an empty slot, open the effect menu and select Fruity Limiter; if it is not in the favorites list, use the plugin selector. Clicking the loaded effect's name opens its interface. If this routing is still unfamiliar, work through the Mixer setup and routing guide first.
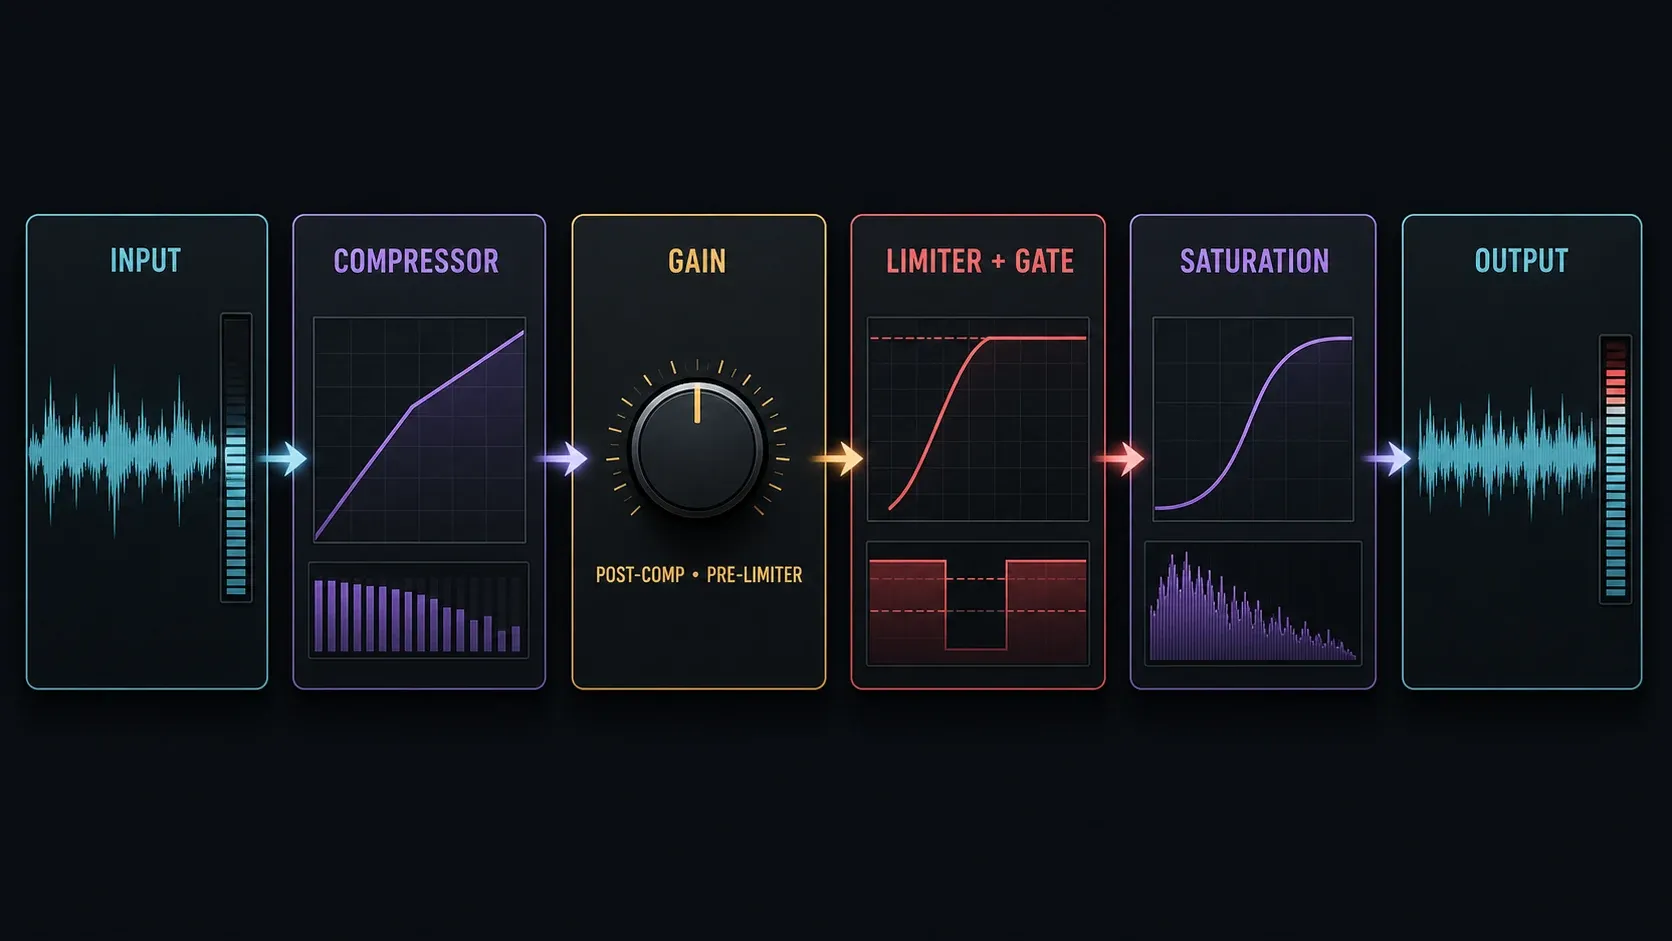
The Image-Line Fruity Limiter manual gives this order: input → Compressor → Gain → Limiter with integrated Noise Gate → Saturation → output. LIMIT and COMP select the controls you see, not the only processor that runs.
The purple GAIN is post-compressor and pre-limiter on either tab. It is not the same as the GAIN in the Noise Gate group at the right. Raising the purple control changes the level feeding the later stages; changing gate Gain changes how much signal passes when the gate is closed.
Keep limiting, gating and saturation separate
On LIMIT, turn CEIL to its maximum +12 dB and ATT to 0 ms for this learning exercise. Image-Line calls this an effective bypass and explicitly says the limiter cannot be disabled completely. Keep the signal reaching it below that ceiling; +12 dB is not permission to drive the chain harder.
Check two more controls before blaming the compressor. Leave Noise Gate GAIN at 100%, which passes the signal without attenuation even in the gate's closed state. Keep the signal below the SAT threshold for a clean comparison. SAT controls a threshold, not a wet percentage: turning it left lowers that threshold and increases saturation.
Now return to COMP. This setup helps separate compression from other processing; it is not a recommended mastering preset. If you later want limiting or saturation, enable their effect deliberately and judge that change separately. The stock-plugin mastering workflow covers final-output decisions.
Read Threshold, Ratio and Knee together
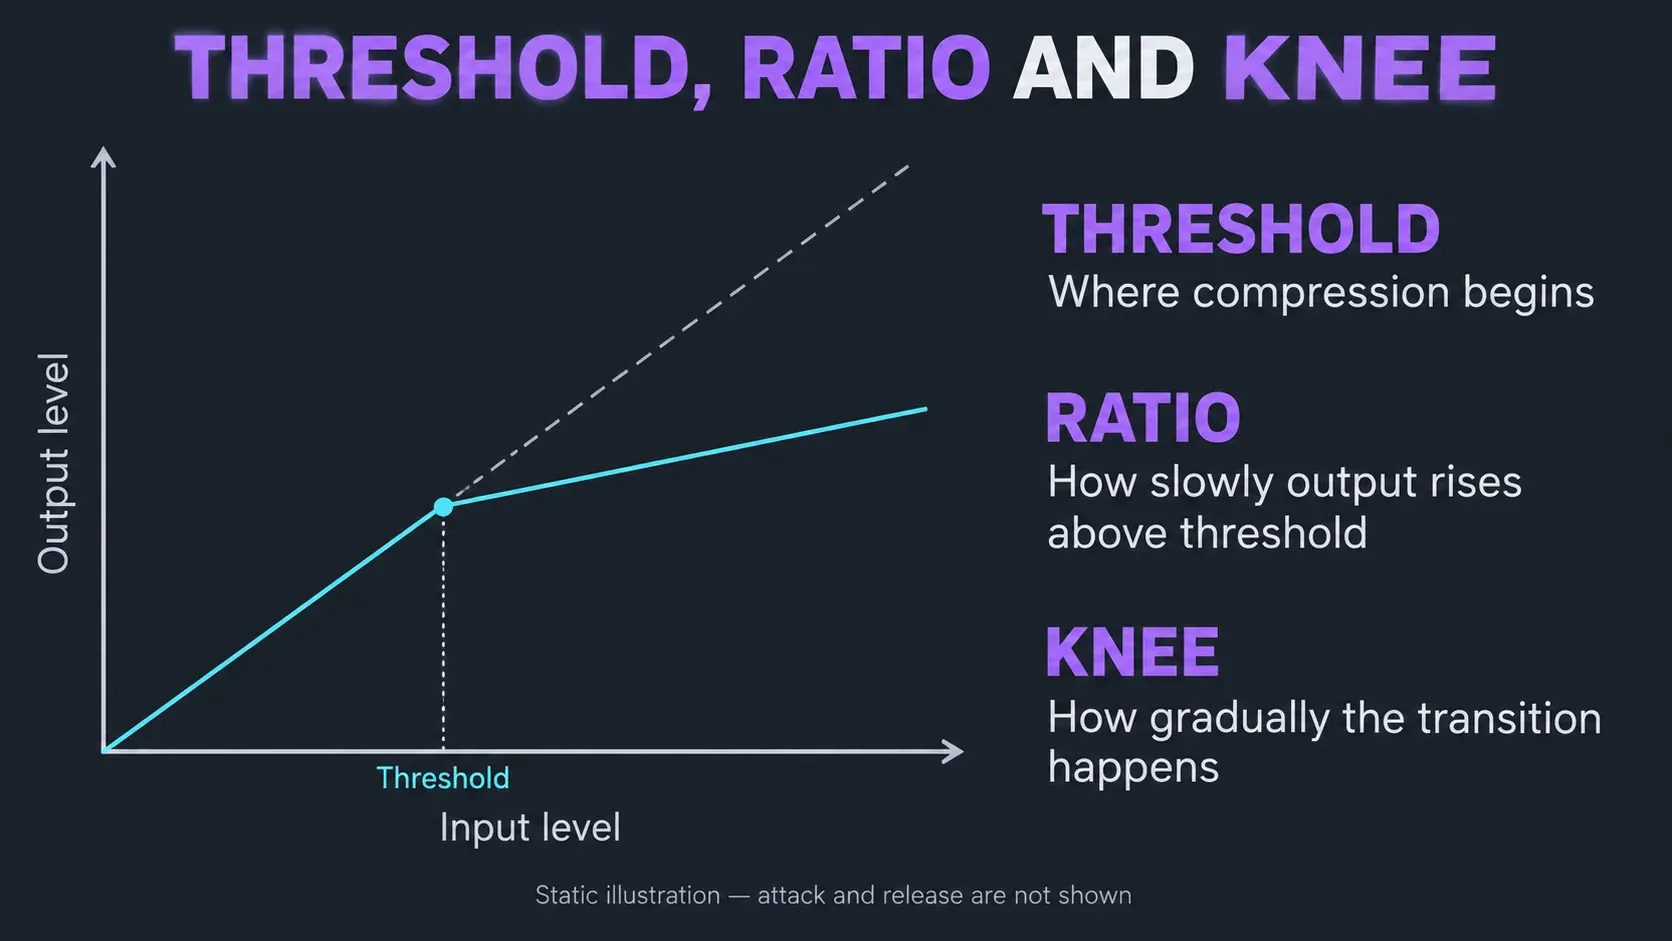
Threshold places the compression boundary. Lowering it brings more of the performance into the working range. Fruity Limiter's compressor follows RMS (root mean square), an averaged level, not just instantaneous peaks, so compare the threshold with the blue analysis trace. A short raw peak can look high without producing the reduction you expected.
Ratio controls how much the output rises as the input exceeds that boundary. As a static example, 4:1 means a 4 dB input increase above the threshold produces a 1 dB output increase in the fully compressed region. This is the standard ratio relationship explained by Image-Line, not a prediction of a moving transient or a preset for this plugin.
Knee changes how gradually the chosen ratio is reached around the threshold. A hard knee has a more definite bend; a soft knee spreads the transition across a range of levels. Do not treat that range as a delay. Hold the Knee control to see its compression curve, then listen to whether the loud events enter compression naturally or too abruptly.
Two Attack controls, two different jobs
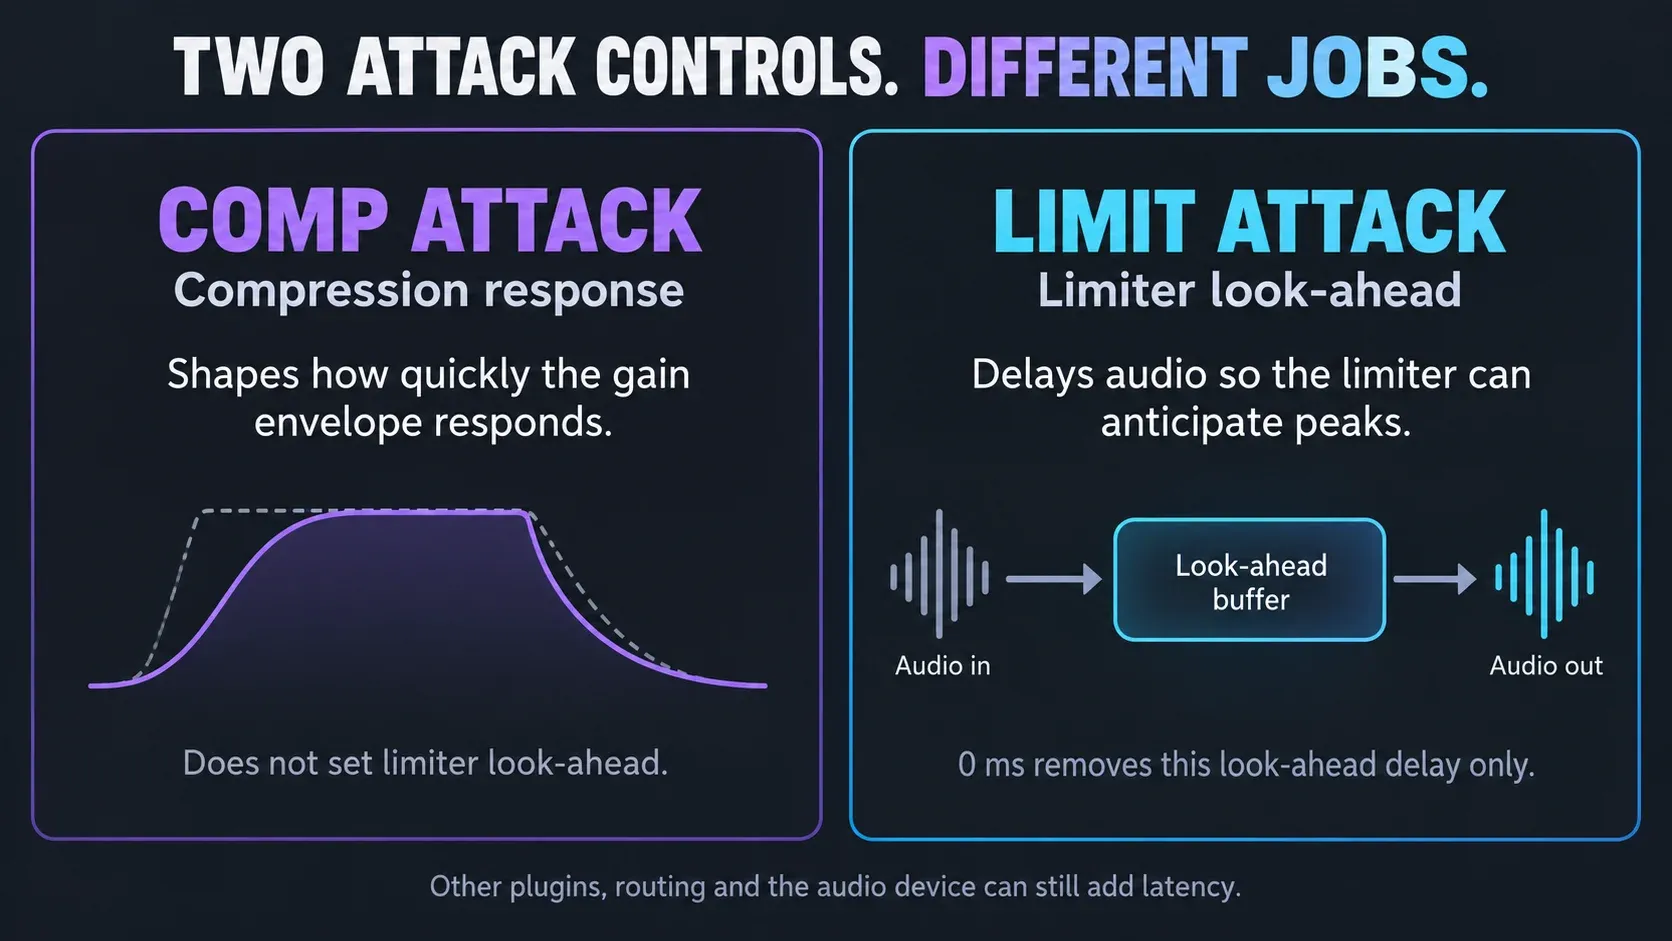
COMP ATT sets how quickly the compression envelope responds. A shorter attack can reduce more of a sound's initial edge; a longer one can let more of that edge through before controlling the body. Try both on the same phrase. A drum that looks tidier but loses its place in the groove has not necessarily improved.
LIMIT ATT sets limiter look-ahead and affects plugin latency. Audio is delayed so the limiter can anticipate incoming peaks. COMP Attack does not set that look-ahead. Setting LIMIT ATT to 0 ms removes this delay, not every delay in the project or audio device.
Image-Line also notes that look-ahead greater than zero is needed to trap transients before they pass the limiter. Do not combine the zero-look-ahead learning setup with a promise of catching every peak.
Release, Sustain and Curve: listen for the return
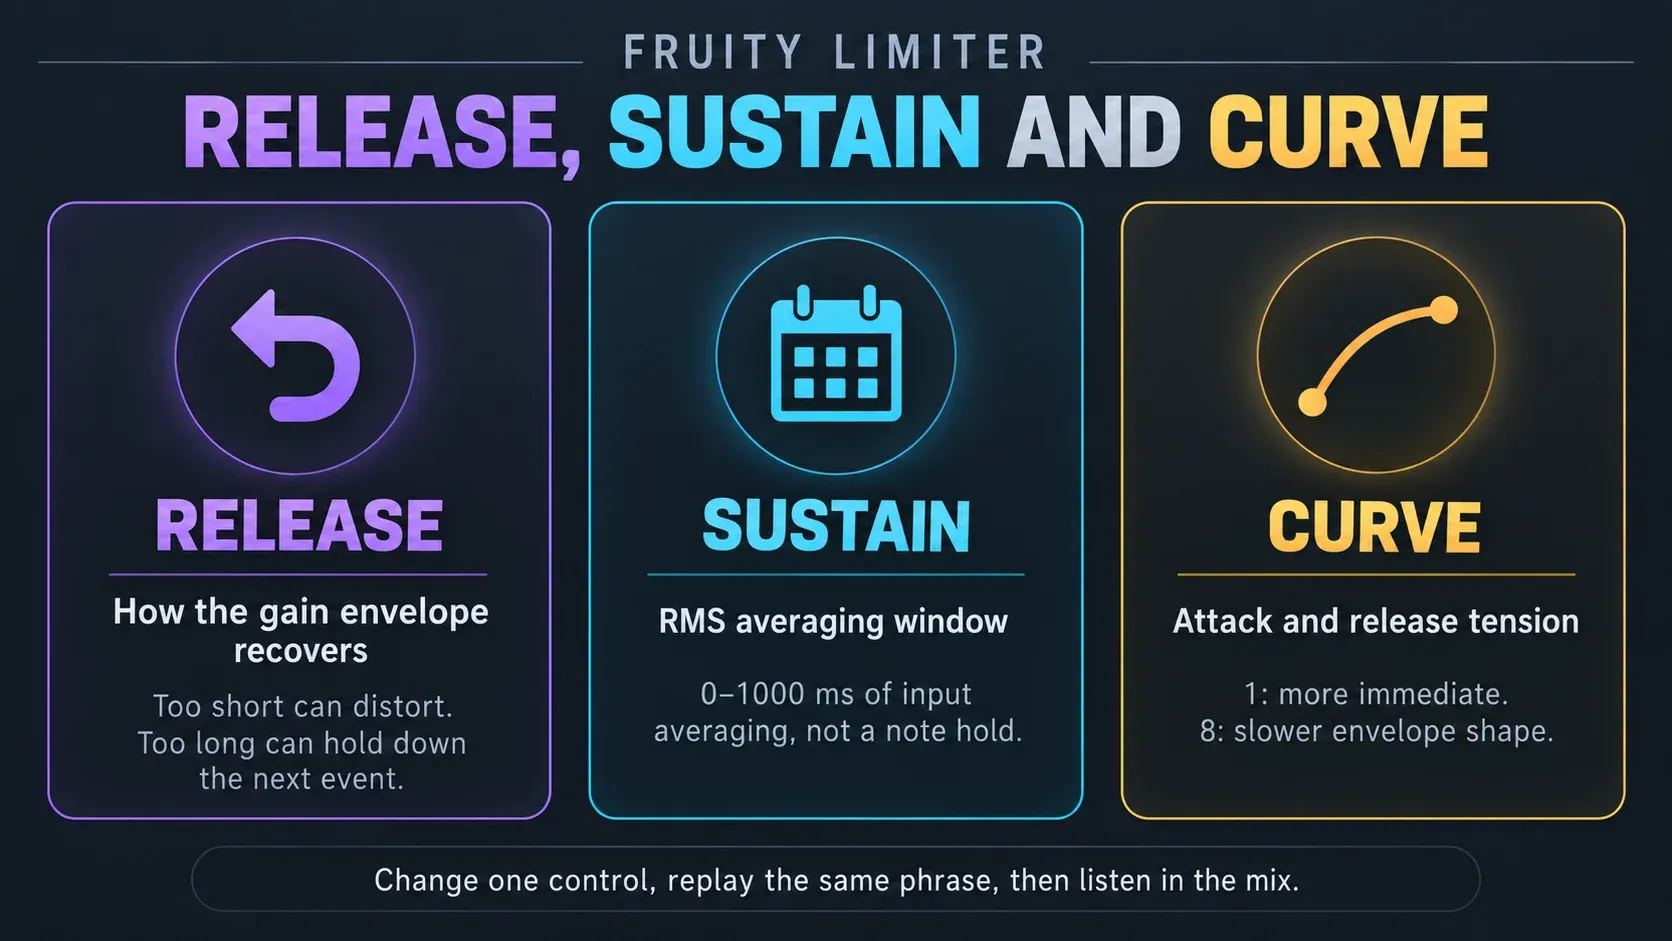
Release is the main influence on the compression envelope's recovery. Too short can cause distortion; too long can leave the next event turned down. Shorten it while listening for recovery between the events you want to keep distinct, then lengthen it if the sound becomes gritty or restless. Tempo can guide listening, but one note-length formula is not a universal setting.
Sustain sets the RMS averaging window from 0 to 1000 ms. It is not a note-envelope hold control. A longer window considers more of the recent input and helps prevent the envelope from releasing too early. If Threshold seems unresponsive to a brief peak, inspect this averaging before adding more Ratio.
For learning, you can try a low Sustain value to make its contribution easier to separate, then increase it and replay the same phrase. Keep the change only if the detector follows the source more usefully. Bass does not automatically need the longest window, and every vocal does not need the same one.
Curve changes the tension of both Attack and Release, from 1, described as immediate, to 8, described as slow. It shapes how the envelope travels through time rather than replacing the timing controls. Its difference is easier to see with a longer Release; use your ears when the display change is subtle.
Read the analysis display without confusing the traces
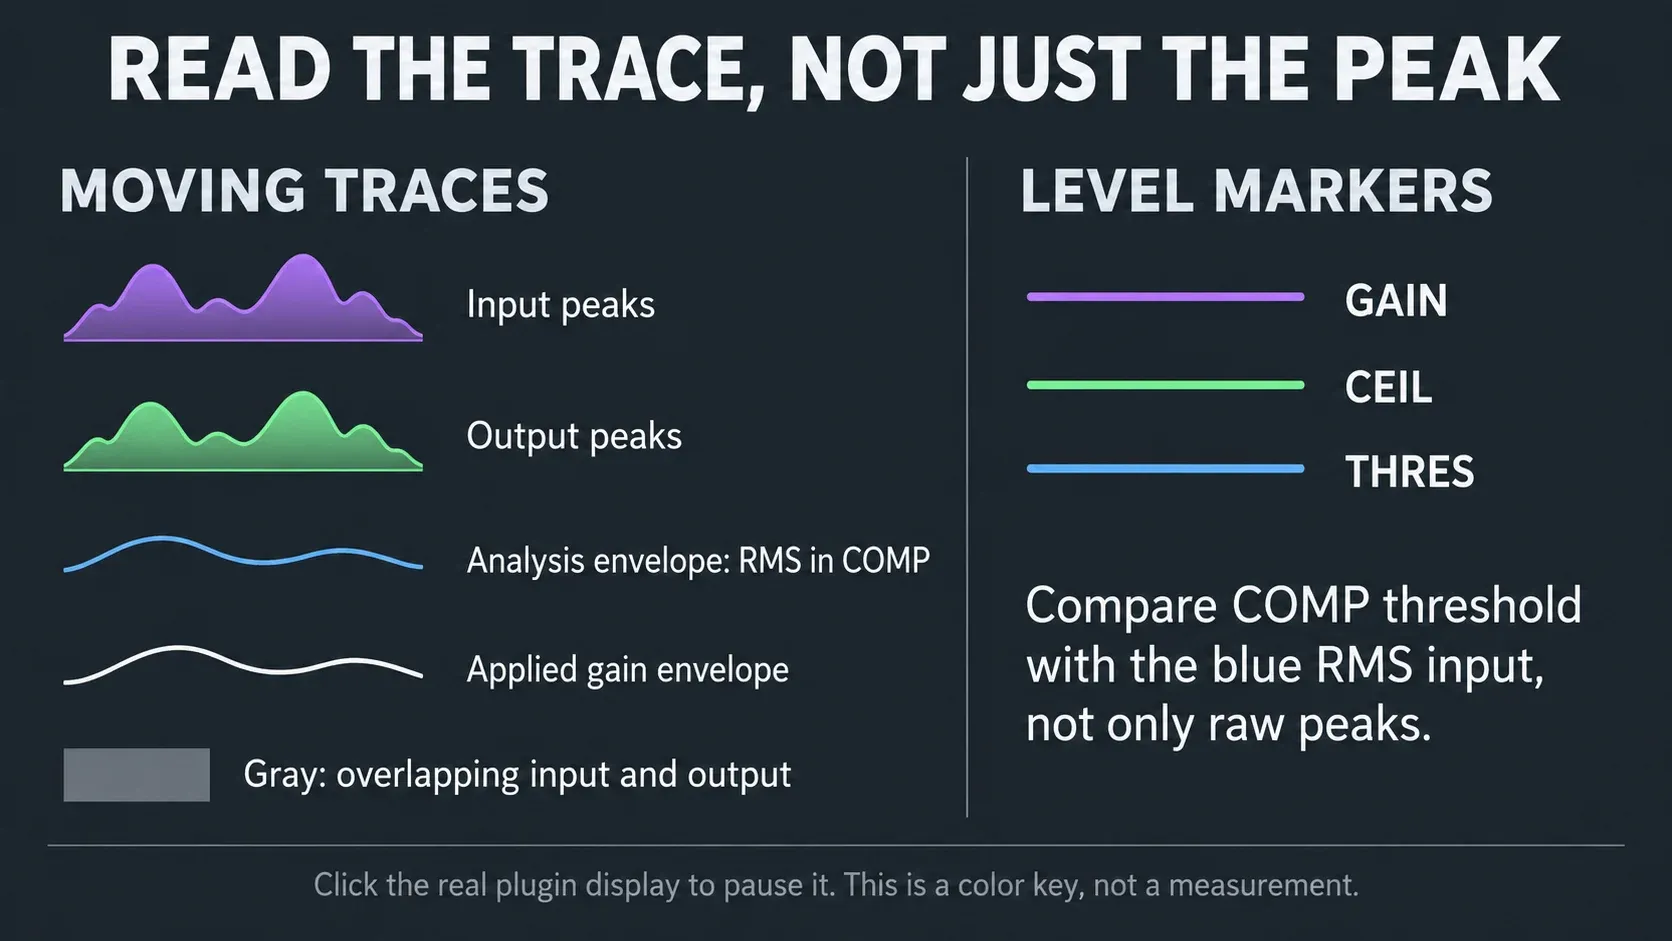
Input peaks are purple and output peaks are green; their overlap appears gray. The analysis envelope is blue, and the applied gain envelope is white. In COMP, the blue trace represents RMS input. The limiter works from peaks instead. These are different views of the signal, not contradictory meters.
The level markers have their own meanings: purple is GAIN, green is CEIL and blue is compressor Threshold. With default markers overlapping at 0 dB, they can look like one white line. Click the actual plugin display to pause it and inspect an event; use the display options if a trace or marker is hidden.
Watch where reduction begins and whether it recovers before the next event that matters. There is no universal number of decibels to chase. A smooth trace can still accompany a dull drum, and a lively trace can be exactly the movement you wanted.
Compare without letting loudness win
Adjust the purple Gain in either direction until the processed and bypassed versions feel close in loudness. Matching peak readings alone is not enough: the official mixing and level guidance explains why peaks and perceived loudness differ. Keep monitoring volume fixed and replay the same section.
Use the effect slot's disable switch to bypass this instance. Audio still passes through the track and its other active effects. The Mixer track's FX switch disables the whole stack, which changes more than the compressor. These separate controls are documented in the Effects Slots reference.
To compare two settings instead, use Store in spare state, the down-arrow control in Fruity Limiter's comparison bank, before making a change. Use Flip with spare state to swap the stored and current settings. That compares two plugin states; it does not automatically provide a dry version, and it is not a substitute for saving your project.
After changing Gain, check whether the limiter or SAT now reacts, then check downstream effects and final output. The gain-staging guide follows those levels through the rest of FL Studio.
Choose the EQ order and the right compression job
Effects run from the top slot downward. With the source controlling its own compressor, EQ before Fruity Limiter changes what its RMS detector receives. EQ after it shapes the compressed result instead. A bass cut before compression can reduce the low end's influence on detection; whether that helps depends on what you wanted controlled.
Use the Fruity Parametric EQ 2 guide to choose the filter, then re-check level and compression after changing the order. If a different track supplies an external sidechain, EQ on the passing audio does not automatically reshape that separate detector signal.
- Drums: decide whether to control the transient or emphasize the body. Compare the groove, not just the highest peak.
- Bass and 808: control unwanted level jumps without erasing intended note movement. Check the kick relationship using the 808 mixing workflow.
- Vocals: separate phrase-level inconsistency from noise, sibilance and room sound. The stock vocal chain treats these as different jobs; a gate cannot selectively remove room noise while the wanted voice keeps it open.
- Buses: if the whole group ducks whenever one source hits, identify that source before adjusting every timing control.
This guide focuses on self-compression. External sidechain compression uses another Mixer track to control the envelope. On ordinary insert tracks the SIDECHAIN choices depend on Mixer sidechain routing; on the Master, Image-Line documents an exception where all tracks are available. Follow the dedicated Fruity Limiter sidechain routing guide for that workflow.
Parallel compression blends a compressed path with a dry path. LIMIT Attack can delay the processed path; Image-Line recommends either 0 ms for that control or Plugin delay compensation → Automatic in the Mixer menu. The PDC reference explains compensation and manual offsets. Other plugins can still add delay, so zero LIMIT Attack alone does not prove the complete parallel routing is aligned.
Troubleshoot the cause, not every knob
- No reduction: confirm audio reaches this instance, the slot is enabled and the detector source is the intended one. Raise Ratio above 1:1 and lower Threshold into the blue RMS input. Opening COMP alone does not enable processing.
- Unexpected limiting or grit: inspect CEIL, SAT and the level after purple Gain. Also lengthen an excessively short compressor Release. Do not assume all distortion comes from one stage.
- Lost transient: try a longer COMP Attack or less compression, then compare at similar loudness. Check that the later limiter is not catching the transient instead.
- Next hit stays ducked: shorten Release or the Sustain window one at a time. Listen through several events, not just the first hit after pressing play.
- Quiet tails disappear: inspect Noise Gate Gain, Threshold and Release. The gate opens when its input crosses its threshold and closes according to its release after falling below it.
- New delay or parallel phasing: inspect LIMIT Attack and PDC, including latency from other effects. COMP Attack is not the limiter's look-ahead control.
- Bypass always loses: check perceived loudness before assuming the processed version is better. The purple Gain may simply have made it louder.
Compression does not restore peaks already lost to clipping at an interface or earlier nonlinear stage. Use the clipping diagnosis to locate the first bad stage. Keep the final output from clipping; a raised limiter ceiling inside this exercise is not a safe delivery ceiling.
If a section needs a different threshold, make the change deliberate. Native automatable controls offer Create automation clip in their right-click menu, as the Automation Clip documentation explains. Follow the automation workflow for repeatable changes rather than moving several timing controls at once.
Keep the mix as the reference
Before keeping the plugin, check the loudest section, the quieter phrase and the full arrangement. Can you name what improved? Does the attack still belong to the sound? Does the next event recover? Are Gain and the later stages behaving as intended?
For the surrounding signal chain, return to the Mixing library. If routing and basic setup are still the obstacle, the Start here route comes first. There is no requirement to compress a source that already works.
Fruity Limiter compression FAQ
How do I make Fruity Limiter compress audio?
Load it on the source's Mixer track, open COMP, raise Ratio above 1:1 and lower Threshold into the blue RMS input. Tune COMP Attack and Release, then compare at similar loudness while checking the later limiter, gate and saturation stages.
Why is Fruity Limiter not compressing?
Check the incoming audio, effect-slot enable switch and detector source. Ratio may be at 1:1, Threshold may be too high, or Sustain may average a short peak below the working range. Watch the blue RMS trace and white gain envelope.
Can I turn off the limiter while using compression?
Image-Line describes LIMIT CEIL at +12 dB and LIMIT ATT at 0 ms as an effective bypass, not a complete off switch. Keep the signal below CEIL and SAT and check Noise Gate Gain at 100% when judging compression alone.
What is the difference between COMP and LIMIT Attack?
COMP Attack controls compression response. LIMIT Attack sets limiter look-ahead and adds plugin delay. Setting LIMIT Attack to 0 ms removes that look-ahead delay, not all latency in the project or audio device.
What does Sustain do?
In COMP, Sustain sets the RMS input-averaging window from 0 to 1000 ms. A longer window helps prevent early envelope release. It is not a note-envelope hold control.
What does Curve change?
Curve changes both Attack and Release tension, from 1, described as immediate, to 8, described as slow. It shapes the envelope rather than replacing the Attack and Release time settings.
Does Knee change attack time?
No. Knee changes the transition from no compression to the selected ratio around the threshold. A softer knee spreads that transition across a range of input levels; Attack controls response over time.
Why does turning up Gain change more than loudness?
The purple Gain is after the compressor but before the limiter. Raising it can make later processing react more, depending on the signal level and the limiter and SAT thresholds. It is separate from the Noise Gate Gain control.
How much gain reduction should I use?
There is no universal target. Use the reduction that solves the source's level, transient or movement problem, then compare at similar perceived loudness in the full mix.
Is ordinary compression the same as external sidechaining?
Self-compression follows the audio passing through the plugin. External sidechaining uses another Mixer track to control the envelope. That changes the detector source and requires the appropriate routing and SIDECHAIN selection.