FL Studio
Fruity Reeverb 2 works best when you treat it as four connected decisions: when the room begins, how large and dense it feels, how the tail changes tone, and how much of that tail reaches the mix. Start with the dry source still clear. Use DELAY to separate the transient from the first reflection, pair SIZE with a believable DEC time, raise DIFF when the tail sounds like scattered echoes, and remove low or high energy before it enters the reverb engine.
On an insert, balance DRY, ER and WET inside the plugin. On a dedicated send track, set DRY to 0% and WET to 100%, then control the amount from the Mixer send level. That split prevents two different wet/dry controls from fighting each other.
This guide maps every control, gives practical starting relationships for vocals, drums and leads, and fixes the four failures that matter most: mud, metallic ringing, blurred transients and a tail that feels detached from the source.
What Fruity Reeverb 2 actually does
Fruity Reeverb 2 simulates an acoustic space by building early reflections and a decaying reverberant tail around the input. Image-Line documents tails of up to 20 seconds, but that is capability, not a target. Most mix problems come from using more duration and more spectrum than the source needs.
The official Fruity Reeverb 2 manual warns that reverb is easy to overdo and can turn a busy mix washed-out and muddy. It also says reverb should rarely be applied across the entire Master track. A shared send is usually easier to control because several sources can enter the same room while each keeps its own send amount.
Fruity Reeverb 2 is one of the FL Studio stock effects covered in our stock-plugin guide. You do not need a separate “Fruity Reeverb 2 VST” download to use it inside FL Studio.
Read the interface as six control groups
The interface looks compact because timing, tone and blend controls share one panel. Read it from left to right:
- Input mode and filters: MID/SIDE, H.CUT and L.CUT decide which stereo component and frequency range enters the reverb engine.
- Room onset: DELAY sets predelay, and TEMPO switches that delay to beat-related values.
- Room shape: SIZE changes the apparent room size and DIFF changes reflection density.
- Tail movement and low-frequency behavior: MOD/SPEED animate the reverb time; BASS/CROSS change low-frequency decay below the crossover.
- Tail duration and brightness: DEC controls overall decay and DAMP changes how quickly high frequencies die away.
- Output blend and width: DRY, ER and WET set the three output components; SEP changes only the wet stereo signal.
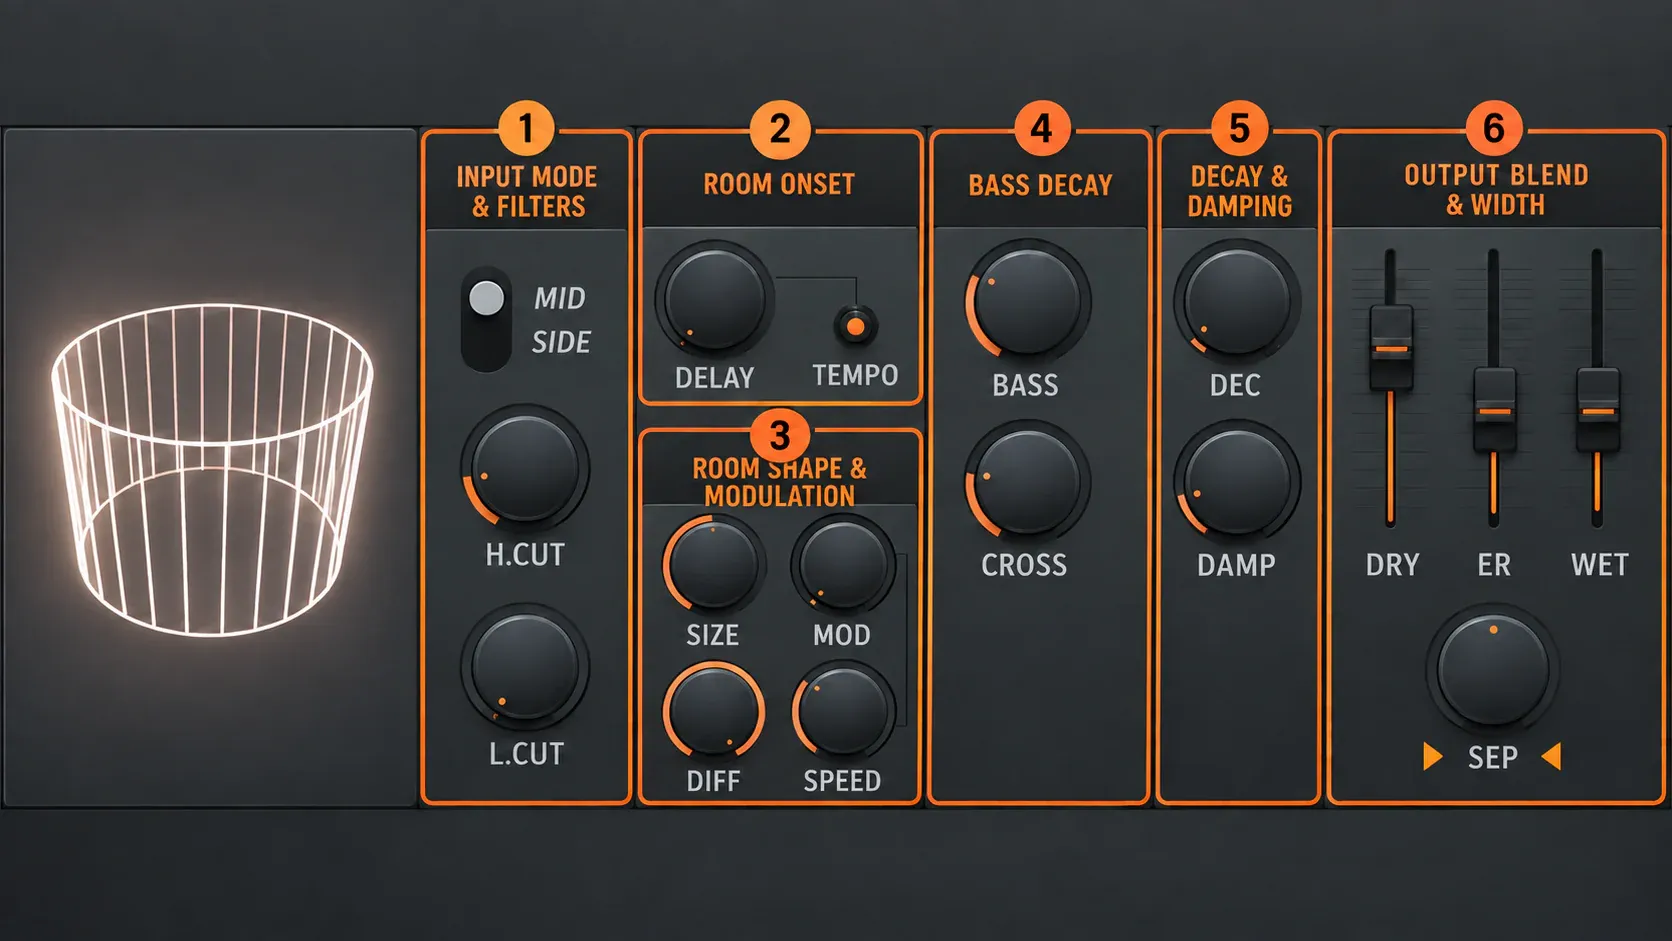
That grouping keeps you from fixing the wrong stage. If the tail is muddy, lowering WET may hide the symptom, but L.CUT or a shorter DEC usually addresses the cause. If the source loses attack, DIFF is not the first control to reach for; DELAY and WET are.
Build the space with predelay, size and decay
DELAY controls the time between the direct sound and the first reflection. A short predelay makes the room attach immediately to the source. A longer predelay leaves a pocket of dry transient before the room arrives. The TEMPO switch lets that gap follow beat-related values, which is useful when a free-time predelay feels rhythmically awkward.
Useful editorial starting points are intentionally broad:
- 0–15 ms: room feels fused to the source; useful when cohesion matters more than separation.
- 15–40 ms: clearer consonants and drum attacks while the room still feels connected.
- 40–80 ms: obvious separation or a deliberate rhythmic gap; easier to hear as an effect.
These are starting ranges, not presets. Tempo, source envelope and DEC all change the result.
SIZE changes the apparent scale of the virtual room. DEC sets how long the reverb takes to fall to −60 dB. The official relationship is simple: small rooms generally make sense with shorter decay, while large rooms support longer decay. Breaking that relationship can be creative, but it should sound intentional.
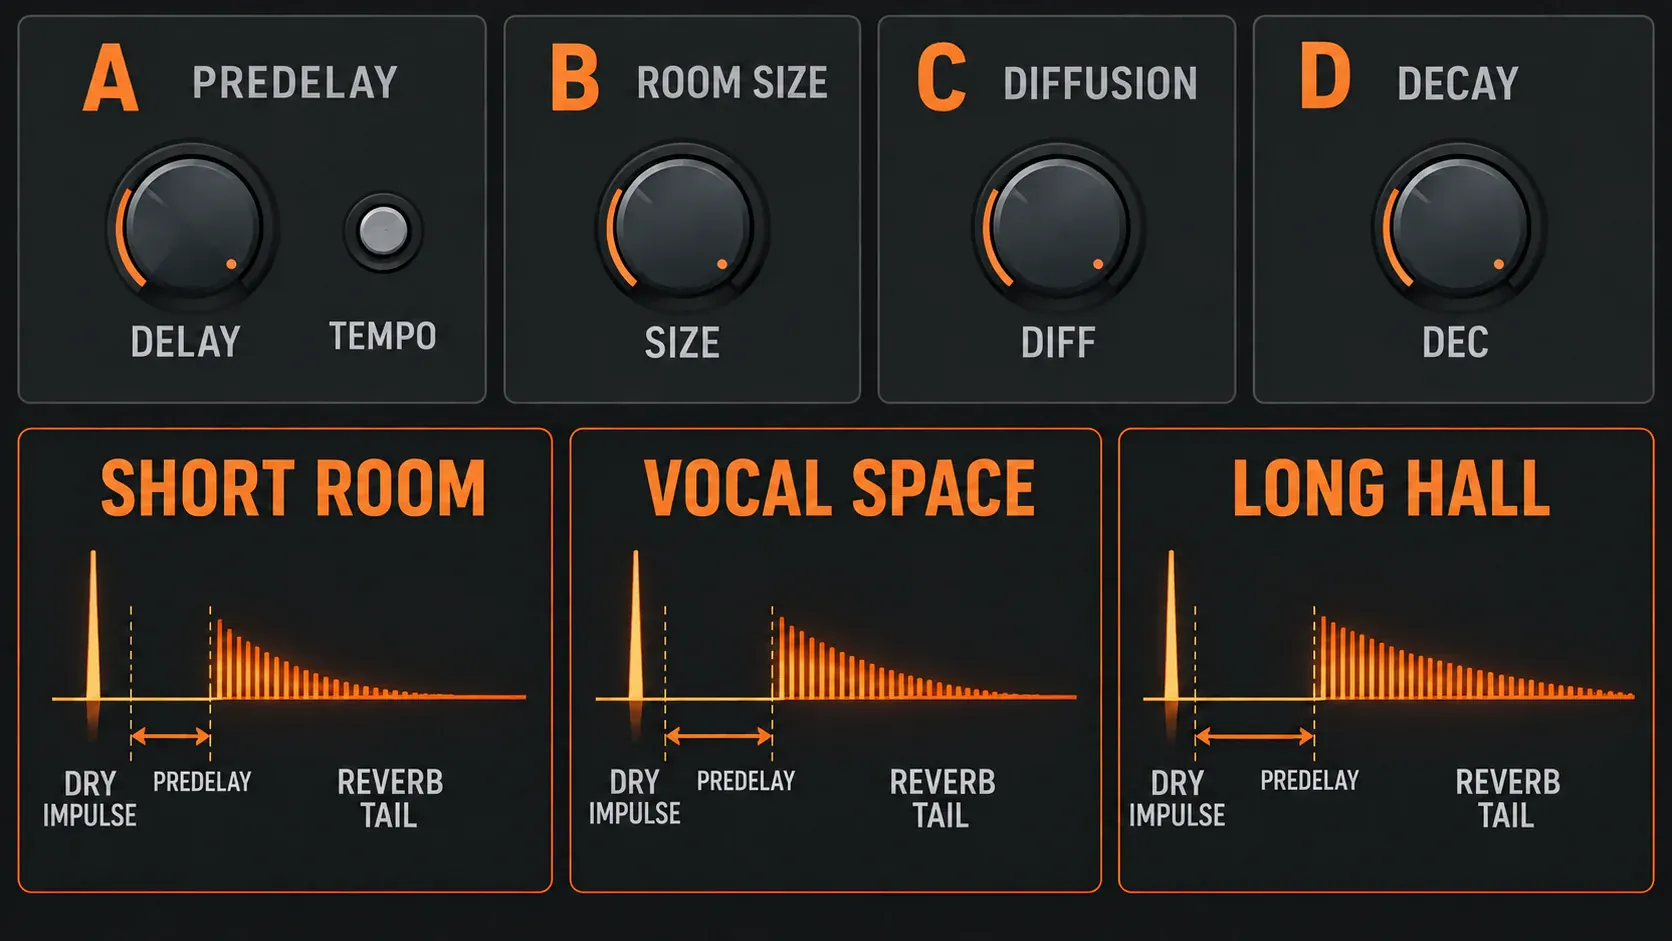
Set them in this order: choose the source separation with DELAY, choose the apparent scale with SIZE, then shorten DEC until the tail clears before the next important phrase or hit. Lengthening first often leads to a large tail that masks the timing decision.
Use diffusion and modulation for texture
DIFF controls reflection density. At lower values, individual reflections are easier to hear and the tail can resemble closely spaced echoes. Higher values merge those reflections into a smoother mass. Vocals and sustained leads often tolerate a denser tail; percussion can benefit from enough definition to preserve rhythm.
MOD varies the reverb time, and SPEED controls the rate of that modulation. Image-Line specifically notes that small modulation values can break up metallic ringing and make the tail smoother. Push MOD too far and the reverb can sound detuned. Treat modulation as a texture repair first, then as an audible effect if the arrangement has space for it.
A reliable order is:
- Raise DIFF until isolated echoes stop distracting you.
- If a narrow metallic tone remains, add a small amount of MOD.
- Adjust SPEED only after the movement is audible enough to judge.
- Recheck pitch-focused material such as vocals, piano and sustained synth leads.
Shape the tail before turning it down
L.CUT and H.CUT filter the signal before it reaches the reverb engine. That matters: unwanted bass or brittle top end never becomes part of the simulated room.
- Raise L.CUT when kick, low toms, bass notes or vocal plosives make the room cloud the low mids.
- Lower H.CUT when cymbals, sibilance or bright synth harmonics produce a sharp tail that sits in front of the source.
DAMP solves a different problem. It changes the decay rate of high frequencies, so the tail becomes progressively darker as it falls. At the maximum setting, high damping is bypassed and the display shows OFF. H.CUT removes high-frequency content at the entrance; DAMP lets it enter but makes it disappear faster.
BASS changes the decay behavior of frequencies below the CROSS point. It is not a bass volume knob. If the room needs warmth without low-frequency overhang, first remove sub-bass with L.CUT, then use CROSS and BASS to shape how the remaining low end decays.
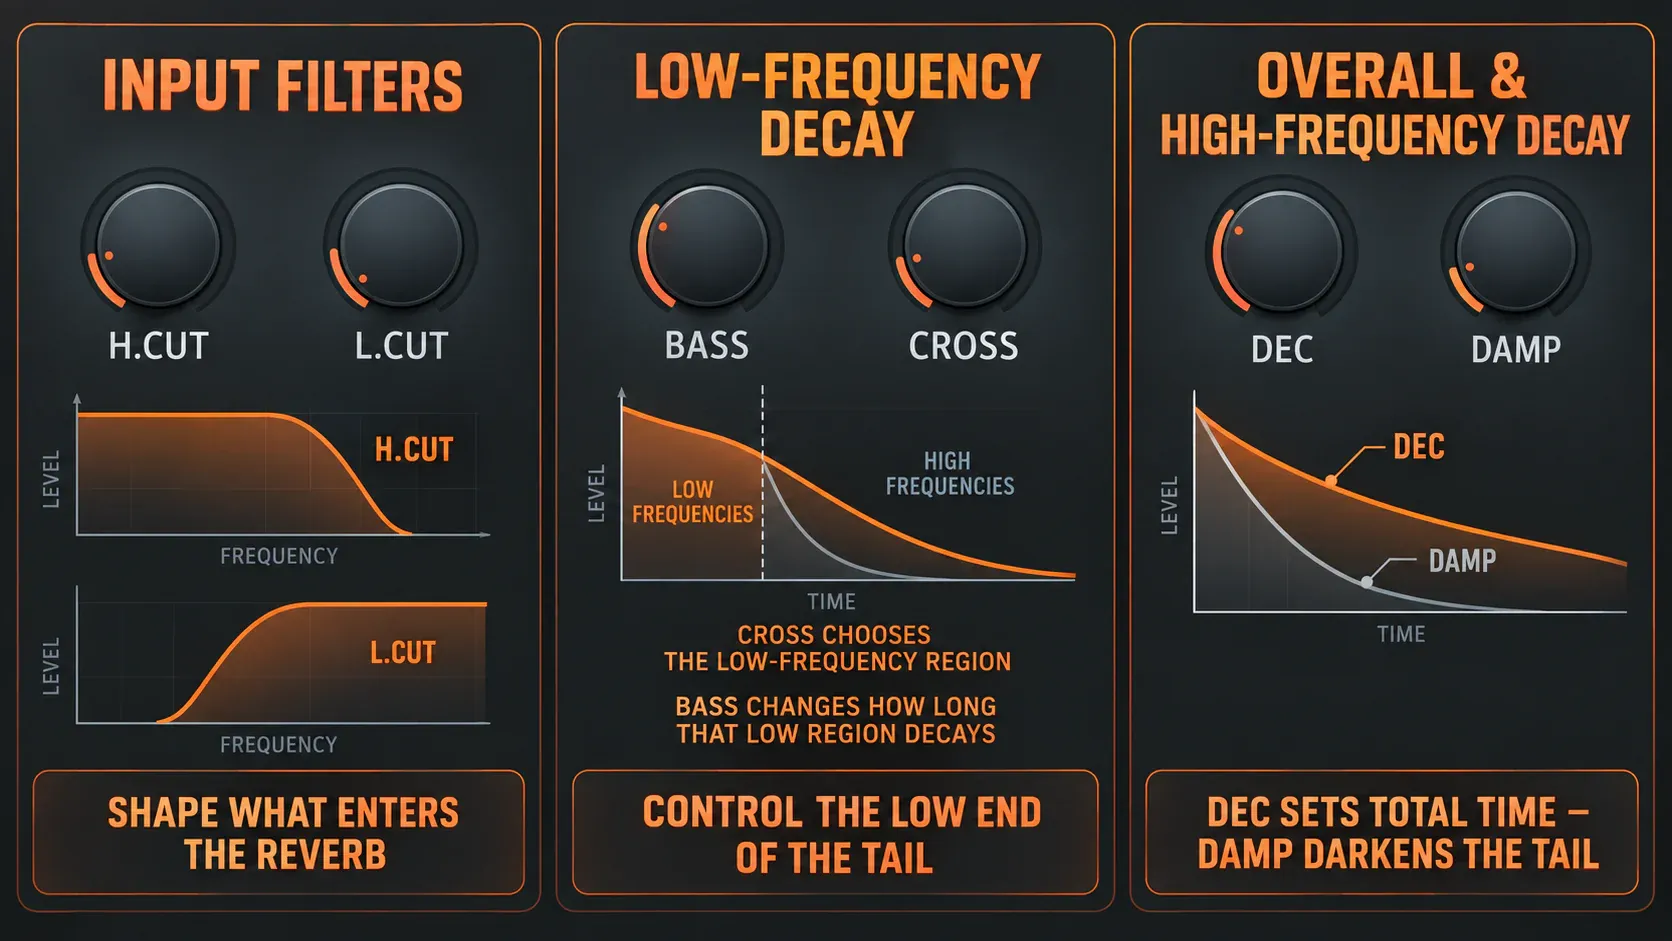
If the mix is muddy, start with L.CUT and DEC. If the tail is harsh, start with H.CUT and DAMP. Lower WET only after the tail itself occupies the right frequency and time range.
Set DRY, ER and WET on an insert
On an insert, the plugin receives the source directly, so the three level controls build the final blend:
- DRY: unprocessed input that passes to the output.
- ER: the first reflections, which provide proximity and room boundary cues.
- WET: the later reverberant tail.
Keep DRY stable while you learn the other two. Raise ER until the source gains a sense of nearby space, then raise WET until the tail becomes audible and pull it back until the source regains focus. More ER with less WET can suggest a small, present room. Less ER with more WET can feel deeper and less immediate.
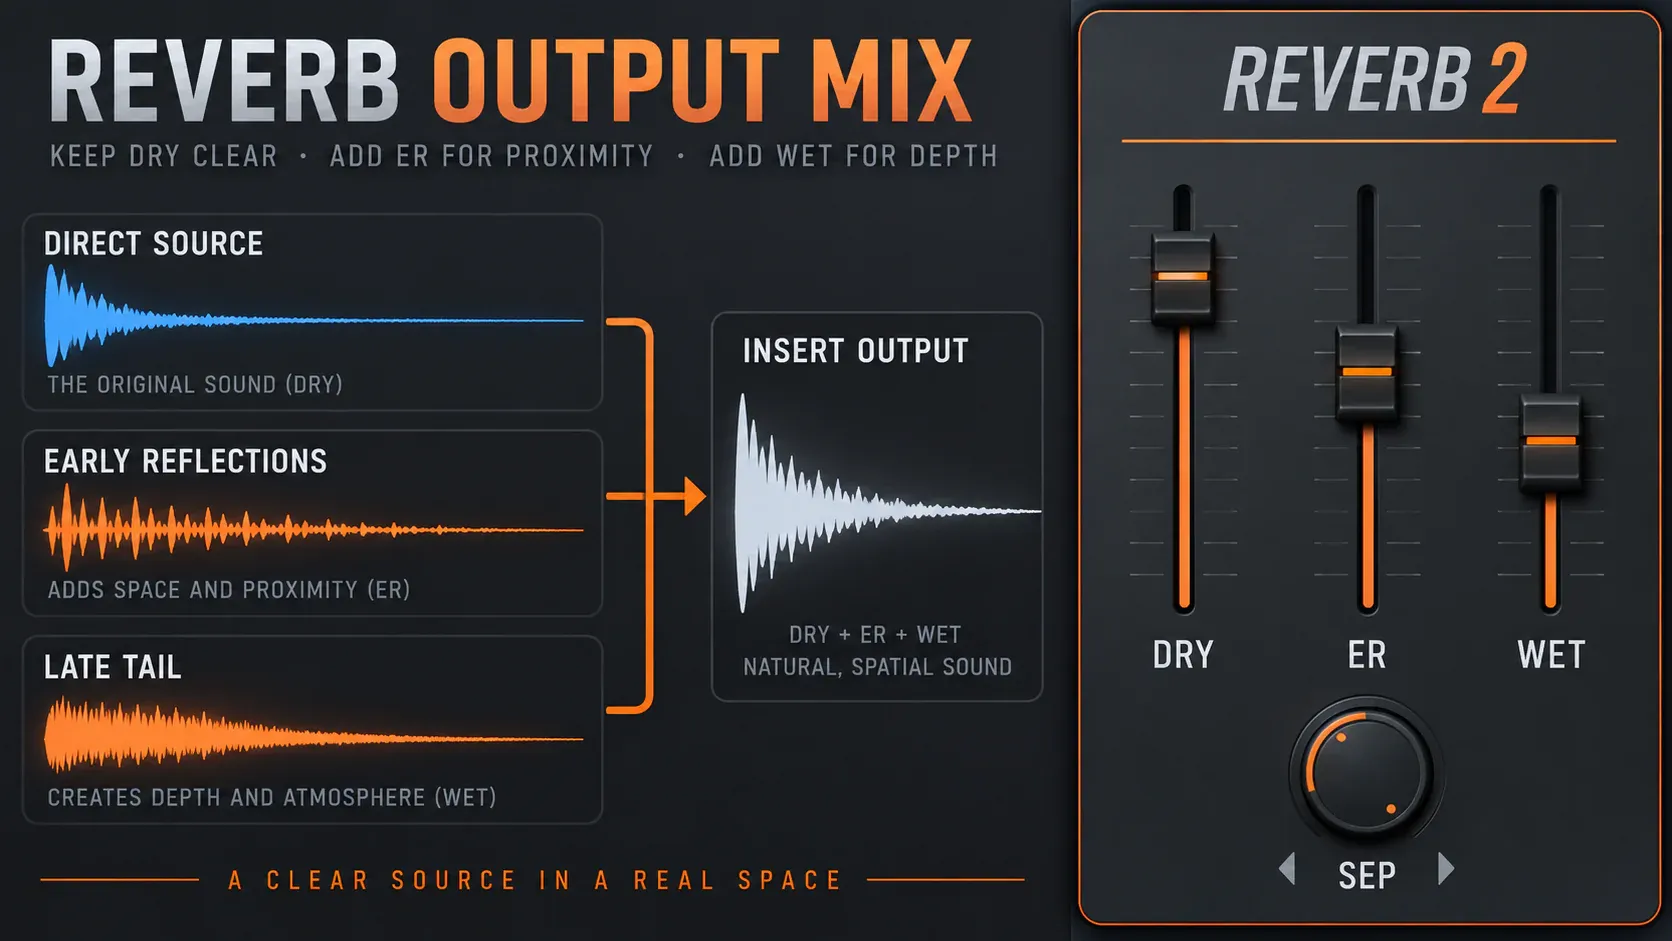
Avoid using both the plugin blend and the Mixer effect-slot mix knob as competing wet/dry controls. Image-Line’s effect-plugin documentation recommends leaving the slot mix at 100% in normal use and controlling wet/dry inside the plugin.
Use DRY 0% and WET 100% on a send
A dedicated send track should return effect only. Image-Line’s documented Fruity Reeverb 2 send setup is:
- DRY: 0%
- WET: 100%
- ER: set for the room character you want
The original Mixer track continues to provide dry sound. The send-level knob decides how much signal enters the shared reverb. That gives every source one clear amount control and makes it easy to process the return with EQ or dynamics.
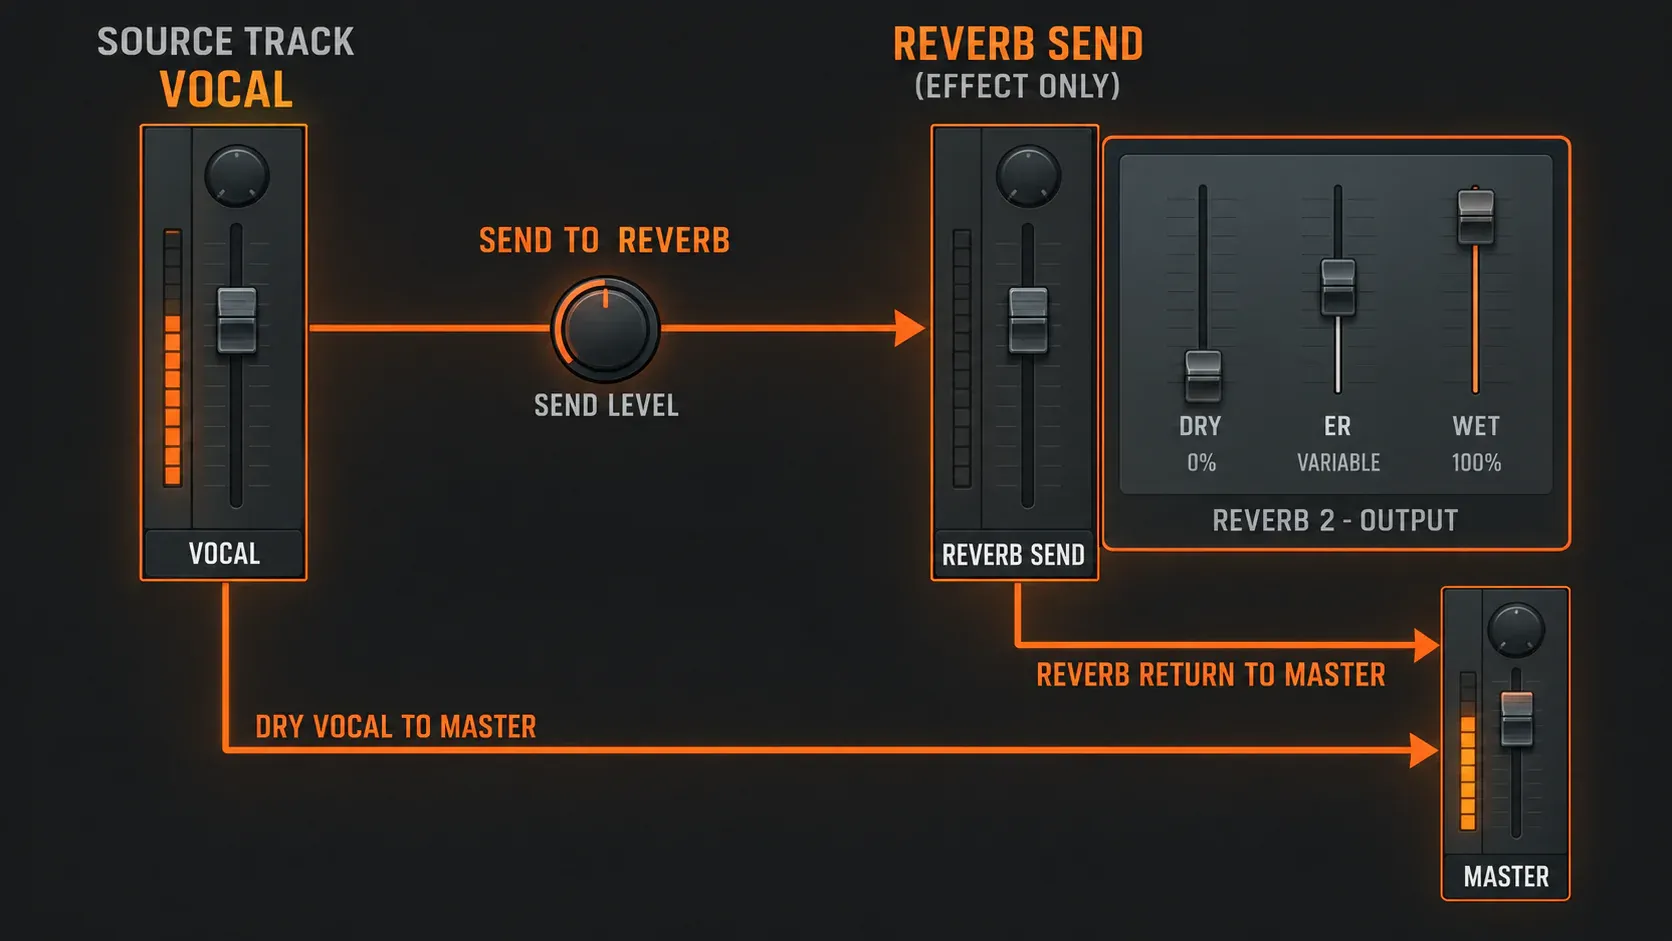
For the complete routing procedure, naming pattern and send-level workflow, use our reverb and delay sends guide. This article stays focused on the Reeverb 2 controls inside that routing.
Starting decisions for vocals, drums and leads
These are decision patterns, not universal presets. Start with the relationship, then adjust by ear in the arrangement.
Vocals: protect diction first
Use enough DELAY to leave consonants and phrase attacks readable, then choose a medium SIZE and shorten DEC until one phrase does not cloud the next. Raise L.CUT so the reverb does not carry plosives or chest resonance. Use H.CUT and DAMP to move the tail behind sibilance. The full dry chain belongs in the FL Studio vocal-mixing guide; the reverb should support that chain rather than replace its cleanup.
Drums: preserve the groove
Short DEC and moderate ER can add room without smearing the next hit. Use L.CUT aggressively enough that the kick does not fill the return with rumble. Lower DIFF if you want audible room texture; raise it when scattered reflections distract from the groove. If the pattern itself lacks motion, fix the notes and accents before asking reverb to create it; our drum-pattern guide covers that stage.
Leads and pads: decide whether the tail is background or part of the hook
For a lead that must stay forward, use predelay and a darker, shorter tail. For a pad, a longer DEC and higher DIFF can become part of the sustained texture. Check MOD carefully on pitch-focused sounds. A moving tail can make a static synth feel alive, but too much modulation turns width into pitch instability.
Use MID, SIDE and SEP with a clear purpose
The default MID mode processes the summed center component. SIDE processes stereo side information; it has no meaningful effect when the input contains no stereo difference. SIDE can create space around centered material because the center is affected less, but it is not a replacement for a balanced stereo source.
SEP changes the stereo separation of the wet reverb only. The dry signal is left unchanged. Use that distinction when the source feels fine but the tail is too wide or too narrow. Judge the result in mono as well as stereo, especially when the reverb is carrying bright or rhythmically important material.
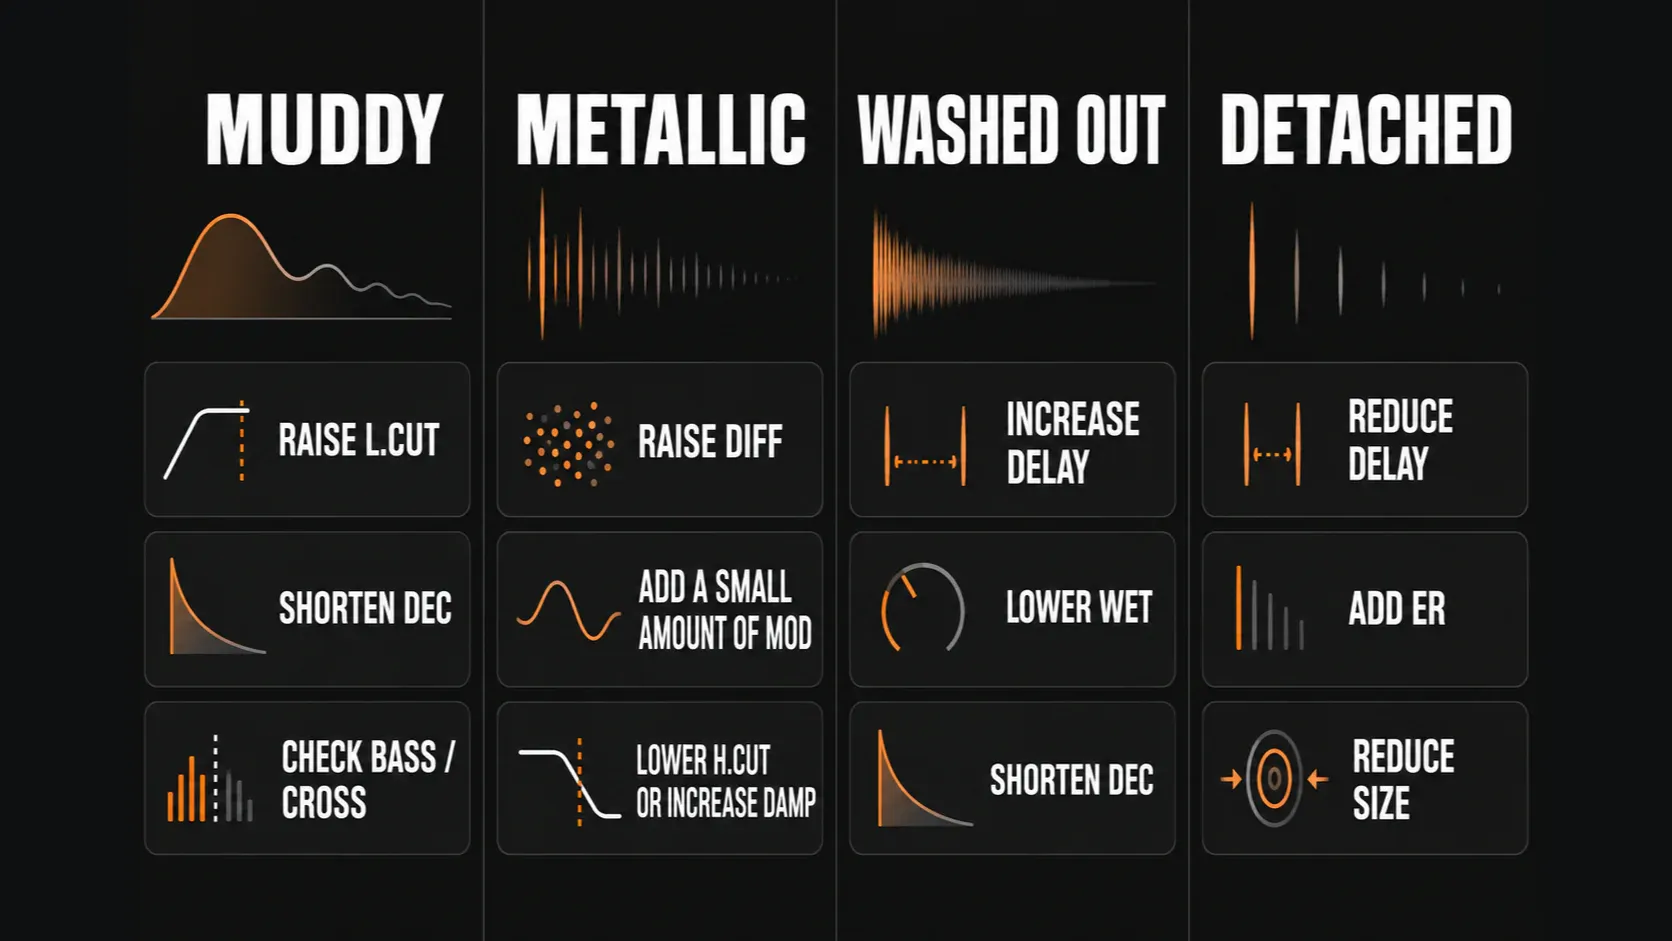
Fix Fruity Reeverb 2 by symptom
The mix turns muddy
Raise L.CUT, shorten DEC, and check whether BASS below CROSS is extending the low end. If several sources feed one send, mute sends one at a time to find which source is filling the return. Do not solve every mud problem by lowering H.CUT; a darker tail can still occupy too much low-mid time.
The tail rings or sounds metallic
Raise DIFF enough to make reflections denser, then add a small amount of MOD. Adjust SPEED only after you can hear movement. If one bright band keeps ringing, lower H.CUT or increase high-frequency damping.
Transients feel washed out
Increase DELAY, reduce WET, or shorten DEC. On a send, lower the source’s send amount rather than changing the global return if other tracks already sit correctly. For drums, check whether ER is too high and making every hit feel surrounded immediately.
The reverb sounds detached
Reduce DELAY, bring ER up slightly, or choose a smaller SIZE. A very long predelay followed by a large bright tail often sounds like a separate echo. Tempo mode can help when the gap is audible but does not lock to the phrase.
The return is wide but the source loses focus
Move SEP toward a narrower wet image, compare MID and SIDE modes, and check mono. Remember that SEP changes only the wet signal. If the dry source itself has a stereo problem, fix that upstream.
Fruity Reeverb 2 checklist
- Choose insert or send before setting DRY and WET.
- On a send, use DRY 0% and WET 100%.
- Set DELAY for transient separation.
- Pair SIZE with a sensible DEC time.
- Use DIFF for density and small MOD values for metallic ringing.
- Remove unnecessary lows and highs before they enter the reverb engine.
- Use DAMP to make high frequencies decay faster.
- Use BASS and CROSS for low-frequency decay behavior, not as a simple bass boost.
- Use ER for proximity and WET for the later tail.
- Remember that SIDE needs stereo information and SEP affects only wet reverb.
- Judge the result in the full arrangement and at a fair level.
The fastest useful setup is rarely the biggest one. Preserve the source, build only the space the arrangement can hold, and make each control solve a problem you can name.