FL Studio
A useful DirectWave instrument starts with one rule: set every sample’s Root Key before stretching its zone across the keyboard. The root tells DirectWave where the recording plays at its original pitch and speed. The zone tells it which notes and velocities should trigger that recording.
For a simple three-note instrument, place low, middle and high recordings at their actual notes, then extend each zone only until the next recording should take over. Add soft, medium and hard recordings as vertical velocity layers. If a sustained note needs to continue while the key is held, set a clean loop and match the amplitude envelope to the way the source should release.
This guide builds that workflow from prepared audio files to a portable DirectWave bank. It also fixes the failures that make sampled instruments feel wrong: incorrect pitch, obvious timbre jumps, silent velocity gaps, loop clicks and missing files after moving a project.
Check whether you have DirectWave or DirectWave Player
DirectWave Player can load Image-Line’s own .dwp and .dwb formats, but the official DirectWave manual lists three limits that matter here: external samples cannot be added to patches, new patches cannot be created, and VST sampling is disabled.
If dragging a WAV file into the plugin does nothing, check the version before troubleshooting the file. Building a new instrument from your own recordings requires the full DirectWave feature set. The Player is still useful for opening finished DirectWave programs.
Prepare and name the source samples
DirectWave can map imperfect files, but clean source preparation makes every later decision easier. Trim unwanted silence, leave a natural attack, and keep the same recording format across one instrument. For sustained material, record enough stable tone after the attack to create a loop without repeating a changing section.
Use our Edison sample-editing guide when the files still need trimming, fades or click repair. DirectWave has its own editor, but source cleanup and instrument mapping are separate jobs.
Put the sampled note in each filename: Piano_C3.wav, Piano_F3.wav, Piano_C4.wav. Image-Line documents filename suffixes for root note, key range, velocity range and trigger group. One full example is samplename_C4+KA3-F#4+V64-95+TG1+TY3+TF100+TO15.wav. You do not need that full syntax for a first instrument. Clear root-note names already prevent the most common mapping mistake.
The parser expects the mapping information after an underscore or a properly separated dash. A name such as Strings_C4.wav can provide the root note; C4_Strings.wav does not follow the documented pattern.
Read DirectWave as four working areas
Most of the job happens in the Program Window. Read it as four connected areas:
- Sample List: every loaded zone with its Root, LKEY, HKEY, LVEL and HVEL values.
- Zone Mapper: the visual grid where horizontal width represents key range and vertical height represents velocity range.
- Preview keyboard: audition notes and set a selected zone’s Root Key by right-clicking a key.
- Lower tabs: Sample controls for start and loop editing, Zone controls for per-zone behavior, and Program controls for the whole instrument.
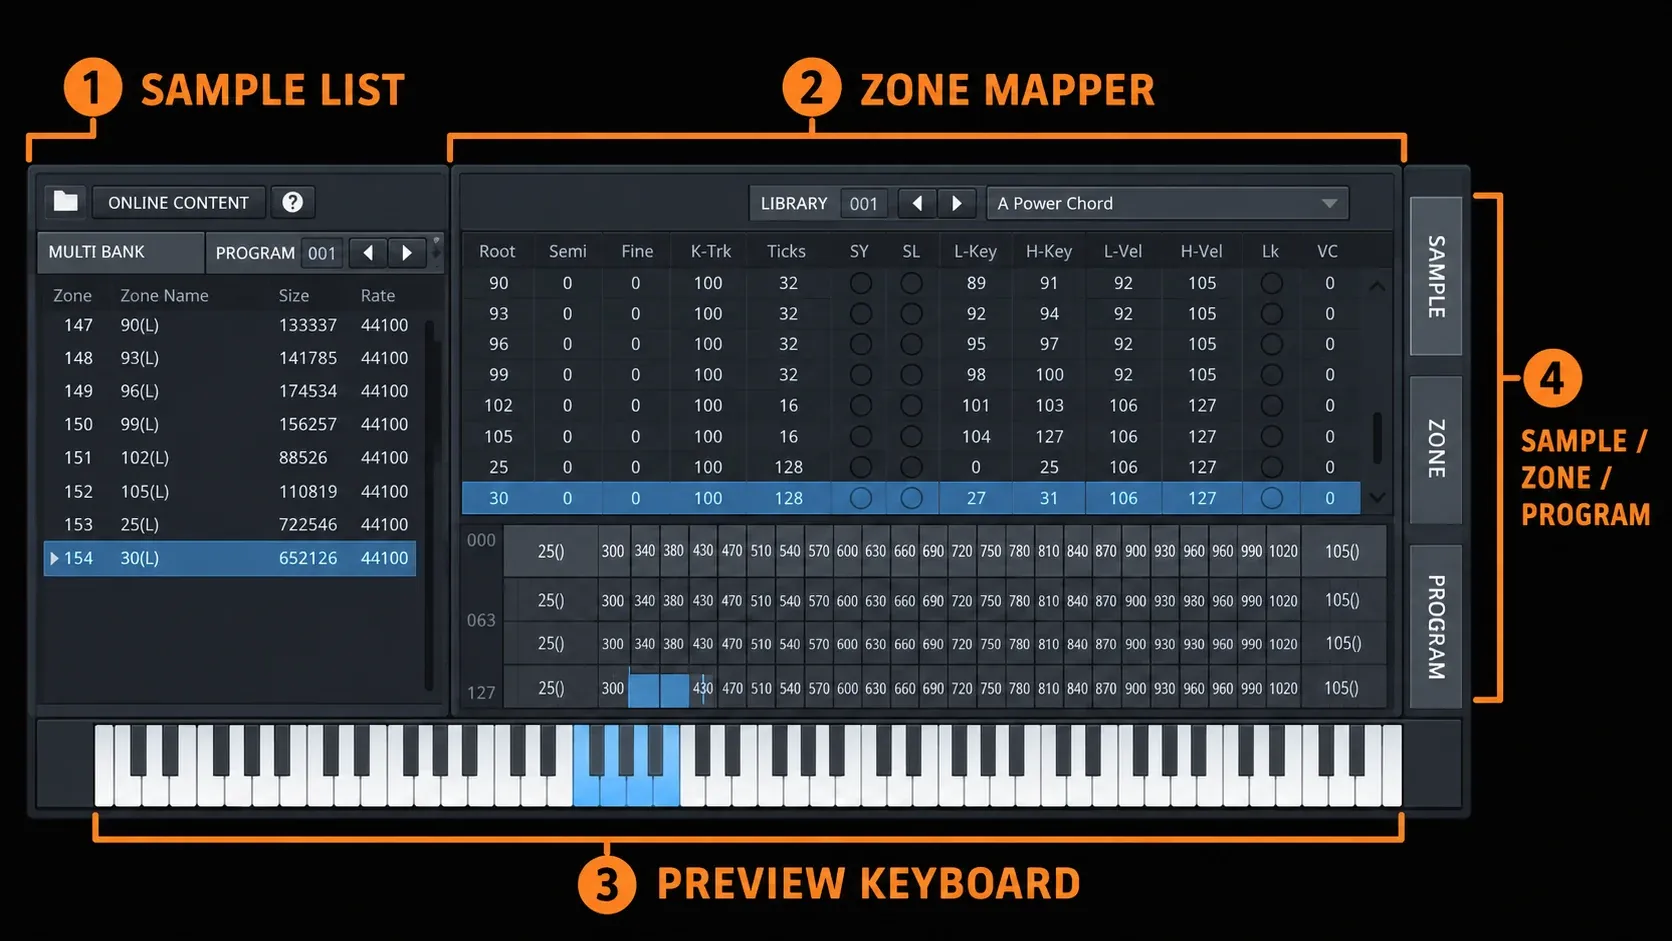
The horizontal and vertical axes are the key to the whole plugin. A zone that is too wide transposes one recording too far. A zone that is too tall can cover velocities meant for another layer. When the instrument sounds wrong, inspect the rectangle before reaching for filters or envelopes.
Add samples and set every Root Key
Drag WAV files from the FL Studio Browser into the Zone Window. Each drop creates a zone. You can also drop samples into the Sample List, then edit their numeric fields.
Select one zone at a time and set its Root Key to the note that was recorded. The Root field uses a MIDI note number, while the preview keyboard gives you a faster visual method: right-click the intended key and the root marker turns orange. Play that key and confirm that DirectWave is not transposing the sample.
If a recording is named correctly, Extract root key from filename can reduce manual work. Automap Zone/s is stronger when the WAV files contain embedded key-range and loop metadata. Automap is not a substitute for checking the result; it can only use metadata that is actually present.
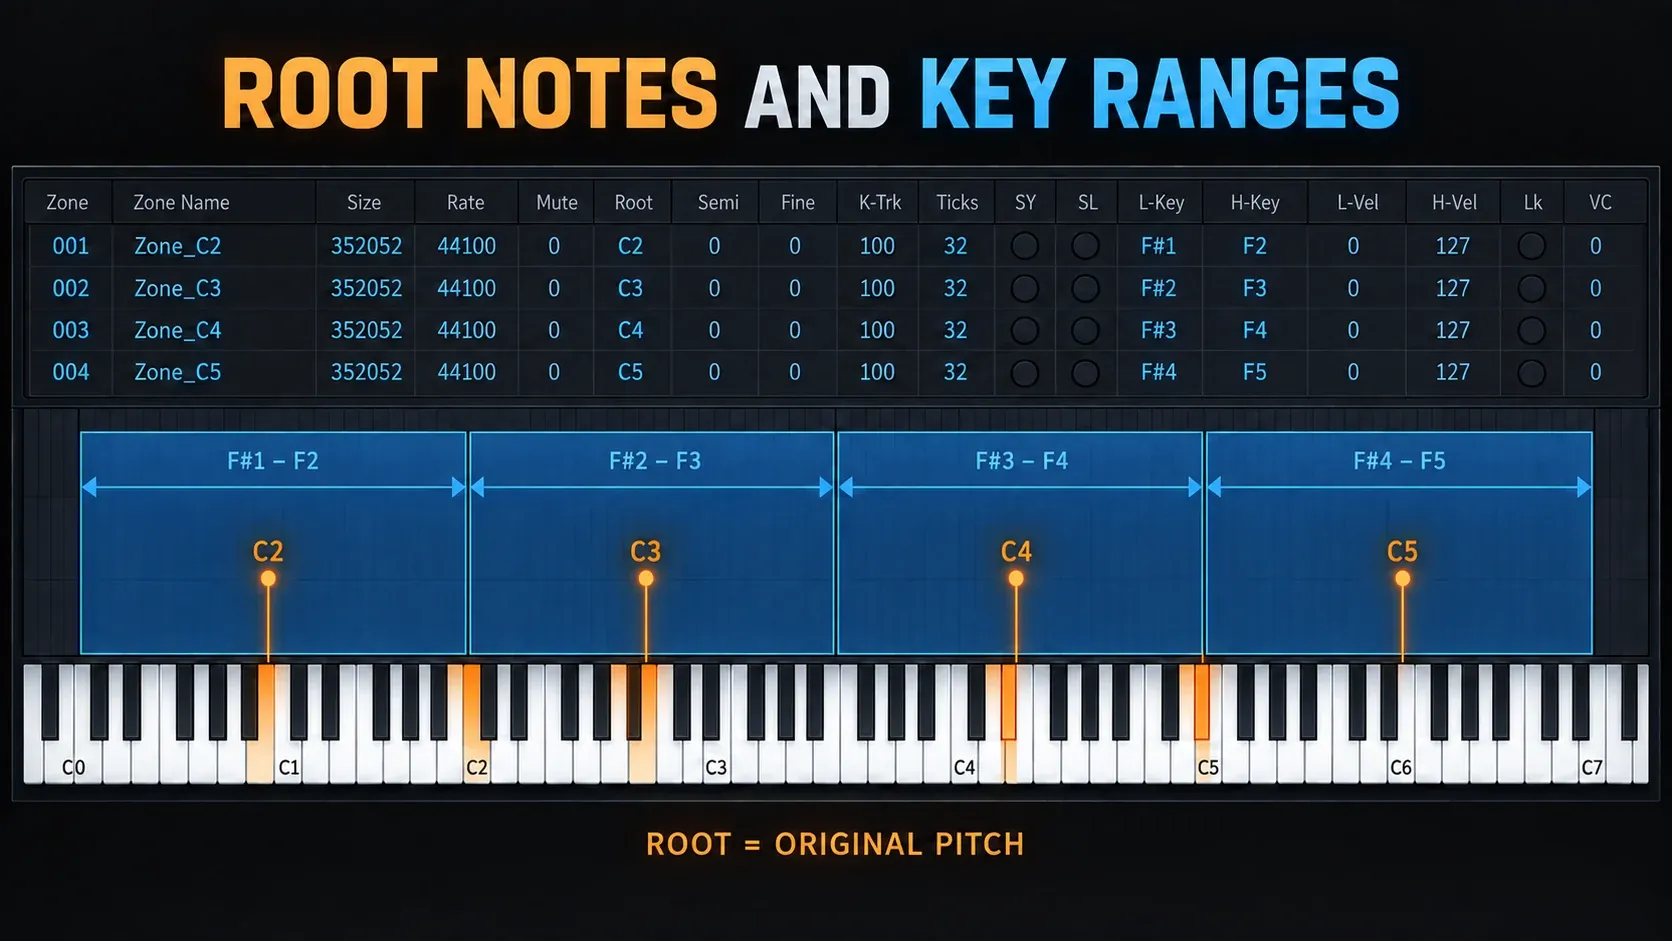
Do not begin by stretching one sample across five octaves. Large transposition ranges change duration and timbre along with pitch. A piano note pitched far upward becomes shorter and brighter; pitched far downward it becomes longer and darker. More recorded roots reduce that movement.
Divide the keyboard into useful key ranges
After roots are correct, set the lowest and highest note for each zone. Drag the zone’s left and right control points or enter LKEY and HKEY in the Sample List.
With recordings at C2, C3, C4 and C5, a practical first split puts each handoff roughly halfway between adjacent roots. That keeps the maximum transposition similar on both sides. Then listen to scales across every boundary. Move the split toward the sample that tolerates transposition better.
- If the lower sample becomes dull before the boundary, let the higher sample take over earlier.
- If the higher sample becomes thin below its root, extend the lower sample farther upward.
- If two zones overlap unintentionally, both may sound and create a level or phase change.
- If there is a gap, notes inside it will produce silence.
Instrument character matters more than geometric symmetry. A stable synth waveform can cover a wide range. Piano, guitar, voice and acoustic textures usually expose wide transposition more quickly.
Build velocity layers without gaps
Velocity lives on the vertical axis. Use LVEL and HVEL, or drag the top and bottom zone points, to decide which playing strength triggers each recording.
For three layers, start with complete coverage:
- Soft: 0–42
- Medium: 43–84
- Hard: 85–127
Those ranges are organizational starting points. Adjust them to the performance. If the source changes character sharply between medium and hard, move the boundary or use a small intentional overlap only when the blend improves the transition.
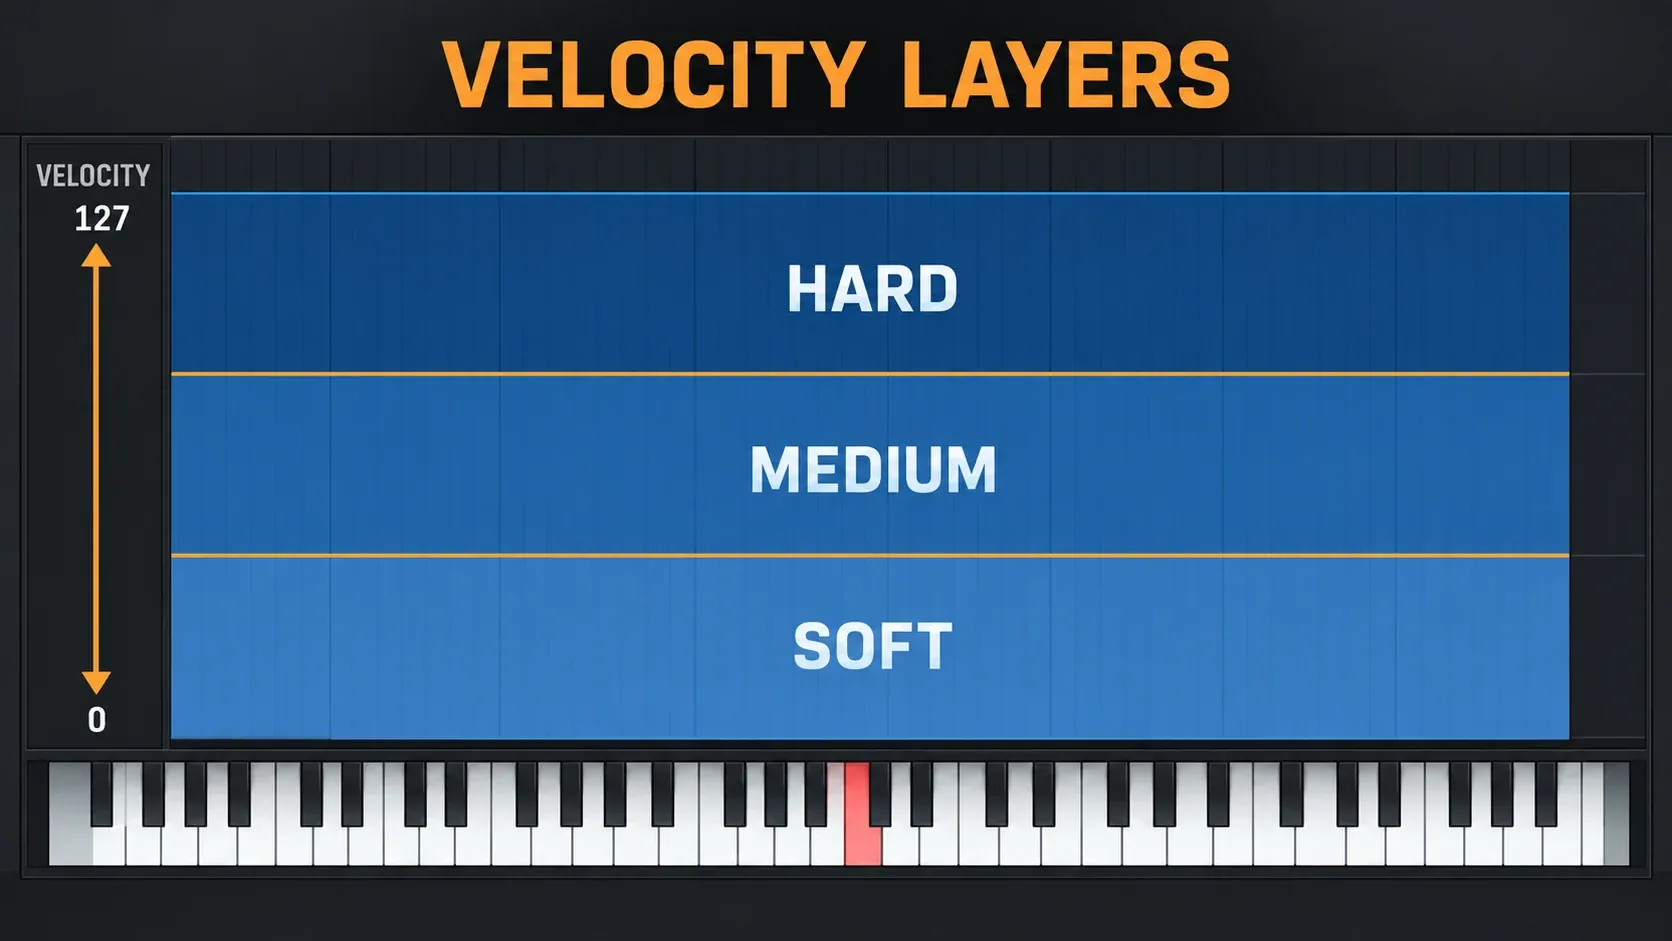
Test the layer map by repeating one note from quiet to hard. A sudden volume jump may come from the recordings themselves, the velocity boundary or both. Do not normalize every layer to identical loudness if the natural dynamic change is part of the instrument. The goal is a believable progression, not equal peak values.
For velocity-layered drum pads, FPC is usually the clearer tool. DirectWave is strongest when the samples need pitched keyboard zones, sustained loops or a multi-program bank.
Set sample starts and sustain loops
Open the Sample tab for start and loop controls. Keep the sample start before the useful attack. Moving it too far right can remove the transient; leaving noise or silence before the attack makes the instrument feel late.
A sustained loop repeats a stable section while the key remains held. Place Loop A and Loop B inside a part of the recording where level and tone change slowly. Image-Line notes that loop clicks commonly come from different amplitudes or phases at the two boundaries. Similar waveform height is not enough; the waveform should also be moving in the same direction.
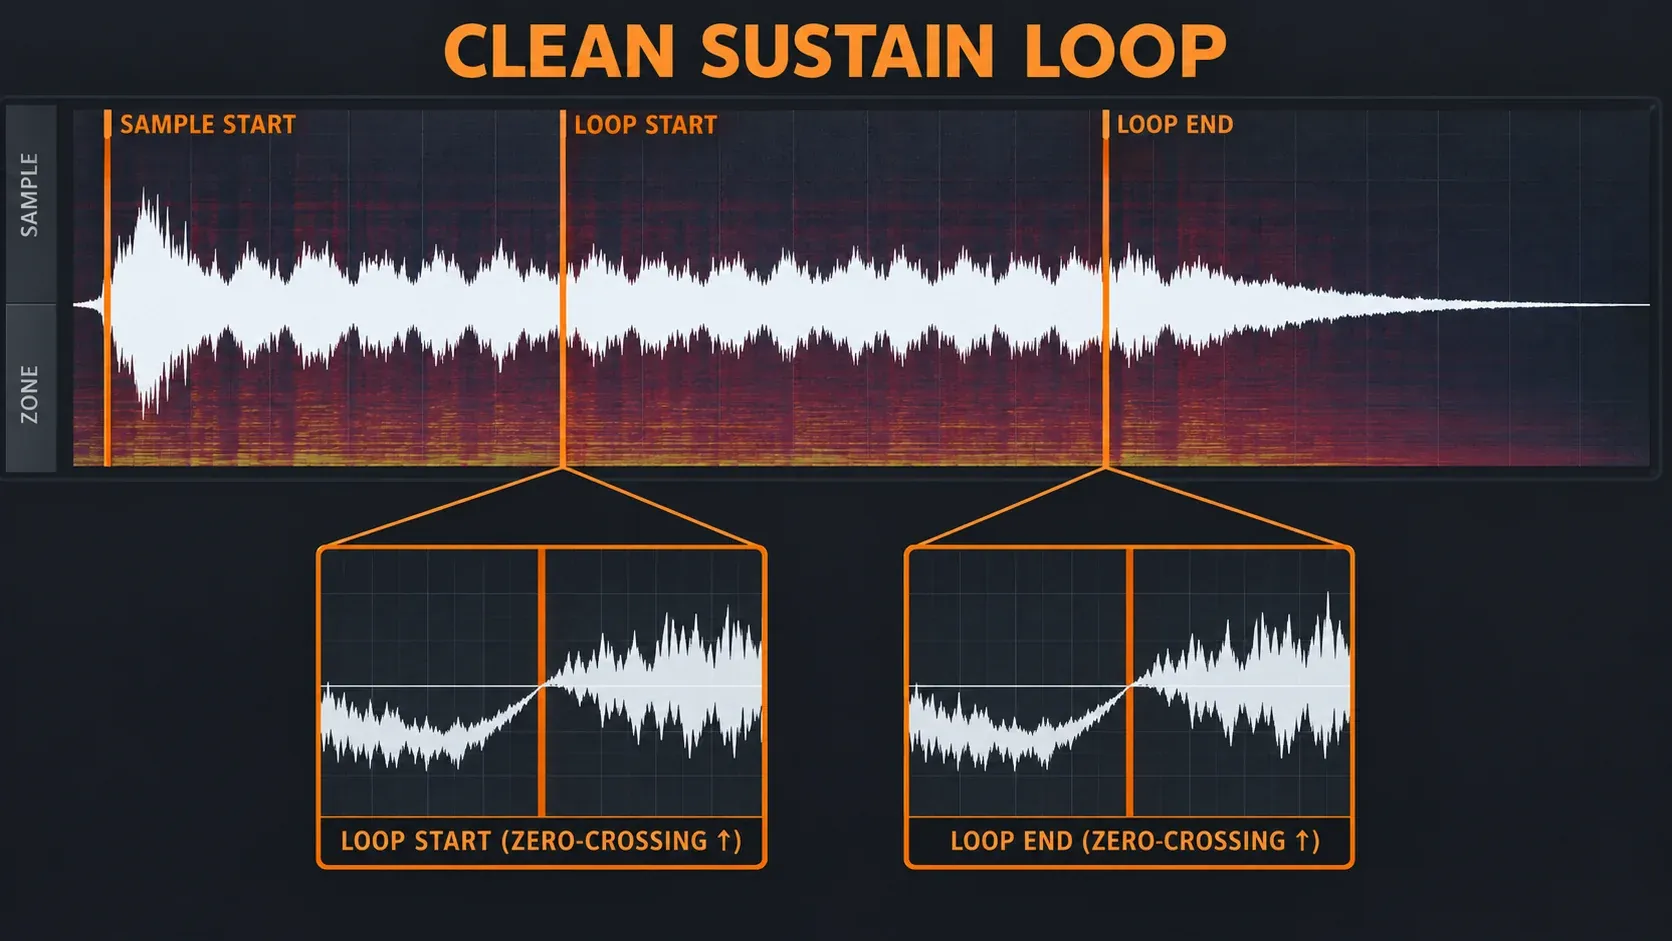
Right-click the waveform and use Tools > Tune loop to move the markers between zero crossings. Zoom in before making the final choice. If the sound still pulses or changes color at the join, move the loop to a steadier section. A Bounce loop can help when forward repetition makes a slow tonal change jump abruptly, but some recordings need crossfading or source editing before they loop well.
Match the envelope to the loop
A loop can be technically clean and still feel unnatural if the program envelope cuts it off. For a held instrument, the amplitude sustain needs to keep the note alive while the key remains down. Release then decides how the note ends after key-up.
Use a short release for tight plucks and rhythmic patches. Give pads, strings and sustained acoustic tones enough release to avoid an abrupt stop, but do not let the tail blur the next phrase. If the selected loop type plays material after Loop B on release, leave a usable tail after the loop boundary.
Separate three symptoms:
- Click while holding: inspect loop boundaries.
- Click only at note-off: inspect the release transition and the audio after the loop.
- Note dies while held: inspect the loop mode and amplitude sustain.
Choose `.dwp` or a monolithic `.dwb`
A standard .dwp program usually does not contain the wave data. The manual says its samples are commonly stored in a same-name subfolder beside the program. That keeps files easy to edit and replace, but moving only the .dwp breaks the instrument.
Monolithic mode saves the samples inside a .dwb DirectWave Bank. A bank can contain up to 16 Program Channels, so .dwb is useful when one portable file matters more than an exposed sample folder.
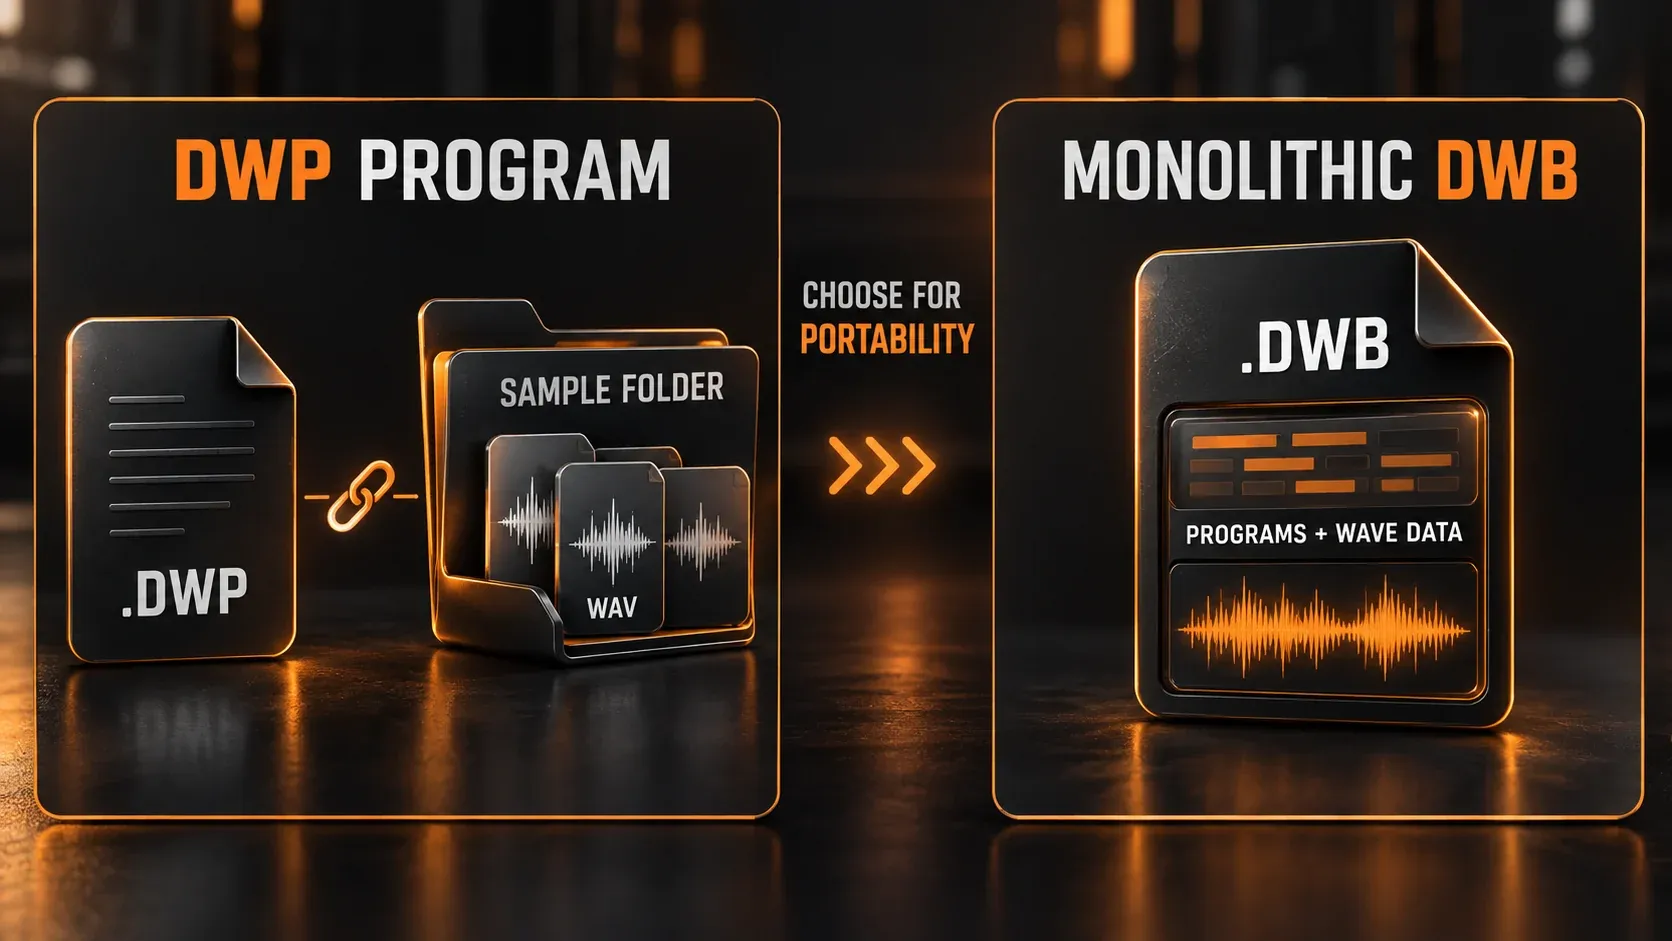
Use .dwp while the instrument is still changing and you want direct access to the WAV files. Use a monolithic .dwb for transfer or archive after checking every zone. Keep the original lossless recordings separately; an embedded bank is a delivery format, not the only copy of irreplaceable source audio.
If a project already opens with unresolved paths, use the missing-samples recovery guide before resaving the bank.
Fix DirectWave problems by symptom
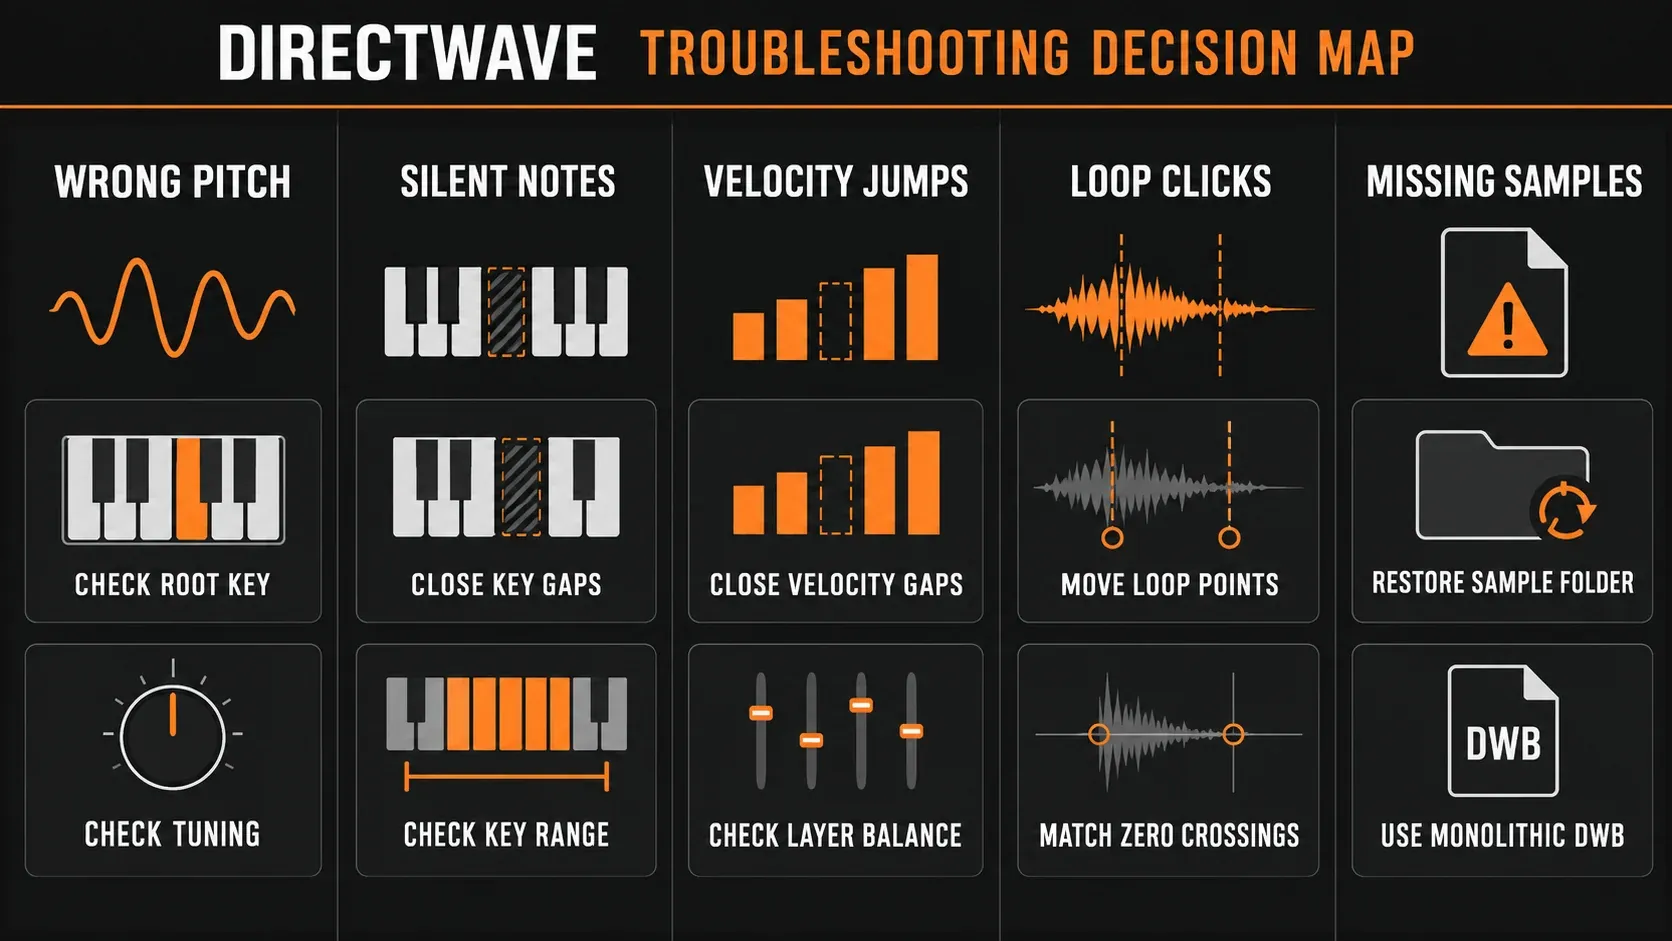
A sample plays at the wrong pitch
Play the zone’s Root Key. If the recording is already transposed there, the root assignment is wrong or the source filename was interpreted incorrectly. Correct Root before changing LKEY or HKEY.
Some notes are silent
Look for horizontal gaps between zones. Then check the selected note at several velocities; a complete key range can still be silent if its velocity layers leave a vertical gap.
One note sounds doubled or suddenly louder
Check for overlapping zones at the same key and velocity. Intentional layering is valid, but accidental overlap triggers more than one sample.
The instrument changes character abruptly across the keyboard
Move the key boundary, add another sampled root or replace the weaker recording. Filters may hide a boundary, but they cannot restore detail lost through excessive transposition.
Velocity produces a hard jump
Compare the source levels and tone first, then adjust LVEL/HVEL. A boundary problem and a recording-level problem often occur together.
The sustain loop clicks or wobbles
Match the waveform amplitude and direction at Loop A and Loop B, use Tune loop, and move the repeated region into a steadier section. If the source changes continuously, prepare a crossfade in the source editor.
The program works on one computer but not another
The .dwp probably moved without its sample folder or with changed relative paths. Restore the folder structure or transfer a checked monolithic .dwb.
DirectWave build checklist
- Confirm you are using the full DirectWave feature set for custom sample mapping.
- Trim and name every source file with its recorded note.
- Set every Root Key before extending key ranges.
- Play scales across each LKEY/HKEY boundary.
- Cover velocities 0–127 without unintended gaps or overlaps.
- Keep loop markers inside a stable sustain at compatible zero crossings.
- Match sustain and release behavior to the loop type.
- Save the companion sample folder with a
.dwp, or use monolithic.dwbfor a portable bank. - Reopen the saved instrument and check roots, boundaries, layers and loops before moving it.
DirectWave becomes predictable when each rectangle has a clear job. Root sets the sample’s true note, horizontal width sets pitch responsibility, vertical height sets dynamic responsibility, and the save format decides where the audio lives. Build in that order and the instrument stays easier to tune, play and move.