FL Studio
FL Studio's Channel Sampler turns one audio sample into a playable instrument. Load a kick, bass hit, vocal sound or sustained tone, then trigger it from the Channel Rack or Piano roll. Three settings do most of the work: the root note tells FL Studio where the original pitch belongs, the Volume envelope controls note-offs, and the stretching mode decides whether higher notes also play faster.
I would sort those out before adding effects. A good sound becomes frustrating fast when every short note plays the entire file or the bass changes length as the melody climbs.
Get one sample playing as an instrument
- Find an audio sample in the Browser. Right-click it and choose Open in new sampler channel. This gives it a separate channel rather than sending it to the channel you are already using.
- Click the new channel's name to open its settings. Open that channel's Piano roll for a pitched part.
- For an ordinary one-shot that should transpose with notes, start with the Sample tab's TIME knob set to (none) and Mode: Resample.
- If the sample has a known musical pitch, set its root note on the preview keyboard. Leave this alone for an unpitched sound unless you deliberately want to transpose it.
- On the Envelope/Instrument tab, select Volume and enable its Envelope switch if you want note length to control the sound.
- Write a short note and a longer note, then listen for the difference. Adjust the envelope's REL control for the tail you want after each note ends.
The Browser's opening options distinguish a new Sampler from sending audio to the selected channel. You can also drag a sample onto the Channel Rack. Dropping it onto the Playlist instead creates an Audio Clip: related sample controls, but a different way of arranging audio.
If the Pattern, channel and Playlist relationship is the confusing part, start with the Channel Rack guide. Here, the job is the behavior of one sound once it is loaded.
Set the source root before transposing the part
The preview keyboard's blue key marks the root note: the key that plays the sample at its original pitch. Sampler defaults to C5. That does not mean a recording loaded into it was recorded in C.
For example, if a clean, pitched sample is known to be G4, right-click G4 on the preview keyboard. G4 now represents its original pitch; the other notes are mapped relative to it. This is a mapping example, not a pitch-detection feature. Right-clicking a key cannot identify an unknown recording's fundamental.
Use a reliable source pitch or establish it first, then use Fine tune for a smaller cents correction if needed. Once that mapping is right, move the Piano roll notes to write the melody. Changing the root instead transposes the relationship of every note already in the part. Image-Line's preview-keyboard controls document the root, fine tuning and playable key region separately.
A noisy kick, cymbal or full chord is not the same tuning problem as a single sustained bass note. Do not force a confident root onto audio whose pitch is ambiguous. For a recorded phrase that needs correction within the performance, see pitch-correcting a sample.
Make Piano roll note length control the sample
A short MIDI note does not automatically mean short audio in Sampler. Without an active Volume envelope, a triggered sample can continue after the note is released. Enable the envelope on the Volume page, not merely an envelope on Pitch or Mod X.
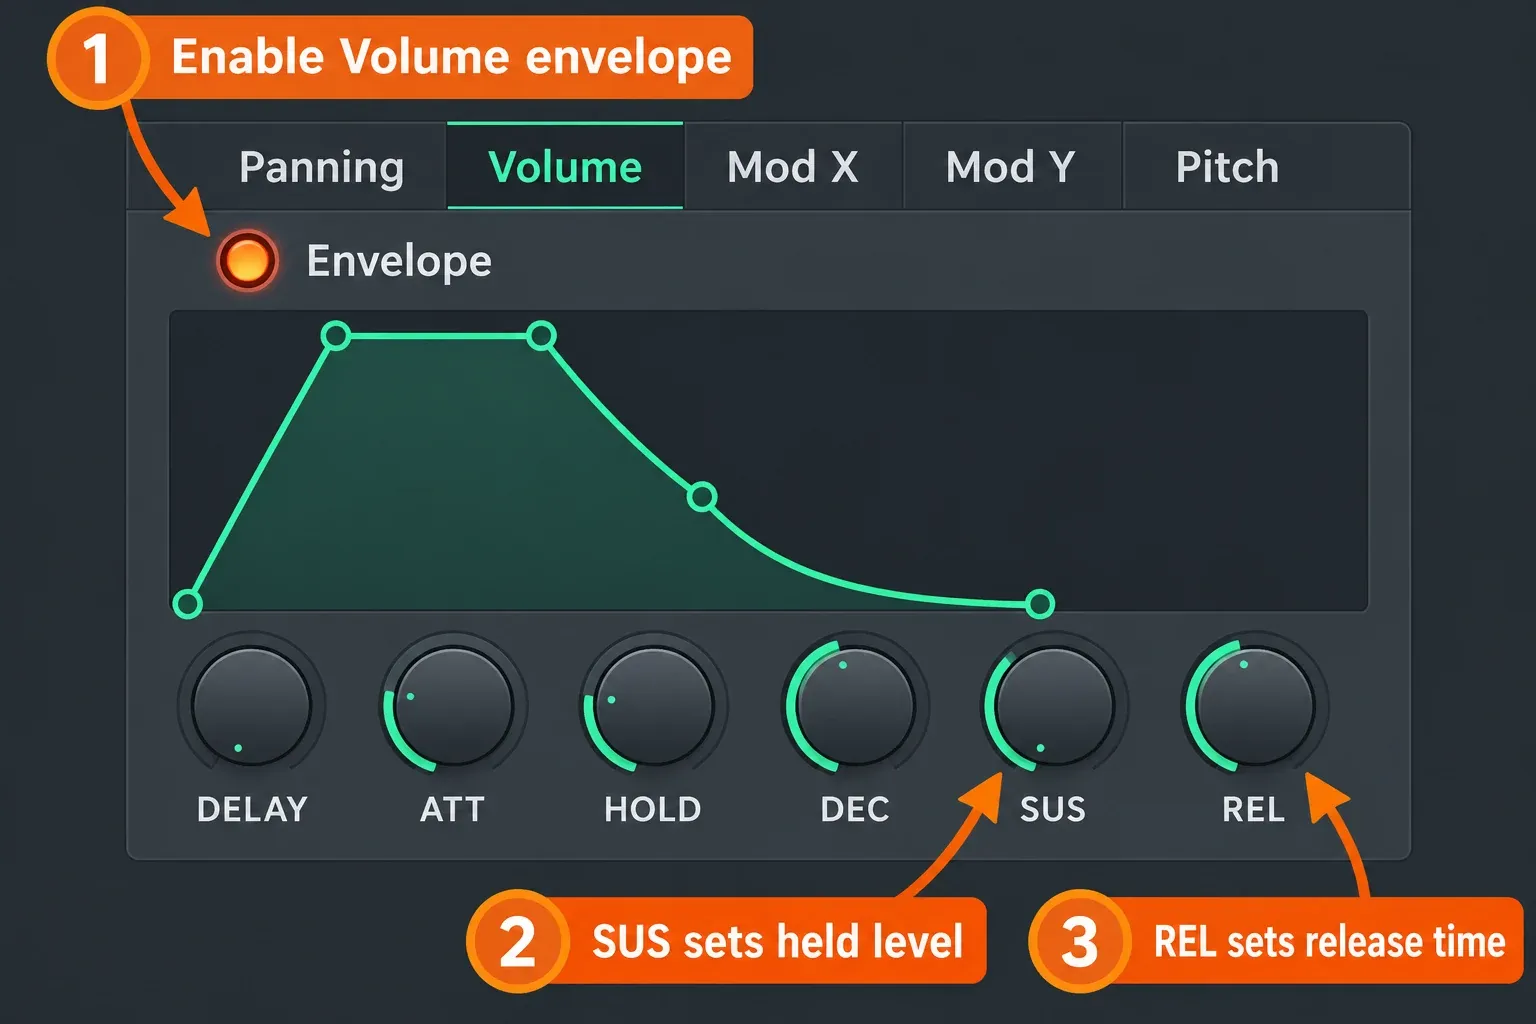
For a sound that should stay at a steady level while the note is held, begin with little or no Delay, a short ATT attack, little or no Hold, and a high SUS sustain level. Set REL to a short tail, then adjust it by ear. Sustain is a level; Release is a duration. They solve different problems.
I prefer a small release to a brutally abrupt stop for most pitched parts, because the transition is less likely to become a distracting click. That is a starting judgment, not a universal preset. Preserve the attack of a drum hit; give a pad time to fade. The envelope controls also offer tempo-based timing and a Presets menu for saving useful envelope shapes.
An envelope cannot supply audio that is not there. A short one-shot still runs out, even under a long note. To sustain part of a recording, give it suitable loop points; stretching it to a longer duration is another, different sound-design decision.
Choose whether pitch should change the duration
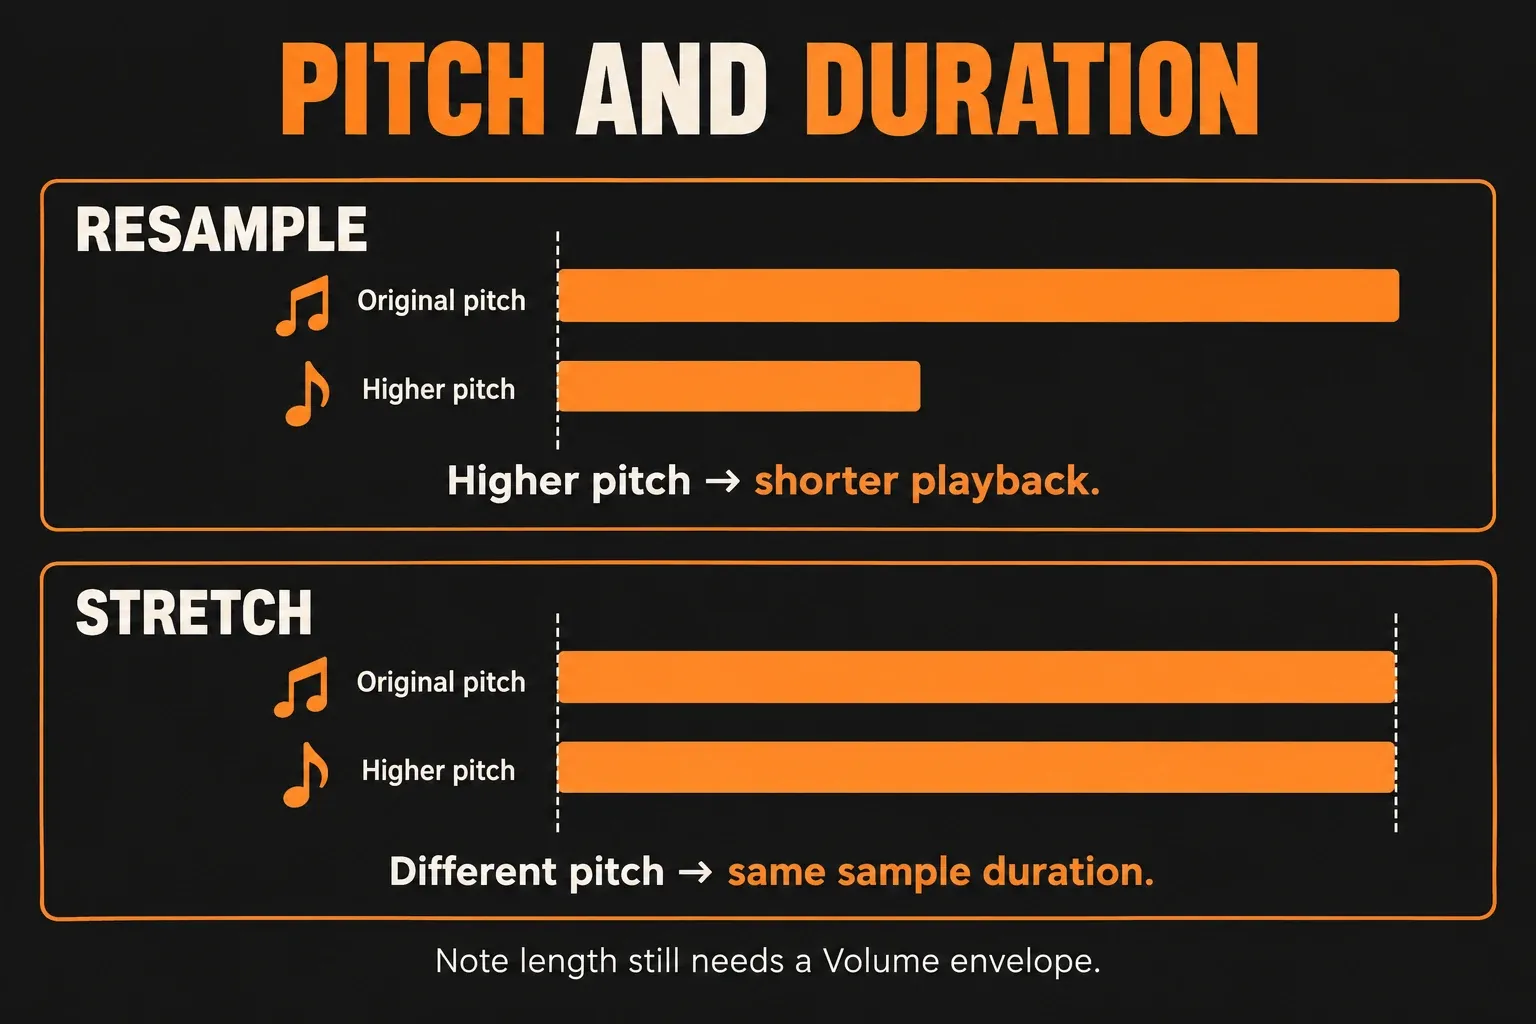
With Resample, higher-pitched notes play the source faster and lower-pitched notes play it slower. The sample's duration changes with the pitch. That can be exactly right for a drum or a bass hit. It can also make a chord made from one vocal sound end unevenly.
Select Stretch when you need different Piano roll pitches to keep the sample's original duration. Image-Line specifically documents this behavior for both Sampler Channels and Audio Clips. This preserves sample duration; it does not replace the Volume envelope's response to note length.
| Your goal | Start here | Check before moving on |
|---|---|---|
| A one-shot that changes speed with pitch | TIME: (none); Mode: Resample | Higher notes naturally finish sooner. |
| A pitched part whose sample duration stays consistent | Mode: Stretch | Selecting Stretch initially locks TIME to the current project tempo. Check the duration and tempo relationship. |
| Restore normal transposition when every note sounds the same | Right-click TIME and select (none) | Then check root mapping and the actual Piano roll notes. |
| Shift the source pitch while retaining its length | The Time stretching section's PITCH control | This differs from the channel's top PITCH/RANGE controls. Tweaking it changes Resample mode to Auto. |
Keep those two PITCH controls straight. The top channel PITCH/RANGE controls handle channel pitch and bend range. The Sample tab's Time stretching PITCH control changes the source pitch while preserving its length. If you want to draw a bend, use the pitch-bend workflow rather than guessing which knob to automate.
Sustain a region with loop points
Open the Sample tab and find the Playback section. Current Sampler controls let you set Loop Start and Loop End manually, including by dragging their handles in the waveform. Zoom in when placing them; holding Shift moves the two loop boundaries together.
- Choose a region that can repeat without an obvious jump. A steady section is usually a more useful starting point than the initial transient.
- Set its Start and End boundaries, then enable Use loop points.
- Hold a note. Playback begins at the sample's beginning, reaches the loop end and returns to the loop start while the note is held.
- Use the Volume envelope and its Release setting to decide how the sound leaves that sustained region when you release the note.
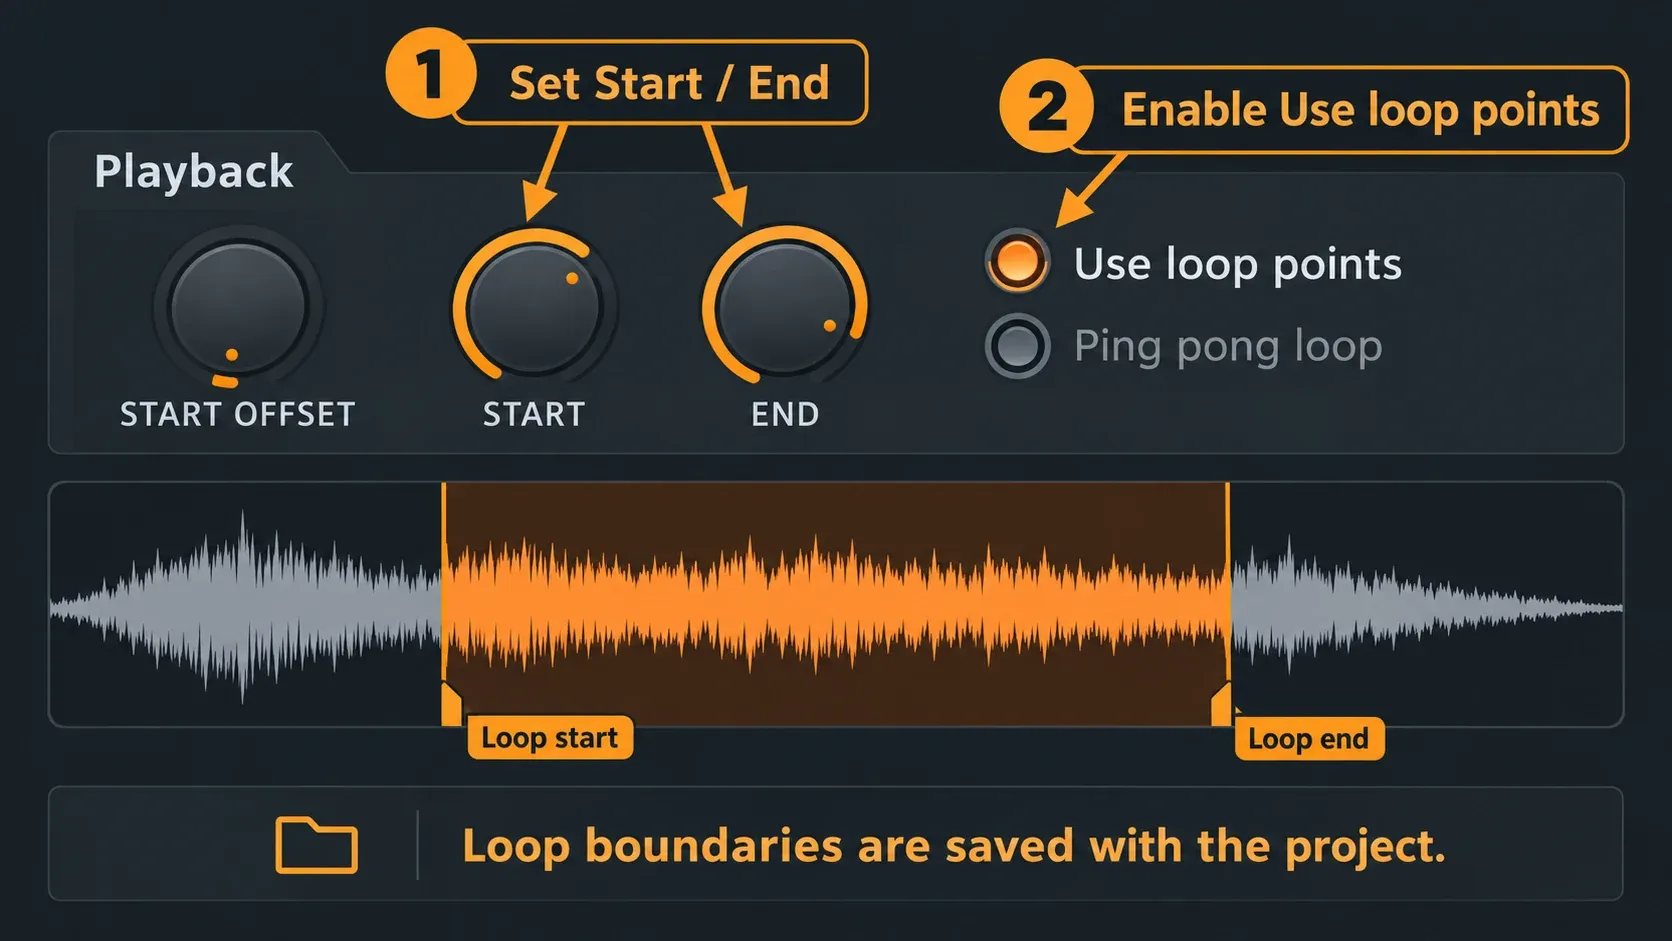
The playback START OFFSET control moves where playback begins; it is not the same as the loop's START. The precomputed SMP START control is different again: it trims the sample data. The current manual distinguishes all three. Manual loop settings are saved per project, not written back into the source sample.
If the join clicks, reconsider the boundaries and the waveform transition before treating it as a volume problem. Sampler also has a precomputed Crossfade Loop process. Use Edison when you need a dedicated editor for more detailed sample preparation; it is not a prerequisite for setting the current Sampler's manual loop boundaries.
Fix overlapping notes without choosing the wrong cut control
For a Piano roll part, begin with the notes themselves and the Volume envelope's Release. A long release can leave audible tails even when the notes no longer overlap.
Cut itself is not a general fix for every sequence. Image-Line documents self-cutting for Step Sequencer notes, with a specific exception for Piano roll notes. Cut/Cut by can still use one channel's Piano roll activity to cut another channel. These controls send note-off/release commands, so a long release can remain audible.
The Miscellaneous tab's Mono mode allows a monophonic part, with pitch slides between overlapping notes governed by SLIDE. MAX polyphony limits simultaneous voices, but MAX = 1 behaves differently from Mono; do not treat them as interchangeable presets. The polyphony and cut-group documentation explains that distinction. Choose the behavior the phrase needs: a smooth bass slide and an abruptly retriggered drum hit are different jobs.
Save the sound, and know when to change tools
Save the project after changing its root, envelope, stretching or loop behavior. Keep the source audio in a stable location. A channel preset is useful for reusing settings, but do not assume it bundles every external file the sound needs.
Right-clicking the sample waveform and choosing Save as saves sample audio with precomputed effects applied. It does not turn that audio file into a complete copy of your channel and project settings. Those precomputed tools also cannot be automated: they process the sample data rather than act as live effect controls. If Keep on disk is active, precomputed effects are unavailable; its documented file requirement is 16- or 32-bit WAV.
Stay in Sampler for one sound played at different pitches. Move to Slicex when separate regions of a phrase need separate keys, or DirectWave Full when the instrument needs multiple source samples. DirectWave Player cannot create a new multisample patch. The broader sampling workflow covers preparing and chopping the source. A clean root mapping, an intentional note-off and the right pitch-duration behavior are enough to make this one sound useful before the project grows any larger.