FL Studio
A pitch bend should move the note where you want it, then get out of the way. In FL Studio, the most useful starting point is the instrument's Channel Pitch control. Automate it for a lead, bass or whole chord. Use native Piano roll slide notes when you need one voice inside a chord to move independently.
I would start with a two-semitone bend on one held note. That makes a range problem easier to spot before you shape the musical phrase. Once the movement and return are right, extend it to the rest of the part.
Choose the bend that fits your phrase
The distinction is what the control affects. Channel Pitch moves the instrument channel's pitch; it does not select one note from a chord. Native slide notes can work within a note-color group, while a hardware wheel is a way to perform and record the movement.
| What you want | Start here | Watch for |
|---|---|---|
| A drawn bend for a lead or whole chord | Channel Pitch automation | Channel RANGE, clip scaling and the final return |
| One moving voice in a native-instrument chord | Overlapping slide note in the same color group | Other voices need a different color |
| A performed bend from your keyboard | Linked pitch wheel, recorded as automation | The recording filter and selected pattern |
| A bend on a VST/AU instrument | Channel Pitch, with the plugin's bend range checked | Native slide notes are not the built-in route |
If the job is tuning an existing recording rather than adding expression to an instrument part, use the separate guide to pitch-correcting a sample. For bass-specific note lengths and glide behavior, the 808 slides guide covers that arrangement.
Draw a pitch bend with Channel Pitch
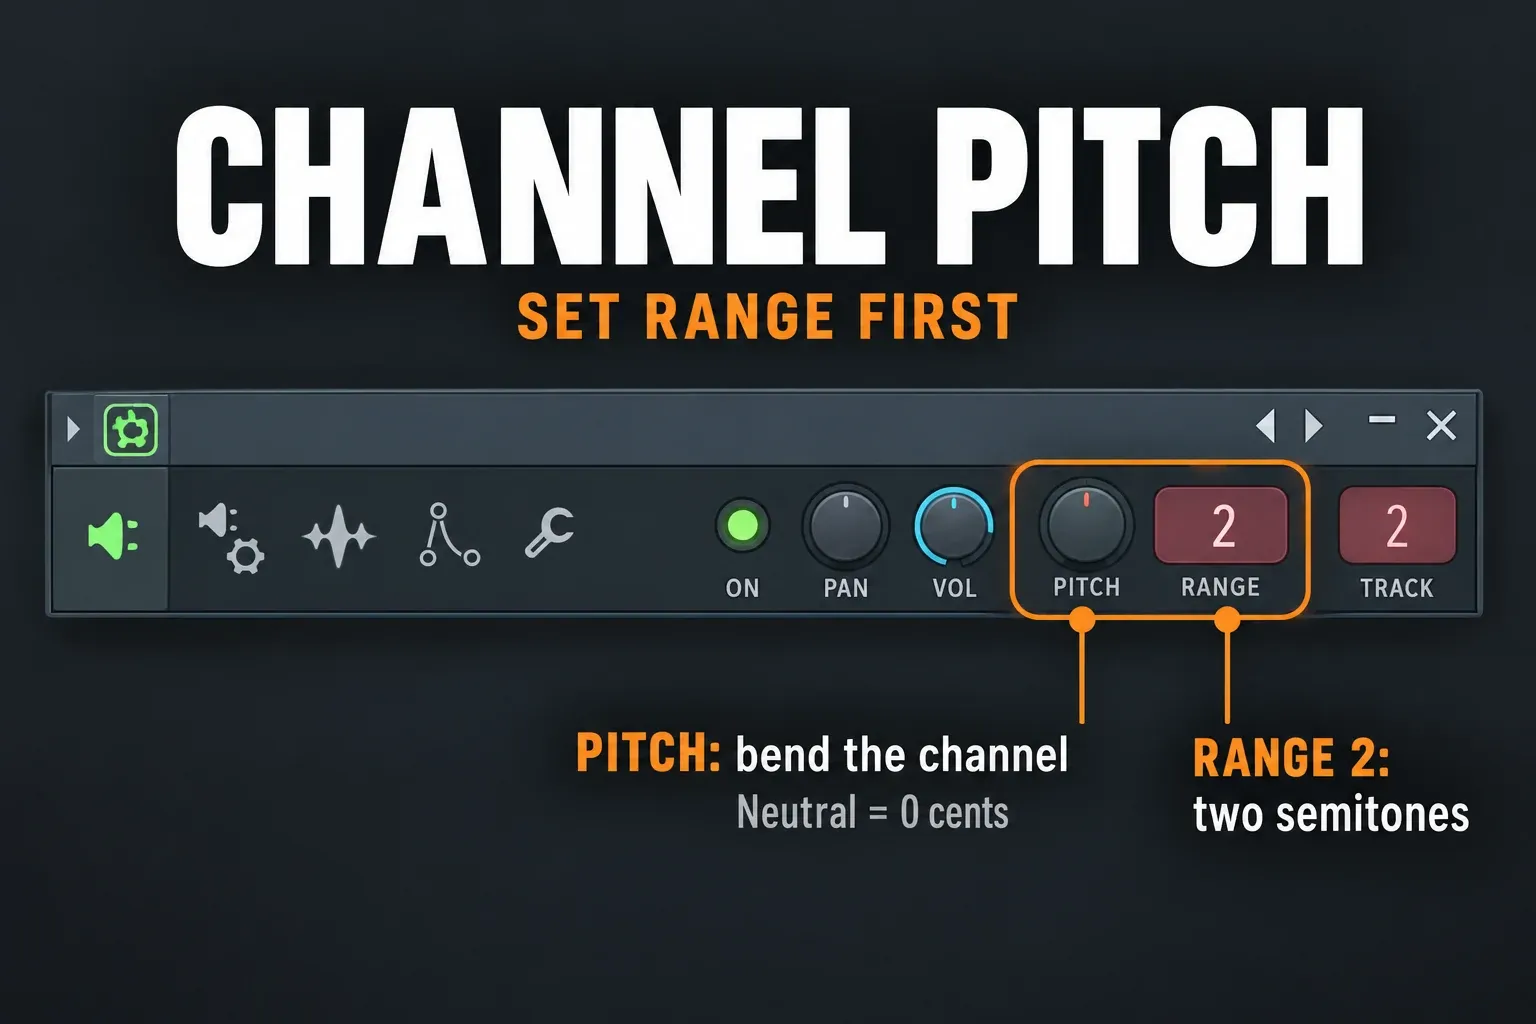
Open the instrument from the Channel Rack and reveal its additional settings with the cog icon. Find PITCH and the adjoining RANGE at the top of the wrapper. Image-Line documents RANGE as the maximum bend in semitones; 100 cents equals one semitone.
- Set the range first. For a simple two-semitone rise, use a RANGE of 2. Set Channel Pitch to its neutral position before creating the clip. Treat this as an example, not a required musical setting.
- Create the automation. Right-click PITCH and choose Create automation clip. This is FL Studio's documented route for automating a native control, and the clip appears in the Playlist.
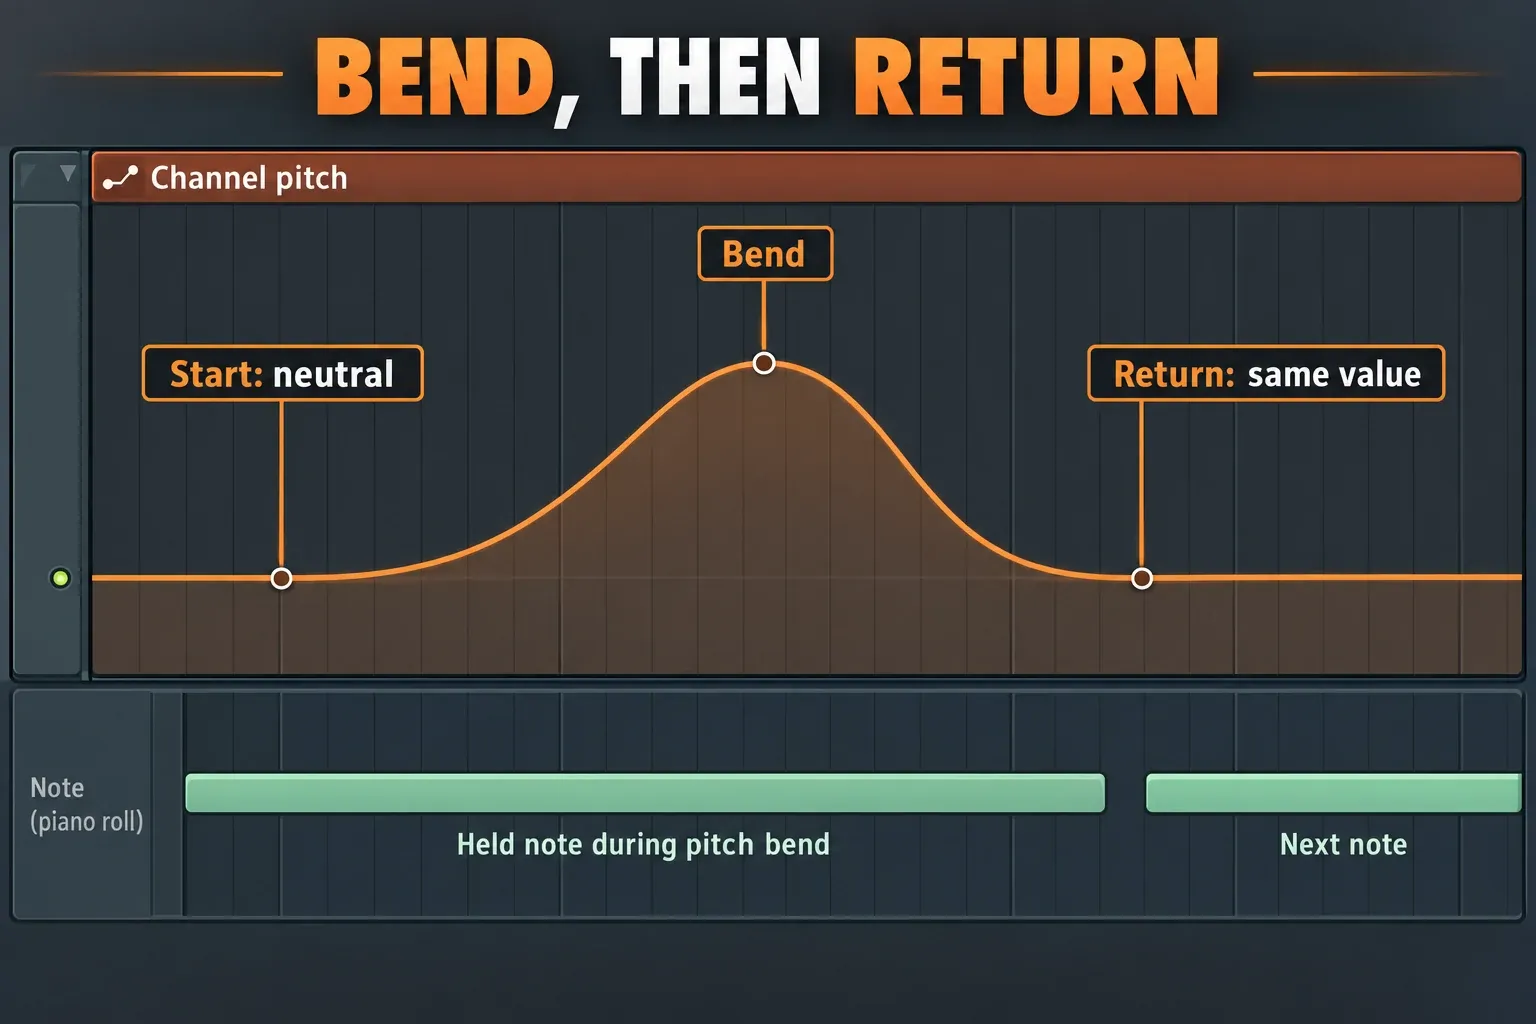
- Draw the movement over the sounding note. Keep an opening point at neutral, add a higher point where the bend should arrive, then add a return point. A downward bend uses a point below neutral instead.
- Match the return to the opening value. Right-click the neutral opening point, choose Copy value, then use Paste value on the return point. Finish the return before the next note if that note should start at its original pitch.
- Check the actual pitch control. Follow the Channel Pitch value during playback: neutral should be 0 cents. Check the bend's destination as well. The line's height alone does not tell you how an existing clip or external instrument is scaled.
Move the points horizontally to change when the bend starts and finishes. Drag a tension handle to change the curve between them. A late, quick lift gives a different phrase from a slow rise across the whole note; neither needs a complicated envelope.
The curve moves, but the bend is too small
Check two separate things: the channel's RANGE and the Automation Clip's MIN/MAX. The latter scale the clip's output. Image-Line notes that MIN/MAX can restrict the result while the Playlist curve looks unchanged.
This matters when you change the range after drawing a bend. Open the clip's channel settings, inspect its scaling and watch the resulting Channel Pitch value. Don't assume a familiar-looking midpoint or a full-height curve proves the destination. Keep the musical shape while correcting the mapping; there is no need to delete the instrument.
Make a VST or AU respond correctly
For an external instrument, automate Channel Pitch first. That is the method Image-Line recommends in its Piano roll slide documentation. Drawing native slide notes under a VST phrase does not give it FL Studio's native slide behavior.
If the instrument bends by the wrong interval, check its own pitch-bend settings as well as the wrapper's range. The host and instrument need to agree on the intended distance; increasing only one setting may leave the result wrong.
Some plugins also need Wrapper MIDI Settings > Send pitch bend range, with the semitone range set accordingly. Enable that only if the plugin's response or range is wrong. Image-Line's pitch-wheel troubleshooting instructions explicitly warn that some plugins interpret the range message as a filter reset. It is not a switch to turn on for every synth.
Plugin-specific per-note systems and third-party workarounds are a separate setup. The steps here cover FL Studio's documented channel bend and native slide routes.
Bend one note inside a chord
Use a native instrument that supports FL Studio's Piano roll slide notes. A slide note has a small triangle and changes a sounding note; a slide note on its own is silent.
- Draw the ordinary note and make it long enough to sustain through the bend.
- Turn on the Piano roll's slide switch, then draw a slide note at the destination pitch. Position it later in time so it overlaps the ordinary note.
- Adjust the slide note's length to set the transition time. The sounding note must continue through that interval to reach the target.
- Give the sounding note and its slide note the same color. Put chord voices that should stay still in a different color group. Use the color selector for new notes, or select existing notes and choose Edit > Change color.
- Turn slide mode off before adding more ordinary notes.
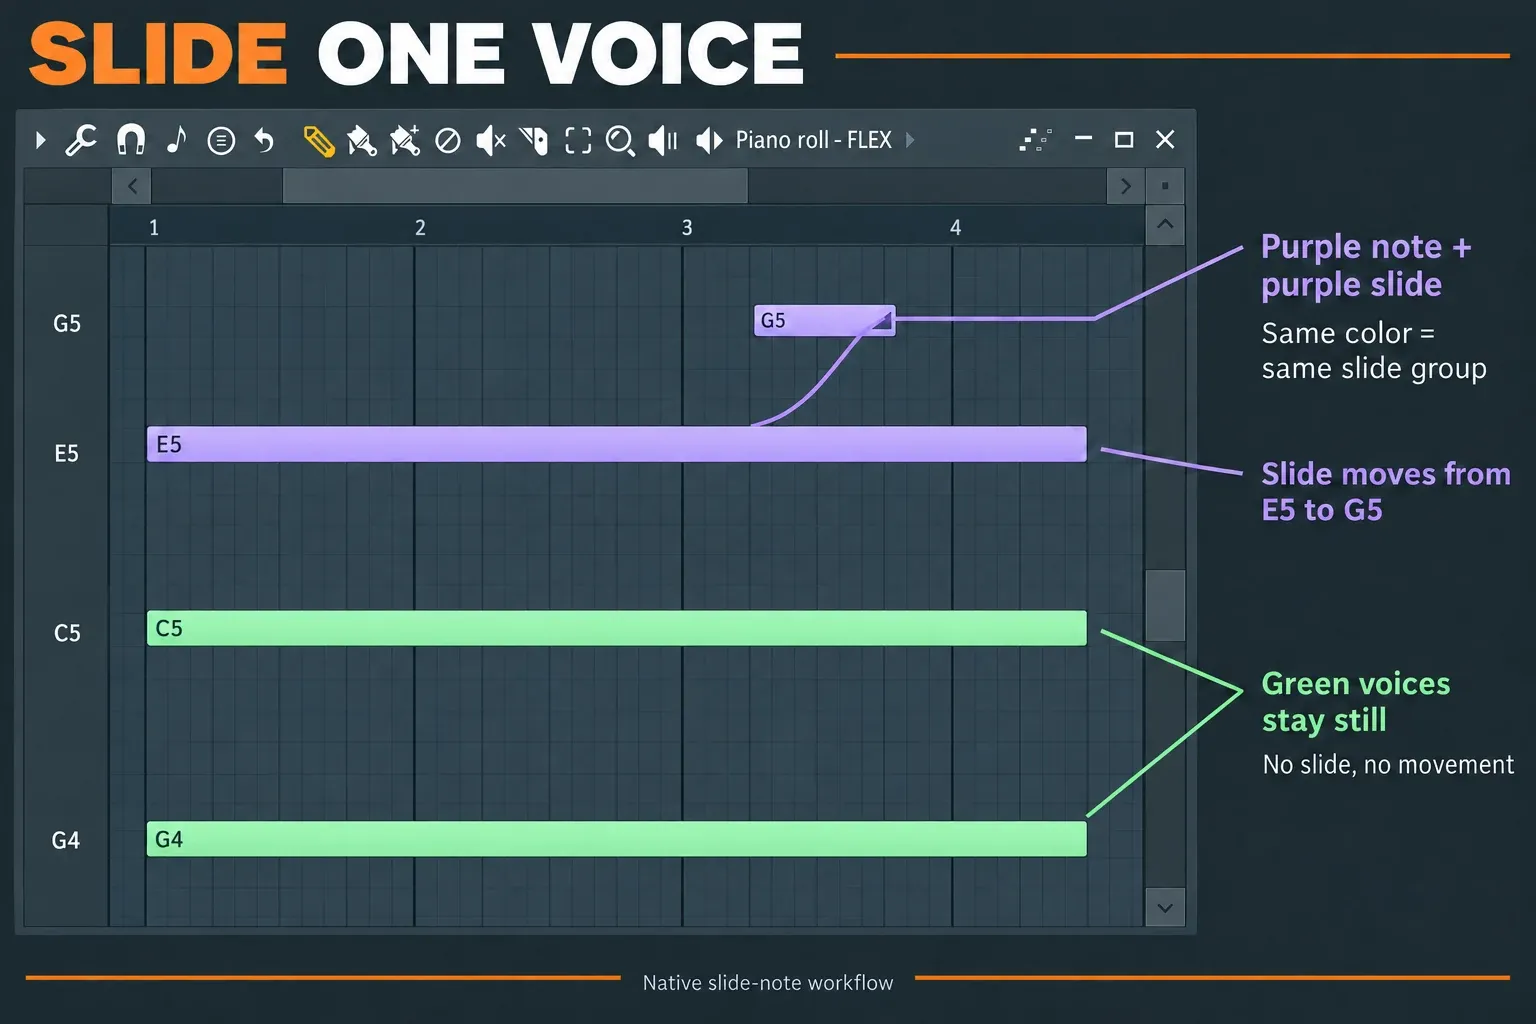
If an entire same-color chord moves, that is expected: FL Studio uses the top note as the slide reference and shifts the other notes by the same interval. Independent note-color groups separate the slides.
The note stays at its new pitch after the slide finishes. To bring a sustained note back, add another same-color slide at its original pitch while it is still sounding. Make that return long enough to complete before the note ends. This differs from moving a spring-loaded keyboard wheel back to center.
Record and edit a keyboard pitch wheel
First move the wheel and check that FL Studio's MIDI activity indicator responds. Image-Line says its default templates after FL Studio 21 already configure pitch and modulation wheels; an older or custom project can still need a link.
For that missing-link case, open Browser > Current project > Remote control, click Omni - Channel pitch and move the wheel. Check the wrapper and instrument ranges, then save the project. Those are the vendor's manual pitch-wheel setup steps.
Right-click the transport Record button and enable the Automation recording filter. Select the pattern that should hold the performance, start recording and play the bend. Image-Line documents that linked controller movements record into the selected pattern.
To edit it, select that pattern, right-click PITCH and choose Edit events. Existing event data can also appear in the Piano roll's lower editor through its Target Control selector. If you prefer Playlist points, use Edit > Turn into automation clip in the Event Editor. A recorded wheel performance starts as event data; it is not automatically a drawn Automation Clip.
Fix a bend that sticks, resets or stays silent
The next note is out of tune: check the final automation point or the wheel's resting position. For native slides, add an intentional return if the same sustained note needs to come back. Ending a slide does not restore its starting pitch.
The pitch jumps when you press Play: inspect the active Automation Clips, the pattern's Channel Pitch events and Current project > Patterns > Initialized controls. Image-Line identifies unintended events and initialized values as causes of unexpected pitch changes. Correct the unwanted data rather than fighting the knob on every pass.
Deleting the Playlist clip did not fix the reset: initialization can remain. If that starting value is unintended, remove its initialized event, or set the desired value and use Init song with this position. Preserve initialization that the arrangement actually needs.
The slide note is silent: check that it overlaps a normal note, shares its color and is driving a compatible native instrument. A VST needs the channel-bend route described above.
The wheel moves but nothing was recorded: check its link, the Automation recording filter and the selected pattern before doing another take. If you are in the wrong pattern, the event editor will not show the performance you expect.
I would get one held note bending and returning correctly before adding more points. Once that works, shape the timing against the phrase: a small lift at the end of a lead line often needs less editing than a bend spread across every note.