FL Studio
To pitch-correct a sample in FL Studio, find its source note, pick the target and make a deliberate semitone shift. Use Clip Properties Pitch for a whole Audio Clip, the Time stretching PITCH control for a Channel-wide shift, or NewTone when individual notes need different corrections. Setting a Sampler root note is a separate job that maps the recording to the keyboard. If the source still needs trimming or chopping, finish the sampling preparation workflow first. After tuning, judge the result against the beat, since the pitch display only tells half the story.
Don’t start by nudging the Pitch knob until the sample “sounds less wrong.” Name the source and the target first. A measured three-semitone move can be repeated tomorrow; a mystery knob position cannot.
Decide whether the sample has one useful pitch
A sustained 808 tail, bass note, bell, pluck or sung vowel usually has a stable fundamental you can tune. A snare, breath, texture or noisy percussion hit may contain plenty of frequencies and still have no musically useful root note. Forcing every sound onto a tuner reading can make a good transient worse.
Polyphonic loops need one more distinction. If the sample holds a chord progression, one global transpose moves every chord by the same interval and leaves the harmony itself untouched. That works when the progression already fits the target relationship, and no amount of shifting will make incompatible chord movement disappear.
Find the source pitch before choosing the target
Start with the steadiest part of the waveform. For an 808, listen to the body after the attack. For a vocal or instrument phrase, find the sustained notes and ignore consonants and breaths. Compare the sound with a reference note from a simple instrument, then confirm it in the arrangement.
For a one-note sample, route it to a Mixer insert, add Tuner and play the stable section on its own. Tuner measures pitch and changes nothing about the sound. Adjust Reactivity if the reading jumps around too quickly, and try Bass for a very low 808. NewTone becomes more useful when you need to see how a note’s pitch moves over time.
A detector can mistake an overtone or the attack for the note you actually want to tune, so check the reading against a simple reference instrument. One detected note will not tell you the key of a full chord progression, and noisy percussion with no sustained pitch should not be forced onto a precise root. A browser-based online pitch detector gives you a second opinion without loading a plugin.
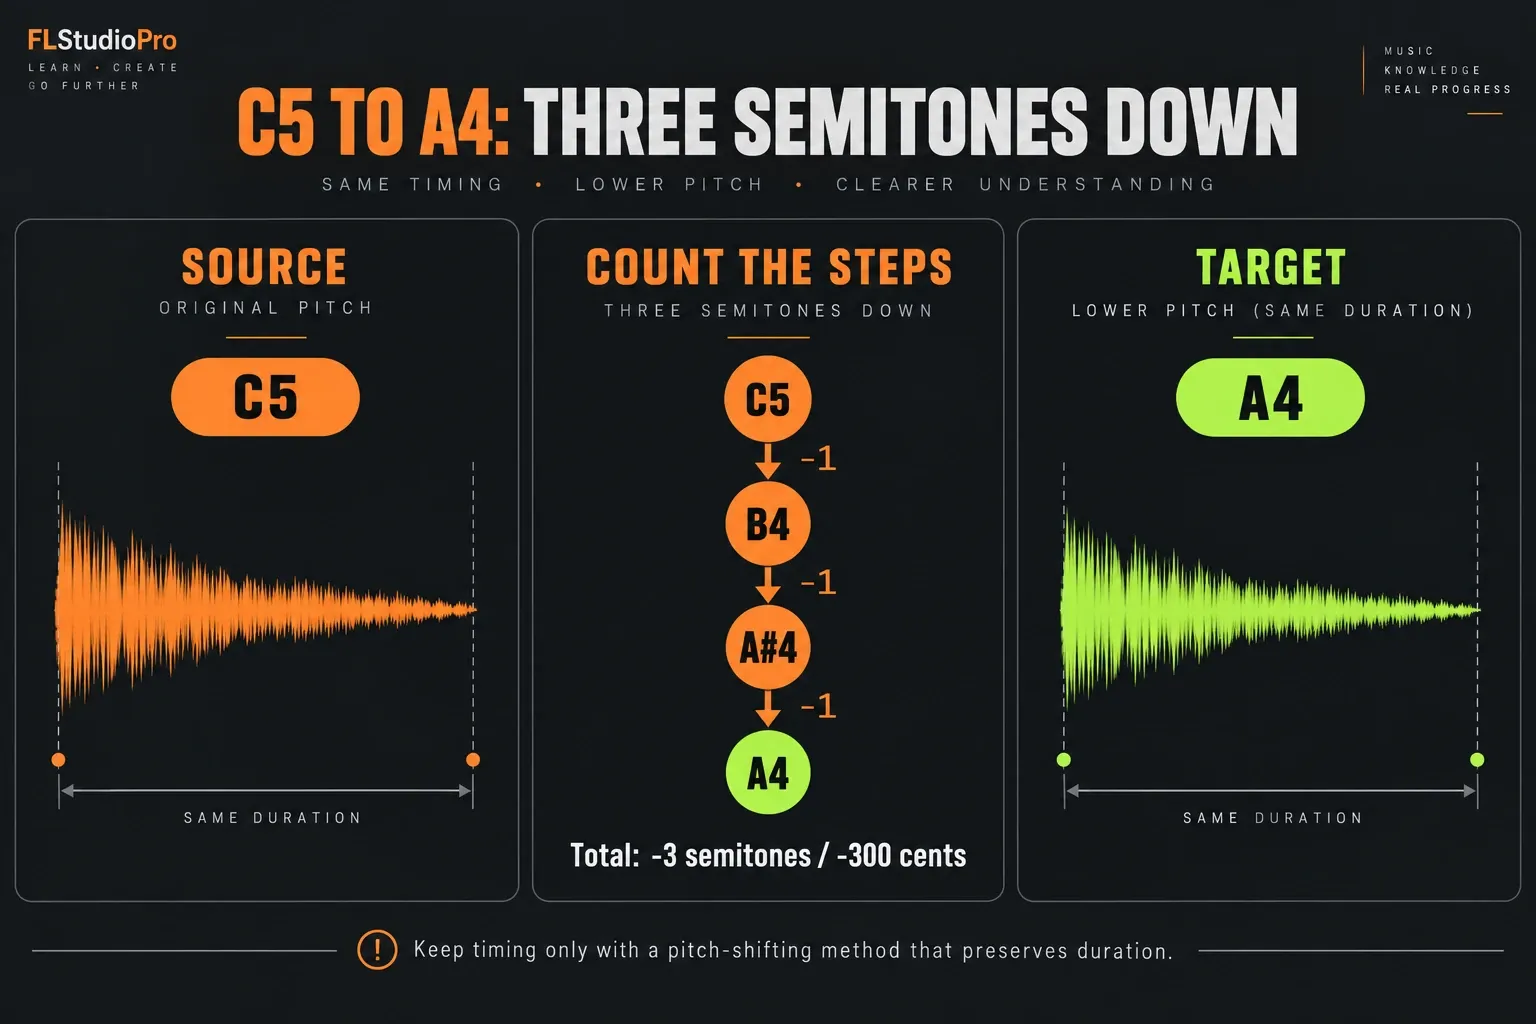
The target is not always the song’s tonic. A bass note may need the root of the current chord, and a vocal chop may work as its third or fifth. Write down both notes, octave included. For example, C5 → B4 → A#4 → A4 is three semitones down, or −300 cents. C5 to A5 is nine semitones up: the same target pitch class in a very different register. Choose the musically useful octave, even when a smaller number looks tidier.
Check metadata before correcting real pitch
Save a separate project version and keep the original audio before you troubleshoot. If a sample changes pitch or speed the moment it loads, look at its metadata before retuning the recording. The Image-Line pitch and tempo checklist covers Edison’s F2 Sample Properties, where you check the stored BPM and Middle note. C5 is just the default mapping; it does not mean every recording contains a C.
On a test copy, reset any unexpected Time stretching PITCH and MUL values and set TIME > (none) to hear unstretched playback. Don’t do this blindly to a loop you tempo-matched on purpose, because it wipes that setup. If the source now sounds right, fix the wrong metadata or setting instead of stacking a compensating transpose on top.
If the pitch snaps back during playback, check Main pitch, Channel pitch, Piano roll pitch events, automation and initialized controls. A stored control change can quietly undo a manual adjustment. Keep intentional bends and delete only the unwanted event you have actually identified.
Choose the lightest pitch tool that solves the problem
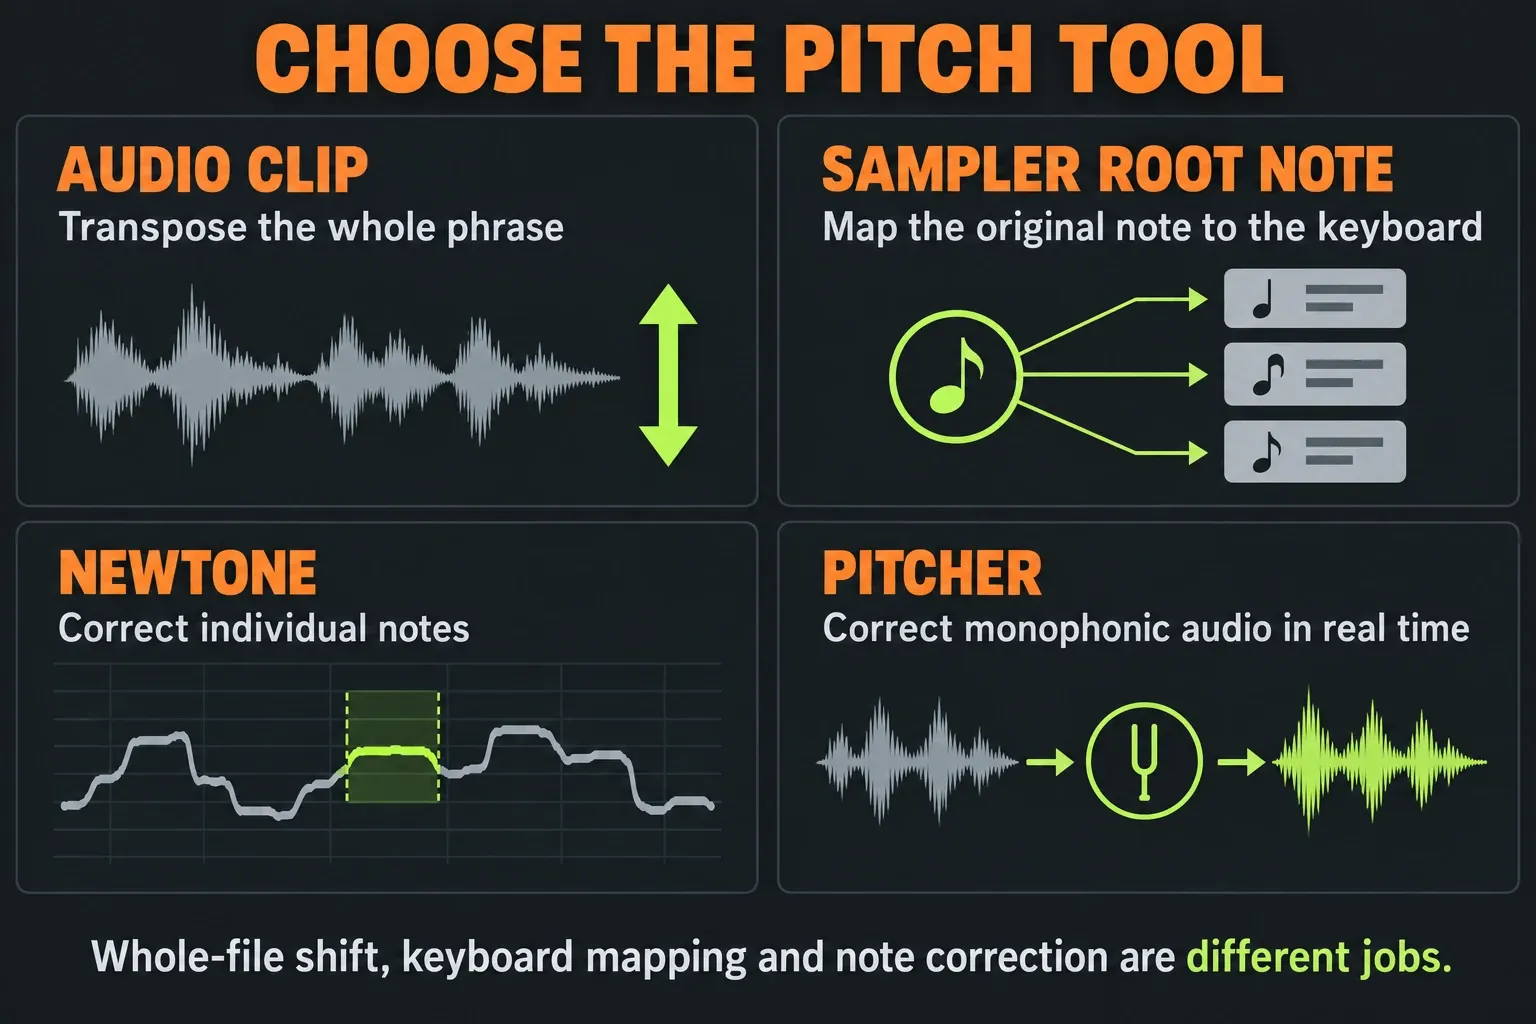
| Problem | Best starting tool | Why |
|---|---|---|
| Whole loop or one-shot needs one transpose | Clip Properties Pitch or Time stretching PITCH | Fast, reversible and easy to compare |
| Playable one-shot maps to the wrong keys | Sampler root note | Corrects the keyboard relationship |
| Several notes in a phrase drift differently | NewTone | Edits pitch regions one by one |
| A monophonic source needs correction during playback | Pitcher | Processes incoming audio in real time |
The Pitcher manual describes Pitcher as a real-time correction and harmonization plugin and sends you to NewTone for detailed editing. For a saved sample that needs careful note work, NewTone is usually easier to inspect and commit. For a fixed transpose, you may not need either plugin.
Transpose the whole Audio Clip without guessing
For a single Playlist occurrence, open Clip Properties (usually Alt/Option-double-click, though shortcuts can be customized) and adjust its Pitch semitone value. Use Fine for cents. The Audio Clip documentation separates these local settings from Channel Settings, which affect every instance sharing that Channel.
For a Channel-wide move, open its Sample tab and use PITCH inside Time stretching. Other Pitch knobs in that window do different things. For the C5-to-A4 example, confirm a three-semitone downward change in the displayed value, then compare the original and corrected versions at similar loudness. For a reversed 808 transition, tune the forward source first so the reversal does not hide its stable note.
The Time stretching PITCH control keeps the sample length and switches Resample to Auto when you adjust it. Ordinary Resample playback, by contrast, ties pitch and speed together, so playing different Piano roll notes can change duration. Check which mode you ended up in; controls that share the name Pitch do not all behave alike.
When you want to play the sample at several notes and keep its duration, try Stretch. For formant adjustment, Stretch pro exposes F.Shift. Selecting Stretch first locks TIME to the current tempo, so recheck any loop you fitted deliberately. The time-stretching guide handles tempo matching and automation in detail; here the goal is simply the right pitch with the right timing.
Clip Properties can give you a local pitch variant without Make unique, but its Stretch Mode is still shared. Use Make unique when you need separate Channel settings, and Make unique as sample when you also need a separate audio file for physical editing. Duplicating a Playlist occurrence on its own does not create a new source file.
Set the Sampler Channel root for playable one-shots
Open the Sampler’s Miscellaneous (wrench) page and right-click the detected source note on the preview keyboard. The blue key marks the root, and the root-note documentation defines it as the key that plays the original pitch. Set the source note there; the song’s key belongs somewhere else.
Say an untouched one-shot sits at A4: map its root to A4. Playing A4 now reproduces the source pitch, and playing C5 asks for a three-semitone upward transpose. Mapping leaves the original file alone and cannot fix a note that drifts. Avoid correcting a sample twice after you have already transposed it, and compare against a reference instrument after the change.
For an 808 or bass note, confirm the pitch on the stable tail and ignore the noisy attack. If the bass design itself is the problem, the Reese bass sound-design guide starts from synthesis; this page assumes you already have an audio file.
Use NewTone for note-level correction
In the Channel’s Sample tab, right-click the waveform and choose Edit in pitch corrector. NewTone loads the sample for editing. Give it a clear line with one note at a time; it will not pull individual voices out of a chord or a full mix. A sung phrase with baked-in harmonies or heavy reverb may need a cleaner source.
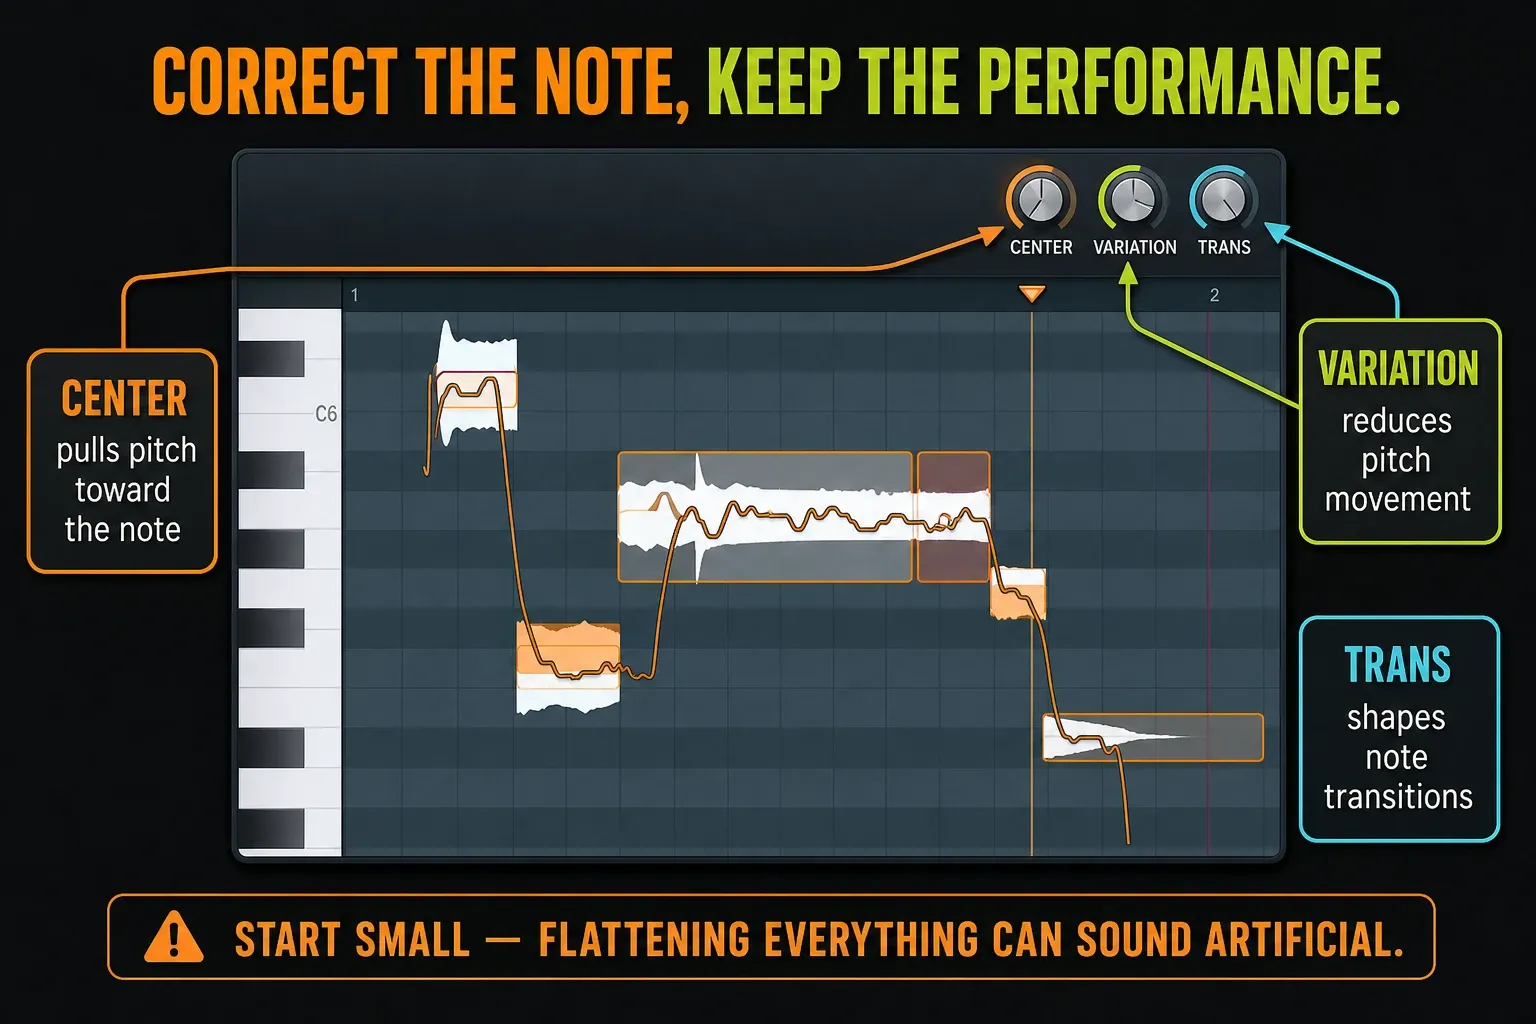
The NewTone manual explains the note display and the edits. Right-click a note to center it on the nearest semitone, or Alt-drag for a fine adjustment. The nearest semitone is not always the harmonically correct one, so listen to the intended melody before you accept a detected target.
- Play the phrase once and identify only the notes that clash.
- Correct the pitch center of those notes first.
- Reduce pitch drift only where it distracts.
- Adjust transitions only when slides enter or leave the wrong note.
- Compare with the original before exporting or dragging the result back.
When the nearest semitone is the wrong target, drag the note vertically to the pitch you want. Check which notes are selected before moving them, because a group edit can change more of the phrase than you meant. Center adjusts overall note centering, Variation controls pitch movement within notes, and Transition changes the movement between notes. Go gently at first. A scoop into a note may be part of the performance, and flattening it does not automatically improve anything.
Preserve formants when the identity matters
Pitch and vocal character are separate decisions. A technically correct transpose can make a voice sound smaller, heavier or less believable. In NewTone’s Advanced Edit mode, double-click a note and adjust its Formant control if needed, then compare the vowels and consonants as well as the pitch trace. No setting makes an extreme shift transparent.
For a creative vocal chop, the altered formant may be exactly the point. For a natural phrase, compare consonants, vowels and breath texture after correction. If a smaller interval or a different take works better, use it instead of forcing an extreme algorithmic rescue.
Keep timing separate from pitch decisions
A correct pitch can still land badly. After any whole-sample transpose or NewTone edit, loop the phrase against the metronome and drums. Check the first downbeat, the final boundary and the transients in between. If the pitch process changed the length, put the phrase back where it belongs in the bar before adding fades or automation.
NewTone’s Sync uses the project tempo for stretching, so it is more than a play-along switch. Check the source BPM before you turn it on. Slaved Playback follows the host transport in Song mode. Keep that difference in mind when auditioning against the song, or you may stretch a phrase that was already in time.
Send the result with Send selection to Playlist or Drag selection, clearing any partial selection if you want the whole sample. That gives you audio, while Send to piano roll sends detected MIDI notes instead. Keep the original separate and muted while you audition the replacement, then check its start, end and Mixer route. The Mixer guide helps if the returned clip sounds unexpectedly louder or runs through different effects.
Check licensing before committing an edit
A plugin showing up in the installer does not prove you own it. Check NewTone’s license status before you invest in a detailed edit. If a save or transfer command reports a demo restriction, sort out the license first; reinstalling will not magically unlock it. Image-Line’s edition and trial guidance separates access to the host from ownership of individual plugins.
The standard FL Studio Trial can save projects but cannot reopen them until purchase, so keep the audio you need before ending a session where export is available. In a licensed host, unowned trial plugins may reopen as empty slots, so unlock them before reopening, and never overwrite the original project while those states are missing.
Use Pitcher only for a real-time job
Pitcher works on monophonic audio in real time, and that includes a recorded vocal playing through a Mixer insert as well as a live microphone. Choose the intended key/allowed notes or MIDI-controlled targets. Feed it a clean signal ahead of chorus, phasing and reverb, since those effects can confuse detection.
Reach for Pitcher when you want correction to stay active during playback, NewTone when you want to inspect and commit individual edits, and Clip Properties for one fixed transpose. If the pitch should move repeatedly across the arrangement, plan that as an automation effect and leave the source note alone.
Listen for artifacts after every serious shift
Solo reveals buzzing, warble or smeared attacks, but the context decides whether they matter. Check the corrected sample:
- alone at normal monitoring level;
- with bass and chords to confirm the target key;
- with drums to confirm timing and transient shape;
- in mono to expose unstable phase or widening;
- at a lower level, where pitch clashes stand out more than the excitement does.
Large moves usually sound less transparent than small ones, and no stretch mode guarantees clean results on every polyphonic or noisy source. When the artifact becomes the main thing you hear, either embrace it as sound design or pick a closer sample. The stock-plugin guide can help with cleanup once the tuning is right.
Run this pitch-correction check
- The sample has a musically useful root or note contour.
- Source pitch and target key/note are written down.
- Metadata and pitch/time controls are understood; test resets have not erased intentional settings.
- The chosen tool matches the task: whole transpose, root mapping, detailed edit or real-time correction.
- Duration and downbeat placement still match the arrangement.
- Formants and transitions still sound intentional.
- The corrected version has been compared at matched level.
- The original audio remains available for rollback.
Once the sample is in tune, carry on through the Sound Design hub. Effects should support the corrected pitch; they should never cover up doubts about it.
Frequently asked questions
How do I change the key of a sample in FL Studio?
Identify the sample’s source pitch, choose the target and transpose the Audio Clip or Sampler by the required semitone interval. Use NewTone when different notes in the phrase need different corrections.
How do I pitch a sample without changing its length?
Use the Audio Clip’s Clip Properties Pitch, or the PITCH control inside Time stretching specifically. Ordinary resampling is different, because it ties pitch to playback speed. For a Sampler played at several notes, try Stretch and check the duration. After any change, recheck alignment against the drums.
Why does my sample play the wrong note in the Piano roll?
Check the Sampler root mapping, source metadata and existing pitch controls or automation. Set the root to the source note, not automatically to C5 or the song’s key. Test resets on a copy so you do not erase intentional pitch or tempo settings.
Should I use Pitcher or NewTone on a sample?
Use Pitcher for monophonic audio corrected during playback, including recorded vocals. Use NewTone to inspect and commit note-by-note edits. A whole-file transpose may need only Clip Properties Pitch. Check plugin licensing before relying on saving or transferring an edit.
Why does pitch correction make my sample sound robotic?
The shift may be too large, pitch variation may be flattened too hard, transitions may be too abrupt, or the formants may no longer fit the source. Ease off the correction and edit only the notes that need it.