FL Studio
To make vocal chops in FL Studio, cut a vocal into useful syllables, arrange those pieces into a new rhythm, and adjust their pitch against your chords. Use the Playlist when you want to see every cut. Use Slicex when you want to trigger several slices from the Piano roll. For a melody played from one vowel, move that slice into a Sampler channel.
I would start with a short, dry phrase and a simple drum loop. You can hear whether the hook works before delay and reverb make every fragment seem more exciting. A good chop needs a clear attack, a useful pitch and somewhere to breathe.
Choose your route before cutting
| Your goal | Start here | What you control |
|---|---|---|
| Rearrange a few words or syllables | Playlist Audio Clips | Visible cuts, placement, fades and individual clip properties |
| Play different parts of a phrase | Slicex | Region boundaries and a MIDI pattern that chooses the slices |
| Play one vowel as a pitched instrument | Sampler channel | A root note, melodic notes, stretching and a volume envelope |
Check your edition first. The current Image-Line edition comparison includes Slicex in Producer Edition and above. Fruity Edition has an eight-Audio-Clip limit and does not include audio recording; Producer Edition and above support recording. Loading an existing vocal and recording a new one are different requirements.
Pick a phrase that gives you something to play
Use your own recording or a vocal whose licence permits your intended sampling and release. Keep that permission with the project. Changing the pitch or cutting away words does not establish permission to use someone else's recording; the U.S. Copyright Office's guidance for musicians explains why you must check the rights and permitted uses of preexisting music.
Listen for a clear vowel such as “oh” or “ah”, a short word with a strong beginning, or two contrasting syllables that can answer each other. A sustained vowel suits a melody. A sharp consonant suits a rhythmic hook. Neither is automatically better; choose the sound for the job.
Dry material gives you more control over the spaces between chops. If the source already has a long reverb tail, that tail comes with the cut. Start with a phrase you can hear clearly, and keep an untouched copy before editing. If you are still choosing how to bring audio into the project, the FL Studio sampling guide covers the broader workflow.
Make a hook directly in the Playlist
Dragging an audio file onto the Playlist creates an Audio Clip. Image-Line's Audio Clip controls let you slice and arrange it, then give each instance its own fades and gain.
- Place the source on a spare Playlist track. Zoom in until you can see the beginning and end of the syllable you want. Keep the uncut source elsewhere in the project.
- Cut around the sound with the Slice tool. Leave the consonant if it gives the chop its attack. For a smoother melodic vowel, cut after the consonant. Turn off Stretch clips before trimming edges so an edge drag does not stretch the sample.
- Remove the unwanted pieces from the working track. Listen to the remaining chop alone. Its end should not carry half of the next word unless that is deliberate.
- Arrange copies against the drums. Start with a repeated phrase, then leave a gap or change its final syllable. Use the grid to place the rhythm; the original syllable boundaries do not have to fall on that grid.
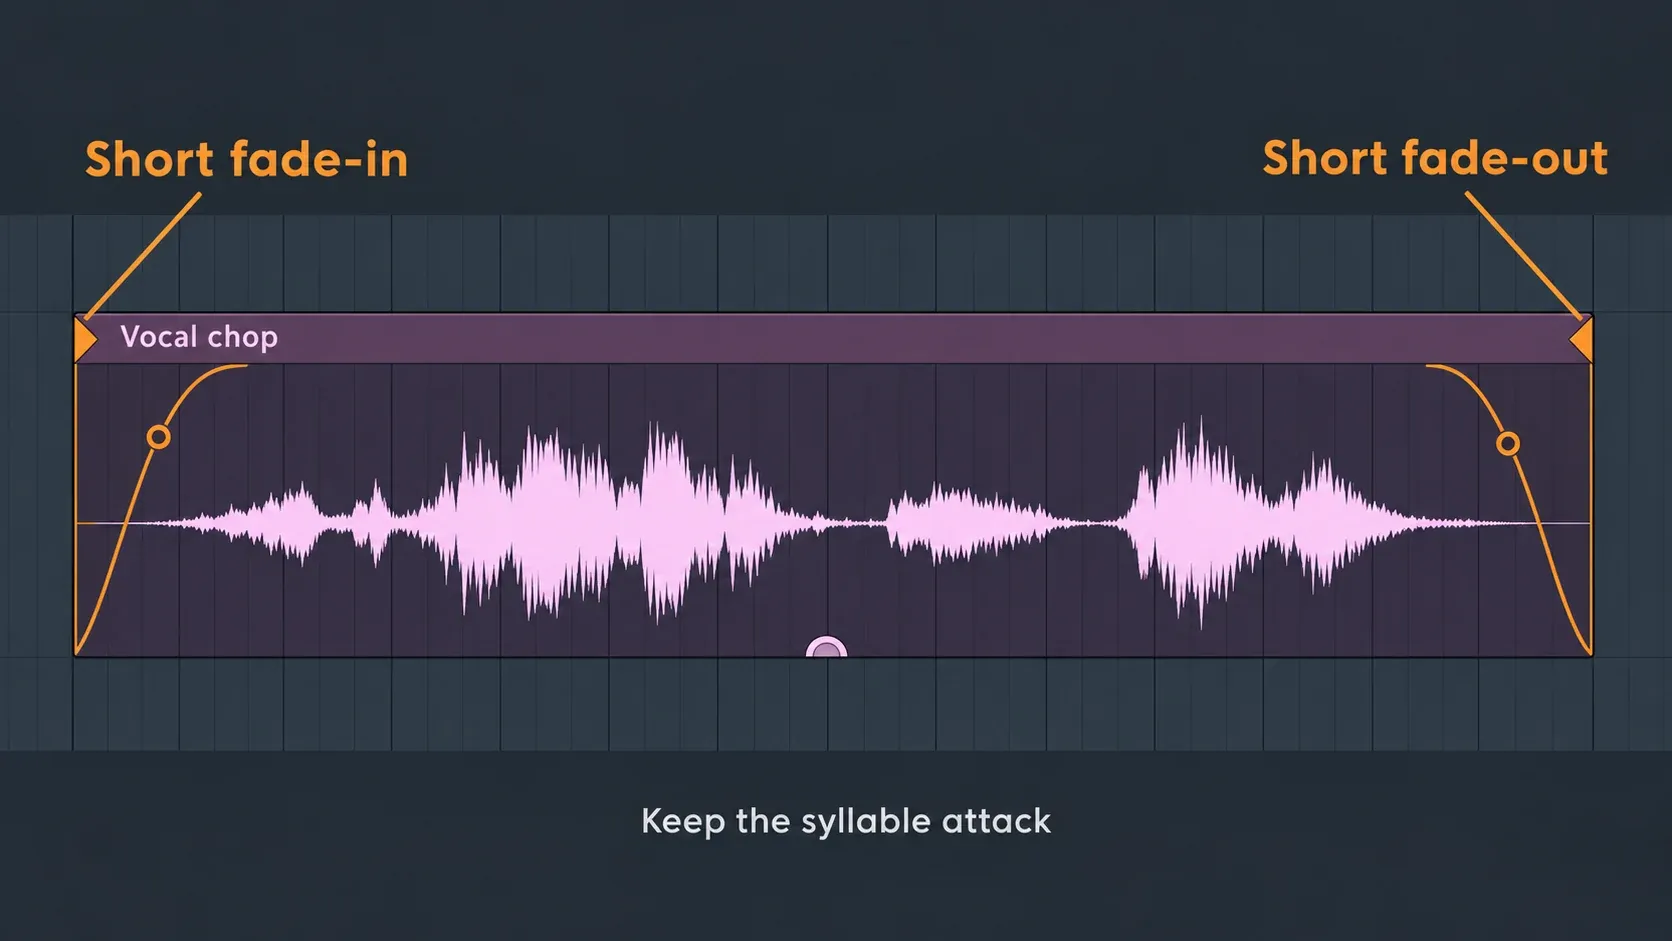
- Smooth the cut edges. Show the fade controls and pull the triangular handles slightly inward. Use the shortest fade that removes the click while keeping the attack you chose.
For a simple four-beat example, place “oh” on beat one, “ah” on the offbeat after beat two, and “oh” again on beat four. Leave beat three empty. That is a starting rhythm, not a rule: change the last sound in the next bar and hear whether the phrase still feels like one hook.
The Playlist's Zero-crossing edits option moves slice and resize edits to the nearest zero crossing, which can help avoid clicks. It can also move the boundary away from the exact point you selected. Use it as a cleanup aid, then listen to the consonant and rhythm again. A long fade can solve the click and spoil the chop.
Change one chop's pitch without changing every copy
In current FL Studio, open the selected instance's Clip properties and adjust Pitch. Image-Line documents instance-specific pitch, gain and reverse controls; the default shortcut for Clip properties is Alt/Opt plus double-click, although the double-click actions can be swapped in the shortcut settings. Use the window title to confirm you opened Clip properties.
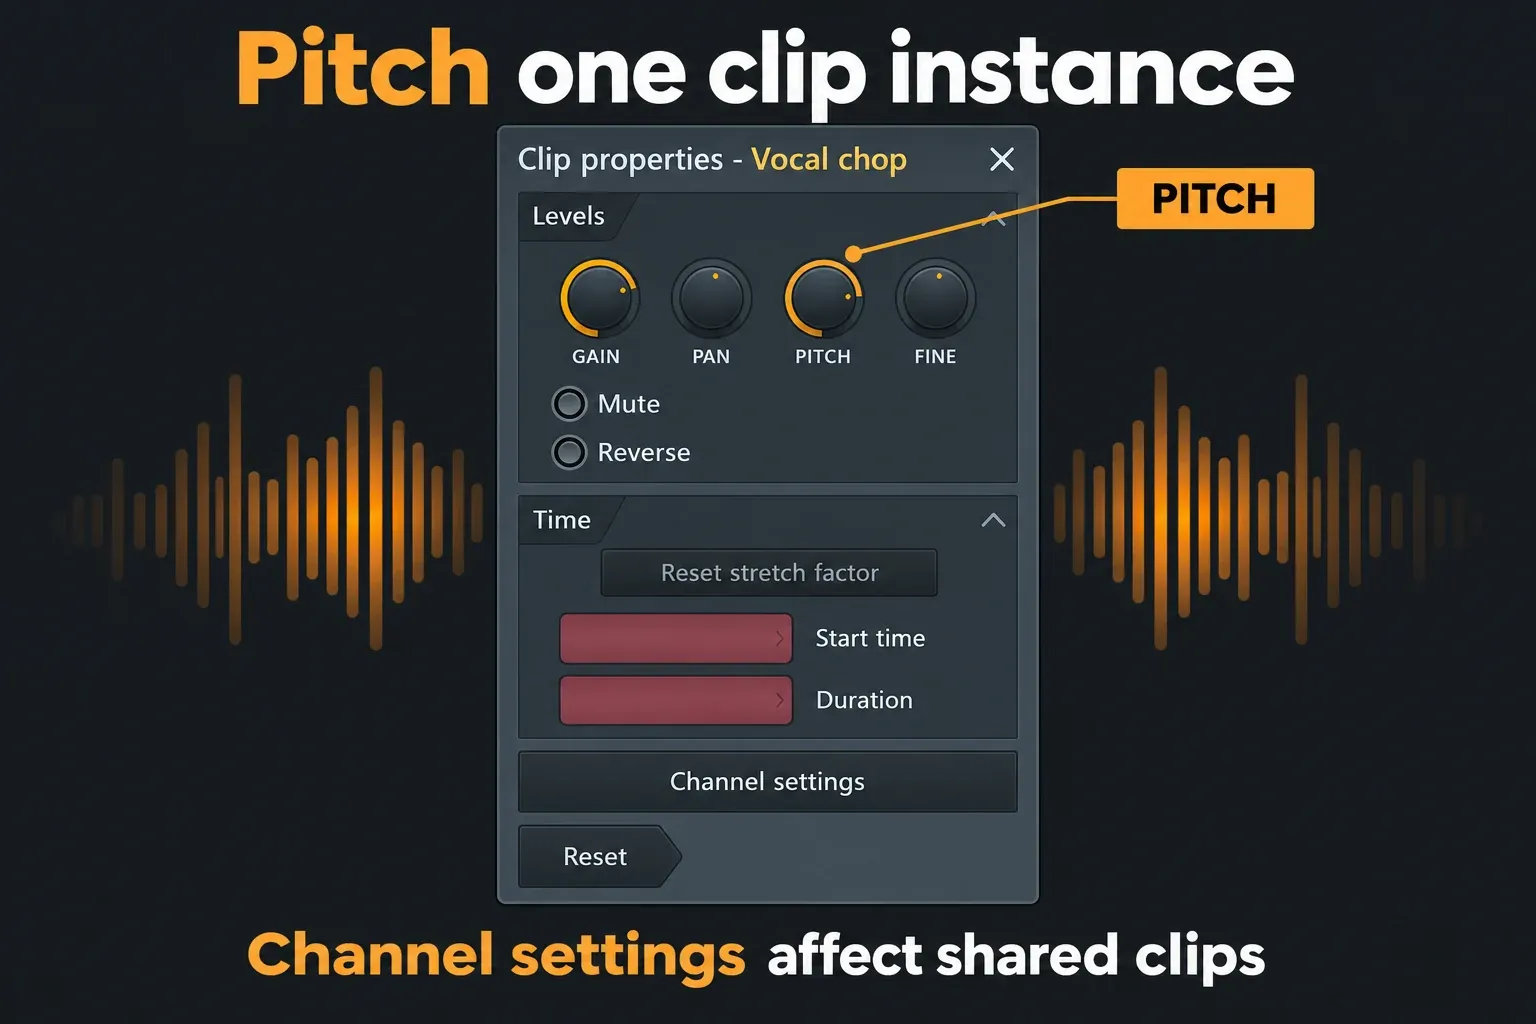
Put the chop against the chord that plays beneath it and move the pitch until it supports that harmony. Clip properties pitch preserves duration, but the stretching mode remains shared by the Audio Clip's instances. The source phrase's key is a clue, but an individual syllable may bend between notes. Judge the sustained part, not just its first instant.
If you use an older version without these instance controls, Make unique creates a separate Audio Clip channel before you change channel-level settings. It still reuses the original audio file. For edits that physically change the sample data, Make unique as sample also creates a separate file. Keep a backup before destructive processing.
Use Slicex for a playable bank of syllables
Slicex makes regions independently playable from the Piano roll or a controller. Load it as an instrument and drag the vocal onto its waveform area. Deck A is the default destination. Existing region data may be used instead of fresh detection, so check the actual markers before assuming the sample has been sliced correctly.
- Create an initial set of regions. In the Wave Editor's Regions > Auto slice menu, try Medium auto-slicing. The detection looks for peaks, not the meaning of words. Fewer carefully chosen syllables are more useful than dozens of accidental fragments.
- Move the markers to musical boundaries. Drag their top handles so each region starts with the intended attack and ends before the next unwanted syllable. Audition the candidates and keep a small set with different sounds.
- Check the MIDI-triggered sound. Slicex's region audition behaviour matters here: right-clicking a region previews raw audio, which can differ from playback through the keyboard or Piano roll with articulation applied.
- Build a new Piano roll pattern. An imported Deck A sample may already have a score because Auto dump writes one. Preserve that pattern if useful, then clear the working notes and draw your own rhythm. If you need the source sequence as a reference, the Wave Editor's Dump score button creates a note sequence from the slices.
- Clean the edges and overlap. The Wave Editor's region tools include Declick in all regions, Declick out all regions and Perfect all regions, which processes both edges. Save before these edits and recheck the attacks afterward.
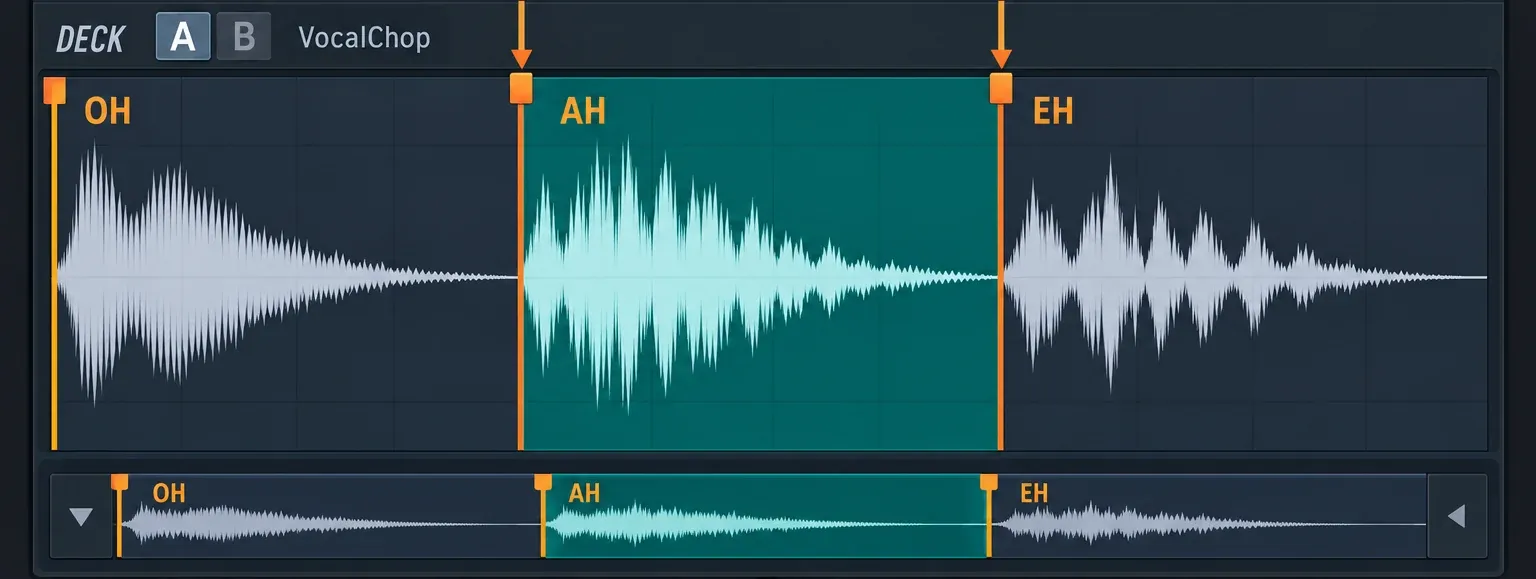
If one syllable runs into the next, assign the slices to the same cut group with Regions > Set all cut groups to.... In Slicex, a new region in the same group cuts an already playing region when their sounds overlap, as described in the Cut Group controls. Keep them separate if you want overlapping tails.
Moving a Slicex note to another row normally selects another region. It does not automatically turn the same vowel into a new musical pitch. That distinction explains many “why is this playing a different chop?” moments. The full Slicex guide covers the instrument's wider routing and articulation options.
Turn one vowel into a melody
For a hook played from one vowel, select that region in Slicex and use the Wave Editor's Drag / copy sample / move selection control to drag it into a Sampler channel in the Channel Rack. The selected audio is copied; check the selection first, because no selection means the whole sample is copied.
Set the Sampler's root note to the vowel's original sustained pitch by right-clicking the corresponding key on its preview keyboard. The root-note setting tells FL Studio which key should play that original pitch. It is not pitch detection or correction. If the vowel moves between notes, choose a more stable fragment before trying to turn it into an instrument.
In the Sampler's time-stretching section, choose Stretch when you want melodic notes to retain the sample's duration. Resample changes playback speed with pitch. Stretch pro adds formant control if you want to adjust the vocal character separately; these behaviours are documented in the Sampler stretching controls. Large shifts can sound rough, so compare the notes you actually need against the track before building a whole melody.
Enable the Sampler's Volume envelope when note length should shape the phrase. Use a short attack, enough sustain for the vowel and a short release that avoids an abrupt end. The instrument envelope controls apply only when their envelope is enabled. A longer MIDI note does not create more recorded vowel; sustaining beyond the sample needs a suitable loop or another source.
Write a short motif against the chords, then answer it with a different rhythm or a second vowel. If the problem is matching an entire phrase to the project tempo, use the separate time-stretching workflow rather than stretching every small chop until it loses its character.
Make the hook fit before adding more effects
Route the chops to their own Mixer insert so you can set their level and effects independently. Start with the drums, bass and chords playing. A chop that sounds impressive alone may cover the lead vocal or make the snare feel smaller.
Balance the loud syllables first. Use EQ for an audible problem, such as rumble or an unpleasant resonance, rather than applying a fixed high-pass or presence boost to every voice. Add delay to extend a phrase into a gap, and keep reverb short enough that the next attack remains clear. Those are musical choices, not a compulsory plugin chain.
Before you call the hook finished, listen through its full loop with the effects bypassed. Check that cuts are clean, the intended syllable plays on each trigger, pitches fit the changing chords and the final tail does not crowd the next section. If the idea holds together dry, you have something worth developing.