FL Studio
To chop a loop in Slicex, load the audio, check its region markers, then use Dump score or MIDI notes to play the slices. The marker decides which audio belongs to a slice; the note decides when that slice plays. Keeping those two jobs separate makes it much easier to fix a chopped-off attack, an empty Piano roll or two hits that should not overlap.
Start with a short loop whose rhythm you can follow. Get a few regions playing cleanly before exploring layers and envelopes. A busy break with dozens of markers makes a poor first test: you can change the wrong region and still hear something plausible.
What Slicex is and when to use it
Image-Line's Slicex guide describes an instrument that divides audio into playable regions. Its slicing and stretching features are particularly suited to drum loops, but you can also chop a vocal phrase or instrumental recording. Detection is a starting point; it does not decide where a musical phrase should breathe.
The current edition matrix includes Slicex in Producer Edition and above; Fruity Slicer and Fruity Slicer 2 are included in all editions. Check which FL Studio edition includes the tools you need before buying.
Using the standard Trial? You can save projects and export audio, but you cannot reopen a saved project until you purchase and unlock FL Studio. Also license the plugins used, either through your edition or a separate purchase where available. Preserve the original FLP: reopening and then overwriting it before trial plugins are unlocked can lose their saved settings. Keep needed work open until then; do not close a useful session just to perform a save-and-reopen test. Image-Line explains the separate trial-plugin rules.
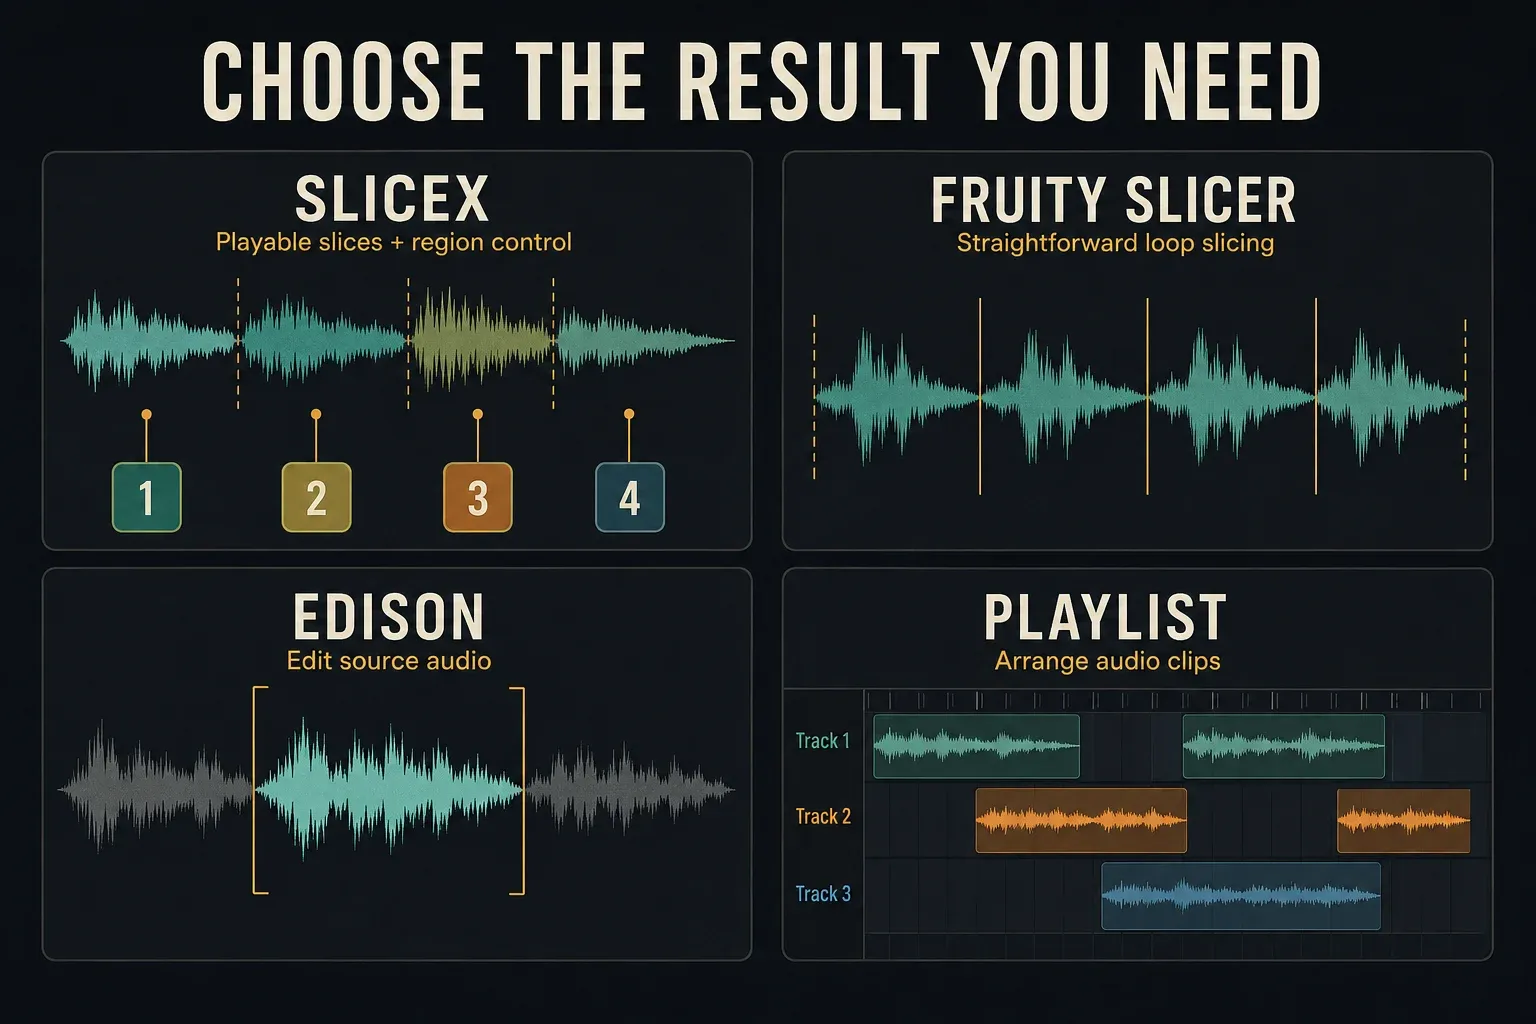
| Your intended result | Start here |
|---|---|
| Chops played from notes or pads, with detailed region control | Slicex |
| A straightforward sliced loop | Fruity Slicer |
| One trimmed, faded or repaired audio file | Edison |
| Audio cuts placed directly in the arrangement | Playlist |
If you are still choosing a sampling method, use the broader FL Studio sampling walkthrough. For file cleanup, the Edison guide explains its workspace and the sample-editing tutorial covers trimming and repairs. The Playlist guide handles arrangement cuts. Here, the goal is a playable Slicex instrument.
Protect the source and find the right controls
Keep an untouched audio copy outside your working edits. Changing markers is different from processing waveform data, and Slicex offers both. Save a named project version before experimenting with destructive tools. Undo is useful during an edit, not a substitute for a retained source.
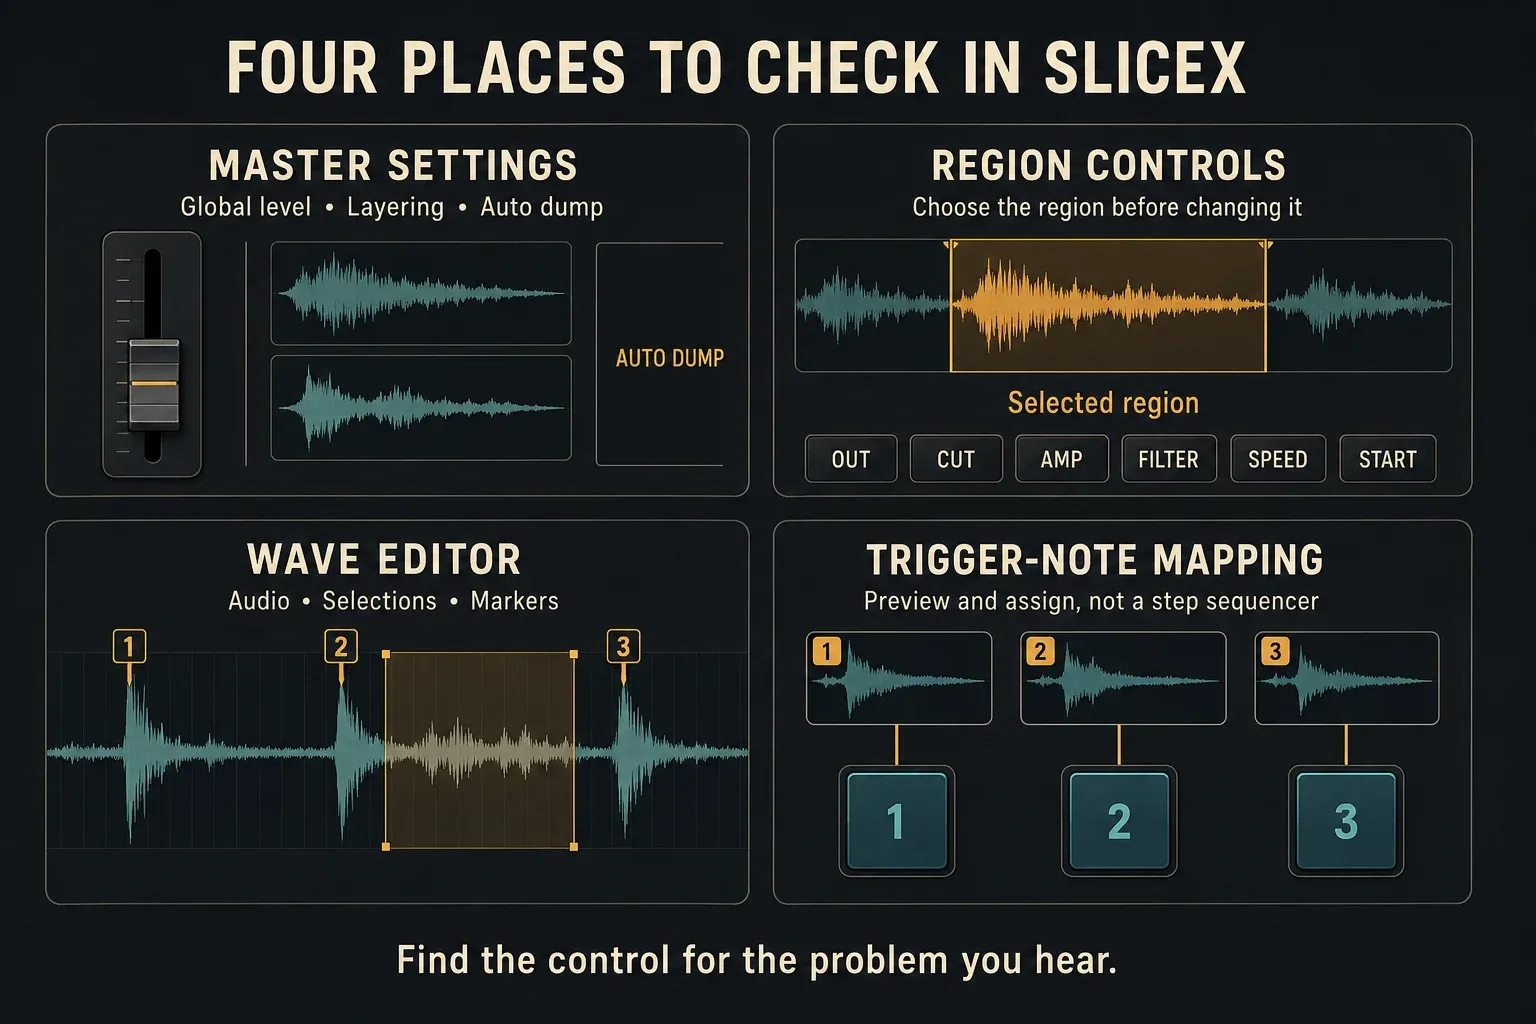
Think of the workspace as four places to solve different problems, not a chain through which every edit must pass:
- Master settings: global behavior, layering and automatic score dumping.
- Region controls and articulators: routing, cut groups and how a selected region responds to notes.
- Wave Editor: source audio, selections, markers and audio processing.
- Trigger-note mapping: which key or pad plays each region.
The Samples & Audio Editing hub connects this workflow with source preparation and repair. A marker problem usually belongs in the editor; a wrong output destination does not require cutting the sample again.
Chop and play a loop in nine steps
- Keep the source. Retain the unedited audio and save a named working project.
- Load Deck A. Drag your loop onto Slicex, deliberately targeting Deck B only if you need the second sample deck.
- Audition the existing markers. Keep useful embedded regions; otherwise choose beat detection or grid slicing.
- Check the grid when using it. Set the known beat count in Sample Properties and check the downbeat alignment.
- Review the boundaries. Move a misplaced marker by its top tab, listening for the next attack and the preceding decay.
- Repair only a real edge problem. Choose the appropriate declick operation; do not run every repair tool in sequence.
- Create or assign notes. Use Dump score for a starting pattern, or assign trigger notes to your controller pads.
- Test note playback. Check articulation, overlapping regions and Mixer destinations from notes, not only raw waveform audition.
- Save and verify. Keep external source dependencies. Reopen a saved copy on a licensed installation; in the standard Trial, keep needed work open until purchase/unlock and export audio for reference.
Load a sample into the intended deck
Drag audio from the FL Studio Browser onto the Slicex channel or interface, or use the Wave Editor's file control. A normal import uses Deck A unless you deliberately drop onto Deck B. These decks hold independent samples or loops; Deck B is not a backup of Deck A.
Watch where you release the file. Holding Shift while dragging appends audio; dropping onto a marker's name replaces that slice. Those are useful editing actions, but neither is the same as starting with a fresh sample. If the result is unexpected, stop and check the target before adding more markers.
Choose detection, grid slicing or manual markers
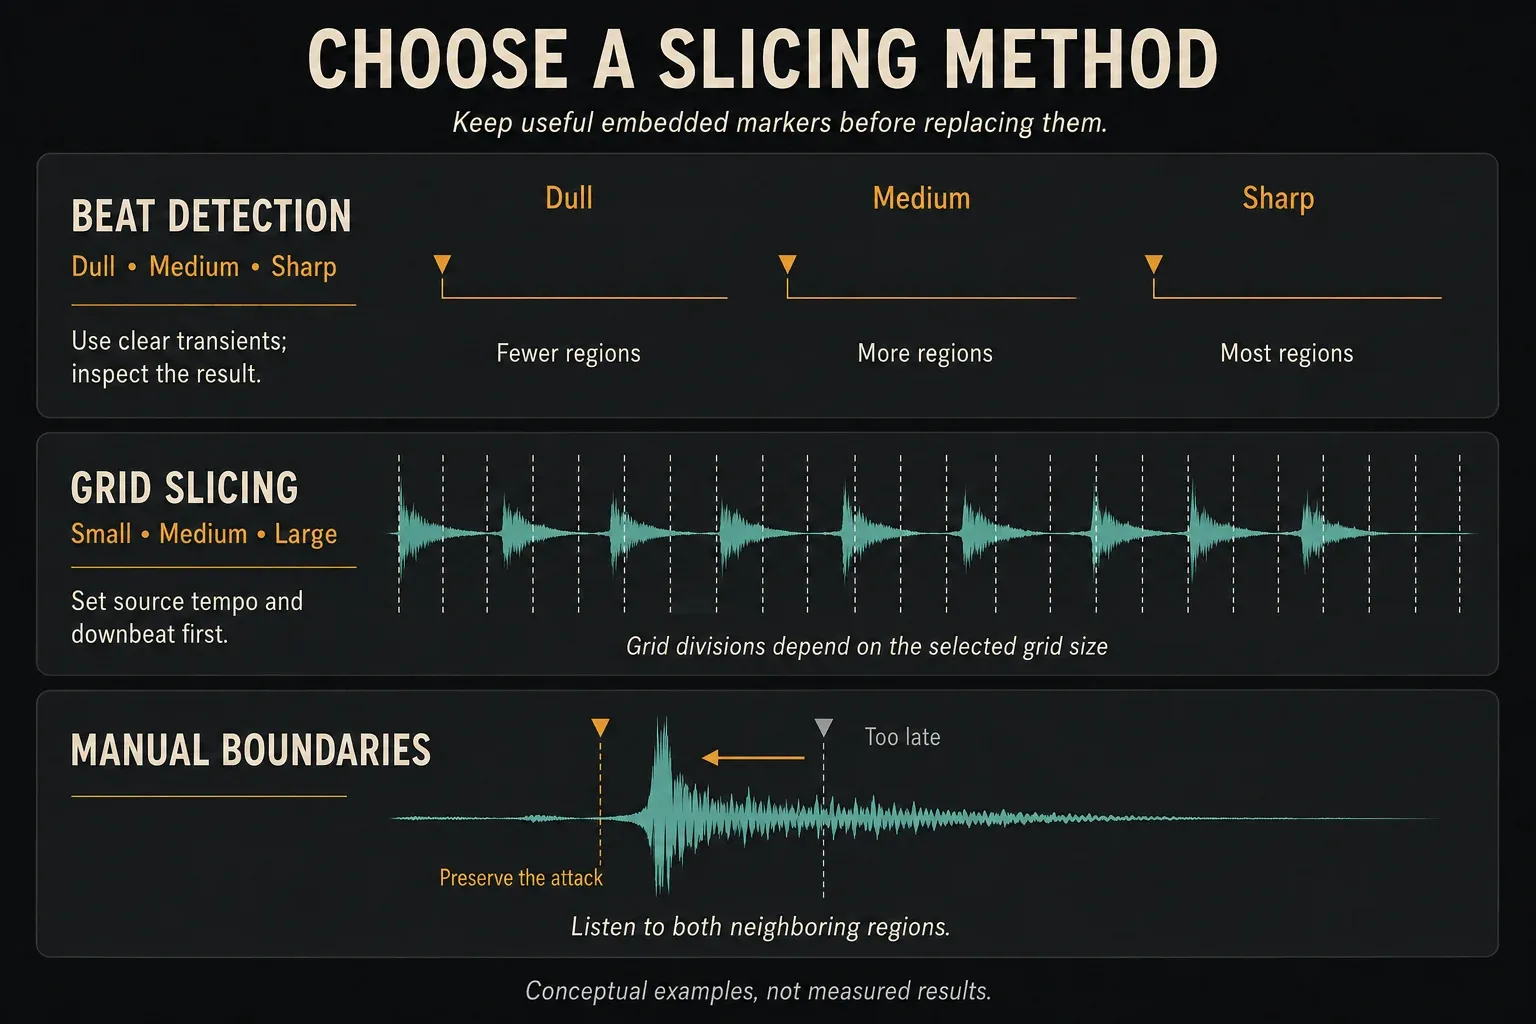
A file with embedded region data uses those regions instead of a new detection pass. Listen before discarding them. For new slicing, right-click the Wave Editor's Auto-slice button to open its presets. The Wave Editor reference separates beat detection from grid slicing.
- Beat detection: Dull finds fewer regions, Medium more and Sharp the most. Pick the result closest to the hits you want, rather than assuming the most sensitive setting is best.
- Grid slicing: Small, Medium and Large divisions follow the editor grid. Useful for deliberate rhythmic divisions; unhelpful if the grid does not match the recording.
- Manual boundaries: move the top tab of a marker and audition both neighboring regions. Preserve the intended attack or pickup, not merely the largest visible peak.
For a known beat count, select that passage and open the Wave Editor's Format > Edit properties. Enter the count in Sel (beats), the selection beat-count field, then check whether the grid lines up with the source. Tempo and downbeat placement are separate checks: correct spacing can still start at the wrong point. The manual also documents a two-stage manual downbeat/grid gesture; do not treat an arbitrary drag as tempo detection.
For a loose performance, keep the natural timing when it serves the phrase. You can rearrange notes later without forcing every source boundary onto an equal division.
Fix clicks without damaging the attack
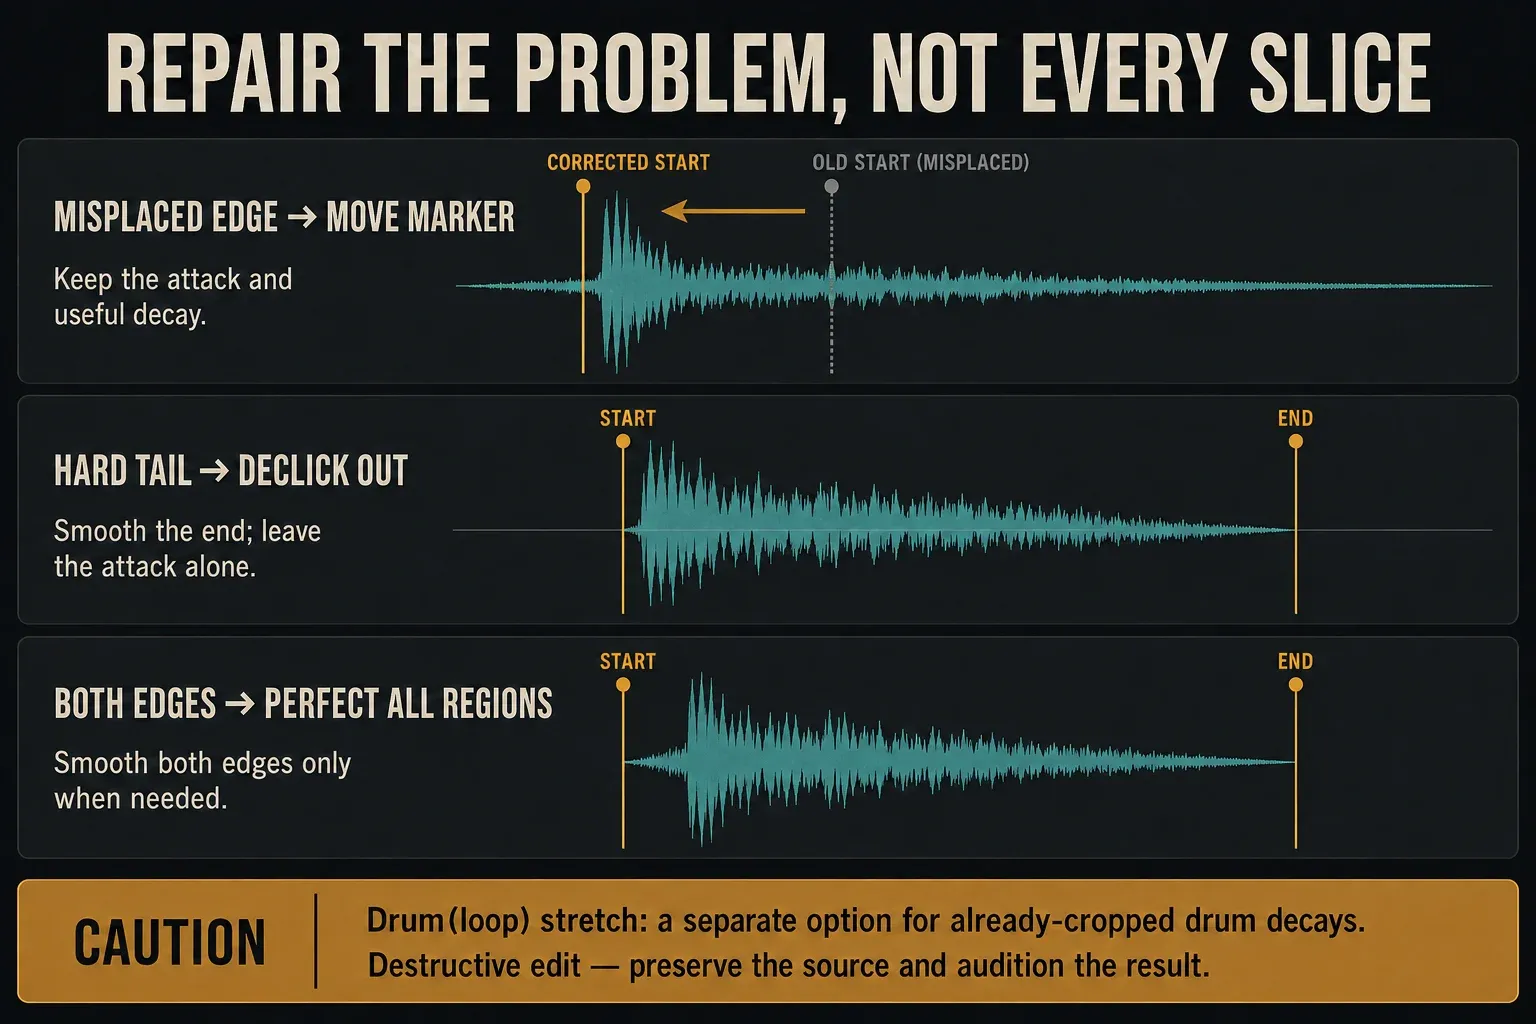
First listen to the source, then to the chopped version. If a region starts late, move its boundary before adding an attack envelope. If a tail is missing, check whether the next marker cut it short. Neither problem is solved simply by making the edge quieter.
Once placement is right, choose the operation that matches the defect:
Tools > Regions > Declick out all regionssmooths region ends. It can be a better fit for drum attacks than processing both edges.Tools > Regions > Perfect all regionssmooths starts and ends. Use it when both need attention, and check that a soft attack has not become duller.Tools > Time > Drum(loop) stretchis a separate option for already-cropped drum decays. It changes sample data; work on a protected copy and compare the result. It does not recover the original missing performance.
These are alternatives for different faults, not a compulsory three-step cleanup. A zero-crossing adjustment can reduce a discontinuity, but moving a boundary also changes timing. Judge the sound in the intended pattern after every change.
A repeatable click at a particular boundary points you toward the slice. Crackle that changes with load or appears across unrelated instruments suggests checking the audio crackling diagnosis too. These are clues, not proof of a single cause.
Dump regions to the Piano roll
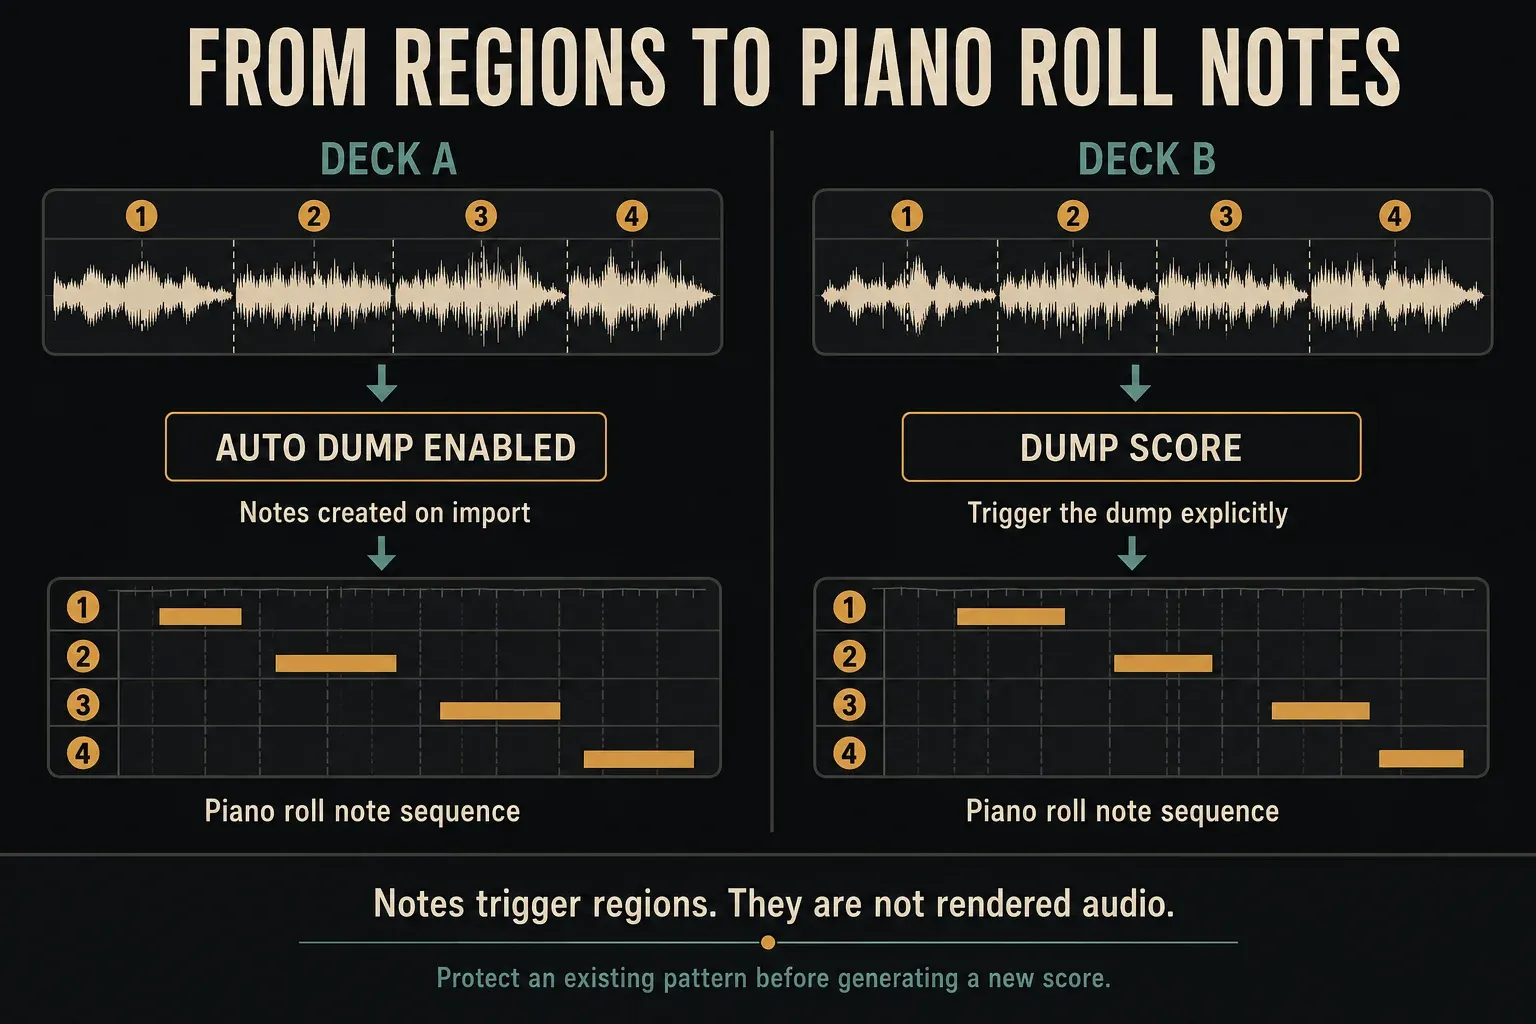
Dump score writes a note sequence that triggers the current regions. It does not render a WAV file. Use the Piano roll editing guide to move, repeat or shorten notes once the basic mapping works.
The Master settings documentation limits Auto-dump to Deck A imports. For Deck B, use the Wave Editor's Dump score button explicitly. If a new import produces an unwanted sequence, check Auto-dump rather than repeatedly deleting notes and importing again.
Right-click the Dump score button for variations. Normal follows the loop's beat length at the current tempo. Reverse reverses the region order, not the audio inside every region. Keep a normal sequence as a comparison before exploring variations.
Moving a note onto another mapped key can trigger a different region rather than pitch-shift the same audio. Check which chop the key plays before treating a vertical note move as a melodic change.
Make note playback match your intention
Right-clicking a waveform region previews its raw audio without articulation. A key, Piano roll note or controller trigger includes articulation. Therefore, hearing the raw slice is not enough to verify an envelope or output assignment: test the actual note pattern.
Play the whole slice or follow note length
For the whole slice to continue regardless of how long the key is held, the main manual specifies Vol - sustaining.fnv in the linked articulator's VOL/ENV mapping. Select the region, check its AMP articulator link and enable the intended envelope. This is not a global switch that bypasses every other playback setting.
Run script > Regions > Play to end is a different option, with a documented limitation for low-tempo drum loops and fill-gaps. Do not substitute it blindly when all you need is a region that ignores a short note length.
Assign regions to MIDI pads
In the editor's Regions menu, Assign trigger notes to all steps through the regions while you press the desired key or pad. Test one region first, then work through the rest. Do not assume a controller's pad numbers correspond to a particular default note range.
The Slicex keyboard panel is for previewing and assigning regions, not step sequencing. If the wrong deck or region sounds, check the actual trigger assignment and note color/channel in the current setup. Do not transpose the whole pattern before finding out which mapping is wrong.
Typing keyboard priority gives editor shortcuts priority; leave it off when you want typing-to-piano input for auditioning. For hardware setup and control assignments outside the plugin, use the MIDI controller mapping guide.
Route, choke and shape regions
The Articulation Panel reference separates the selected region's output and cut group from its sound-shaping controls.
OUT is an offset. If Slicex's base Mixer destination is track 5 and the selected region has OUT set to 2, that region goes to track 7. It does not go to track 2. Play its assigned note and watch the destination before adding effects; the Mixer routing guide covers the next stage.
CUT is a choke group. When another region in the same group is triggered, it stops an earlier region that is still sounding. Test with an obvious overlap. If the first hit has already ended, there is nothing left to cut. This CUT control is not the filter's cutoff parameter.
Articulators are shared. Eight modulation banks can be linked to region parameters. Changing a bank can affect other linked regions too. For independent shaping, assign a different bank before editing it; changing only the selected region on screen does not make a shared bank private.
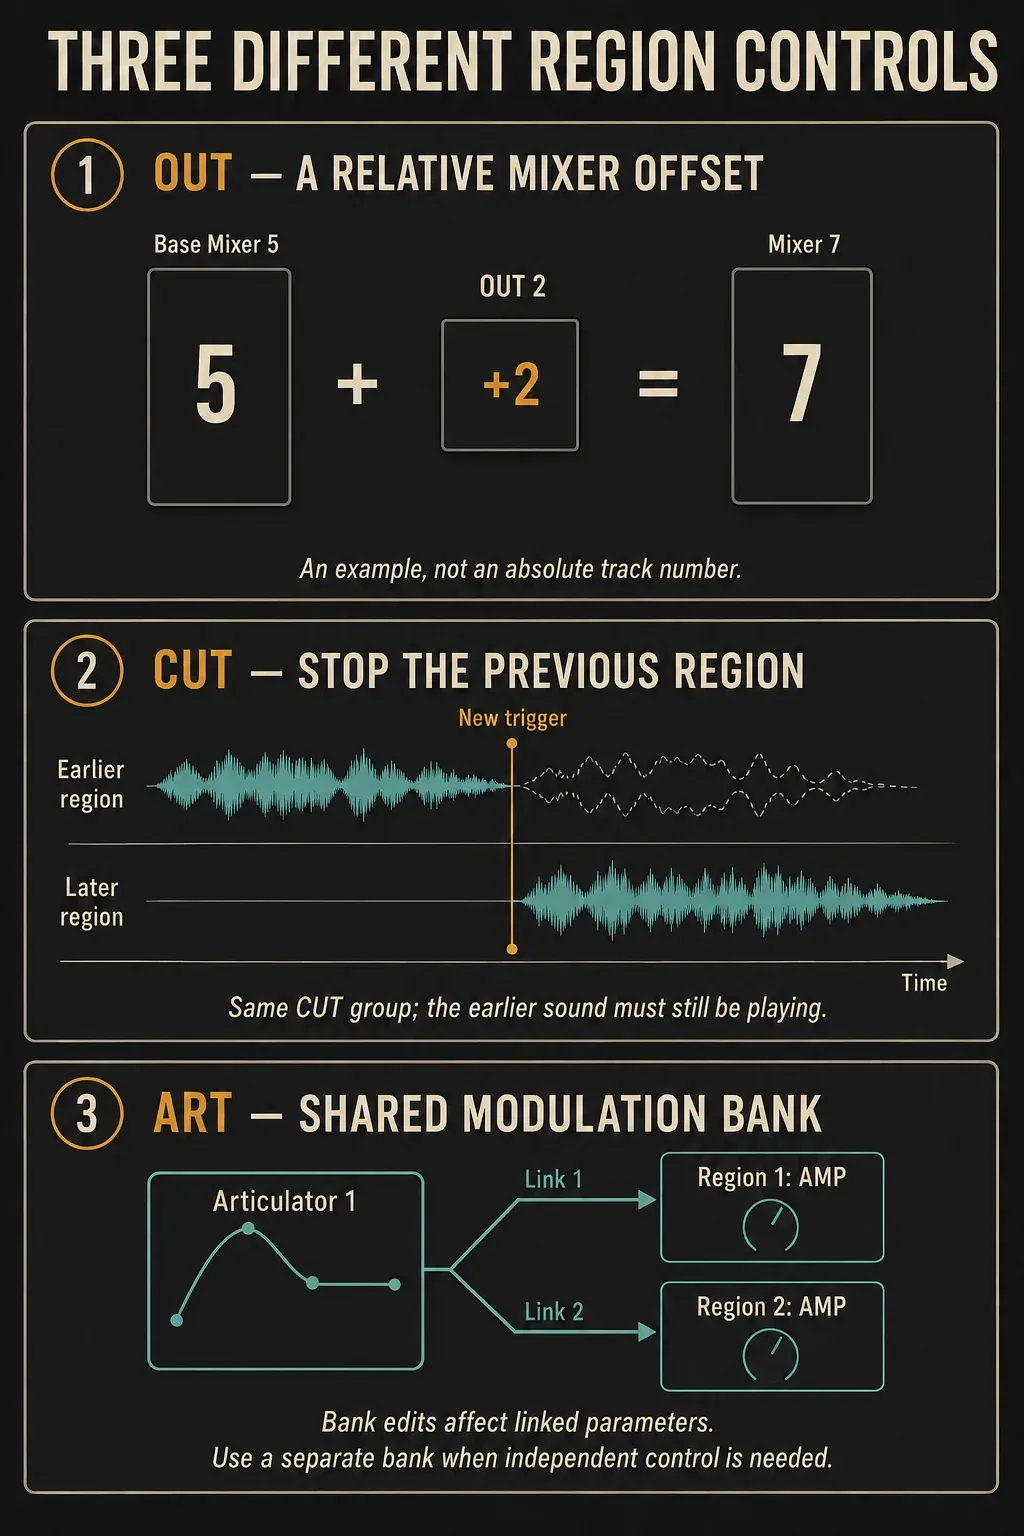
For a volume envelope, link the region's AMP to an articulator, choose VOL and ENV, and enable the envelope. Then audition notes. Region FILTER, SPEED and START offer other changes, but leave them alone until you can name the result you want. START has a limited range unless Sample start covers whole length is enabled; changing speed is not the same as changing project tempo.
Layer only when you want simultaneous regions
More than one region can share a trigger note, including regions across the two decks. The All layering mode plays the assigned regions together; its gain-compensated counterpart reduces the combined level. Velocity-based layering can crossfade between co-assigned regions. Check the combined sound at several velocities before building the full pattern.
A layer and a choke group solve different problems. If you want two hits together, investigate layering; if a new hit should silence a ringing one, investigate CUT.
Save the instrument and keep its audio
Keep the FLP as the editable instrument-and-pattern version. When another program needs the chops as files, the Wave Editor can export regions as WAVs named from their markers. Its sampler export can include middle-note metadata. Audio export and the note sequence are different deliverables; sending one does not recreate every Slicex setting in another sampler.
The editor's drag/copy control sends the selection, or the whole sample if nothing is selected, to a compatible destination. Confirm that selection before dragging; a highlighted region and the entire recording are easy to confuse when zoomed in.
- Rename important regions and retain the untouched source.
- Check the note mapping, cut groups and actual Mixer outputs.
- Inspect
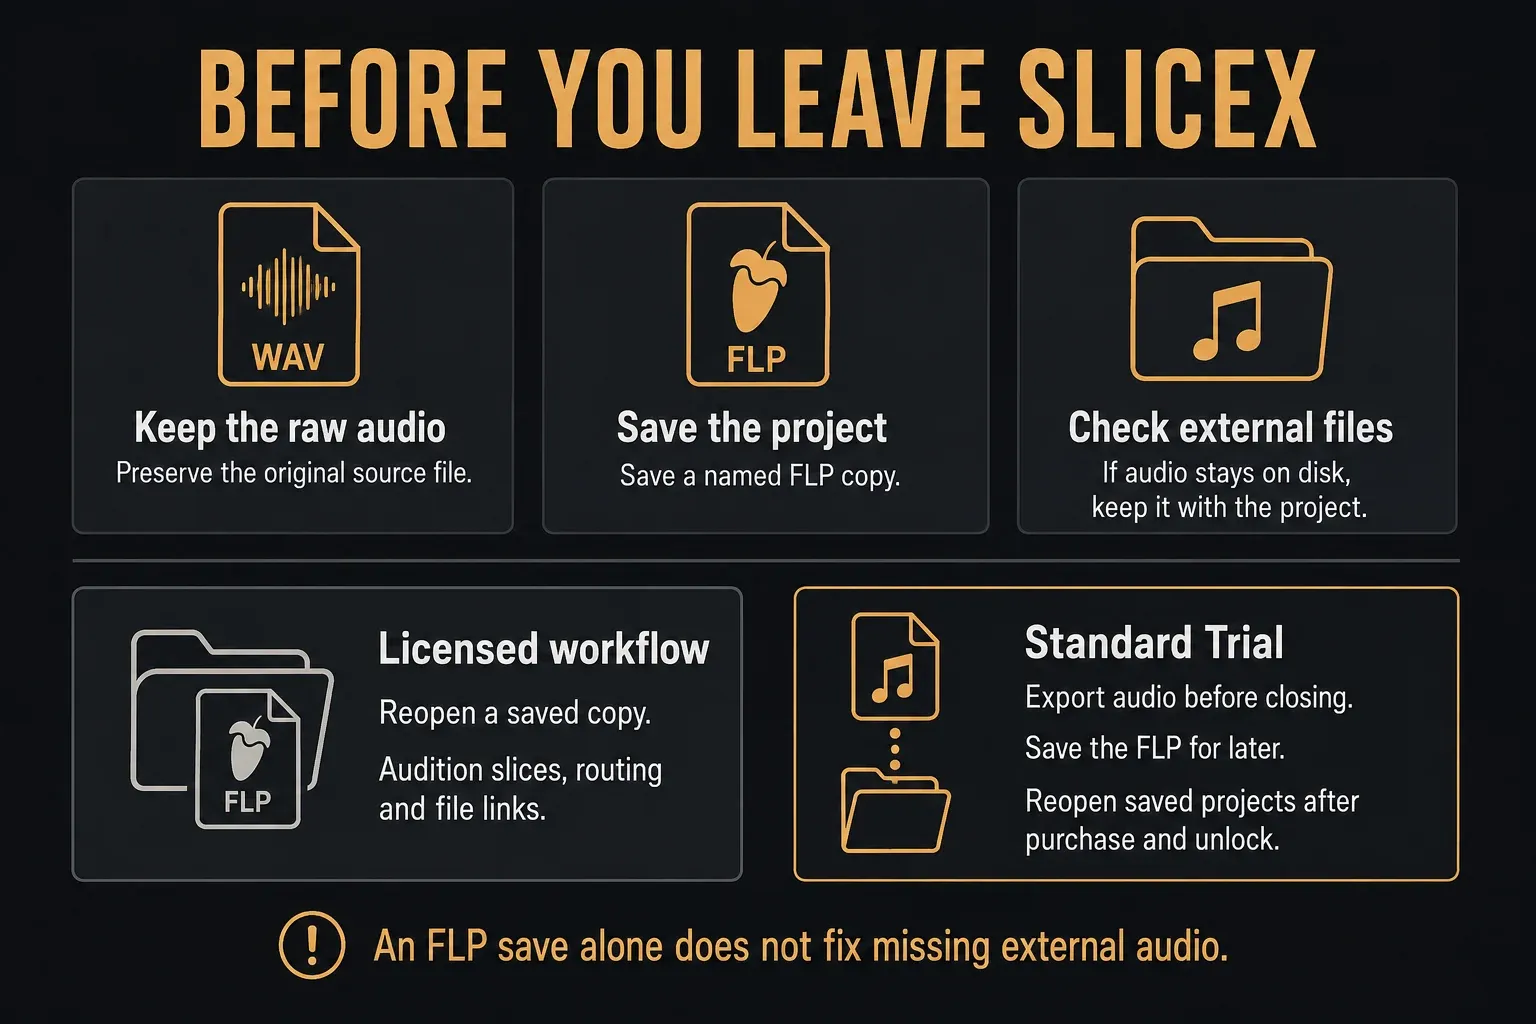
Leave unedited audio data on disk: when enabled, that unedited data is not stored inside the project or preset. Keep the referenced file with the project's dependencies. - Save a project version. On a licensed installation, reopen a saved copy and test it before archiving or moving the source files.
- In standard Trial, keep needed work open until purchase/unlock. Save the project for later and export a reference mix while it is available.
Lock audio data prevents further audio edits; it does not create a backup or prove that external files have been collected. A successful test on the current machine is useful, but a moved project still needs its dependencies checked at the destination.
Frequently asked questions
What is Slicex used for?
Slicex turns regions of audio into a playable instrument. Use it to trigger chops from notes or pads, rearrange a loop and control individual regions. Use an audio editor instead when you only need one repaired file.
Why is Deck B not creating Piano roll notes?
Auto-dump applies to Deck A imports. Select Deck B and use the Wave Editor's Dump score action explicitly. The result is a note sequence that triggers regions, not rendered audio.
Why does right-click preview sound different?
Right-clicking a waveform region plays raw audio without articulation. Notes from the keyboard, Piano roll or controller include articulation, so use notes to check envelopes and region output settings.
How do I play a whole slice from a short note?
Use Vol - sustaining.fnv in the linked articulator's VOL/ENV mapping and check that the intended envelope is enabled. The separate Play to end region script has limitations for low-tempo drum loops and fill-gaps.
How do I stop Slicex regions overlapping?
Give the relevant regions the same CUT group. A new trigger then stops an earlier region in that group if it is still sounding. Test with an audible overlap; changing the filter cutoff is not the same control.
Can I save and reopen Slicex in the Trial?
You can save the project and export audio in the standard FL Studio Trial, but you cannot reopen the saved project until you purchase and unlock FL Studio. The plugins also need valid licenses, through your edition or separate purchases where available. Do not overwrite the original FLP after reopening it with trial plugins still unavailable. Keep needed work open until then.