FL Studio
The hiss is quiet until the singer stops. Then it fills every gap—and a hard noise gate can cut off the ends of words. To remove steady background noise in FL Studio, use Edison to capture a representative noise profile, select the audio to clean and preview conservative reduction. Listen with Output noise only to check what you are losing, then turn it off before clicking Accept so you keep the processed recording, not the removed noise.
This workflow is for recorded audio, not a live microphone noise-cancellation switch. Keep an untouched recording: the aim is less distracting noise without a dull or watery performance.
Which background noise can Edison reduce?
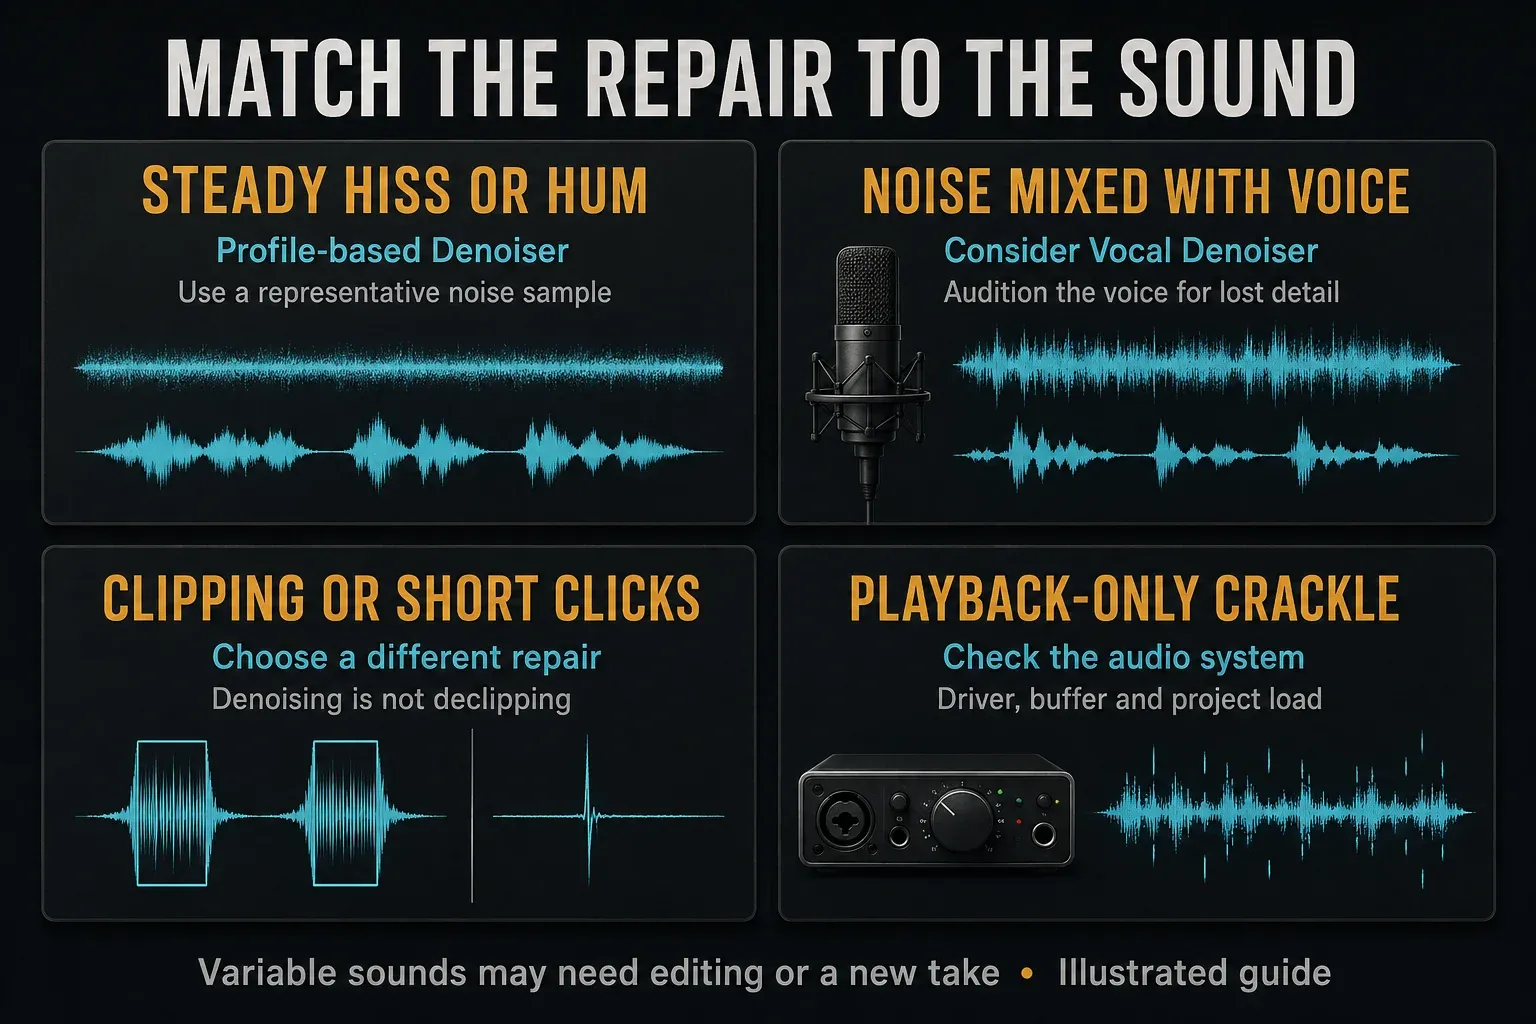
Edison’s profile-based Denoiser suits hiss, hum, mains buzz and fan or air-conditioning noise that stays reasonably stable in level and frequency. The current Noise Removal Tool manual distinguishes that from changing events such as a door slam or bird song. A single noise profile is not a recipe for removing every unwanted sound.
Listen during a pause and under a phrase. Does the same background continue, or are you hearing a brief click, a room echo, distortion or playback trouble? Choose by the audible problem, not by the word “noise” on a button.
| What you hear | Useful starting point | What to check |
|---|---|---|
| Steady hiss, hum or fan noise | Edison Denoiser with a representative profile | Wanted detail in the removed signal |
| Other sound mixed with a voice | Consider Edison Vocal Denoiser | Whether it preserves the actual voice |
| Noise only bothers you between phrases | A gate or deliberate edits | Word beginnings, breaths and tails |
| Clipping or isolated clicks | Separate repair tools or a new take | Denoising is not the same repair; Edison’s Declicker is Windows-only |
| Crackle only during project playback | Audio-system diagnosis first | Driver, load and underruns—not a guessed noise profile |
Check the source before repairing a recording
If you can record again, make a short comparison take after reducing an obvious room noise or improving microphone placement. Change one thing at a time and listen; do not assume a quieter-looking waveform proves a cleaner recording. The audio-recording workflow covers capture and level checks, while the microphone input checklist helps when the input is absent or wrong.
If glitches appear only while a busy project plays, check the crackling-audio diagnosis and audio settings before altering a good source file. Image-Line’s Audio Settings documentation describes buffer and driver behavior. Noise already recorded into a file and a playback underrun are different problems, even when both sound unpleasant.
Open Edison and protect the raw audio
The current edition comparison includes Edison and denoising in Producer Edition and above. You can evaluate the appropriate edition in the standard time-unlimited Trial, but saved projects cannot be reopened until purchase and unlock. Save your project for later and export needed audio before closing; do not make project reopening your only recovery plan in Trial.
Load Edison into a Mixer effect slot, then use its File > Load sample command to open the recording. Work from the raw take when available, rather than a mix with added reverb and unrelated instruments. That is a practical starting choice, not a claim that denoising must always precede every other process. The Edison recording and editing guide explains the broader editor workflow.
Keep the original file under its existing name and save the result under a new one, such as lead-vocal-take-02-denoise.wav. Accept replaces the selected audio in Edison; it does not create a separate backup. Saving over the source file later is a separate action you should avoid when other clips or projects still need it.
For an Audio Clip already in the Playlist, Clip menu > Make unique as sample duplicates both the clip and its disk file. Ordinary Make unique reuses the audio file. The Playlist’s sample-copy distinction matters here: a renamed clip is not necessarily a second recording. Edit sample opens Edison or your configured external wave editor, so confirm which editor actually appears.
Remove background noise in eight steps
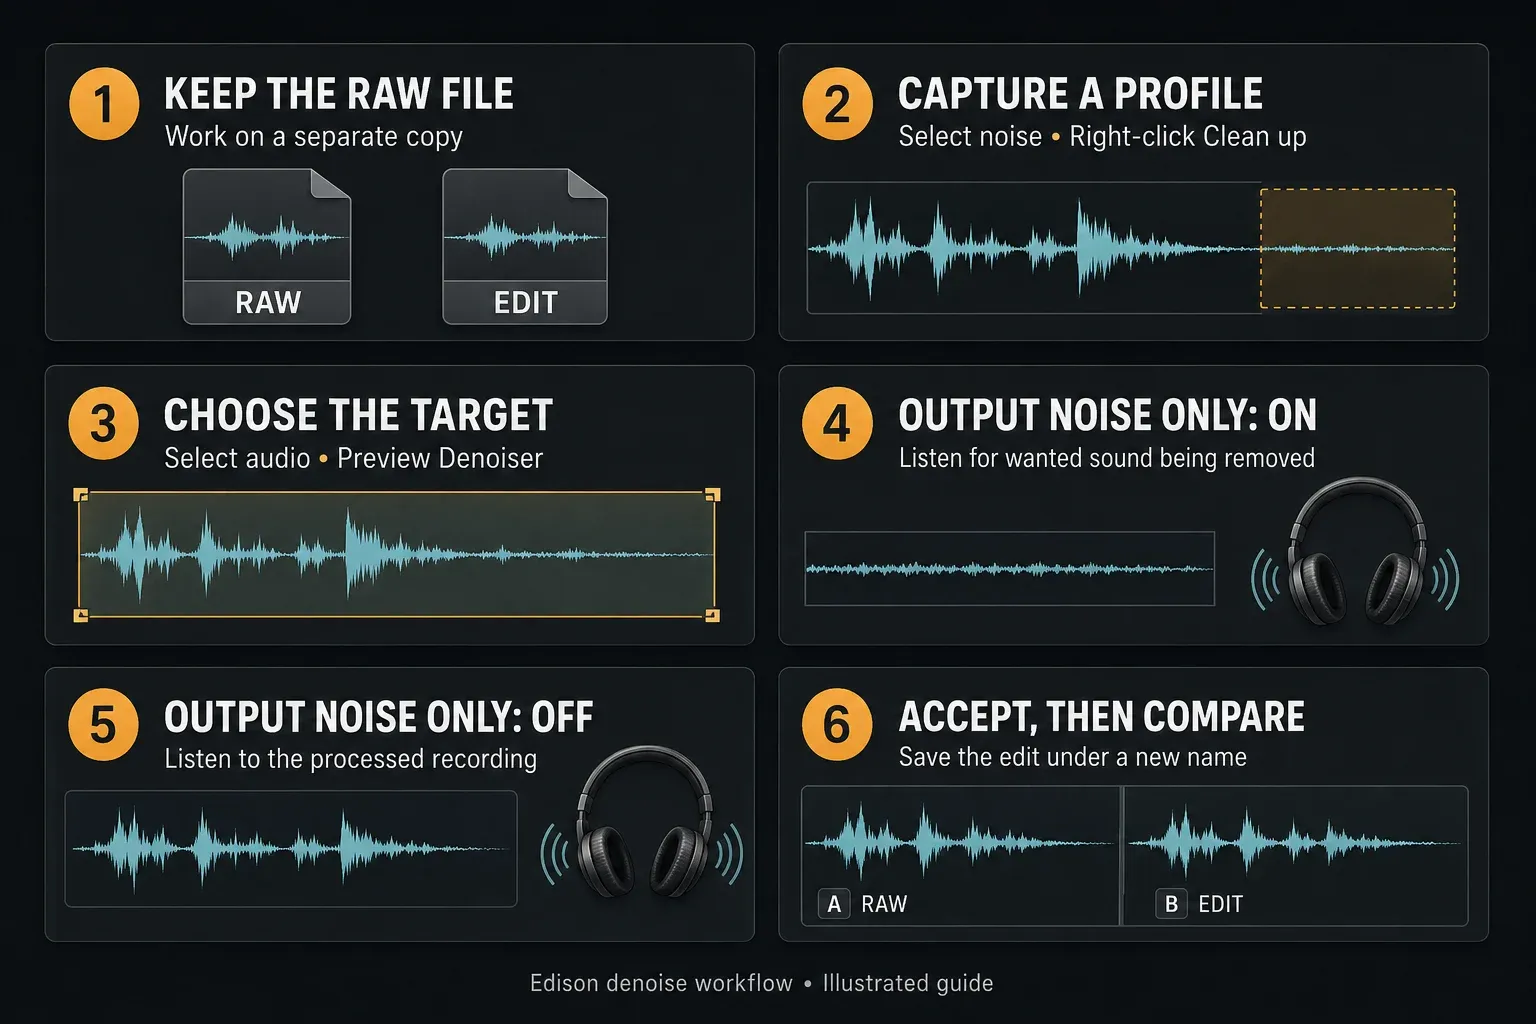
- Preserve and load the raw recording. Keep an untouched file, open a working copy in Edison and confirm you hear the intended audio.
- Select representative noise. Find the longest useful section of the same stable background, preferably without wanted voice, notes or decays.
- Acquire the noise profile. Right-click
Clean up (denoise), or open the Noise Removal Tool and chooseAcquire noise profile. - Select the audio to process. Close the dialog if necessary, select the intended recording or coherent region, then reopen
Clean up (denoise). The profile is retained. - Preview with Denoiser active. Activate the Denoiser section, leave unrelated repair modules off and begin with the default settings.
- Listen to the removed audio. Turn on
Output noise onlyduring Preview. Adjust Windows Threshold and Amount, or macOS Amount, while checking for wanted detail. - Switch back to the processed recording. Turn
Output noise onlyoff and preview again. On macOS, adjust Smoothing here to assess artifacts. Check quiet passages, phrases and their boundaries. - Accept, save separately and compare. With
Output noise onlystill off, clickAccept. Save a separate edited file and compare it with the original solo and in the mix.
How do you choose a noise profile?
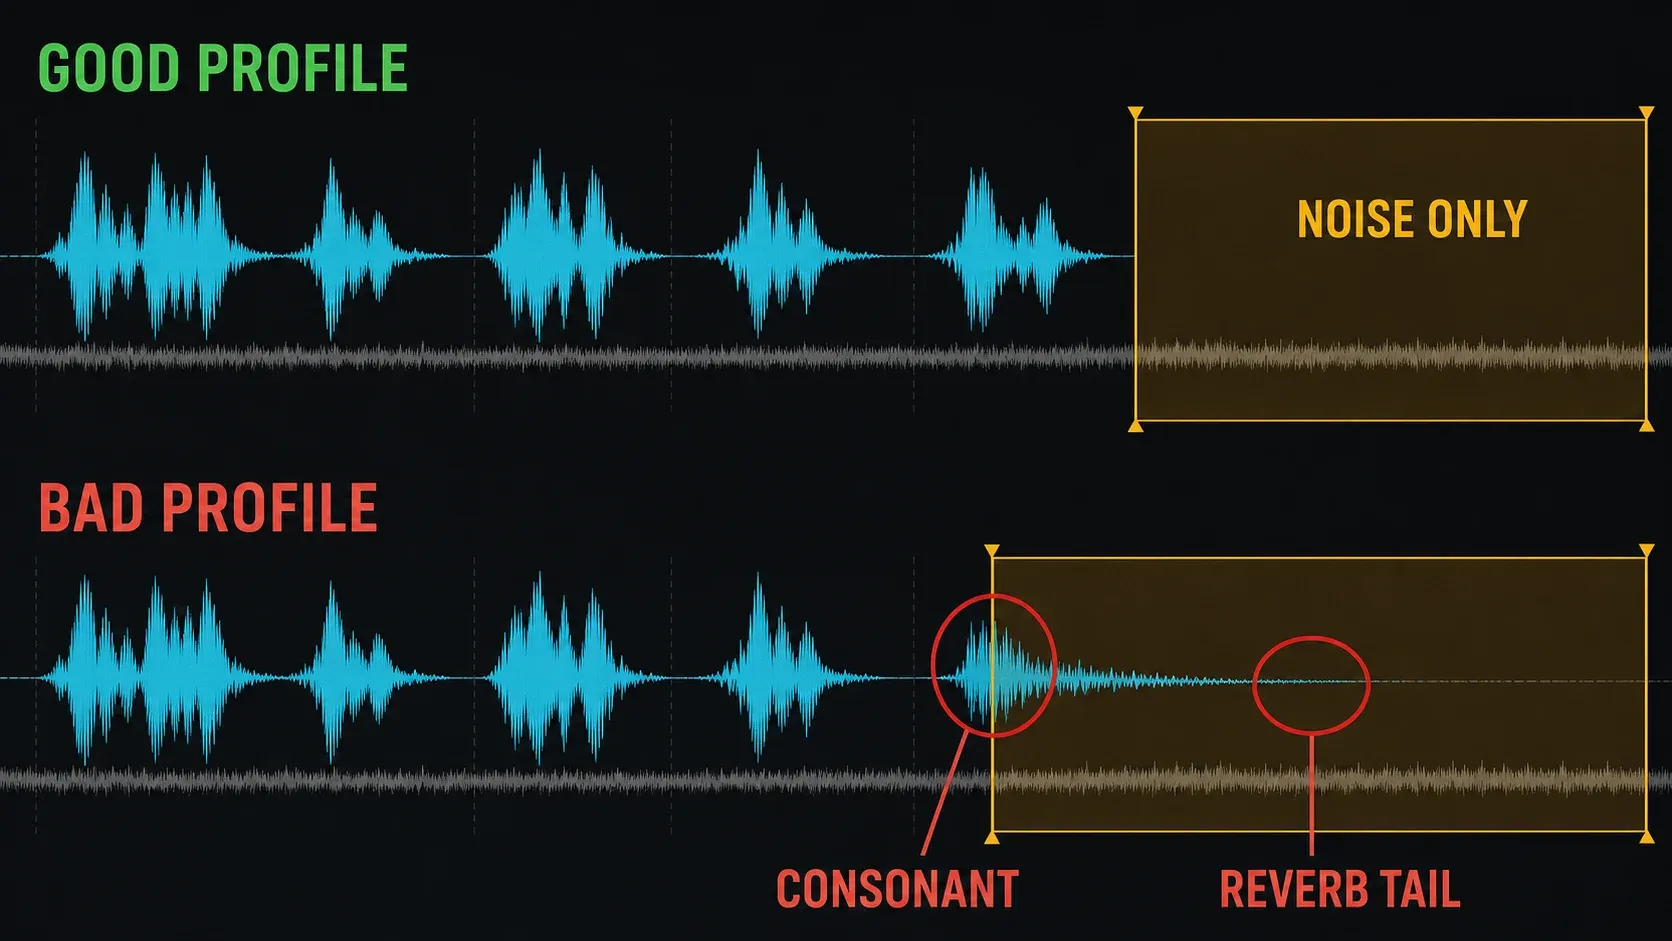
Look before the performance starts, after it ends and between phrases. A useful selection contains the same background as the section you want to clean. Quiet is not the same as unwanted: an inhale, guitar decay or reverb tail can be part of the performance.
Choose the longest representative noise-only stretch you can find, rather than forcing a fixed one-second selection. If the recording changes halfway through—for example, a fan switches speed—listen separately to each section before applying one profile across everything.
What if there is no noise-only section?
The manual allows a quiet section where the noise is most exposed when no isolated noise is available. That is a compromise, not an equally clean reference. Preview cautiously and stop if the wanted sound begins disappearing. A cropped sample with no isolated noise is also the problem raised in this Edison user discussion; it is worth checking the untrimmed original before inventing a noise reference.
For voice mixed with other sound, the separate Vocal Denoiser described below may be worth auditioning. For an instrument with no suitable reference, accepting some noise or using a better source can be preferable to damaging the note.
Capture the profile, then select the target
Right-click Clean up (denoise) while the noise region is selected. Alternatively, open Tools > Spectral > Clean up (denoise) and use Acquire noise profile. The tool retains that profile when you close it to change the selected region. A green frequency curve confirms a profile is loaded; it cannot tell you whether the selection contained a breath.
Do not confuse this with Tools > Noise > Acquire noise threshold. The Edison menu reference lists that as a level threshold for noise-gating functions, not a spectral noise profile.
No selection means the whole sample
In this Denoiser, leaving no region selected processes the whole sample. For a partial cleanup, select the intended coherent section before reopening the tool. If you process small islands differently, listen across their edges for an abrupt change in background or tone.
Before Preview, check that Denoiser is active. Declipper and Declicker are separate repair modules, not extra strengths of denoising. The current Declicker is Windows-only. The sample-editing and cleanup guide covers cuts, fades and repair choices beyond steady background noise.
What does Output noise only do?
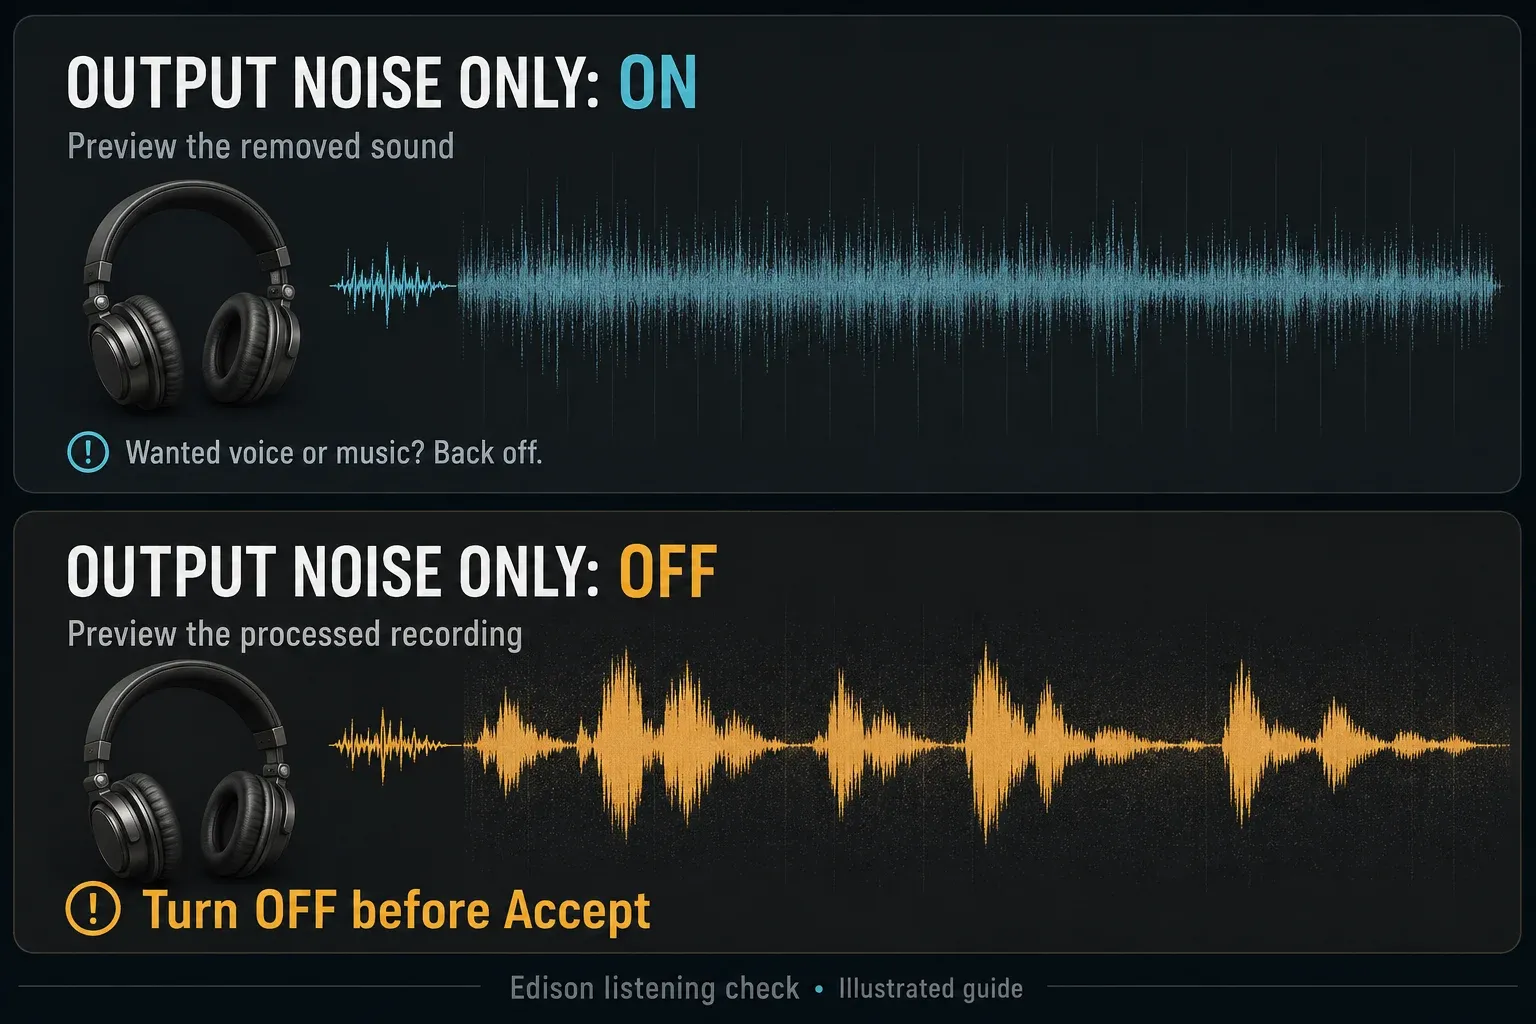
With Output noise only on, Preview lets you hear the material being removed. Listen for recognizable words, cymbal attacks or a decay you meant to keep. If they become audible there, revisit the profile or reduce processing; do not keep turning Amount up because the quiet gap sounds cleaner.
Turn Output noise only off before Accept. In that state, Preview and Accept deliver the processed audio left after removal. This is the distinction in Image-Line’s removed-versus-residual explanation. A noise-only audition is a useful check, but it is not the finished vocal you want to send to the Playlist.
Which denoise settings work on Windows and macOS?
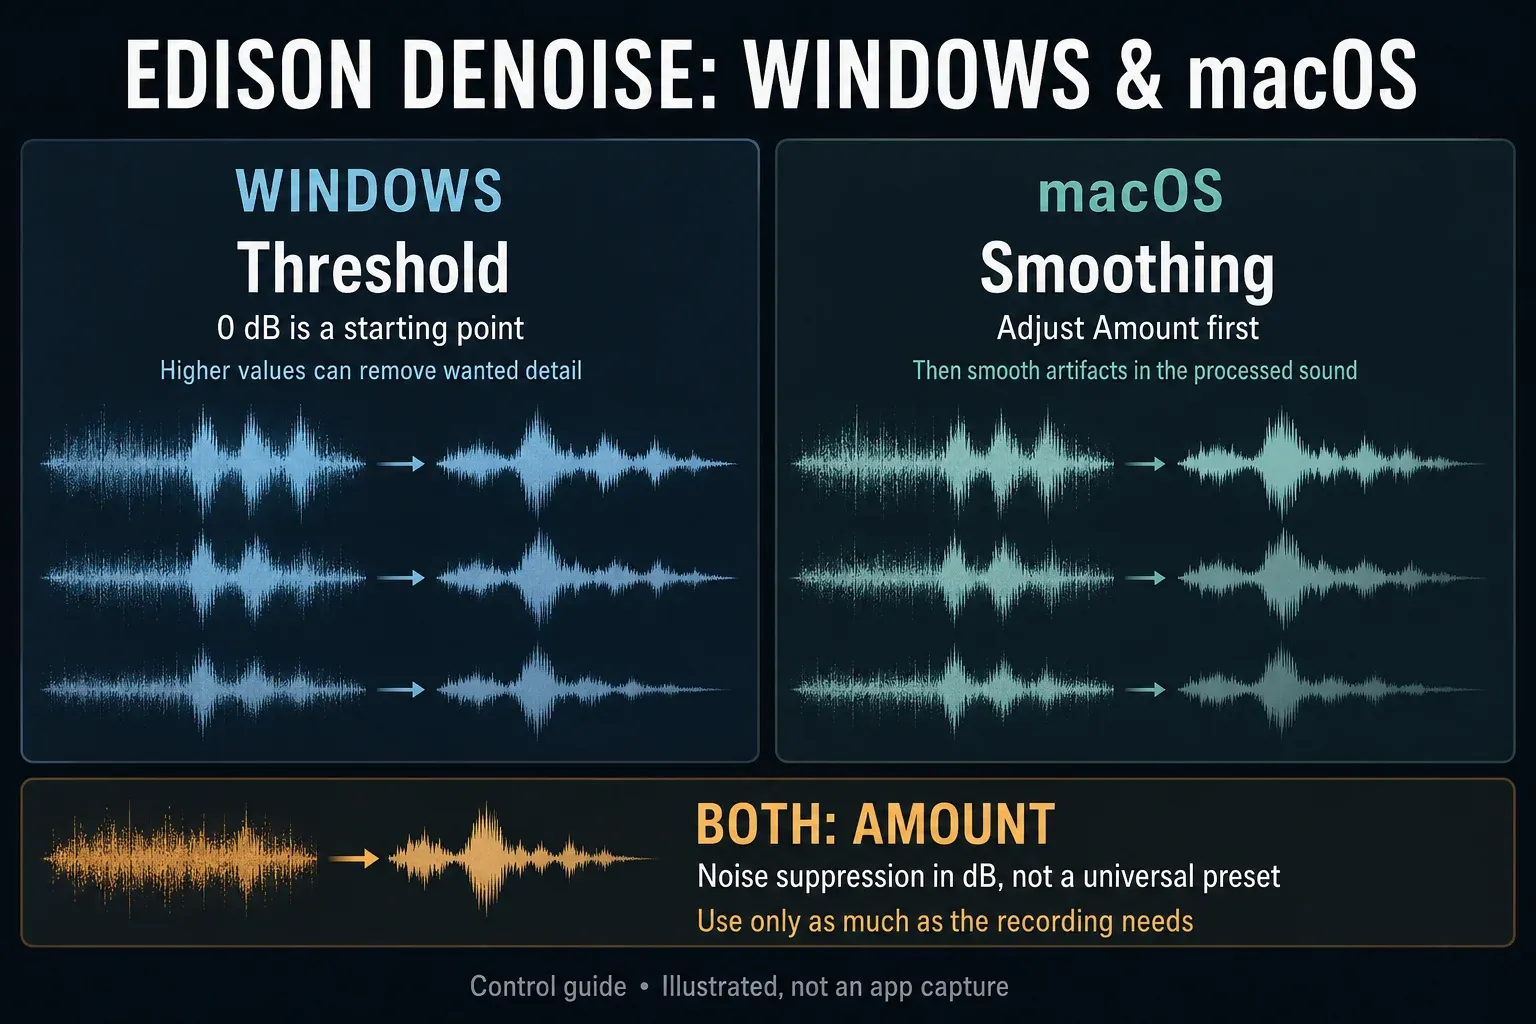
The current manual exposes Threshold on Windows and Smoothing on macOS. Amount controls noise suppression in decibels. A percentage from a different denoiser or an old tutorial is not a transferable setting.
Windows: Threshold first, then Amount
Image-Line gives 0 dB as a starting point for Threshold. A higher Threshold classifies more material as noise, including potentially useful low-level detail. With Output noise only enabled, adjust until wanted sound begins to appear, then back off. Lower Threshold can preserve detail but leave noise audibly following the performance.
Next, use Amount to set how much of that noise to suppress. Increase it only until the remainder stops distracting you in the intended context. If the result sounds underwater, revisit Threshold and then Amount rather than accepting the edit and trying to hide the damage with EQ.
macOS: Amount, then Smoothing
Listen to the removed signal while adjusting Amount, and back off when wanted sound starts appearing. Then turn Output noise only off and adjust Smoothing while listening for processing artifacts. It is not a replacement name for the Windows Threshold control, and it does not make unlimited suppression transparent.
Compare the edit before keeping it
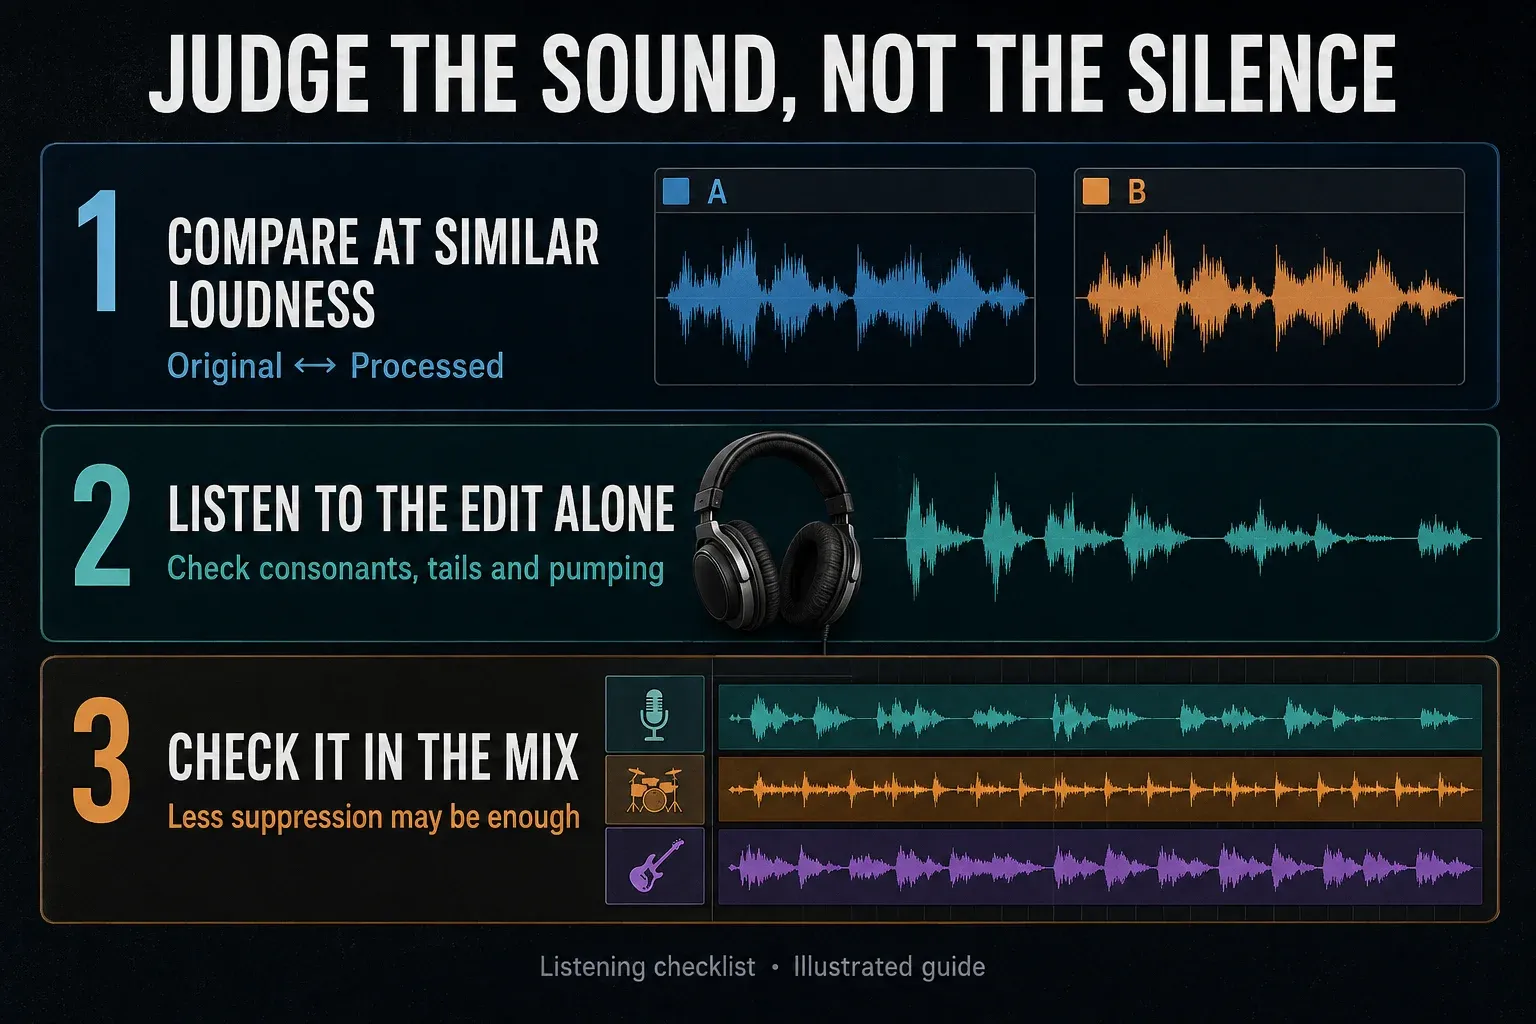
After a conservative Preview, accept the working copy and save it separately. Match the perceived listening level of original and processed versions closely enough to make a fair comparison, and play only one at a time. You are judging articulation and background, not rewarding whichever version is louder.
- Compare the same phrase in the original and processed versions. Does the voice or instrument still have its intended texture?
- Solo the edit and check soft consonants, attacks, breaths, sustained notes and tails. Listen across any processed-region boundaries.
- Hear the edit in the actual mix or final listening context. Less suppression can be enough once other audio masks the remaining noise.
If a version fails, return to the raw source for another attempt rather than piling stronger reduction onto an already damaged edit. Once the recording is usable, continue with vocal EQ, dynamics and effects as needed. Recheck the noise when you make a quiet phrase louder.
When should you use Vocal Denoiser, a gate or EQ?
Vocal Denoiser separates detected voice from other sound
Open Tools > Spectral > Vocal denoiser/isolator in Edison. Unlike the profile-based Denoiser, the Vocal Denoiser Tool analyzes the sample with an AI model and lets you balance detected vocal and non-vocal material. Its Mix range is -100% for non-vocal audio to +100% for detected vocal, with 0% representing the original.
Use Preview and judge the actual words and tone. A partial blend may preserve useful ambience; the maximum vocal setting is not automatically the best result. This is not a promise to rescue any buried voice. For separating a whole song into instrument parts, use the stem-separation workflow instead. Room reverb also has a separate Tools > Spectral > Deverb process; it is not a stable hiss profile.
A gate quiets gaps but does not separate overlapping sounds
The Fruity Limiter gate controls set its threshold, closed-state gain and release. When a voice opens the gate, the noise traveling with that voice passes too. A high threshold or abrupt release can cut the words and tails you wanted to preserve.
In Fruity Limiter, the gate’s default GAIN is 100%, which means no attenuation while closed; turning that control left increases the gating effect. It is a different GAIN from the plugin’s main loudness control. Start by understanding those controls, not copying a threshold from someone else’s recording.
EQ changes frequencies, including wanted sound at those frequencies
A notch may help a narrow unwanted tone, and a high-pass filter may reduce rumble below the useful range of the recording. Parametric EQ 2’s filters operate on frequency bands, not on a noise identity. If hiss overlaps a voice’s brightness, a broad high-frequency cut removes both. Check the Mixer route when comparing live EQ with an accepted Edison edit, so you know which processing you are hearing.
Fix the result when something sounds wrong
Only noise remains after processing
Check whether Output noise only was left on. Use Edison’s Undo if available or reload the preserved raw file, repeat the preview with that option off and only then Accept. Do not overwrite the raw recording with a noise-only output.
The profile is missing or the wrong section was processed
Acquire a profile from the selected noise region, not a gate threshold. Then return to Edison and select the target separately. If nothing is selected, the whole sample is processed; if only the little noise patch is selected, you have not selected the performance you meant to clean.
The voice becomes dull, lispy or watery
Check for wanted audio in the profile and in Output noise only. On Windows, revisit Threshold and Amount; on macOS, revisit Amount and then Smoothing with processed output selected. If lowering the damage leaves too much noise, consider a different source or repair rather than repeating stronger passes. The vocal-recording guide helps reduce the need for that compromise next time.
Background texture changes at an edit boundary
Return to the original and reconsider the target region. One steady noise floor often suits a coherent full-recording treatment; genuinely different sections may need separate decisions. Preview across each join, not just the middle of the repaired phrase.
Save a separate file and return it to the Playlist
Use File > Save sample as for the named edited file. For an uncompressed WAV, select Microsoft wave file, not Microsoft compressed wave file; both can have a .wav extension, but they are not the same encoding. The raw source remains your fallback.
To add the intended result to the Playlist, select that region—or leave no selection for the whole sample—and left-click Send sample to Playlist. The Edison send-button reference distinguishes left-click from right-click, which replaces the currently selected Audio Clip or Sampler Channel. Check placement and routing, and mute the old version rather than accidentally playing both.
Save the project too; in standard Trial, export needed audio before closing because saved-project reopening requires purchase and unlock. Keep the raw file until the edit is approved in context. For the next editing step, use the Samples & Audio Editing guides; if the background begins at capture, revisit the Recording guides.
Frequently asked questions
Can Edison remove hiss and hum from vocals?
Its profile-based Denoiser can reduce reasonably stable hiss or hum, including underneath a vocal. Capture a representative profile and preview carefully: stronger removal can damage wanted detail, so complete silence is not always a useful goal.
How do I capture a noise profile in Edison?
Select a representative noise-only region if possible, then right-click Clean up (denoise). Alternatively, open Tools > Spectral > Clean up (denoise) and choose Acquire noise profile. After capture, select the audio to process separately.
Should Output noise only be on when I click Accept?
No, not when you want the cleaned recording. Turn it on to audition the removed material, then turn it off, preview the processed audio and leave it off before Accept.
Why does Edison noise removal sound underwater?
The profile may contain wanted sound or the reduction may be too aggressive. On Windows, revisit Threshold and Amount. On macOS, adjust Amount, then listen to the processed result while adjusting Smoothing. Return to the raw recording if an accepted edit is already damaged.
Can I denoise without an isolated noise-only section?
The manual allows a quiet section where the noise is most audible, but that reference can contain wanted audio. Treat it cautiously. For voice mixed with other sounds, audition the separate Vocal Denoiser; neither route guarantees a clean result.
Is Fruity Limiter a replacement for Edison denoise?
Its gate reduces audio when the level falls below a threshold. It can quiet gaps, but noise still passes when the voice opens the gate. Edison’s profile-based Denoiser targets stable background within recorded audio instead.
Is denoising included in FL Studio Fruity Edition?
The current edition comparison lists Edison and denoising in Producer Edition and above, not Fruity. The standard time-unlimited Trial lets you evaluate editions and export audio, but saved projects cannot be reopened until purchase and unlock.