FL Studio
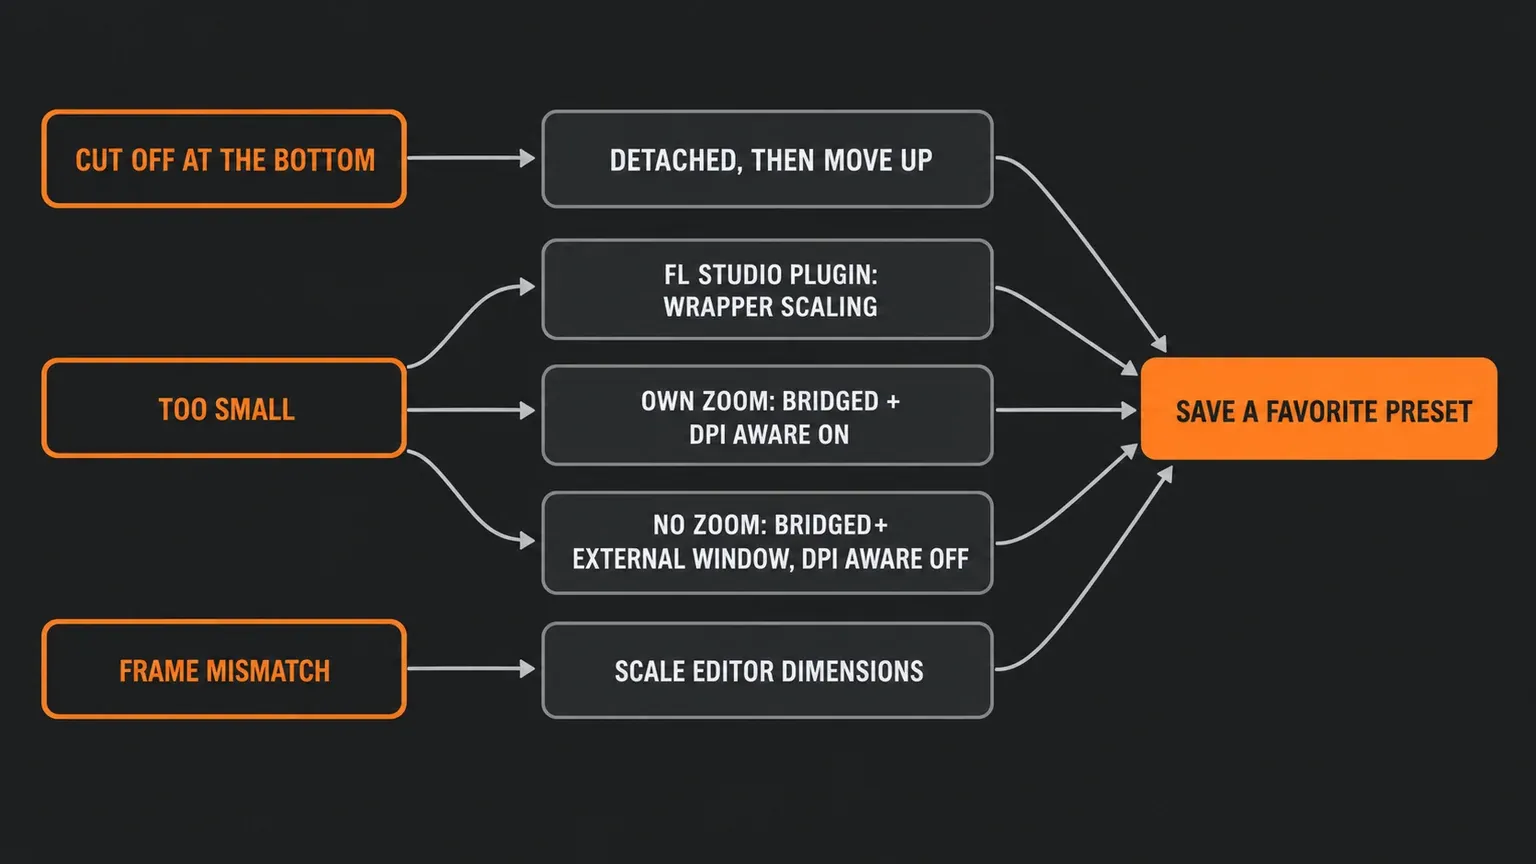
To resize a plugin in FL Studio, start with the small arrow at the top left of the plugin window. For Image-Line's own plugins, choose Scaling in that menu and pick Host, System or a percentage from 100% to 400%. That option applies only to FL Studio plugins. Third-party VST, AU and CLAP plugins are set up in the wrapper settings instead. If the plugin has its own size control, turn on Make bridged and DPI aware when bridged, then use the plugin's zoom. If it has none, turn on Make bridged and External window with DPI aware when bridged off. Afterwards, save a favorite preset, because scaling options are stored with presets rather than with the wrapper's saved options. A plugin that is simply taller than your screen can be Detached and moved up.
A plugin window can go wrong in four ways: cut off at the bottom of a laptop screen, tiny on a 4K or 5K monitor, blurry, or sitting in a frame that doesn't match the plugin inside it. Each one starts with a different control, and the controls are different for Image-Line's plugins and third-party ones. I cover the quick route by symptom, the documented settings for both kinds of plugin, what Reload plugin and bridging cost you, how to make the size stick, the two last-resort fixes, and what changes on a Mac. Making FL Studio's own windows and editors bigger or smaller is a separate job, covered in our guide to zoom and GUI scaling in FL Studio.
Which fix to try first
Image-Line's knowledge base answer on plugins not scaling properly sums up the problem: FL Studio's vector interface adapts to your screen resolution, but hosted plugins "may show up very large, while others appear too small." Match your symptom to the first control below before you change anything else.
| What you see | Plugin | Start with |
|---|---|---|
| Bottom controls cut off on a small screen | Any | Detached in the wrapper menu, then move the window up; then the plugin's own size control |
| Tiny on a high-resolution screen | FL Studio plugin | Wrapper menu > Scaling |
| Tiny, and the plugin has a zoom or size menu | Third-party | Make bridged and DPI aware when bridged on, then the plugin's zoom |
| Tiny, and the plugin has no size control | Third-party | Make bridged and External window on, DPI aware when bridged off |
| Frame bigger or smaller than the plugin inside it | Third-party | Scale editor dimensions; then check FL Studio against Windows scaling |
| Everything blurry or tiny, all plugins | Any, Windows | The two last-resort fixes below |
| Right size today, wrong size next time | Any | A favorite preset saved after you set the size |
| Floating in front of other windows on a Mac | Third-party, macOS | Expected on macOS; use the plugin's own size control |
Check the base layer first. Image-Line's General Settings page says Main GUI scaling is normally left on System, so FL Studio follows your computer's scaling: a system set to 200% gives you FL Studio at 200%. Changing Main GUI scaling needs an FL Studio restart. On displays between 3840x2160 and 5120x2880, the manual says settings between 125% and 200% usually work well, and the best factor depends on resolution, monitor size and eyesight.
Then change one layer at a time. Several of these settings only apply after a restart or a plugin reload, so if you change three at once you won't know which one fixed it, or which one broke the next plugin. Two monitors with different scaling add a layer of their own, and our guide to FL Studio on two monitors sorts out that setup step by step.
Plugin too big or cut off at the bottom
This is the oldest version of the problem. Answers from a 2005 KVR thread, an eight-year-old Reddit thread and a 2020 Image-Line forum thread about a plugin too big for the screen all give the same fix: little arrow in the top left, then Detached. The Plugin Wrapper page of the manual describes Detached as freeing the plugin from the FL Studio desktop so it can be moved. Detaching doesn't make the plugin smaller. It lets you drag the window higher, so the bottom row of controls comes into view. A detached plugin also behaves like a separate application, which has side effects covered further down.
Three more ways to win back height, in the order I'd try them:
- Use the plugin's own size control. Many third-party plugins have a zoom menu, a size setting or a resize corner you can drag. Where it lives depends on the plugin, so check its manual. If the plugin offers a smaller size, that's the cleanest fix because nothing else on screen changes.
- Hide the wrapper toolbar. In General Settings, "Hide plugin window toolbar by default" hides the Plugin Wrapper Controls when instrument plugins open. It's an initial state: if you open the toolbar for a channel and close the plugin, FL Studio remembers that for the channel. It gains only a strip of height, but sometimes that's all a plugin needs.
- Lower the scaling that drives the plugin. For an FL Studio plugin, set a smaller Scaling percentage in the wrapper menu. For a bridged third-party plugin following Windows scaling, a lower Windows scale shrinks it, along with everything else on screen.
One trick from outside FL Studio: in a 2018 Cantabile Community thread, a user whose synth filled the whole screen reached its bottom buttons by moving the Windows taskbar to the right edge of the screen. It costs nothing to try on a short laptop display.
Resize FL Studio's own plugins
For Image-Line's instruments and effects, such as the ones in our list of FL Studio stock plugins worth learning, the control is in the wrapper menu: click the arrow at the top left of the plugin window and open Scaling. The manual lists three choices:
- Host follows FL Studio's own General Settings > Scaling.
- System follows the operating system's scaling.
- Scaling factor is a custom size from 100% to 400%.
The manual points out that this is useful across monitors with different resolutions. I'd keep most plugins on Host so they match the rest of FL Studio, and give a fixed percentage only to the one you want bigger or smaller than everything else, such as an EQ you keep large on a second screen.
General Settings says "most" native plugins rescale with this factor, not all of them. For the ones that don't, there's Legacy scaling in the Advanced section of General Settings. It applies to all native plugins at once and needs an FL Studio restart. It is normally left on Main, and it only offers 100%, 200%, 300% and 400%: in the manual's words, "Fractional scaling is not possible." Treat it as the fallback for a stubborn Image-Line plugin, not the first stop.
Third-party plugins that have their own zoom
The wrapper Scaling option doesn't apply to VST, AU and CLAP plugins. The manual's section on rescaling third-party plugins starts with a blunt line, "High resolution monitors will shrink plugin interfaces," and then gives two recipes. Which one you need depends on whether the plugin can scale itself.
The switches live in the plugin wrapper settings. Click the cog next to the plugin name to show the wrapper's extra controls, click the plugin settings icon, a speaker with a small cog, and then switch between the Settings and Processing tabs. Our guide to VST, AU and CLAP plugins explains how FL Studio frames a third-party plugin, if the wrapper itself is new to you.
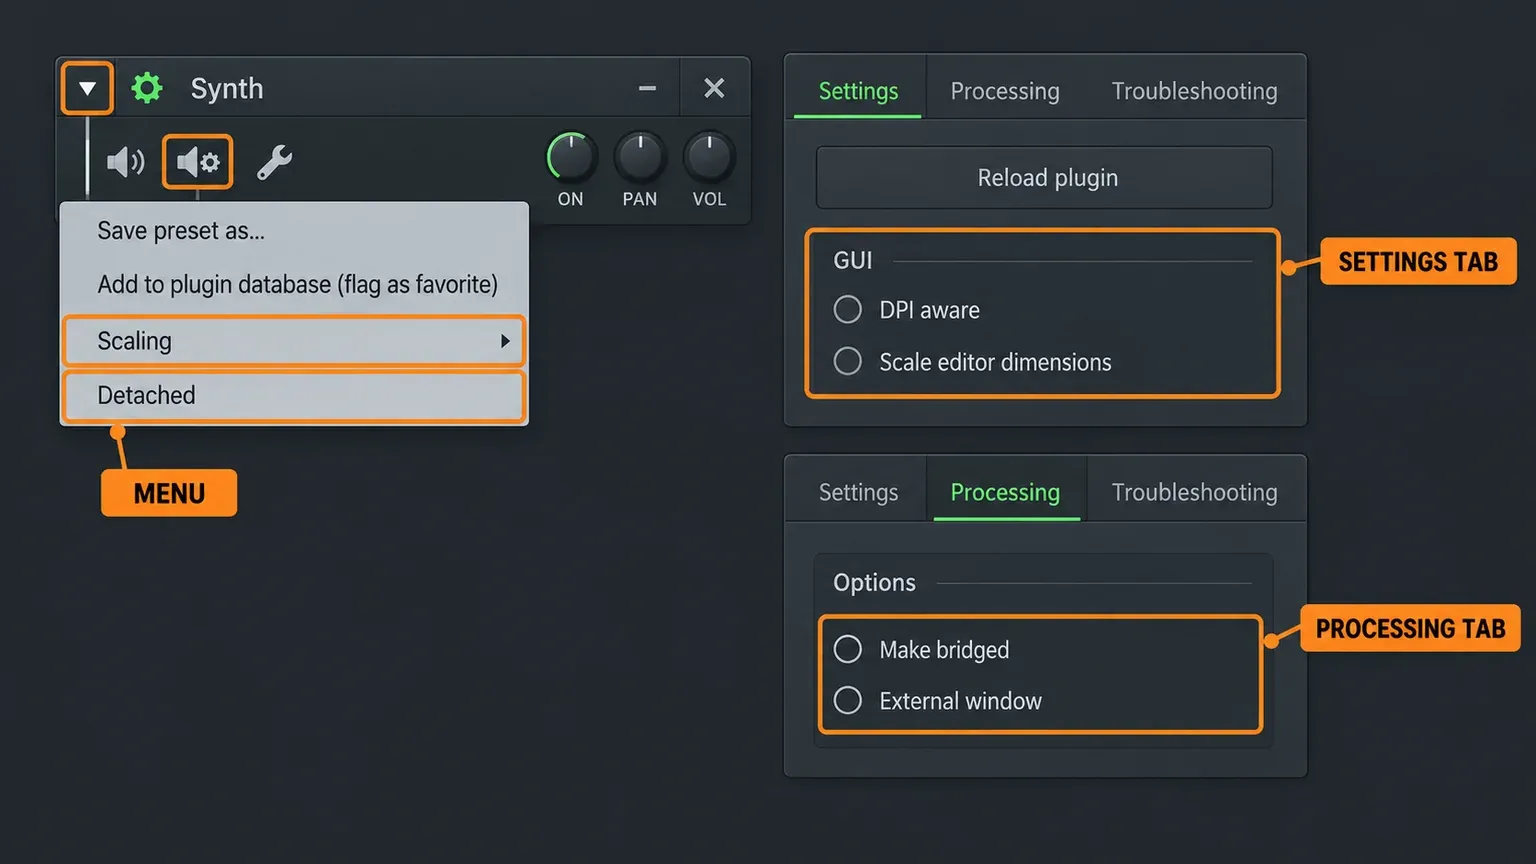
For a plugin with native rescaling, the manual's recipe is:
- Processing tab: turn Make bridged on.
- Settings tab: turn DPI aware when bridged on.
- Set the size inside the plugin, with its own zoom or scaling setting.
The manual's recipes call the switch "DPI aware when bridged". In the Settings tab figure of the current manual, the GUI section shows it as DPI aware, with a note that it requires reloading the plugin. With it selected, the plugin is assumed to do its own DPI scaling, following the Windows setting, each monitor, or FL Studio's scaling. That's why this recipe suits plugins that already know how to scale.
If Make bridged isn't there, the manual has a simple reason: the option won't show if the plugin is already bridged, and you can carry on without it. Its Make bridged entry also says "Only VST plugins can be 'Bridged'," while the rescaling section covers VST, AU and CLAP. So if you loaded an AU or CLAP build and can't find the switch, it's worth trying the VST3 or VST version of the same plugin. Our guide to installing VST3, AU and CLAP plugins shows where each format goes, and the plugin not showing guide helps when the other format doesn't appear in FL Studio.
Third-party plugins with no size control
An older plugin with a fixed-size interface can't scale itself, so the second recipe hands the job to Windows. Bridging opens the plugin outside FL Studio, and the manual says this lets it respond to Windows system scaling. Before you start, save the plugin's sound, because the last step may reset it:
- Wrapper menu: Save preset as, or Save channel state as.
- Processing tab: turn Make bridged on and External window on.
- Settings tab: turn DPI aware when bridged off.
- If the size doesn't change, use Reload plugin, then load the preset you saved.
The manual describes External window as an option "for use with bridged plugins" that "can be used to correct plugins that appear too small," and tells you to deselect DPI aware when bridged first. With DPI aware off, Windows scales the plugin's editor window according to each monitor's scaling. The plugin follows your Windows scale value from then on, so the way to change its size is the Windows scale, which the manual reaches through Control Panel > Display > Custom Sizing Options.
If a plugin ignores both recipes, the manual asks you to contact the developer and request that they support VST scaling. That's worth five minutes, especially for a plugin you use every day.
Reload plugin, DPI aware and a frame that doesn't fit
Some quick answers to this question tell you to toggle DPI aware and click Reload plugin. They leave out the important part. The manual says Reload plugin "reloads the plugin and resets it to the default settings." If you've been shaping a sound in that instance, a reload takes it back to the plugin's defaults. Save a preset first, or use Save channel state as, which the manual says saves the whole channel state including the VST wrapper settings. Then reload and load the sound back in.
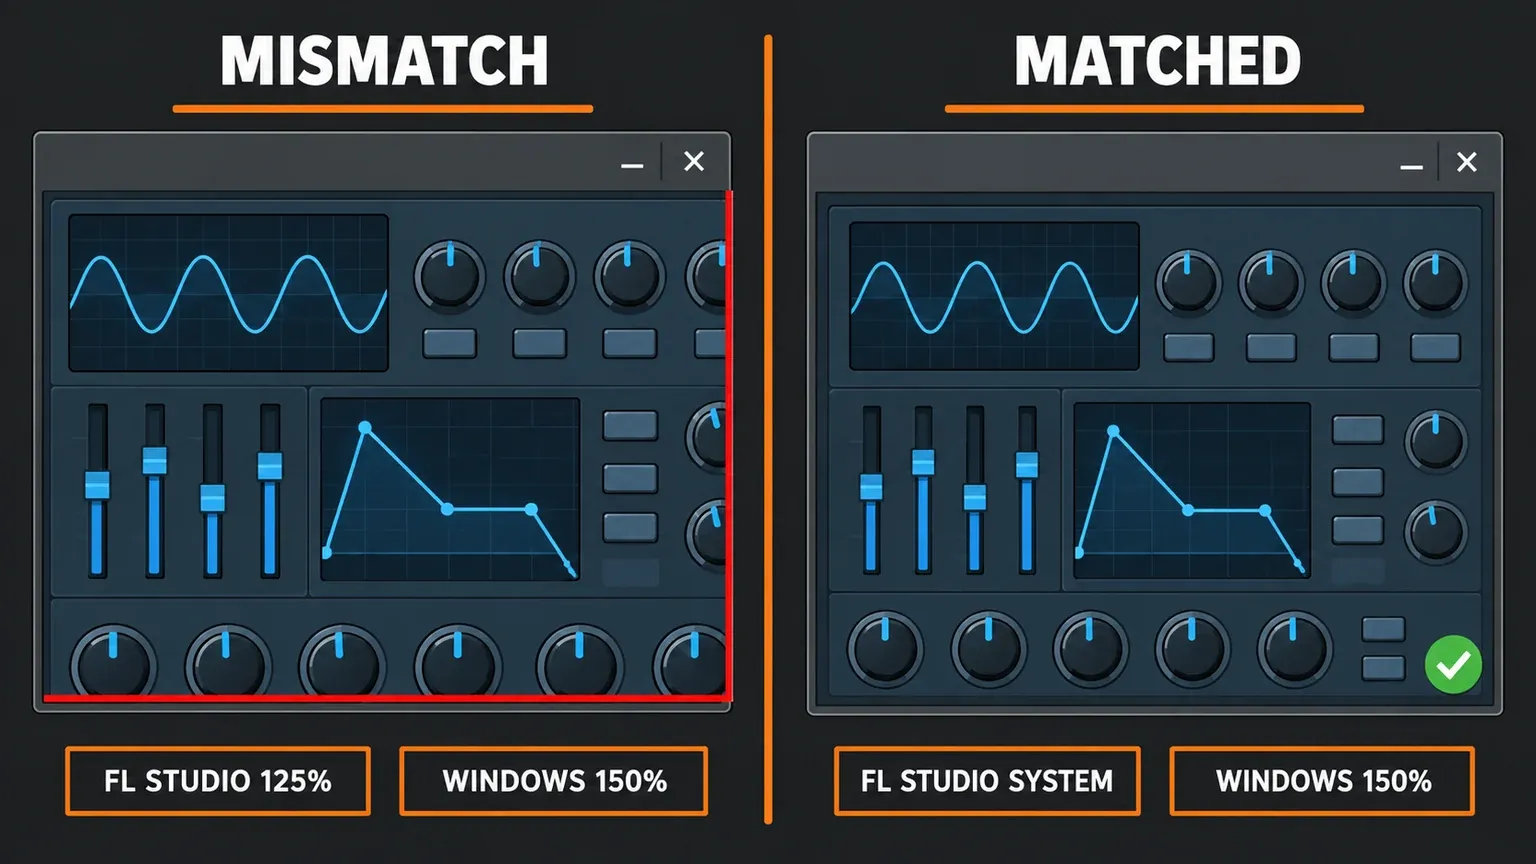
Sometimes the plugin and the window around it disagree: the frame is too big for the editor, or too small and clips it. The Settings tab has a switch for exactly this, and the manual's advice for Scale editor dimensions is short: "Try this when plugin GUIs are mismatched to the size of the window containing them."
One Windows-specific note from the same page: if you run the scaled version of FL Studio described below and VST plugins don't display correctly, deselect DPI aware.
Make the size stick next time
This is the part most forum threads skip, and it's why a plugin you fixed yesterday opens tiny again today. The wrapper's Autosave and Save buttons keep the Settings and Processing tab options for each plugin, but the manual adds: "Not all options are saved. Scaling / GUI options. In this case, these parameters are saved with presets." Its advice is to make a favorite preset after setting these options, so the plugin always loads with the correct GUI settings.
In practice: get the size right, then use Add to plugin database (flag as favorite) from the plugin's top-left menu, and load the plugin from that favorite from then on. Our plugin database guide covers adding a favorite with the opening state you want, and the folder it belongs in. Check the result by loading the favorite into a fresh slot.
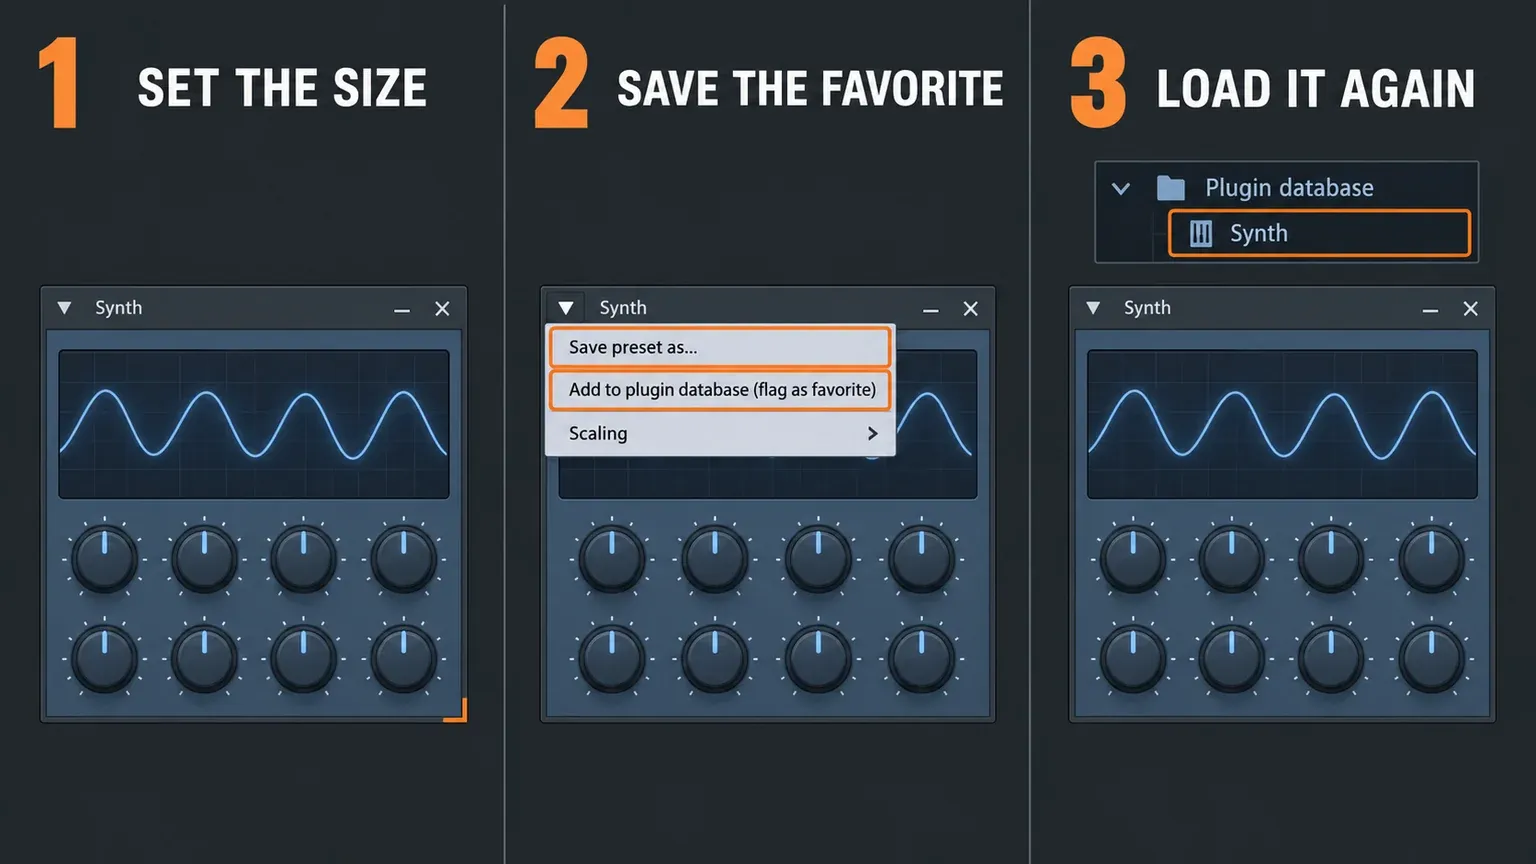
If you want to undo everything, the wrapper's Options area has Delete, which clears the saved options for that plugin, and Reset, which returns its options to the default state.
What bridging and detaching cost
Both fixes take the plugin out of FL Studio's own window, and the manual is clear about what follows:
- Detached plugins are seen by Windows and FL Studio as separate applications. The plugin stops responding to MIDI input while you tweak its interface and can take over the audio interface. Click back into FL Studio to keep playing it from your MIDI controller.
- Bridged plugins appear to the operating system as a separate program, can take audio interface focus, and depending on your driver and audio options can stop audio playback. The manual's work-arounds are FL Studio ASIO or deselecting Options > Audio > Auto close.
- Keyboard focus. Bridged plugins always take keyboard focus when you click in them, and the wrapper's Keep focus option won't always stop that. Some detached windows can take it too.
- CPU and stability. Image-Line estimates the overhead of bridging at "approx 1-2% per plugin" and notes that it can decrease stability for some plugins.
So I'd bridge only the plugins whose size you can't fix any other way. The manual's own advice on bridging in general is "if these don't apply, don't bridge." If a big project already runs hot, our guide to high CPU in FL Studio shows how to find hidden overhead from bridging.
When nothing else works: two last resorts on Windows
The manual calls these the "foolproof fixes when all else fails." Both work on the whole screen, not one plugin.
Run the scaled version of FL Studio. The installation folder contains FL64 (scaled).exe and FL (scaled).exe, which hand FL Studio and VST plugins over to Windows scaling. The manual names the trade-off: FL Studio may look slightly blurry, particularly on displays of 17 inches or larger. A 2021 Image-Line forum feature request describes the same choice from a 4K user's side: the scaled version gave normal-size VSTs with blur everywhere, and the normal version gave a crisp interface with tiny VSTs.
Lower the display resolution. On a 14 to 17 inch laptop running 3840x2160, the manual suggests 1920x1080 or 2560x1440, says you probably won't notice much change in image quality, and expects the plugin scaling issues to be solved. On a small 4K laptop full of older plugins, I'd try this before setting up a dozen plugins one by one. On a large desktop monitor, the resolution drop is easier to see, so the per-plugin recipes are the better route there.
When FL Studio and Windows scaling disagree
Some reports show a mismatch that the recipes alone don't fix. In a December 2024 Image-Line forum report about the wrapper window being sized incorrectly, a user with FL Studio's Main GUI at 125% and Windows at 150% turned DPI aware off. The plugin editor followed Windows, the wrapper frame followed FL Studio, and the frame clipped the editor of Native Instruments FM8. The forum's site administrator replied that they were aware of it. I can't tell from the thread whether a later update changed this, but the safe setup is the one the manual already recommends: Main GUI on System, so FL Studio and Windows use the same value.
A February 2025 forum thread about Native Instruments plugins on a 4K screen describes Komplete Kontrol and Battery opening with a black screen and then at the wrong scale after an update to FL Studio 24. The first reply suggested turning DPI aware off, and a later post asked for it to be moved into a bug report. Problems like this are specific to one plugin and one FL Studio version. If you hit one, report it to both Image-Line and the plugin developer with the FL Studio version, the plugin version and your scaling values.
Resizing plugins on a Mac
Image-Line's third-party recipes are written around Windows scaling: the Control Panel steps, the scaled executables and the Windows note on DPI aware. I couldn't find a separate Mac recipe for those switches in Image-Line's manual or knowledge base. What Image-Line does document is how third-party plugins behave on macOS. Its knowledge base answer on macOS detached plugins says third-party plugins are always in Detached mode in FL Studio for macOS "until the developers find a reliable fix," so they can stay in front of other windows. Option+F12 closes all plugin windows. The two-monitor guide linked above covers the rest of that foreground behavior.
On a Mac, I'd start with the plugin's own zoom or size setting. For Image-Line's plugins, the wrapper menu's Scaling option carries no Windows-only note in the manual, so it's the next thing to try. If everything on screen is too small or too big, the system-level control is the display resolution: Apple's guide to changing your Mac display's resolution goes through Apple menu > System Settings > Displays. Apple notes that some app windows may not fit entirely on the screen after a change, that "using a scaled resolution may affect performance," and that the default resolution is best.
Quick answers
Why are my plugins so small in FL Studio?
High-resolution screens shrink plugin interfaces, as the manual puts it. FL Studio's own interface scales with your system, but a third-party plugin needs one of the two wrapper recipes, or its own zoom.
Can I drag a plugin window bigger like any other window?
Only if the plugin supports resizing. Some have a resize corner or a size menu; others have a fixed interface, and for those the wrapper recipes or Windows scaling decide the size.
Why does my plugin go back to the wrong size?
Scaling and GUI options are saved with presets, not by the wrapper's Autosave. Save a favorite preset after you set the size and load the plugin from it.
Should I bridge every plugin to be safe?
No. Image-Line puts the overhead at about 1 to 2% CPU per bridged plugin, notes stability risks for some plugins, and says not to bridge unless you need it. Bridge the ones you can't size any other way.
Next time a plugin opens at the wrong size, check two things: is it an Image-Line plugin or a third-party one, and does it have its own zoom? Those two answers pick the fix, and a favorite preset makes it stick.