FL Studio
FL Studio has several ways to autotune a vocal, and the easiest free starting point is now AutoTune Go through FL Cloud Free. Pitcher handles automatic correction and MIDI-controlled harmonies if you own its license. NewTone lets you edit a recorded vocal note by note. The full Antares AutoTune products have separate product licenses or subscription access.
I would choose the tool by the job before buying anything. A singer who wants to hear a tuned voice while performing needs a different workflow from someone fixing two notes in a finished take. And a deliberate hard-tune hook needs different settings from a lead you want to keep expressive.
Which autotune should you use in FL Studio?
| Your task | Choose | License or access |
|---|---|---|
| Start with straightforward automatic vocal tuning | AutoTune Go | Available at no additional cost through FL Cloud Free |
| Use native automatic correction or MIDI-controlled harmonies | Pitcher | Included in Signature Bundle and All Plugins Edition |
| Repair individual notes in recorded audio | NewTone | Included in Signature Bundle and All Plugins Edition |
| Use a particular Antares product's extra controls or Graph Mode | The appropriate full AutoTune product | Separate product license or applicable subscription |
Image-Line's AutoTune Go announcement confirms that Go is free for FL Studio users through FL Cloud Free. You can start there without buying a higher FL Studio edition or a full Antares product.
For Pitcher and NewTone, check the current edition comparison rather than assuming that every plugin visible in FL Studio is included in your purchase. Image-Line's effect-plugin guide explains that some installed effects are trial versions, identified by “Trial” in their wrapper title. I would resolve that license question before building a finished vocal session around one.
“Autotune” is often used to mean automatic pitch correction in general. AutoTune is also the Antares product family. Pitcher is an Image-Line plugin, not a different name for AutoTune Pro. That distinction matters when a tutorial shows controls your plugin does not have.
Get AutoTune Go through FL Cloud
In current desktop FL Studio, open Tools > Manage cloud plugins. Find AutoTune Go in the FL Cloud Plugins manager, then choose Install. This is the installation route Image-Line documents for Go. Follow the manager's setup and account prompts; you do not need a paid FL Cloud plan just to access the Go offer.
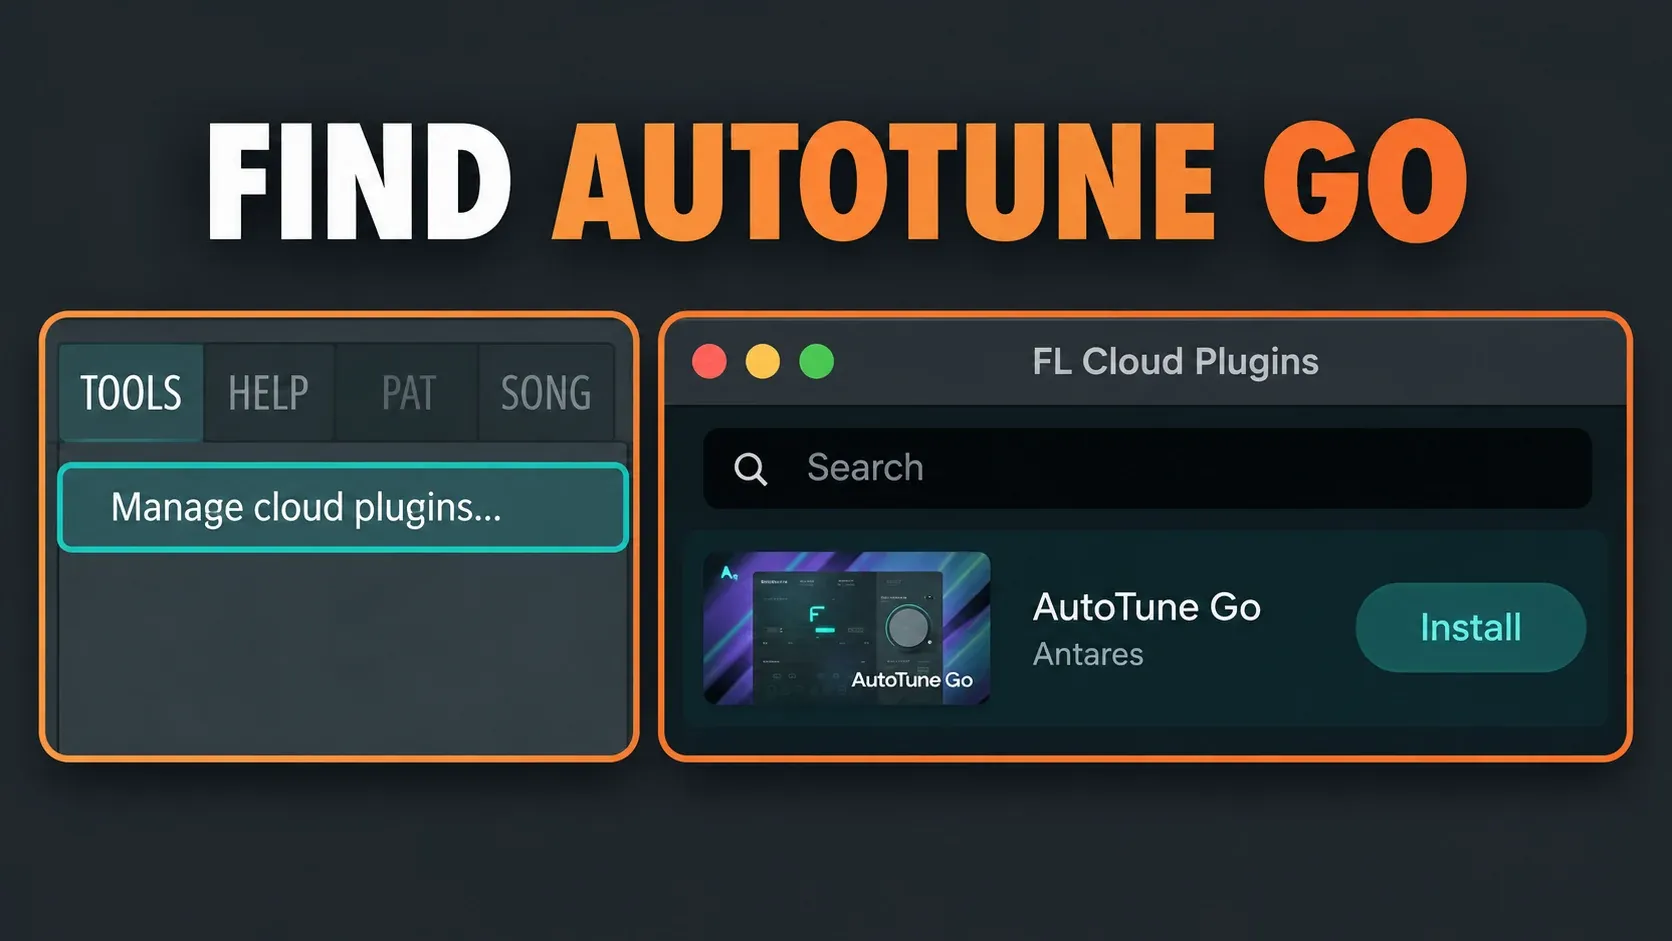
FL Cloud needs an internet connection to install its plugins, as explained in its plugin installation and connection requirements. If the Tools entry or the plugin is missing, check your installed FL Studio build and the official setup instructions before treating that as a reason to upgrade your edition. A missing menu and a missing license are different problems.
Once the plugin is available, route the vocal to its own Mixer insert and load the effect there. For recorded audio, confirm the Audio Clip's Mixer assignment. For a live microphone, confirm the selected input reaches that insert. The plugin must receive the voice you intend to tune; opening its window on an unrelated insert changes nothing.
FL Studio's Mixer effect-loading controls let you choose an effect from an FX slot or drag it from the Plugin Picker. Keep the tuning on the vocal insert rather than putting it on the Master, where it would receive the entire mix.
Set the key before choosing the tuning strength
AutoTune Go's documented tuning controls are Key & Scale, Vocal Range and Retune Speed. Image-Line lists Major, Minor and Chromatic scale choices, manual or automatic vocal-range selection, and four retune-speed settings. Those are three separate decisions.
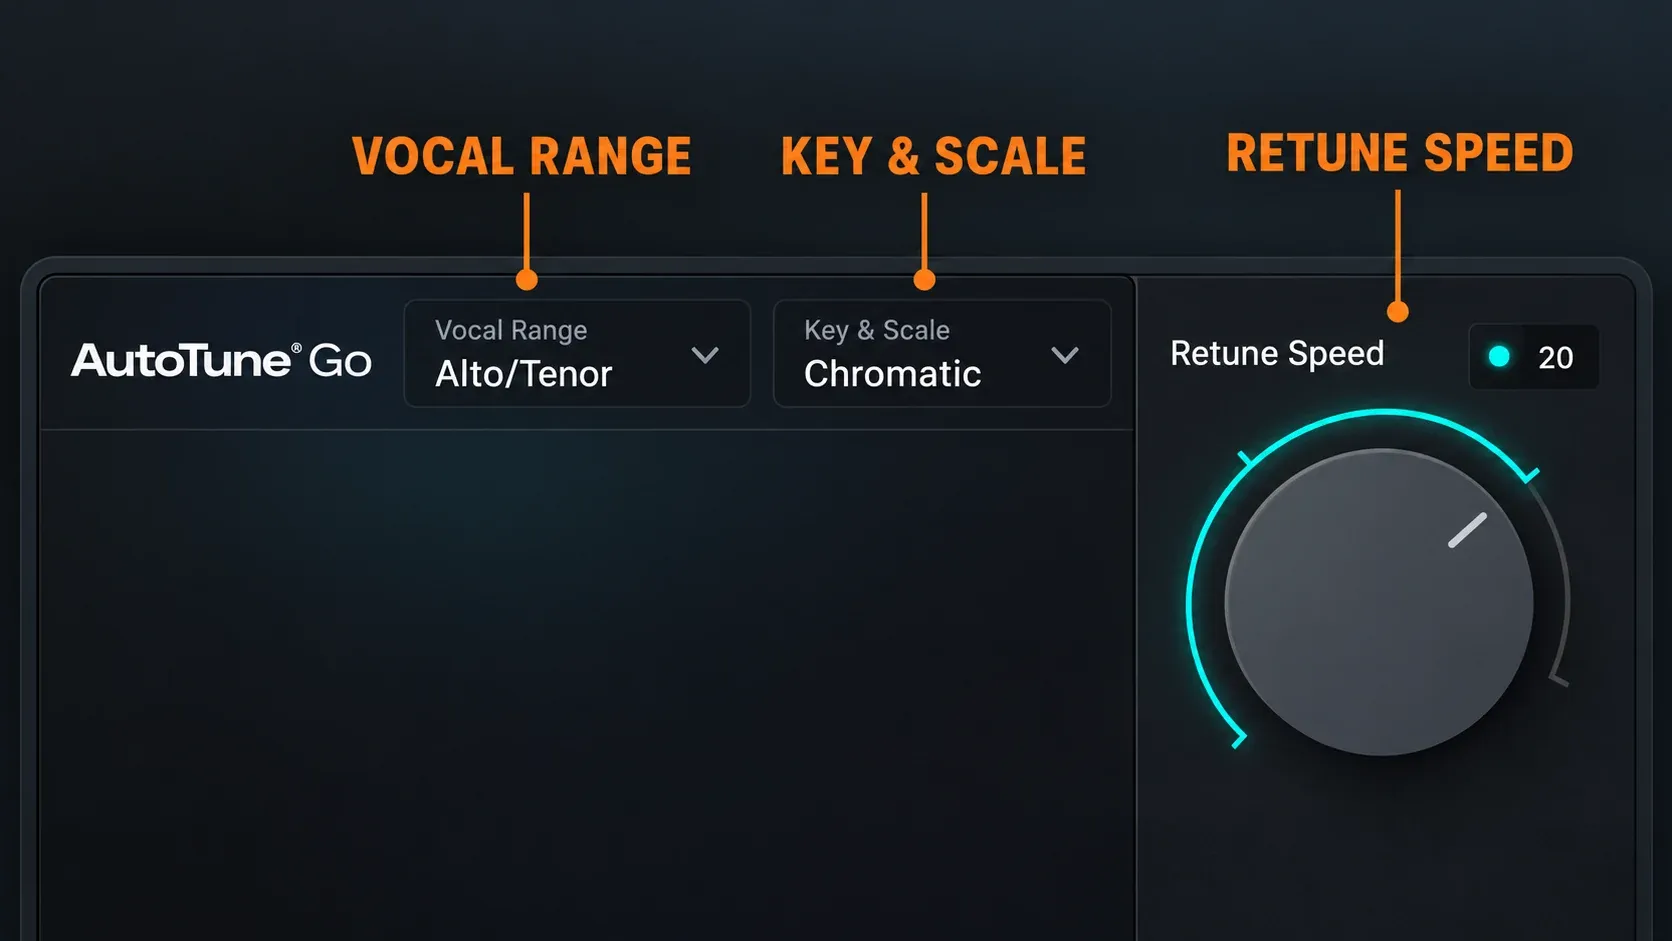
Key and scale define the allowed pitches. Start from the song's known harmony or reliable information supplied with the beat, then listen to the vocal against the chords. C major and C minor are not interchangeable. Chromatic permits every semitone, so it is not a substitute for choosing the song's scale when you want correction constrained to that scale.
Vocal range describes the source being tracked. Go can detect that range automatically or let you choose it manually. Do not confuse vocal-range detection with finding the song's key. A low verse and a high chorus also deserve separate attention; check what the voice actually sings instead of choosing a range from the singer's identity.
Retune Speed changes how quickly correction happens. Image-Line describes Go's four speed settings as spanning subtle correction to fast, tight tuning. Start toward the subtle end for an expressive lead. Move toward the fast end when the obvious snapping effect is part of the hook. Listen through note entrances, slides and held vowels, not just one loud phrase.
Do not copy a number from an AutoTune Pro tutorial into Go and expect the same result. The control set and available adjustments differ. If the note is being pulled to the wrong musical target, first check the allowed pitches; a more aggressive speed only gets you to that wrong target sooner.
Use Pitcher when you already have it
If your license includes Pitcher, there is no need to replace it just because Go is available. Image-Line describes Pitcher as a real-time correction and harmonization plugin. For ordinary automatic tuning, leave its MIDI, Octaves and Harmonize modes off, choose the key and Major or Minor scale, then adjust Correction Speed.
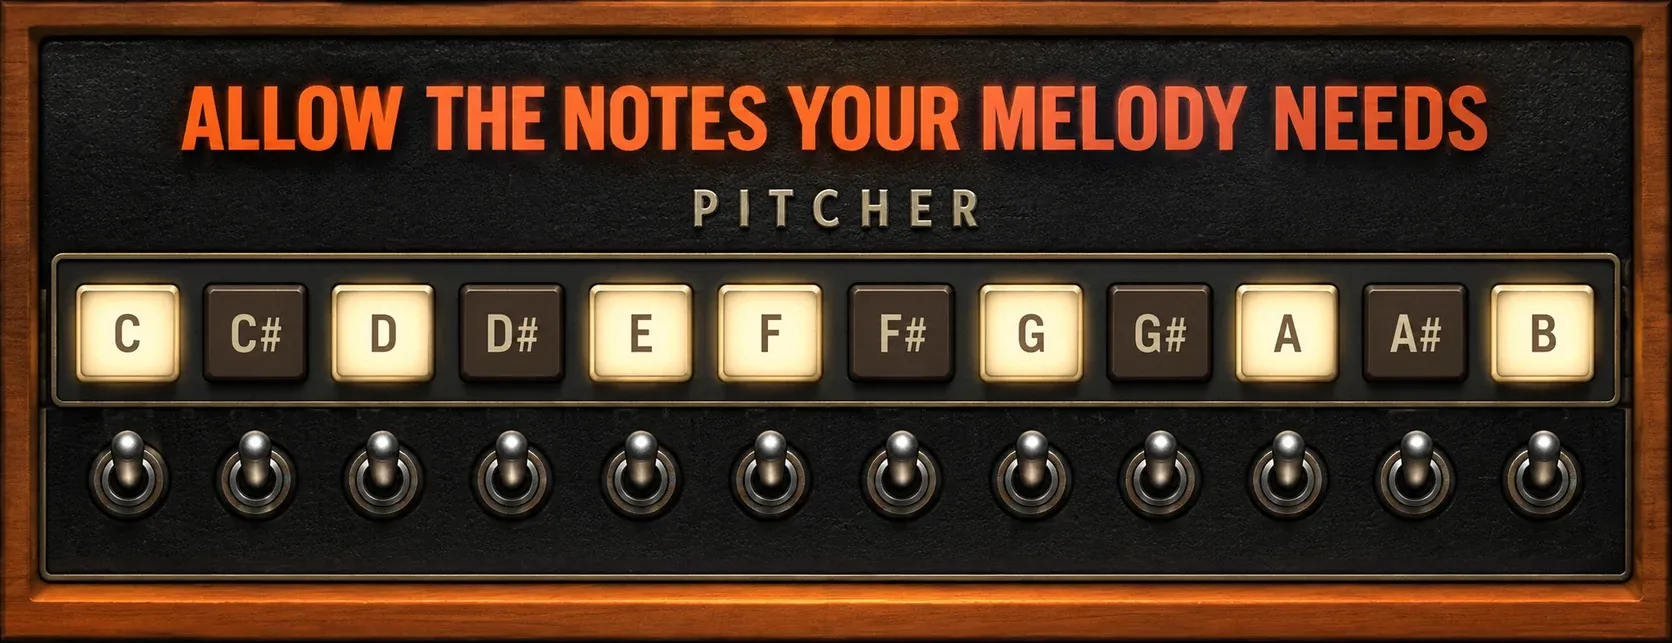
Pitcher also lets you enable or disable individual note buttons to override the selected scale. That helps when a melody contains an intentional note outside the basic major or minor set. Check that specific phrase against its chord before excluding the note. The nearest allowed pitch is not necessarily the note the melody needs.
Its documented input requirements are worth respecting: use a monophonic source, and put Pitcher before phasing, chorus or reverb that can interfere with detection. A stack of singers or a complete instrumental mix is not a clean single-note vocal input. A slower correction speed can preserve more of a slide; fast correction makes the intervention more obvious.
If you need the full control walkthrough, use the dedicated Pitcher setup guide. MIDI harmonies are a separate musical task from choosing an autotune effect for the lead.
Switch to NewTone when only a few notes need repair
I would choose NewTone when the take already has the character I want and a small number of notes need attention. It is a pitch and time editor for loaded audio, rather than the same live correction workflow as Pitcher. You can see the detected notes and work on the phrase that needs repair.
In the NewTone editing controls, Center pulls notes toward the nearest pitch, Variation changes pitch variation, and Transition changes transitions between notes. A single-note right-click snaps that note to the nearest semitone. None of those operations decides whether the nearest semitone is the right note for your song.
Load a copy of the vocal, make the necessary changes, then return the edited audio to the Playlist. Keep the original take. For a precise selection, note-level controls and the export route, follow the NewTone vocal-tuning guide. If you are tuning a sampled phrase to a beat rather than choosing a vocal effect, the sample pitch-correction workflow explains how to match it to the song.
When the full Antares AutoTune makes sense
Pay for a full AutoTune product when you can name the feature you need. Antares currently separates streamlined automatic tuning, its Advanced product and AutoTune Pro's Graph Mode for detailed manual editing. Go's free access does not provide a Pro license.
Check the exact product's current operating-system requirements, plugin formats, license terms and DAW compatibility before purchasing. In particular, Pro's ARA2 compatibility list names Logic, Studio One, Cubase and Nuendo. It does not list FL Studio. Choose from the features documented for your host before following a demonstration made in another DAW.
If you only need a straightforward tuned lead, I would start with Go or the Pitcher license you already own. A larger product makes sense when its additional editing or performance controls solve a problem you can hear and identify.
Fix the cause of a bad result
The voice follows wrong notes: check the key, scale and any excluded notes against the actual chord under the phrase. Switching from C major to C minor changes the available targets; raising the correction strength does not solve that musical mismatch.
The sound jumps or warbles: check the source first. Solo a single vocal, bypass chorus and reverb ahead of the tuner, and check the chosen vocal range or Pitcher's detection settings. If one syllable remains troublesome, repair that part manually instead of forcing the whole performance through stronger correction.
The lead sounds flatter than you intended: slow the correction and listen to slides and held notes again. For a deliberate hard-tune sound, keep the fast movement but judge whether the chosen notes support the hook. “Natural” and “obvious” are production choices; either can be right when the melody still works.
You hear both a dry and tuned voice while recording: inspect your monitoring paths before adding another tuning plugin. Interface direct monitoring and the FL Studio monitor path may both be audible. Image-Line's recording and monitoring guidance explains the difference. To hear the tuner while singing, use the FL Studio path and turn off the interface's dry direct-monitor path; that hardware control depends on your interface.
Once the pitch decisions work, balance the vocal and build the rest of the effects around it. The FL Studio vocal-mixing guide takes over from there.