FL Studio
Pitcher is FL Studio’s real-time pitch-correction and harmonization plugin. It can pull a monophonic vocal toward an allowed set of notes while the audio is playing, or follow MIDI notes when you want manual targets and generated harmony voices.
The useful word is real-time. Pitcher belongs where you need immediate correction, monitored vocal effects or MIDI-directed pitch moves. It is not the right tool for drawing detailed note-by-note edits after recording, and it cannot untangle chords, choirs or a complete mix.
Start with the source Pitcher can track
Pitcher expects one clear note at a time. A lead vocal, bass line or other monophonic source fits that requirement. Layered doubles, backing-vocal stacks, polyphonic instruments and full stereo mixes contain simultaneous pitches, so the detector cannot reliably decide which note should control the correction.
Route the vocal to its own Mixer insert and place Pitcher first in the effects chain. Image-Line warns that phasing, chorus and reverb before Pitcher can damage pitch detection. Those effects create extra movement or reflections around the fundamental pitch. Put them after Pitcher, then build the rest of the chain with the vocal-mixing guide.
Recording quality still matters. A dry signal with steady level gives the detector a simpler job than a noisy or heavily reflected recording. If the take itself needs attention, fix the input path first using the FL Studio vocal-recording workflow. Pitch correction cannot repair clipping, room echo or a poor microphone position.
Set Key, Scale and allowed notes before Correction Speed
The automatic section decides which pitches the vocal may land on. Choose the song’s Key, select Major or Minor under Scale, and inspect the C through B note buttons. An enabled note is a legal correction target. A disabled note is avoided, so Pitcher sends the input toward the nearest enabled note instead.
The note buttons can override the selected scale. That matters when the melody uses a borrowed note, a custom mode or a scale that does not fit a simple Major or Minor preset. Do not keep a wrong preset and try to solve it with a faster Correction Speed. A fast wrong target only produces a more obvious wrong note.
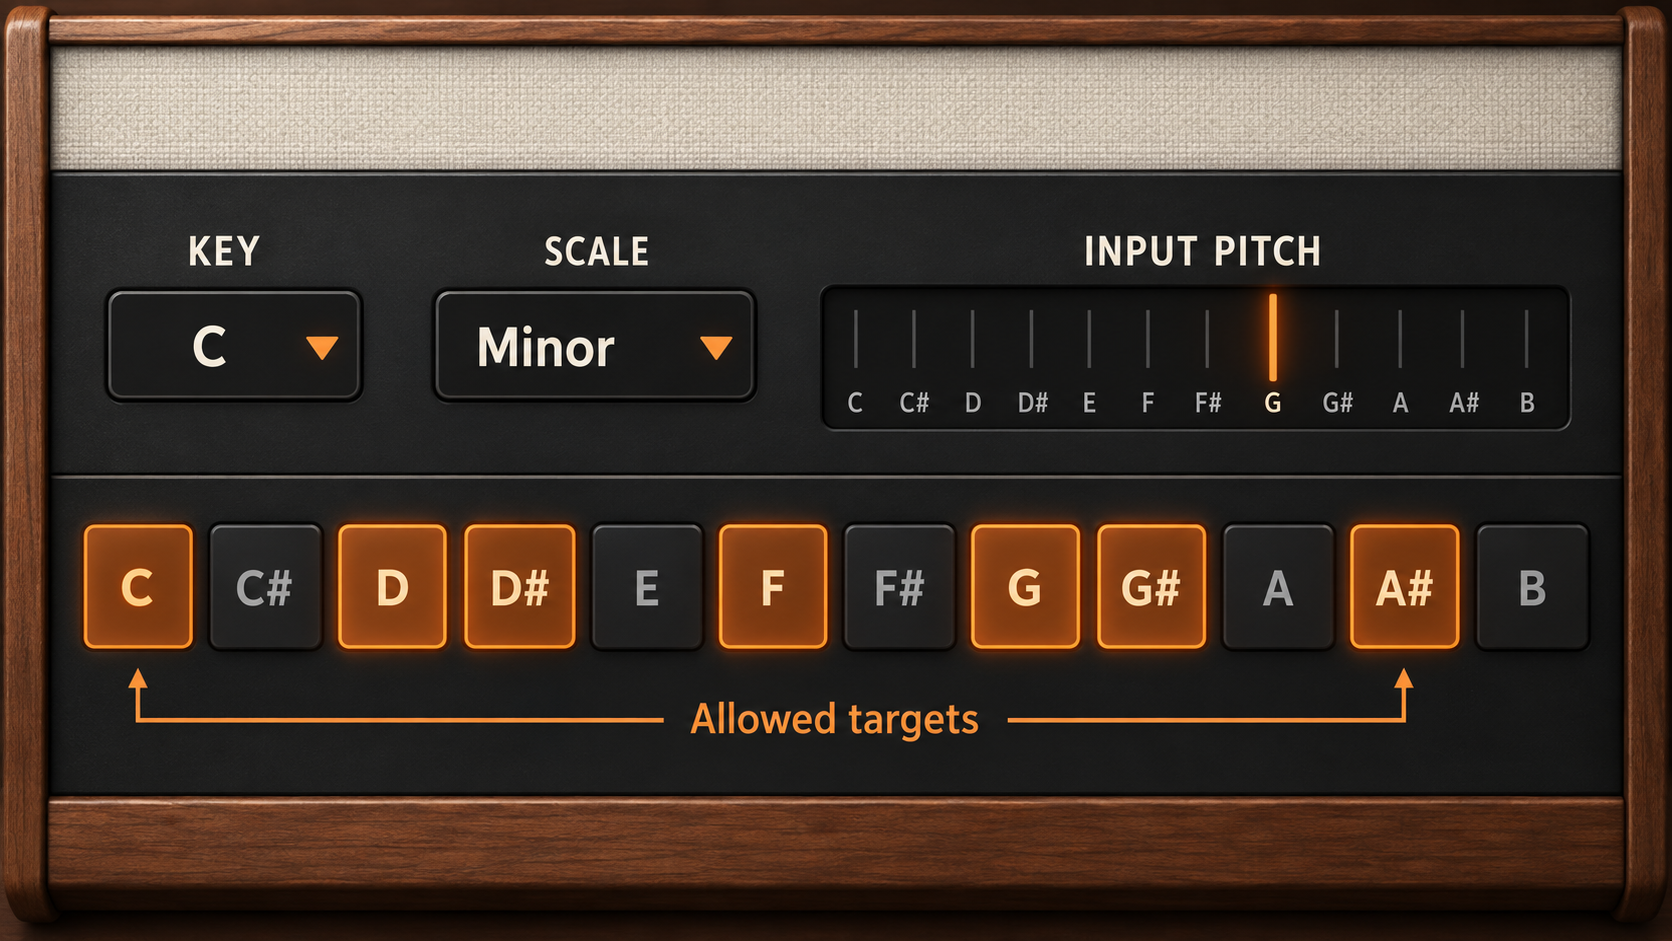
If you do not know the key, use the input-pitch indicator as evidence rather than guessing from one sustained note. Watch several phrases, compare the detected notes with the instrumental, and disable notes that clearly do not belong. Confirm the result through the whole section: one phrase can omit the note that exposes a wrong scale.
Correction Speed controls the character
Correction Speed determines how quickly Pitcher moves the detected pitch toward the target. Faster settings make the transition more obvious and artificial. Slower settings preserve more of the singer’s movement and usually sound more natural, especially on legato lines and glissando.
There is no universal “natural vocal” position. The right setting depends on the performance and the effect. Start slower, then increase speed until unstable notes settle without flattening every slide and onset. For a deliberate hard-tune sound, move faster after the scale is correct.
Listen to transitions, not only held notes. A sustained vowel may sound controlled while the first consonant, scoop or slide into the next note exposes a setting that is too aggressive. If every transition snaps, reduce speed. If the center of each note still wanders too far, increase it in small steps.
Use Minimum Frequency to reject low interference
Minimum Frequency tells Pitcher not to consider frequencies below a chosen threshold. Raising it can stop low rumble and other subharmonic content from confusing the detector. Image-Line also notes that detectors below the threshold are disabled, which can reduce unnecessary processing.
The manual gives 80–170 Hz for male vocals and 170–220 Hz for female vocals as starting ranges. Treat those numbers as orientation, not identity-based presets. Voice range, microphone noise and the notes in the actual performance matter more than the label. Set the threshold high enough to reject interference but low enough to keep the lowest sung note inside the detection range.
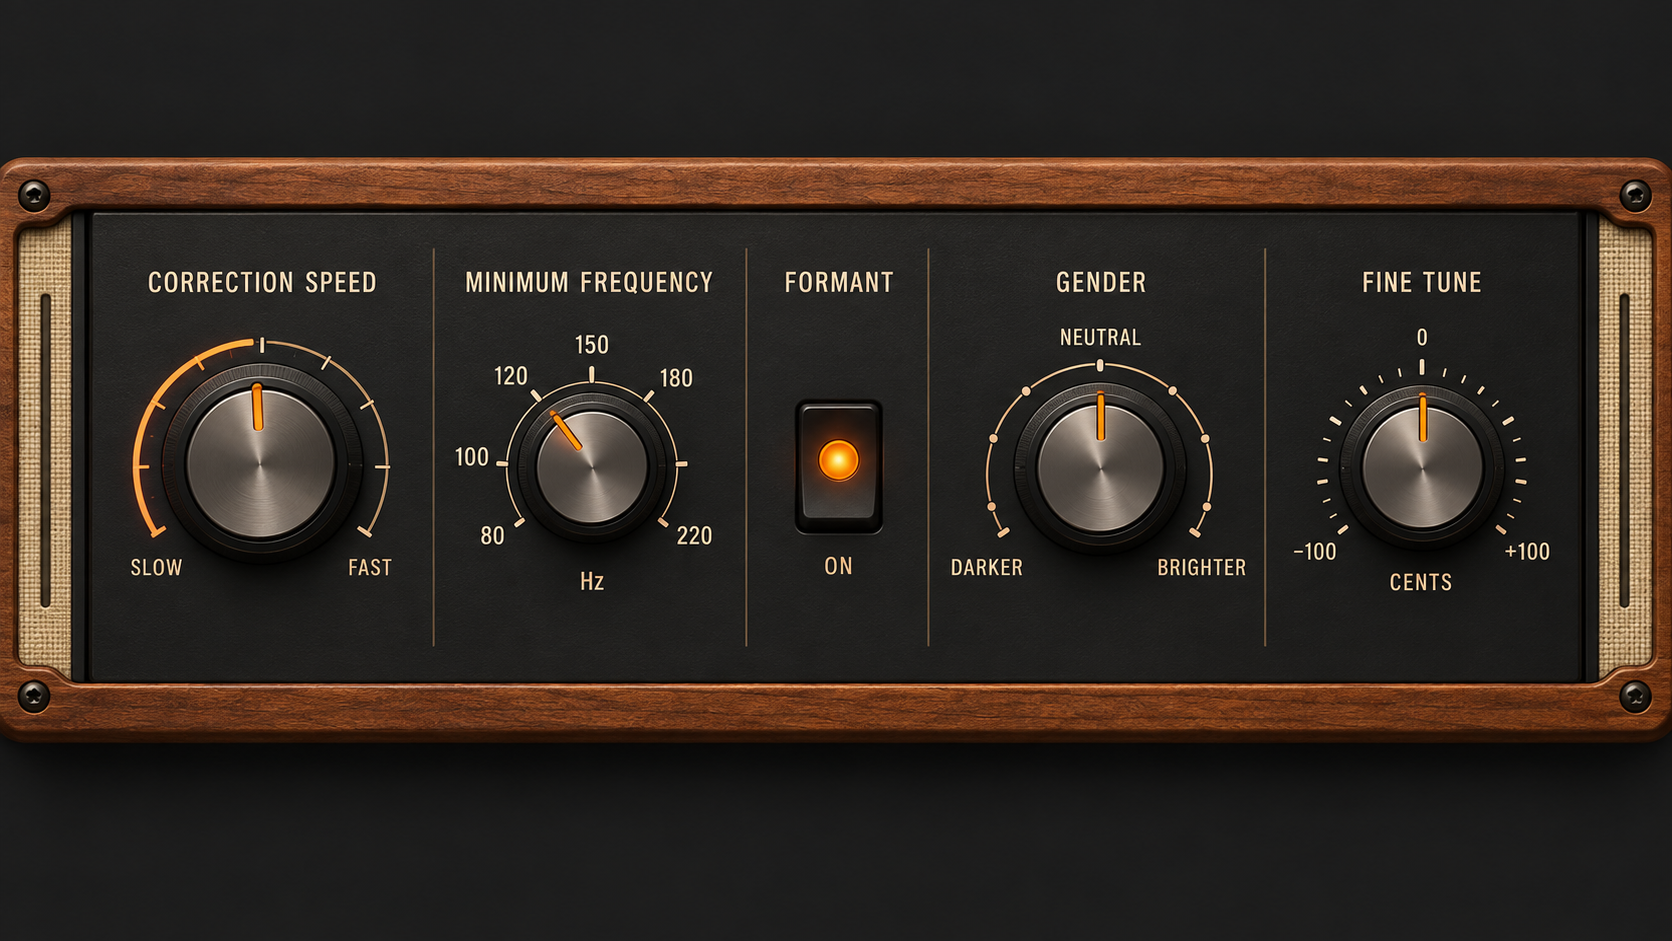
If the pitch indicator drops out on low notes after you raise Minimum Frequency, the threshold is too high. If it jumps toward low noise between phrases, the threshold may be too low or the recording path may need a high-pass filter and cleaner gain staging.
Formant, Gender and Fine Tune solve different problems
A formant is a resonance created by the vocal tract. When pitch changes by several notes without formant preservation, the voice can take on the familiar tiny or oversized character associated with extreme pitch shifting. Enabling Formant keeps those resonances more stable while Pitcher changes musical pitch.
The Gender control is a formant override. Use it as a tone control for the shifted voice, not as a claim about the singer. Move it only when the formant-preserved result feels too small, too dark or disconnected from the intended character. Large changes are an effect; subtle changes are easier to blend with the original performance.
Fine Tune provides a ±100-cent adjustment. It is useful when the source or instrumental reference is intentionally offset from standard tuning. Check the project’s reference first. Fine Tune should correct a known tuning relationship, not compensate for a wrong Key or allowed-note map.
Switch to MIDI when the melody needs exact targets
Automatic mode chooses the nearest enabled note. MIDI mode lets a keyboard or Piano roll tell Pitcher which note to use. This is the better route when the intended melody is known, when a chromatic note should occur at one exact moment, or when you want harmony voices controlled as a chord.
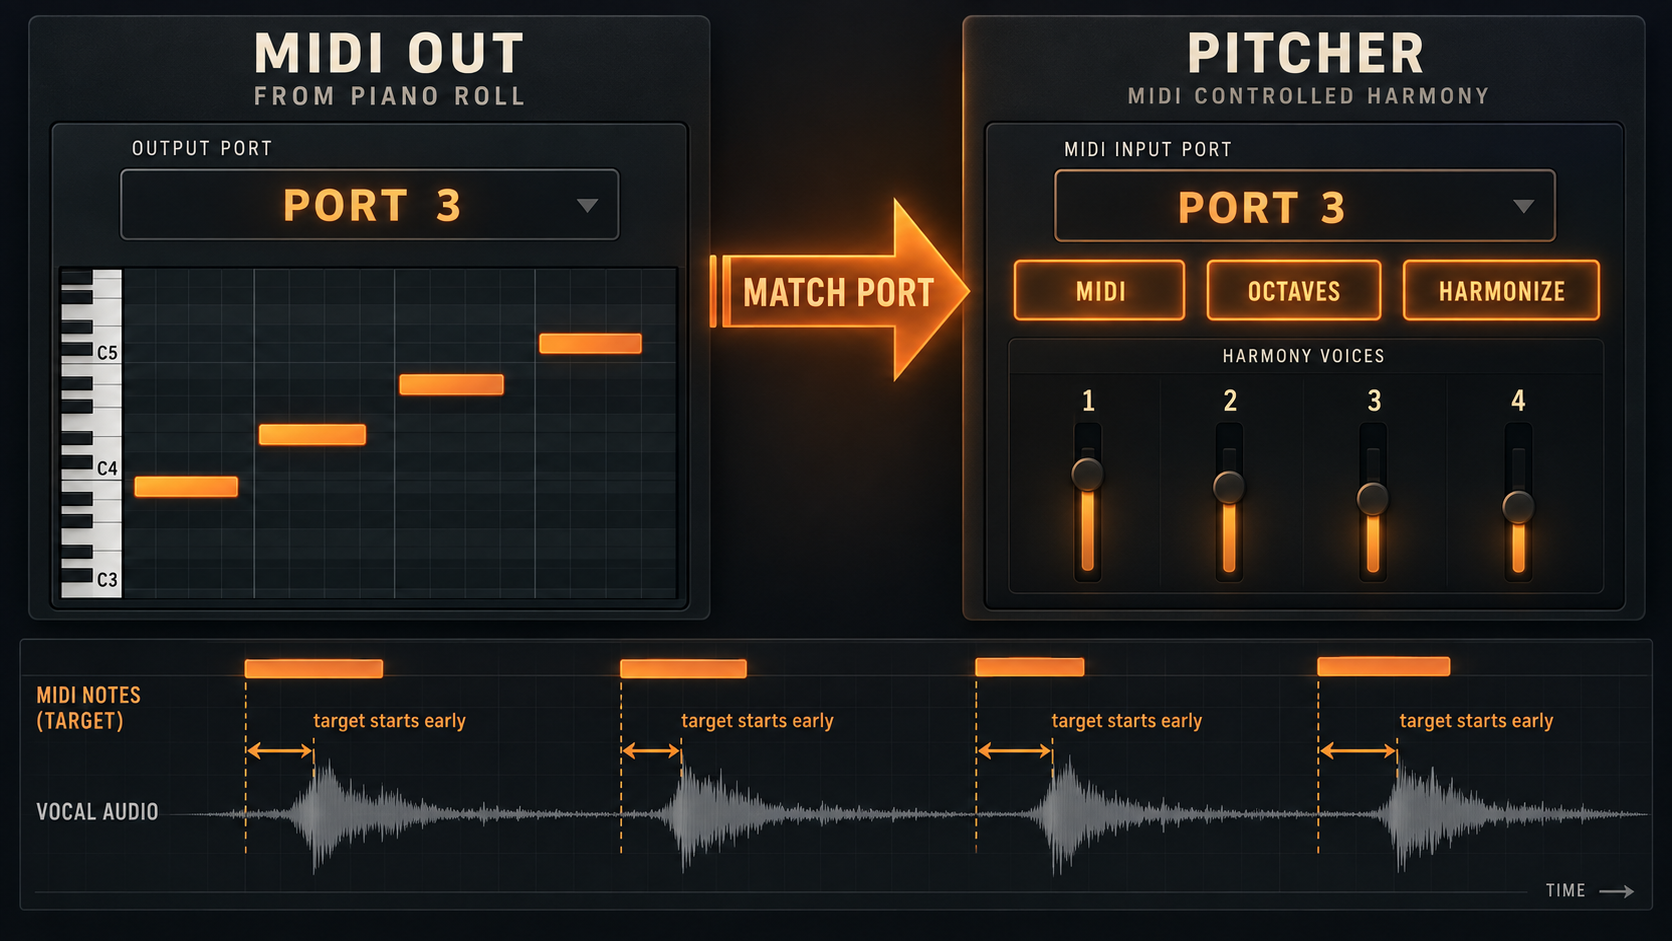
Load MIDI Out as a Channel Rack generator. Set its Port to any number from 0 to 255, then select MIDI mode in Pitcher and set Pitcher to the same port. The number itself has no special sound; the match is what creates the connection.
Write the target notes in MIDI Out’s Piano roll. Place each MIDI note slightly before the corresponding vocal attack. Image-Line recommends this lead because a target that arrives after the vocal onset can miss the attack and correct only the body of the note.
Choose MIDI, Octaves or Harmonize deliberately
The mode switches change how Pitcher interprets incoming notes:
| Mode | What the MIDI note controls | Best fit |
|---|---|---|
| Automatic | No MIDI target; Pitcher uses active scale notes | General real-time correction |
| MIDI | The target note inside the detected octave | Manual melodic correction without forcing a new octave |
| Octaves | The target note and played octave | Explicit octave jumps and stronger pitch manipulation |
| Harmonize | Up to four played MIDI notes, including their octaves | Chordal backing voices from one monophonic source |
Harmonize can create up to four independent voices. Voice Panning places those voices across the stereo field: the highest played note is assigned to the top slider, with lower notes assigned below it according to the chord. Use Replace when only the generated voices should pass, or Mix when the incoming vocal should remain beside them.
The Vel option lets MIDI velocity control harmony-voice volume, but the manual notes that Octaves must be deselected for this feature to work. If velocity appears to do nothing, check that switch before rewriting the Piano roll.
Troubleshoot from input to target
| Symptom | Likely cause | Check |
|---|---|---|
| Pitch indicator jumps or chooses random notes | Polyphonic, wet or noisy input | Solo the dry monophonic source and move Pitcher to the first insert slot |
| The vocal lands on the wrong note | Wrong Key, Scale or enabled-note set | Compare the melody with the C–B buttons before changing speed |
| Low notes disappear | Minimum Frequency is too high | Lower the threshold until the lowest intended note tracks |
| Correction sounds robotic | Correction Speed is too fast for the intended result | Slow it down and listen to slides and attacks |
| Large shifts sound tiny or unnatural | Formant preservation is off or Gender is pushed too far | Enable Formant and return Gender toward a neutral position |
| MIDI notes do not control Pitcher | Port mismatch or MIDI mode is not active | Match the 0–255 port on MIDI Out and Pitcher |
| The attack is not corrected | The MIDI target starts too late | Move the target note slightly before the vocal attack |
| No harmony chord appears | Harmonize is off or the source is already polyphonic | Enable Harmonize and feed Pitcher one dry monophonic line |
If monitoring feels delayed, separate plugin setup from system latency. Pitcher works in real time, but the complete path still includes the audio interface, buffer, project load and any later effects. The audio-settings guide explains how to check that path without treating one buffer value as correct for every computer.
Pitcher, NewTone and sample correction are different jobs
Choose the tool by when the decision needs to happen. Pitcher makes a correction while audio passes through the Mixer. NewTone is the detailed offline editor for recorded audio, where notes, timing and transitions can be inspected and adjusted after the take. The sample pitch-correction guide covers clips and samples that need to match a project key rather than follow a live vocal performance.
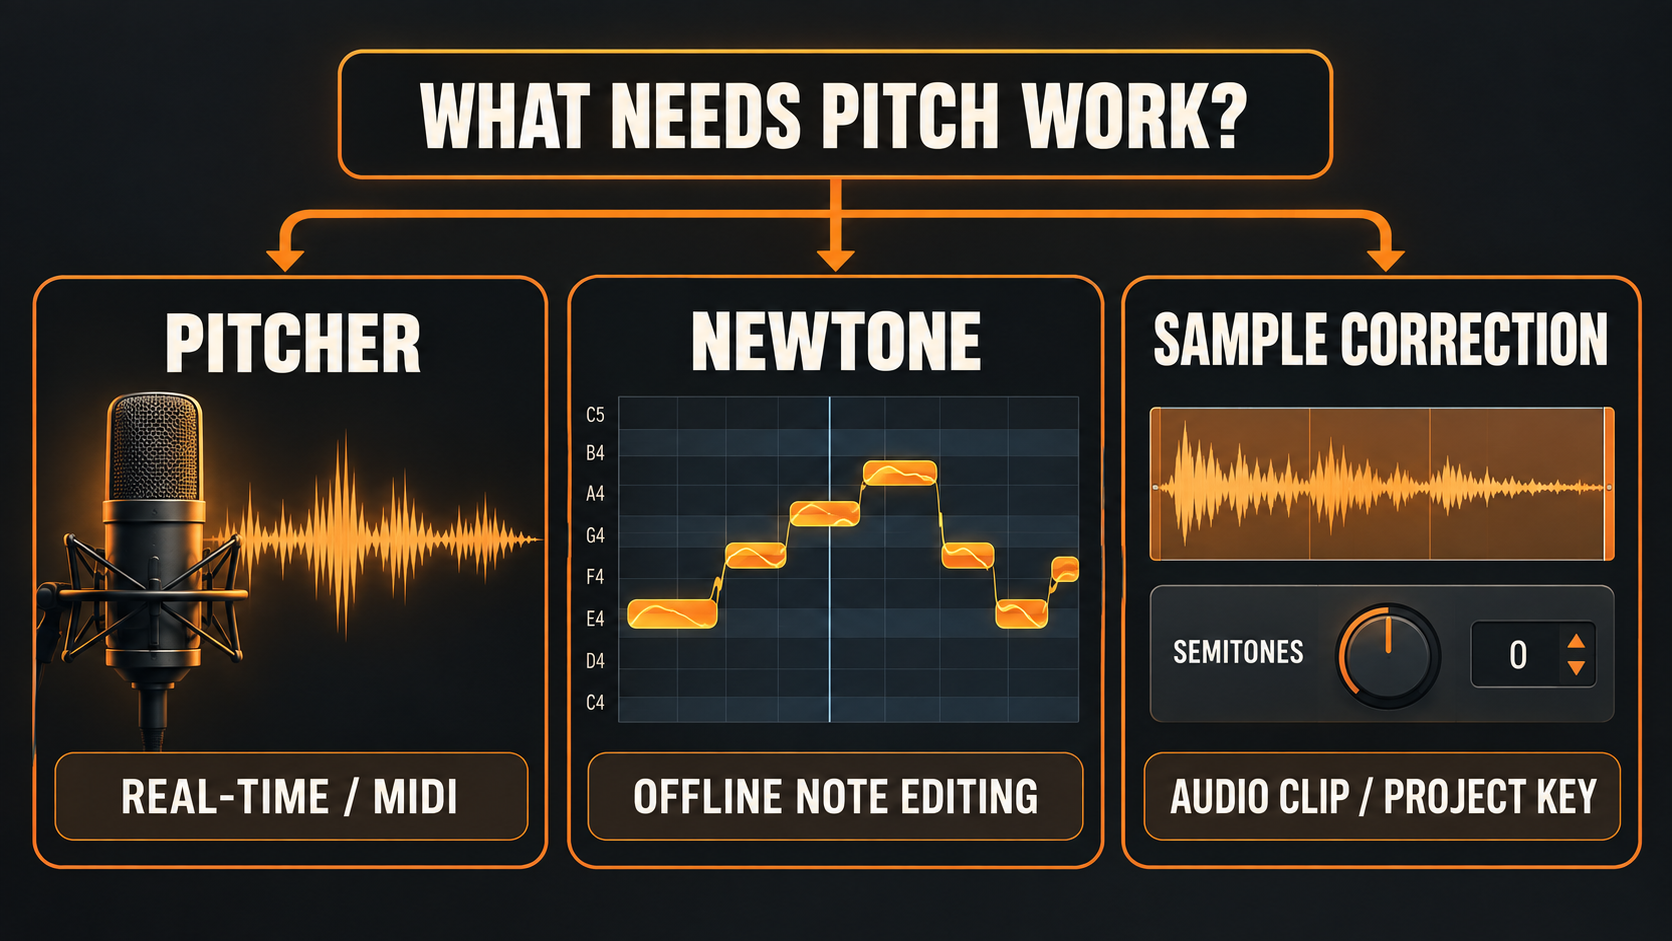
| Task | Use | Reason |
|---|---|---|
| Hear correction while monitoring or playing | Pitcher | Processes the monophonic signal in real time |
| Force exact targets from a Piano roll | Pitcher with MIDI Out | MIDI supplies the target notes and harmonies |
| Edit individual recorded notes and transitions | NewTone | Provides an offline note-level editing view |
| Match a prepared sample to the song | Audio Clip or sample-pitch workflow | The source is a clip, not a live monophonic performance |
A practical vocal workflow can use both Pitcher and NewTone, but each should have a reason. Use Pitcher when the real-time effect is part of the performance or sound. Use NewTone when the final edit needs visible control over recorded notes. Do not stack tools simply because both mention pitch.
Check your FL Studio edition before building the workflow
On Image-Line’s current comparison page, Pitcher is included with Signature Bundle and All Plugins Edition. It can also be purchased separately. Fruity Edition and Producer Edition do not include it as part of their bundle.
Product packaging can change, so confirm the live FL Studio editions comparison before paying. The site’s FL Studio editions guide helps compare the wider bundle rather than choosing an edition for one plugin alone.
A reliable Pitcher setup order
- Feed Pitcher one dry monophonic source on its own Mixer insert.
- Place Pitcher first, before chorus, phasing, reverb and other effects that can blur detection.
- Set Key and Scale, then make the C–B allowed-note buttons match the actual melody.
- Start with a slower Correction Speed and move faster only as the intended sound requires.
- Raise Minimum Frequency until low interference stops without losing the lowest sung note.
- Enable Formant when larger shifts need stable vocal resonances; adjust Gender only for a deliberate tone change.
- For manual targets, match the MIDI Out and Pitcher ports and start notes just before each vocal attack.
- Use Harmonize only with a clean single-note source, then balance its four available voices with panning, Mix or Replace and MIDI velocity where appropriate.
Most Pitcher problems can be traced in that same order: source, insert position, allowed notes, correction behavior and MIDI routing. Solve the first wrong dependency instead of pushing every control harder. That keeps the correction predictable and leaves the creative choices visible.