FL Studio
FPC turns a folder of drum samples into one playable instrument. Instead of keeping every kick, snare and hi-hat on separate Channel Rack rows, you can build a pad layout, stack several samples on each pad, let velocity choose the right layer and send individual drums to their own Mixer tracks.
That makes FPC useful for two different jobs: programming drums from the Piano roll and performing them from a pad controller. The setup becomes much easier when you work in the right order. Build the sound first, define how the layers respond, map the controller, then add choke groups and Mixer routing. Saving comes last, because a preset is only useful if it can still find its samples later.
This guide follows the controls documented in the Image-Line FPC manual. It explains a reliable structure for building a kit without pretending there is one perfect velocity split or one universal MIDI layout.
What FPC solves that separate Channel Rack samples do not
Separate sampler channels are fast when a pattern needs one kick, one snare and a couple of hats. FPC becomes the better choice when the drums need to behave like a connected instrument.
- One pad can hold several samples. A light snare hit can trigger a soft layer while a hard hit reaches a brighter layer.
- Repeated notes can rotate through alternates. Cycle mode gives you round-robin variation instead of firing the same sample every time.
- Pads can interact. A closed hi-hat can stop an open hi-hat through CUT/BY groups.
- A controller layout can stay consistent. You can map a bank of 16 pads in sequence and preserve that note layout while changing presets.
- Drums can leave FPC through separate Mixer paths. Output offsets keep the kit in one instrument while giving important pieces their own processing.
FPC does not replace drum sequencing. You still build rhythms in the Piano roll or record a performance. If the pattern itself is the weak point, start with the drum-pattern guide. If you mainly want fast step entry with independent channels, the Step Sequencer workflow may be enough.
Start with a preset before building a kit from zero
Load FPC from the Channel Rack and begin with one of its presets. This confirms that the pad-to-note relationship, Piano roll and audio path make sense before custom samples add more variables.
FPC has two banks of 16 pads, for 32 pads in total. The selected pad is the one whose settings and layers you are editing. The Layout control can switch among three interface arrangements, including pad-bank views intended for touch use.
The Pattern Manager provides percussion MIDI patterns. Selecting one sends the pattern to the FPC channel as Piano roll data, and selecting another replaces the currently selected pattern. Treat these patterns as starting material. Adjust the notes, velocities and timing to fit the track rather than expecting a preset groove to solve the arrangement.
A sensible five-minute orientation is:
- Load a factory FPC preset.
- Open the Pattern Manager and choose one short pattern.
- Open the Piano roll and inspect which notes trigger which pads.
- Change a few note velocities and listen for different responses.
- Select pads in FPC and watch the pad and layer areas change.
Once that relationship is clear, either adapt the preset or clear individual pads and begin replacing sounds.
Read the interface in three working zones
Most FPC confusion comes from changing the right type of setting in the wrong area. Read the plugin as three connected zones:
- Pad Matrix: chooses the drum or articulation you are editing.
- Main Pad Properties: controls pad-level behavior such as the MIDI note, name, volume scaling, CUT/BY group and Output offset.
- Layer Properties: controls the samples inside the selected pad, including their velocity ranges and playback behavior.
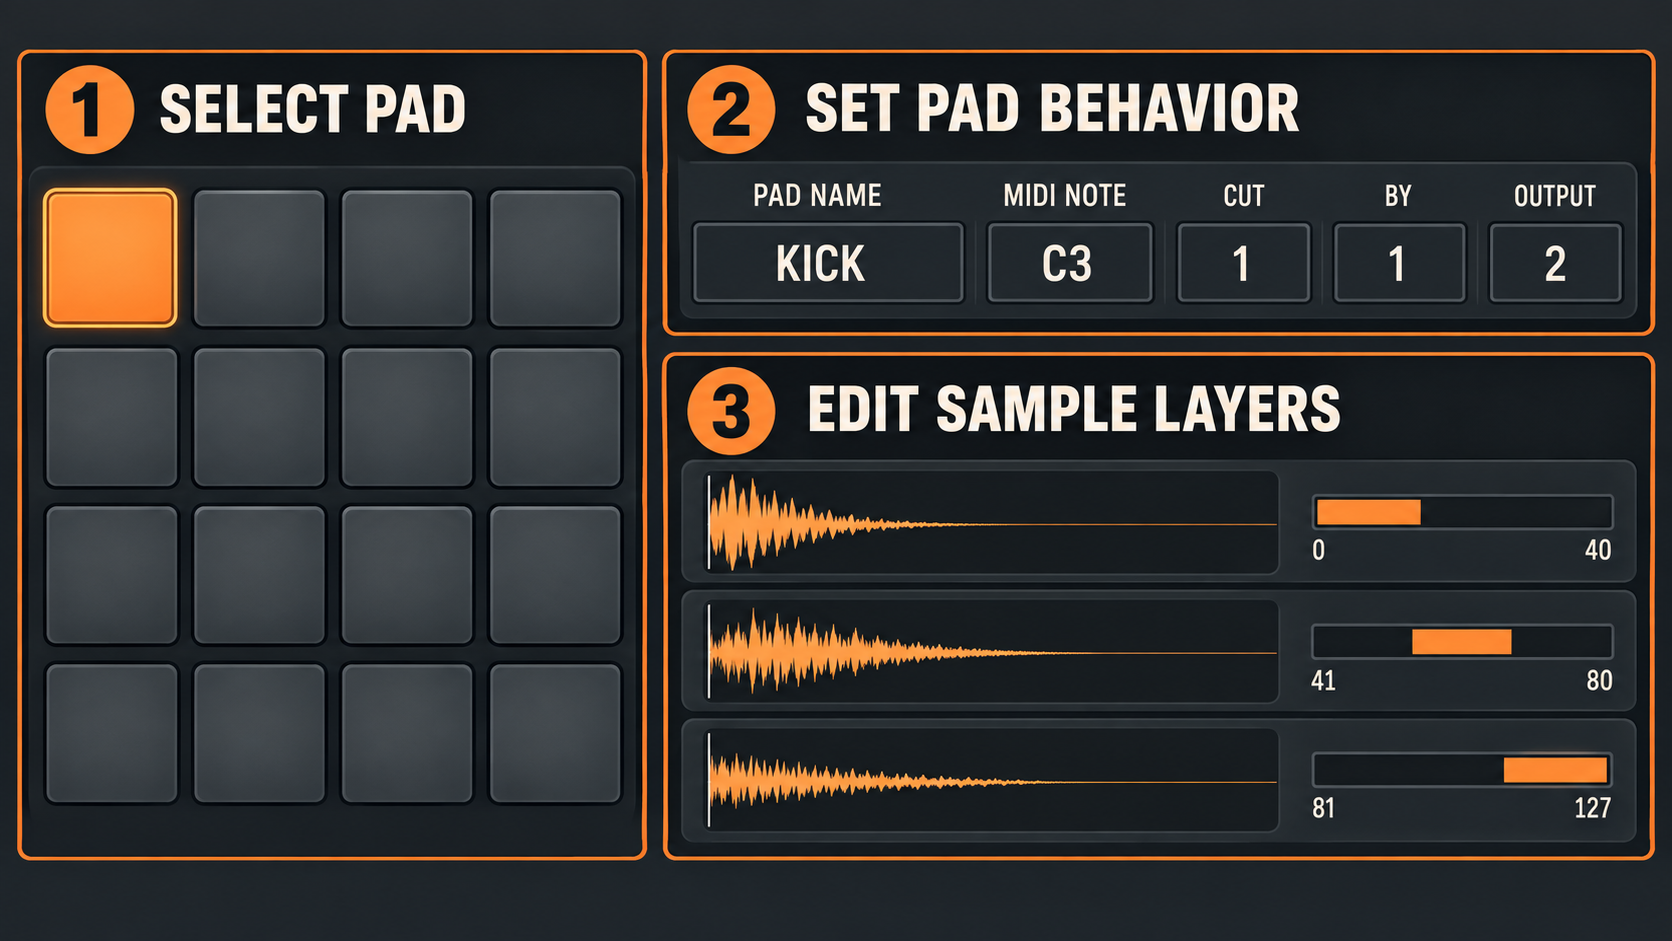
Think of a pad as the container and layers as the contents. Renaming a pad or changing its MIDI note affects the container. Adjusting a waveform, layer volume or velocity range affects one sample inside it.
Build a custom FPC kit one drum family at a time
Do not fill all 32 pads before checking the first few. Build a small core kit, make it playable, then expand it.
- Choose a pad layout. Put the most-used drums where your hands or Piano roll habits expect them. A common core is kick, snare, closed hat, open hat, clap and one or two percussion sounds.
- Select the first pad and load samples. Dragging several samples onto one FPC pad automatically creates layers.
- Name the pad clearly. Names such as “Kick Tight,” “Snare Main” and “Hat Open” make routing and later troubleshooting faster than generic names.
- Balance the layers. Different recordings rarely arrive at the same perceived level. Use layer volume so the transition from soft to hard feels intentional rather than like a sudden gain jump.
- Repeat by drum family. Finish the kick layers before moving to the snare, then hats and percussion. This keeps problems local.
If your samples are scattered across temporary download folders, organize them before building the kit. The sample-pack setup guide explains how to expose stable folders in the FL Studio Browser.
Use velocity layers to change intensity, not merely volume
Velocity can do more than turn the same sample up and down. A well-built pad uses different recordings for different playing intensities: a softer transient at low velocity, a fuller body in the middle and a sharper attack near the top.
After loading velocity-related samples, use Spread Even. Image-Line documents it as dividing the available velocity range evenly among the layers without overlap. For four layers, this creates four zones from the lowest to the highest input velocity. It is a clean starting point, not a finished musical rule.
Then adjust the boundaries by ear and purpose. A snare may need a broad medium zone because most notes live there. A kick may only need a narrow hard layer for accents. Lock Layers links adjacent endpoints so the ranges stay against one another instead of drifting into accidental gaps or overlaps.
The Scale volume option usually stays enabled because incoming velocity still shapes output level within the layer structure. Image-Line notes that you may disable it when the multiple velocity-sensitive layers themselves provide the entire dynamic change. I would only do that deliberately; turning it off by habit can make a kit feel flatter than expected.
Separate layer overlap from round robin
Two different ideas often get mixed together in FPC:
- Velocity layering chooses a sample according to how softly or hard the note is played.
- Round robin rotates among alternate samples that belong to the same velocity area.
With Random layers off, overlapping layers play together. That is useful when you intentionally want to combine a body sample with a transient or room layer. It is not round robin; every overlapping layer sounds on the same hit.
With Random layers on, overlapping layers can behave according to the selected randomization mode. Cycle is the documented round-robin option: FPC plays each layer in the group in turn. The Random modes choose among the group, with an option that avoids repeating the previous layer.
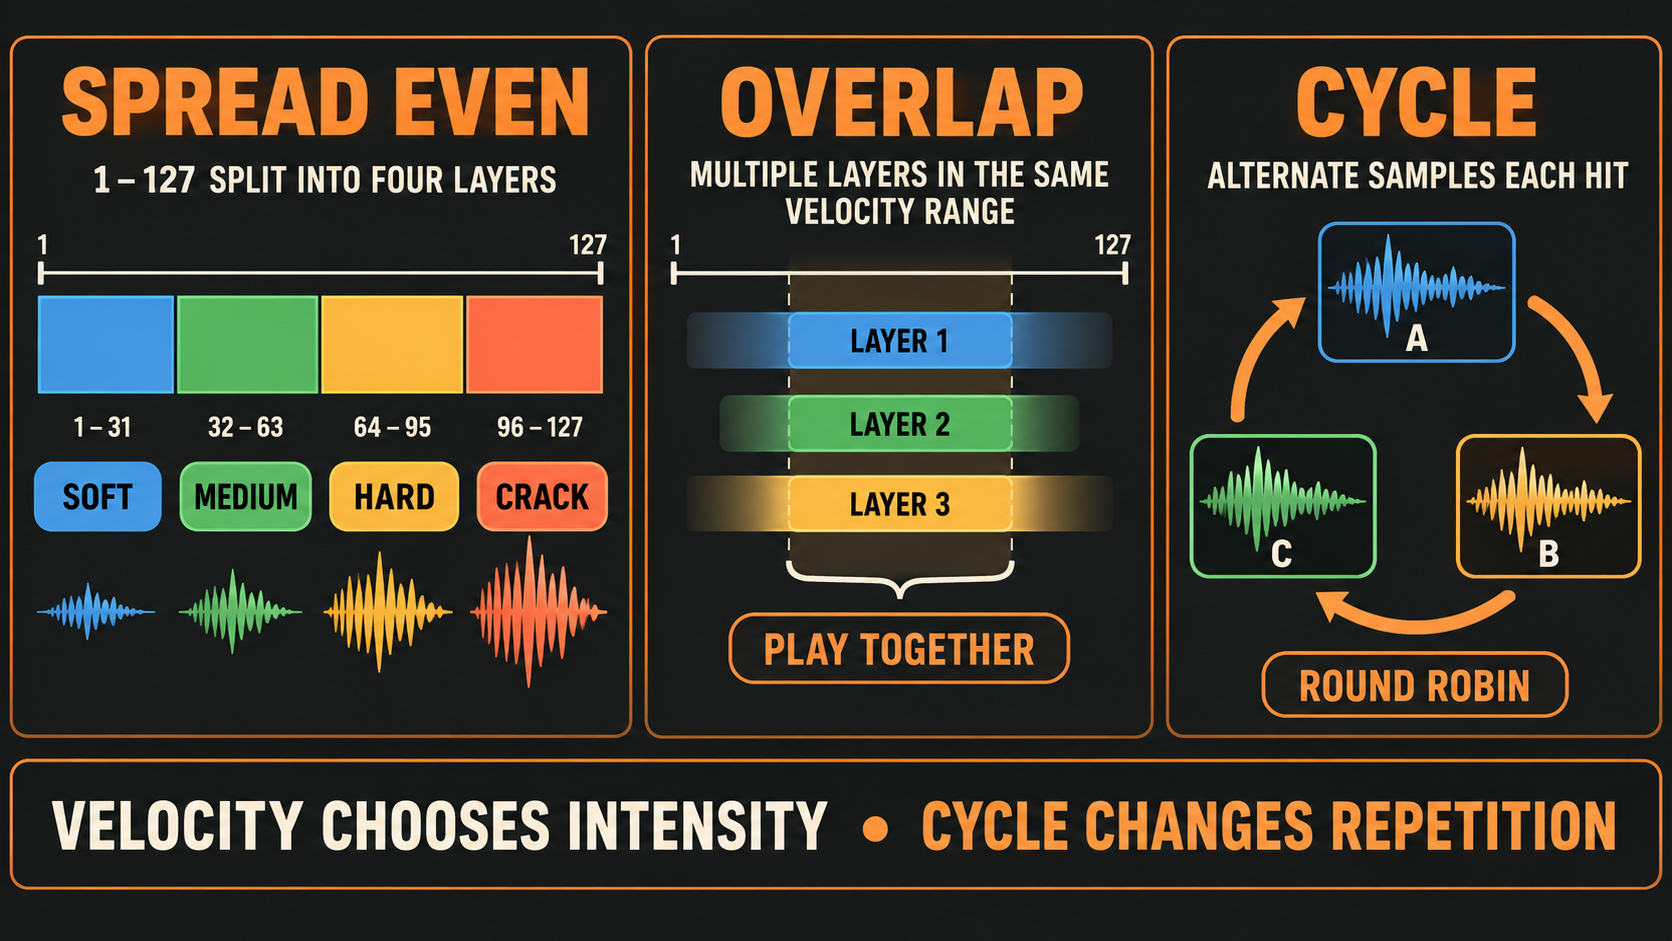
A practical snare pad might use three velocity bands. Each band can contain two or three alternate recordings with overlapping ranges, then Cycle can rotate within that band. The incoming velocity still chooses soft, medium or hard; the cycle changes which equivalent take plays next.
Do not create variation by piling unrelated sounds into the same group. Alternates should share a similar role, tuning and intensity. Otherwise the kit changes character unpredictably rather than sounding less repetitive.
Map a MIDI controller after the kit responds correctly
Confirm the kit from the Piano roll or onscreen pads before mapping hardware. That separates a kit problem from an input problem.
FPC can learn one note for the selected pad, but Map notes for entire bank is faster for a 16-pad controller. Starting from the lower-left FPC pad, each incoming MIDI note is assigned to the next pad in sequence until the bank is mapped. Trigger the physical pads in the order you want them to appear.
After mapping, enable Use current layout when changing presets if you want the controller layout to remain in place when loading another kit. Without that protection, a preset can bring its own note layout and make the hardware appear inconsistent.
Save the note layout separately if you use the same controller across several kits. The general MIDI controller mapping guide covers FL Studio input setup and broader controller links; FPC’s bank mapping is the pad-to-note layer inside that setup.
If one pad refuses to respond, check the chain in this order:
- Does FL Studio receive the controller at all?
- Does the physical pad send the note you expect?
- Is that note assigned to the intended FPC pad?
- Does the selected pad contain an active sample layer for the played velocity?
The last check matters. A note can be mapped correctly and still sound silent if the active layer ranges leave a gap at that velocity.
Use CUT and BY for open and closed hi-hats
An open hi-hat should stop when a closed hi-hat arrives. Letting both continue makes even a carefully programmed pattern feel disconnected.
FPC handles that relationship with two pad-level values:
- CUT places the selected pad in a cut group.
- BY tells FPC which cut group can stop the selected pad.
For a simple pair, give the closed-hat pad CUT 1 and the open-hat pad BY 1. The closed hat then cuts the open hat. If a pad should stop its own previous note, set its CUT and BY values to the same number.
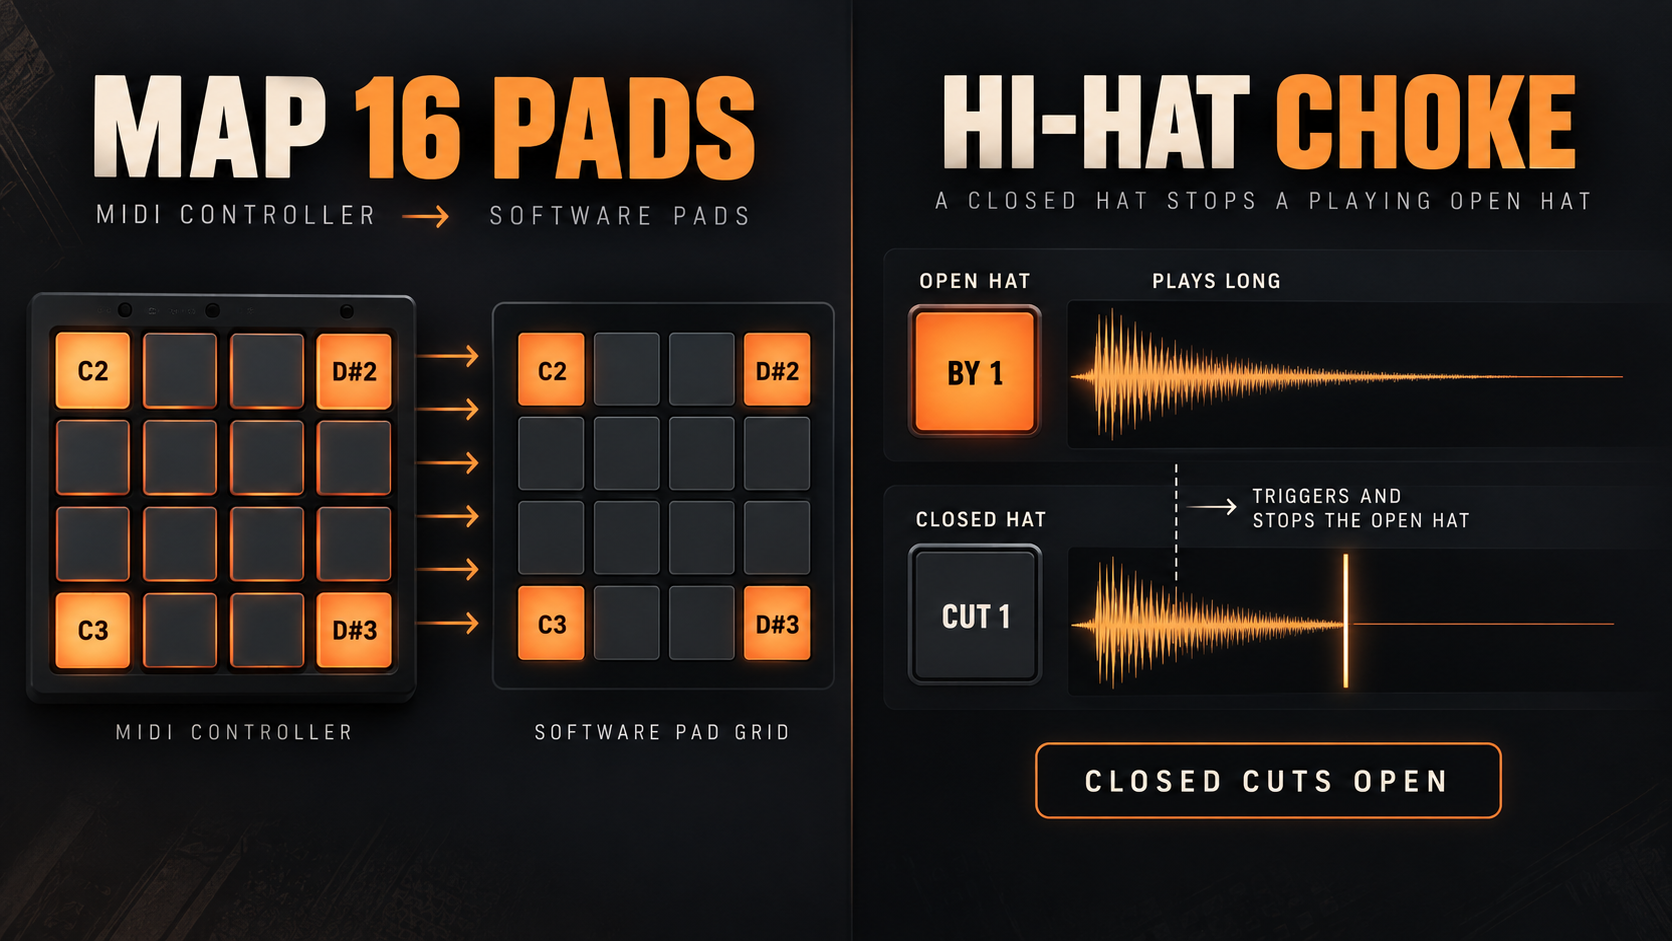
Keep choke groups narrow. A group should describe a real exclusivity relationship, such as open and closed hats or two articulations of the same percussion instrument. Reusing one number across unrelated cymbals and drums can stop notes you intended to keep.
Route important pads to separate Mixer tracks
FPC’s Output control is an offset, not an absolute Mixer destination. It is calculated from the Mixer track assigned to the FPC channel.
Suppose FPC is routed to Mixer track 10:
- Output 0 reaches track 10.
- Output 1 reaches track 11.
- Output 2 reaches track 12.
- Output 3 reaches track 13.
This lets you keep the kit together while processing the kick, snare, hats or percussion groups independently. A compact setup could use Output 0 for kick, 1 for snare, 2 for all hats and 3 for percussion. You do not need a separate output for every pad unless the mix actually needs it.
Reserve enough consecutive Mixer tracks before assigning offsets, and name those tracks. If FPC later moves from track 10 to track 20, every offset moves with it. That relative behavior is useful, but it also explains why a saved routing plan can appear to land on different track numbers after the base FPC channel is reassigned.
Use the Mixer routing guide for inserts, buses and sends after the pads reach their intended tracks.
Save the kit so FPC can find its samples again
A working session is not proof that the preset is portable. FPC must be able to locate the source samples the next time the `.fst` file loads.
Image-Line’s documented saving sequence is straightforward:
- Keep the kit samples in a folder visible under the Browser’s Extra search folders.
- Open the plugin Wrapper menu and choose Save preset as.
- Save the FPC kit as an `.fst` preset.
- Reload the preset and confirm that its samples resolve correctly.
Use unique sample filenames. If several search folders contain files called “Kick1.wav,” FPC can load the first matching name it finds. Descriptive names such as “DustRoom_Kick_Hard_03.wav” reduce that ambiguity. Renaming the files after the preset is built can break the lookup, so settle the folder and names before the final save.
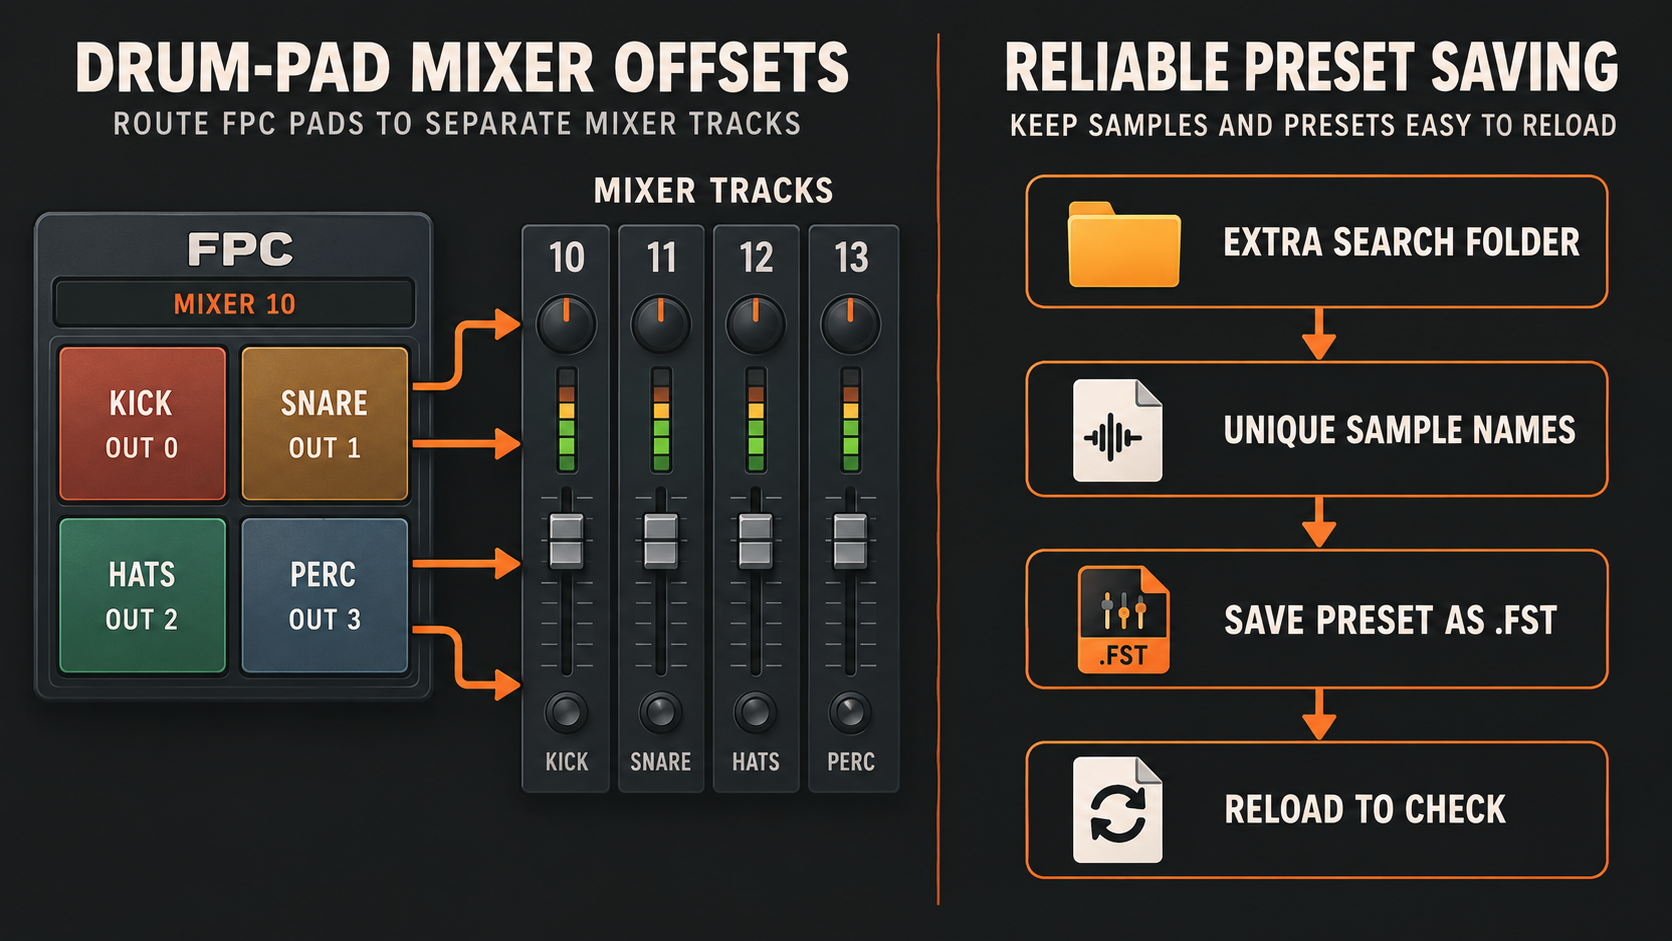
For an important kit, reload it in a fresh empty project before relying on it elsewhere. This is a check of the saved file and path relationship, not a reason to duplicate the samples across random project folders.
FPC troubleshooting by symptom
| Symptom | Likely cause | Check |
|---|---|---|
| A mapped pad is silent | Wrong note or a gap in layer velocity ranges | Verify the incoming note, pad assignment and active range for that velocity |
| Several samples play on every hit | Layer ranges overlap while Random layers is off | Use Spread Even or remove the overlap; enable Cycle only for true alternates |
| Changing presets breaks the controller layout | The preset loads its saved note map | Enable Use current layout when changing presets |
| Open and closed hats ring together | CUT/BY values do not share the intended group | Put the closed hat in CUT 1 and the open hat in BY 1 |
| A pad reaches the wrong Mixer track | Output was treated as an absolute track number | Add the pad offset to FPC’s assigned base Mixer track |
| A saved kit loads the wrong sample | Duplicate filenames exist in search folders | Rename source files uniquely and save the preset again |
| A saved kit reports missing samples | The source folder is no longer in Extra search folders | Restore the stable folder path or add it to the Browser search list |
A repeatable FPC setup order
The cleanest FPC workflow is short enough to remember:
- Load a preset and confirm that FPC, the Piano roll and audio routing work.
- Choose the pad layout and build a small core kit.
- Drop related samples onto each pad and balance the layers.
- Use Spread Even for initial velocity zones, then refine the boundaries.
- Use deliberate overlap for stacking or Cycle for alternate takes.
- Map the controller and preserve the current note layout.
- Add CUT/BY groups for mutually exclusive articulations.
- Assign only the Mixer offsets the mix needs.
- Place samples in a stable Extra search folder with unique names.
- Save the `.fst` preset and reload it to verify the dependency path.
FPC is one of the most practical instruments in the FL Studio stock-plugin set because it connects sound design, performance and mixing without scattering the kit across unrelated channels. Build the pad behavior before chasing a larger layout, and a 16-pad core kit will usually be more useful than 32 pads you cannot predict.