FL Studio
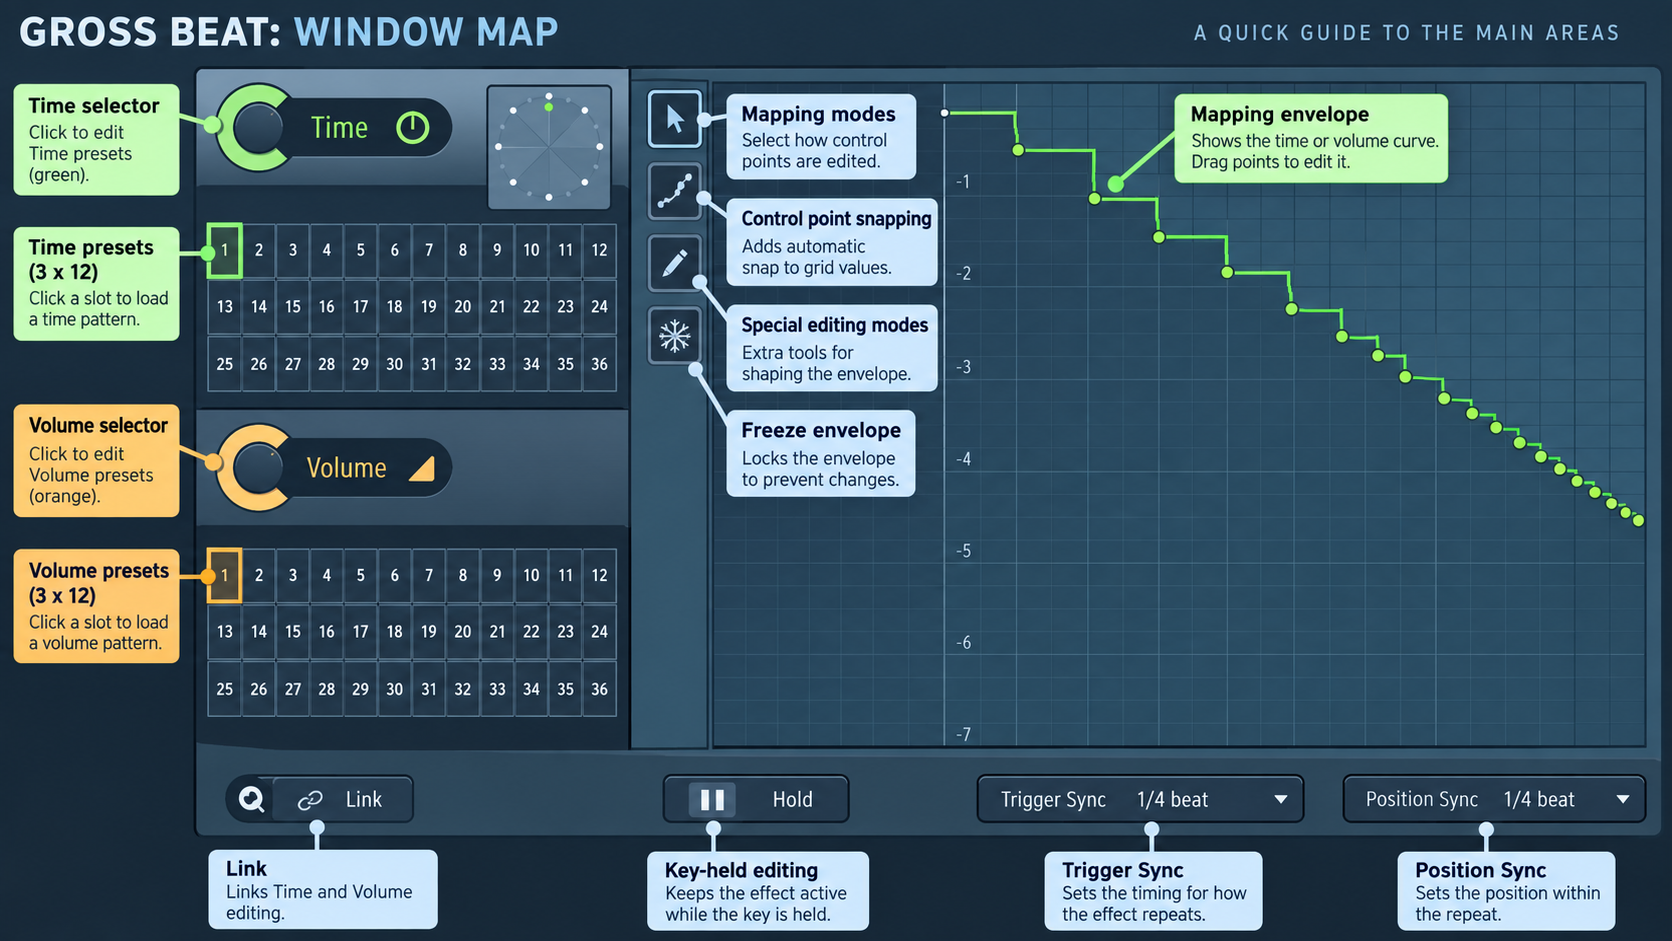
Gross Beat becomes much easier to control when you stop treating it as one big “glitch” button. The plugin has two separate jobs: the Time envelope rearranges audio held in a rolling buffer, while the Volume envelope gates or shapes level. The slot system then lets you recall those patterns from automation or MIDI.
That separation is the whole workflow. Decide whether the sound needs a timing move, a level move or both. Build the smallest useful envelope, choose how the slot should start, and automate the slot instead of drawing a different effect across the entire song.
What Gross Beat is actually doing
Gross Beat continuously records the incoming signal into a two-bar rolling buffer. A Time envelope tells the plugin which part of that recent audio to read and how quickly to move through it. A Volume envelope changes the output level over the same musical grid.
This explains two behaviors that often look like bugs. First, the Time section cannot pull meaningful audio from a buffer that has not filled yet. Starting playback immediately before an intended reverse or repeat can leave the plugin with little useful history. Second, changing the Volume envelope does not create a reverse, half-speed or scratch effect. It only changes level.
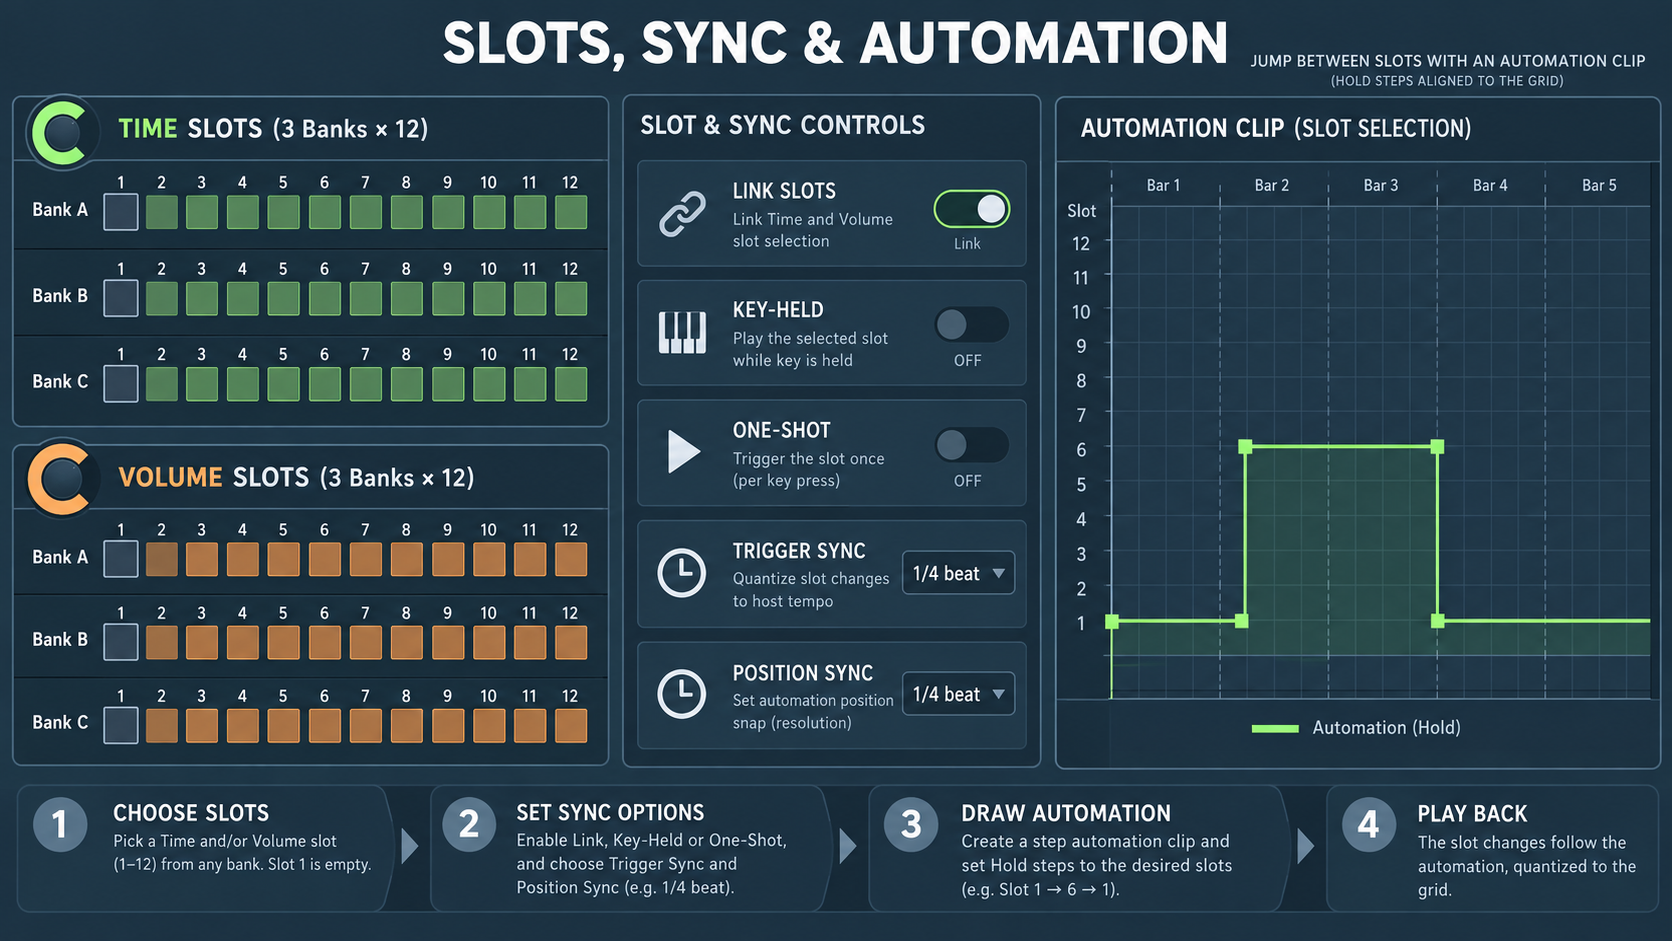
Gross Beat provides 36 Time slots and 36 Volume slots, arranged as three banks of 12. The first slot in each section is empty, which gives you a clean “off” state inside the plugin. The remaining slots can hold different time movements and gates. The Image-Line Gross Beat manual documents the buffer, mapping controls and slot behavior in detail.
Read the Time envelope before drawing it
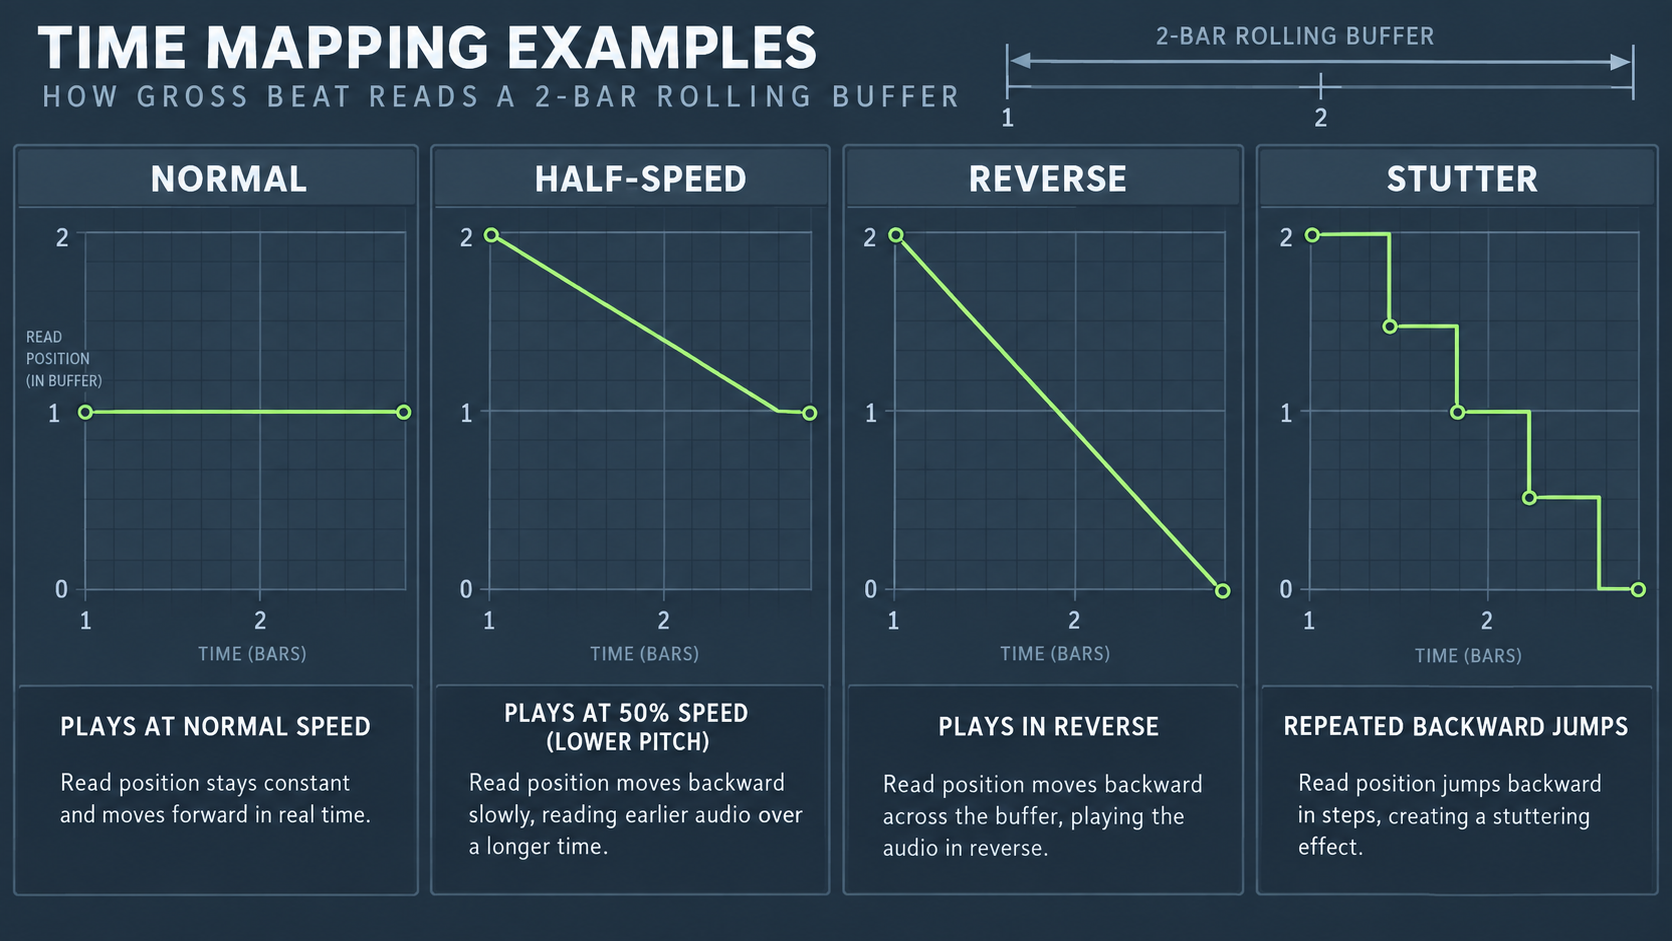
The Time graph is not a conventional volume curve. Think of the horizontal axis as song time moving forward and the vertical axis as the position being read from the recent buffer. The shape of the line controls the playback direction and speed.
| Envelope shape | Result | Useful starting point |
|---|---|---|
| Horizontal segment | Normal-speed playback | Keep a phrase moving without a speed change |
| Line sloping down from left to right | Slower playback with lower pitch | Half-speed or tape-stop style movement |
| Line sloping up from left to right | Faster playback with higher pitch | Quick catches and accelerated fills |
| Step downward | Jump backward in the buffer | Repeats and stutters |
| Step upward | Jump forward in the buffer | Skipping past part of the buffered phrase |
| Reverse-oriented slope | Read the buffered audio backward | Reversed fills and pickups |
The Hold mapping mode is useful when you want clean steps instead of smooth transitions. That makes it a practical choice for repeated slices, sudden jumps and rhythmic scratches. A smooth diagonal line is better when the effect should bend speed over time rather than snap between buffer positions.
Build half-speed, reverse and stutter deliberately
Half-speed
Start with a diagonal Time segment that reads the buffer more slowly across the chosen beat division. Keep the slot short enough to serve the arrangement. A one-beat or two-beat half-speed fill is easier to place than a pattern that takes over an entire section.
Pitch changes are part of this time manipulation. If the result becomes rough in the high end, compare the documented HQ resampling option. It can improve pitch-shifted audio, but it asks for more CPU. There is no useful universal CPU figure because the cost depends on the project and system.
Reverse
A reverse pattern needs audio behind the playhead. Let the source play long enough to populate the rolling buffer before the slot is triggered. If the reverse is meant to lead into a downbeat, place the trigger so the effect has material to read and its end lands on the intended beat.
Stutter
Use short repeated steps in Hold mode. Each downward step jumps back into the buffer, producing a repeat when the spacing is regular. The musical value comes from the grid: eighth-note and sixteenth-note patterns read as deliberate rhythm, while arbitrary spacing often sounds like a broken transport.
Keep one plain slot available while editing. Switching between the effect slot and Slot 1 makes it clear whether Gross Beat is causing the change or whether the source, routing or another insert is involved.
Use the Volume envelope for gates, not time travel
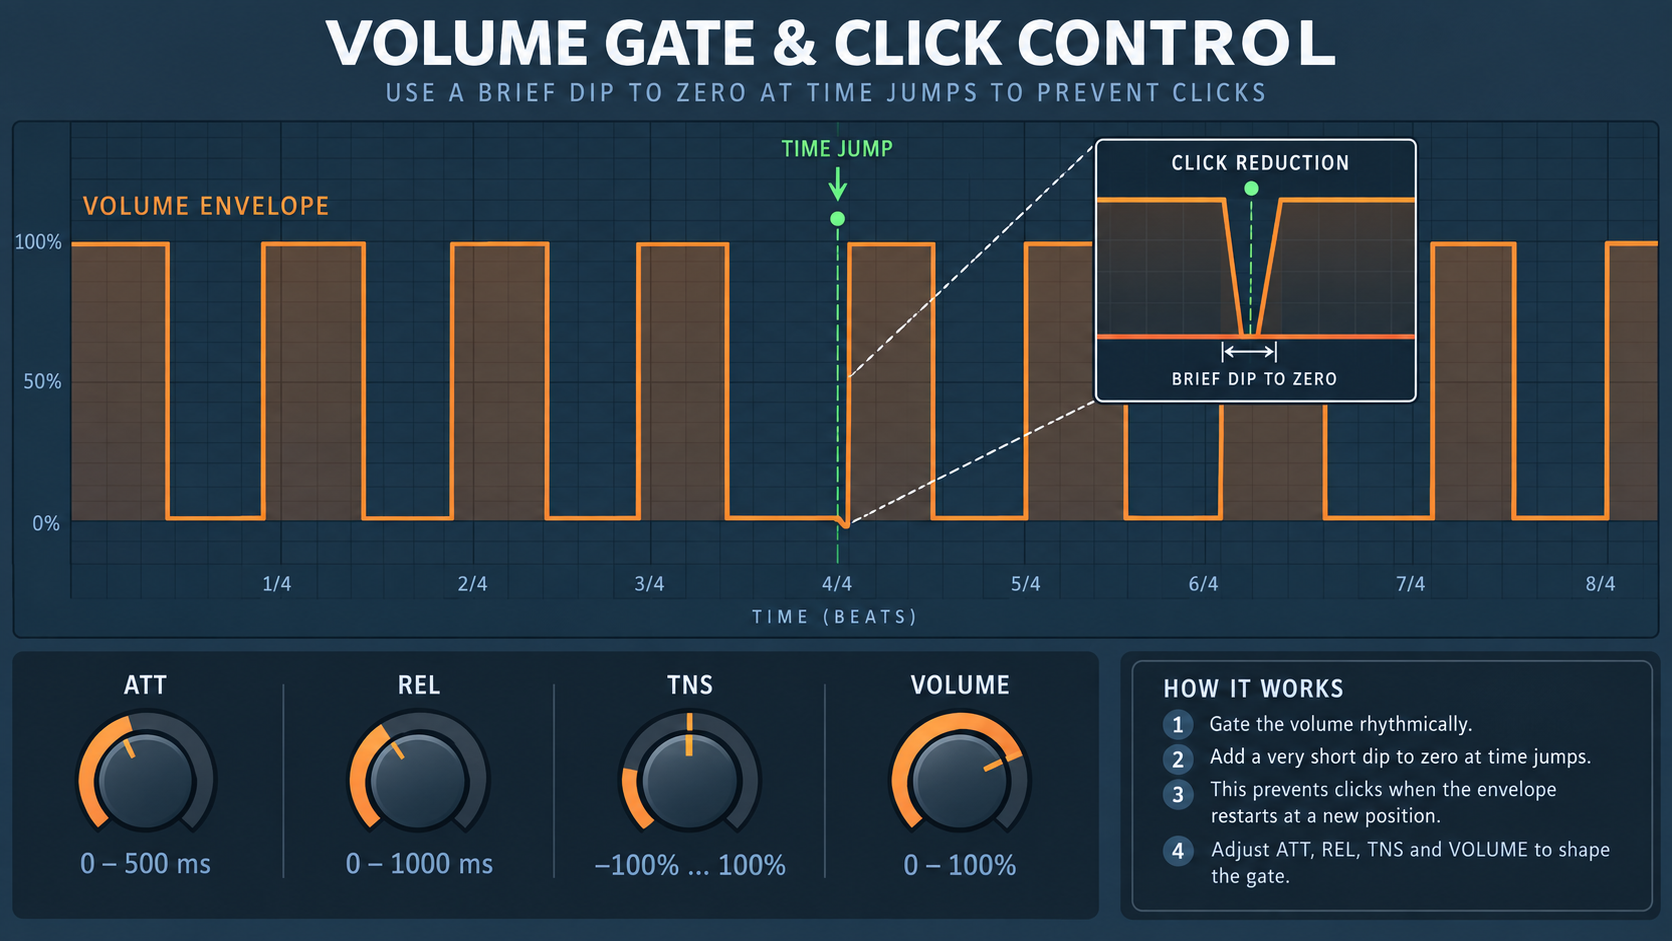
The Volume section shapes level independently of the Time section. It can create tremolo, rhythmic mutes, pumping patterns and sharp gates without changing the buffer read position. A basic gate alternates between full level and silence on the chosen grid.
Four controls determine how hard that pattern feels:
| Control | Documented range | What to listen for |
|---|---|---|
| ATT | 0–500 ms | How quickly a gate opens |
| REL | 0–1000 ms | How quickly it closes |
| TNS | −100% to 100% | The curve tension between points |
| Volume | 0–100% | The output level of the Volume effect |
A zero or very short attack and release creates a hard gate. That can be useful on drums, but abrupt level changes can click when they cut through a waveform away from a zero crossing. Add a little attack or release when the edge sounds too hard.
Reduce clicks around Time jumps
Image-Line also documents a more precise technique: dip the Volume envelope briefly toward zero around a sudden Time-envelope jump. The level falls during the discontinuity, then returns after the new buffer position is stable. Smoothing attack compensation helps preserve the attack when that smoothing would otherwise soften it.
Choose how slots work together
The slot controls decide whether the Time and Volume patterns behave as a pair, how long they stay active and where they begin.
- Link slots pairs the corresponding Time and Volume slots. Selecting a Time slot selects the matching Volume slot, which is useful when one effect needs both a buffer move and a gate.
- Key-held keeps a slot active while its MIDI note is held. Releasing the note returns control according to the plugin’s slot behavior.
- One-shot plays the selected slot once, then returns to Slot 1. This suits fills that should fire and clear themselves.
Leave Link off when one Volume gate should continue while several Time patterns change, or when a Time effect needs no gating at all. Turn it on when the two halves must always be recalled together. This small decision keeps automation readable.
Trigger Sync and Position Sync solve different problems
Trigger Sync controls when a newly selected slot is allowed to start. With Trigger Sync off, the change begins immediately. With a value from 1/4 through 4 beats, the switch aligns to the global song position. At 4 beats, the change waits for the bar boundary.
Position Sync controls the position inside the envelope when Trigger Sync is off. Off starts the envelope from its beginning. Values from 1/4 through 4 beats derive the starting point from the current global position, so the pattern can stay musically aligned even when triggered between boundaries.
If an automated slot appears late, inspect Trigger Sync before moving the automation point. The point may be correct while the plugin is intentionally waiting for the next division. If the slot starts immediately but enters halfway through its pattern, inspect Position Sync.
Set Time mix and Volume mix inside Gross Beat
Both sections have mix controls from 0 to 100%. If the Time effect sounds weaker than expected, confirm that Time mix is not reduced. The same applies to Volume mix when a gate seems shallow.
Image-Line recommends the Time mix control instead of an external wet/dry control because parallel dry and time-shifted signals can create phasing. Use the plugin’s own mix when blending the Time effect. For arrangement control, automate the slot or the relevant internal mix instead of adding a second parallel path by habit.
Automate Gross Beat without diagonal transitions
Right-click a Time or Volume slot and choose Create automation clip. The automation value selects the slot. Change the automation points to Hold so the value jumps directly from one slot to another. A diagonal automation line sweeps through intermediate values and can select unintended slots on the way.
Keep the automation clip simple:
- Start on Slot 1 for the unprocessed state.
- Jump to the effect slot at the intended musical boundary.
- Return to Slot 1 after the fill.
- Check Trigger Sync so the audible switch lands where the automation suggests.
MIDI can select slots directly, and Fruity Keyboard Controller can act as another control source. This is useful for performance, but it creates another troubleshooting path: incoming notes may be switching slots even when the Playlist automation looks correct. The broader FL Studio automation guide covers clip editing and control-link habits.
Why Gross Beat seems not to work
| Symptom | Likely cause | Check |
|---|---|---|
| Reverse or repeat is silent or incomplete | The rolling buffer has not collected enough audio | Start playback earlier and trigger after source audio has entered the plugin |
| The sound only gets quieter | A Volume slot is selected while a Time effect is expected | Select the intended Time slot and check Link slots |
| The effect is faint | Time mix or Volume mix is below the expected level | Check the internal mix controls |
| The wrong pattern plays | The wrong bank or slot is active | Confirm the selected slot in both sections |
| The switch happens late | Trigger Sync is waiting for the next division | Compare Off with the intended beat value |
| Slots change without visible Playlist automation | MIDI or a linked controller is selecting them | Inspect MIDI input and controller links |
| The plugin opens with limitations | The installed license does not include Gross Beat | Check the current edition entitlement and demo state |
On the current Image-Line comparison table, Gross Beat is included with Signature Bundle and up: Signature Bundle and All Plugins Edition. Fruity Edition and Producer Edition do not include it. The plugin may still appear in FL Studio in demo form, but the license must cover Gross Beat to remove its demo limitations. Check the live FL Studio editions comparison before buying because product packaging can change.
A clean workflow for using Gross Beat in a beat
Route the target sound to a Mixer insert and add Gross Beat where the effect belongs. A drum bus can produce a coordinated fill, while a single instrument insert keeps the rest of the beat stable. The FL Studio Mixer guide explains the routing model if the effect is landing on the wrong sounds.
Then work in this order:
- Decide whether the idea is a Time move, a Volume move or both.
- Choose one slot and keep Slot 1 as the clean state.
- Draw the smallest envelope that performs the musical job.
- Set Trigger Sync and Position Sync before moving arrangement automation.
- Use Hold points in the automation clip.
- Listen for clicks around Time jumps and shape the Volume envelope if needed.
- Enable HQ resampling only when the pitch-shifted result benefits from it.
For a first beat, use Gross Beat as a transition tool rather than a permanent insert state. One half-speed bar before a drop, a short reverse pickup or a gated final beat is enough to teach the slot system without letting the effect replace the groove. The beat-making guide gives that decision a full arrangement context, and the stock plugins guide helps place Gross Beat beside other native tools.
The reliable mental model is simple: Time reads the last two bars differently, Volume shapes level, and slots recall the result. Once those three pieces are separated, Gross Beat stops feeling random and becomes a precise arrangement instrument.