FL Studio
Your loop has a kick, bass and a melody, but every extra sound makes it harder to finish. To make a beat in FL Studio, give those parts clear jobs, turn them into sections in the Playlist, and export a version you can actually judge. Below is a small 90-BPM exercise with exact drum positions, a two-bar melody and a 32-bar arrangement. Change the sounds; keep the decisions clear.
This is a beatmaking lesson, not a tour of every window. If opening the Channel Rack, Piano Roll or Mixer is still the obstacle, use the FL Studio beginner tutorial first. Here, the goal is a complete beat ready for feedback—not a promise of a release-ready master.
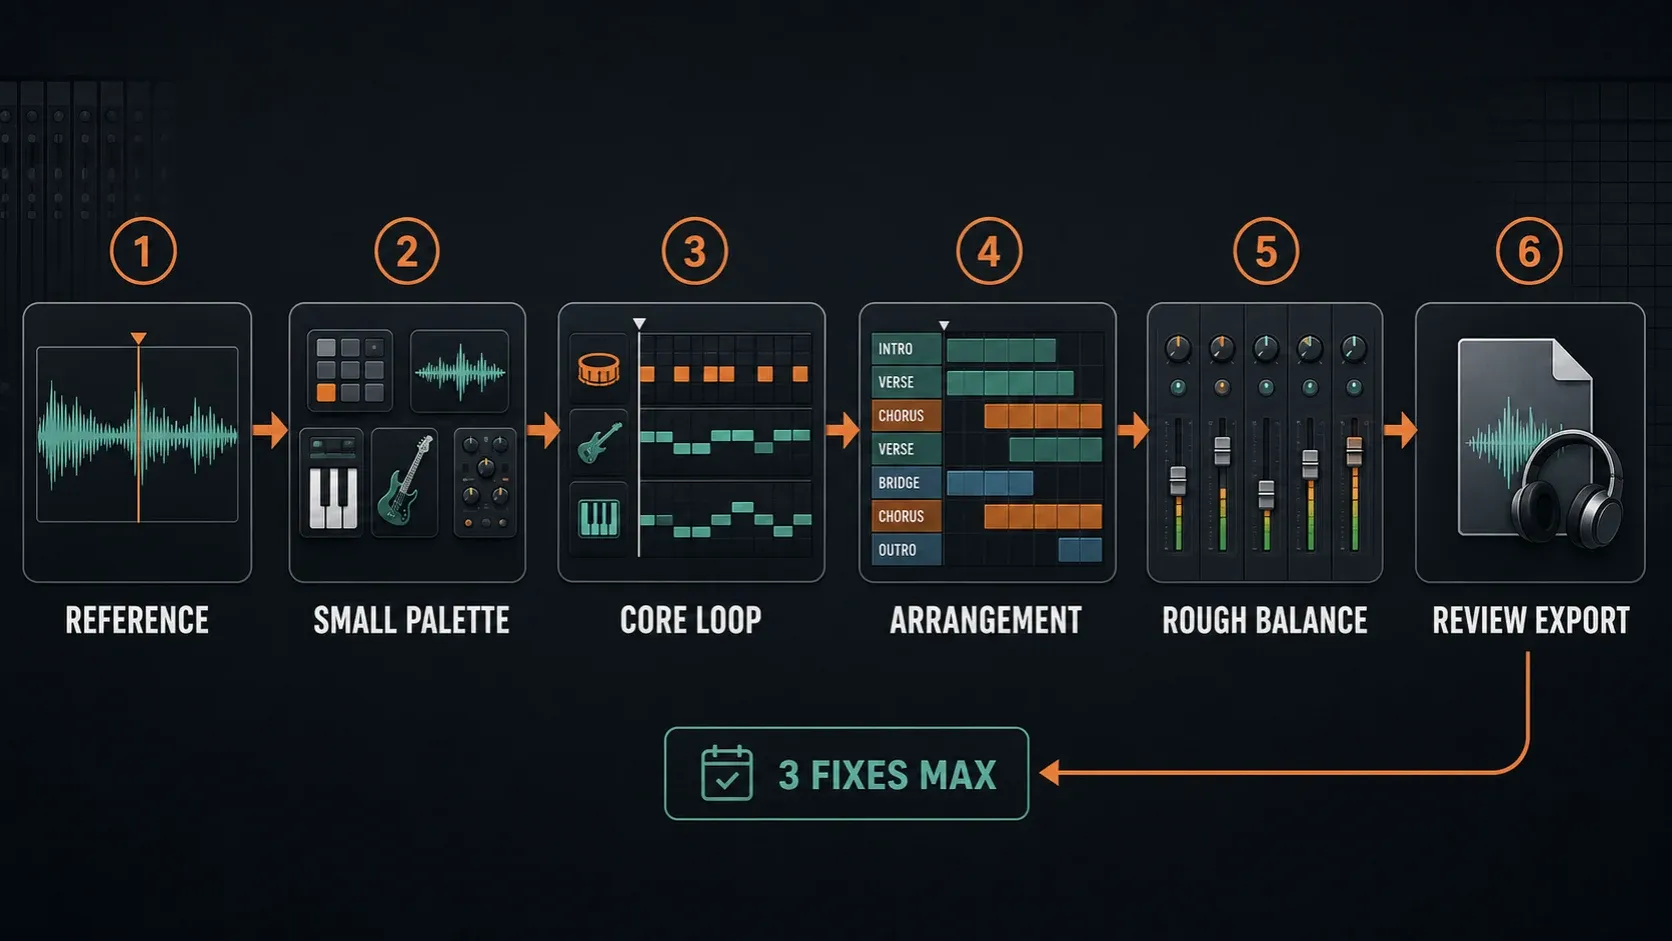
How to make a beat in FL Studio in eight moves
- Choose a target and save. Set a tempo, name the FLP, and decide what the beat should feel like.
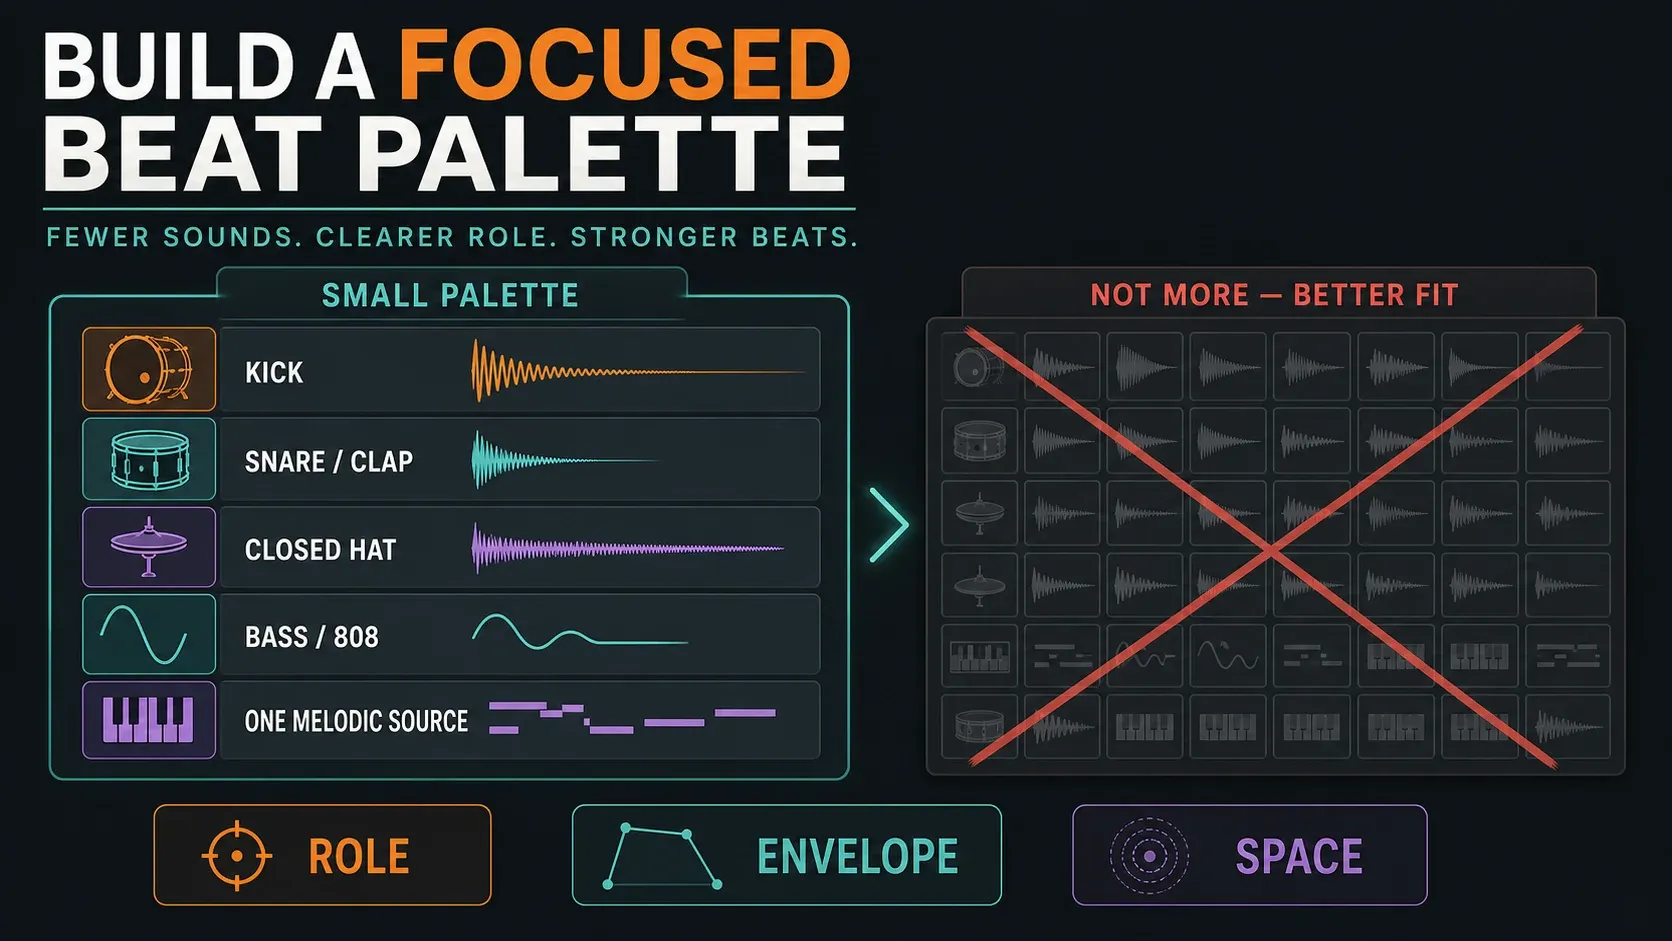
- Pick five sound roles. Choose kick, clap, closed hat, bass and one melodic instrument.
- Build the drum pattern. Enter the one-bar example, then listen before adding a fill.
- Add bass and melody. Write separate two-bar parts and hear them together in Song mode.
- Keep variations independent. Name Patterns and use Make unique before changing one repeated section's notes.
- Arrange 32 bars. Give the intro, main section, break, return and ending different combinations of parts.
- Balance the sources. Check Mixer destinations, levels and unwanted distortion before adding effects.
- Export and listen. Render the full song, check its beginning and ending, then choose the next useful revision.
Choose a target you can finish
Pick a reference for pace and density, not notes to copy. Listen for the backbeat, the space between bass notes and how many melodic parts play together. A brief such as “dry drums, short bass and a sparse keys phrase” gives you something to compare each new sound against.
For this exercise, set the toolbar tempo to 90 BPM and keep the project in 4/4. These are practice choices, not hip-hop rules. A faster grid can also carry a slower-feeling backbeat. If you have already found a convincing groove at another tempo, there is no reason to reset it just to match this page.
Use File → Save as and a name such as first-beat-01.flp. Save a new version before a risky rearrangement. The standard FL Studio trial can save and export, but cannot reopen your saved project until you unlock FL Studio. Export important work before ending that session. A paid edition also does not automatically license every trial plugin you tried: keep track of the instruments and effects the project needs.
Choose five sound roles, not a folder full of options
Start with one kick, one clap or snare, one closed hi-hat, one bass and one melodic instrument. A short kick and a fairly dry clap make this first balance easier to hear. That is a starting preference, not a ban on long drums or reverb.
Audition the drum samples in the Browser and drag each into empty space in the Channel Rack to add a source. Dropping onto an existing Channel can replace its sound, so check where you release the file. The Browser guide explains auditioning and destinations; use the sample-pack setup guide if your own folders are missing.
For bass and keys, FLEX is included with every FL Studio edition and offers both free and paid packs. Choose sounds you already have access to; a premium pack or FL Cloud subscription is not required for this exercise. Add one instance for bass and another for the melodic part. Pick a bass sound with a clear sustained pitch and a simple keys or pluck sound without a busy built-in sequence.
You can enter every note with a mouse. A MIDI keyboard is optional. Before replacing a sample, name the problem: “the kick tail hides the bass” is a useful reason; “there might be a better kick” can keep the Browser open all evening.
Program a one-bar FL Studio drum pattern
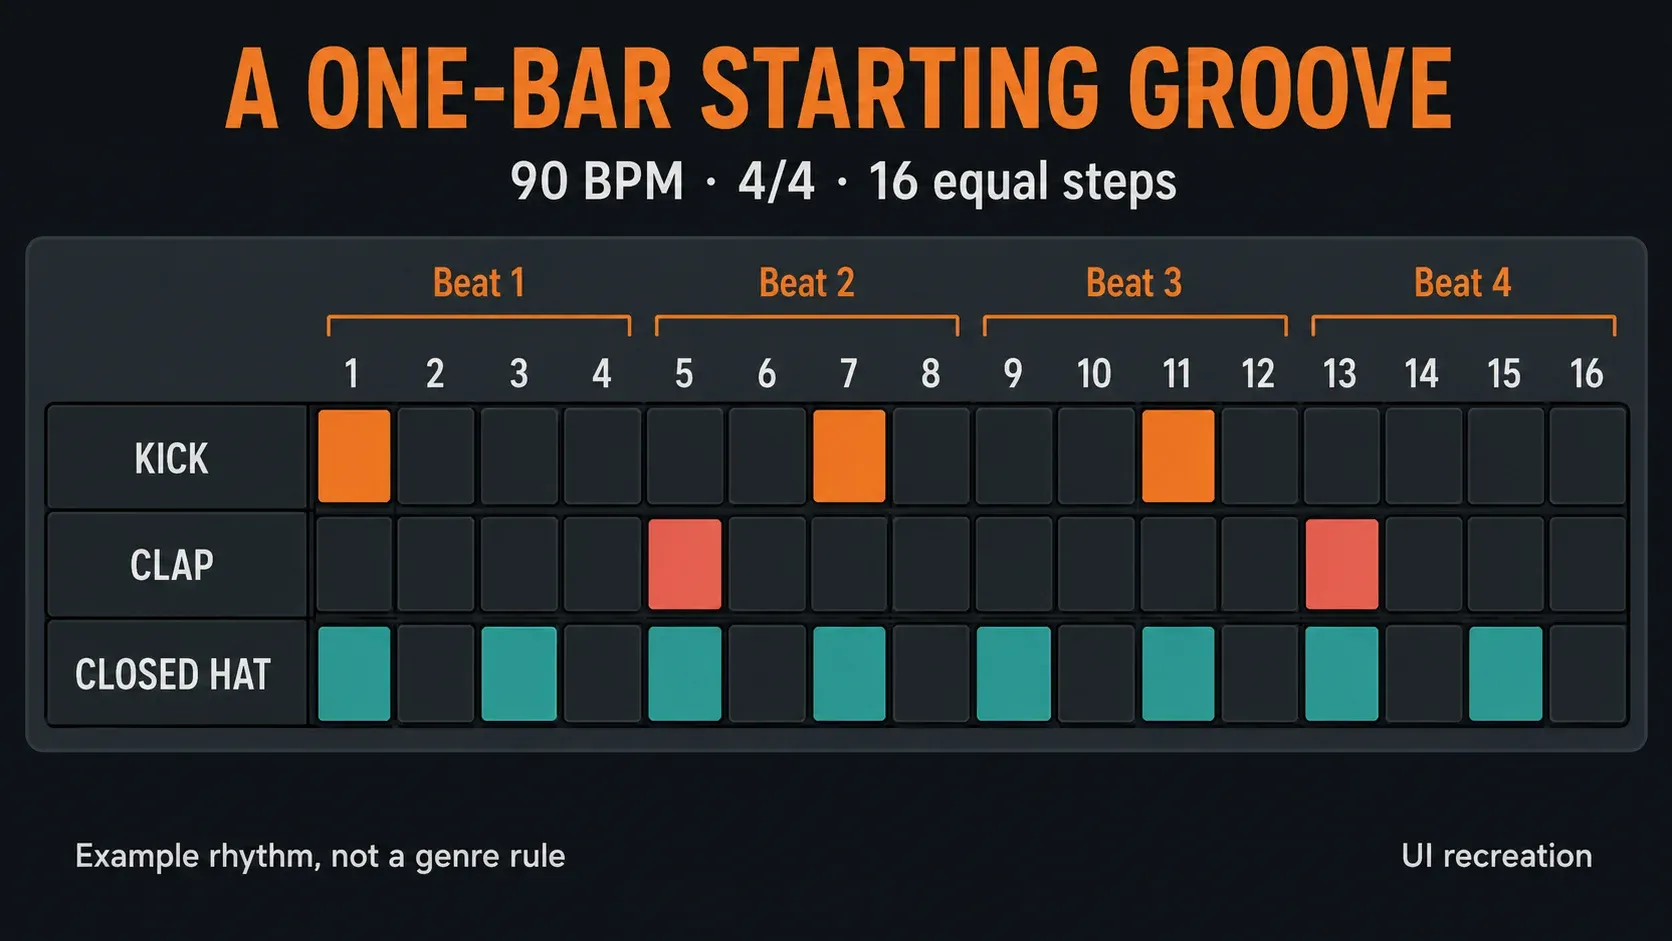
Select an empty Pattern, name it Drums Main, and use Pattern playback while entering the hits. In the Step Sequencer, a step represents a sixteenth note. In this 4/4 example, 16 equal steps make one bar; four steps make one beat. Count the cells, not just the color groups.
| Sound | Active steps | What to listen for |
|---|---|---|
| Kick | 1, 7, 11 | A downbeat followed by two offbeat pushes |
| Clap or snare | 5, 13 | The backbeat on beats 2 and 4 |
| Closed hat | 1, 3, 5, 7, 9, 11, 13, 15 | Eight evenly spaced hits |
Activate those cells and play the loop. Left-click activates a step; right-click normally deactivates it, although the mouse-button setting can allow left-click toggling. If it sounds crowded, remove the kick on step 7 and compare. Keep whichever version supports the pulse. Neither is a required genre pattern.
Once the placement works, use the Channel Rack Graph Editor's velocity view to soften a few hats. Compare the result at a similar listening level; random differences are not automatically better. The Step Sequencer walkthrough covers the controls, while the drum-pattern guide takes the idea into fills and variations.
Leave global swing alone for the first comparison. When you want a different feel, the swing and groove guide explains which events and Channels respond. Swing is a musical choice, not a repair for an unclear backbeat.
Write bass and a two-bar melody
Create an empty Pattern named Bass, select the bass Channel and open its Piano Roll. Start with an A2 note on beat 1 of each of two bars, each lasting two beats. Use the octave that sounds clear on your chosen preset; presets can transpose or layer pitches, so the note label alone does not guarantee a particular low-frequency result.
Open the Playlist and place two adjacent one-bar Drums Main clips at bars 1 and 2, plus the two-bar Bass clip starting at bar 1 on another lane. Switch to Song mode to hear them together. Pattern mode plays the selected Pattern, so a separate Bass Pattern will not automatically bring the drums with it.
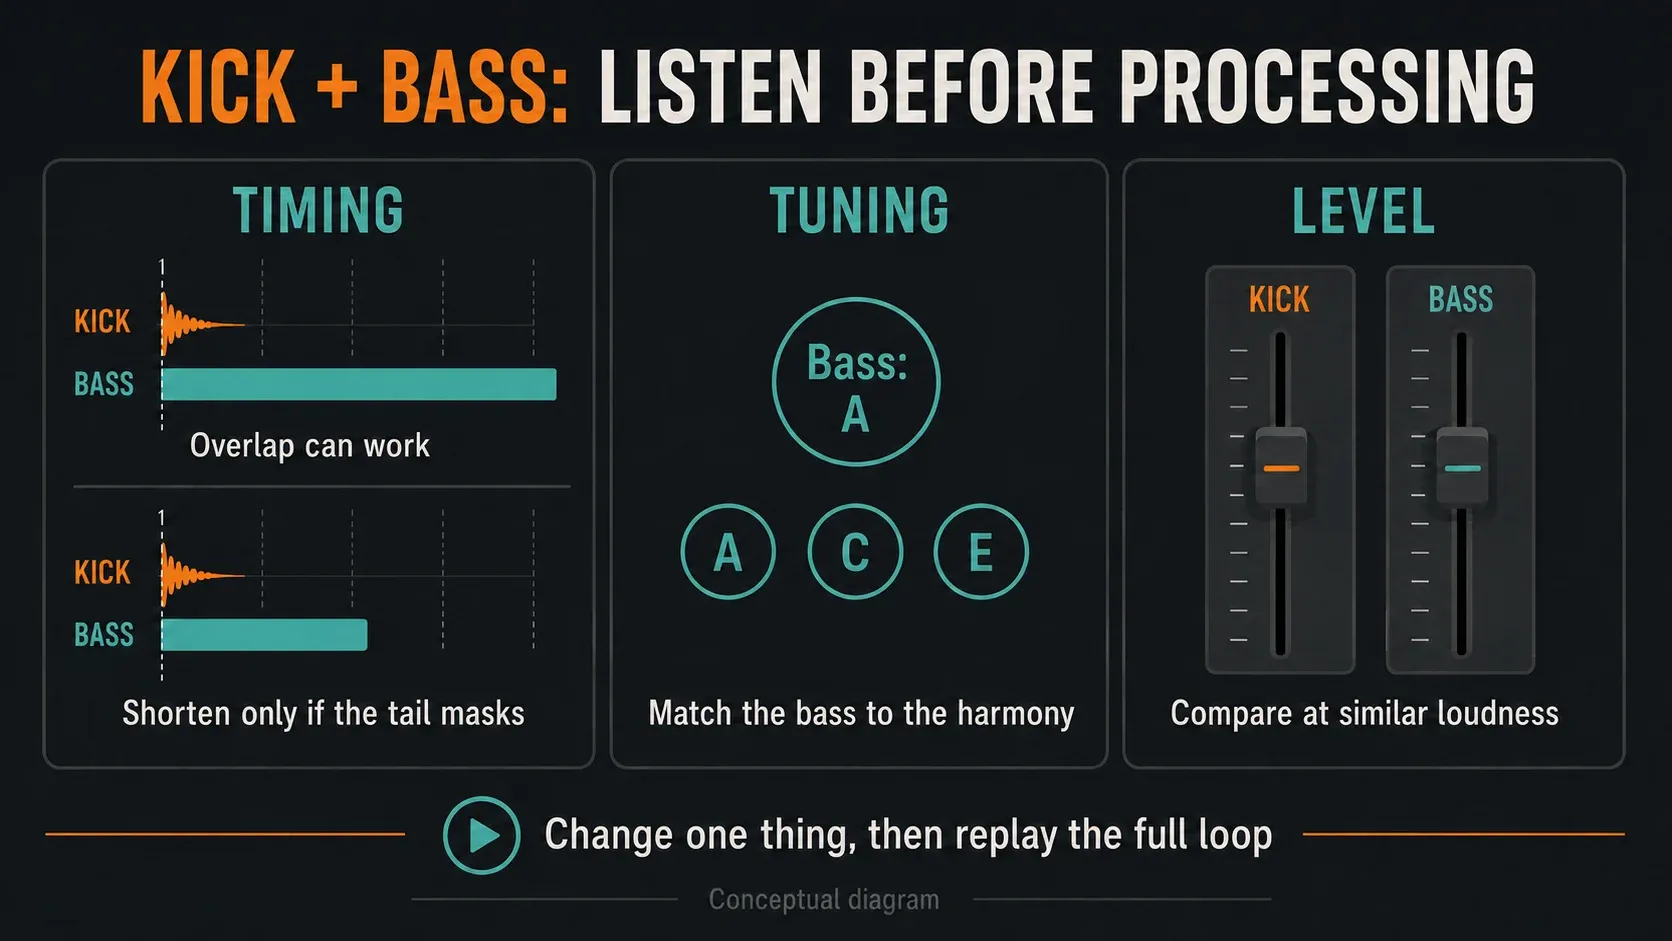
Listen for the bass tail covering the next kick. Simultaneous kick and bass can work; do not shift every bass note off the kick by default. If the low end is unclear, compare a shorter note, a shorter kick and a lower bass level one at a time. A sampled 808 may also need its root pitch checked: use the 808 tuning guide before treating every Piano Roll label as the sample's sounding pitch.
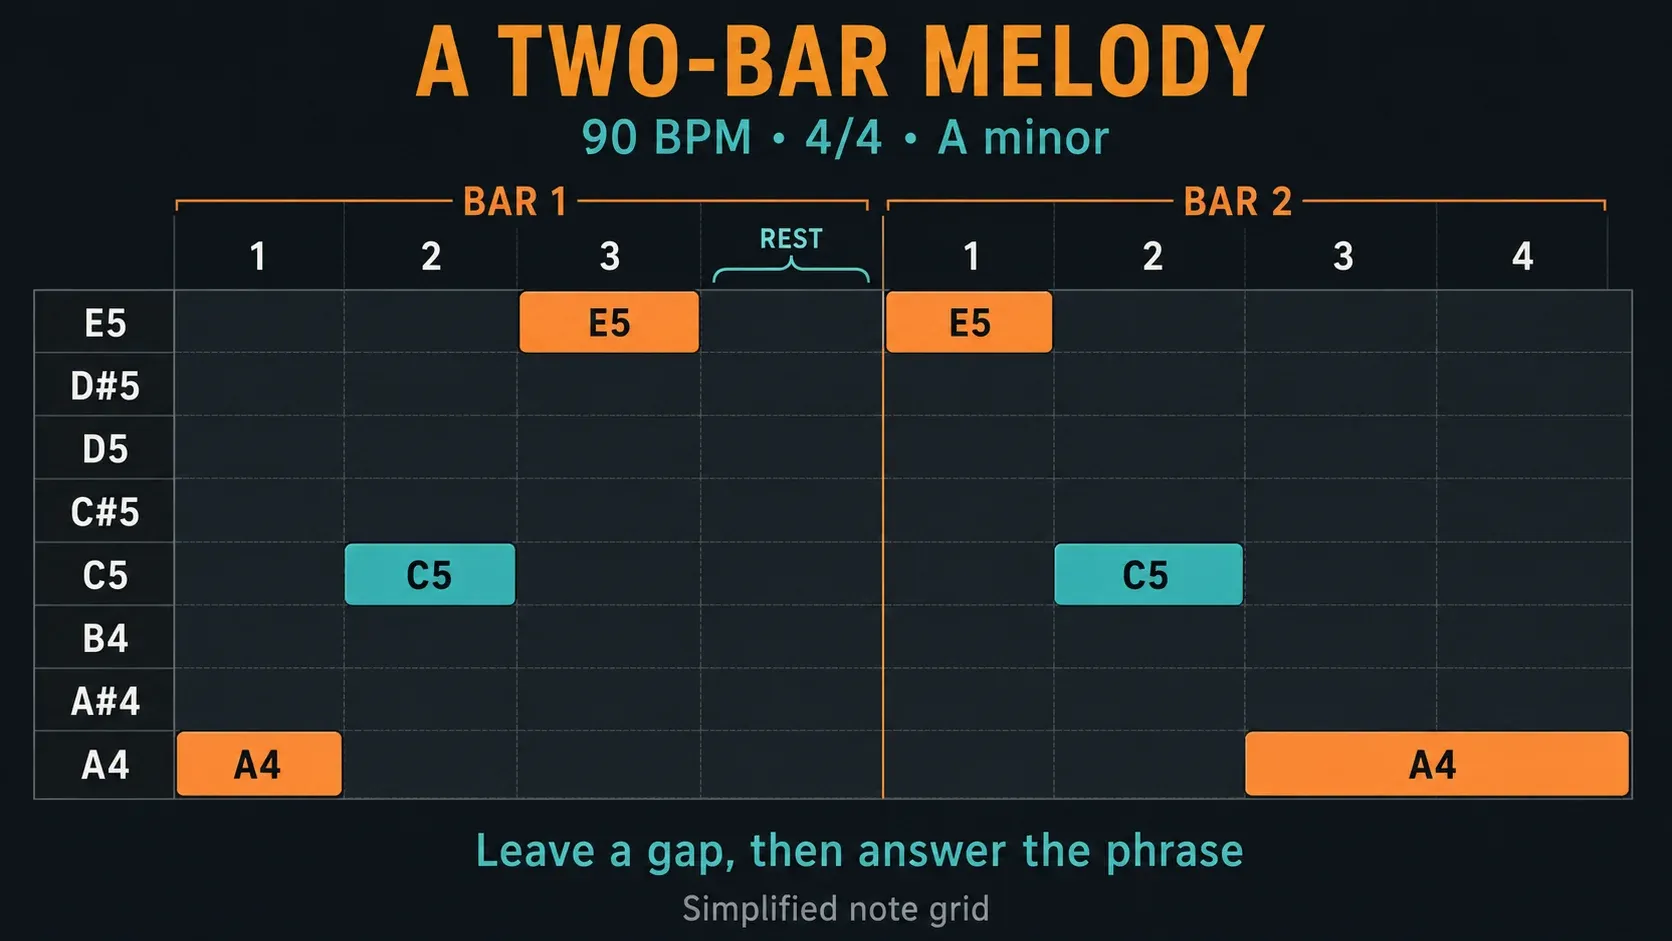
Create a third Pattern named Melody for your keys or pluck Channel. The Piano Roll's Draw tool lets you place notes with the mouse and resize their right edges. For this phrase, choose a one-beat division in the local time-grid Snap menu and enter:
| Bar | Beat 1 | Beat 2 | Beats 3–4 |
|---|---|---|---|
| 1 | A4, one beat | C5, one beat | E5 for one beat; rest on beat 4 |
| 2 | E5, one beat | C5, one beat | A4 held for two beats |
A, C and E give this exercise an A-minor outline. This is a small pitch set to work with, not a claim that three notes fit every sample or chord. Place Melody at bar 1 alongside the other clips and listen in Song mode. The first bar leaves a gap; the second settles on A. Change the rhythm before adding another instrument.
If pitch editing is unfamiliar, the Piano Roll guide covers it in detail. Scale highlighting can help you see a note set, but visual shading is different from actively snapping notes to a scale. Neither feature decides whether the phrase is interesting.
Keep Patterns and variations easy to change
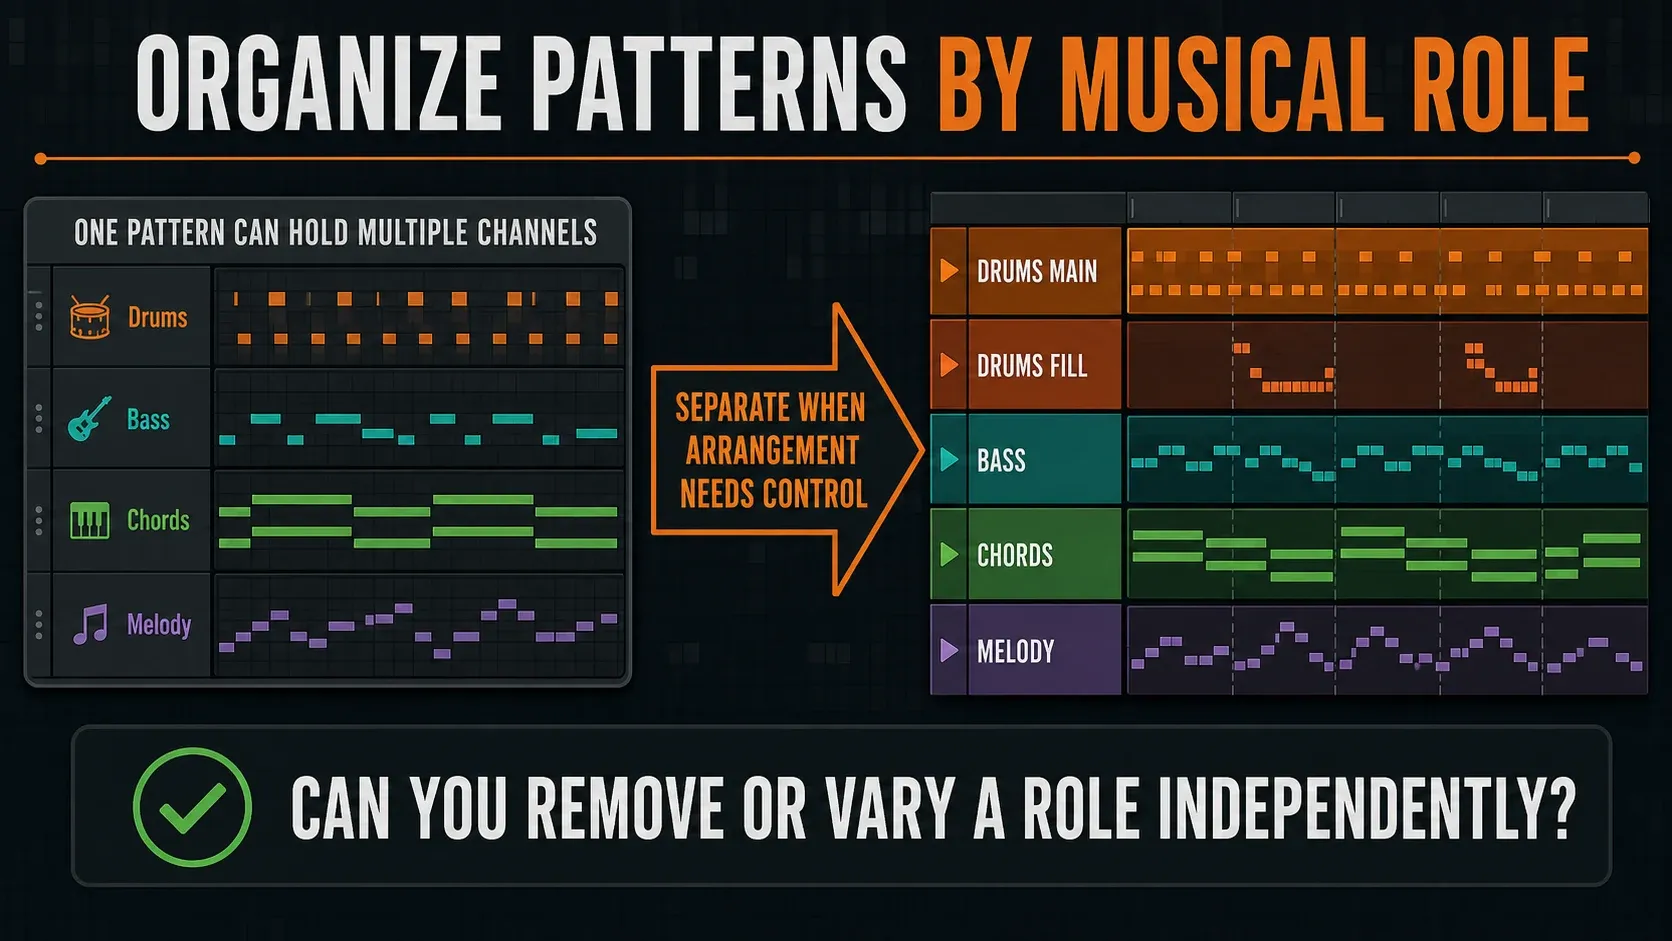
You now have three named Patterns and five sound sources. As Image-Line's Patterns menu reference explains, a Pattern can hold data for multiple Channels. Drums Main can therefore contain kick, clap and hat together; Bass and Melody stay separate because you will remove them independently during arrangement.
F4 finds the next empty Pattern and opens naming; it does not move notes out of your current Pattern. Use the menu command if your keyboard intercepts function keys. If you already put everything into one Pattern, save first, then consider Patterns → Split by channel. Check the resulting clips and remove unwanted overlapping originals before continuing.
For a fill at the end of a section, open that Pattern Clip's menu and choose Make unique before editing its notes. A normal repeated clip still points to the same Pattern. Also remember that unique note data is not a new instrument: changing the shared kick sample or synth preset can still affect other Patterns using that Channel. The pattern-looping guide explains copying and shared dependencies.
Arrange a 32-bar beat with audible contrast
Extend the parts through the Playlist, then remove clips to make sections. Keep one-bar drums and two-bar bass/melody clips aligned to their bar boundaries. Our example uses the following layout; these are practice sections, not a mandatory song structure.
| Bars | Parts | Decision |
|---|---|---|
| 1–4 | Melody only | Introduce the phrase without revealing the low end |
| 5–12 | Drums, bass and melody | Let the complete groove establish itself |
| 13–16 | Melody only | Remove drums and bass so the next entry matters |
| 17–28 | Drums, bass and melody | Return to the main idea; try one unique drum fill near the end |
| 29–32 | Melody only | Let the phrase end, with its final decay after bar 32 |
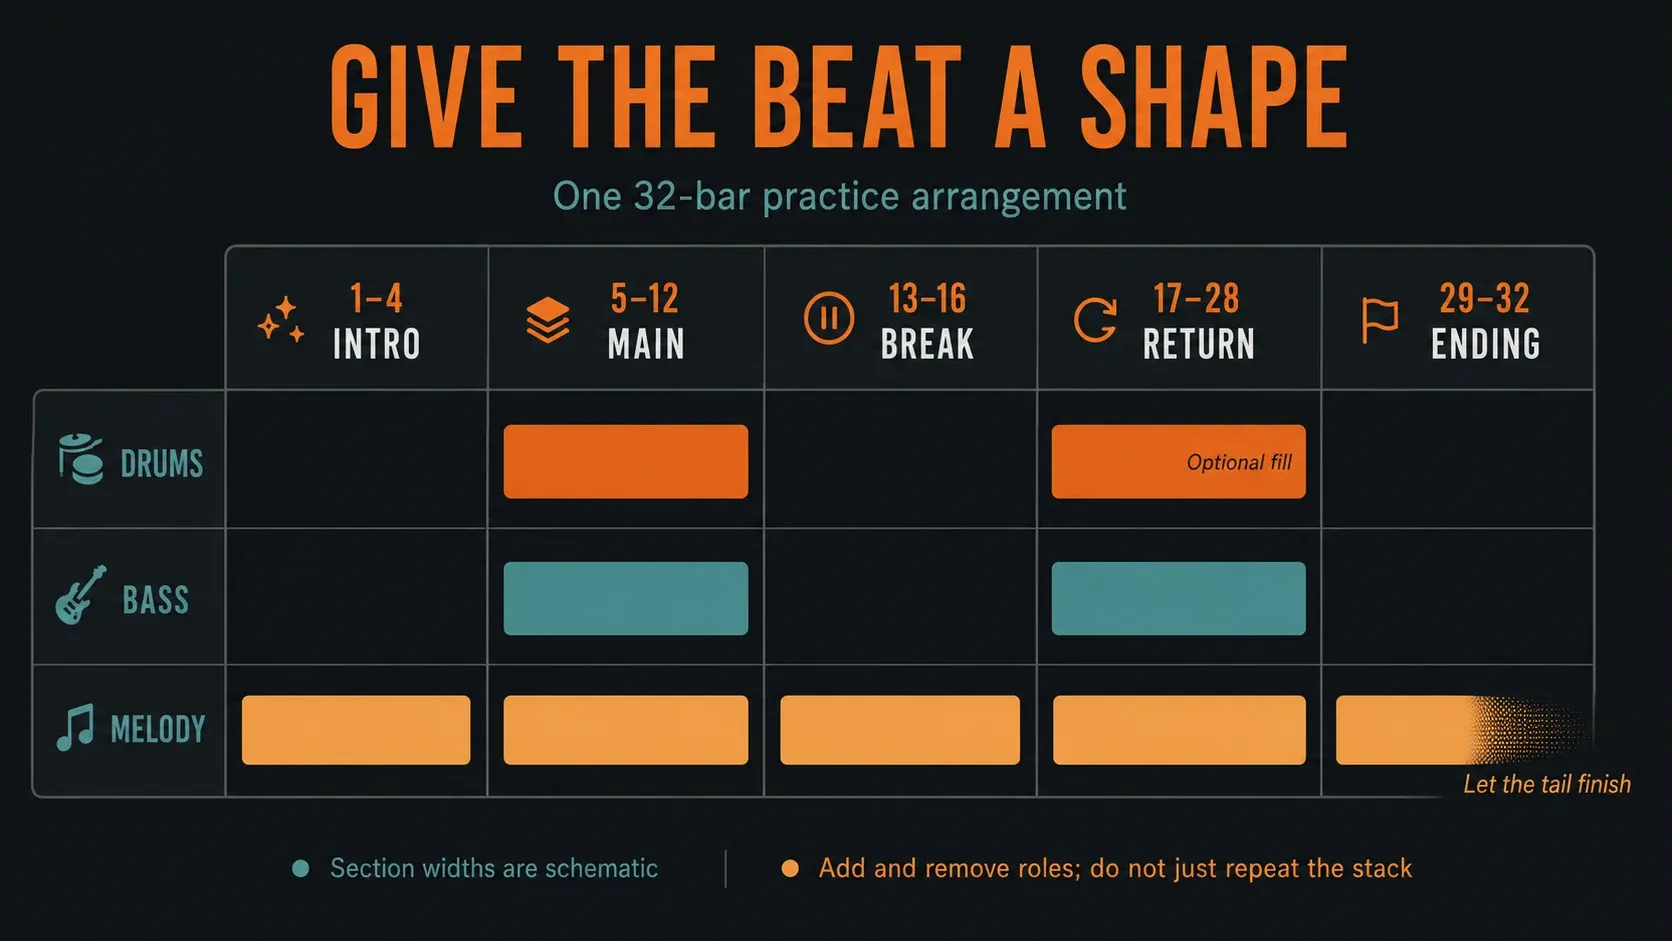
Play from bar 1 without editing. Does the entry at bar 5 feel different from the intro? Does bar 17 restore something you missed? If the answer is no, change the combination of parts before buying a transition pack. A fill helps announce a return; it cannot make an unchanged arrangement develop.
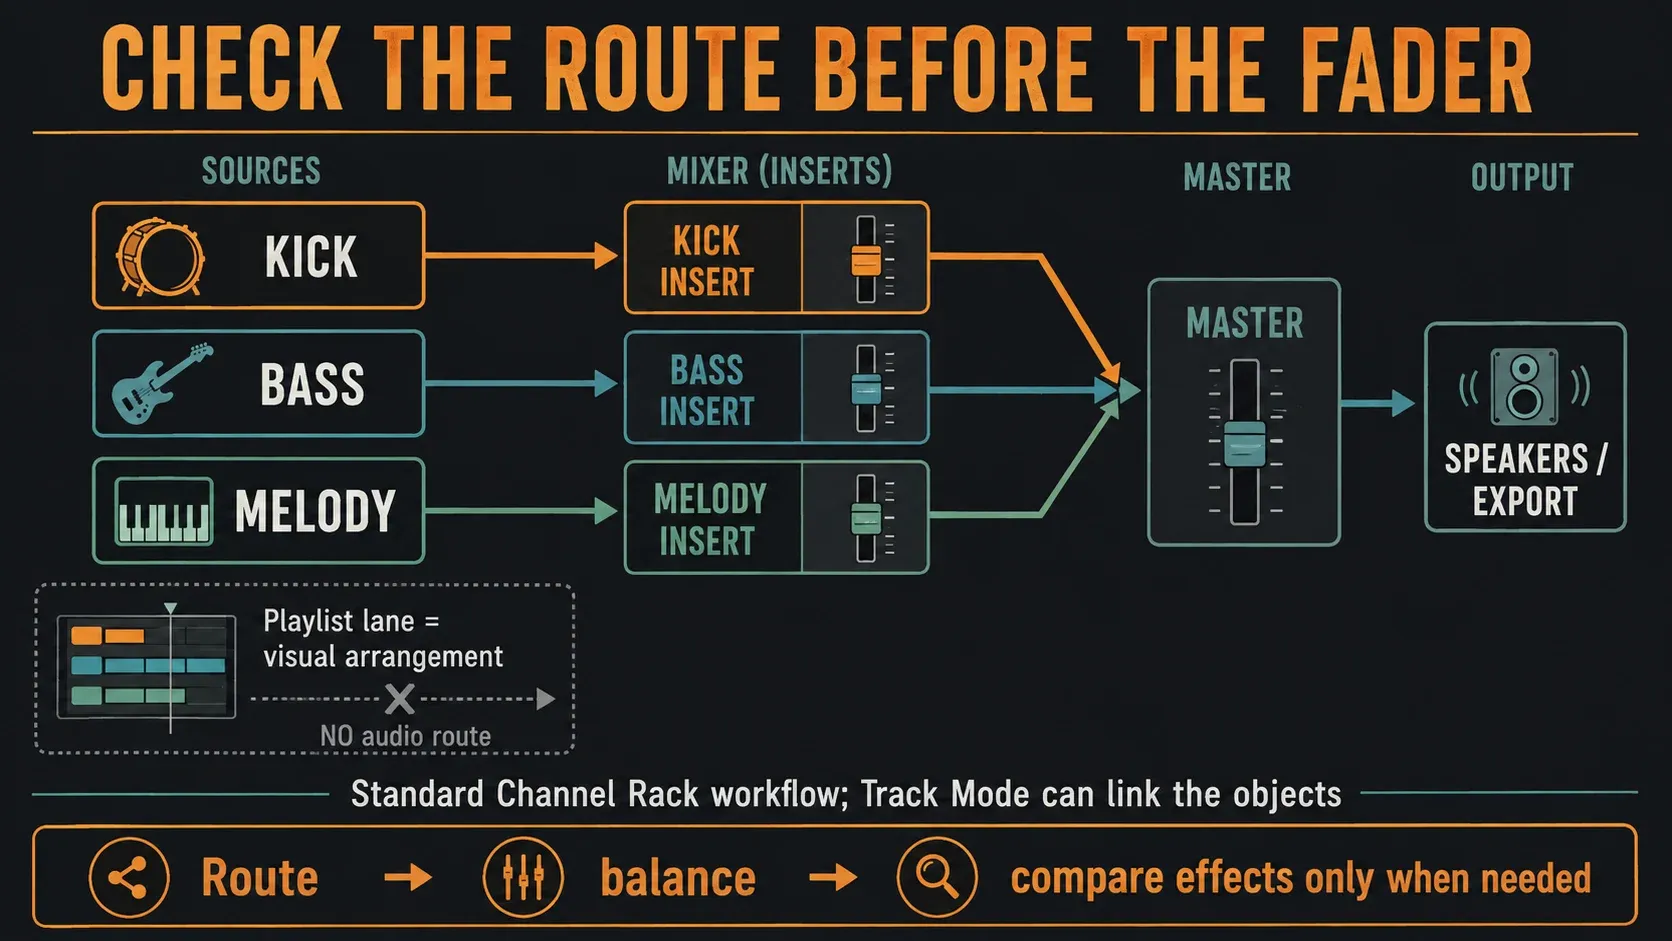
The Playlist manual distinguishes flexible clip lanes from audio routing. In the ordinary Channel Rack workflow, lane 3 does not automatically feed Mixer insert 3. Deliberately configured Instrument or Audio Track modes can link those objects. Moving an ordinary clip to a different lane is not a reliable way to change its Mixer destination.
Make a rough balance without a loudness contest
Assign kick, clap, hats, bass and melody to intentional Mixer destinations, then name the inserts. In the standard Channel Rack workflow, the Mixer-track selector beside a Channel sets its destination. If your project uses linked Track Mode, inspect that existing relationship instead of assigning routes blindly. The Mixer tutorial covers the alternatives.
Loop the busy section and adjust levels until the drums, bass and melody remain distinguishable at a comfortable monitoring volume. Lower an overpowering melody before boosting every drum. If an effect seems unnecessary, compare it bypassed at similar perceived loudness; bypassing can change level, which can bias the decision.
Keep the final Master output below clipping for your review export. Image-Line's levels and clipping guidance distinguishes the internal floating-point mix from fixed-depth output: an insert going above 0 dB is not automatically the same as a clipped 16- or 24-bit WAV. Effects can still distort earlier in the chain. Turning the Master down will not undo distortion already created inside a plugin.
You do not need a particular kick peak, a fixed EQ curve or a limiter on every first beat. Use processing for an audible purpose. For a deliberate kick-triggered bass reduction, follow the sidechain guide; overlapping notes alone are not proof that sidechain compression is required.
Export the whole beat and check the file
Save the FLP, check that required sources reach the Master, and use File → Export → Wave file for a lossless review copy. In the render dialog choose the full song, not the selected Pattern. Clear an accidental Playlist time selection if you want the whole arrangement: the export manual gives a timeline selection priority when determining Song render length.
For this exercise, stereo 24-bit WAV at your existing project sample rate is a practical review choice, not a universal delivery specification. Keep Split mixer tracks off for one stereo mix and Leave remainder for the final decay. Inspect the expected length and ending before rendering; a stray later marker can extend the file. The song-export walkthrough covers the procedure, and the export-settings guide covers format and tail decisions.
Play the rendered file in another player. Check the opening, full section and final decay, then listen all the way through. MP3 can be a convenient smaller sharing copy; an FLP or MIDI file is not a listening mix. Choose up to three useful changes—such as lowering the hat, shortening a bass tail and simplifying the fill—then export the revision. Save the project and its source samples as well as the audio.
Fix the stage that is actually broken
| Problem | Check before adding another plugin |
|---|---|
| Only bass or melody plays | Separate Patterns do not play together automatically. Align their clips in the Playlist and use Song playback. |
| The full beat feels crowded | Mute one optional part. Compare note length and level before adding layers or EQ. |
| The bass feels wrong despite in-key notes | Check the sample's tuning or preset transposition, then its rhythm and decay against the actual harmony. |
| A fill changed every chorus | Restore the original Pattern, make the intended clip unique, and edit its notes. Instrument settings may still be shared. |
| The export is too short or missing a part | Check full-song render mode, time selection, mutes, Master routing and tail settings. |
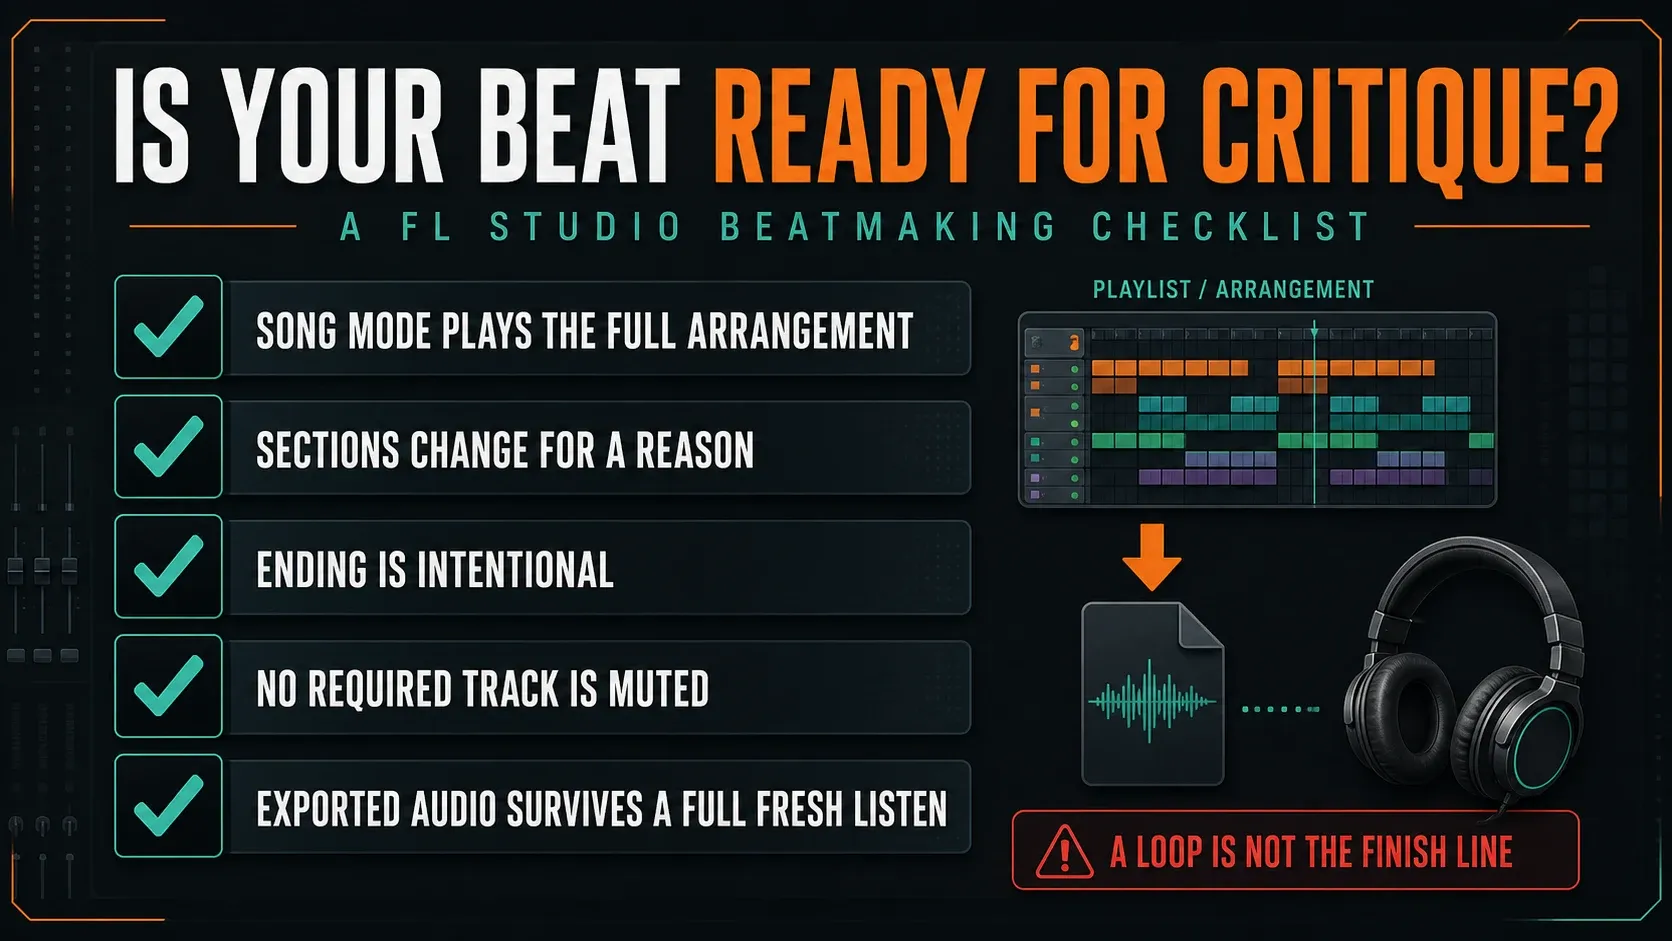
When the beat has a beginning, contrast, an ending and a checked audio file, get feedback on one question you can act on. “Does the bass obscure the kick at bar 5?” is easier to answer than “Is this professional?” Use the Beatmaking & Drums hub for the next rhythm skill, or the Workflow hub when arranging and editing are the bottleneck.
FL Studio beatmaking FAQ
What should I start with when making a beat in FL Studio?
Start with the element that gives you a clear direction. This exercise uses drums at 90 BPM, but a sample, bass phrase or chord idea can lead. Pick a small sound palette and decide what the next section will change before adding many layers.
Can I make a beat without paid plugins or a MIDI keyboard?
Yes. You can enter drum steps and Piano Roll notes with a mouse. Included samples and accessible stock sounds are enough for this exercise. FLEX is included with every FL Studio edition, but some FLEX packs are paid; choose sounds you already have access to.
Can I finish and export a beat in the FL Studio trial?
Yes. The standard trial can save projects and export audio, but it cannot reopen your saved project until FL Studio is unlocked. Occasional special trials can differ. Check plugin licenses too: buying an edition does not automatically license every trial plugin used in the project.
Should drums, bass and melody use separate Patterns?
They do not have to. One Pattern can contain data for several Channels. Separate musical roles when you want to remove or vary them independently in the Playlist; keep percussion together when it is useful to arrange it as a unit.
Does making a Pattern unique also copy its instruments?
No. A unique Pattern lets you edit its note data independently, but it can still use the same instrument Channels. Changing a shared sample, preset or Channel setting can affect other Patterns using that source.
How long should my first FL Studio beat be?
There is no required length. The 32-bar example here provides an intro, main section, break, return and ending to practice. Change the structure to suit your reference and purpose rather than padding it to a number.
How do I know when the beat is ready for feedback?
Song mode should play a complete arrangement with audible section changes, a workable balance and an intentional ending. Listen to the exported audio as well as the project. It is ready for feedback when you can ask a specific question about the next improvement.