FL Studio
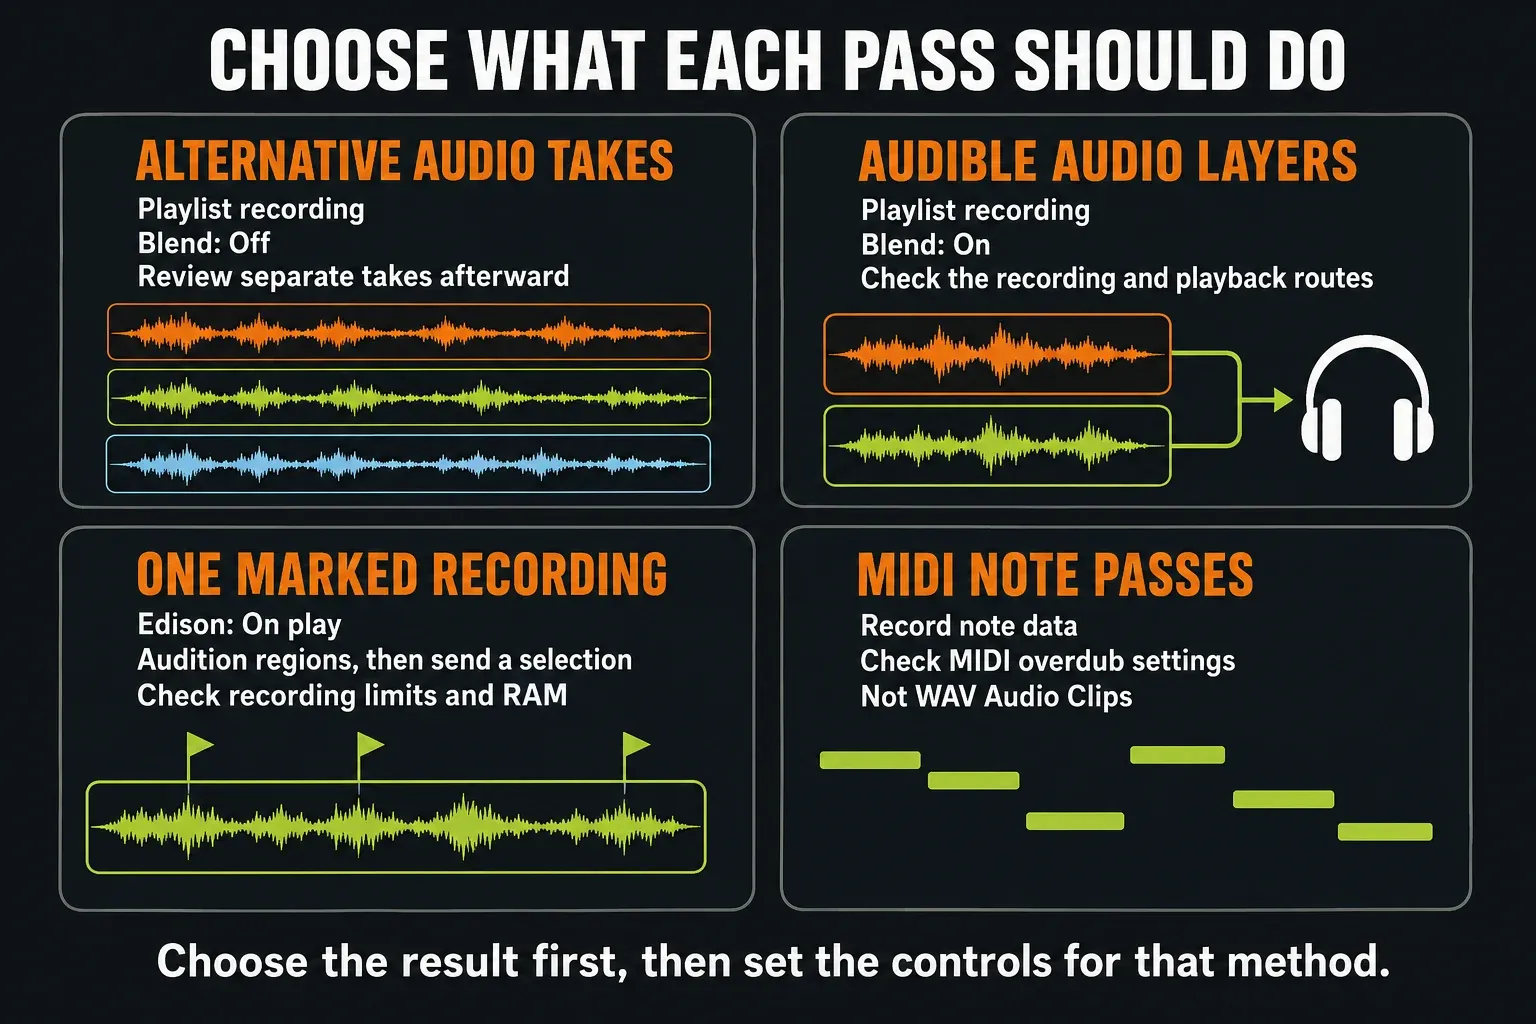
To record separate audio takes in FL Studio, select a section of the Playlist, switch to Song mode, turn Loop recording on and Blend recording off, then record from an armed Mixer input. Each completed pass becomes another Audio Clip. Earlier passes stay muted so you can concentrate on the next performance instead of hearing several versions at once.
If you want earlier passes to play while you add another layer, use Blend recording on and check the playback routing. If you want one continuous recording with markers between takes, use Edison. Those are three different outcomes; choose one before touching Record.
Before starting: external audio recording requires Producer Edition or higher, a working input and the appropriate driver/permissions. In the standard time-unlimited Trial, you can save projects and export audio, but cannot reopen saved projects until you purchase and unlock FL Studio. Keep needed work open and preserve your audio before closing it.
Choose your loop-recording method
- Several alternatives for one phrase: record into Playlist Audio Tracks with Loop on and Blend off. Use grouped child lanes to keep the takes together.
- A growing stack of audible parts: use Playlist sound-on-sound recording with Blend on and separate capture/playback routing.
- One recording divided by loop markers: use Edison in On play mode, then select and export the region you want. Check its recording-duration setting first.
- Keyboard notes rather than microphone audio: use MIDI recording into a Pattern. The audio-take grouping instructions below do not create separate MIDI Patterns.
This guide starts with separate audio takes. If the microphone does not yet produce a usable test recording, fix the missing microphone signal first. A Mixer meter moving with the backing track is not proof that your microphone is reaching the selected input.
Record separate audio takes in nine steps
- Verify the source. With the backing paused, select the intended external input on a dedicated Mixer insert and make a short recording. Play it back to check the actual sound, not just a moving meter.
- Link a Playlist lane. Right-click its track header and choose
Track mode > Audio Track > [your Mixer insert]. Name the parent for the part, such as Lead vocal. - Set the recording pickup. Choose
External input only (EXT)in the pickup selector beside the Mixer Input menu. Check the live-input monitoring separately and listen through headphones. - Select the repeated section. Hold
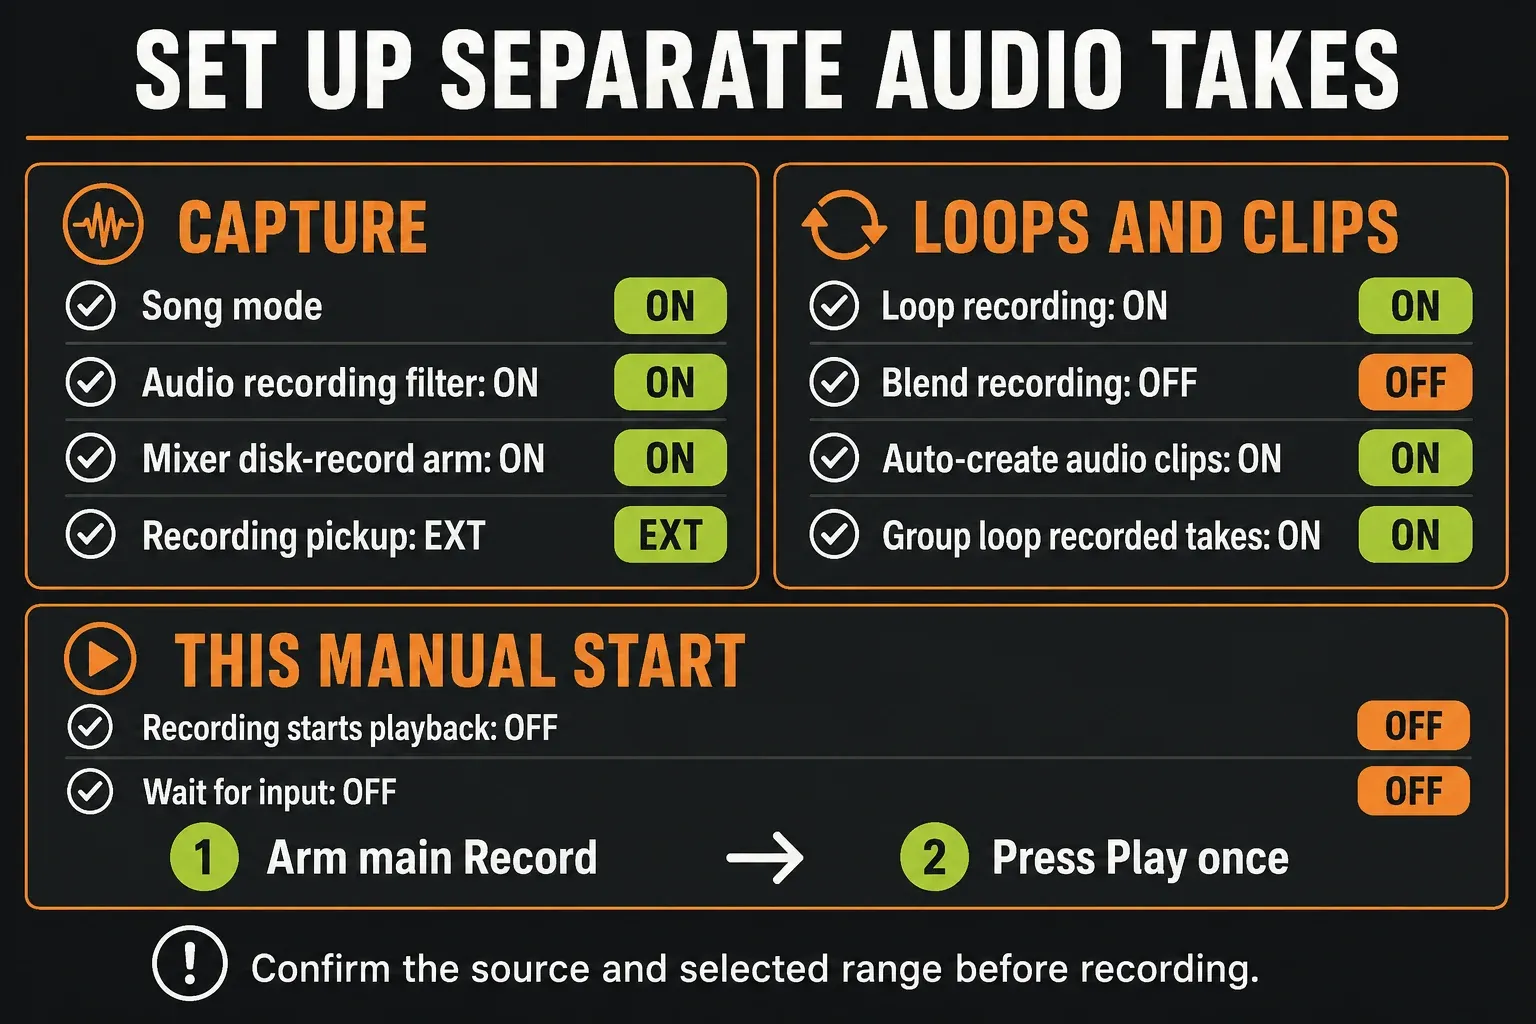
Ctrland left-drag across the Playlist's bar-count ruler. For the example here, select bar 1 to bar 6: leave bar 1 as a lead-in and perform from bar 2 to bar 6. - Choose Song and Audio. Select Song mode and right-click the main Record button to enable its Audio recording filter. Keep unrelated Notes or Automation recording off unless you intend to capture them.
- Set the two loop controls. Turn Loop recording on and Blend recording off. This is the separate-takes configuration, not audible layer-building.
- Prepare clip placement. In
Mixer menu > Disk recording, enableAuto-create audio clipsandGroup loop recorded takes. Confirm that the input insert's disk-record arm is enabled. - Use a predictable manual start. For this sequence, turn
Recording starts playbackoff in the Record button's right-click menu and turnWait for inputoff on the Toolbar. Then arm the main Record button and press Play once. - Stop and inspect. Perform a few passes, then press Stop. Inspect the grouped Audio Clips, unmute one take at a time and play it back. Save the project and preserve the recorded WAV files before deleting anything.
The Toolbar's recording controls explain why the manual-start settings matter: Recording starts playback can start the transport as soon as you press Record, while Wait for input can postpone the start. You do not need to disable them forever; they are off here so that “Record, then Play” has one clear meaning.
Set the range and repeat the lead-in
Make a time selection in the ruler, not just a selection of clips. For a four-bar phrase with a one-bar run-up, the selected region is five bars long: it starts at bar 1, the performance begins at bar 2, and the right boundary is the start of bar 6. Playback returns from bar 6 to bar 1 on each pass.
Keep the lead-in inside the selected region if you want it on every pass. The Toolbar's Recording Count-in gives you metronome ticks before recording starts; it is not a substitute for space inside the repeating selection. Let the final note or word finish before the loop boundary, or extend the selection when the part needs a longer tail.
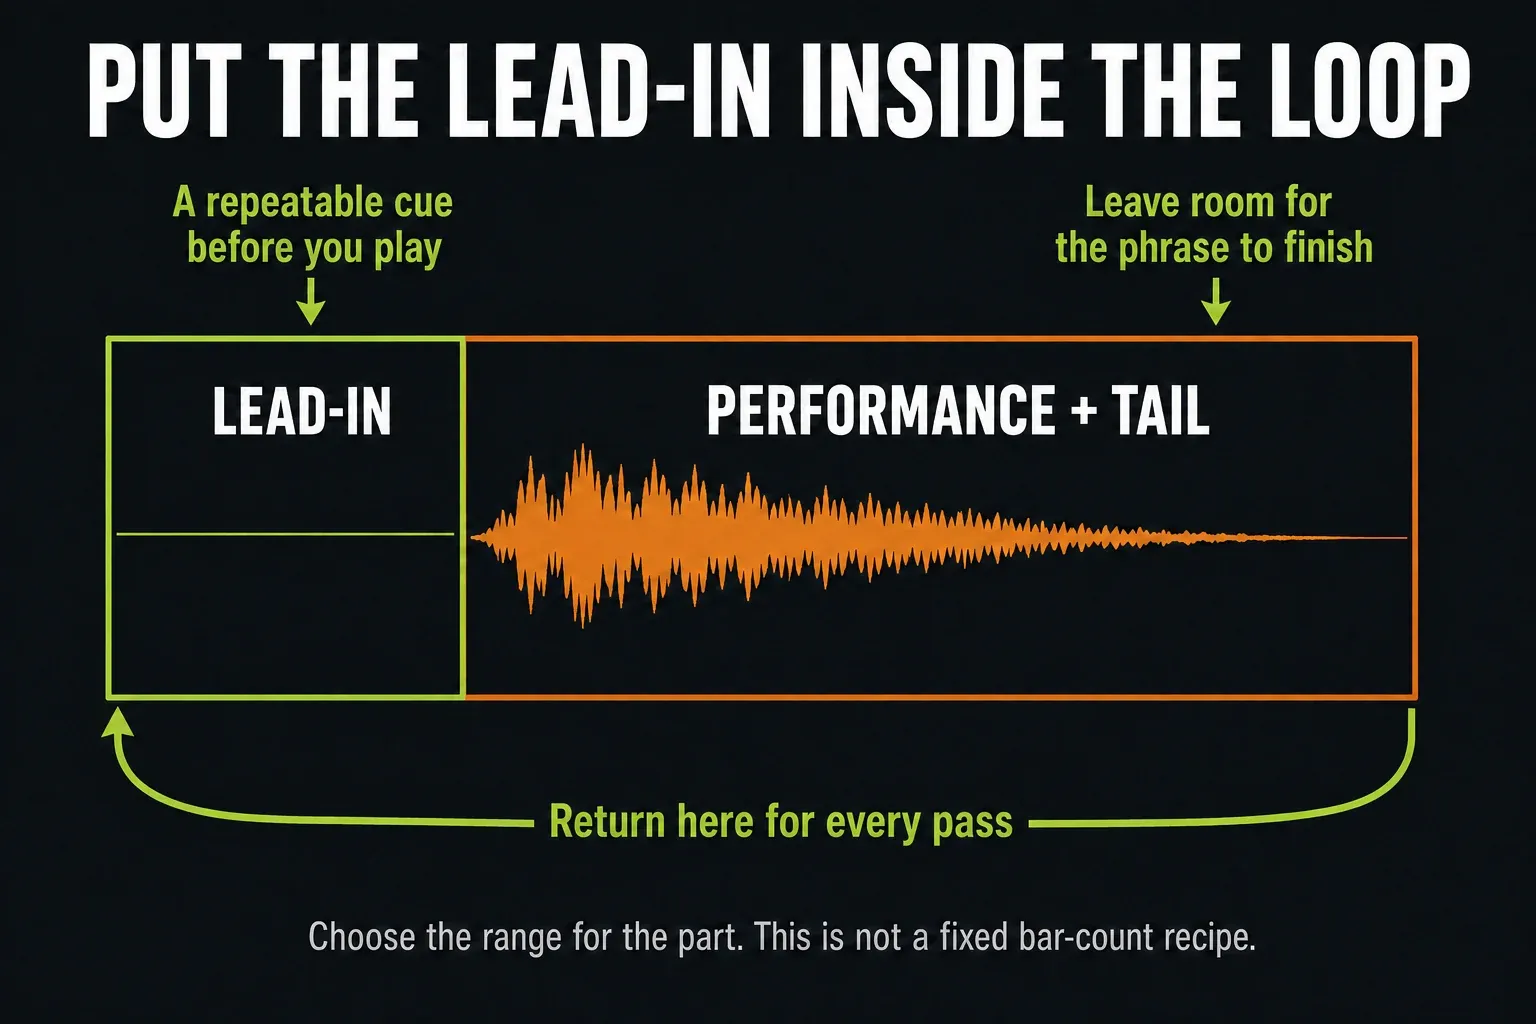
Why leave that space? Playlist loop recording creates files and clips at the boundary. Image-Line documents possible glitches at the first milliseconds of a new pass on some systems or heavy projects. An empty run-up moves your performance away from that transition. It is a useful precaution, not a cure for driver problems or crackling throughout the whole take.
If the loop unexpectedly lasts only one bar, make an explicit time selection. With Loop recording enabled and no Playlist data or selection, the default is one bar. For the wider difference between time selections, clips and arrangement markers, see the Playlist workflow guide.
Separate capture from what you hear
EXT records the external input, not the FL Studio mix feeding that insert. It excludes internally routed tracks and downstream FL Studio effects, fader and pan changes. It cannot remove processing already applied by the microphone, hardware preamp or interface before the signal reaches FL Studio. Set the incoming level at the source/interface; pulling down the Mixer fader does not repair an input that clipped before recording.
Choose a mono input when your source occupies only one side of an input pair. Keep a genuinely stereo source stereo. A socket count alone does not tell you whether a USB device or processed instrument is delivering a mono or stereo signal.
Monitoring is a separate choice. For software monitoring, use Monitor external input > On, or When armed with the Mixer insert armed, and confirm its output reaches your headphones. If you use the interface's direct monitoring instead, turn FL Studio's Monitor external input off to avoid hearing both paths. Leave the capture pickup at EXT.
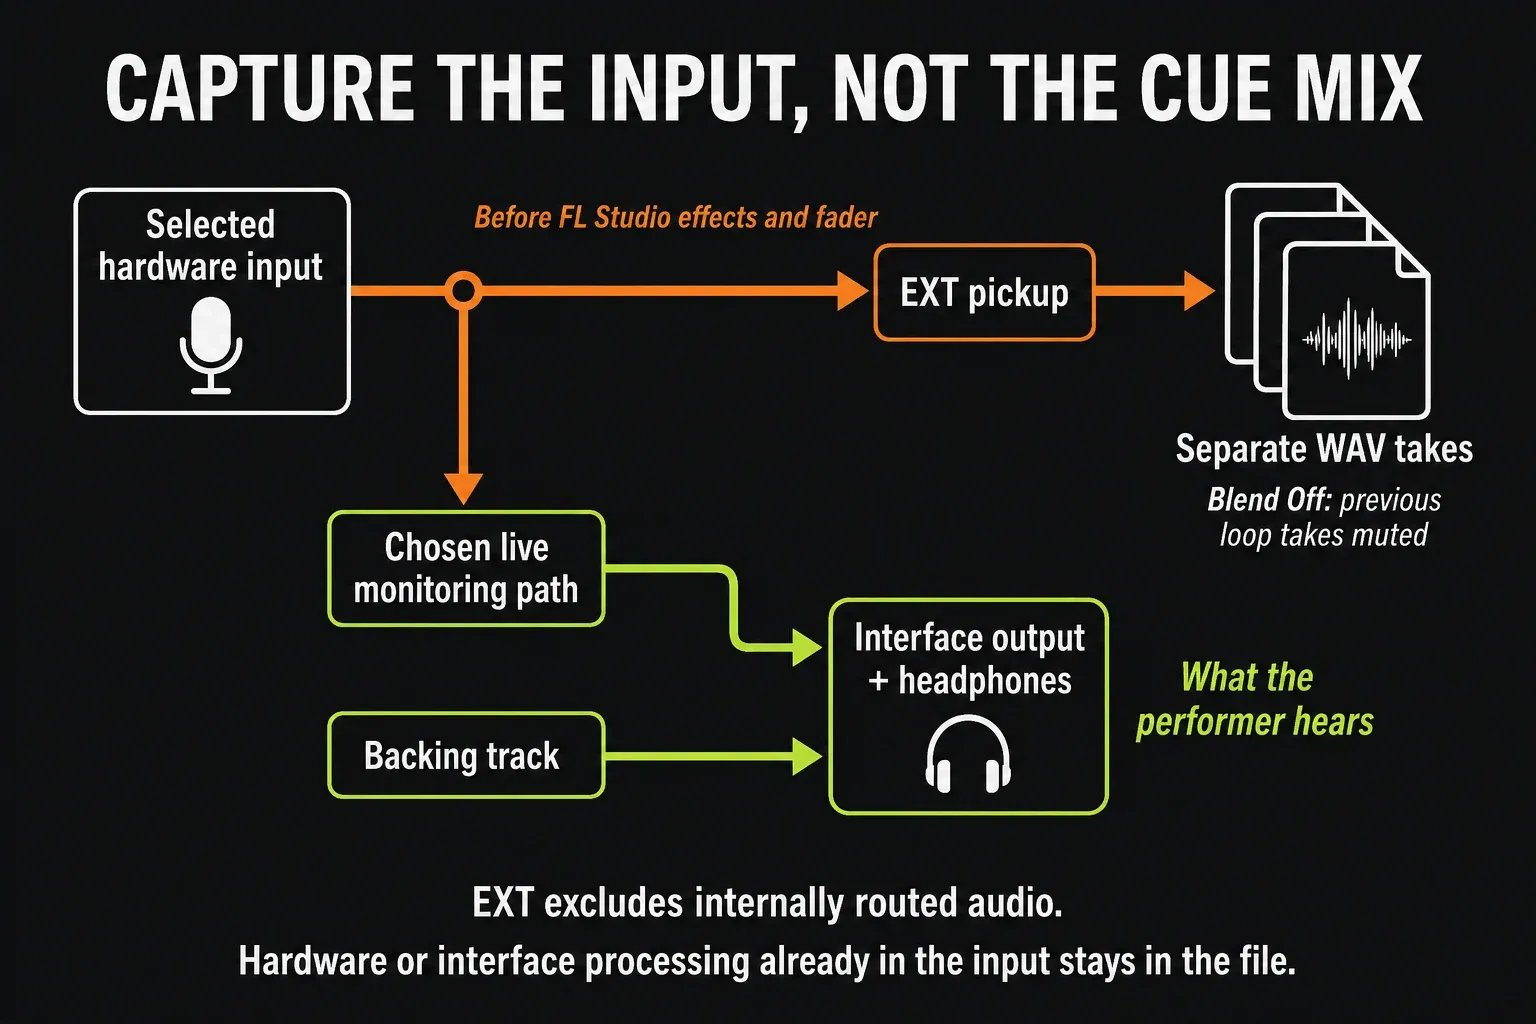
Keep backing tracks on their own playback routes. Use a dedicated input insert because it makes the job easier to inspect, not because the Master always records the entire mix regardless of pickup. Current EXT excludes internal audio even there; a dedicated insert simply keeps input, monitoring and recording controls clearer. For full device setup, follow recording audio into the Playlist; for routing decisions, use the Mixer guide.
Keep the takes grouped and the old passes quiet
The Mixer's Disk recording options do different jobs. Auto-create audio clips places recorded audio in the Playlist when you record in Song mode. Group loop recorded takes puts subsequent loop takes on child tracks beneath the Playlist Audio Track that initiated the recording. Neither option decides whether you hear earlier takes: that is Blend recording.
With Blend off, previous loop recordings are muted. After stopping, deliberately unmute the take you want to audition. Grouping does not automatically select the best performance, combine phrases or remove bad takes from disk.
Two disarm settings also have different scopes. Mixer menu > Disk recording > Auto-unarm unarms Mixer tracks when you press Stop. Disarm on stop in the main Record button's menu turns off the main recording switch. If the next attempt plays but records nothing, check both levels of arming instead of changing the loop range.
For a useful first session, give each pass a purpose: one comfortable performance, one with a different emphasis, then a focused retry of the difficult phrase. Stop before judging them. The vocal recording guide and guitar recording guide cover the source-specific choices that loop settings cannot fix.
Build audible layers with sound-on-sound
Turn Blend recording on when you want completed passes to play underneath the next one. Keep Loop recording and Song mode on. The point is to hear the accumulated parts while recording a new layer, not to bake the whole accumulated mix into every new file.
For this workflow, use ordinary Playlist lanes rather than linked Audio Track mode, and a dedicated EXT capture insert. Send that insert's listening output to a separate playback/output route. Check that the completed Audio Clips play through that playback route, not through the capture insert. Keep live-input monitoring available through either the interface or FL Studio, as above.
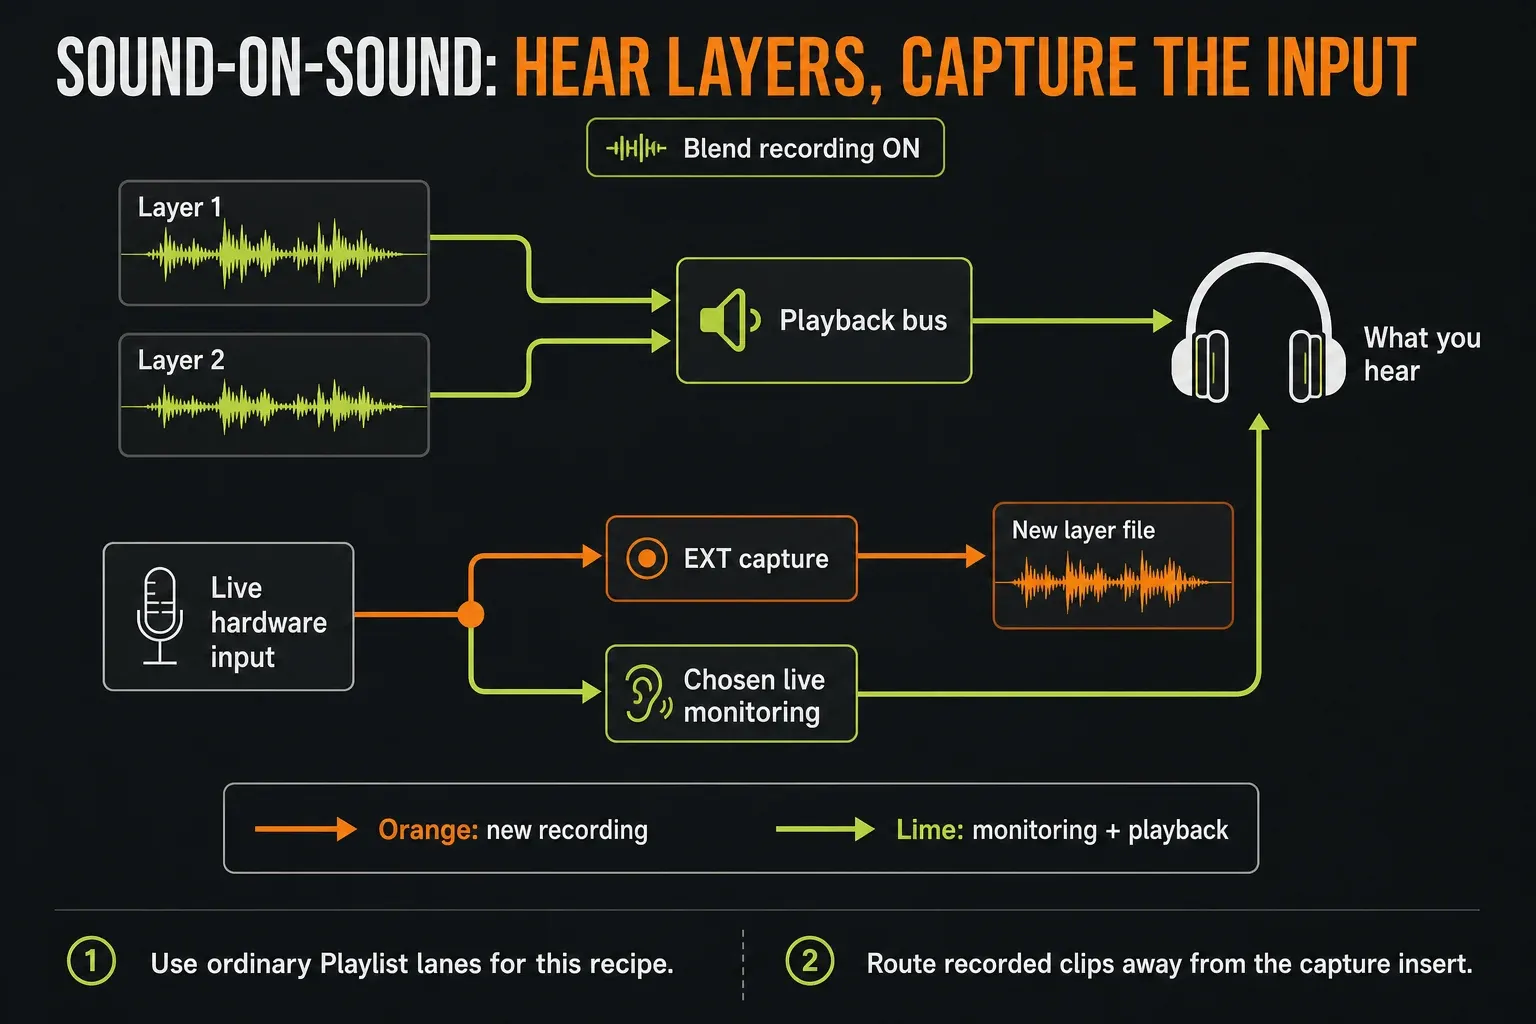
There is a wrinkle in the official instructions worth understanding. The Playlist loop section warns against Audio Track mode because it routes recorded clips back to the recording insert. On the same page, the current EXT description says it excludes internally routed audio. Both points matter: returning a clip to an insert changes the routing, but it does not make EXT capture that internal clip. The separated route here follows the loop workflow without relying on that broad warning as a description of every pickup setting.
After the first layer, stop and inspect the new file with the backing muted. If it contains the backing or earlier layers, check the actual pickup, any hardware loopback input, and the route feeding the recorder. Blend changes playback of previous passes; it is not a switch that removes unwanted audio from the source signal.
Use Edison for marked continuous capture
Edison records at its position in the Mixer effects chain. In On play mode, the recording gets Song jump markers when the Playlist loops. You can select a marked region and send just that take to the Playlist. This is an alternative to creating a separate disk-recorded clip at every boundary, not the sound-on-sound method above.
- Select the dedicated input Mixer insert and press
Shift+E. This opens Edison in the first empty effects slot withSlave playback to hostandOn playenabled. Check its position: first empty does not mean before all existing effects. - Select the intended external input and set
Monitor external input > Onfor this software-monitored Edison recipe. Use headphones and disable the interface's direct-monitor path if it doubles the sound. Put Edison before effects you do not want recorded. Keep the Mixer disk-record arm and main recording switch off so you do not also create a Playlist disk recording. With the backing paused, speak or play and confirm that Edison's own input meter responds; do not rely on the Mixer meter alone. - Check Edison's
Forduration before performing. A minutes/file-size limit wraps and overwrites older audio when reached.Everremains limited by available RAM; it does not mean unlimited storage. - Select the Playlist time range, use Song mode, and turn Wait for input off for a manual start. Confirm Edison is armed in On play, then press the main Play button. Each loop boundary gets a marker in the continuing recording.
- When finished, press Stop in FL Studio and turn Edison's Record button off. Do this before auditioning so the next playback does not start another recording.
- With Edison focused, Ctrl-click a region's start marker to select that region. Use the left/right arrow keys to move between takes and audition against the project with host playback synchronization enabled.
- Keep the desired region selected and press
Shift+Cto send it to the Playlist. The send operation uses the whole sample if no selection exists, so inspect the highlighted range first.
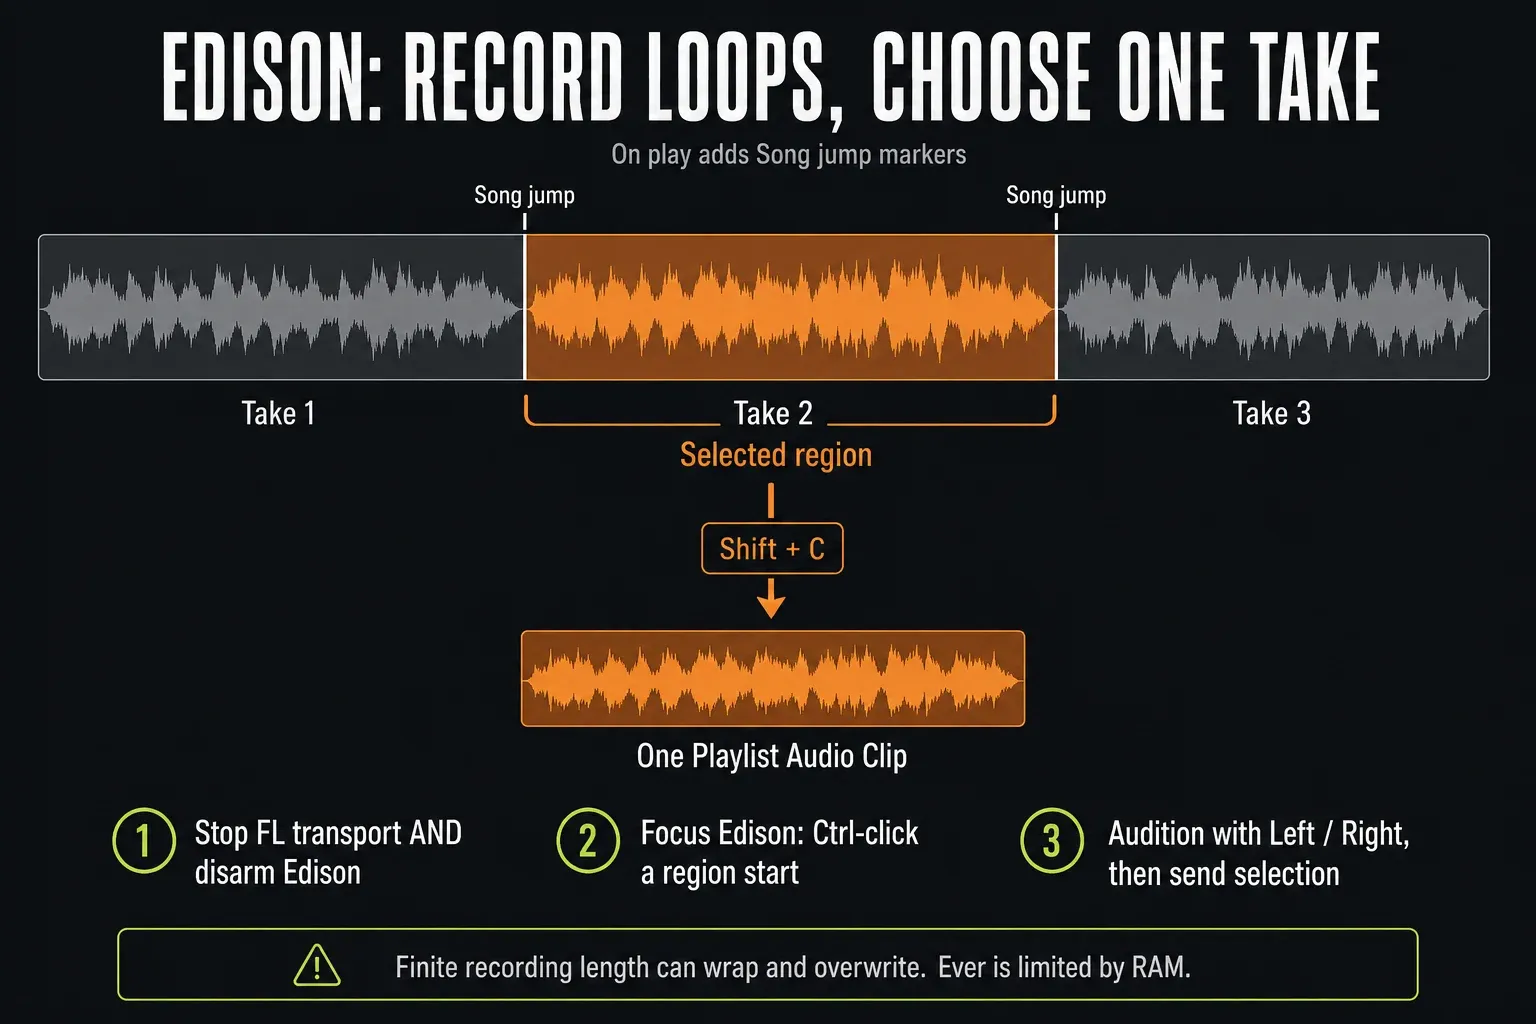
The Edison recording and region-export instructions also describe its RAM limits. Editing can require several times the original sample's memory. Prefer disk recording for long uninterrupted sessions, and export important Edison audio before relying on it as a keeper. Do not assume a short rolling duration will preserve the beginning of a long performance.
EXT is a disk-recording pickup; it does not move Edison ahead of effects or remove other audio reaching Edison's slot. Do not carry the earlier direct-monitoring Off setting into this recipe without checking Edison's input. The Mixer input-monitoring controls distinguish On from When armed; here the disk arm is off, so On is the explicit choice. For editing after you have chosen a region, continue with the Edison audio-editing guide.
MIDI loop recording is not audio-take recording
A MIDI keyboard normally sends notes to the selected instrument and Pattern, not a recording of its sound. Blend recording merges new notes with existing notes when enabled; with it off, newly recorded notes can overwrite existing note data. Do not expect the audio-take grouping switch to create a fresh Pattern for each pass.
If you want an alternative MIDI performance, preserve the current Pattern and record into a separate empty Pattern. The official note-recording procedure explains that Pattern destination; the MIDI recording guide covers input quantization and controller setup without mixing those controls into this audio workflow.
Review and preserve the takes
Stop recording, name the useful takes, and compare them at a sensible listening level. Keep only the take being auditioned audible, then listen in the track rather than choosing solely from its waveform. A bigger waveform is not necessarily the better performance.
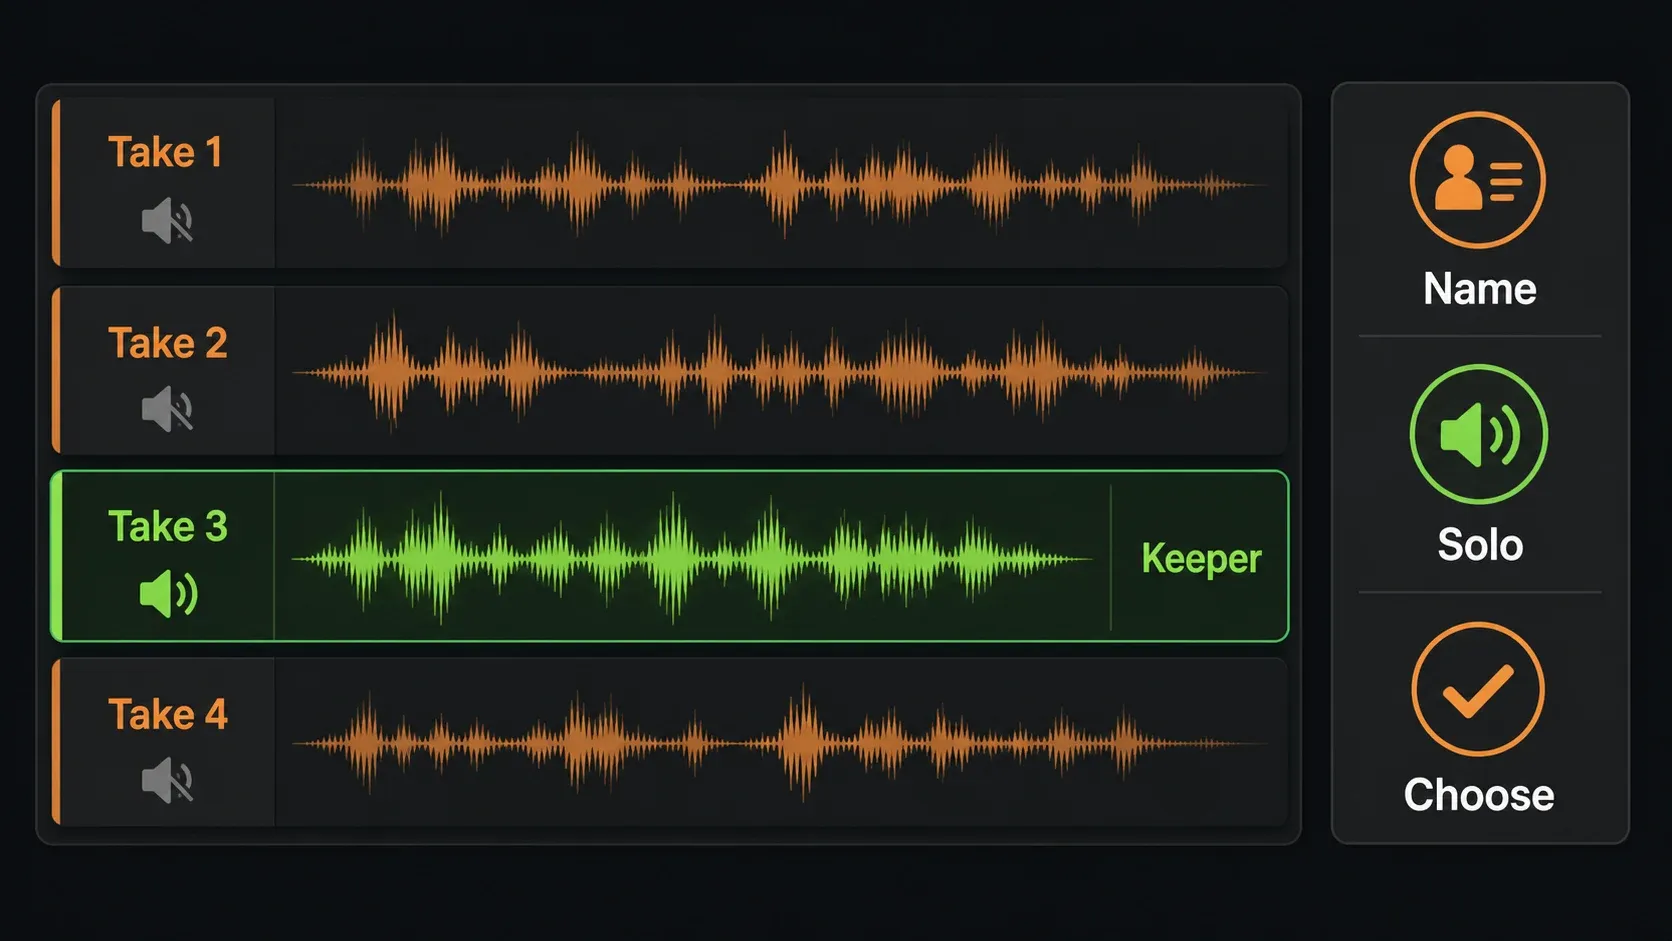
Choose a full take when it works. If you need a composite, retain the source takes and assemble the chosen phrases on an editing lane. Listen across each join; short fades or crossfades can help with a discontinuity, but they do not fix a mismatched note or word. Loop recording stores performances; it does not automatically build the finished comp.
Keep the project and its actual audio files together in your backup. Current Project General Settings lets you use the common user-data locations, store data relative to the project, or choose a specified data folder. You can also right-click a Mixer insert's disk-record arm to choose a recording file name/location. Check that actual destination before a long session.
A project data folder collects generated recordings, but does not automatically copy every sample you imported from elsewhere. Review the copy/move choices when gathering files. Saving an FLP alone is not the same as making an independent copy of all its external WAV files.
Do not treat Delete or Undo as safe archiving. Deleted recordings can later be moved to the operating system's trash when the relevant undo/redo history is no longer available or FL Studio closes. Preserve the takes you need before cleanup. On a licensed installation, reopen the saved project and verify that its audio still loads; in standard Trial, do that check after purchase/unlock and keep the current session available in the meantime.
Fix common loop-recording problems
It plays the range once and stops
Check Song mode and the actual Loop recording switch. A selected ruler range alone is not the same as enabling recording repetition. Recreate the time selection and inspect recording markers or automation if controls change unexpectedly. Test the transport before performing the part again.
It loops, but no new Audio Clips appear
Check Audio in the main Record filter, the main Record arm, the input insert's disk arm, Song mode and Auto-create audio clips. Confirm the file destination is writable and has space. If you are recording only into Edison, audio stays there until you send or save it; automatic Playlist child takes are not the expected result.
I hear every earlier take, or the backing is in the new file
For silent alternatives, turn Blend off and check for manually unmuted clips. For unwanted sound inside a recording, inspect EXT versus a mixed/post-effects pickup and check the source for loopback or microphone bleed. Muting an old clip after recording cannot remove audio already captured into the new WAV.
The beginning glitches, or the whole take lands late
These are different problems. Try a lead-in inside the loop for a boundary-only glitch. For early/late recorded placement, check the recording latency-compensation and input-delay settings; they do not reduce the delay you hear while monitoring. For ongoing crackle or an uncomfortable live echo, work through the audio settings and latency guide before collecting more takes.
Edison has no useful markers, or earlier audio disappears
Check that Edison is recording in On play while the main Playlist transport actually loops. Merely looping playback inside Edison is a different operation. If older audio disappears, inspect For: a finite recording limit deliberately rolls over. Stop, export what you need, and choose a suitable capture method before continuing.
Check the workflow before the full session
Use the five-bar selection above and record a few deliberately short passes. After stopping, confirm that complete passes exist, that only the intended source was captured, and that one take can play without the others. A partial last pass may also exist; listen before labeling it a failed recording.
Save, check the WAV location, and preserve your work. Once that small test behaves as expected, record the real phrase. For the next stage—from input setup through editing and mixing—use the Recording guides.
Frequently asked questions
How do I loop-record multiple takes in FL Studio?
Use Song mode, a Playlist time selection, Loop recording on and Blend recording off. Select the external input, arm its Mixer insert and enable Audio in the main Record filter. Auto-create audio clips and Group loop recorded takes place the passes beneath the linked Playlist Audio Track. For a manual Record-then-Play start, turn Recording starts playback and Wait for input off first.
How do I stop hearing the previous take?
Turn Blend recording off for separate audio takes and check that old clips have not been manually unmuted. Live-input monitoring is separate: choose the interface's direct monitoring or FL Studio monitoring according to your setup.
Should I use Playlist recording or Edison?
Use the Playlist for separate disk-recorded takes or audible sound-on-sound layers with suitable routing. Edison records continuously into RAM and adds markers in On play mode, letting you export a selected region. Check its For limit because finite limits overwrite older audio; Ever is still RAM-limited.
Why does loop recording create no Audio Clips?
Check the Audio filter, main Record arm, Mixer disk arm, Song mode, Auto-create audio clips and recording destination. An Edison-only recording remains in Edison until you send or save it, so it does not automatically create Playlist child takes.
Does loop recording automatically comp the best phrases?
No. It captures performances. You choose the keeper or assemble phrases yourself, listen across the joins and preserve the original takes before cleanup.
Can I reopen my recorded project in the Trial?
The standard time-unlimited Trial can save projects and export audio, but cannot reopen saved projects until FL Studio is purchased and unlocked. Keep needed work open and preserve the audio before closing. A special time-limited Trial can have different reopening terms.