FL Studio
To record an electric guitar directly in FL Studio, connect it to an instrument/Hi-Z input, select that input on a dedicated Mixer insert and use the EXT recording pickup. You can hear an amp simulator through FL Studio while keeping the incoming DI file free of FL Studio effects. Recording a microphone on an amp or an acoustic guitar uses the same recording controls, but a different hardware input—and it does not produce a raw electric-guitar DI.
Start with that choice. A louder amp preset cannot fix a guitar plugged into the wrong input, and a great headphone sound does not prove that you recorded the signal you meant to keep.
Edition check: this external-audio workflow requires Producer Edition or higher, as listed in Image-Line’s audio-recording prerequisites. In the standard time-unlimited Trial, select an edition that supports recording. You can save projects and export audio, but you cannot reopen saved projects until you purchase and unlock FL Studio. Keep needed work open, export what you need and check the edition/plugin requirements before closing.
Record guitar in FL Studio in ten steps
- Choose and connect the source. Use an instrument/Hi-Z input for a guitar DI, a mic input for a microphone, or the documented matching input for a modeler’s output. Never connect an amp’s speaker output directly to the interface.
- Select the interface. Open
Options > Audio settings. Use its manufacturer’s ASIO driver on Windows when available, or select the interface through Core Audio on macOS. On macOS, allow FL Studio microphone access if requested. - Set the hardware gain. Play the hardest section you intend to record. Watch the interface’s input indication, leave headroom and avoid clipping; do not set input gain from the amp sim’s output loudness.
- Link a dedicated Audio Track. In the Playlist, right-click a track header, choose
Track mode > Audio trackand select an unused Mixer insert. Name the route for its role, such as Rhythm L DI. - Select the input and pickup. Choose the mono version of the connected socket for one guitar or microphone. Click the recording-pickup selector immediately before the Input menu and choose EXT to exclude FL Studio processing. Confirm the track’s disk-record arm is on.
- Choose one monitoring path. For hardware direct monitoring, set FL Studio’s
Monitor external inputtoOff. To hear an FL Studio amp/cab chain, turn hardware direct monitoring off and set FL input monitoring toWhen armedorOn. - Prepare the recording start. Select Song mode. Enable
Audioin the main Record button’s right-click filter. For this arm-then-Play sequence, turnRecording starts playbackandWait for Inputoff. LeaveAuto-create audio clipenabled under the Mixer’sDisk recordingmenu. - Record a test. Arm the main Record button, press Play, perform a short loud passage and stop. Listen back for clipping, noise, unwanted printed effects and consistent clip placement.
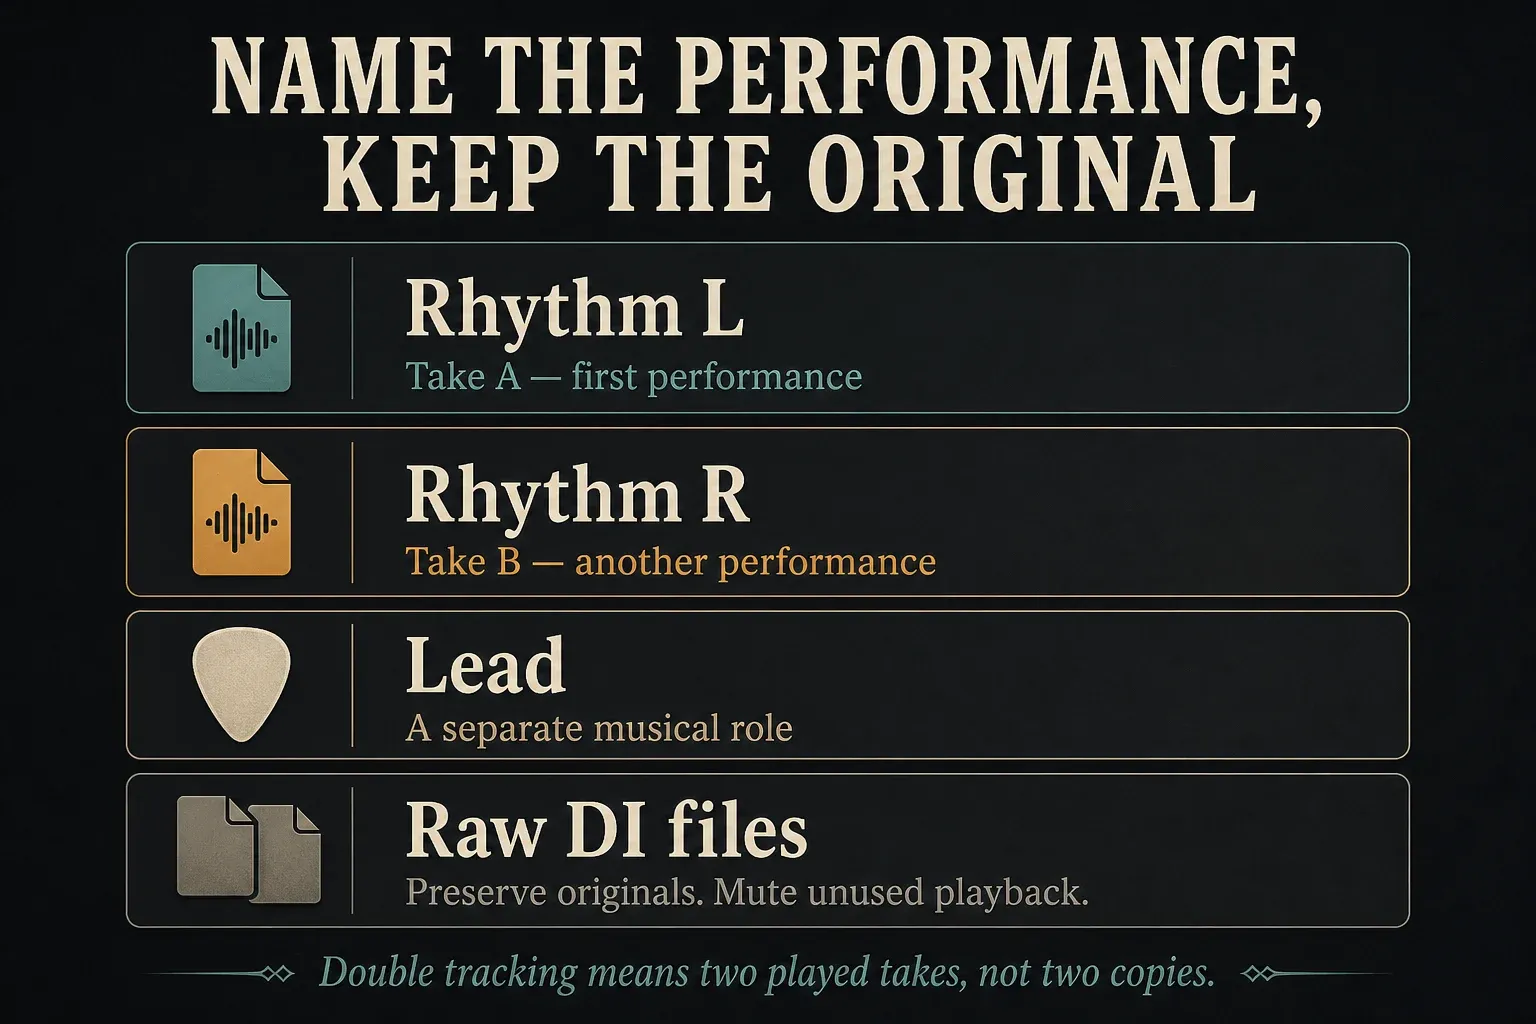
- Record the performance. Mute unused earlier takes before another pass. Record separate performances for a rhythm double; label the chosen takes and keep their original audio files.
- Save the project and its audio. Check where the recorded WAV files are stored and include them in your backup. On a licensed installation, reopen and verify playback. In standard Trial, check the files in the open session and do not close work you still need before purchase/unlock.
The broader FL Studio audio-recording guide explains device setup, Playlist recording and Edison in more detail. Here, the important decisions are guitar input, playing tone and the file you keep.
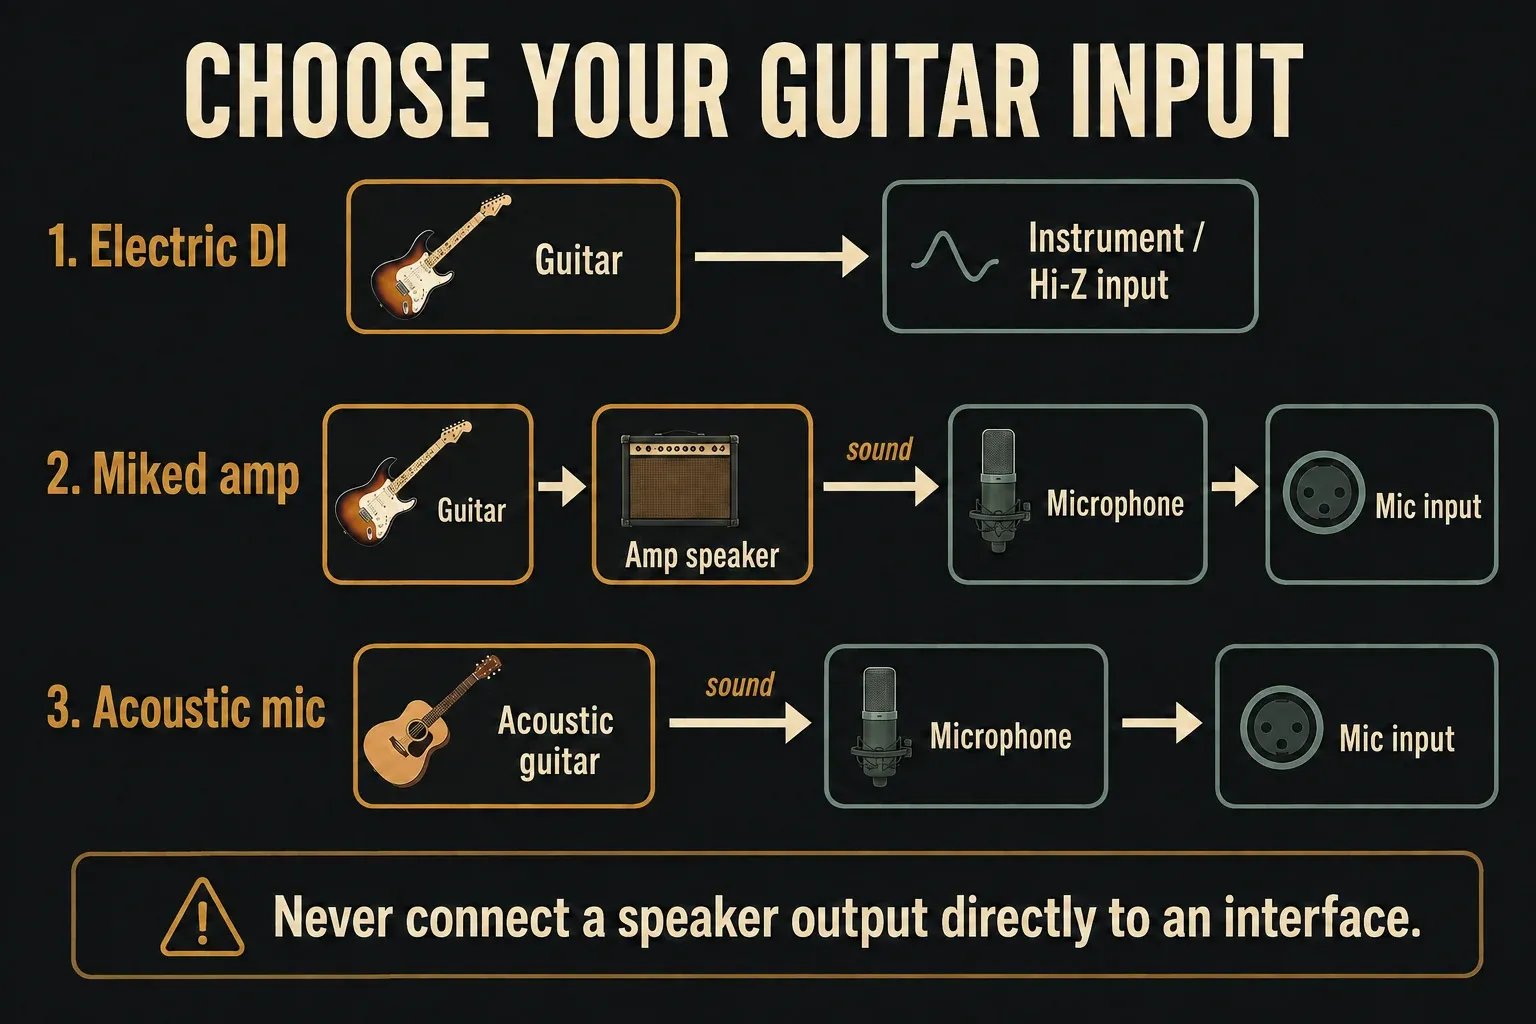
Choose the guitar recording route before the input
Electric guitar direct: keep the pickup signal
Connect the guitar with a normal 1/4-inch TS instrument cable to an input that supports Instrument, INST or Hi-Z. For an unprocessed DI, connect before any pedal or hardware processing you do not want committed. The result is the pickup signal, not the sound of a loudspeaker in a room.
If the interface has no instrument input, a suitable instrument DI box can feed its microphone input. Focusrite’s instrument-input troubleshooting explains why an unsuitable mic or line connection can sound weak, dull, distorted or noisy. Combo sockets do not necessarily switch to instrument mode automatically; check the input’s documented capabilities.
Microphone on an amp: keep the amp sound
Here you record the amp, speaker, microphone and room as part of the performance. Connect the microphone to a microphone input. EXT keeps later FL Studio effects out of the recording; it cannot remove distortion, cabinet tone or room sound already captured by the microphone.
If you also want a raw DI, use a suitable DI/split arrangement before the amp: one path feeds the amp, another records the guitar separately. A spare copy of the amp-mic file is not a clean DI.
Acoustic guitar: microphone or pickup?
A microphone captures the strings, body and room. An acoustic pickup captures its own transducer signal. Choose the sound you need, then match the input to the pickup or preamp’s documented output. Do not assume that every acoustic preamp outputs the same level.
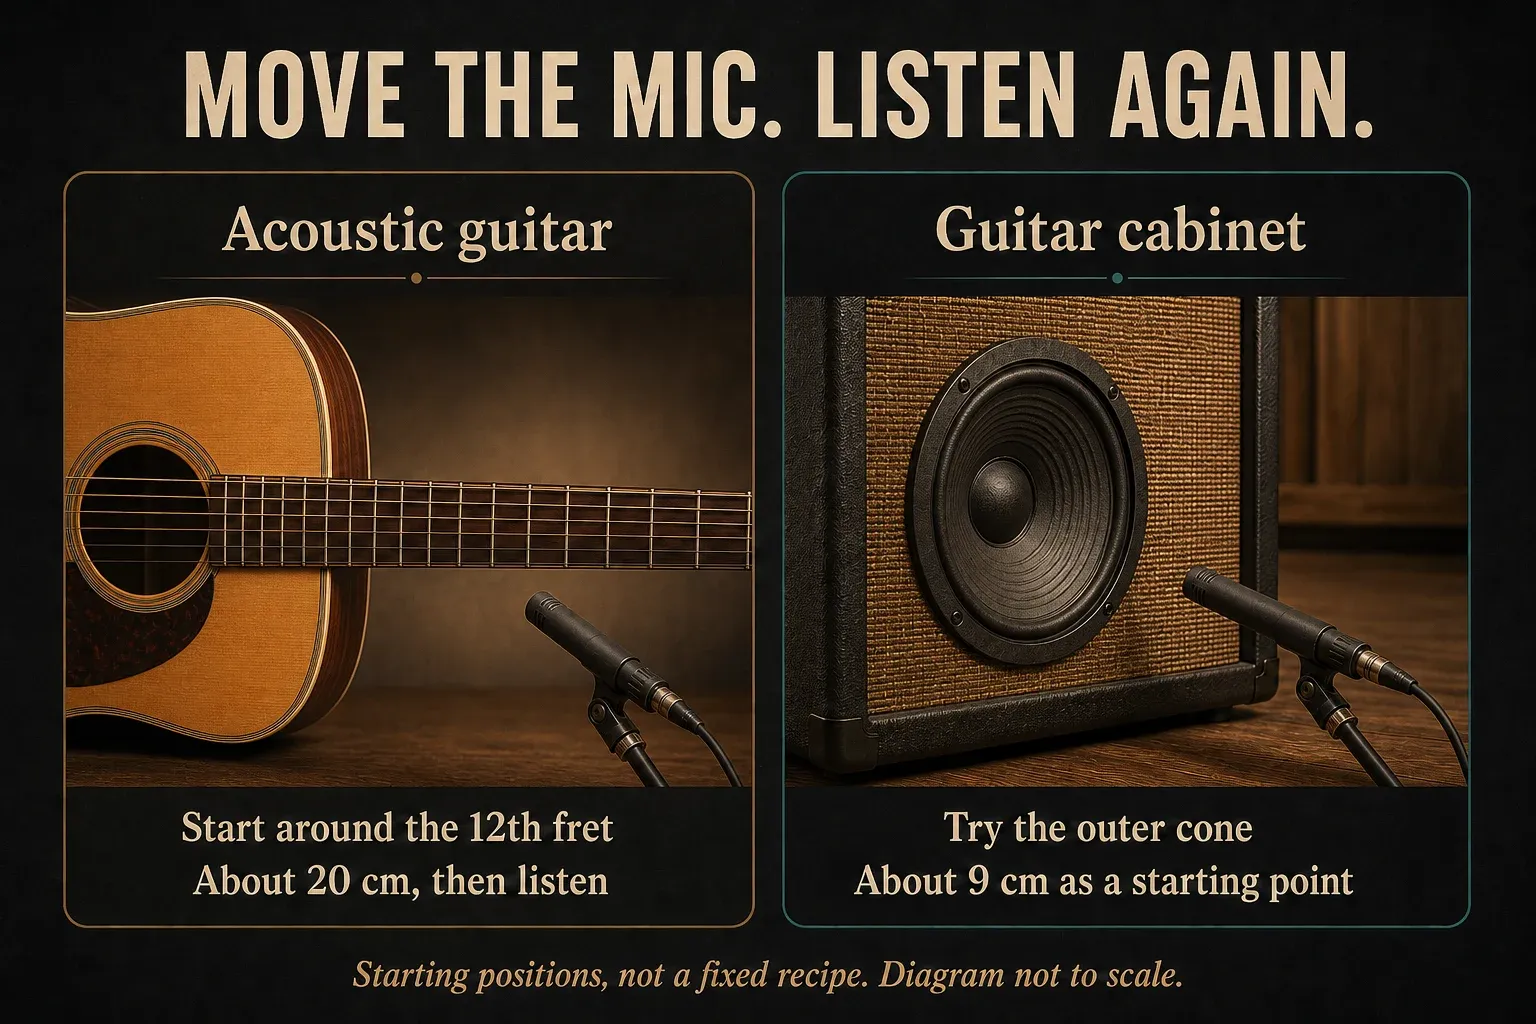
For a first microphone position, try roughly 20 cm from the 12th-fret area, as suggested in Shure’s home-recording guide. Record a phrase and listen in the song. This is a starting position, not a measurement every guitar must obey.
Use the right input—and keep speaker outputs out of it
For a passive electric guitar, use the interface’s instrument/Hi-Z mode. Active pickups, pedalboards and modelers need a little more checking: their output levels vary, and a modeler may offer line-level or USB recording outputs. Follow the output device’s instructions and match that output to the interface input.
Never connect a powered amplifier’s speaker output directly to an audio interface. Use only a documented recording/line output or a correctly rated load-box setup with an appropriate output. An ordinary instrument DI box is not automatically a speaker load. Even when using a line output, keep whatever speaker or load the amp manufacturer requires connected. Two notes explains the different jobs of a load box, DI and reamp box. If you cannot verify the exact amp and connected device, do not make the connection.
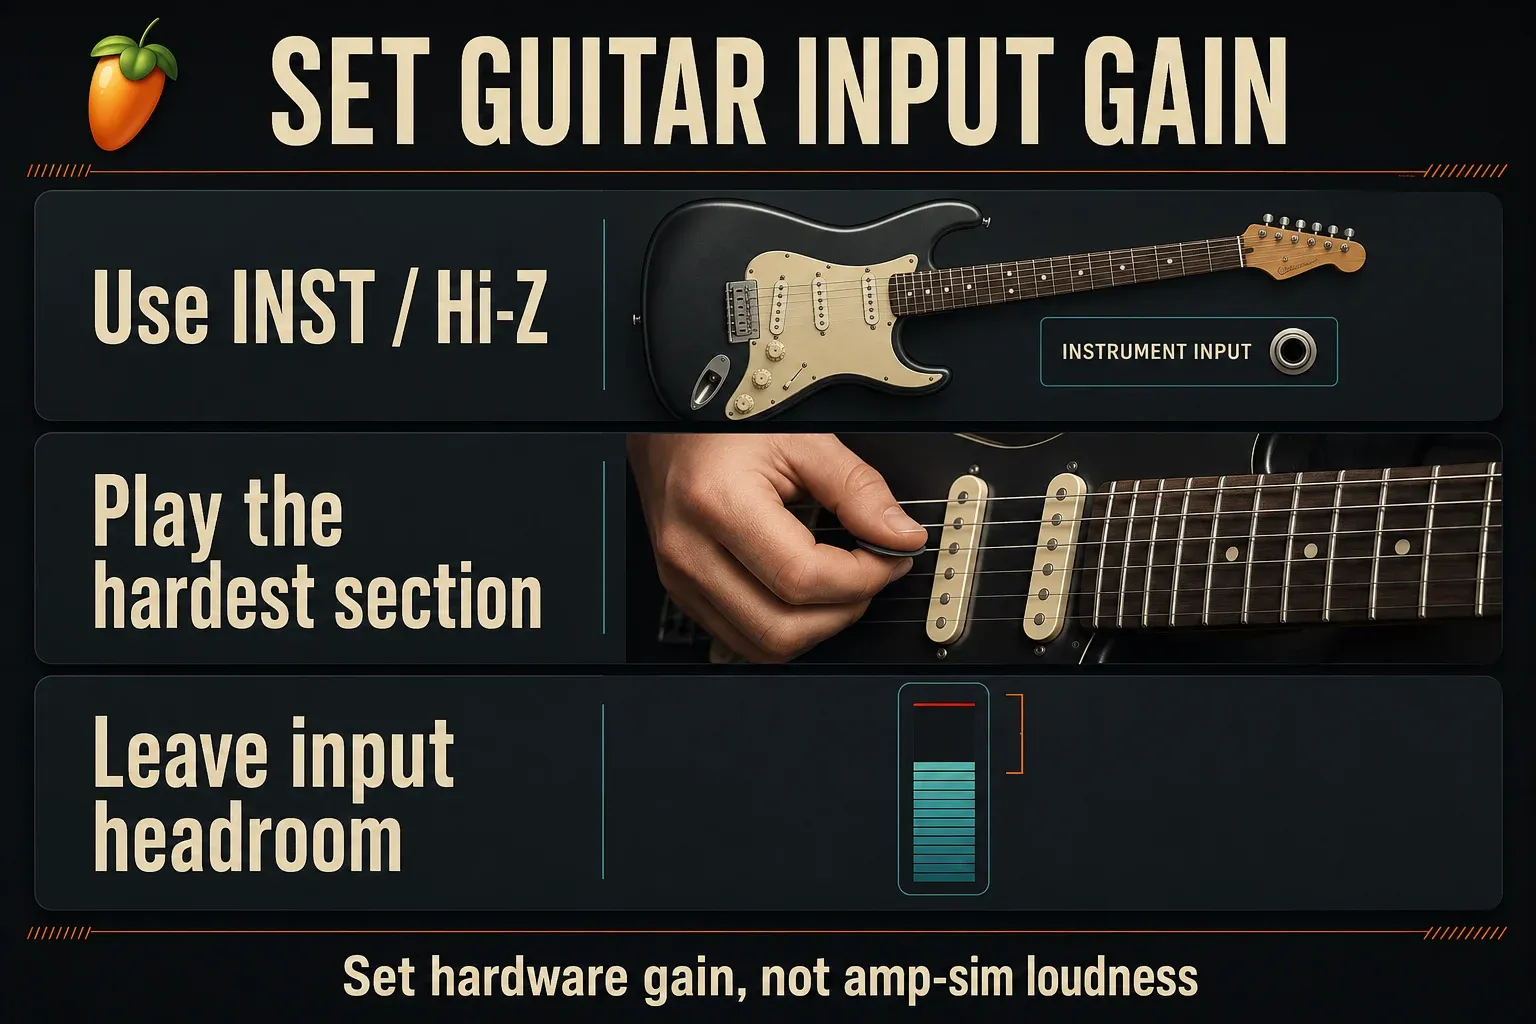
Set guitar input gain without chasing a magic number
Watch the interface’s input meter or clipping indication while you play the hardest palm mute, chord attack or lead accent in the part. Set its hardware gain so those attacks do not overload the input. Then listen to a recording with FL Studio effects bypassed. A distorted amp preset can disguise distortion you did not intend to record.
There is no single gain-knob position for every pickup and interface. Start from the interface manufacturer’s guidance and leave room for a harder-than-expected attack. Increasing an amp sim’s output is a listening-level change, not a repair for a weak connection. Lowering a Mixer fader cannot undo clipping that already happened before the audio reached FL Studio.
Weak or intermittent input? Check the simple things first
Connect the guitar directly, bypass the pedalboard and try a known-good instrument cable. Check the guitar’s volume, pickup selector, tuner mute and any active-pickup battery. Then try another compatible interface input. If the fault follows the guitar or cable, rebuilding the FL Studio Mixer is unlikely to help.
Create a dedicated FL Studio guitar Audio Track
The manual setup in the ten steps gives you time to check the source before transport starts. After linking a Playlist lane to a Mixer insert, select the connected input and verify the disk-record arm. The clickable recording-pickup selector sits immediately before the Input menu; use it to choose EXT and find the separate external-input monitoring options. For a custom WAV filename or location, right-click the Mixer track’s recording icon. The resulting clip is linked to an audio file on disk, not stored as audio inside the FLP.
There is also a quick route: the toolbar microphone’s Into the Playlist as an audio clip command creates an Audio Track and opens the input selector. Selecting that input starts recording after a four-click count-in. Set up the instrument, gain and monitoring before using it. It is not just an alternative way to open an idle input menu.
Use names such as Rhythm L DI, Lead Amp Mic or Acoustic Mic. The Mixer routing guide explains insert, bus and Master connections if the lane-to-insert relationship is unfamiliar.
Why a mono input fixes many one-sided recordings
One guitar output or microphone usually feeds one interface channel. Selecting a stereo pair can put that signal on only its left or right side. Choose the connected socket from the Mixer input menu’s mono list: FL Studio feeds that source into both channels of its stereo Mixer track. You can then pan the part deliberately.
This does not mean every guitar setup must be mono. A stereo pedal or modeler may have two distinct outputs worth recording together; select and cable both correctly. If a mono test is still one-sided, check pan and output routing rather than recording the whole session again on the same assumption.
Use an insert, not the Master
A dedicated insert makes the guitar route easier to inspect and mix independently. The Master receives other song audio; pickup modes that include internal audio can capture that material too. EXT excludes internally routed Mixer audio, but a separate guitar insert still gives you a clearer input and effects route.
Record a dry DI while hearing the amp sim
For a guitar connected directly to the instrument input, place your amp/cab chain on its Mixer insert and choose EXT as the recording pickup. Enable Monitor external input > When armed or On and disable hardware direct monitoring if you want to hear only the software-processed input.
The file receives the interface input before FL Studio effects, while the monitored sound passes through the insert’s plugins. Recorded Audio Clips normally return to that originating insert in Audio Track mode. Hearing the amp again during playback therefore does not prove it was printed into the file: bypass the chain and listen.
EXT does not undo upstream processing. Pedals, a modeler, a miked amplifier, interface processing or a processed input/loopback source can already be part of the incoming signal. Call the file a dry guitar DI only when the selected source really is that unprocessed DI.
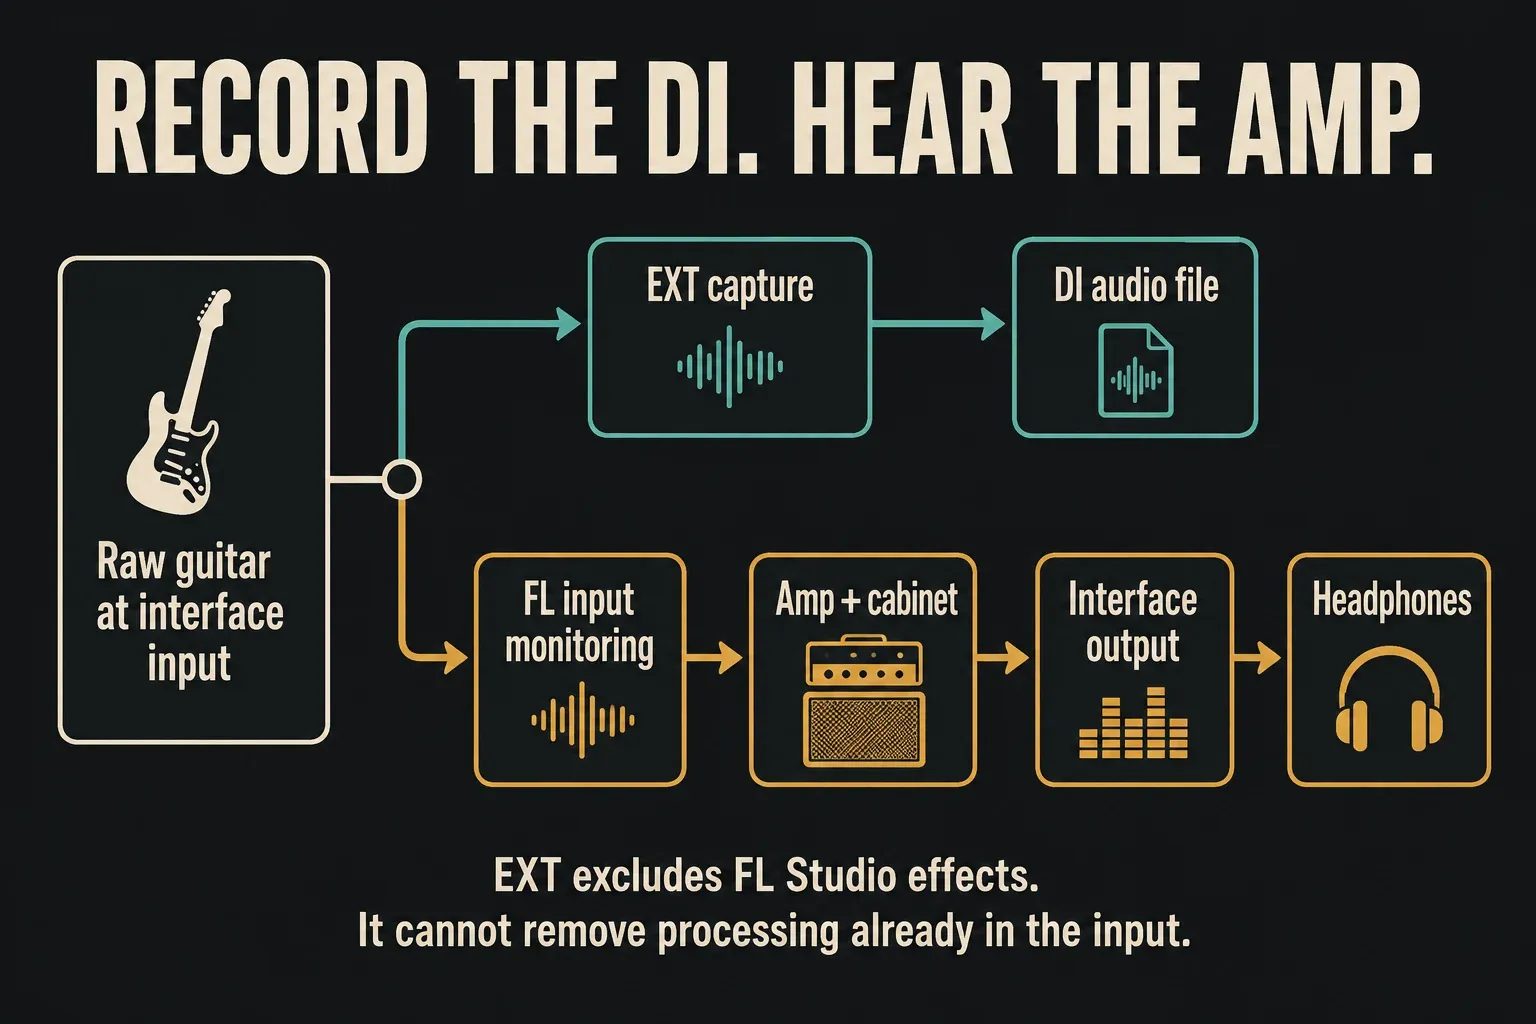
When should you print the effects?
Print a sound when committing it is deliberate, not because the headphones sounded good. The FX pickup records after the last Mixer effect slot and can include internally routed audio too. It is not the same pickup point as track EQ, level, pan or mute. Image-Line’s recording-pickup reference distinguishes those stages.
For a flexible DI session, keep EXT and save the intended amp settings with the project. If you intentionally record a processed version too, label it clearly so it is not mistaken for the raw source.
Check the cabinet stage before blaming the DI
The amp model and speaker-cabinet model do different jobs. Focusrite’s amp-sim explanation separates the amp’s core tone from the cabinet/IR stage that shapes it. Many amp plugins already include a cabinet; others use a separate stage.
If the result is unexpectedly harsh, check what is enabled before adding corrective EQ. Do not add a second cabinet processor simply because the first one is inside the amp plugin. Use the stock-plugin guide to identify available native effects, then choose a small chain you understand.
Choose direct or software monitoring
Hardware direct monitoring sends the interface input to its headphone/output mix without the trip through FL Studio. It still sends audio to the DAW for recording. Focusrite describes this as a near-zero-latency monitoring path, not an absolute zero-delay guarantee. It does not include an amp sim running inside FL Studio; upstream hardware tone may still be audible.
Software monitoring sends the input through FL Studio’s amp/cab chain and back to the interface output. That lets you play into the intended tone, but the buffer and processing path add delay. Use wired headphones from the intended monitoring device and keep listening levels comfortable.
If a thin direct guitar and a delayed distorted guitar are both audible, check for two live paths. For direct monitoring, set FL Studio’s Monitor external input to Off. Leave the recording pickup at EXT; input monitoring is a separate control. For software monitoring, disable the interface’s direct path and use When armed or On in FL Studio. Also check unused older takes if the apparent doubling continues.
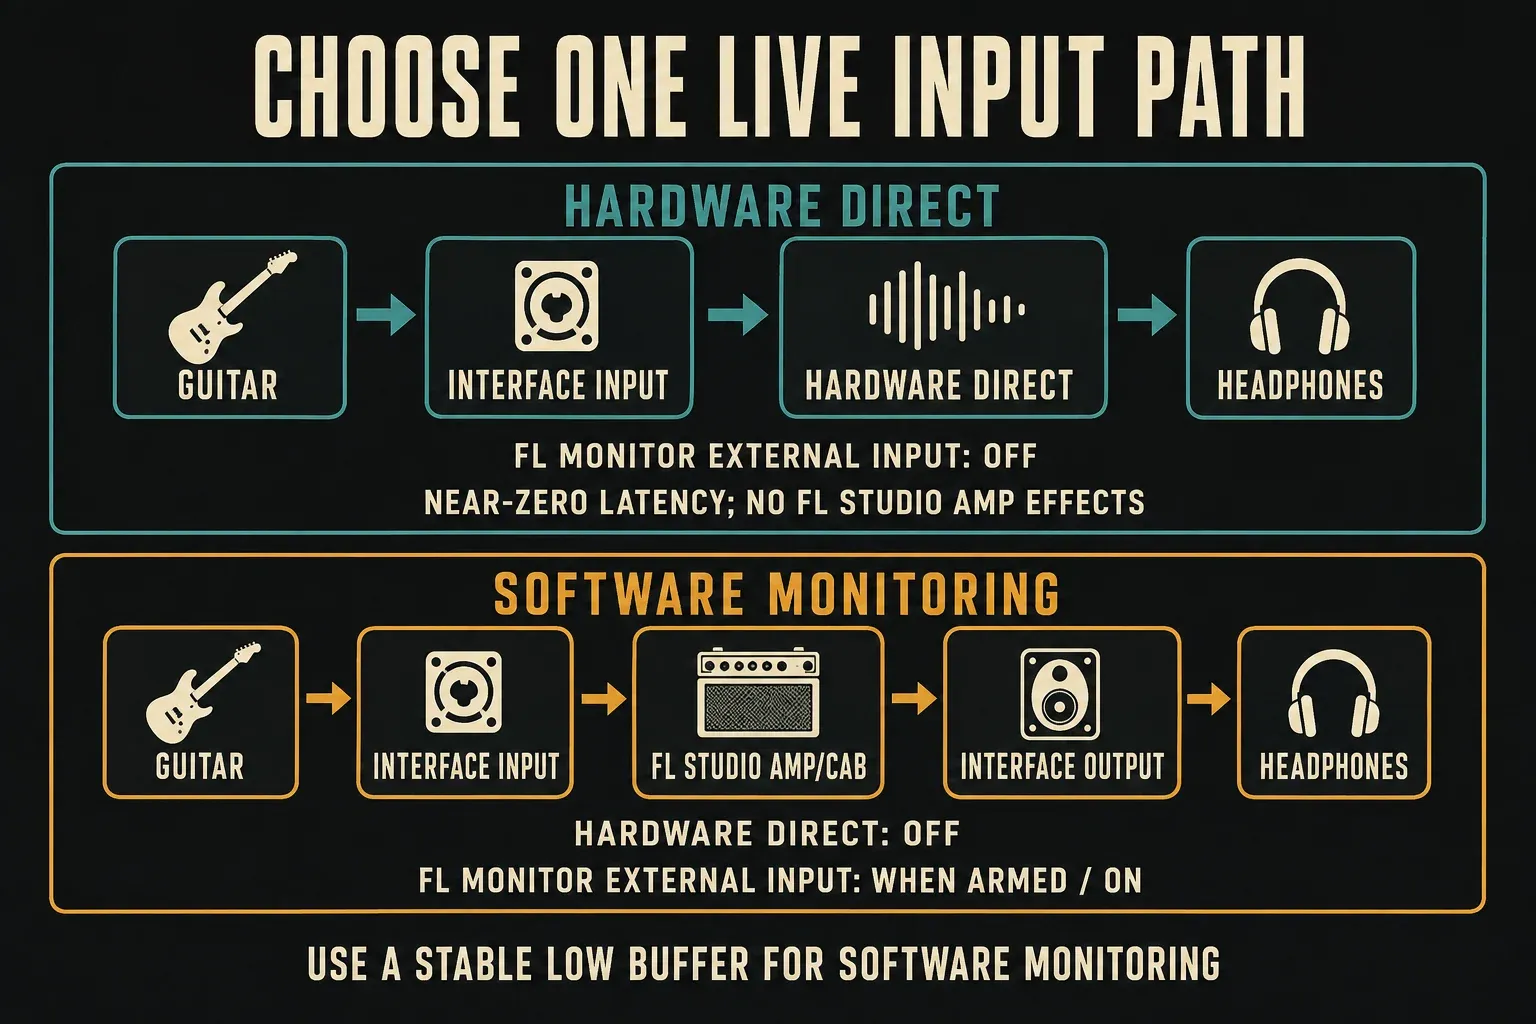
Reduce monitoring delay without making the session unstable
Start with the correct interface driver and a small tracking project. Lower the buffer only while playback stays free of audible glitches. Image-Line’s current Audio Settings guidance recommends 128 samples as an Apple Silicon starting point, with specified higher values if needed. That is not a universal setting for every computer or a measurement of total round-trip latency.
Temporarily remove processing that adds significant delay to the monitored route. Some look-ahead, linear-phase or oversampling modes add latency, but the effect depends on the plugin and mode; check its reported delay and documentation. Try a simple amp/cab chain rather than tracking through a finished mastering setup. If the smaller buffer crackles, work through the crackling-audio checklist instead of accepting damaged takes.
A late recording is a different problem
Live monitoring delay is what you feel while playing. Recorded alignment is where the new clip lands against the arrangement. The Mixer’s disk-recording latency compensation affects the latter, not the live sound.
For repeatable early or late placement, test with the native interface driver, check recording latency compensation and then the documented Playback Tracking or per-input delay controls. Do not guess an offset from one loose performance. The audio-settings and latency guide helps separate those checks from buffer changes. Hardware reamping can add a real round trip that needs its own alignment check.
Place a microphone by listening, not just measuring
Acoustic guitar: start around the 12th fret
Try the starting position described above, then record a phrase at performance level. Moving toward the sound hole can add bass; moving away can help when it is boomy. Change one thing at a time, including the player’s position in the room, and compare in the backing track rather than judging only the solo sound.
Guitar cabinet: compare positions across the speaker
Shure’s home-recording guide suggests an outer-cone starting position about 9 cm away. Its separate amp-miking guidance explains the usual contrast: toward the center is brighter, toward the edge is less bright. These are experiments, not a guarantee that one spot suits your amp, mic and part. Keep a note of the position after you like the playback.
Find hum and hiss before adding a gate
Start with the source, then add processing back in:
- Listen to a DI test with the FL Studio effects bypassed.
- Connect directly with a known-good instrument cable.
- Check instrument input mode and hardware gain.
- Check the guitar’s controls, pickup position and any active battery.
- Try a different playing position away from nearby power supplies and other interference sources.
- Add the amp/cab plugins one at a time and listen during rests.
Radial’s guitar-noise guidance distinguishes pickup interference and ground-loop problems. A change when you touch the strings is not enough to diagnose the wiring from an article. If you suspect faulty equipment or unsafe power, stop using that setup and ask a qualified technician. Never remove a protective mains earth/ground to reduce hum.
A gate can mute low-level noise between phrases, but it does not fix the source of that noise. Set it by listening to quiet notes and decays too; an aggressive threshold can cut off the performance you wanted to preserve.
Make a test take before recording the whole part
Play a loud passage, stop and listen back with your hands off the guitar. Check:
- Input: the interface did not clip on the hardest attacks.
- File: bypassing FL effects reveals the source you intended—raw DI, modeler or microphone—not an accidentally printed plugin chain.
- Tone: the playing sound supports the part without hiding a faulty input.
- Noise: rests and decays are usable.
- Timing: the live response was playable and the clip placement is consistent.
- Storage: the actual recorded WAV is in a known location and included with the project backup.
Do the reopen check on a licensed installation. Standard Trial cannot reopen saved projects until purchase/unlock; verify and export needed work while the session remains open instead.
Keep doubles, leads and raw files identifiable
For a real rhythm double, record two performances: for example, Rhythm L — Take A and Rhythm R — Take B. Copying and panning one unchanged clip does not create a second performance. Choose how wide to pan them by listening in the arrangement, not by treating every guitar as a mandatory hard-panned pair.
Keep leads, harmonies and textures clearly named. Preserve the original DI files where you recorded DI; mute unused clips rather than letting every safety copy play at once. RhythmL_T03_DI tells you more than Guitar final new. The project-organization workflow covers the wider folder and naming setup.
Choose the performance before spending time editing every pass. If you need repeated attempts over one section, use the loop-recording guide to set the loop range and decide whether earlier takes stay audible. A named source and a deliberate monitoring route make those repeated passes easier to judge.
Reamp the DI without feeding it back into itself
Changing an amp plugin later uses the existing DI file. Sending that file to a real guitar amp needs a hardware route. For a standard amp instrument input, Radial’s reamping workflow uses a dedicated interface line output through a reamp box to match the level and impedance, then records the miked amp on a new input.
Send only the intended DI to that dedicated output. Do not route the new amp-mic return back to the output feeding the reamp box: that creates a feedback path. Follow the particular amp and reamp device manuals, including any required speaker/load connection. If you cannot verify the route, keep the DI and postpone the hardware experiment.
Save the guitar files, not just the project
Image-Line’s project-format reference makes the distinction clear: an FLP does not contain its separate audio samples. Back up the recorded WAV files with it. A zipped project includes Audio Clip and Sampler files used by the project, but not every external library used by third-party plugins unless that plugin’s saved format embeds the data.
Before moving or deleting a recording folder, verify the backup and, on a licensed installation, reopen it and play the guitar parts. In standard Trial, leave needed work open until purchase/unlock and export what you need. A convincing live tone is useful; an identifiable recording you can actually return to is the result worth protecting.
Use the FL Studio Recording hub for the next step, whether that is another input source, looped takes or editing the recorded performance.
Frequently asked questions
Can I plug a guitar directly into my computer?
Use an audio interface with a suitable instrument/Hi-Z input, or an instrument DI box feeding a microphone input. A generic computer microphone socket is not equivalent to a guitar input. For a modeler with USB or line output, follow that device’s documented connection and driver setup.
Should I record guitar dry or with an amp sim?
For an unprocessed electric-guitar DI, use EXT to exclude FL Studio effects and monitor through the amp/cab chain with software input monitoring enabled. EXT cannot remove pedals, modeler processing or amp tone already present in the incoming signal. Print plugin effects only deliberately, using the pickup point you intend.
Why can I hear dry guitar and the amp sim together?
Hardware direct monitoring and FL Studio input monitoring may both be audible. To hear the FL amp sim alone, disable the hardware direct path and use Monitor external input When armed or On. For direct monitoring, set FL input monitoring Off. If doubling remains, check older takes and other monitored routes.
Why is my guitar recording only on one side?
A stereo input pair may contain your single guitar or microphone on only one side. Select that socket from the Mixer’s mono input list and record a test; FL Studio feeds it to both Mixer channels. If it is still one-sided, check pan and output routing. A genuinely stereo hardware source needs both outputs connected correctly.
Can I connect an amplifier speaker output to my interface?
No. Never connect a powered amp speaker output directly to an interface. Use a documented recording output or a correctly rated load-box setup with an appropriate output, and retain any speaker/load the amp requires. An ordinary instrument DI box is not automatically a load box. Check both devices’ manuals before connecting.
Can I record guitar in FL Studio Trial?
The standard Trial lets you test editions; choose Producer or higher for this recording workflow. You can save and export, but cannot reopen saved projects until purchase/unlock. Check required edition and plugin entitlements, and keep needed work open or exported before closing the session.