FL Studio

To bitcrush a sound in FL Studio, load Fruity Delay 3 on its Mixer insert, set Delay Model to Off, then lower Bits and Smp Rate. Set its Output Dry to zero while finding the texture, then blend the clean sound back in if it needs more definition. I’d start here because the two degradation controls stay separate and you can get the effect without adding echoes or installing another plugin.
This is a desktop FL Studio workflow for a vocal, drum, synth or sample. Fruity Delay 3, Effector and Fruity Squeeze are included across the four desktop editions; you don’t need to buy a bitcrusher just to try the sound.
Bitcrush with Fruity Delay 3, without the delay
The useful trick is Delay Model → Off. Image-Line confirms that this disables the delay while keeping sample-rate and bit reduction active. Setting the delay time very short is a different thing: use the model selector.
- Route only the sound you want to process. Select its channel in the Channel Rack, right-click an unused Mixer insert and choose Channel routing → Route selected channels to this track. If the sound already has its own insert, use that one. Play it and check that the insert’s meter responds. Loading the effect on the Master processes the whole mix.
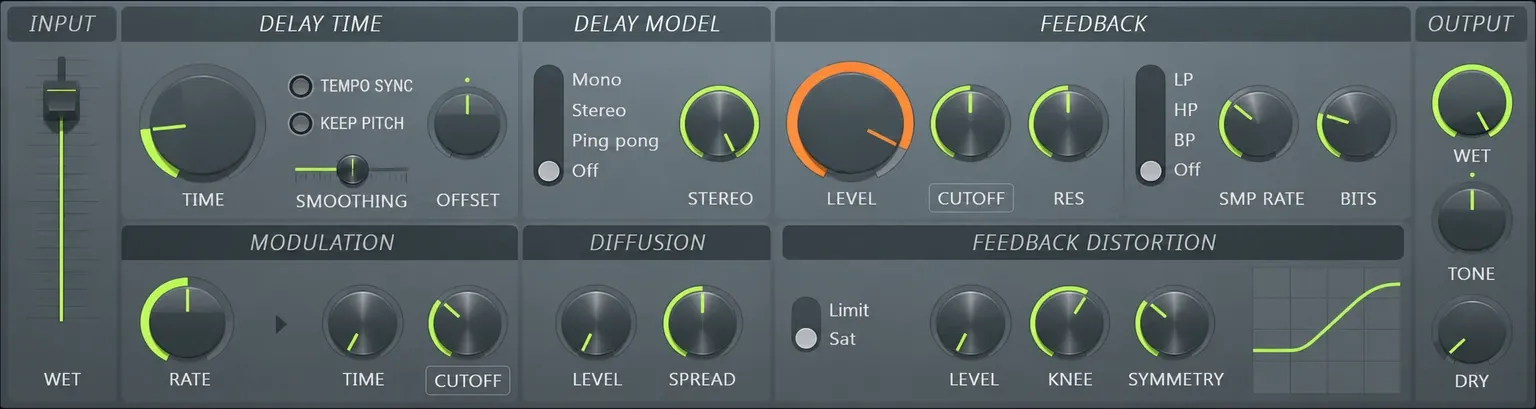
- Load Fruity Delay 3 into an empty effect slot. Leave the slot enabled and its Mixer mix control fully wet for this initial check. Open the plugin and choose Off at the bottom of the Delay Model selector.
- Hear the processed signal on its own. Keep Input Wet and Output Wet up, and turn Output Dry all the way down. Set the Feedback filter selector to Off and keep Output Tone centered. To isolate the bitcrushing, keep the Feedback Distortion Level at minimum rather than adding its separate saturation or limiting effect.
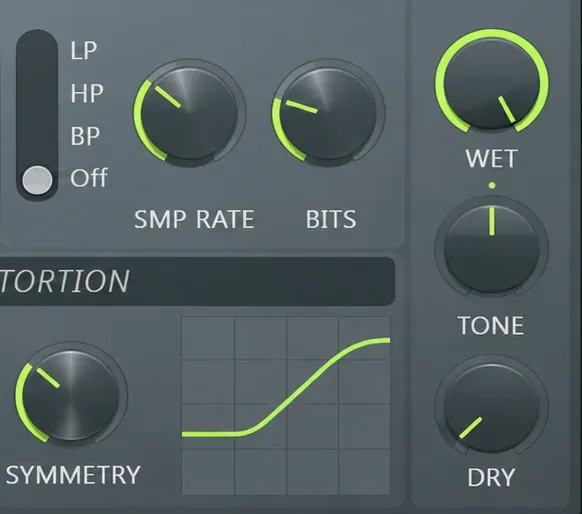
- Lower Bits first. Try about 8 bits as an obvious starting texture, then move upward for a cleaner result or downward for a rougher one. Read the value in FL Studio’s Hint Bar while adjusting the knob. Listen to a quiet note or the end of a vocal phrase as well as the loudest hit.
- Lower Smp Rate separately. Around 12 kHz is a starting choice for a deliberately degraded effect, not a target you have to reach. Move it while the same phrase loops. If the metallic edge takes over, raise the rate again; if the crunch is already right, leave this control higher.
- Blend and match the level. Bring Output Dry up for more of the original attack and clarity, and reduce Output Wet as needed. Compare the enabled and bypassed slot at a similar listening level. Leave enough headroom that louder output isn’t being mistaken for a better texture.
The Mixer’s channel-routing menu assigns the selected Channel Rack channel; a Playlist lane’s position alone doesn’t tell you which insert receives it. If unrelated sounds change too, check the routing before changing the bitcrusher.
My preference is to find the ugly, fully processed version first and then back it off. A little clean signal often preserves a vocal’s consonants or a drum’s initial hit better than pushing every control toward the clean end at once.
If a quiet tail disappears at a low bit setting, raise Bits or blend some dry signal before increasing the level of the whole track. Judge the loud hit and its quieter ending together; the most extreme setting isn’t automatically the most useful one.
Bits and sample rate change different parts of the sound
Bits reduces the precision used to represent amplitude. At low settings, the quantization texture becomes part of the sound. Smp Rate lowers the processing sample frequency; Image-Line describes the resulting loss of high-frequency fidelity and aliasing noises. These controls can work together, but they aren’t interchangeable.
| What you want | Start with | Then decide |
|---|---|---|
| A grainy vocal or synth with its rhythm intact | Lower Bits, keeping Smp Rate higher | Raise Bits if quiet endings turn too noisy; blend some dry signal for intelligibility. |
| A metallic, digital edge on drums or a loop | Lower Smp Rate | Raise the rate if the added edge overwhelms the original hit. |
| A strongly degraded accent or transition | Reduce both, one at a time | Keep the effect on that sound or passage instead of crushing the entire Master. |
The 8-bit and 12 kHz choices above are example settings for finding a texture, rather than a faithful console emulation or a recipe for every source. A cleaner setting can be the better musical choice.
Keep the project’s audio-device sample rate and normal export settings. Changing the sound inside this insert is the creative effect. Lowering the project sample rate or choosing a lower export bit depth changes a different stage of the workflow. A normal high-quality render preserves the crushed sound; it doesn’t restore the detail removed by the effect.
Use Effector LO-FI for a quick performance effect
Choose LO-FI in Effector if you’d rather shape the effect with a pad. Turn BYPASS off so the effect stays enabled after you release the pad, set DRY/WET fully wet while choosing the sound, then adjust X PARAM and Y PARAM. Blend the dry signal back afterward.
The Effector controls also allow momentary activation while you press the X/Y pad. If the sound turns clean as soon as you let go, check BYPASS before assuming the effect failed. Keep X MOD and Y MOD at their neutral center positions if you want a static setting rather than LFO movement.
I’d use Effector for broad gestures and Delay 3 when the distinction between bit depth and sample rate matters. Effector processes one selected effect at a time; selecting a different effect replaces LO-FI within that instance.
Fruity Squeeze is another stock option
In Fruity Squeeze, use Squarize for bit-depth reduction. Its separate Puncher process replaces alternating groups of samples with a chosen value; it isn’t simply a conventional sample-rate knob. The Squeeze controls explain both processes and the plugin’s filter, Mix and Gain controls.
Choose Squeeze for its particular destructive texture, rather than treating it as an exact substitute for the two Delay 3 controls. You don’t need an extra dither plugin to follow the Delay 3 route above.
Do you need a free bitcrusher plugin?
Not for this job. The stock route already gives you separate bit-depth and sample-rate controls. If you want a dedicated interface that also travels to another DAW, Kilohearts Bitcrush is free with an account and provides Rate, Bits and Mix controls.
Be careful with old recommendations for Krush. Tritik’s original Krush 1 remains a free legacy download, but it is no longer maintained. The current Krush 2 is a separate paid plugin. Don’t assume the latest product has the same price or support status as the one used in an older tutorial.
If an external plugin is your choice, finish its normal installation and scan it in FL Studio’s Plugin Manager. Installing a new plugin is optional here, not a missing step in the stock workflow.
If it echoes, sounds unchanged or loses definition
| Symptom | Check | Next action |
|---|---|---|
| Repeated echoes instead of an immediate crushed sound | Delay Model in Fruity Delay 3 | Select Off. If echoes remain, bypass other delay plugins in the signal path one at a time. |
| Only a faint change | Correct Mixer insert, enabled slot, slot mix, Input/Output Wet and Output Dry | First hear the processed signal alone with Output Dry at zero; lower Bits or Smp Rate enough to reveal which texture you’re changing. |
| Effector turns clean when the mouse is released | BYPASS and momentary pad operation | Use the BYPASS switch to leave the selected effect enabled. |
| The vocal becomes hard to understand | How much dry signal remains and how far both controls have been reduced | Raise Bits or Smp Rate, or blend more dry signal. Keep only as much degradation as the phrase can carry. |
| The effect is louder and seems better only when enabled | Output level at a similar listening volume | Lower the processed output and compare again before making the effect more extreme. |
For warmth or controlled peak shaping rather than reduced digital resolution, use vocal saturation or Fruity Soft Clipper. They solve different sound-design problems; bitcrushing doesn’t replace them.