FL Studio
FL Studio’s Riff Machine is an eight-stage Piano Roll generator that can build a note progression, turn it into chords, arpeggiate it, change its shape, vary note properties, add articulation and groove, then constrain the result to a key and range. Open the Piano Roll, choose Tools → Riff machine, or press Alt+E on Windows and Option+E on macOS.
The useful way to learn it is not to randomize all eight stages at once. Set Piano Roll Snap first, preview the chain one stage at a time, and keep only the stages that solve a specific musical problem. That gives you a phrase you can edit instead of a dense block of notes you do not understand.
Open Riff Machine on the instrument you want to write
- Select the target instrument and Pattern.
- Open its Piano Roll.
- Choose a musical Snap value such as 1/2 beat or 1/4 beat instead of (none).
- Open Tools → Riff machine or use Alt/Option+E.
- Set a short working length, then use Preview up to current step as you move through the tabs.
Launching from the instrument’s Piano Roll keeps the target clear. Image-Line also documents a main Tools route that can create a channel with an approved preset, but that extra behavior is rarely what you want when a sound has already been chosen.
The Snap choice matters before any creative setting. According to the current Image-Line Riff Machine manual, generated notes follow the current Piano Roll Snap, and the Length and Variation controls do not work when Snap is set to (none). If a knob seems dead, inspect Snap before changing the generator.
Build a controlled first riff
For a first pass, keep the chain deliberately plain:
- Enable Progression, choose a simple pattern and set the phrase length.
- Enable Chords only if you want the progression expanded into harmony.
- Enable Arpeggiation and choose one clear direction with a small octave range.
- Leave Mirror, Levels and Groove off until the pitch order works.
- Use Articulation gently so the notes separate without becoming staccato clicks.
- Enable Fit, choose the key and scale, and define a playable register.
- Preview, adjust the stage that caused the problem, then click Accept.
This order separates composition from decoration. Progression, Chords and Arpeggiation decide what notes occur and in what order. Levels, Articulation and Groove affect performance details. Fit provides the final pitch boundary. When all of them change at once, it becomes hard to tell whether a weak phrase came from harmony, rhythm, range or randomization.
What each Riff Machine stage actually changes
| Stage | Musical job | Common failure | First fix |
|---|---|---|---|
| Progression | Creates the long guide-note sequence | The foundation already feels random | Choose a simpler pattern or supply your own notes |
| Chords | Expands guide notes into chord tones | The phrase becomes harmonically crowded | Disable Chords or choose a leaner chord pattern |
| Arpeggiation | Turns chord material into a moving line | Too many octaves or constant restarts | Reduce Range and check Sync |
| Mirror | Reverses time order or inverts pitch shape | The phrase loses its recognizable contour | Use one mirror operation, not both |
| Levels | Varies velocity, pan and other note properties | Expression feels erratic | Reduce the relevant multiplier and keep pitch variation low |
| Articulation | Changes note lengths and transitions | Notes become clipped or overlap | Bring Multiply closer to neutral and lower Variation |
| Groove | Moves starts and durations toward a timing template | The line sounds late, stiff or uneven | Reduce Start time/Duration strength and check Sensitivity |
| Fit | Constrains key, scale and register | Notes jump to awkward octaves | Widen the keyboard range or change the snap direction |
Progression and Chords create the source material
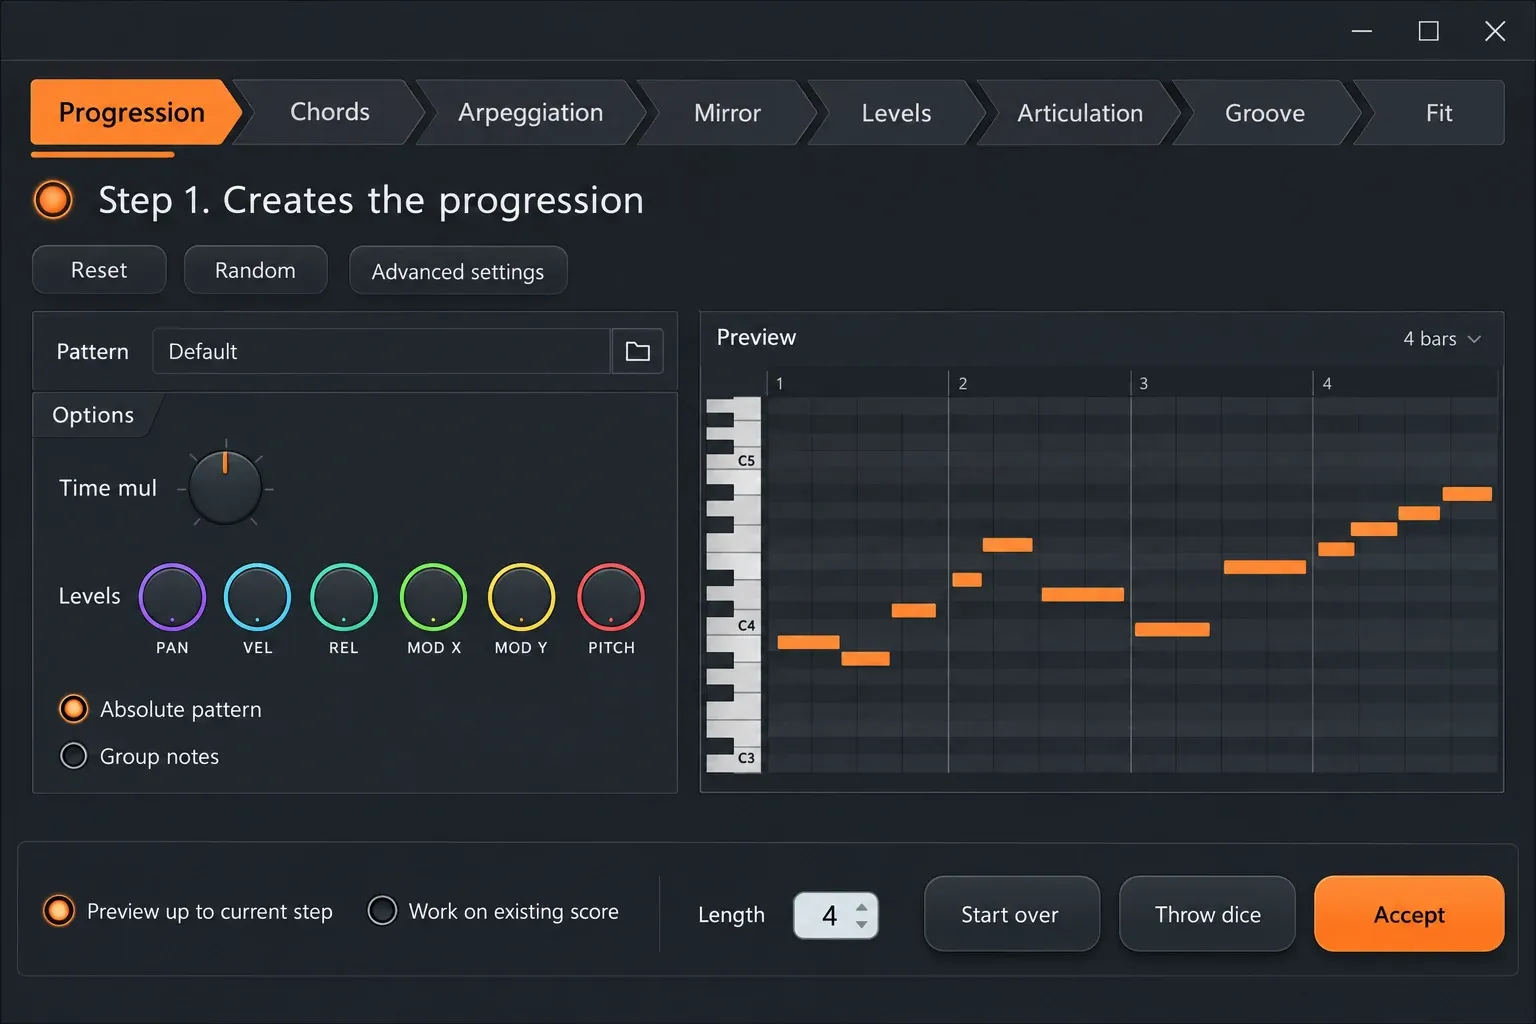
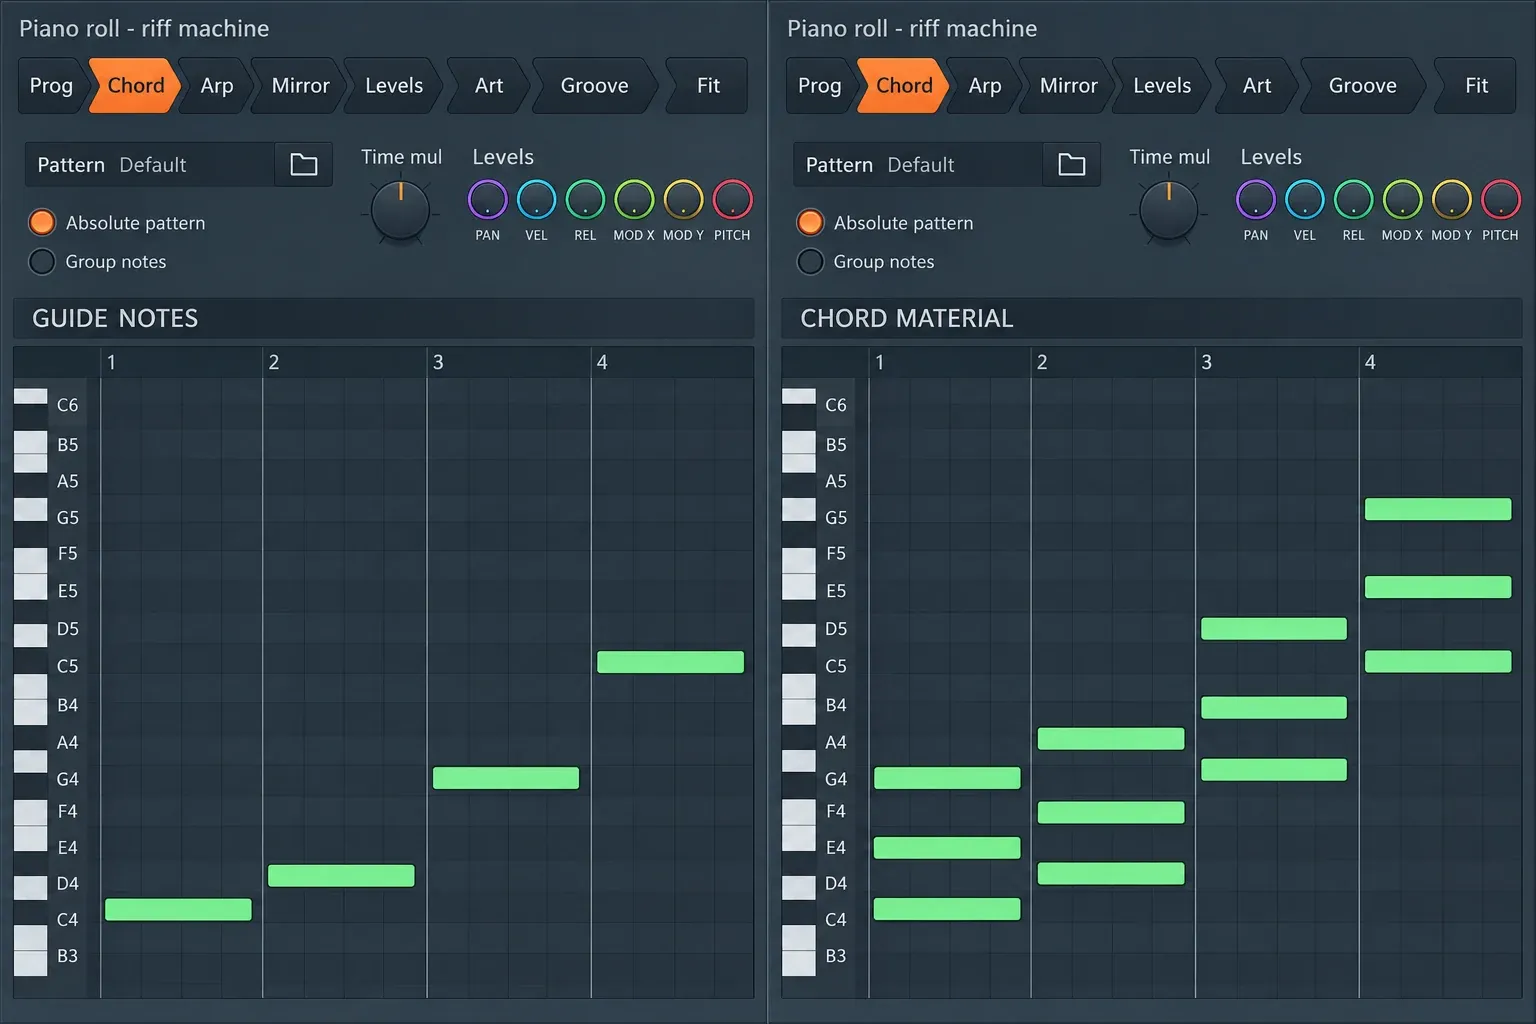
Progression selects a sequence of long notes. Its pattern and multipliers establish the broad contour before the phrase is sliced into a rhythm. Image-Line recommends a progression of at least eight bars when you want later stages to have maximum room to act. That is guidance rather than a minimum: a four-bar loop is easier to judge while learning, while eight bars expose repetition and range problems more clearly.
Chords transforms the note sequence into stacked notes for the arpeggiator. It does not replace the separate FL Studio Chord Progression Tool. Riff Machine’s Chords stage is one part of a destructive note-generation chain; the newer chord tool is designed around creating and revising the harmonic progression itself.
Both stages expose pattern controls and multipliers for time, pan, velocity, Mod X, Mod Y and pitch. Treat those multipliers as modifiers, not a checklist. A pan multiplier has little to work with if the chosen source pattern contains no meaningful pan variation. Pitch multiplication can also make the later Fit stage do heavy corrective work, which often produces larger octave changes than expected.
Arpeggiation decides the motion
The Arpeggiation stage is where stacked notes become a line. Choose the pattern first, then make four decisions:
- Pattern mode: Normal preserves the pattern, Flip inverts it and Alternate switches between orientations.
- Time mul: changes pattern note duration relative to the selected pattern.
- Range: sets the octave span and direction. Normal rises, Flip falls and Alternate moves up and down.
- Sync: decides when the arpeggio restarts. Time keeps repeating, Block restarts at a new block and Chord restarts on each new chord.
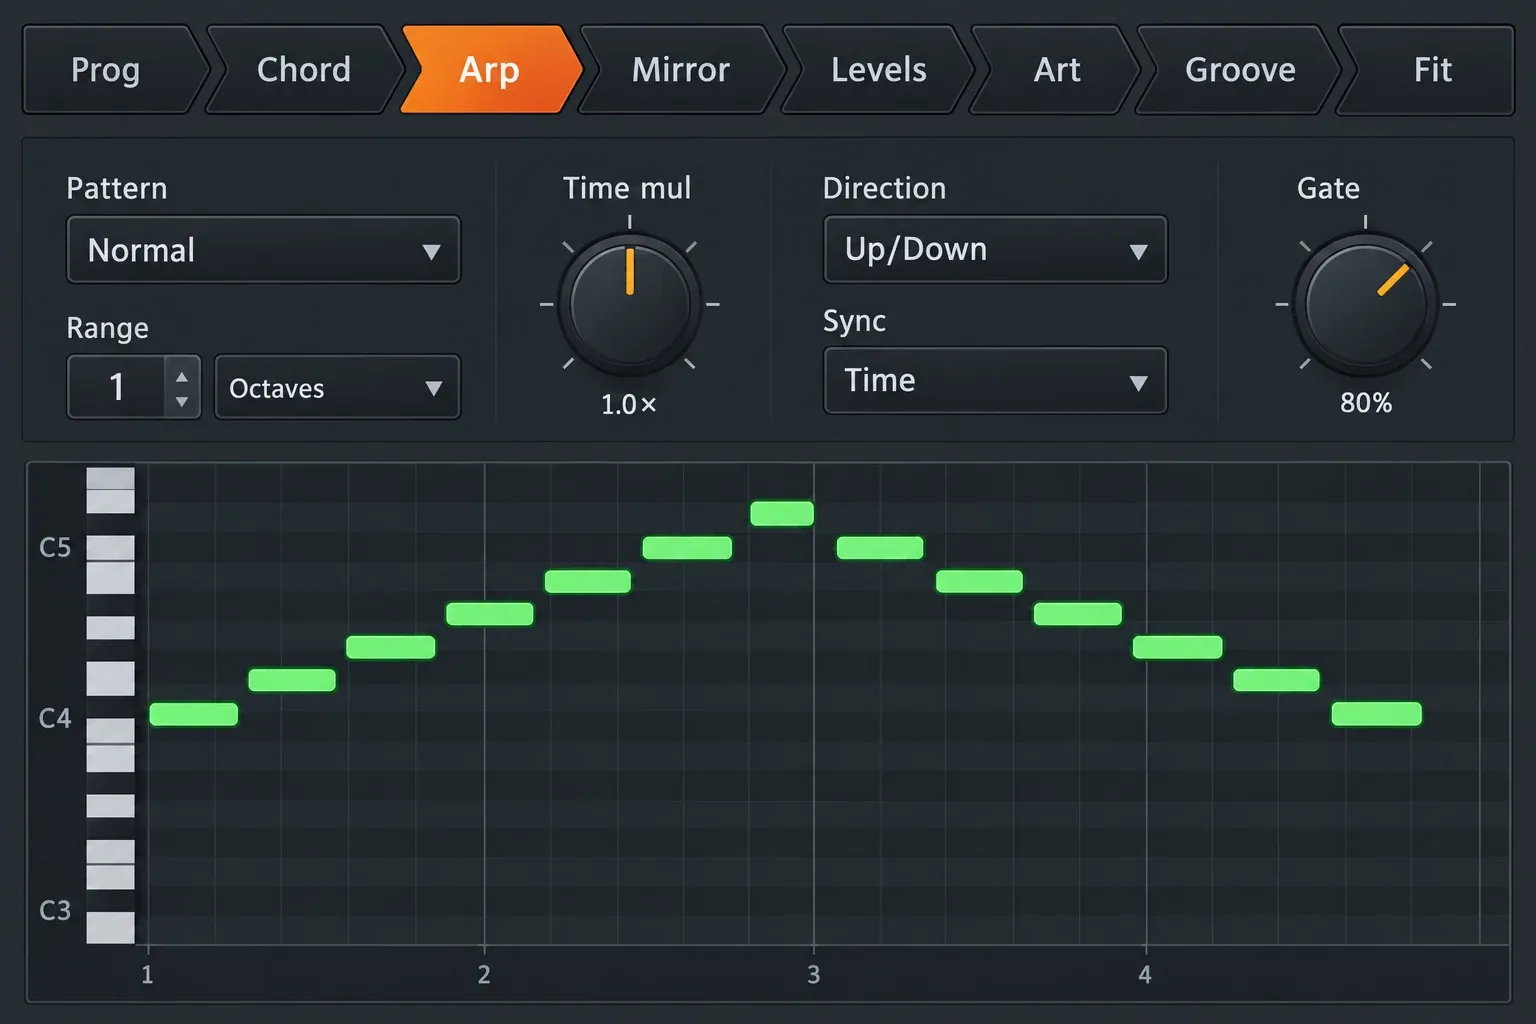
Gate trims notes to create separation. It does not set the arpeggio speed. If you want a faster pattern, change the pattern or its time multiplier; if you want the same rhythm with shorter notes, change Gate. This distinction also applies in the dedicated FL Studio arpeggiator workflow, which is the better article when your task is only to turn selected chords into an arp.
Start with one octave and a predictable Sync mode. A three-octave alternating pattern can sound impressive for a moment, but it often hides whether the harmony works. Expand Range only after the one-octave version has a contour worth keeping.
Use Mirror as a variation, not a rescue button
Flip horizontally reverses the note pattern in time. Flip vertically inverts its pitch shape. Preserve start times keeps the relative timing positions when the horizontal transform is applied. These controls are useful for finding a response phrase after the original already works.
If the source line has no clear motif, mirroring it usually creates a differently confusing line. Disable Mirror, solve the Progression and Arpeggiation stages, then audition one flip at a time. Horizontal flip is the more obvious choice for a second-half answer; vertical flip makes a larger harmonic change and should be judged with Fit active.
Levels and Articulation solve different problems
Levels changes note properties: pan, velocity, release velocity, Mod X, Mod Y and pitch. Bipolar lets values move both above and below their starting point, while Seed changes the random distribution. Keep Reset before processing in mind when the incoming notes already contain intentional expression; resetting removes that starting shape before variation is added.
Articulation works on note length and transitions. Multiply changes the general note length, Variation introduces random length differences, Seed chooses another distribution and Use lengths bases the result on the source note lengths. Gap leaves a small space between note endings and the next attacks, which makes repeated notes and chord changes easier to hear. Chop chords cuts notes that overlap a newly starting chord so the previous harmony does not continue through the change. These behaviors follow the current Image-Line Articulate reference, whose controls are shared with this stage. Small variation can stop every note ending at the same mechanical point. Large variation can create overlaps or notes so short that the instrument barely speaks.
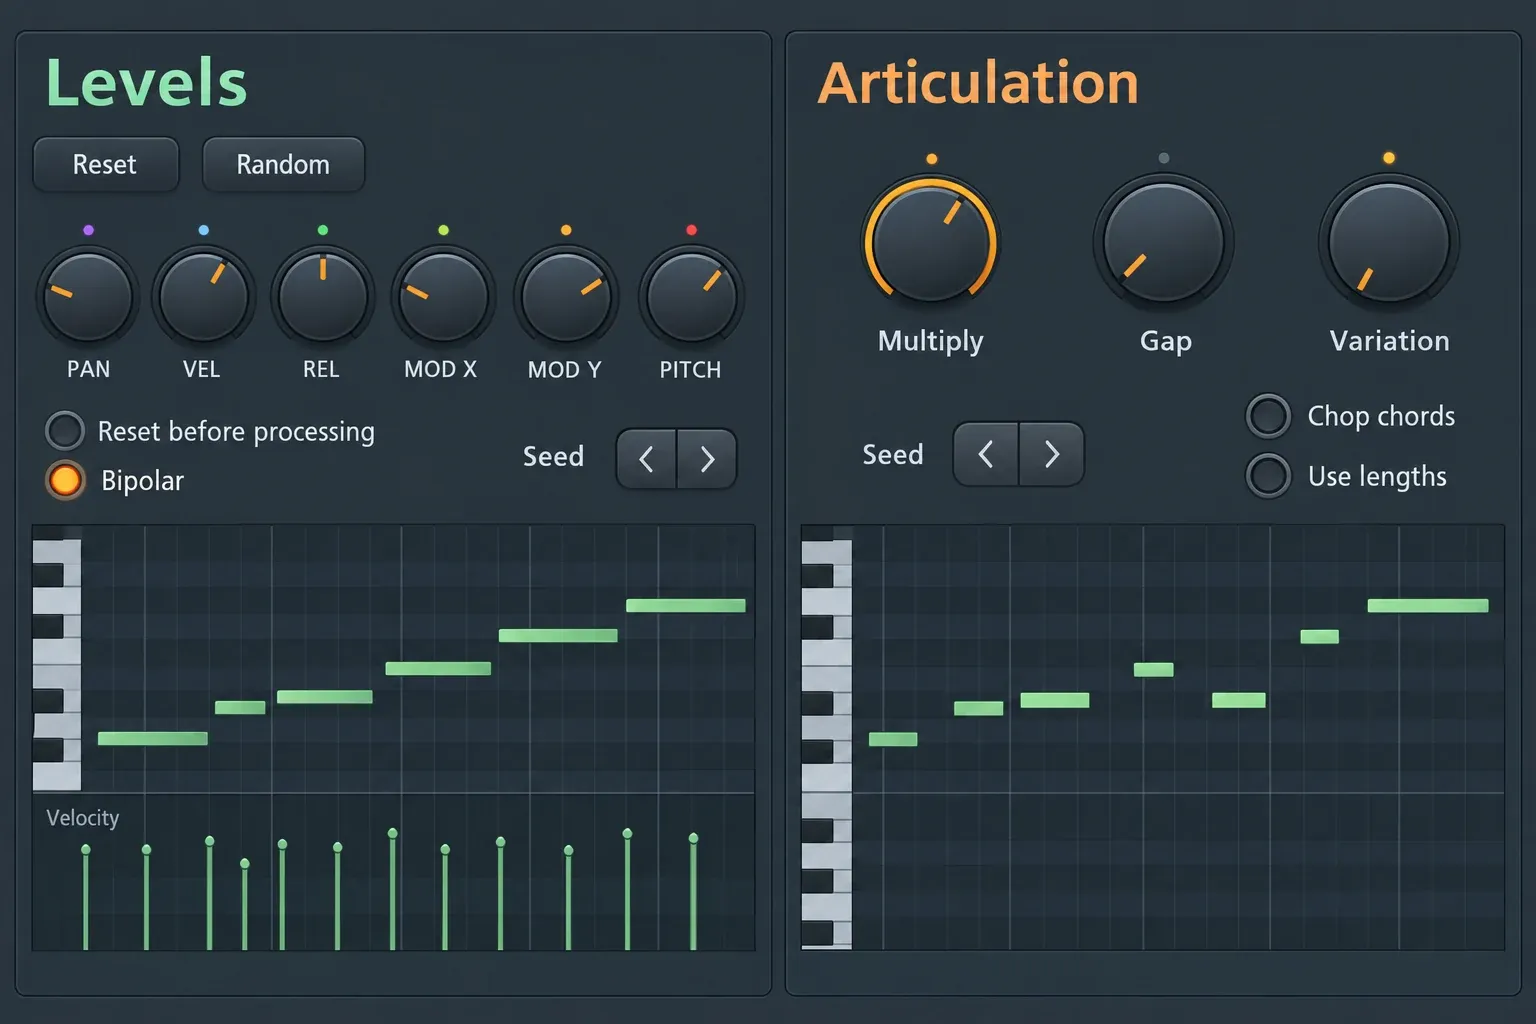
Gate and Articulation can fight each other because both affect how long a note lasts. Establish the arpeggio with Gate near a neutral, readable setting, then use Articulation for variation. If note endings become inconsistent, temporarily disable one stage and listen again.
Groove changes timing against a template
The Groove stage loads a timing template and blends the notes toward it. Start time controls how strongly note starts move toward the template. Sensitivity controls how close a note feature must be before it is quantized. Duration blends note duration or end position, depending on the selected mode.
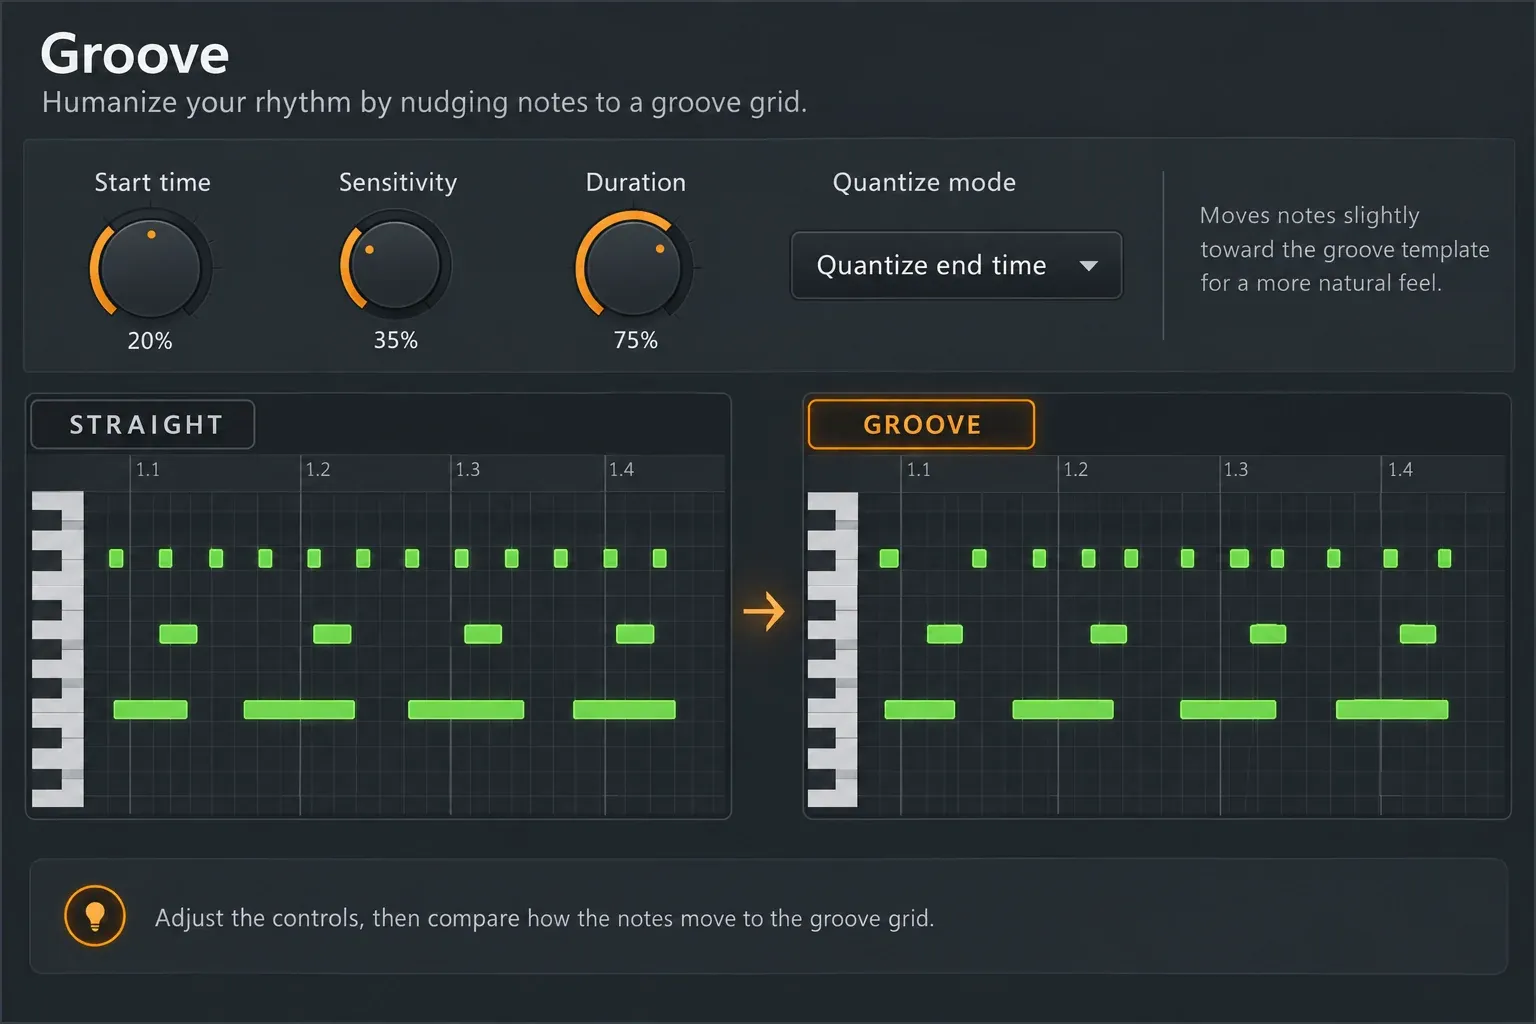
The four modes change what happens to note endings:
- Leave duration keeps note lengths unchanged.
- Leave end time preserves note end positions.
- Quantize duration aligns starts and durations with the grid.
- Quantize end time aligns end positions with the grid.
Groove is not a substitute for choosing the right Snap. Snap defines the grid Riff Machine uses, while Groove blends the notes toward a selected template. If a phrase is rhythmically unreadable before Groove, return to Arpeggiation and Snap. If it is correct but rigid, Groove is the right stage to adjust.
Finish with Fit so the riff belongs to the song
Fit restricts the result by key, scale and keyboard range. Choose the key and scale, then set how out-of-scale notes move: Above, Under or Alternate. Define the register on the keyboard ruler, and use Wrap to bottom when notes above the range should return to its lower octave.
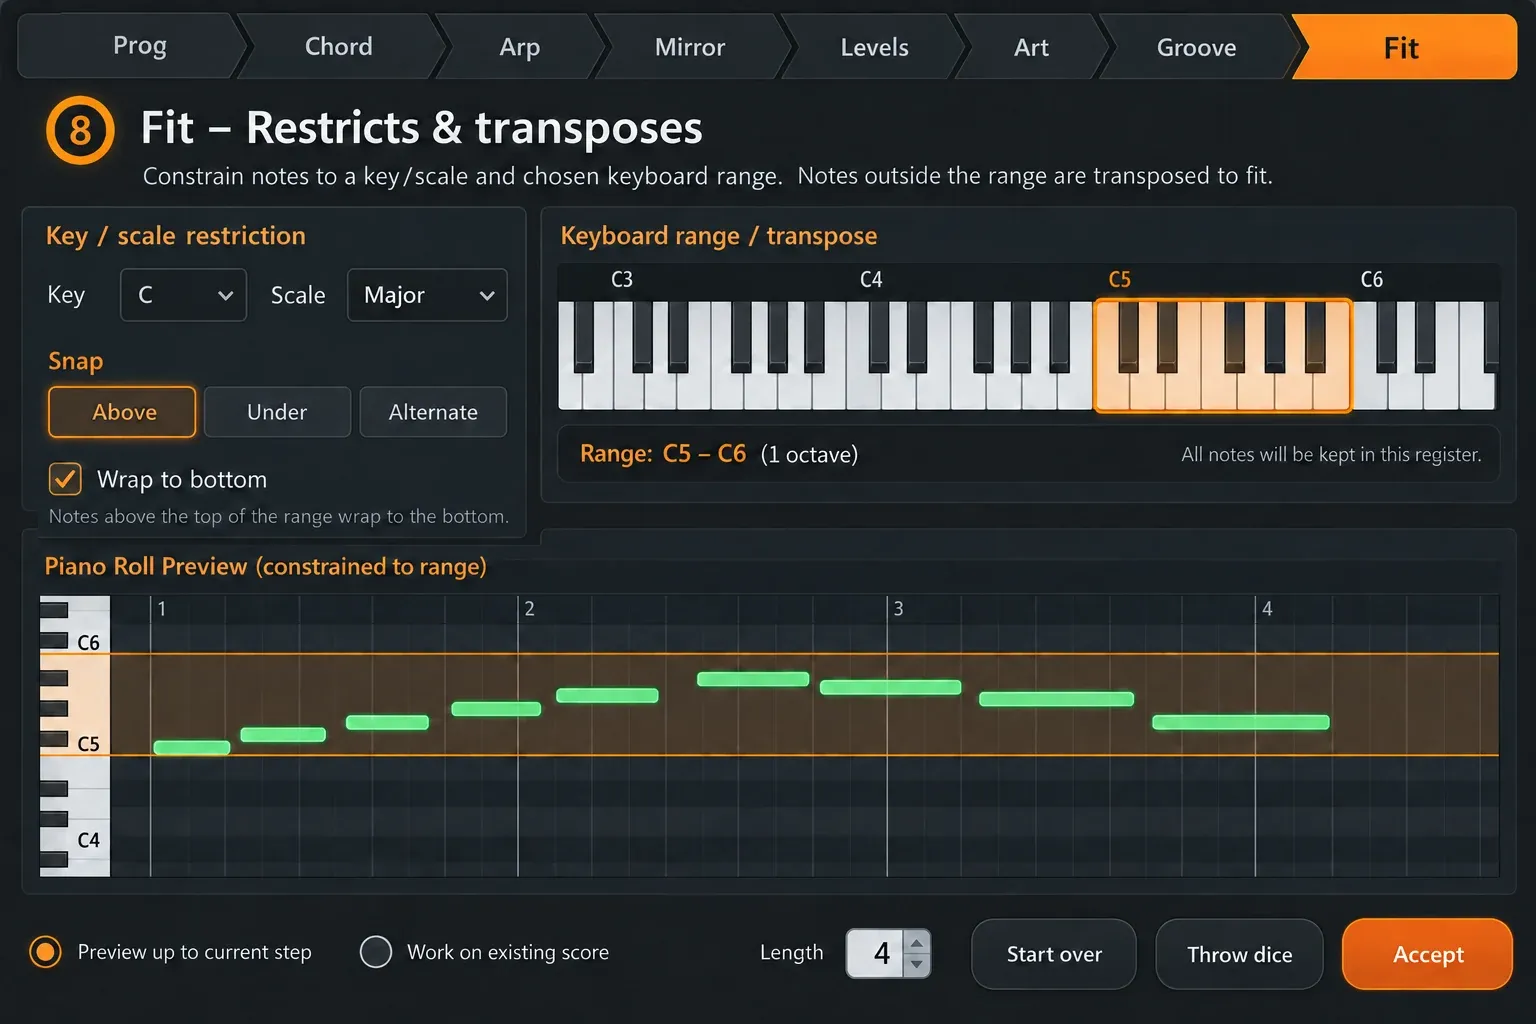
A scale-correct note can still be wrong for the instrument. A bass riff may become thin if Fit allows it to climb too high; a lead can disappear into a muddy lower octave. Judge the range with the actual sound selected, then widen the keyboard region only when the melody needs more room.
The current Image-Line Fit reference explains the key/scale menus, snap directions, note offset and range ruler. Use those controls after pitch-order changes such as Arpeggiation and Mirror so the final restriction sees the phrase you intend to accept.
Apply Riff Machine to notes you already wrote
Riff Machine becomes more useful when you stop asking it to invent everything. Enter a progression or motif in the Piano Roll before opening the tool, then enable Work on existing score. Disable any stage that should not rewrite your idea.
- Write or paste the notes into the target Piano Roll.
- Select the phrase if only part of the score should be the working idea.
- Open Riff Machine and enable Work on existing score.
- Disable Progression when the existing pitch sequence must remain the source.
- Enable only the transformations you need, such as Arpeggiation, Articulation, Groove or Fit.
- Use Preview up to current step after each enabled stage.
- Accept the result, then edit the notes directly.
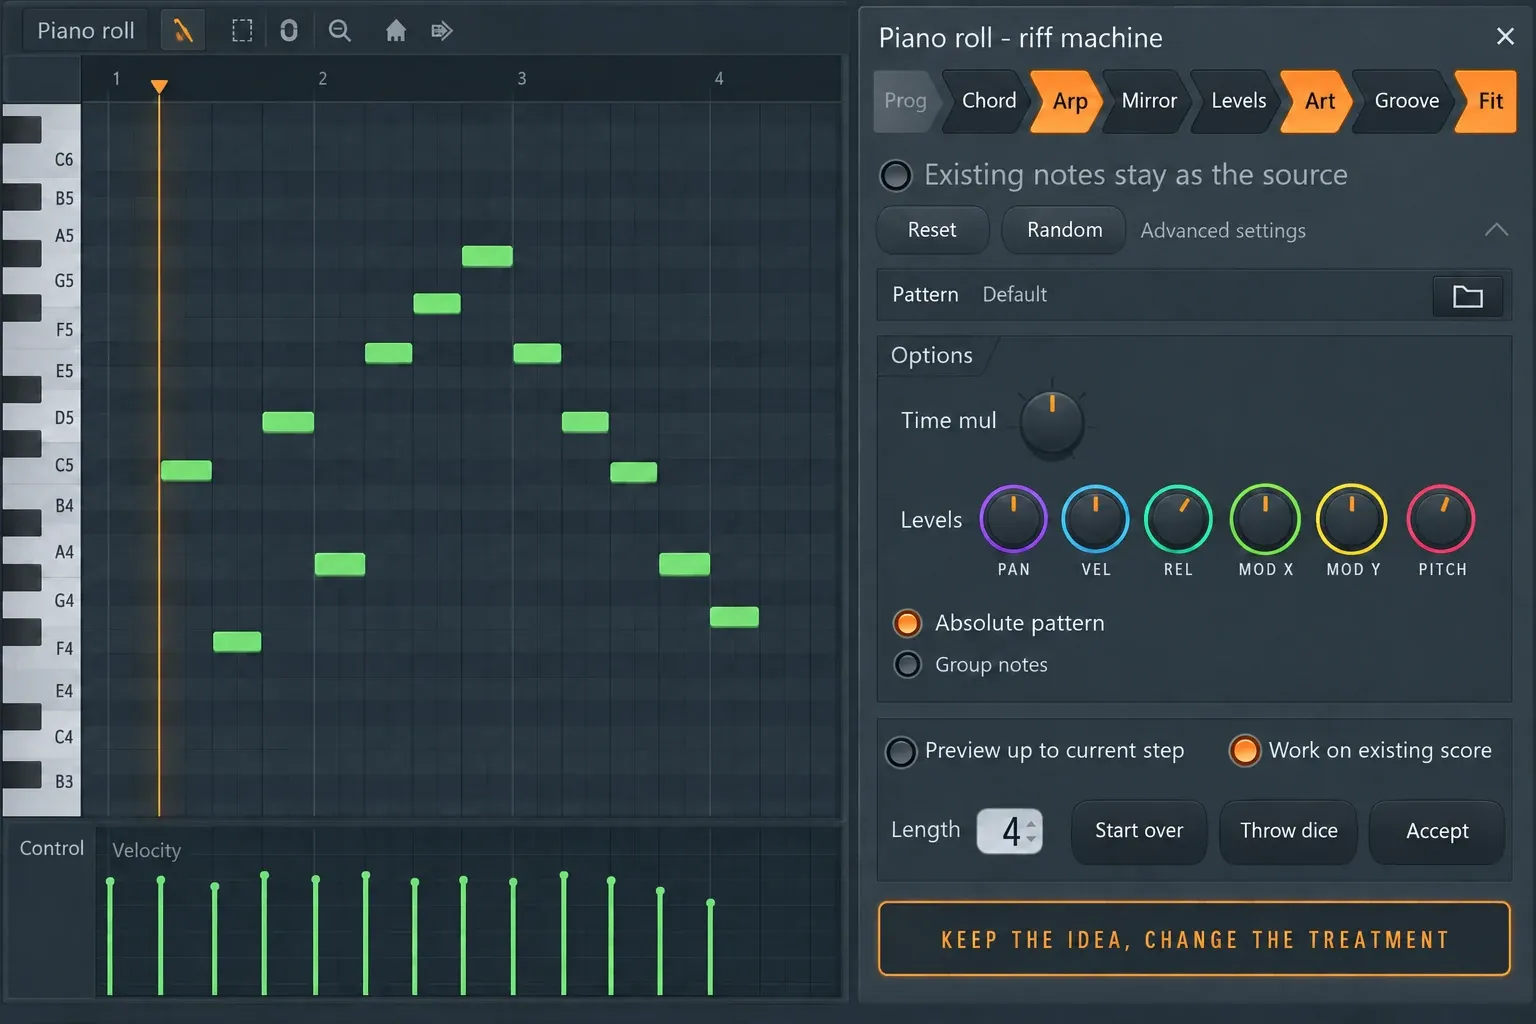
This route keeps the harmonic intention in your hands while using Riff Machine for transformation. For direct editing after Accept, the FL Studio Piano Roll guide covers selection, Snap, note properties and the editing tools around the generator.
Fix Riff Machine problems by symptom
Length or Variation does nothing
Set Piano Roll Snap to a musical division. The official manual states that both controls stop working when Snap is (none). Reopen Riff Machine after changing Snap if the preview does not refresh as expected.
The riff has too many notes
Turn off Chords first. If the density drops too far, restore Chords and use a simpler pattern, reduce the Arpeggiation range or slow its time multiplier. Throwing the dice again changes the random seed without fixing the density decision.
The pattern restarts at the wrong place
Check Arpeggiation Sync. Use Chord when each harmony change should restart the pattern, Block when it should reset by block, or Time when it should continue without those restarts.
The melody is in key but jumps across awkward octaves
Open Fit and inspect the keyboard range, snap direction and Wrap to bottom. Scale restriction fixes pitch class; the range controls fix register. Do not keep changing Progression when the source contour is already good.
The rhythm feels late or uneven
Disable Groove. If the timing becomes correct, lower Start time and Duration strength or choose a simpler groove template. If the timing remains wrong, return to the Arpeggiation pattern and Piano Roll Snap.
Notes are too short or overlap
Compare Arpeggiation Gate with Articulation Multiply and Variation. Return one stage toward neutral, then adjust the other. Several length controls can produce the same symptom, so isolating them is faster than changing both.
Randomization erased useful velocity work
Disable Reset before processing in Levels when the incoming values should remain the baseline. Reduce VEL variation, or disable Levels and edit velocity after accepting the notes.
The result changes too much every time
Avoid Throw dice until the enabled stages and their broad settings are correct. Throw dice produces another seed; it does not simplify the chain. Keep the stages that already work, disable the one causing the problem, and preview from that point.
Accept the riff, then finish it in the Piano Roll
Accept writes the current result into the Piano Roll. Treat that as the start of editing, not the end of composition. Remove duplicate or weak notes, shorten obvious overlaps, adjust the strongest accents and create a small difference between the first and second half of the phrase.
Use the dedicated tool when the cleanup has one narrow goal. The Strumizer is better for staggering chord attacks; the Arpeggiator is better for a focused arp transformation; the Chord Progression Tool is better for revising harmony. Riff Machine earns its place when you want several transformations in one staged preview.
The practical rule is simple: generate broadly, diagnose by stage, and edit the accepted notes deliberately. Snap, Arpeggiation and Fit usually have the largest effect on whether the result is usable. Once those are stable, Levels, Articulation and Groove can add movement without taking control away from the phrase.